
FAQs
Access Token Removal FAQs
Access Token removal refers to the deprecation of Access Tokens in Contentstack for stacks created after December 16, 2020. Thus, new stacks no longer support Access Tokens for authentication.
Instead, you can:
- Use Delivery Tokens with the access_token header for Content Delivery API requests.
- Use Management Tokens or Authtokens for Content Management API requests.
This enhances security and provides more control over content access.
Access Tokens provided broad stack-level access, including both published and draft content across environments, which increased security risks. To enhance security and improve management flexibility, Contentstack introduced Delivery Tokens and Management Tokens as more secure alternatives.
No. The deprecation only applies to stacks created after December 16, 2020. Stacks created before this date still support Access Tokens. However, using Delivery and Management Tokens is strongly recommended.
Yes. You can use a Management Token or your user-specific Authtoken to fetch unpublished or draft content.
The following example request uses an Access Token:
# Making a GET request to retrieve a specific entry from a given content type.
curl -X GET \
'https://api.contentstack.io/v3/content_types/{ContentTypeUid}/entries/{EntryUid}?include_publish_details=true&include_workflow=true' \
-H 'accept-encoding: application/json' \  # Ensures JSON response
-H 'access_token: {your_access_token}' \  # Authorization token for the API
-H 'api_key: {your_api_key}'              # API key identifying the stack
This request does not work for stacks created after December 16, 2020. Replace {your_access_token} with your Delivery Token.
To replace Access Tokens with Delivery Tokens:
- Generate a separate Delivery Token for each publishing environment.
- Use the Delivery Token value in the access_token header for Content Delivery API calls.
To replace Access Tokens with Management Tokens:
For published content (Content Delivery API): Use a Delivery Token in the access_token header.
-H 'access_token: {delivery_token}'For unpublished content (Content Management API): Use a Management Token in the authorization header.
-H 'authorization: {management_token}'No. Contentstack does not log Access Token usage. You must manually replace Access Tokens with Delivery or Management Tokens in your scripts and integrations.
The access_token key remains valid for older stacks (before December 16, 2020). New stacks must use Delivery Tokens in this header. For newer stacks, use the Delivery Token value in the access_token header.
You can refer to the Types of Tokens document to understand the differences, usage, and limitations.
No. Use:
- Delivery Tokens with the access_token header (Content Delivery API)
- Management Tokens with the authorization header (Content Management API)

API FAQs
Here are some important points that you need to consider:
- Limit Response Payload: GET calls usually return a lot of unwanted parameters. If the APIs are used excessively, the default API response not only increases infrastructure load but also starts impacting the performance of your app. It's important to validate data and filter out anything that shouldn't be there.
Ideally, the best practice is to limit your response payload to 5 MB. - Keep the total number of “includes” and “level depth” to the minimum: When retrieving data, always make sure you decide logically what you need to extract and avoid retrieving unnecessarily large data.
It is recommended to keep the number of includes (when referencing other entries) and the depth levels as low as possible. The best practice is to restrict your total include to not exceed 10. However it depends on the user’s requirement (and their final response payload size, which should be restricted to the ideal response size mentioned above). - Make use of projection queries: To restrict the size returned in your response payload, make sure to use projection queries such as only, except, etc. These projection queries allow you to retrieve/exclude specific field data for each entry.
- Make use of pagination: If you think that your response payload can be overwhelming, you can use skip and limit parameters to paginate your response.
- Use “Lazy loading”: This factor totally depends on the user and also on the framework that they use. If the website data is pulled in from multiple content types, lazy loading is a good approach that will let them load the important sections of their website first before loading the others.
Exceptional Use Case
So what do you do if you might hit the limits even after following the above precautionary measures?
In this scenario, you can make use of filtering or pagination. What does this mean? Let’s look at the steps involved:
- First, you can divide your includes into multiple calls, say you need to add 10 includes. You can split them into groups of, maybe, two.
- You can append projection queries such as only, except, etc. to these batches to retrieve restricted response.
- [Optional, but recommended] Now, if you feel your response can be overwhelming, you can use skip and limit parameters to paginate your response.
- Finally, you can merge the results of all the batches together to get your final response.
Yes, the “Publish Later” option is supported in REST API calls as well. When passing the publish entry details in the body parameter of the Publish an Entry POST call, you need to provide the “scheduled_at” key with the publishing date/time in the ISO format as its value.
The body parameter should look like this:
{
    "entry": {
        "locales": [
           ...
        ],
        "environments": [
            ...
        ]
    },
    "locale": "en-us",
    "version": 1,
    "scheduled_at": "2016-10-07T12:34:36.000Z"
}
By default, Contentstack's Image Delivery API optimizes the JPEG or WebP images by 85%. When you use optimization on images, it tends to increase the size of the original image. However, it reduces overall bandwidth over multiple images delivered from the API. So, a few images that were available in lower sizes are delivered in larger sizes when retrieved through the API.
Yes, Contentstack gives you the provision to automate release postings via “POST” calls. You can schedule the entry to be published at a later date/time by adding the “scheduled_at” key in the Body parameter. When passing the publish entry details in the Body parameter of the POST call, you need to provide the publishing date/time in the ISO format as the value of the “scheduled_at” key. The Body parameter should look like this:
{
    "entry": {
        "locales": [
           ...
        ],
        "environments": [
            ...
        ]
    },
    "locale": "en-us",
    "version": 1,
    "scheduled_at": "2016-10-07T12:34:36.000Z"
}
Yes, we have open APIs for Content Delivery and Content Management.
Content Delivery API helps you to retrieve data and Content Management API allows you to create, access, and manage data.
Yes, Contentstack uses Fastly, a leading Content Delivery Network (CDN) provider, to provide lightning-fast content delivery to users anywhere in the world. Learn more about CDN.
Yes, this is possible. You need to execute the “only[BASE][]” query and provide the unique IDs of only those fields that you wish to retrieve, as its parameters. For more details, refer to the Only Operator section in our Content Delivery API.
Image Delivery APIs are image manipulation and optimization API calls. The API calls will help you to retrieve, manipulate, and/or convert image files of your Contentstack account and deliver it to your web or mobile applications.
You can resize an image by specifying the “width” and “height” of the image.
- width: The “width” parameter lets you dynamically resize the width of the output image by specifying pixels (as any positive integer between 1 and 8192) or percentage values (as a percentage value between 0.0 and 0.99). In case of percentages values above 99, append a ‘p’ parameter to the value).
- height: The “height” parameter lets you dynamically resize the height of the output image by specifying pixels (as any positive integer between 1 and 8192) or percentage values (as a percentage value between 0.0 and 0.99). In case of percentages values above 99, append a ‘p’ parameter to the value).
To see these parameters in action, refer to our documentation.
You can use a combination of the “crop” and “overlay” parameters to achieve this activity. First, crop the desired section from the source image and then attach it to the final image.
To crop a specific section of an image, you can use the “crop” parameter and pass the desired width and height of the section that you want to remove. The query to be used is ?crop={width_value},{height_value}. For e.g., if you wish to crop an image where you want a width of 300px and a height of 400px from the center, you can specify the values in the above query as ‘?crop=300,400’. To trim only a particular side of an image, use the “
trim” parameter.
Later, use the “overlay” parameter to attach the cropped image on top of another.
You can use the format parameter to convert a given image from one format to another.
This can be achieved using the “overlay” parameter.
The supported formats to which you can convert your source image are .gif, .png, .jpg (for JPEG), .pjpg (for Progressive JPEG), .webp, .webpll (Lossless), .webply (Lossy), and .avif.
Image optimization improves the loading speed of a website by reducing the size of uploaded images without compromising on the quality aspect. Optimization ensures a better user experience and swiftly delivers elements of a website to the browser . The reason for faster load speed is essential for a website because it factors into the SEO ranking. Also, the traffic is highly improved when the file sizes are reduced. You can optimize an image by using the auto parameter or reducing the quality of an image.
This can be partially achieved by using an overlay image.
To compress the size of an image you can use the quality parameter. This parameter lets you control the level of compression to an image. You can specify the value for this parameter in whole numbers, i.e., between 1 and 100. To add a quality parameter for an image you will need to specify ?quality={quality_value} after the URL of an image.
You can use the “trim” parameter to trim an image from the sides/edges. This parameter comes in handy especially when you need to remove borders or white spaces around images. The value for this parameter can be given in pixels or percentage.
To trim an image using the “trim” parameter, you need to specify the value for right and left in pixels or percentage “?trim={right_value},{left_value}”
Yes, you can crop an image using the crop parameter to a specific pixel or percentage. Using this parameter, you can remove pixels from an image by specifying the height and width in pixels or percentage value, or defining height and width in aspect ratio.
Yes, the “orient” parameter gives you the ability to orient the image. By using this parameter, you will be able to move an image right, left, horizontally, vertically, or flip.
The “quality” parameter supports only the lossy file format and thus is not applicable for image formats such as PNG and GIF because they are lossless file formats. Refer to our documentation for more details.
If the border is added as the background of the image, you can change the color using the “bg-color” parameter.
There is no specific format for uploading images. For performing image transformation activities, you can upload images in any convenient format or resolution. If you wish to convert the format of any image, you can use the “format” parameter.
Image Delivery API calls can transform your images on demand. It can dynamically resize, convert, adjust quality, crop/trim, change orientations, and image background colors.
They operate via a query string URL of the API call. When a user makes a request for an image, the Image Delivery API does two things:
- Serves the desired image request from cache (cache hit).
- Transforms the source image based on the parameters in the URL of the API call.
Yes. Images can be presented in ultra high definition formats allowing you to serve pixel perfect images on everything from mobile devices to 4K monitor displays.
The browsers supporting WebP image format are Google Chrome, Opera, and Android browsers.
In such cases, you can use the progressive JPEG format which is supported by most of the modern browsers.
The “quality” parameter supports all images of the Lossy file type. The formats included in the Lossy file type are JPEG, Progressive JPEG, and WEBP(Lossy).
To display an image within a circle, use the overlay parameter. The overlay image should have a circle of transparent pixels within it. When you place this image over the actual image, the actual image will be displayed within a circle. Now, if the color of the solid background of this overlay is the same as the color of the background where the image will be placed in your app, it will give a circular cropped image effect.
Architecture FAQs
Partially headless setup means you have some portion of your website on a traditional setup and the remaining on a headless CMS. This setup is useful in cases when migrating from a conventional CMS to a headless CMS.
The partially headless architecture diagram shows how one content section, such as blog, is migrated to a headless CMS, whereas the rest of the digital properties remain on a traditional setup.
A simple site is a website that has a few pages and limited third-party integration. An example of a simple website could be a marketing site of an enterprise, which uses basic integration services such as website search, site analytics, and so on.
If the sole purpose of your website is to serve content, and is likely to deliver the same content to all users, you must go for a static website. Dynamic or simple website architecture, on the other hand, integrates well with other apps, helps you do more with content (such as deliver personalized content, etc.) and enables user interaction.
Yes. In such a case, it is recommended to use the complex website architecture as it offers the required flexibility and agility to add more services.
So initially, if your website is simple but gradually develops to become complex, use the complex website architecture for effective scaling.
The dynamic website architecture provides better flexibility and agility. You can add more services as required, without impacting or changing any other components, enabling quick scaling.
Stack Assets FAQs
The maximum allowed size for a single asset file is 700 MB. Additionally, you can define custom file size limits (both maximum and minimum) using the File Size Limit validation rule.
Yes. A maximum of 10,000 assets can be uploaded in a stack. The limit can be increased based on your plan. Contact our support team for more details.
Contentstack does not support applying Image Delivery API requests on images directly inserted into text fields. However, you can achieve this by following these steps:
- Upload the Image as an Asset: Upload the image to the Asset module using the Upload Asset API call. The response body will include the url parameter containing the asset’s URL and a unique uid for the uploaded asset.
- Insert the URL into the Text Field: In the Rich Text Editor (RTE) or any other text field, switch to the HTML code view and use the asset URL as the image source instead of directly inserting the image.
- Use the Image Delivery API: With the asset’s UID and URL, you can apply Image Delivery API requests to modify the image as needed.
Yes, you can use the Image Delivery API to query the same asset with different dimensions.
No, bulk editing of assets is not supported. You can edit only one asset at a time. For more details, refer to the available bulk operations on assets.
Yes, the additional metadata support for assets/entries is available.
No, adding metadata via the API does not increment the version of the entry or asset.
When you publish an entry or asset, its associated metadata is also published. However, for bulk publishing of entries or assets, the metadata is not published. For more information, refer to the publish metadata documentation.
You can add additional metadata to an asset or entry only through the Metadata for Entries and Assets Content Management API requests.
The maximum metadata size allowed per extension is 5 KB. This includes the total metadata defined for all entries and assets associated with the extension.
When an asset is unpublished, it becomes inaccessible in the environments and locales it was unpublished from. However, the URL remains active and accessible within the Contentstack assets repository unless the asset is deleted.
No, once an asset is uploaded, the filename cannot be changed.
Replacing an asset does not break references in entries as long as you are using permanent URLs.
Yes, Contentstack allows you to organize assets into folders for easier management. You can create nested folders and move assets between them.
Yes, Contentstack maintains a version history for assets, allowing you to view and restore previous versions if necessary.
Assets FAQs
Create a space to separate brands, websites, or business units that require independent governance. Create a workspace to isolate short-lived work such as campaigns, seasonal updates, or experimentation inside the same space.
Yes. In Contentstack CMS implementations, teams commonly map one or more spaces to a stack (brand or site) and use a shared space (eg., “Global Brand Assets”) for assets reused across stacks through linking.
Yes. When a space is linked to multiple stacks, content teams can reuse assets across stacks through the asset picker, subject to roles, space access, and localization rules.
No. An asset belongs to a single space. To reuse an asset across projects, store it in a shared space (eg., Global Brand Assets) and reference it where needed.
Add languages globally in Assets > Settings first. Then enable only the required languages inside specific workspaces. Only workspace-enabled languages become available for localization in that workspace.
Yes. Add only the required languages at the workspace level. Only those enabled languages become available for localizing assets in that workspace.
Yes. Asset localization can include localized metadata (title/description/tags) and can also include replacing the file when the localized version requires it (eg., an image with translated on-image text).
Unlocalizing removes the localized variant, and the asset starts pulling values again from the default language for that locale.
No. The asset picker respects locale rules. Entries can select assets that match the entry locale or the locale fallback chain, depending on how fallback is configured.
System metadata is generated by Contentstack, is read-only, and tracks file and activity details. User-defined fields are configured through fields and asset types to store business metadata (eg., product ID, usage rights, campaign name).
Yes. Each save creates a new version with asset versioning (eg., updates to file or configurable metadata). Versioning preserves history and enables restoration.
No. The permanent URL remains constant across versions, even when the file is replaced, while version history continues to track changes.
Contentstack supports restoring older versions, but selective deletion of specific versions is not supported as a standard end-user action. Version history exists to support traceability and rollback.
No. Custom version names have a maximum length of 32 characters.
Deleting a workspace deletes the workspace and the assets associated with it. This action is destructive and intended for cleanup of temporary workspaces.
No. Workspace UID is read-only after creation. Create a new workspace if a different UID is required.
Fork creates a new workspace using an existing workspace as the source. Teams commonly fork a campaign workspace to create a new variation without starting from scratch.
Yes. Search and filtering support system fields and user-defined fields. Advanced search supports constructing complex queries across multiple fields.
Yes. Contentstack Assets provides organization/product roles, and each space supports space-scoped roles. Users must be assigned to a space to access its assets, even if a user has a product role.
No. Spaces and workspaces serve different purposes and cannot be converted.
Yes. Assign a Contentstack Assets role and then grant access only to specific spaces.
Yes. Create a custom role (eg., Vendor) with limited permissions and assign it to one or more spaces.
AI features such as tag suggestion, description suggestion, alt text suggestion, visual markup suggestion, and reverse image search depend on asset type and format. Some AI capabilities apply primarily to image formats.
No. Visual markup applies to supported image formats and is not available for non-visual file formats (eg., most documents).
Yes. Asset types can require specific fields and apply validation rules. Assets must meet required-field rules before saving.
Deleted folders/assets can be restored from trash for up to 14 days. After this, the assets or folder and all its contents will be permanently deleted.
Asset Folder-level Permission FAQs
Asset folder-level permissions define specific actions a custom user role can perform on an asset folder. This ensures that users only interact with the folders and assets they are authorized to access, providing enhanced control over content management.
Yes, you can select multiple asset folders and assign them to a custom role simultaneously. This streamlines the process of managing permissions across multiple folders.
Yes, you can assign distinct permissions to different asset folders. For example, you could grant “Read” permission to one folder (e.g., Folder 1) and “Publish” permission to another (e.g., Folder 2), depending on your organizational needs.
Yes, when you assign permissions to a folder, those permissions also apply to its assets and any subfolders, ensuring consistent access control within the folder hierarchy.
Yes, you can modify or revoke permissions for a custom role at any time. This change will immediately take effect, updating the role's access to the folder, its assets, and its subfolders.
When a user belongs to multiple roles with varying permissions:
- Permissive actions are merged: If one role grants "Update" permission and another grants "Publish," the user will have both permissions.
- Cannot Do permissions take precedence: If one role allows "Read" and another explicitly denies "Read," the restriction takes priority, and the user’s access is limited.
This ensures that restrictive permissions are prioritized for better control and security.
Agent OS FAQs
Agent OS is Contentstack’s adaptive intelligence framework that unifies Agents, Automations, and Polaris to deliver intelligent, context-aware, and governed digital operations. It blends deterministic workflows with LLM-powered reasoning to help enterprises operate faster and more intelligently.
Agent OS is made up of three main components:
- Agents: The intelligent reasoning layer that understands context, makes decisions, and performs actions using instructions, tools, and brand governance.
- Automations: The workflow engine that runs event-driven and scheduled tasks with reliability and governance.
- Polaris: The in-app conversational assistant that provides contextual guidance and interacts with agents and automations.
No, it's designed for business and technical teams with a no-code interface.
No, it enhances them. Agents and Automations work together seamlessly.
Absolutely. It connects via connectors and MCP for external systems like Slack, Jira, Notion, and others.
An Agent is an intelligent, AI-powered system within Contentstack Agent OS that can understand context, reason, make decisions, and take actions on behalf of users. Unlike traditional automations that follow fixed, rule-based steps, agents use a combination of:
- Model: LLM for reasoning and language understanding
- Instructions: Persona, guidelines, goals, boundaries
- Context: Situational data and enterprise knowledge for adaptive decisions
- Tools/Abilities: Actions, automations, and other agents they can call
No. Agents can be fully created and configured using a no-code interface.
Agents run within governed enterprise controls, use secure authentication, and follow brand and compliance rules.
You can review execution logs, adjust instructions or abilities, and refine behavior. Brand Kit and Knowledge Vault minimize errors.
Polaris is Contentstack’s in-app conversational assistant that provides intelligent, context-aware help across the CMS. It allows users to interact with the platform through natural language, asking questions, generating content, running tasks, or triggering agents and automations.
Polaris also uses brand context and system knowledge to deliver accurate, on-brand responses.
Yes. Polaris is accessible across the platform.
Automations help you to perform repetitive tasks without human intervention. You can set up an automation using various third party applications. For example, you can notify your team via an email whenever an entry is created in your stack.
To set up an automation, you need to configure your trigger and action connectors. To learn more, refer to the Create Automation step in the Get Started with Automations document.
Connectors are a combination of Triggers and Actions events. When a trigger event is executed, the action connector performs the defined steps. Refer to Automate Connectors to get started.
Trigger connectors are conditions that help set off an automation whenever the selected event is executed. Action connectors is the action performed when a trigger event is executed. For example, an automation is set up to send a slack message (action event) whenever an entry is created (trigger event) in Contentstack.
You can configure only one trigger event in a particular automation. You can configure multiple actions for a single automation. For example, you can set up an automation to perform end to end translation when an entry is created/updated in Contentstack. For this, you need to configure different action connectors to carry out the translation process. To learn more, refer to our End to End Translation using Smartling example.
You can view the logs for your automation in the Execution Log section. This is useful for checking the status of your automations. To learn more, refer to our documentation on Execution Log.
You can also monitor the acitvities performed in a particular project via the Audit Log.
You can view all the connected apps for your project in the Connected Apps section. You can check the authentication status of an app or re-authorize an app. To learn more, refer to our documentation on Connected Apps.
Once you create an Automation, the list of existing automations appears in the Automations listing page. In the Actions column, click the three ellipses icon, and then click the Edit icon that you see for editing the automation. Refer to our documentation on Edit Automation Details.
On the Automations listing page, click the three ellipses icon, and then click the Delete icon that you see for deleting the automation. Refer to our documentation on Delete Automation.
In the automation, click the edit icon visible on the action header to rename the step. Add a suitable name for the step and save it. Refer to our documentation on Rename Step.
To re-authorize a connected app, follow the steps given below:
- In the Connected Apps section, select the app that you want to re-authorize.
- Click over the connection and click the Reauthorize icon.
- Change necessary permissions and click the Authorize button.
Analytics FAQs
The new Analytics feature integrates Product Analytics and Mission Control, offering a unified view of interactions with Contentstack’s CMS, Launch, Automate, Personalize, Brand Kit, and other products. It provides comprehensive metrics, including status codes, cache usage, SDK usage, and top URLs.
To access Analytics, log in to your Contentstack account, select the organization from the dropdown menu in the header, and click the “Analytics” icon in the left navigation panel.
Yes, you can filter data in the Analytics dashboard based on specific services, groups, and durations.
Note: The date range for these filters must be within 90 days.
Contentstack does not provide analytics for the pages of your website. However, you can use any external tool to get the analytics.
Branches FAQs
The modules currently available in Contentstack will not be affected. Some modules are branch-specific. Whereas some are globally available throughout all the branches. You will have an additional scope section where you can decide whether you want that module for either all or specific branches for which you want the module.
Please refer to our Branch-Specific Modules and Global Modules documentation for more information.
Modules such as Content Types, Global Fields, Entries, Assets, Publish Queue, Releases, Languages, Extensions, Audit Logs, Global search, and Labels are branch specific. They can be created, updated, or deleted within a particular branch without affecting any other branch. Their details can differ across the other branches present in a stack.
Please refer to our Branch-Specific module documentation for more information.
Modules such as Environments, Webhooks, Workflows, Publish Rules, Users, Roles, and Tokens are globally available. Details for these modules are available across every branch of the stack.
Please refer to our Global Modules documentation for more information.
Any user with the role “Owner,” “Admin,” and “Developer” will be able to use the branches feature. Content managers can only work within the branches assigned to them. Custom roles can access branches as per the permissions assigned to them.
Yes. You can set up a webhook or workflow for a specific branch. The system allows the creation of branch-specific workflows for a content type.
Yes, you can add languages only to a specific branch of the stack. That language will not be available in other branches of the stack. Please refer to the Languages section in our Branch-specific Modules document for more information.
Extensions are specific to a branch. If you add an extension within a branch, it won’t be available across other branches. Please refer to the Extensions section in our Branch-specific Modules document for more information.
No, the main branch cannot be deleted. Please refer to the Limitations of Branches document.
Yes, two different aliases can point to the same branch. Learn how to Assign an Alias to a Branch.
No, you cannot have the same unique ID for a branch and an alias.
You can retrieve information from all or a specific branch. You can also create and delete a branch using the API requests. You will need to pass the branch header if you want to execute calls within specific branches. Please refer to the Branches collection in our Content Management API documentation for more information.
You can add a branch header while executing an API request to get details specific to a branch. If this header is not mentioned, by default, data will be retrieved from the "main" branch of your stack. The response body for every request will contain the _branch parameter specifying the branch from which the information is retrieved. Please refer to our Content Management API documentation for more information. You can also visit the API Change Log for more details about the breaking changes.
You can compare two branches to get the differences in the content type or global field modules, by either using the Comparing Branches requests in Content Management API or the Compare Branches using the CLI.
You can merge the differences in the content type or global field modules of two branches, by either using the Merging Branches requests in Content Management API or the Branch Merge using the CLI.
No, currently the compare and merge feature is only available for the content type and global field modules.
No, currently the compare and merge feature is only available via CMA requests or CLI commands.
You can compare or merge two branches at a time. Please refer to our documentation on Comparing and Merging Branches for more information.
Yes, there are various merge strategies to choose from while merging two branches. Please refer to our Merging Branches documentation for more information on how to select the best possible merge strategy.
Before performing a merge, pre-checks are performed to make sure the merge can complete. If these pre-checks fail, the merge will not be attempted, and you’ll see that merge job as failed, with an explanation of why. If these checks pass, the merge will be performed. By default, a backup branch is created of the branch you are merging into before any merge action takes place. You can create and point an alias to this backup branch to get your production website back to it’s previous state. Please refer to our Merging Branches documentation for more information on how to select the best possible merge strategy.
Brand Kit FAQs
Brand Kit is a cutting-edge platform designed to ensure AI-generated content aligns with a customer's brand, style, and messaging. It enables the creation of brand-specific profiles and provides access to relevant company information, ensuring consistent, on-brand AI-generated content.
Brand Kit is designed for organizations and content teams that prioritize brand consistency and integrity in their digital content. It is ideal for organizations aiming to maintain a distinctive brand voice across all AI-generated content.
In Contentstack, a Brand Kit can be associated with one or more stacks, allowing consistent branding across multiple digital properties. Each Brand Kit is connected to a single Knowledge Vault, providing a centralized source of truth for all brand assets and guidelines.
Refer to the Get Started with Brand Kit documentation to create and use a new Brand Kit.
To permanently delete an existing Brand Kit, go to the Brand Kit settings and click the Delete Brand Kit button. Refer to the Delete a Brand Kit documentation for more information.
Voice Profiles in Contentstack's Brand Kit enables you to create custom guidelines for the tone, style, and language of the AI-generated content. This ensures that your brand's voice remains authentic and engaging across all digital touchpoints.
To create a Voice Profile in Contentstack's Brand Kit, adjust the Communication Style Mixer settings, including the Formality Level, Tone of Voice, Humor Level, and Language Complexity Level. These settings help define how your brand's AI-generated content should sound and engage with the audience. For more details, refer to the Create a Voice Profile documentation.
To delete an existing Voice Profile from a Brand Kit, go to the Voice Profiles dashboard. Click the Delete option under the Actions tab to permanently delete the Voice Profile. For more information, refer to the Delete a Voice Profile documentation.
The Knowledge Vault is a centralized repository where you can store, manage, and organize brand-related documents, data, and content. This vector database stores a curated collection of factual information specific to a company.
The Knowledge Vault is a trusted source for AI, allowing it to generate content that is not only tonally consistent but also grounded in accurate and relevant company data.
Your Knowledge Vault should include factual, company-specific information such as background, products/services, industry knowledge, customer data, documentation, and marketing data to ensure AI-generated content aligns with your brand's identity and offerings.
You should avoid including irrelevant, outdated, confusing, sensitive, or mislabeled data that could introduce errors or inconsistencies in AI-generated content. You should try including only accurate, up-to-date, and clearly labeled brand assets and information to maintain the integrity and coherence of your digital presence.
CLI FAQs
No. The Delete Token command removes the token only from the current session and not from the stack.
You can use the cm:export-to-csv CLI command to export stack data into a CSV file. For more details refer our detailed guide on the topic.
The Bootstrap Starter Apps command automates the procedure of stack creation and setting up the project (starter app). Follow this guide to set up and run a starter app with minimal steps.
No. Currently, the branches merge feature is not supported.
Content Type FAQs
Yes. You can create and add custom fields to your content type. To learn more, refer to the Custom Fields documentation.
Yes. A content type can have up to 500 fields.
No. The Title field is a default field and cannot be removed.
No. The Title field is always unique by default.
The Reference field allows you to include entries from other content types within a content type.
When you create a content type and add a field, follow these steps to change its display name:
- Click the “Properties” (gear) icon for the field.
- Enter a suitable title under the Display Name property.
Yes. You can add tooltips using the Help Text property of a field.
- Click the “Properties” (gear) icon for the field.
- In the Help Text field, enter the text you want to display as a tooltip.
- Hyperlinks are supported.
Tip: Keep tooltips short and precise.
No. Once created, a content type’s UID cannot be changed. However, you can edit the UID while creating the content type.
Field UIDs must contain only lowercase characters (a–z) and numbers (0–9). Uppercase letters are not allowed.
This error occurs when a field UID uses a reserved keyword. Contentstack restricts certain keywords from being used as UIDs in content types or entries.
No. Contentstack lets you compare content type versions, but you cannot revert to an earlier schema version.
You can restore a content type using APIs:
- Fetch the previous version of the content type using the Versioning API.
- Use the Import a Content Type API to import the version you fetched.
Warning: Restoring a previous version saves it as a new version, which may lead to data loss.
Yes. The Compare Versions screen lets you select any two saved versions of a content type, even if they are not consecutive.
No. Field reordering is not tracked in content type version comparisons because it does not affect the underlying data.
Versioning applies only to the content type schema. Entry data, workflow states, and published content remain unaffected.
No. You cannot directly restore fields from a previous version, but you can manually recreate them using the comparison view as a reference.
Contentstack uses Added, Deleted, and Modified tags to indicate schema changes between versions.
No. Contentstack automatically assigns sequential version numbers, which cannot be renamed or manually managed.
No. All saved versions of a content type are retained, although performance may be affected if an unusually large number of versions is stored.
Yes. Contentstack provides:
- Starter apps that include ready-made content type templates (JSON files). You can import these JSON files into your stack to get started.
- Prebuilt content models that you can use directly to speed up your setup.
Refer to the Best Practices for Content Type Changes guide. It covers scenarios to help you avoid data loss when making schema changes.
Yes. Each key and value can contain up to 100 characters.
Yes. The JSON schema for Select fields includes both key and value data. Refer to the Select Field Schema documentation for details.
Yes. All existing choices are lost if you toggle this option.
Yes. You can migrate content using CLI. Refer to the JSON RTE Migration Guide.
Yes. You can migrate all entries in a content type from HTML RTE fields to JSON RTE fields in just a few minutes. Refer to the JSON RTE Migration guide.
In the formatting bar, click Property > Add Properties, enter the details in the modal that appears, and click Apply.
Yes. Add the include_html parameter when fetching an entry. For examples, refer to the following API requests:
Contentstack FAQs
Contentstack is a headless CMS with an API-first approach that puts content at the center. It is designed to simplify the process of publication by separating code from content. You can access, create, and manage content in Contentstack, via RESTful APIs, across multiple channels such as websites, mobile apps, or any other platform. Go through our Contentstack website.
You will first need a Contentstack account to get started. Once you have an account, read our docs to understand how Contentstack works. Developers who are well aware of Contentstack and are interested in creating websites and apps can get started with our docs on various platforms. While new users, content managers, and editors can go through the basic concepts of creating a website or app in Contentstack in our Content Manager's Guide.
Yes, you can go through the Platforms and SDKs section where you can find our step-by-step tutorial for creating a website or app in Contentstack for some of the common platforms, such as JavaScript, iOS, React Native, etc.
You can also refer to the Sample Apps for more step-by-step guides.
Since Contentstack is a cloud-based CMS, you do not need anything (except for an internet connection, a browser, and a Contentstack account) to get started.
Contentstack provides 24x7 online support. You can contact the support team either by using the in-product chatbox or by emailing us at support@contentstack.com.
To learn more about Contentstack, visit Contentstack Academy.
Contentstack does not provide any formal training. However, it provides extensive documentation that covers a wide range of topics including, important concepts, guides, tutorials, SDK and API references, code samples, and short videos that help you learn and get started with Contentstack.
Contentstack is a cloud-based CMS. This means that you just need an internet connection on your desktop, laptop, or tablet to get started with Contentstack.
Contentstack runs on all modern desktop browsers.
Contentstack stores all of its data in MongoDB Server.
You are free to host your website with any provider of your choice. Alternatively, you can use Contentstack’s own front-end hosting and deployment platform, Contentstack Launch, for websites built on the Contentstack CMS.
Contentstack DataSync FAQs
No, the Sync tokens and Data are stored in the Filesystem in a plain-text format.
Yes, you can store your data on Filesystem, as well as on other database systems, such as MongoDB.
You can switch from contentstack-express to DataSync by following the steps mentioned in the migration guide.
Contentstack Regions FAQs
You can choose a region for your organization data while subscribing for a Contentstack (organization) account.
Contact our support team for more details.
- For AWS North America, our main region is Oregon, US (us-west-1) and the backup region is North Virginia, US (us-east-1).
- For AWS Europe, our main region is Ireland, Europe (eu-west-1) and the backup is Frankfurt, Europe (eu-central-1).
- For Azure North America, our primary region is West US 2 and our backups are configured in US East region(MongoDB Database backups) and West US region(Assets backups)
- For Azure Europe, our primary region is US-East-1 (N. Virginia) and our backup region is EU Central 1 (Frankfurt)
- For GCP North America, our primary region is Oregon, US (us-west1) and the backup region is South Carolina, US (us-east1)
For GCP Europe, our primary region is europe-west1 (Belgium) and our backup region is europe-west3 (Frankfurt).
For AWS Australia, our primary region is Sydney and our backup region is Singapore.
The European data center is completely separate from the North American data center. So, if you choose a region for your organization, the whole data of your organization will reside in the selected region.
No. Data is NOT shared between the European and North American data centers. Both the data centers are 100% separate and isolated from each other. Every piece of your organization data resides in your choice of region. This means that you cannot decide to store some parts of the organization data in one region and the rest in the other.
Once an organization has been registered/ created, you cannot change the organization region.
The base API URLs to access the European, Azure North American, and Azure European region’s content are different from those of the North American region. Refer to the API Endpoints section above for more details.
Yes. New product features and updates will be available in both regions. When a new product feature is released, it's first made available to the North American region. Then, in the next 2 weeks, the same feature will be available for the European region. We will keep our customers informed about the release dates through the pre- and post-release emails.
The North American and European data centers are completely separate from each other and not meant to serve as a disaster recovery mechanism if either of them goes down. Within each data center, we already have an efficient disaster recovery system in place that works to ensure continuous and high availability during an outage.
Yes. New product features and updates will be available in both regions at the same time. We will keep our customers informed about the release dates through the pre-release and post-release emails.
No. Though both regions serve different customer bases, there is no difference in their performances. Contentstack app functions at the optimum level in the Azure as well as the AWS regions.
Similarly, both regions have high levels of data security and privacy.
The Azure NA or Azure EU region is separate and independent from other regions and therefore has different login URLs, passwords, and API endpoints to access organization apps and content.
No. Both the regions have an efficient disaster recovery system that works to ensure continuous and high availability during an outage.
You can either use the Azure NA region login endpoint or navigate to the login page and select “Azure North America” as your region.
You can either use the Azure EU region login endpoint or navigate to the login page and select Azure Europe as your region.
You can either use the GCP NA region login endpoint or navigate to the login page and select “GCP North America” as your region.
You can either use the GCP EU region login endpoint or navigate to the login page and select “GCP Europe” as your region.
You can either use the AWS AU region login endpoint or navigate to the login page and select “GCP Europe” as your region.
No. You cannot store parts of your organization's content in multiple regions. If you choose the Azure North America (NA) data center as your region, all of your organization's data will reside in the same region.
Navigate to the status.contentstack.com page and scroll down to the section of your region to know the status.
Currently, we have support for Seven regions.
- Amazon Web Services US Region
- Amazon Web Services EU Region
- Amazon Web Services AU Region
- Microsoft Azure US Region
- Microsoft Azure EU Region
- Google Cloud Platform US Region
- Google Cloud Platform Europe Region
No. All regions and data centers offer the same tiers of SLA as defined in the Contentstack-Customer agreement.
Data and Insights (Lytics) FAQs
Data & Insights (Lytics) is Contentstack’s native audience management and behavioral data platform. It lets you collect real-time user signals, define audience segments, and power personalized experiences using Contentstack Personalize. While it can connect to external Customer Data Platforms like Segment or Salesforce, it acts as the central hub for activating audiences across your digital experience.
You can connect your existing Data & Insights (Lytics) account by enabling the Data Activation Layer (DAL) in your organization’s Admin Settings. During setup, select your linked Data & Insights (Lytics) account from the dropdown. If your account is not listed, contact the support team with your Contentstack organization ID to request a manual connection. Make sure DAL is enabled before submitting the request.
Yes, a single Data & Insights (Lytics) account can collect data across multiple domains. However, when using Data Activation Layer (DAL) within Contentstack, that account can only be connected to one stack. For multi-domain setups, check your api_whitelist_domains configuration in Data & Insights (Lytics). Leave it blank to allow the tag across all domains, or explicitly list each one.
By default, each Contentstack organization can connect up to three Data & Insights (Lytics) accounts. If you need additional accounts for demo or testing purposes, contact the support team with a brief justification. Limits may be increased for special cases such as sales demo environments.
The Data Activation Layer (DAL) is the connection layer between Contentstack and Data & Insights (Lytics). It enables automatic content classification, real-time audience syncing, seamless data flow between platforms, and a unified user experience.
You can add users directly through the DAL configuration, as follows:
Go to Organization Admin in Contentstack.
Click Edit DAL Config.
Scroll to the Add Users section.
Select users from the list (only Admins and Users not already in the account are shown).
- Click Update.
Users who are not organization admins may require additional permissions. If they cannot see the Data & Insights (Lytics) option in the navigation:
Ensure they have the correct stack-level permissions.
Try accessing Data & Insights (Lytics) directly using the OAuth link.
Contact the support team if navigation from Audience Insights fails
When a Data & Insights (Lytics) account is connected through Data Activation Layer (DAL), all user management must be done within Contentstack, not directly in Data & Insights (Lytics). This ensures proper integration, permission syncing, and access control.
To install the Real-Time Events tag:
Copy the Data & Insights (Lytics) tag code from your account.
For Launch hosting: Enable Real-Time User Event Tracking in your project settings. For detailed steps, please refer to the Event Tracking (Lytics) in Contentstack Launch documentation.
For self-hosting: Add the tag to your website’s <head> section.
2. Ensure jstag.optIn() is called to handle cookie consent.
3. Test the installation using the Data & Insights (Lytics) Chrome Extension.
The Launch tag includes additional logic optimized for Single-Page Applications (SPAs), including:
Automatic page view tracking on route changes
Profile state management for SPAs
Enhanced navigation detection
Improved user experience polling.
Common issues with Next.js integration include:
The tag is not properly initialized for server-side rendering
The window object is not available in server environments
The standard tag is used instead of the SPA-compatible Launch tag
jstag.optIn() is not called correctly for cookie consent.
Contentstack uses Data & Insights (Lytics) APIs to automatically sync audiences to Personalize, so no additional configuration is needed. You no longer need to trigger a special job inData & Insights (Lytics) to enable the sync.
DAL begins processing data immediately after tag installation, with the Stream Stats page updating every 2 minutes.
Content classification may take a few hours to several days, depending on content volume and traffic.
- Audience Insights typically require 2–4 weeks to accumulate meaningful data. Behavioral scoring timelines vary based on user interactions and overall traffic volume.
Yes, you can use the same Data Activation Layer (DAL) configuration across multiple Launch projects within the same organization.
Confirm that the Data & Insights (Lytics)tag is firing on your website.
Use the Data & Insights (Lytics) Chrome Extension to verify profile data.
Check that audiences are being created and synced to Personalize. Monitor the Data & Insights (Lytics) dashboard for incoming data.
- Monitor the Data & Insights (Lytics) dashboard for incoming data.
This error typically indicates a domain whitelist or public profile sharing issue.
Go to Account > Settings > Details and ensure Allow access via API is checked. If that setting is already enabled:
Check your account’s api_whitelist_domains configuration.
If it’s blank, no action is needed.
If it includes values, make sure your website domain is added to the list.
Clear your browser cache and allow time for changes to propagate.
- Verify that your tag includes the correct Account ID.
Ensure the Data & Insights (Lytics) tag is properly installed and firing.
Confirm that jstag.optIn() has been called to handle cookie consent.
Verify that scores are enabled under Account > Settings > Lytics API.
Add score fields to the Allowlist fields for public API setting.
Allow 24–48 hours for scores to begin appearing.
This is a known issue with the Data & Insights (Lytics) Chrome Extension. You will need to manually close it on each tab. The development team is aware of this behavior.
Error: Workflow modifies schema for table that has unpublished changes
To resolve this:
Use a Data & Insights (Lytics) Auth token to publish schema changes via the API.
Alternatively, publish changes manually in the Data & Insights (Lytics) UI before creating jobs.
- Wait until all changes are fully published before proceeding.
Data & Insights (Lytics) supports a wide range of integrations across advertising, marketing automation, analytics, data storage, and more. For a complete list, visit the Data & Insights (Lytics) Integrations Directory.
Use the Recently Visited URLs field type.
Set up URL pattern matching in the audience rules.
Configure time-based conditions (for example, “visited in the last 10 days”).
- Test audience membership using the Data & Insights (Lytics) Chrome Extension.
Data & Insights (Lytics) Flows are visual workflows used to activate data across systems within Data & Insights. To learn more, explore the Data & Insights (Lytics) Practitioner path on Contentstack Academy.
Data & Insights (Lytics) respects cookie consent using the jstag.optIn() method.
No data is collected without explicit user consent.
Users can clear their data by removing browser cookies.
Data & Insights (Lytics) supports integration with most Consent Management Platforms (CMPs).
User behavioral data and content interactions
Audience membership information
Personalization attributes
All data is stored securely using enterprise-grade security measures
Yes, if users log in and you pass their Account ID or email to Data & Insights (Lytics), personalization can be based on their authenticated identity rather than browser cookies.
Use the Segment Create API endpoint: https://docs.lytics.com/reference/segment-create
Yes, Data & Insights (Lytics) provides APIs for fetching audience data. Refer to the Data & Insights (Lytics) API documentation for available endpoints and authentication requirements.
Use the Collect endpoint:
https://api.lytics.io/collect/json/{stream}You can send custom user attributes, events, and content metadata to this endpoint.
Auth tokens are automatically created when you set up Data Activation Layer (DAL). You can find them in your Data & Insights (Lytics) account under Security > Authorizations.
Installing the Real-Time Events tag is free.
Basic data collection and insights are included with Contentstack CMS.
Billing typically begins when you launch active personalization campaigns.
Contact your account manager for specific pricing details.
Contentstack Academy: Complete the Lytics Practitioner Certification path.
Official Documentation: Data & Insights (Lytics) Docs
Contentstack End-to-end Guide: Data & Insights (Lytics) + Contentstack
- Community Support: Join the #support-data-and-insights Slack channel.
A five-course certification path on Contentstack Academy
40+ training videos covering all aspects of Data & Insights (Lytics)
Hands-on labs and practical exercises
Regular webinars and live demo sessions.
Immediate help: Post in the #support-data-and-insights Slack channel.
Technical issues: Submit a ticket through the official Contentstack Support system.
Security reviews: Email securityreviews@contentstack.com.
- General IT support: Email helpdesk@contentstack.com.
This error typically occurs with the content classification API. Contact Data & Insights (Lytics) Support with your use case details and API token to resolve the issue.
This message appears because audience sync jobs run on an hourly schedule. You cannot trigger the job immediately, but it will process automatically based on its timing
This means you have reached the maximum number of Data Activation Layer (DAL) instances allowed for your account. Contact the support team to request an account limit increase, especially for demo or testing needs.
This usually means score sharing is not enabled. Go to Account > Settings > Lytics API, enable score sharing, and add the required score fields to your public API allowlist.
All Contentstack-provisioned Data & Insights (Lytics) accounts require login through the Contentstack App Switcher. Direct login on the Data & Insights (Lytics ) website is not supported for Contentstack-managed accounts.
You cannot reset a password for a Contentstack-provisioned Lytics account because authentication is handled through Contentstack's OAuth connection. To access your account, simply sign in to Contentstack and open Data & Insights (Lytics) from the App Switcher.
Contentstack is the source of truth for all user management, roles, and permissions. User roles in Data & Insights (Lytics) are automatically mapped from your Contentstack organization. All role or permission updates must be made within Contentstack, for example, through Organization Admin or by contacting an Organization Owner or Admin. You cannot add users, remove users, or change roles directly within the Data & Insights (Lytics) UI.
Data & Insights (Lytics) roles are automatically mapped from your Contentstack organization roles. Because authentication is handled through Contentstack’s OAuth connection, all role assignments must be managed in Contentstack, not within the Data & Insights (Lytics) interface.
Roles for Data & Insights (Lytics) accounts provisioned through Contentstack cannot be changed within the Data & Insights (Lytics) interface. To update permissions or change a user’s role, you must contact an Organization Owner or Admin in Contentstack, as all role management is handled at the Contentstack organization level.
Data & Insights (Lytics) access levels are determined by your Contentstack organization role. The table below outlines the permissions granted for each role.
| Contentstack Role | Lytics Access Level | Description |
|---|---|---|
| Owner | Admin | Full access to audiences, event data, and integration settings. |
| Admin | Editor | Can manage audiences and events, and analyze data, cannot modify integration configurations. |
| Member (non-admin) | Audience Manager | Access to content classification, collections, and topics. |
| Member (non-admin) | Data Manager | Access to schemas, queries, users, and PII fields. |
| Guest / Collaborator | Restricted | No, Data & Insights (Lytics) access unless explicitly granted. |
Delivery Token FAQs
Both Access Tokens and Delivery Tokens provide read-only access to a stack.
- Access Tokens can retrieve published and unpublished (draft) entries, regardless of the environment.
- Delivery Tokens can only retrieve published entries from the specific environment linked to the token.
Note: Access Tokens are no longer supported for stacks created after December 16, 2020. Use Delivery Tokens for accessing published content and Management Tokens for Content Management API requests.
Additional Resource: Refer to Types of Tokens to learn more about different tokens available in Contentstack.
No. Delivery Tokens are read-only and can only be used to retrieve published content. You cannot use them to create or update content.
No. You can use Delivery Tokens only to fetch published content from the environment they are associated with. They cannot retrieve draft or unpublished content.
No. Preview Tokens are linked with Delivery Tokens. You must first create a Delivery Token and generate a Preview Token.
No. A Delivery Token is strictly environment-specific. You must create separate Delivery Tokens for each environment for clear data separation.
Yes. Management Tokens provide full access to your stack, including unpublished content, and must remain private.
Delivery Tokens offer read-only access to only the published content, making them suitable for use in public-facing applications. They help maintain better security and data boundaries.
Anyone with access to your stack's settings can generate a Preview Token.
Developer Hub FAQs
Contentstack Developer Hub is an app development framework/portal that developers can leverage to build, host, and publish ready-to-use private or public apps. In addition, it includes app development APIs, SDKs, and other tools that can help developers build apps with ease.
Contentstack Developer Hub Framework is an app development platform you can use to build, host, and publish apps. It lets you define further details for your app by adding UI locations, Integrating OAuth, and setting up Webhooks.
Apps and other resources help you extend the capabilities of our core CMS and customize its functionalities. They allow you to enhance the Contentstack experience by connecting to various third-party services in simple one-click solutions.
Currently, the limit is 50 apps. To increase the limit, please contact customer support.
Your apps communicate with Contentstack via two major touchpoints: Webhooks and UI Locations. Contentstack provides signed support for both integrations. The signed feature for webhooks allows developers to verify whether the webhook requests originated from Contentstack. Also, the signed feature for UI Locations enables the initial page load calls to contain a JWT token that is further used to verify whether the page load request originated from Contentstack itself.
While communication to Contentstack from outside resources, use OAuth support token instead of user session tokens or management token. These are easy to manage and scale as per the app developer’s demand.
The Contentstack Marketplace team accepts apps from Contentstack-certified partners. A dedicated team reviews these apps before publishing them on the Contentstack Marketplace platform.
The end-to-end process for app submission and approval involves these steps:
- Agree to Contentstack Terms of Service.
- The Marketplace team provides detailed documentation to guide the developers about app creation and submission.
- Fill out the metadata content form and submit a clone of your app for review.
- The marketing content for your app will be created by collaborating efforts made by you and the Marketplace team.
- The Marketplace team conducts app reviews along with the marketing content.
- App testing and security checks.
- Publish the app.
Apps are the future for integrating and implementing third-party solutions within our headless CMS. Unlike extensions, apps offer advanced functionalities, enhancing all the features of extensions and more for seamless integration with your favorite third-party platforms.
Contentstack apps provide an interactive UI for managing custom app configurations. Apps can be reused across multiple stacks, whereas extensions are limited to a specific stack. Learn more about the differences here.
For developers, creating complex functions with apps is easier, faster, and more feature-rich.
Yes. Contentstack Marketplace Apps require TLS 1.2 or higher communications, including HTTPS.
Contentstack currently supports three regions: AWS North America, AWS Europe, Azure Europe, and Azure North America. Contentstack-supported regions are hosted in the following data centers:
- For AWS North America, our central region is Oregon, US (us-west-1), and the backup region is North Virginia, US (us-east-1).
- For AWS Europe, our main center is Ireland, Europe (eu-west-1), and the backup is Frankfurt, Europe (eu-central-1).
- For Azure North America, our primary region is West US 2 and our backups are configured in US East region (MongoDB Database backups), and the West US region (Assets backups).
- For Azure Europe, our primary region is West Europe (Netherlands) and our backup region is EU Central 1 (Frankfurt).
Here is the list of guides that walks you through how to build apps using Developer Hub.
- About Developer Hub
- Creating an App in Developer Hub
- Installing your App via Developer Hub
- Configuring an App
- Managing your Apps
- Managing OAuth
- For more guides and documentation, visit our Developer Hub page.
Drafts and Auto Save FAQs
Drafts and Auto Save automatically stores draft updates, so you do not need to manually click Save before leaving the editor.
If you close the browser tab or refresh the page:
- Your most recent synced changes remain saved as a draft
- The draft state loads automatically when you reopen the entry
- The browser does not display the standard “unsaved changes” warning
Note: If your internet connection drops before changes are synced, recent edits may not be saved. Confirm that the status indicator shows that changes are synced before leaving the page.
No. Drafts and Auto Save creates and updates draft states only.
A draft becomes a major version only when you explicitly click Save or Publish.
Until then:
- Changes remain in draft state
- Entry Listing page displays a Draft pill
Drafts and Auto Save uses a debounce-based mechanism. Changes sync automatically after you pause typing.
If a network delay occurs:
- The status indicator shows that changes are syncing
- Editing may pause and become temporarily unavailable, if connectivity is lost
If another user edits the same entry:
- Fields they are editing become locked for you
- You can view updates shortly after they are saved
- You cannot modify a field that is currently locked
Warning: You cannot edit a field while another user is actively editing it. The field becomes available after the lock is released.
Yes. You can compare:
- Minor draft updates (auto-saved changes)
- Major saved versions
Compare helps you:
- Review collaborative edits
- Validate changes before saving
- Identify differences between draft and major versions
Note: Draft versions are retained only for the five most recent major versions of an entry. When newer major versions are created, draft updates associated with older major versions are automatically removed. As a result, only recent drafts appear in the version comparison panel.
If another user saves or publishes a newer version while you are editing:
- A notification appears
- Editing may be temporarily restricted
- You must compare your draft with the newer version before saving to avoid overwriting changes
Note: Always compare your draft with the latest version before saving if you receive a notification about a newer version.
No. Minor updates are grouped in draft logs. Only explicit Save or Publish actions create major versions.
This reduces unnecessary version creation while maintaining a clear version history.
Yes, with field-level locking.
- Each field locks individually when edited
- Other users can edit different unlocked fields
- Structural actions in container fields may be restricted if nested fields are locked
This allows collaboration while preventing direct editing conflicts.
Entries FAQs
Contentstack offers Live Preview functionality, enabling you to review your entry content across various channels before saving or publishing it on your live website. This feature allows you to edit an entry and observe content changes simultaneously in real-time.
When you delete an entry that has been published, that entry will get unpublished. This means that the entry will cease to display on your web/mobile property.
Entry UID is unique per stack.
Every time you save an entry with changes, Contentstack creates a new version of the entry. Users can view all the versions and compare any two versions of an entry at a time. If you wish to switch back to a previous version, you can simply click the Version drop-down of your entry's page and 'View' the version or 'Compare' an earlier version with the current version from the list.
If you wish to make any previous version as the latest version of the entry, just select the required previous version and click on 'Save'.
The 'Publish Queue' section shows the list of all the items sent for publishing, along with its current publish status (published/pending/failed).
First, you need to check whether the ‘Deploy Content to Server’ option is enabled for the environment to which the entry is published. Then, the latest version of the contentstack-express server needs to be installed on your system. Until then, the status of entries shall be displayed as pending.
Yes. Currently, you can bulk publish multiple entries. Check out the CLI guide and Publish an Entry sections to know more.
You can also bulk publish multiple entries with nested references at once. Check out our Bulk Publish Entries with Nested References documentation to know more.
Yes, you can publish all nested references up to 5 levels of depth by publishing a single parent entry. Check out our Publish Entries with Nested References documentation to know more.
To create entries in a stack, you need to be either the owner of the stack or you need to be assigned a role that contains write access to the stack. If you are not the owner of the stack, you need to acquire write access to your role from the owner of the stack.
When you publish an entry, the system automatically puts it in the queue for publishing. The ‘Publish Queue’ section shows the list of all the items sent for publishing, along with their current status. You cannot manually change the status of an entry in the Publish Queue.
Contentstack supports Drafts and Auto Save for entries. When this feature is enabled for your stack, changes made while editing an entry are automatically saved as draft updates in the background. This reduces the risk of losing work if the browser tab is refreshed or closed.
Draft updates are captured automatically while you edit and are synced with other users viewing the same entry.
If the Drafts and Auto Save feature is disabled for your stack, you must manually click Save to store changes.
No. The published entries in this case will not be affected. It will only be affected if you republish the entries on ‘staging’ after making changes to the content type ABC. Note that making changes to an existing content type (having entries) may cause the entries to lose data in Contentstack, but not in the published environment.
New entries remain in Draft state (version 0) until they are saved for the first time.
While an entry is in version 0:
- The locale cannot be changed
- Publishing is unavailable
- The entry cannot be added to releases
- Workflow stages cannot be applied
Saving the entry creates the first major version and enables these capabilities.
Yes. Drafts and Auto Save supports collaborative editing. Multiple users can edit different fields within the same entry simultaneously.
When a user edits a field, that field becomes temporarily locked to prevent conflicting updates. Other users can still edit unlocked fields in the entry.
Entry Comments FAQs
Users or roles with "read" access to a specific content type or entry can access the entry comments feature. For more information, refer to the Mention Users or Roles in a Comment document.
No, webhooks cannot currently be triggered by entry comments.
If you delete a field with associated comments, both the field and its comments will no longer appear in the entry editor. The discussion automatically resolves and moves to the Resolved section in the Discussions tab. You can access these details anytime through the Discussions tab in the right navigation panel. For more information, refer to the Entry Comments document.
No, comments can only be added to the subfields of "Group" and "Global Fields", but not to the parent field as a whole. For more information, refer to the Add a Comment document.
To add comments to the subfields of a "Group", "Modular Blocks", or "Global" field marked as "Multiple," you must first enter data in the fields and save the entry. After saving, you can start adding comments to the subfields. For more information, refer to the Add a Comment document.
No, comments can only be added to the fields inside each block of a "Modular Blocks" field, not to the parent "Modular Blocks" field as a whole. For more information, refer to the Add a Comment document.
No, only one active discussion is allowed per field. However, an entry can have multiple open discussions across different fields. For more information, refer to the About Discussions document.
Yes, you can reopen a resolved discussion if there is no active discussion on the field it was originally linked to. For more information, refer to the Reopen a Discussion document.
Yes, discussions can be field-specific for each localized version of an entry. However, the "Comments" feature is not available for unlocalized entries or older versions. For more information, refer to the About Discussions document.
No, changes or edits made to comments are not tracked. Once submitted, comments are saved as-is.
No, comments and discussions are not included in the exported entry data.
Yes, tagged users receive email and in-app notifications.
No, only users with access to the content type or entry can be tagged or notified. For more information, refer to the Mention Users or Roles in a Comment document.
No, comments are specific to the field in the locale they are added to and do not carry over to other localized versions.
No, changes to the master locale entry do not affect the comments or discussions in localized versions.
No, currently, the comments feature cannot be disabled for specific fields or entries.
Resolved discussions remain accessible in the Resolved section of the Discussions tab for future reference. For more information, refer to the View Discussions Timeline document.
If an entry is deleted, all associated comments and discussions are permanently removed. While you can restore the entry from the Trash, the previous discussions cannot be recovered. For more information, refer to the Edit or Delete a Comment document.
Entry Variants FAQs
Only Developer or Administrator roles can create variant groups in a stack.
Entry Variants allow you to create different versions of an entry based on specific criteria, such as different languages, regions, or user preferences. This feature helps manage diverse content within the same entry structure.
Learn more about Entry Variants.
To create Entry Variants, go to the Entries section within your stack. When creating or editing an entry, you can create entry variants by selecting a variant from the “Variants” dropdown and updating the content specific to the selected variant.
Learn more about creating entry variants.
Yes, you can create Entry Variants for all content type entries available in your stack as long as your content type is linked to variant groups.
Learn to manage variant groups.
You can switch between Entry Variants using the “Variants” dropdown menu available in the entry editor. Select the desired variant to view or edit it.
Yes, some limitations include the Taxonomy not supporting the Variants feature and that you cannot create, delete, or edit the title and description of variant groups or variants within the stack.
Note: Variant Groups correspond to the experiences created within your Personalize projects.
Learn more about the limitations for entry variants.
No, you cannot directly localize an entry variant. However, you can create an entry variant specifically for a localized language.
To do this, select a localized entry first, and then create an entry variant for that language. This allows you to manage content variations for different languages.
Managing versions of Entry Variants can be more complex than standard entries. Use the version history feature to track changes and revert to previous versions as needed.
Learn more about managing versions of entry variants.
Yes, each entry variant can be published independently, allowing you to control which variants are live at any given time.
Learn more about publishing entry variants.
Publishing one entry variant does not impact the published status of other entry variants for the same entry. Each entry variant's status is managed separately.
Learn more about publishing entry variants.
You can publish entry variants in all the available languages of your stack. However, an entry variant can only be created for a language if the base entry is localized for that particular language.
Learn more about how publishing works with entry variants.
Yes, unpublishing an entry variant will remove it from public view, while other published entry variants of the same entry remain unaffected.
Learn more about unpublishing entry variants.
Yes, you can select entry variants from the entries list page and bulk publish them.
Learn more about how publishing works with entry variants.
Environments FAQs
An environment in Contentstack is a specific publishing channel for your content. It helps you manage and preview your content effectively at different stages, such as development, staging, or production, before making it available to the public. This ensures content quality, reduced errors, and a seamless user experience.
Yes, you can publish content simultaneously to multiple environments, such as development, staging, and production. This simplifies your workflow and ensures content consistency across environments.
If you delete an environment with published content, the associated entries and assets remain in Contentstack but become inaccessible via that environment.
Delivery tokens linked to the deleted environment are invalidated, preventing content retrieval through APIs.
Warning: This action is permanent, and you cannot restore a deleted environment.
You can automate content deployments to multiple environments simultaneously by configuring Webhooks or using Automate.
Webhooks allow you to trigger automatic deployments to multiple servers or services whenever you publish or update content.
Automate provides visual workflows to schedule, coordinate, and manage deployments across multiple environments, ensuring consistency.
Yes, each environment can have a different Base URL. This allows you to publish content to distinct locations, such as separate URLs for development, staging, and production, based on your deployment workflow.
No, an environment is specific to a single stack and cannot be shared across multiple stacks. Each stack requires its own set of environments to manage and deploy content independently.
Environments support multilingual content by allowing language-specific Base URLs. You can set different URLs per environment for each language, enabling content to be published and managed effectively across multiple languages and regions.

The Base URL is the consistent part of the destination’s web address. It helps Contentstack identify the destination to which you will publish the content, for example, www.yourdomain.com.
No, you do not need to enter the Base URL while setting up the environment for your mobile application. This is because the apps fetch content directly from Contentstack via APIs.
Yes, environments are global modules available across all branches of your stack. Any environment created in the main branch will be accessible in all other branches.
Experience Extensions FAQs
To separate an extension from Contentstack, we make use of the HTML5 sandbox attribute on the iframe. And, the following sandbox flags are enabled:
allow-scripts: This flag re-enables an extension to run JavaScript in its own sandboxallow-popups: Use this flag to enable your extension to open pop-ups.allow-popups-to-escape-sandbox: This flag allows the sandboxed document to open new windows without imposing any sandbox-specific restrictions on them.
Note: For external hosting of extensions, the allow-same-origin option will be enabled, where the origin refers to the domain where you've hosted the extensions. Also, ensure that the response header has the exact origin URL passed in the request header.
For Contentstack-hosted extensions, the iframe's origin will be null as we don't enable the allow-same-origin flag.
Yes, it is mandatory to host your extensions on HTTPS as we do not allow users to reference non-HTTPS URLs (i.e., http://) with the exception of Localhost URLs (http://localhost) which are used for development purposes.
If you plan to serve your extension from localhost, block mixed content protection in Chrome and Firefox.
Since an extension is run in a sandboxed iframe, it receives the origin null. Because of this reason, custom web fonts do not work as expected. In order to overcome this, you need to configure your servers to send the headers: Access-Control-Allow-Origin null or Access-Control-Allow-Origin
Yes, but only of the fields that you create using Contentstack’s UI Extensions. You cannot customize the appearance of Contentstack’s default fields
There are two ways to install Extensions in Contentstack:
Note: Extensions are going to be deprecated soon. We encourage you to visit our Marketplace to get a complete list of available apps.
- Color picker
- YouTube video selector
- Key-value pair fields
- Product catalog viewer
- Salesforce/Marketo data fetcher
For more experience use cases, read All Contentstack Experience Extensions document.
The possibilities are endless. You can create a custom field and/or integrate the field with third-party apps.
No, there are no validation rules to be followed when choosing extension names. But do try to keep it short because long names can break the layout.
Yes, you can use multiple extensions in a content type. There are no limitations pertaining to using Extension fields. However, for content types, we have a field limitation of 100, which is applicable to Extension fields too.
Yes, there are certain limitations to using extensions. They are as follows:
- Size: The maximum size of an extension is 500 KB
- Title: The title of an extension cannot exceed 256 characters
- Stack limit: At most 50 extensions can be installed in a stack.
- Config file size: The size limit of an extension’s configuration file is 10 KB
- JSON data type size: The maximum size limit of the JSON Data Type is 10 KB
- Browser-support: Internally hosted extensions are not supported on Internet Explorer and Microsoft Edge as they lack support for the <iframe> srcdoc attribute.
Yes, it is possible to add configuration externally on a stack-level. Refer to our API documentation on configuration from the Extension SDK during runtime.
To understand how this is done, refer to the Create New Custom Field article.
As the extension runs on the browser, a simple console debugger can be used to debug extensions.
If any URL defined in extension.json contains error or is invalid, the extension will not be rendered properly, i.e., it will be broken, and in some cases, it may not show up at all.
If you remove an installed extension, all the content that has been stored using the extension field will remain unaffected until another extension with the same UID but different attributes is used instead of the deleted extension in the content type.
It accepts multiple values if you enable the “Multiple” property while setting up the extension. To enable "Multiple," edit the extension, and check the Multiple checkbox on the extension configuration page.
The supported data types for an Extension field are: Text, Boolean, JSON, Number, and Date. Depending on the data that you want your extension field to consume, you can select any one of the data types.
When you update an extension, it is important to update the content type too (within which the extension is being used) by simply saving the content type once again. This integrates the updated changes in the extension with the content type.
When an extension is deleted, the following things may happen:
- The entry data for the field remains unchanged, unless another extension with the same UID as of the deleted extension but with changed data type or the “Multiple” setting is added.
- The entry data for the field will not be rendered in UI.
Tip: If you need to render the entry data unchanged, you need to add a new extension with the same UID as of the deleted extension, with the same data type and set the “Multiple” option.
No, it will not affect any existing entries.
Theoretically, yes. An extension can affect your content owing to the fact that they have access to all the content that the user running the extension has. It is advisable that users take utmost care while building/using extensions to avoid any kind of data loss.
Field Validation FAQs
Yes. You can add custom validations to “Single Line Textbox” and “Multi Line textbox” fields by setting the “Validations (Regex)” property.
The “Validation (Regex)” field property is available for “Single Line Textbox” and “Multi Line textbox” fields. You can find common examples of validations in our documentation. Since you can add validations using regex, learning how regex works might be helpful.
No, you can only define one validation rule for a single field.
Validations can be added to “Single Line Textbox” and “Multi Line textbox” fields using regex (regular expressions). When creating a content type, perform the following steps to add regex validation to a field in order to check for email addresses:
- Edit the required content type. Click on the “Email” field. This opens the Edit Properties window of the field.
- Now, enter the following regex value in the “Validation (Regex)” property. This will validate email addresses:
[a-z0-9!#$%&'*+=?^_`{|}~-]+(?:\.[a-z0-9!#$%&'*+=?^_`{|}~-]+)*@(?:[a-z0-9](?:[a-z0-9-]*[a-z0-9])?\.)+[a-z0-9](?:[a-z0-9-]*[a-z0-9])?
Yes, you can set validations on the “File” field to restrict users from uploading certain file types. To do this, click the “File” field to open its properties. Then, use the “Allow file type(s)” property to allow the upload of specific file types.
Global Field FAQs
After creating a Global field, you can add it to any content type by editing the content type, inserting a new field, selecting Global, and choosing the desired Global field from the list.
Learn more about adding Global fields to content types.
Yes, Contentstack now allows nesting of Global fields up to 5 levels deep, including the parent field. This enhancement enables more flexible and complex content modeling. Learn more Nested Global Fields.
Global fields are ideal for content that is reused across multiple content types, such as SEO metadata, author information, or address details.
For example, an SEO Global field can include Meta Title and Meta Description fields, which can then be added to various content types to ensure consistent SEO data entry.
Learn more about Global Field Use Cases.
When you update a Global field’s schema, the changes automatically reflect in all content types where the Global field is used. This ensures consistency across your content model and reduces the need for repetitive updates.
Learn more about editing a Global field.
Yes, you can delete a Global field. However, deleting a Global field will result in the loss of data associated with that field in all existing entries. It’s advisable to ensure that the field is no longer needed before deletion.
Learn more about deleting a Global field.
Yes, Global fields are specific to the branch in which they are created. For example, if you create a SEO Global field within the development branch, you will be able to use or access this Global field only within that development branch.
Learn more about Branch-specific Modules.
The Reference field lets you link entries from the same or different content types, allowing dynamic relationships between content entries.
The Global field, on the other hand, is a reusable set of predefined fields that can be created once and added to multiple content types. Unlike the Reference field, which pulls existing content, a Global field requires users to input values separately for each entry where it is used.
A Group field is used to group related fields together within a single content type. It helps organize fields logically, especially when dealing with repeated or structured data (e.g., contact information, SEO fields).
A Global field, on the other hand, is a reusable set of fields that you can create once and reference across multiple content types. It’s ideal for maintaining consistency and reducing redundancy in your content model. Updates made to a Global field automatically reflect wherever it is used.
GraphQL FAQs
To try out Contentstack's GraphQL Content Delivery API, access the GraphQL explorer through the following endpoint:
https://www.contentstack.com/docs/developers/apis/graphql-content-delivery-api/explorer/?api_key=blt95a0a7afb9613f51&access_token=csd2e15b5bad2bf983e44dca27&environment=production
You can apply your own stack details to test the GraphQL API requests over your stack.
Each entry or asset associated with a content type has its own set of system-defined fields. These fields provide additional information about the entity.
Let’s understand the different system fields generated by Contentstack’s GraphQL Content Delivery API for each entry or asset:
| System Fields | Description |
| uid (String) | Represents the unique ID of an entry or asset |
| version (Integer) | Determines the version number assigned to an entry or asset |
| content_type_uid (String) | Determines the unique ID of the content type to which the entry or asset belongs |
| locale (String) | Determines the language in which the entry has been localized |
| publish_details | Determines the following publishing details for an entry or asset:
|
| created_at (DateTime) | Determines the date and time at which the entry or asset was created |
| updated_at (DateTime) | Determines the date and time at which the entry or asset was last modified |
| created_by (String) | Represents the user who created the entry or added the asset |
| updated_by (String) | Represents the user who last modified the entry or asset |
| tags (String) | Determines the specific tags assigned to an entry or asset |
To avoid the hassles of passing specific entry UIDs while fetching an entry from a singleton content type, you can prefix the content type UID with all_, e.g., all_header. You can query singleton content types in the same way as you query content types with multiple entries.
Consider the following query that attempts to fetch an entry of the Header singleton content type, which stores website header content:
query {
  all_header { # Where the header content type is of type singleton.
   total
   items {
    title
   }
  }
}
Note: All the filters and ordering functions will be available to the user. They would work the same as how you query a content type with multiple entries.
When an API request hits the Contentstack server, internally the {content_type_uid}Where filter is assigned a JSON scalar value. Since the where filter accepts JSON scalar input types, you can create filters on keys that may not exist on the current content type's schema. Contentstack processes your API requests without any errors.
In Contentstack's GraphQL documents, you assign names to several entities, such as operations, content types, fields, variables, and fragments. All the GraphQL names you define must follow the same grammatical form of /[_A-Za-z][_0-9A-Za-z]*/.
Additional Resource: You can refer to the GraphQL documentation to learn more about the naming specifications.
The aforementioned naming convention means if you have a content type name that starts with a number, it will end up throwing the following error:
{
  "errors": [
    {
      "message": "Names must match /^[_a-zA-Z][_a-zA-Z0-9]*$/ but \"{content_type_name}\" does not."
    },
    ...
  ]
}
Tip: To prevent typename collisions, you can avoid using special characters while naming content types or fields.
Contentstack returns the MAX_DOCUMENT_LIMIT_EXCEEDED error message when a GraphQL API request attempts to fetch more than 7,500 documents (assets, entries, their referenced assets and entries, etc.).
To resolve this error, you can reduce the total number of referenced items being queried or pass the skip or limit parameters while querying referenced items. Learn more about fetching referenced entries or assets.
Contentstack counts each GraphQL query as one irrespective of the number of content types queried in it. Similarly, the rate limit remains the same whether you query one or more than one content types in a single API request.
JSON Rich Text Editor FAQs
Yes, you can migrate content from existing HTML-based RTE to the new JSON RTE using CLI. Please refer to our migration guide for more details.
Yes, Contentstack allows you to migrate your rich text content from your existing HTML-based RTE fields to the new JSON RTE fields for all entries of a content type in just a few minutes. Please refer to our migration guide for more details.
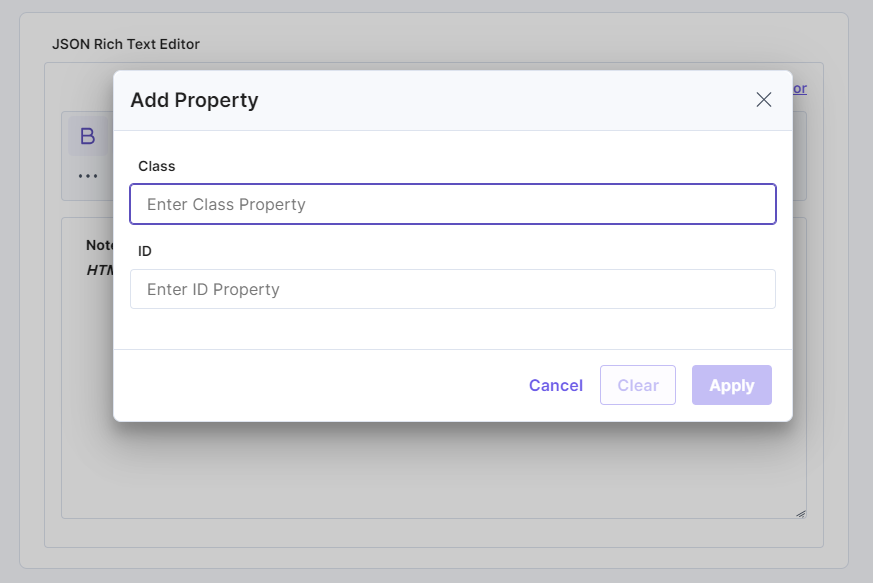
Yes, you can add the include_html parameter while fetching an entry to get a HTML response. Please refer to the following API requests in our CMA API documentation:
JSON RTE Plugins FAQs
Yes, we have three prebuilt plugins namely Highlight, Info Panel, and Word Count. For more information, refer to our Use Prebuilt JSON RTE Plugins documentation.
No, you cannot create plugins for the HTML based editor. These plugins are only available for the JSON Rich Text Editor in the new Contentstack user interface.
Yes, you can create customized plugins for your JSON Rich Text Editor. For more information, refer to our Create New JSON RTE Plugin documentation.
No, you can host your plugin in Contentstack by uploading the plugin.system.js file in Assets and using this file URL to add the plugin to a stack. For more information, refer to the Host the Custom JSON RTE Plugin section in our Create New JSON RTE Plugin documentation.
Yes, you can clone the extensions repository and change the source code for the JSON RTE plugin you want to update. You’ll then need to host this new code and add it to your stack. For more information, refer to our Create New JSON RTE Plugin documentation.
Yes, you can create, update, or delete plugins via API. Please check our JSON RTE Plugins CMA request collection.
Yes, you can test your plugin on a local host. For more information, refer to the Test the JSON RTE Plugin section in our Create New JSON RTE Plugin documentation.
Labels FAQs
Labels in Contentstack help you organize content types into logical folders, making it easier to manage and access them.
Labels make it easier to organize content types based on teams, projects, or any specific criteria. This improves navigation and simplifies content type management.
Yes, labels are branch-specific. A label created in one branch (e.g., development) can only be applied to content types within that branch.
Yes, you can edit or delete labels by accessing the Manage Labels modal. You can rename a label, nest it under another label, or delete it if no longer needed.
Yes, you can assign multiple labels to a content type. For more details, refer to the About Labels documentation.
Content types without labels are listed under [Unlabeled] in the Content Type Views section on the Entry List page. For more details, refer to the About Labels documentation.
No, labels are not included when exporting or importing content types.
Yes, you can create, edit, rename, nest, and delete labels in Contentstack. For detailed instructions, refer to the Manage Labels documentation.
Launch FAQs
No. Your last successful deployment will remain active until it is replaced by a subsequent successful deployment. However, redeploying your site will clear the CDN cache for your site, so previously cached pages will be served as uncached requests the first time they are accessed.
Yes. Custom domains may be added and configured in each environment’s settings.
Yes. Launch deploys server-side functionality as serverless functions. This includes SSR-rendered pages, and Cloud Functions.
Yes. To deploy a static site, follow the process specified in your framework code for static site generation (SSG) rendering.
Yes. You can execute your code in proximity to your user’s location before a request is processed using Edge Functions in Contentstack Launch.
Yes. The Log Targets feature in Contentstack Launch allows you to forward the logs produced by Launch Cloud Functions or by Launch-supported frameworks to third-party monitoring services that support GRPC OTLP endpoint.
You can find the frameworks supported by Launch in the Launch Framework Support Matrix.
Launch runtime operates in a read-only file system, except for the designated /tmp directory, which facilitates write operations. The /tmp directory is a temporary file system accessible to every Launch serverless runtime, offering up to 500 MB of storage.
Note: The data stored in /tmp is non-persistent and is automatically deleted upon request completion.
Yes. Automate includes triggers and actions for common Launch activities. Launch also includes deploy hooks functionality, allowing you to trigger rebuilds via a URL. Launch can also use the Marketplace app to set up an SSO at the edge.
Launch technical support is offered through the same technical support channels used for all other Contentstack products.
Depending upon your specific architecture and change process, migrating your existing site to Launch can be achieved with zero or minimal downtime.
Launch currently supports deploying sites via GitHub, BitBucket, and direct zip file uploads. GitLab support will be available shortly.
Yes. Launch can be configured to automatically redeploy when code updates are committed in GitHub and when webhooks are accessed. Launch commands are also available via Contentstack’s CLI.
Yes. Automatic deployments can be configured in your environment’s settings screen.
Yes. Each Launch project includes 5 environments by default, which you can use to deploy environments for staging, testing, content review, and more.
Launch features deployment and server logs to help you troubleshoot deployments and functionality. Serverless functions can also be tested locally.
If you wish to deploy sites to Launch directly from GitHub, then you must authenticate with your GitHub account. However, Launch also supports deployments directly from a zip file upload, which does not require GitHub access.
Bulk site deployments can be achieved via the CLI and through local scripting.
Launch is a front-end hosting and deployment platform for websites built on the Contentstack CMS instantly, but it cannot run Docker containers.
Please refer to this documentation, for more information about Docker containers and why Launch does not support them.
Currently, Launch supports Node.js versions 18.x (discontinued as of August 1, 2025), 20.x and 22.x for running website builds during deployment. For more information, please refer to the supported Node.js versions.
Warning: Support for Node.js version 18 is discontinued for Launch as of August 1, 2025. Update to a supported Node.js version to avoid disruptions in your projects.
Launch cannot be used for native mobile apps, such as those installed from an app store. However, you can use Launch to host mobile-friendly and responsive websites or web apps. Additionally, it can be used to support backend needs, such as building APIs that your mobile app can access.
Caching reduces latency and load times by storing copies of your content closer to your users on CDN servers. This results in faster page loads, improved user experience, and reduced load on your origin servers.
Caching duration depends on the Cache-Control headers you set. You can specify caching durations using headers like max-age and stale-while-revalidate.
Yes. You can control caching behavior by setting specific HTTP headers in your responses.
Refer to the Dynamic Content with Cache Headers section in the Caching Guide for Contentstack Launch doc for details.
No. Launch does not support Next.js ISR or native caching APIs like revalidatePath or revalidateTag. For more details, see Next.js limitations.
Use the following header to disable caching:
Cache-Control: no-store
Refer to the Purging Cache section in the Caching Guide for Contentstack Launch doc for details.
It is generally not recommended to layer multiple CDNs, as this could lead to cache conflicts and unpredictable behavior.
You can monitor caching behavior using response headers such as x-cache or cf-cache-status. A value of HIT indicates that the content was served from the cache, whereas MISS indicates that it was fetched from the origin.
Sensitive or private data should never be cached. Always ensure sensitive data responses have caching disabled (no-store or no-cache) headers set explicitly.
Visit our dedicated Next.js on Launch Documentation for more details.
By default, 404 and error pages are not cached by Launch’s CDN, even if Cache-Control headers are present. This is a platform-level behavior to ensure error pages are always revalidated. Identify known bad routes and handle them gracefully at the edge using Launch Edge Functions.
No. Launch does not support the native data cache feature of the Next.js App Router (e.g., fetchCache, revalidatePath, revalidateTag) due to its serverless and read-only file system architecture.
- Use SSR with Cache-Control headers: Cache API responses at the CDN level using Cache-Control headers to increase the cache-hit ratio and enable on-demand cache revalidation with Automate.
Cache-Control: public, s-maxage=86400, stale-while-revalidate=60 - Cache API requests in a framework-agnostic way: Check out the GitHub example that caches Contentstack Management API responses to reduce rate-limiting issues.
Launch uses Cloudflare as its CDN. Caching external URLs can apply, but only if the external URL is served through Cloudflare and returns cacheable Cache-Control headers. If the external origin is hosted on a different CDN or server and lacks cacheable headers, the response will not be cached.
No. Each request is handled by a stateless function instance that may not retain memory between invocations. This implies:
- Any data stored in memory—such as variables, objects, or in-process caches—is not guaranteed to persist beyond a single request.
- You should opt out of in-memory caching supported by some libraries, such as the Contentstack SDK, which can optionally maintain a local cache to help with rate limiting and performance.
Check your website's HTML for the presence of the Event Tracking <script> tag. If the tag is present, Event Tracking is active.
For example: <script async="" src="https://c.lytics.io/api/tag/*/latest.min.js"></script>
Yes. If your application uses ETag-based browser-side caching, you must redeploy your site. This ensures that the Event Tracking script is correctly delivered to users.
If the Real-Time Event <script> tag is missing from the HTML, Event Tracking is disabled.
Changes typically take effect within 5 minutes of updating the settings.
A mandatory redeploy is required to activate the Event Tracking (Lytics) feature on your website due to browser caching (ETag behavior).
A mandatory redeploy is required to deactivate the Event Tracking (Lytics) feature on your website due to browser caching (ETag behavior).
No. Data collection begins only after users provide explicit consent. To collect user-specific data, you must configure a custom tag or build a custom consent modal. When the user accepts, Real-Time User Event Tracking starts for that session.
Focus on high-traffic and frequently accessed pages, especially those updated regularly. These include landing pages, key product pages, dynamic content, and essential resources that must load quickly.
No, Cache Priming seamlessly integrates with your current caching configuration. It enhances performance by preloading content during deployment without overriding existing cache rules or policies.
Yes, Cache Priming supports multi-environment deployments, ensuring optimized caching across staging, production, and other environments without manual intervention.
Cache Priming works alongside cache revalidation mechanisms, updating content based on predefined policies or upon new deployments.
Yes, Cache Priming optimizes both static and dynamic content. It preloads frequently accessed dynamic pages that follow predictable update patterns while ensuring static pages load instantly.
Configure Cache Priming by specifying key URLs in launch.json and enabling the cache priming toggle from the UI. For detailed instructions, refer to the Cache Priming document.
You can use Automate to purge the cache for the URL and remove the URL from the Cache Priming list. The cache will gradually invalidate outdated content based on your CDN’s expiration policies.
Cache Priming is designed for globally accessible content and respects security policies, geo-restrictions, and IP limitations:
- Geo-Specific Content: Priming is only effective where regional content is accessible. If a page is restricted by geography, users outside those regions may not benefit.
- Security & IP Restrictions: Cache Priming does not override authentication or IP-based restrictions. Websites with strict access controls must explicitly allow Contentstack IPs for priming to be effective.
Cache Priming can preload API responses, making frequently requested data instantly available. This reduces response times and backend load.
For major content updates, use Cache Priming alongside cache revalidation strategies to serve fresh content without requiring a full cache purge.
To learn how to revalidate already cache-primed paths, refer to the Revalidate CDN Cache Launch document.
This is due to how <NuxtLink> handles client-side navigation. To resolve this, use standard <a> tags instead.
Learn more in the Nuxt.js on Launch guide.
Launch can forward up to 1000 logs in a single request.
Localization FAQs
Contentstack supports writing or adding content from right to left (RTL) using the JSON Rich Text Editor streamlining the process of content management and editing. However, for other text fields, users can paste Arabic and Hebrew content copied from any source file. Learn how localization works.
No, Contentstack does not provide any translation service.
The default language of a stack is known as the master language of a stack. Once it is set while creating a stack, it cannot be changed. Read more about master language.
No. You need to perform the following steps to localize an entry.
- Select the language using the language selector option, say French - France.
- The entry page for ‘French - France’ shows an Unlocalized, unpublished copy of the main entry in Master language.
- Now, make changes in this entry in order to localize it in ‘French - France’, and click on Save or Publish.
This will create a new copy of the same entry. This new copy will then cease to fetch data from the main entry in master language, and the entry will be considered as localized in ‘French - France’.
Yes, you can retrieve content from the fallback language version of an entry or asset if the current localized version hasn’t been published. Pass the include_fallback=true query parameter to fetch the published version from the fallback language. Learn more about how the fallback logic works while retrieving published content.
You can also refer to our Content Delivery API documentation on entries and assets to understand how you can fetch fallback content for published entries.
If the fallback language for the specified locale is the master language itself, then the include_fallback:true query parameter is rendered inapplicable.
Live Preview FAQs
To set up Live Preview, you need to first configure the feature for the website for which you want to preview content. Once configured, you can enable Live Preview for the stack that holds your website content through the stack’s “Settings”.
Learn how to Set up Live Preview for your website and enable the feature within your stack.
No, you do not need to save or publish your entry to preview content. The changes you make to an entry reflect in the preview window in real-time.
Yes, you can preview the content of your website even if the server is running on localhost.
Yes, the functionality for multi-level references is expected to work seamlessly in Live Preview 2.0.
Management Token FAQs
Both management tokens and authtokens allow read-write access to a stack, enabling authorized CMA (Content Management API) requests.
- Authtokens are user-specific and include personal user details with every API request.
- Management tokens are stack-level tokens not tied to any user, meaning role-specific permissions do not apply.
Additional Resource: Refer to the Types of Tokens document to learn about tokens.
Yes, Management Tokens support create, read, update, and delete operations for both published and unpublished (draft) content of your stack, irrespective of the publishing environment.
Yes, you can set an expiration limit for the Management Token or generate one without an expiry date.
Additional Resource: Learn more about setting expiration limits while generating a Management Token.
You can update a token’s name, description, scope, permissions, expiry date, and rate limits. However, you cannot modify the generated token string.
Additional Resource: Refer to the Edit a Management Token document for further details.
Use Management Tokens for automation, CI/CD pipelines, external integrations, or in Single Sign-On environments. This avoids the risk of exposing personal authtokens.
Not entirely. While Management Tokens support most CMA (Content Management API) requests, they cannot manage:
- Publish rules requiring user interaction
- User roles
- Workflow stage assignments
No, Management Tokens do not have permissions to manage user invitations or removals.
Marketplace FAQs
Contentstack Marketplace is Contentstack's very own app distribution platform. Customers can easily expand the capabilities of their Contentstack web application using our Marketplace apps.
We support two types of apps, organization apps and stack apps.
This means organization apps can manage users and roles at organization level. These apps can target SCIM functionality at organization level.
Organization apps use OAuth to authorize users for user tokens.
Stack Apps: Stack apps utilize stack-level scopes and permissions.
This means stack apps can manage UI experiences at stack level.
Both Organization Admins and Stack Admins can install relevant Marketplace apps.
Organization Apps can be installed by organization admins only.
Stack Apps can be installed by organization admins and stack admins only.
Make sure you are the stack admin of the stack where you want to install the app. For organization admins, check if you are a member of the stack where you want to install the app.
Marketplace apps are enhanced versions of extensions. Using extensions is currently a manual, and developer-centric experience. Whereas Marketplace apps are quite easy to install and can be used by any audience regardless of your expertise.
Apps also allow you to overcome few limitations of extensions.
They can request app installation from stack admins using the app request feature in the marketplace.
Non Organization/Stack Owners/Admins can request for Marketplace app installation in the stack of their choice. The request is sent to the admins.
Admins can view these requests in the Marketplace > Manage > App Requests section and then decide whether to install the app or reject the request.
Navigate to the Contentstack Marketplace page, then go to the Starters section to install the app of your choice.
Contact the Marketplace Support team to develop an app.
Miscellaneous FAQs
You can add custom filters for retrieving content via API calls. When executing the GET calls to retrieve content, you can pass certain queries as parameters. These queries act as filters and fetch all the content that satisfy the specified query expression.
To know more about the queries that can be used to filter out content, refer the Queries section of our API docs.
Contentstack uses CDN which helps to deliver content and implements caching, wherein the CDN maintains cached copies of the resource that have been accessed via API calls and make them available to users for future requests.
Contentstack uses two frameworks for websites – Contentstack Express and Contentstack SDK.
Yes, the Authtoken is unique per user. The authtoken is very important as it is required to perform the write API calls.
To retrieve the API Key of your stack, perform the steps given below after logging into your Contentstack account:
- In your stack, click the Settings icon on the left navigation panel.
By default, you will be on the Stack option. At the right-hand side of the page, you will find the API Credentials section under which you will get the API Key for your stack.
To retrieve the Authtoken, you need to log in to your Contentstack account via the login call of the User Session API Request. And, in the response body of the call, you will find your Authtoken.
Markdown is a markup language with plain text formatting syntax. It does not support inline styling (CSS). However, you can input HTML in Markdown. Here's the official Markdown documentation on inline HTML.
You can import content types as well as entries into your stacks in Contentstack. Our documentation provides in-depth guides and video tutorials on how to import content types and entries.
If you are using Contentstack’s web framework, routing is handled by the router that is available in the app.js file or the custom plugin of your framework. Learn more about how routing works with Contentstack.
A unique identifier (UID) is an alphanumeric string that is associated with an entity (content type, entry, asset, or field) in Contentstack. UIDs make it possible to address/identify that entity so that it can be accessed and interacted with.
Yes. many external applications can be integrated with Contentstack. Check out the external integrations page to learn more.
Yes. Through plugins and hooks, you can add custom logic to extend the functionality of Contentstack. Learn how this works.
Nested Reference Publishing FAQs
You can publish nested referenced items up to a default depth of 5 levels at a time, for both single and bulk publishing, and can vary as per your organization’s plan.
You can only select a maximum of 50 locales in which you want to publish content.
You can only select a maximum of 50 environments to which you want to publish content.
Yes, the "Nested Reference Publishing" feature supports scheduled publishing options.
No, you cannot selectively publish specific child entries of a parent entry.
Yes, you get a tree view of all nested items while publishing an entry.
No, while bulk publishing entries, you cannot view the nested references for any of the selected parent entries.
Organization FAQs
Organization is specifically designed for administrators to simplify the process of managing stacks and permissions of a group or company. Organization encapsulates all users, stacks and all the resources within stacks. It allows you to manage roles and permissions for the users and stacks of your account and enables smoother collaboration between the users. For more information, read Work with Organizations documentation.
Yes, you can. To do so, log in to your Contentstack account and perform the steps given below:
- Click on the “ORGANIZATION” drop-down on the header and select the Organization you want to access
- Click on the “Org Admin” icon on the left. This will open the “Settings” page.
- In the “Organization Info” section, click on the “Transfer Ownership” button on the right-hand side.

- Enter the email ID of the user to whom you wish to transfer the Organization"s ownership and click on “Transfer”. This will send an email invitation to the user to accept the ownership of the organization. If the user does not receive the invitation, you can resend the invitation by clicking on “Resend”.
Once the invited user accepts the ownership invitation, the organization will cease to be under your ownership and you will be assigned the ‘Member’ role.
Note: Only the owner of the organization can transfer the ownership of the organization.
To create a new organization, contact the Contentstack support team at support@contentstack.com.
To get the details of an organization, log in to your Contentstack account and perform the following steps:
- Click on the "ORGANIZATION" drop-down on the header and select the Organization you want to access.
- Click on the “Org Admin” icon on the left navigation panel.
This will open the ‘Organization Settings’ page which consists of the details of the organization as shown in the following screenshot:

Note: Only the Owner and the Admin users can view this info.
You cannot delete an organization. To permanently disable your organization, contact the Contentstack support team at support@contentstack.com.
To get a list of all stacks in an organization, log in to your Contentstack account and perform the steps given below:
- Click on the "ORGANIZATION" drop-down on the header and select the Organization that you want to access.
- Click the “Org Admin” icon on the left navigation panel.
Click on the Stacks tab on the left-hand side of the page. This will open the Stacks page that displays the list of all the stacks that belong to the organization.
Only the Owner and the Admin users of the organization has the right to invite users to the organization. To invite users to an organization, log in to your Contentstack account and perform the steps given below:
Click on the "ORGANIZATION" drop-down on the header and select the Organization you want to access.
Click on the “Org Admin” icon on the left navigation panel.
Click on the Users tab on the left-hand side of the page. This will open the Users page that displays the list of users who belong to that organization.
- Click on the Invite User button on top of the page.
- In the “Invite User” form that opens, enter the following details:
- Under the Email section, enter the email ID(s) of the user(s) you wish to share the stack with.
- In the Organization Roles section, you also need to assign a role to the user. You can select either the ‘ADMIN’ or ‘MEMBER’ role.
- In the Stack-level permissions section, assign stack-specific roles to these users.
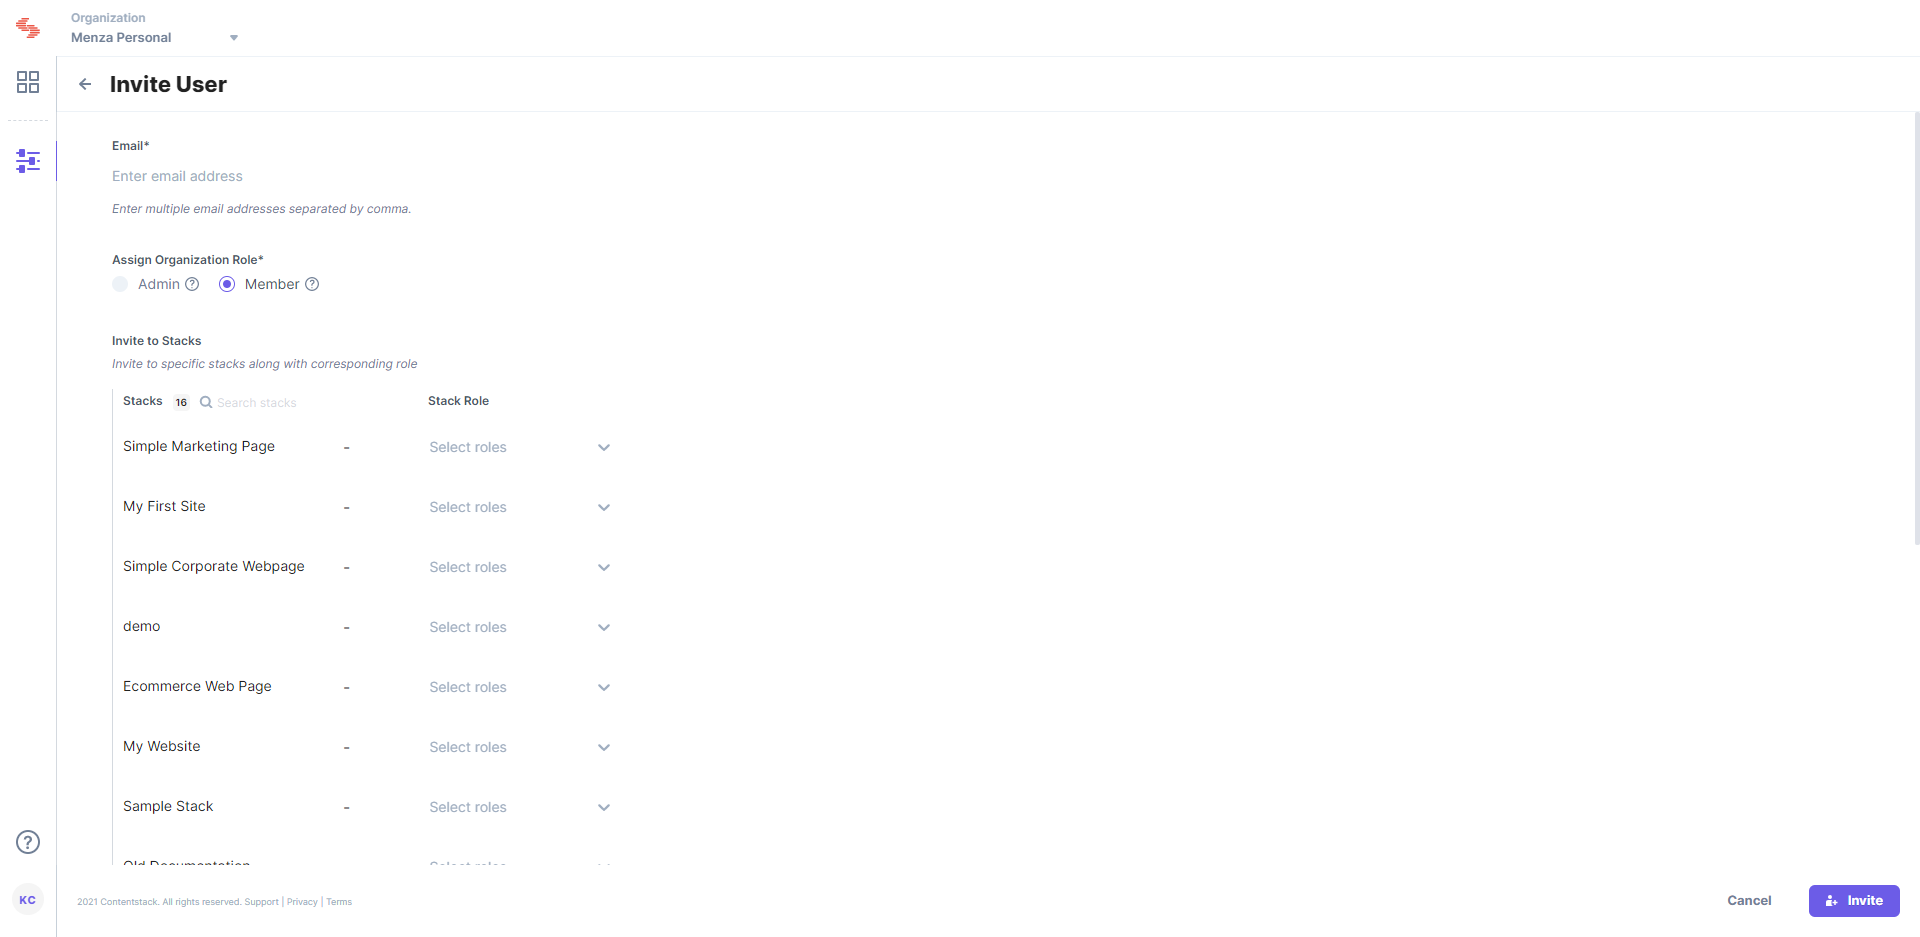
- Click on Invite to send the invitation to the user(s).
To get a list of all users in an organization, log in to your Contentstack account and perform the steps given below:
- Click on the “ORGANIZATION” drop-down on the header and select the Organization that you want to access.
- Click on the “Org Admin” icon on the left navigation panel.
- Click on the Users tab on the left-hand side of the page. This will open the Users Overview page that displays the list of users who belong to that organization.
To remove a user from an organization, log in to your Contentstack account and perform the steps given below:
- Click on the ORGANIZATION drop-down on the header and select the Organization that you want to access.
- Click on the “Org Admin” icon on the left navigation panel.
- Click on the Users tab. This will open the Users page that displays the list of users who belong to that organization.
- Click on the user that you wish to remove and click on the “Remove” icon
 .
.
In Contentstack, roles can be assigned at two level: Organization-level roles and Stack-level roles.
While inviting a user to an organization, you can assign Member and Admin roles. These roles define what you can do in the organization. Read more about organization roles.
When inviting a user to a stack, you can assign Developer, Content Manager or a custom role. These role define what a user can do within the stack. Read more about stack roles.
Yes, there are limits to your usage in an organization. These limits depend on the plan that you have subscribed for.
To get the plan details and usage of your organization, log in to your Contentstack account and perform the following steps:
- Click on the ORGANIZATION drop-down on the header and select the Organization that you want to access.
- Click on the “Org Admin” icon on the left navigation panel.
- Click on the Plan & Usage tab. This will lead you to the Plan & Usage page that will display the current usage and maximum allowed limit of the current plan’s features, which include stacks, assets, entries, content types, and users, API calls, and bandwidth.
To update a user role in an organization, log in to your Contentstack account and perform the steps given below:
- Click on the ORGANIZATION drop-down on the header and select the Organization that you want to open.
- Click on the “Org Admin” icon on the left navigation panel.
- Click on the Users tab on the left-hand side of the page. This will open the Users page that displays the list of users who belong to that organization.
- Click on the user whose role you wish to update. This will open the ‘User Details’ page.
- Reassign the respective organization roles for the user.
- Click on the Update button to update the roles of the user(s).
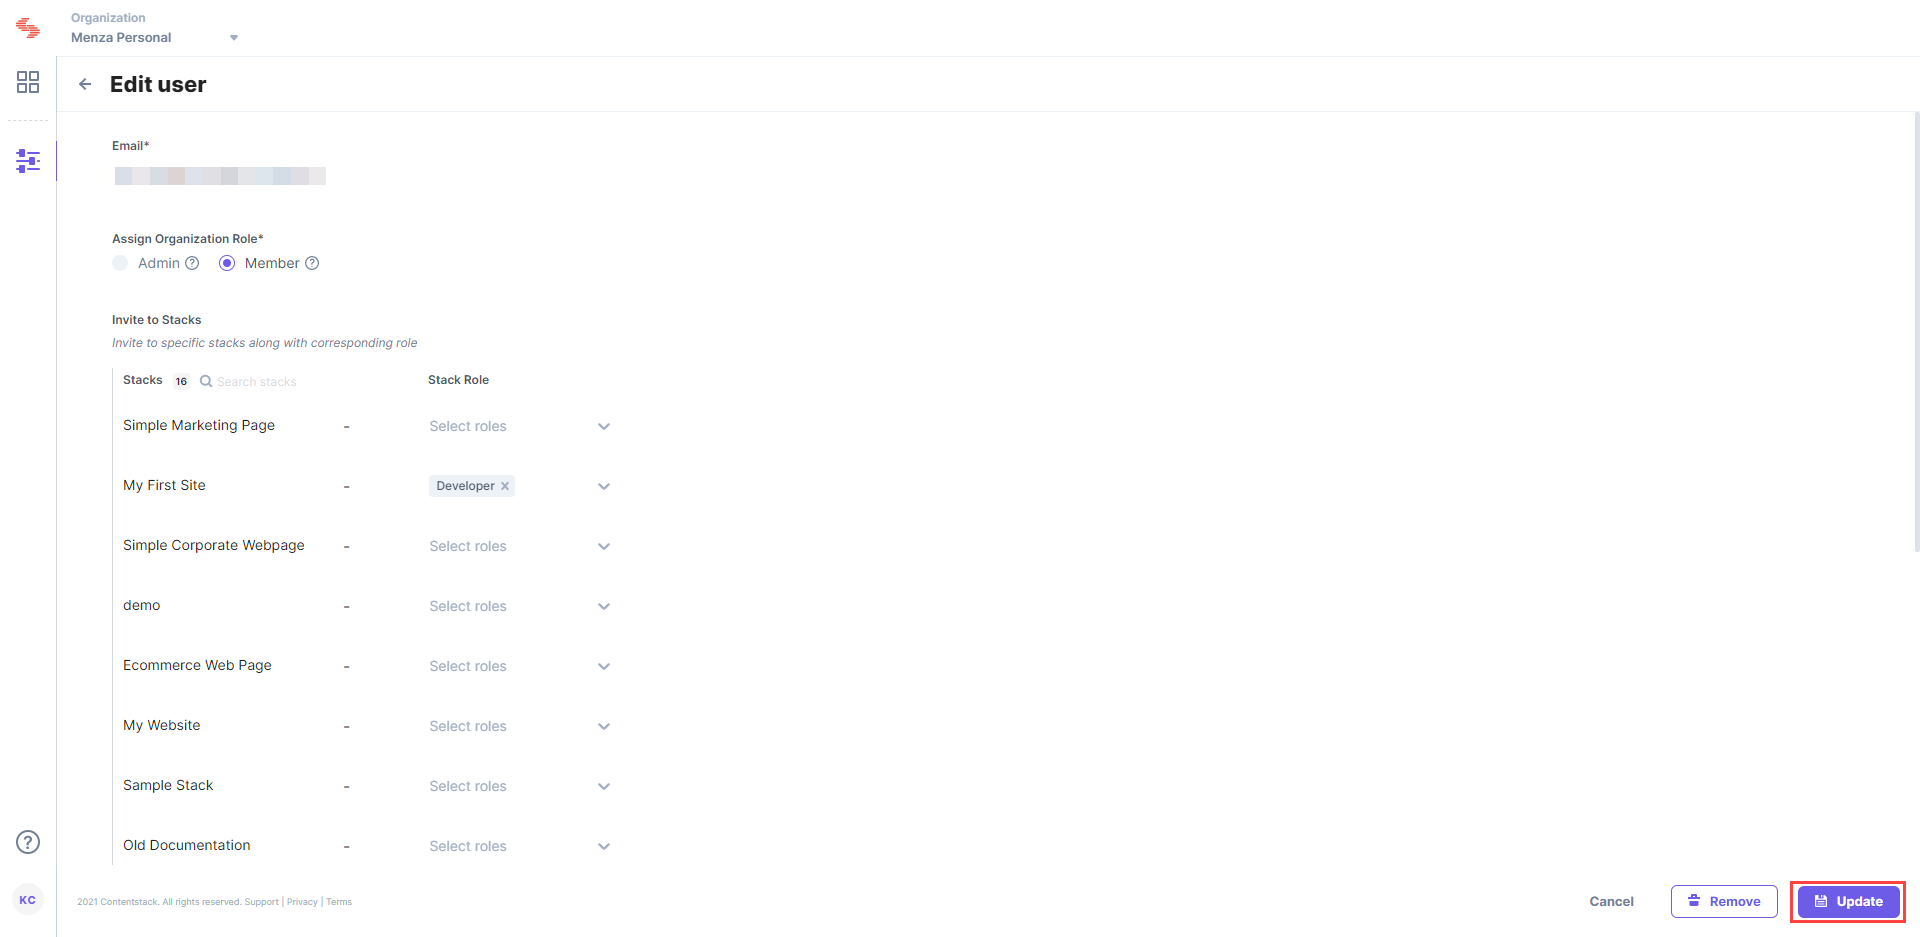
Note: You need to be the organization owner or be assigned the 'admin' role in order to update the roles of users in an organization.
To retrieve the organization ID of an organization, log in to your Contentstack account and perform the steps given below:
- Click on the ORGANIZATION drop-down on the header and select the Organization that you want to access.
- Click on the “Org Admin” icon on the left navigation panel.
- By default, the Organization Info section is opened which displays the name and ID of an Organization.
You cannot change the name of an organization. In order to do so, please contact our Support team.
Users who are assigned the ‘Admin’ role will be able to access and modify the organization information, invite users, view usage, etc. whereas users assigned the ‘Member’ role will not be able to access any Organization settings.
No, after a user has been removed from the organization, he/she will not able to access the stacks shared/created by them in the organization.
Personalize FAQs
Contentstack Personalize is a marketing solution that empowers organizations to effectively tailor their content, enabling them to tell the right stories to the right people at the right time. This sophisticated engine offers segmentation and A/B testing capabilities to streamline content optimization, ensuring maximum engagement and impact.
Segmentation: Users can easily segment their visitors into audiences based on various criteria, such as location, interests, purchase history, and more. Then segmented experiences use these audiences to target specific content to the desired audiences.
A/B Testing: The A/B testing experiences allow users to experiment with different variants of their content to optimize performance. Users can create the variants, distribute them, and measure conversion metrics to determine which performs best.
The traffic split remains locked while the test is running or paused. To update the distribution, create a new draft of the experience and direct traffic to your preferred variant. This restriction ensures content consistency while a specific version of the A/B test is running and maintains the statistical accuracy of your test results.
A user’s variant assignment remains consistent for the entire duration of the test. Each user is assigned to a variant based on their unique identifier (UID), stored as a cookie by the Personalize Edge SDK. This ensures that every user sees the same variant each time they visit, keeping test data accurate and results reliable. The assignment remains fixed unless the cookie is deleted, reset, or expires. If the cookie is cleared or expires, the user may be re-assigned to a variant during their next session. This design prevents re-bucketing and ensures precise conversion tracking throughout the A/B test.
Here are some possible use cases for Contentstack Personalize:
- Visitor Authentication: Showing different cards based on whether the visitor is an authenticated user or not.
- Product Promotion: Displaying promotional material for a product an existing customer has not purchased before.
- Geolocation: Showing different shipping options via cards depending on which is offered by the visitor's current selected store.
- A/B Testing: Testing different layouts, text, graphics, etc. for a campaign landing page to measure lead generation effectiveness.
- Device Recognition: Changing graphics displayed based on the device used by the visitor (mobile vs. web).
- UTM Parameters: Personalizing content for marketing campaigns to identify specific channels and content that drive the most engagement.
Content editors need a straightforward way to manage the nuanced and tailored experiences Personalize is designed to enable. Variants lays a foundational framework for Personalize to drive testing and personalization for different needs and use cases – ensuring you deliver the right story to the right audience at the right time. Variants enable content editors to intuitively access and edit all content variants directly within the entry editor of the CMS, minimizing content duplication and maximizing content reuse.
Pricing for Personalize is based on Data & Insights (Lytics) events, not on the number of personalization experiences or variants delivered.
What counts as an event:
- Each page view or tracked user action (such as clicks, form submissions, or video plays) generates an event.
- These events are stored in Lytics and form the basis for usage measurement.
How pricing is calculated:
- Your cost depends on the number of Data & Insights (Lytics) events collected, regardless of how many personalization rules or variants you use.
- The number of variants delivered does not impact pricing.
For GA, Personalize customers will have the Variants feature enabled in their CMS by default.
Personalize relies on our customers' data collection, so if they can track their visitors (as we can), then you can use Personalize. We drop a first-party cookie. So if the user clears their cookies and our customers are not specifically identifying the visitors, their audience will be reset to the base entry. If they fully block cookies, then they’ll only get base content, but they will always get something.
Variants are available out of the box for customers using our headless CMS and leveraging Personalize as well. Customers using our headless CMS but leveraging another personalization tool will still be able to leverage Variants with additional setup involved.
Variants are stack-specific. A Personalize project can connect to one stack at a time.
You can use the CLI or Personalize Management API to duplicate key components of a project, such as attributes, audiences, and experience data across stacks. Full project duplication without CMS stacks can be achieved by combining available API endpoints and custom scripts.
Attributes and Audiences
You can copy these programmatically using the Personalize Management API.
Experiences and Variants
- Use the Get All Experience Versions endpoint to retrieve detailed experience and variant data.
- Use the Get a Single Experience endpoint to return metadata such as the name, description, and type.
- Recreate experiences and variants in your target stack using the retrieved data.
Yes, you can create variants of a locale for all locales. Variants are per locale - a variant in one locale does not exist in another.
One-time setup of Personalize Edge SDK snippet on the front-end. Once the snippet is in place, marketers can set up personalization experiences without developers. It’s like no-code personalization.
When a user qualifies for more than one audience, content priority is determined by experience order and variant hierarchy.
Within an experience:
- Variants are mutually exclusive, so only one variant is displayed.
- The variant order determines which variant is selected if a user matches multiple variants.
Across experiences:
- Experiences are prioritized based on their order in the Experiences list (via Prioritize Experiences).
- If multiple experiences apply, all variant fields are applied unless there’s a conflict.
- When conflicts occur, the highest-priority experience (listed first) takes precedence.
This design ensures users receive consistent and predictable content, even when they belong to multiple audiences.
Customers who purchase Personalize gain access to the Data & Insights (Lytics) dashboard and audience builder, but with a narrower feature set compared to the full DXP/CDP plan.
Personalize (Web Personalization plan)
- Includes the Data & Insights (Lytics) audience builder, attributes, behavioral scores, and content affinities collected through the JavaScript tag. Designed for web personalization.
- Limited to one Cloud Connect integration and no Flows or external data integrations.
DXP/CDP (Full plan)
- Provides advanced audience-building capabilities using multiple data sources, behavioral scoring, complex segmentation logic, and omnichannel activation.
- Enables cross-channel experiences that extend beyond the web.
Personalize offers a strong foundation for audience targeting and web personalization. Teams can later upgrade to DXP for advanced, multi-channel personalization.
Multi-Armed Bandit is an adaptive traffic distribution strategy for A/B Test experiences. It automatically adjusts how traffic is allocated across variants based on real-time conversion performance, instead of keeping traffic split fixed for the entire test duration.
- In a standard A/B test, traffic distribution remains fixed, either equally split or custom, until the test ends.
- All variants start with equal traffic.
- Traffic is continuously optimized toward better-performing variants.
- Underperforming variants are gradually shown less often, but are not fully excluded.
With Multi-Armed Bandit:
- At least 1,000 total impressions, or
- At least 30 total conversions.
Until one of these thresholds is met, all variants continue to receive equal traffic. Once redistribution begins, Personalize continuously optimizes traffic allocation based on real-time performance.
To ensure ongoing learning, every Multi-Armed Bandit test reserves a minimum exploratory traffic share of 1%, which is split equally across all variants. This guarantees that each variant continues to receive a small amount of traffic, even if it is underperforming.
Once the threshold is met, traffic redistribution occurs every minute, as long as the system continues to receive impression and conversion events.
- All variants continue to collect data.
- Variants that initially perform poorly still have an opportunity to improve over time.
Multi-Armed Bandit optimizes traffic while the test is running, but it does not automatically stop or end an experience. You must manually manage the lifecycle of the experience, just like any other A/B Test experience.
Preview Sharing FAQs
The Share button in Visual Editor will be disabled if your Live Preview SDK version is older than v3.2.0.
To enable sharing functionality, make sure you’re using Live Preview SDK v3.2.0 or later.
Yes, you can share the preview link with multiple internal and stakeholders for collaborative feedback.
Yes, comments are threaded, allowing reviewers and content managers to reply within a discussion thread
Resolved comments can be accessed in the Resolved section within the Discussions panel.
Yes, you can reopen a resolved comment if further discussion is required.
Only the original commenter can delete their respective comment.
By default, the expiration period is 7 days, but it can be adjusted when generating the preview link.
No, you need to generate a new preview link after expiration.
Yes, both internal and external reviewers receive email notifications if they are tagged in new comments.
Preview Sharing allows both internal and external stakeholders to review content and leave comments anywhere on the page, while Visual Editor Discussions are intended for internal teams to provide field-level comments focused on design and structure directly within Contentstack.
Releases FAQs
You can update all entries and assets within a release to their latest versions using the Update release items to their latest versions option.
This warning indicates you're trying to add an entry to a release that was created before the bulk add to release feature was enabled. To resolve this, clone the older release into a new one that supports nested references, and then add the entries to the cloned release.
No, you cannot update the items of a locked release. However, you can unlock a release and update the items to their latest version.
Yes, you can update release items to their latest versions to update the unlocalized release entry to its localized version.
If you update the release to their latest versions, all the entries within the release will get updated to their latest versions. However, if an entry is in an in-progress state, it will return an error during the publishing operation.
No, you cannot update specific release items to their latest versions individually. You need to create a separate release to update specific items individually.
In Stack Bulk Task Queue, you will see the items added to the release. Details such as items removed from release and who locked or unlocked the releases are not visible in the Stack Bulk Task Queue.
Yes, you can duplicate a release by cloning a release. This will create a new release with the same content as the original release.
Release status will be changed to deployed once the deployment is completed. You can also check the deployment status in Publish Queue.
Role Mapping
To add new IdP users to your SSO enabled organization, just add them to any of your IdP group or role (in your IdP settings) that is mapped with Contentstack roles. They can then directly login to Contentstack (via SSO) with the corresponding permissions.
If you want to provide a different set of permissions to some users, create a new group/role in your IdP, and add users to this group. Subsequently, add the mapping for this group in Contentstack SSO user settings.
To invite external users, disable Strict Mode and invite them as usual from Contentstack from Organization Settings. Remember to select the Allow login without SSO checkbox.
Yes. Only the roles received from your IdP for the users will be honored. This means that, on enabling IdP Role Mapping, the existing roles assigned to the users will be overridden by the roles assigned to IdP groups. This, however, is not applicable for external users (i.e., users who log in without SSO to your SSO-enabled organization).
Please note that there is no way to revert the changes that were overridden by your IdP roles. The roles that were assigned to users prior to enabling IdP Role Mapping are erased.
If you disable IdP Role Mapping, Contentstack no longer honors roles (and permissions) returned by your IdP. There are, however, no changes to the existing permissions of the users in Contentstack. Users continue to maintain the permissions that they had.
However, subsequent to disabling IdP Role Mapping, role management can be done only through Contentsatack’s Users and Roles settings.
Search FAQs
Yes, you can use the Quick Search feature to search for entries and assets from any location within your stack.
Yes, you can share your saved views with other collaborators within the stack.
Additional Resource: Refer to our Share Saved Views document for more information.
Only users with Edit access can update a saved view. Users with View access can modify the view, but must save it as a new one.
You will receive a notification via the bell icon when someone shares a view with you.

Yes, you can select multiple users or roles in the Share View modal and assign appropriate permissions.

No, saved views can only be shared within the same stack.
Popular Views are predefined sets of filters and settings tailored for common search scenarios, such as All Entries or Not Published.
Saved Views are custom views that you create and save based on your specific search settings. These views can be accessed later for repeated use.
No, Popular Views are predefined and cannot be changed or updated. However, you can modify the results generated by a popular view and save them as a new Saved View.
To customize the displayed filters, click the Manage Filters button at the bottom of the left panel. Then, select the desired filters and rearrange them according to your needs.
Additional Resource: Refer to our Use Filters document for more information.
Yes, you can.
Additional Resource: Refer to our Advanced Search document for more information.
Yes, you can edit the title of your saved view and update an existing view with additional queries.
Additional Resource: To learn more about modifying views, refer to our Use Saved Views document.
Yes, you can search for custom fields by selecting the Specific field option from the dropdown in the search bar.
Additional Resource: Refer to our Basic Search document for more information.
You can view localized entries using the Language filter, which narrows the entries list to a specific language. This filter is accessible from the Filters panel on the left or by clicking the “Filter” icon in the Language column of the entries table.

Additional Resource: For more information, refer to our Get Localized Entries documentation.
Security FAQs
Contentstack accounts are password protected. To make them more secure, we have two-factor authentication that lets you add an extra layer of security.
In case you forget your password, you can reset it again by performing the steps given below:
- Click the Forgot Password? link on the login page.
- On the Forgot your Password? page, enter your email ID and click the Send Instructions button. You will receive an email containing the password reset page link.
- On the Reset Password page, enter the new password and click the Reset Password button.
Now you can log into your account using the new password.
To reset your Contentstack user account password, log in to your Contentstack account, and perform the following steps
- Click your profile located at the top-right corner of the page, and select Security. This opens the Account Settings page.
- Under the Change Password section, enter your old password and new password, confirm it, and click Update to update your password
Now you can log in to your account using new password.
In case you forget your password, please contact our Support team.
To change the registered phone number associated with your Contentstack account, log in to your Contentstack account using existing phone number, and perform the following steps:
- Click your profile located at the top-right corner of the page, and select Security. This opens the Account Settings page.
- Under the Two-factor Authentication section, click the Reset your phone number link.
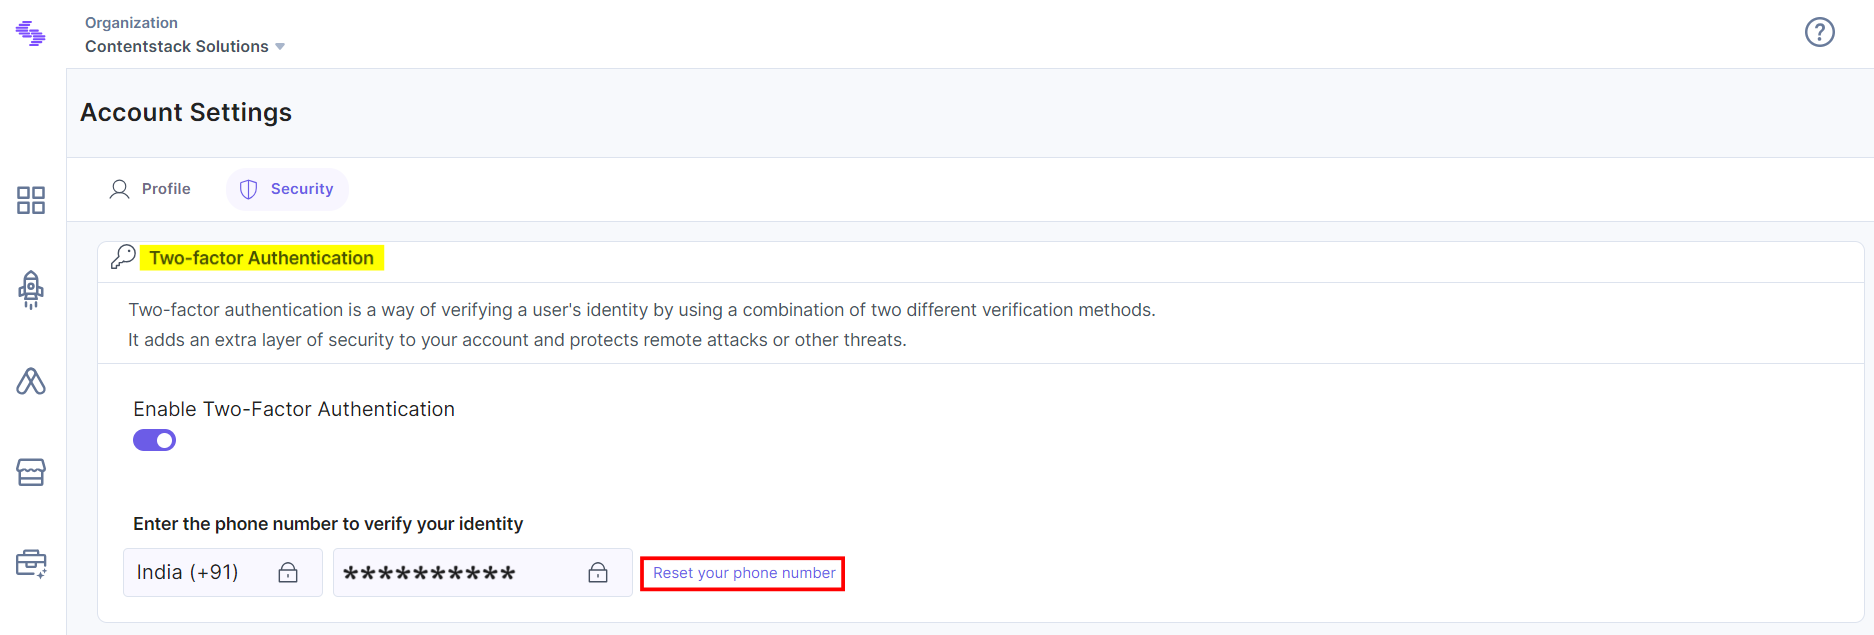
- Enter the new phone number and click Reset.
- Select a method to verify your phone number either using the Authy app or via text message, and perform the verification process as performed while enabling two-factor authentication.
If you do not have access to the phone number that was used for 2FA registration, you will need to contact our Support team for further assistance.
For any enterprise, data is of utmost importance and it's crucial to protect it. So, it's very important to have a proper disaster recovery plan in place to cover all contingencies. To do so, it's imperative that we set in place a system that will considerably reduce the damages caused by a fire, theft, flooding, etc, by backing up our data at appropriate locations.
Apart from natural disasters, backing up files can protect your content against accidental loss of user data, database corruption, and hardware failures. It’s our job as service providers to make sure that backups are performed and in a secure location.
We have taken this into account and have come up with the required measures to create the right plan for you.
Let’s see them in detail.
- Region and Availability Zones
We leverage AWS to deploy Contentstack in multiple availability zones so that if one of the instances in an availability zone fails, the requests will be routed to one of the healthy instances. If an availability zone fails altogether, the requests will be routed to the working availability zones. Contentstack won't face any downtime.
- Highly Available Architecture
Contentstack has a network architecture that is designed for maximum reliability and uptime, and offers up to 99.95% Service Level Agreement (SLA) for its services, just as promised. The infrastructure consisting of highly-available, redundant number of data centers ensures minimum service interruption due to natural disasters, hardware failures, or other incidents.
- CDN and Caching
Our highly efficient CDN ensures faster delivery of content irrespective of the destination with the help of nodes that are spread all around the world. Also, it allows caching – keeping copies of content that were requested earlier thus making it available for future requests.
- Data is constantly backed up
We use a Cloud-based backup solution to backup our database. For every request made, your data is constantly backed up.
Single Sign-On (SSO) FAQs
To enable SSO, you need to meet these two conditions:
- You must be the owner of the organization
- SSO must be a part of your Contentstack plan
If you meet these two conditions, you can set up SSO for your organization by following the Set up SSO guide.
When a user is included in an SSO-enabled Organization, he/she accesses the Organization through SSO using their IdP credentials instead of their Contentstack credentials (which they might not have created). If, later on, SSO is disabled for the Organization, the user will not be able to log in to Contentstack through IdP. However, the user is still part of the Organization.
To access the same organization, the user will have to perform the following steps:
- Open Contentstack’s login page and click the Forgot Password? link.
- Enter the email address and click SEND INSTRUCTIONS.
Now, the user will receive the password reset instructions on the email address. The user needs to follow the instruction and login to their Contentstack account.
An organization owner can always use his Contentstack credentials to log in to Contentstack and make relevant changes, irrespective of whether SSO has been enabled or not.
If the IdP experiences system fails, then the owner can perform the following steps:
- Log in to the Contentstack account.
- Go to Organization settings page and open the Single Sign-On tab, go to User Management, disable Strict Mode, and grant access to the required user(s) by checking the Allow Access without SSO option.
These users will now be able to access the organization using their Contentstack credentials, instead of through SSO (IdP credentials).
However, if the user does not have a Contentstack account, he/she will receive an email with the account setup instructions to create an account in Contentstack. Post setting up their account, they will be able to access the Organization content.
To sign in to an SSO-enabled organization in Contentstack, perform the following steps:
- Open the login page of Contentstack and click the Log in via SSO button.
- Then, enter your organization SSO Name, and click on Log in via SSO button. This will open your corporate IdP login page.
Note: You must have received the SSO name in your stack or organization invitation email. If you do not know your organization SSO Name, contact your organization owner or admin.
- Finally, sign in to your Contentstack account by entering your IdP login details.
To invite users that are not in your IdP, perform the following steps:
Log in to your Contentstack account, go to the Organization Settings page and click on Single Sign-On tab, open the User Management tab, and disable the Strict Mode.
- Then, go to the Users tab located at the header, and invite users.
- While inviting, select the Allow Access without SSO checkbox. This will allow the invited user to access the SSO-enabled organization through Contentstack credentials.
No. You do not have to send an invitation again since the existing users continue to remain part of the organization, even after SSO is enabled.
Nothing changes for the existing users, except that they are required to sign in using SSO, instead of normal Contentstack username/password login. However, if any existing user is not part of your identity provider, you may have to disable Strict Mode and update the user in Contentstack by assigning permission to Allow Access Without SSO.
Adding encryption to SAML attributes adds another layer of security, ensuring that personal or corporate information is not compromised.
Your SAML attributes such as email, first name, and last name that are mapped with your IdP are encrypted. Learn more about SAML encryption.
You need to enable SAML encryption in Contentstack and your IdP settings.
To enable SAML encryption in Contentstack, follow the steps given below:
- Log in to your Contentstack account, go to the Organization Settings page, and click on the Single Sign-On tab.
- Click on the IdP Configuration tab.
- Check the Enable SAML Encryption toggle, and click on Save.
Provide the following details in your IdP to enable SAML encryption:
- In the Single Sign-On Url field, provide the ACS URL that was generated for your organization in Contentstack.
- Use Contentstack’s Entity ID (generated in Step 1) in your IdP in Audience URI, SP Entity ID, SAML Issuer ID, or fields similar to these.
- In the NameID Format, select or enter Email Address. This defines the parameter that your IdP should use to identify Contentstack users.
- [Optional Step] If you want to encrypt your SAML attributes, you need to enable SAML encryption in your IdP and upload the Contentstack Public Certificate.
Stack FAQs
Yes, you need a Stack to start working with Contentstack. All content, including content types, entries, and assets, is stored within a Stack.
After creating the stack, you are automatically redirected to it. You can now start adding content and managing assets.
Yes, the stack Owner or Admin can edit a stack’s details.
Deleting a stack removes all associated entries, assets, and settings. If you have accidentally deleted a stack, the Contentstack Support team can assist with data restoration. For further information, refer to the Restore Deleted Content document.
To find the Stack’s API key, log in to your Contentstack account and perform the following steps:
- Go to your stack and click the “Settings” icon in the left navigation panel or use the shortcut key “S” (for Windows and MacOS users).
- View the stack’s API Key in the API Credentials section.
You can use it to authenticate and make API requests.
No, you cannot change the Master Language after creating the Stack. However, you can add multiple languages to localize your content.
Once you transfer the ownership,
- The new owner gets full control over the stack.
- You lose Stack Owner privileges but remain a user.
Yes, you can track all changes using Audit Logs.
Yes, you can duplicate stacks. You can also use Branches to create multiple copies of your stack content.
Support FAQs
For any help related to Contentstack, please contact us either by using the in-product chatbox or by emailing the Support team.
Get in touch with us through our in-app chat box.
To do this, log in to your Contentstack account and click on the Help (Question Mark ‘?’) icon on the top right corner of the page.
Click on Chat with Support to initiate a conversation with our Support team.
You can also reach out to us at support@contentstack.com via email.
If you are using our app's classic UI then, log in to your Contentstack account and click on the Help (Question Mark ‘?’) icon on the top right corner of the page.
Click on Chat with Support to initiate a conversation with our Support team.
You can also reach out to us at support@contentstack.com via email.
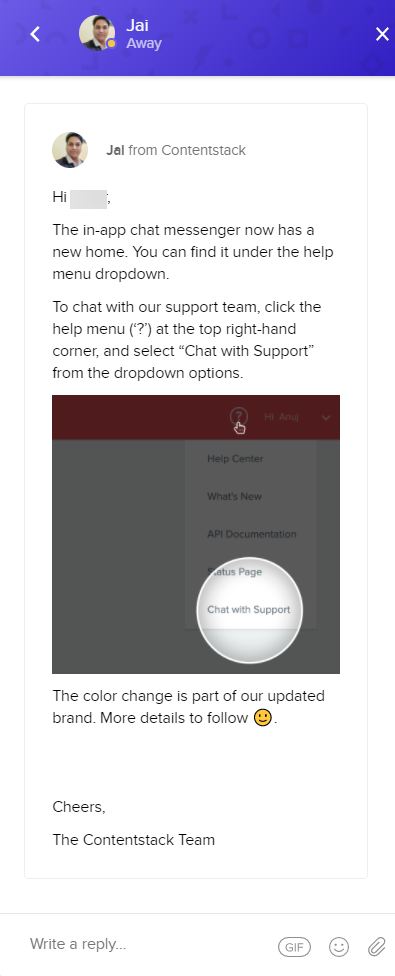
If you find any bug in our product or have any suggestions, please contact our support team via the in-product chatbox or email us at support@contentstack.com.
We use cloud-based backup solutions for backing up our database.
Our databases are stored in multiple regions. As a result, in case if one region is affected by any disaster, the data stored in other regions serve as backups.
If you wish to create content backups at your end, you can use our Webhooks. Webhooks trigger whenever an event happens (such as entry created, content type deleted). The data is then sent to an external URL that you specify in webhooks.
System for Cross-domain Identity Management (SCIM) FAQs
Here’s a step-by-step guide that explains how to enable SCIM for your Contentstack organization and manage user provisioning through OneLogin as your identity provider (IdP).
To enable SCIM, however, the following things need to be in place:
Currently, we support SCIM for OneLogin, Microsoft Azure AD, and Okta Native apps. We plan to add support for other IdPs soon.
The endpoint to edit user details is not supported. Considering that users can be members of more than one organization in Contentstack, we do not support an organization to edit user details such as their name or email address.
However, to change users’ organization role, you can use the Contentstack app and follow the steps mentioned in this Change Organization Role of Existing Users guide.
Contentstack supports SCIM 2.0.
If you deprovision users via IdP, they will no longer be a part of the respective Contentstack organization. However, those users will still have access to the Contentstack account.
If a user belongs to multiple groups, he/she will get the highest order of permission on the organization and stack(s). For example, user1 belongs to group1 and group2, and these groups have the following set of permissions:
Group1:
“Developer” role in all stacks
Group2:
“Content manager” role in all stacks
In this case, user1 will be the admin of the organization and have the “Developer” and "Content manager" roles in all the stacks.
Taxonomy FAQs
The taxonomy feature is a global module that will be available across all branches in a stack.
Taxonomy is the higher-level module that contains terms which are the main pieces that help classify entries. For example, if you want to classify your entries based on regions, you can create a taxonomy called Regions and have terms within it such as North America, Europe, Australia, India, etc.
Learn more about creating taxonomy and creating terms.
The modules currently available in Contentstack will not be affected. You can create taxonomies as per your requirements, and simply add them to the content types, and classify the entries by adding terms.
If you delete a taxonomy, its association with all the content types to which it was added is lost. Also, the terms within the taxonomy also lose their association to the entries.
Note: Once deleted, you can restore a taxonomy within 14 days.
If you delete terms within a taxonomy, all its child terms are deleted as well. As a result, the entries to which these terms were linked will lose their connection.
Note: Once deleted, you can restore a term within 14 days.
Terms serve as fundamental elements for categorizing entries. You can incorporate multiple terms within a taxonomy, organizing them in a hierarchical structure. Subsequently, you can associate these terms with entries.
Learn more about creating terms and adding terms to entries.
Certainly, you have the flexibility to rearrange and shift terms within a taxonomy as needed, allowing for a more organized and structured classification.
Learn more about moving terms.
You can retrieve information for all or a specific taxonomy. You can also create and delete taxonomies using the API requests.
Refer to the Taxonomy collection in our Content Management API documentation for more information.
You can retrieve information for all or a specific taxonomy via the API requests.
Refer to the Taxonomy collection in our Content Delivery API documentation for more information.
Yes, we have introduced the following enhancements to the Content Management API requests:
Timeline FAQs
Timeline is a feature that allows content managers to visualize how their website will appear once scheduled updates are made live. It provides a comprehensive view of upcoming content transformations.
Timeline works by enabling users to set specific dates and times for content updates. It then allows them to preview these changes in a simulated environment, ensuring everything looks as intended before going live.
Learn more about Preview Content across a Timeline.
Yes, Timeline allows you to check the appearance of content editions without the need to schedule them initially. This flexibility helps in refining content before committing to a publishing schedule.
Learn more about Previewing Entries.
Yes, Timeline supports various types of content updates, including text changes, image updates, layout adjustments, and more. It offers a holistic preview experience for all scheduled changes.
By using Timeline, you can streamline your workflow by ensuring that updates align with your site's design and user experience goals. It also helps in coordinating content releases and maintaining consistency across scheduled changes.
Learn more about Preview Content across a Timeline.
The key differences between Timeline and the Release Preview app in Contentstack lie in their implementation, capabilities, and integration within the Contentstack ecosystem.
Implementation:
- Release Preview App: Visualizes future changes before a scheduled release, requires marketplace integration.
- Timeline: Core feature with backend support for a seamless experience.
Capabilities:
- Release Preview App: Limited to specific release dates.
- Timeline: Preview or compare the website for any future date.
Integration:
- Release Preview App: Requires separate installation and setup.
- Timeline: Built-in, no extra setup needed.
Timeline offers better functionality, flexibility, and integration than the Release Preview App.
Note: The Release Preview app is no longer supported and has been removed from the Contentstack marketplace.
- Core Integration: No extra installations required.
- Backend Support: Smoother and more reliable.
- Enhanced Flexibility: Preview any future date.
- Comprehensive Comparison: Compare across different future releases/scheduled publishes.
- Future-Proof: Regular updates and improvements.
Note: The Release Preview app is no longer supported and has been removed from the Contentstack marketplace.
Yes, Timeline supports previewing content across various environments, allowing you to visualize how updates will appear before they go live.
Yes, Timeline supports previewing content in multiple languages, helping you ensure consistency and accuracy across localized versions of your website.
Users and Roles FAQs
Yes, you can add users to add and edit content for your website. For that, you need to share the relevant stack with other users.
You can add an unlimited number of users to a stack.
Yes, you can control access to content for users and groups by assigning them specific roles. We recommend you to go through the Roles section in order to achieve this functionality.
No, the developer can remove only those users whom he/she has invited to the stack.
Only the owner of the stack has the right to delete a stack.
The Custom Role gives you the provision to apply permissions at entry, field, and asset levels.
No, each stack can have only one Owner, who has complete rights to the content and settings of a stack. In addition to that, the Owner has the right to delete a stack as well as transfer the ownership of the stack to another user.
Yes, both the roles are different and the differences that are mentioned in the Stack Admin vs Stack Developer section.
Users with the Custom or Content Manager role cannot view the full Stack settings, but they may have access to limited or specific settings, depending on their assigned permissions.
Yes, there are certain limitations in Roles. They are as follows:
- Title: The title of a role should be between 1 and 160 characters.
- Description: The description of a role should not exceed 320 characters.
- Permissions Limitations: When creating a custom role, you cannot add individual components beyond certain limits in permissions. The maximum allowed limit of components (Content Types, Entries, Assets, Locales, Environments) within the permissions of a custom role is 100.
Visual Editor FAQs
Visual Editor is an intuitive feature that allows content creators to edit, manage, and preview web pages in real time. It includes enhanced collaboration, automation options, and advanced field editing with modifiers and AI tools.
Learn more about Visual Editor.
Yes, you can modify text, images, and other components directly on the canvas using the toolbar. For advanced fields or structured edits, you can use the Form panel. All updates appear in real time on the preview, giving you immediate visual feedback.
Learn more about editing pages.
Yes, you can rearrange modular blocks and field instances within the page layout. Use the arrow controls on the canvas to move components vertically or horizontally based on their structure.
Learn more about editing pages.
To set up Visual Editor, ensure that your organization has the Live Preview and Visual Editor plans enabled. Additionally, you need to have a configured live preview setup.
Learn more about setting up Visual Editor.
The Form panel lets you edit content directly alongside a live preview of your webpage. It’s the fastest way to update content and see those changes in real time, without switching tabs or losing context.
You can use the breadcrumb trail at the top to navigate between parent and referenced entries. You can edit referenced entries inline without opening a new tab, making the editing experience seamless and efficient.
These features streamline content updates and help maintain visual and structural context throughout the editing process.
Once you have made your changes in Visual Editor, click Save to save your edits. Then, click the Publish button to see all the modified entries, where you can choose to bulk publish them at once.
Learn more about Publishing a Page.
Yes, the Discussions panel allows team members to leave comments and feedback directly on any fields or components within a page. You can also view active discussions, resolved feedback, and the timeline for all discussions across web pages.
Learn more about Discussions.
The Audiences feature in Visual Editor allows you to preview personalized content by simulating how it will appear to different audience segments. Using specific filters, you can preview and customize the page for a targeted set of users, ensuring tailored content reaches the right audience.
Learn more about Audiences.
Visual Editor offers a WYSIWYG (What You See Is What You Get) interface, enabling you to edit content directly on the canvas of your web page. This allows for a more intuitive and immersive experience, as you can see how your changes will look in real time while editing the layout and content together. It also supports field modifiers and sidebar extensions like Automate and AI Assistant within the canvas, allowing you to work across multiple entries in a visual environment.
In contrast, the traditional entry editor focuses on editing individual fields of entries in a structured form view. It requires you to modify text, images, and other components for one entry at a time, without a live preview of the overall page.
While the traditional editor is effective for detailed content management, Visual Editor provides a comprehensive view, making it easier to understand the impact of your changes as you go.
Learn more about Visual Editor.
Yes, use the Automate app from the right sidebar to trigger automations directly within Visual Editor. You can streamline tasks like updating content, triggering workflows, or applying translations. All changes appear instantly on the canvas, so you can see the results in real time.
Learn more about Automate.
When working on a page with multiple entries, Visual Editor displays contextual metadata, such as content type, field name, and reference path when you hover over a field. This helps you quickly identify the associated entry and ensures you update the correct content.
Yes, you can access AI-powered field modifiers directly on the canvas. You can open a draggable modal, use the AI Assistant to refine field content, and view your updates in real time without opening the Form panel.
Webhooks FAQs
In the case where a third party services is down during a webhook POST call, you won't receive any notifications. But, users have the provision to retry the webhook operation. You can check webhook logs to view the failed requests and can retry them.
When a release is deployed, it triggers the webhooks for the individual items (entries and assets) of the release, if such webhook events are defined.
In such cases, a source key is added to the webhook data of an event that is triggered via a release. This key contains the JSON data of the source event (type, title, and UID).
Here's what is added to the webhook data:
"source": {
    "type": "release",
    "title": "{{release_title}}",
    "uid": "{{release_uid}}"
},You can trigger a webhook for several events as listed in the Webhook Events article.
Yes, you can filter the webhook execution details returned in the API response based on a specific date range. To do so, pass from and to as query parameters while running the Get executions of a webhook API request. You need to provide the dates for both these parameters in ISO format.
For instance, to specify December 8, 2017, you can provide the following value in ISO date format:
2017-12-08T00:00:00.000Z
Contentstack supports several authentication methods for webhooks including HTTP Basic Auth, OAuth 2.0 Client Credential, and Bearer Token. Each method offers a different level of security and integration flexibility to suit various use cases.
Note: The Basic Auth method is available by default. To enable the OAuth 2.0 Client Credential authentication method for your organization, please contact our support team.
If an OAuth token expires, the webhook should return a status code of 4xx (typically 400, 401, or 403) with specific error messages like invalid_request, invalid_token, or insufficient_scope. Contentstack will then request a new token and retry the webhook request.
You can specify additional parameters required by your OAuth authorization server using the Request Query Parameters field in the webhook settings. This allows you to provide context or instructions in key-value format.
Note: The request query parameters will be appended to the access token URL.
Workflows FAQs
You can create a minimum of 2 and a maximum of 20 Workflow stages.
Yes. You can add more than one workflow for a content type, as long as each workflow is associated with a distinct branch.
First, you need to add all the stages at once, and later on you can browse through Stage transition rules to select a specific stage under the Next available stages section.
No, you cannot add more than one publish rule for a content type.
Yes, workflows can be integrated with publish rules for automated publishing. You can set up rules to automatically publish content when it reaches certain stages of the workflow. For more information, refer to the publish rules documentation.
Currently, Contentstack does not support cloning or copying workflows directly. You need to manually create a new workflow and replicate the steps from the existing one.