

.svg?format=pjpg&auto=webp)
.svg?format=pjpg&auto=webp)
.png?format=pjpg&auto=webp)


.png?format=pjpg&auto=webp)
Create New JSON RTE Plugin
In this guide, we will learn how to develop a new JSON Rich Text Editor plugin from the ground up.
Note: When working within specific branches, plugins added or created will be available only within that particular branch. For example, you are working within the development branch, and you add new JSON RTE Plugins to this branch. These JSON RTE plugins will be available only within the development branch. Refer to our Branch-specific Modules document for more information.
Prerequisites
- Node.js version 8 or above
Building Your JSON RTE Plugin
Here is an overview of the steps involved in building a customized JSON RTE Plugin and adding it to your stack:
- Clone Boilerplate GitHub Repository
- Install Dependencies
- Add Custom Visuals for the JSON RTE Plugin
- Test the JSON RTE Plugin
- Build the JSON RTE Plugin
- Host the Custom JSON RTE Plugin
- Add JSON RTE Plugin to a Stack
- Use Custom JSON RTE Plugin in Content Types
Note: JSON RTE Plugins work on SystemJS. The boilerplate is configured to build the output in SystemJS format.
Clone Boilerplate GitHub Repository
Create a clone of the boilerplate GitHub repository that contains the template needed to create a JSON RTE plugin using the Contentstack app SDK. In the cloned boilerplate repository, you’ll find the src/plugin.tsx file that contains the setup code for initializing the JSON RTE plugin.
Here’s how the code within the plugin.tsx file looks:
/** @jsx jsx */
import { jsx } from "@emotion/core";
import ContentstackSDK from "@contentstack/app-sdk";

export default ContentstackSDK.init().then(async (sdk) => {
    const extensionObj = await sdk["location"];
    const RTE = await extensionObj["RTEPlugin"];

    return {};
});
Install Dependencies
Run the following command to install the dependencies:
npm install
Add Custom Visuals for the JSON RTE Plugin
Once you have cloned the GitHub repository, you can add the visual part of your plugin (the tile, icon style, displayOn, and element type) to the template code inside the plugin.tsx file. These parameters can vary for various plugins.
The Highlight plugin source code is as follows:
import React from 'react'
import { Icon } from '@contentstack/venus-components'
import ContentstackSDK from "@contentstack/app-sdk";

export default ContentstackSDK.init().then(async (sdk) => {
    const extensionObj = await sdk["location"];
    const RTE = await extensionObj["RTEPlugin"];
    if(!RTE) return ;

    const Highlight = RTE('highlight', () => ({
        title: 'Highlight',
        icon: <Icon style={{padding: '0 6px'}} icon="Edit" size="original" />,
        render: (props:any) => {
            return <span style={{background: 'rgba(251, 243, 219, 1)'}}>{props.children}</span>
        },
        displayOn: ['toolbar'],
        elementType: ['text']
    }));

    return {
        Highlight
    };
});
Test the JSON RTE Plugin
To test your JSON RTE plugin, run the following command:
npm start
Now, your plugin is up and running on the localhost at https://localhost:1268/plugin.system.js. You can use it to test your plugin.
Note: Open the plugin URL in any browser to check the code. If your plugin code doesn't load, you can click on Advanced or Show Details and go to the URL.
Build the JSON RTE Plugin
Once your custom plugin code is ready, you can build the JSON RTE plugin using the following command:
npm run build
Execution of this command generates a dist folder in your working directory.
Host the Custom JSON RTE Plugin
There are two ways to host your custom JSON RTE plugin code:
- Host Externally: This method is suitable if you do not want to host the custom JSON RTE plugin code on Contentstack but on an external server. In this case, you can host the dist/plugin.system.js file on any static file server. You can use this hosted file URL for your JSON RTE plugin.Note: If you are hosting your plugin on an external server, you need to make your plugin accessible to Contentstack. For that, you need to add the region-specific URL in your allowed origin list to avoid CORS issues:
- AWS NA region - https://rte-extension.contentstack.com
- AWS EU region - https://eu-rte-extension.contentstack.com
- Azure NA - https://azure-na-rte-extension.contentstack.com
- Azure EU - https://azure-eu-rte-extension.contentstack.com
- GCP NA region - https://gcp-na-rte-extension.contentstack.com
- GCP EU region - https://gcp-eu-rte-extension.contentstack.com
- Host on Contentstack: Through this method, you can host your custom JSON RTE plugin code on Contentstack. To do this, you need to upload the dist/plugin.system.js file to Contentstack’s Assets repository. Now, you can use the file URL for your JSON RTE plugin.
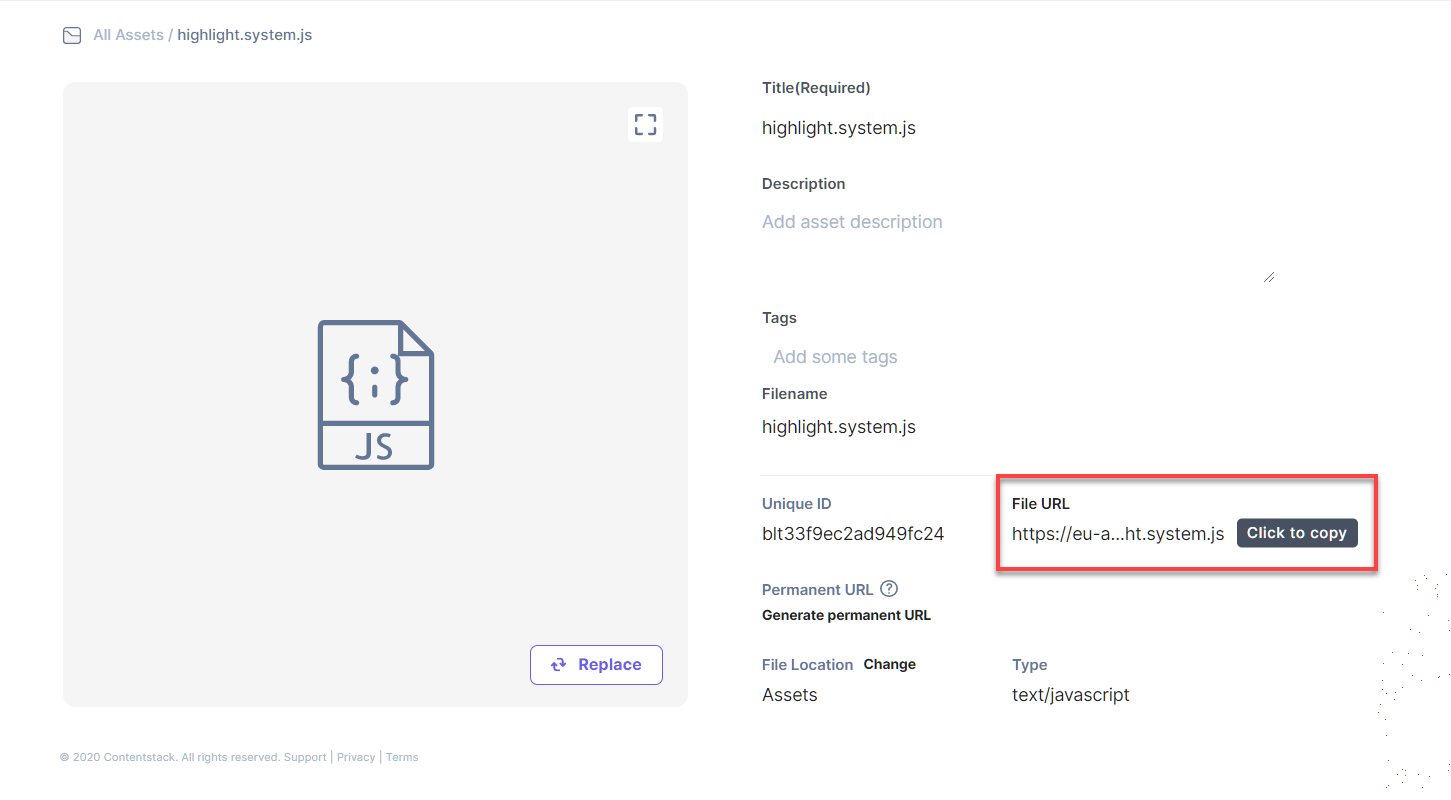
- Host Externally: This method is suitable if you do not want to host the custom JSON RTE plugin code on Contentstack but on an external server. In this case, you can host the dist/plugin.system.js file on any static file server. You can use this hosted file URL for your JSON RTE plugin.
Add JSON RTE Plugin to a Stack
To add the custom JSON RTE Plugin extension, log in to your Contentstack account, and perform the following steps:
- Go to your stack, click the “Settings” icon on the left navigation panel, and select Extensions.
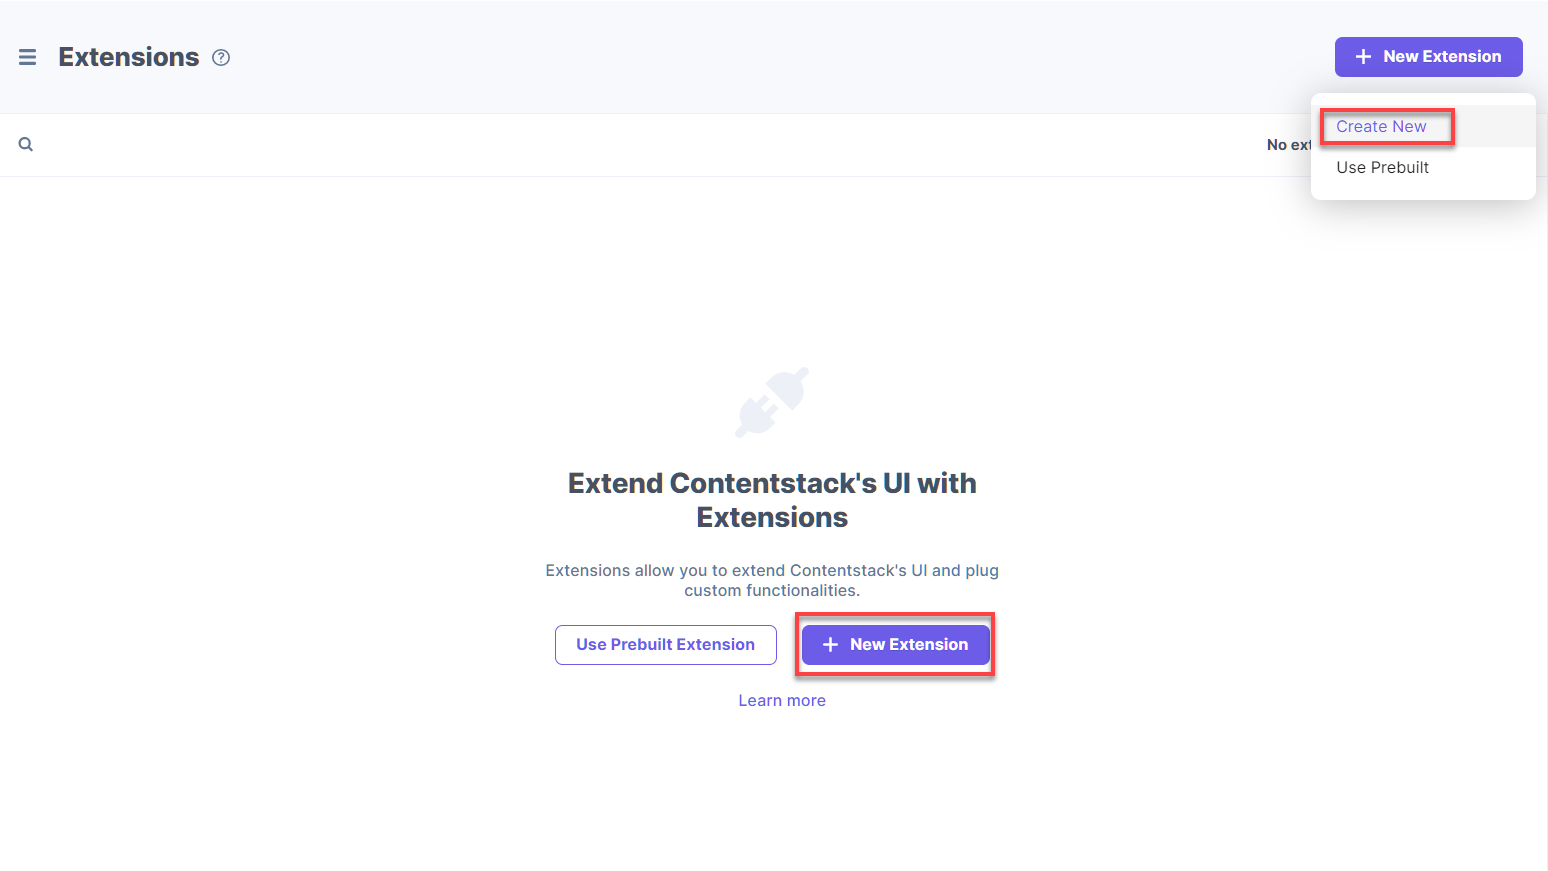
- On the Extensions page, click on the + New Extension button at the top-right corner of the page, and select Create New. If you have not added any extensions in the stack, click on the + New Extension link as shown below.
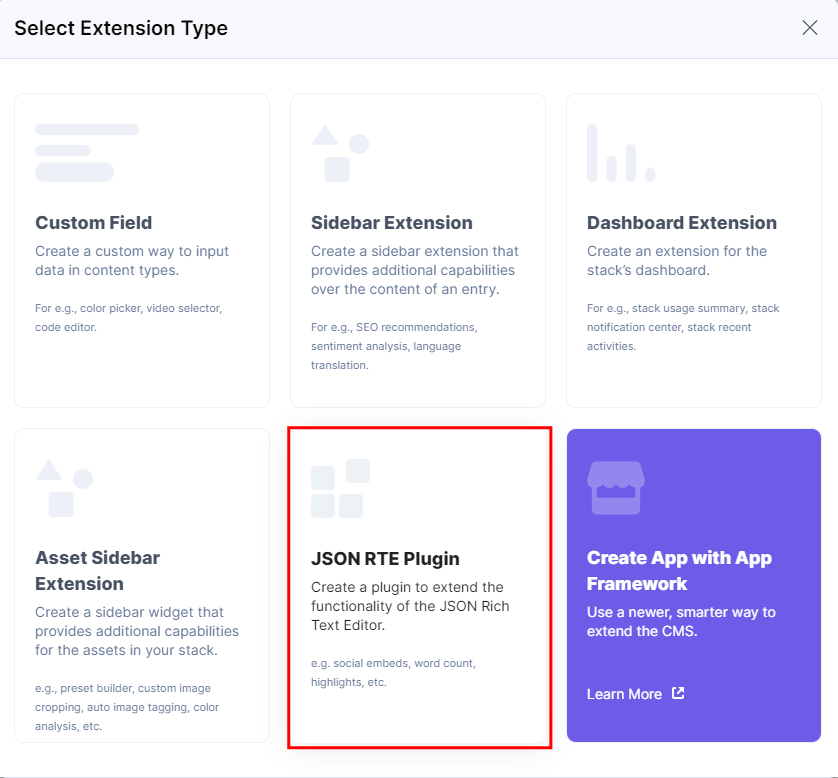
- In the Select Extension Type window, select JSON RTE Plugin.
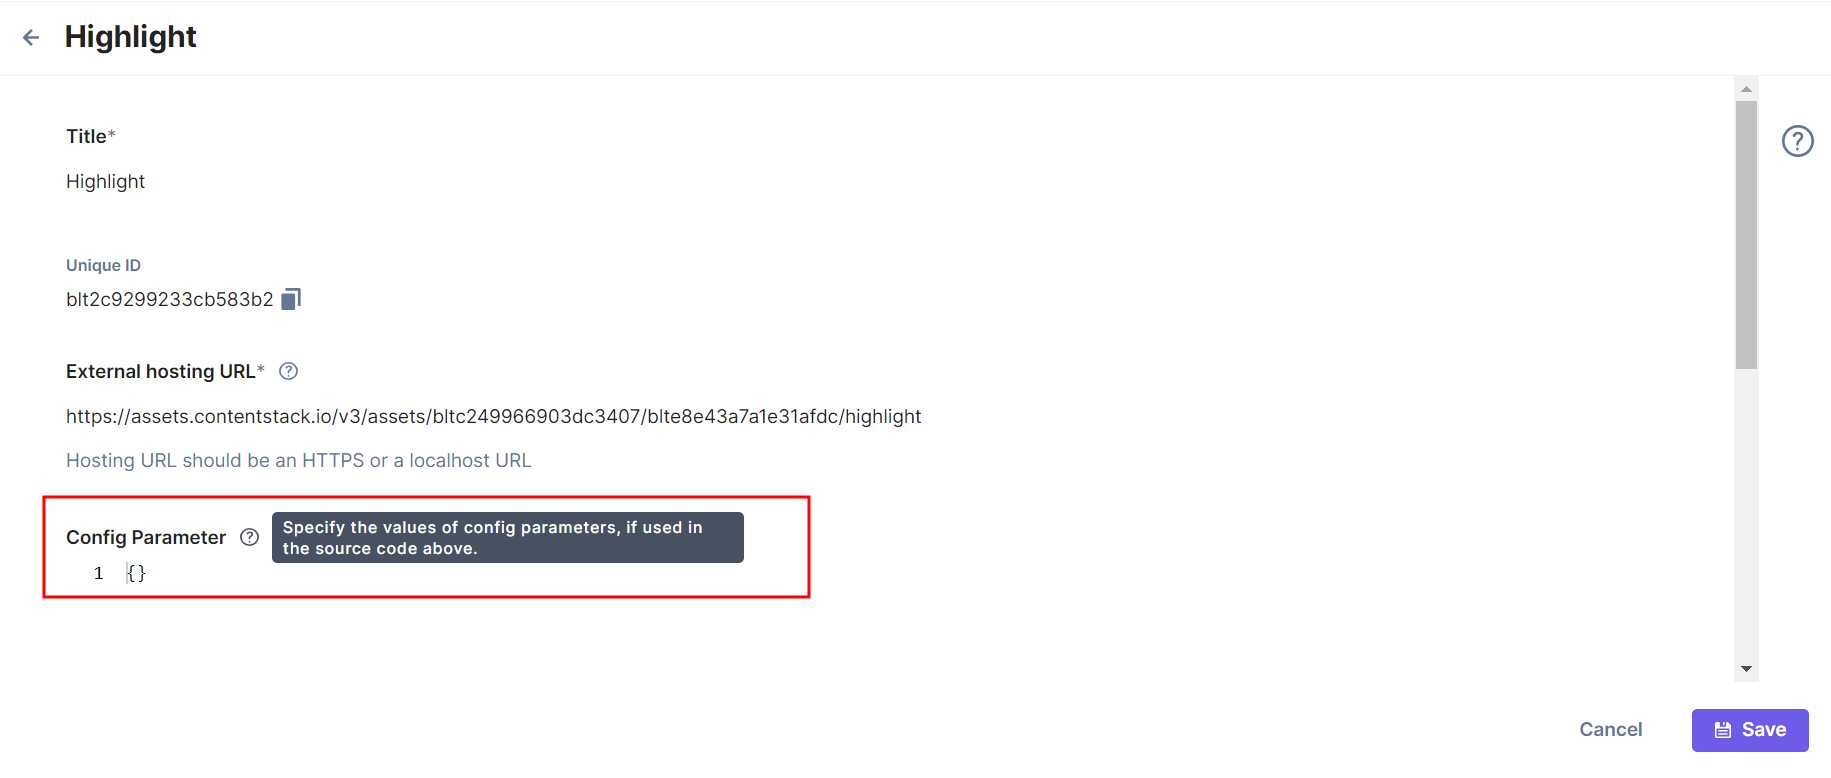
- On the resulting page, enter values in the fields as given below:
- Title (required): Define the title for your plugin. You can use this title when adding the JSON RTE plugin to your content type.
- External Hosting URL (required): Specify the URL of your externally-hosted JSON RTE plugin code or the file URL if you are hosting through Contentstack.
Note: The external hosting URL should be an HTTPS or a localhost URL.
- Config Parameters (optional): If you have used any config parameters in the source code, provide the value for the parameters here.
Note: The maximum size of the JSON RTE plugin configuration cannot exceed 10 KB.
The settings provided in this field will act as the default configuration settings for all the instances of the JSON RTE plugin within the stack.
- Save your custom JSON RTE plugin.
Use Custom JSON RTE Plugins in Content Types
Once you have added a custom JSON RTE plugin, you can use it in your content type’s JSON Rich Text Editor field(s). To add a custom JSON RTE plugin in your content type, follow the steps mentioned in the Use JSON RTE Plugins in Content Types article.
Note: You can add a maximum of five plugins to a single JSON RTE field in a content type.
API Reference
To retrieve, add or update JSON RTE plugins within your stack via API request, refer to the JSON RTE Plugins collection or the following API requests in our CMA API documentation:
Additional Resource: If you want to customize your JSON RTE plugin, refer to the JSON RTE Plugin SDK API Reference.
More articles in "Get started with JSON RTE Plugins"
