

.svg?format=pjpg&auto=webp)
.svg?format=pjpg&auto=webp)
.png?format=pjpg&auto=webp)


.png?format=pjpg&auto=webp)
Contentstack OAuth
Contentstack OAuth uses the OAuth 2.0 protocol that allows external applications and services to access Contentstack APIs on behalf of a user. You can implement an OAuth connection to Contentstack by creating apps in the Developer Hub console.
When to use Contentstack OAuth?
Contentstack OAuth allows the resource owner (user) to share the protected data from the Contentstack resource server (API) without sharing their credentials. For that matter, the Contentstack OAuth server issues access tokens (App & User tokens) that the client applications can utilize to access restricted data on behalf of the resource owner.
Some scenarios in which you can use Contentstack OAuth are as follows:
- When you want an external application to authenticate a user or an application without sharing user credentials.
- When you want an external application to authenticate a user or an application without sharing the management token.
- When you want an external application to only gain access to a subset of APIs and not the entire collection of APIs.
- When you want an application to be transparent about the permissions, it requests.
Multiple Region Support
Since Contentstack is hosted at multiple data centers, the API domain URL varies for each data center. Learn more about Contentstack Regions.
Private apps only authorize specific organization members in which the app is developed. Suppose you want your application to execute OAuth capabilities across all regions/data centers. In that case, you need to publish your app either as a Public App or a Public Unlisted App.
Additional Resource: Learn more about app visibility status.
Here, the developers need to identify which data center the client has authorized the app from and the region the organization is hosted. After authorization, developers can identify the region using the location parameter in the redirected URL.
The regional parameters are as follows:
Region | Parameter |
North America | NA |
Europe | EU |
Azure North America | AZURE_NA |
Azure Europe | AZURE_EU |
GCP North America | GCP_NA |
GCP Europe | GCP_EU |
This is required as all Contentstack API’s are scoped to the region.
Types of Contentstack OAuth Tokens
There are two types of OAuth tokens that you can generate with your applications:
- App Tokens
- User Tokens
App Token
The App Token is associated with installed applications. The scope of an app token differs from that of a user token. Here are a few properties of the app token:
- Actions performed using an app token are tagged to the app installation, not the user who authorized and installed it.
- Deprovisioning the user who installed the app does not revoke the app token.
- Uninstalling an application revokes its app token.
- Server-to-server and long-lived communications should use the app tokens.
User Token
The User Token is associated with the users who authorized it. The scope of a user token differs from that of an app token. Here are a few properties of the user token:
- Actions performed by user token are tagged to the user who authorized it.
- Deprovisioning the user revokes all the user tokens authorized by them.
- Users can manually revoke any authorized tokens from the marketplace's Manage > Authorized Apps section.
- Organization Admins can revoke all tokens by any organization member from the Manage > Authorized Apps section of the marketplace.
Token expiry
Currently, user tokens and app tokens are valid for 60 minutes only. You can generate new tokens by following the Refresh Token flow.
Integrate your Apps with Contentstack OAuth
You can create custom applications in Developer Hub. It provides the necessary tools to develop an app. While developing apps, you can integrate your application with the Contentstack OAuth.
To integrate your app with Contentstack OAuth, log in to your Contentstack account and follow the steps below:
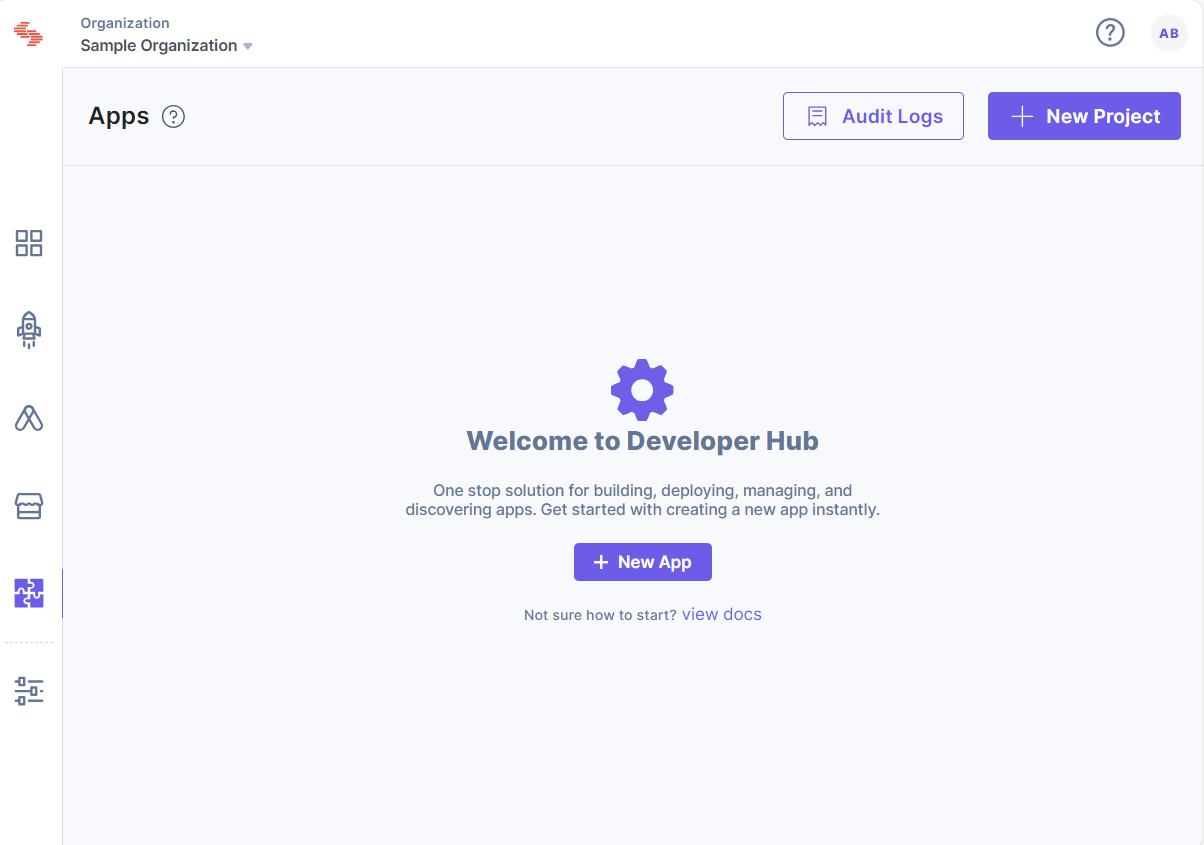
- On the left navigation panel, you will find a new icon for Developer Hub (as shown below). Click the icon to go to the Developer Hub.
- Click the + New App button.
- In the resulting New App modal, select the Type of App and enter the following details:
- Name: Enter the app's name (for example, Sample App).
- Description (optional): Enter a description for your app.
- Click the Create button.
- On the Basic Information screen, you can view general details about your app, such as name, description, and app UID.
- You can add an icon for your app by clicking on the Upload a new file button.
- Click the Save button.
Configuring Contentstack OAuth
Configuring OAuth and its scopes allows your app to perform tasks in your development workspace. You can configure and select scopes through the OAuth option available in your app.
To configure OAuth, log in to your Contentstack account and follow the steps below:
- Create a new App or click the app you want to configure.
- On the left navigation panel, click the OAuth tab.
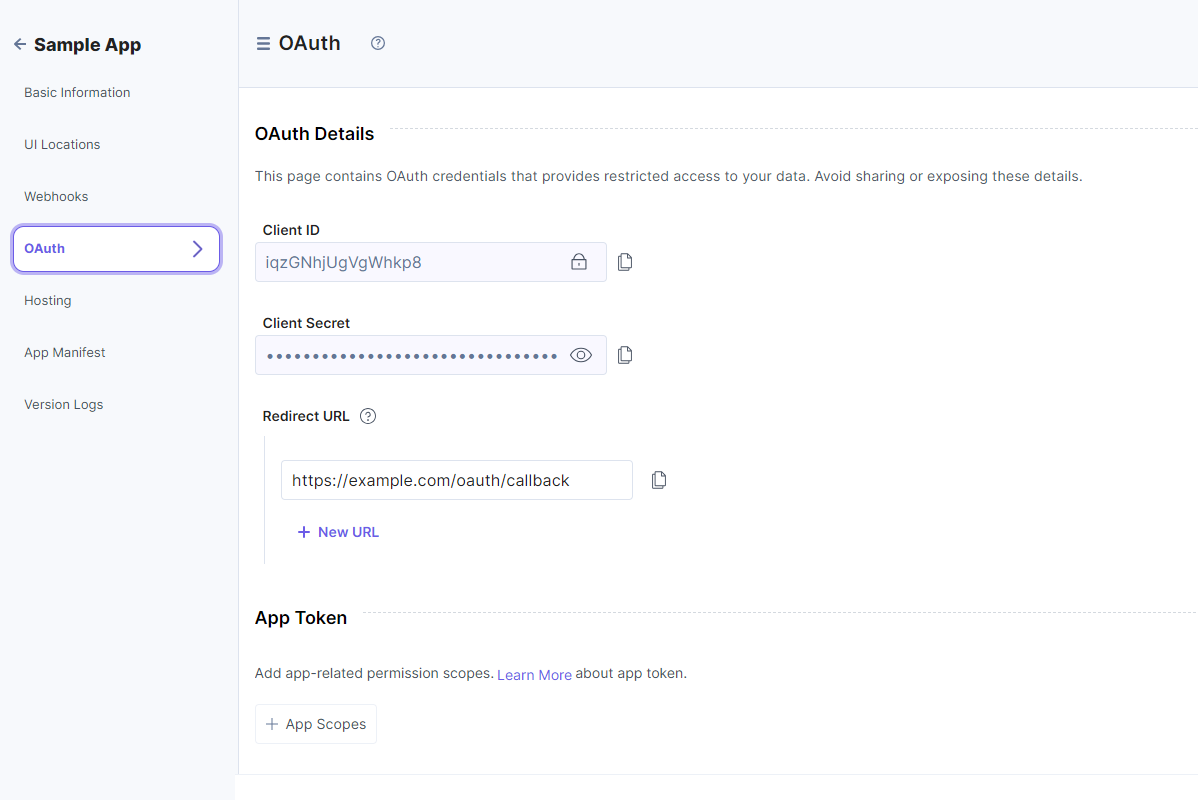
- In the OAuth Details page, the following options are displayed for your app:
- Client ID: The Client ID identifies your application and frequently appears in the OAuth negotiation URLs. You can freely share client IDs in code and emails, but you cannot use them alone to perform actions on behalf of your app.
- Client Secret: The Client Secret acts as a secret credential when exchanging tokens with Contentstack. You should not share the client secret keys via emails, distributed native applications, client-side javascript, or public code repositories.
- Redirect URL: The authorization server directs users to the Redirect URL once they have successfully granted authorization to the app. Maintaining the security of this URL is crucial to avoid redirection to unauthorized locations.
When configuring the app, developers must register one or more Redirect URLs. Users have the flexibility to configure up to 10 redirect URLs, with the initial one serving as the default. If desired, users can easily alter the default with a simple drag-and-drop method to rearrange the URLs.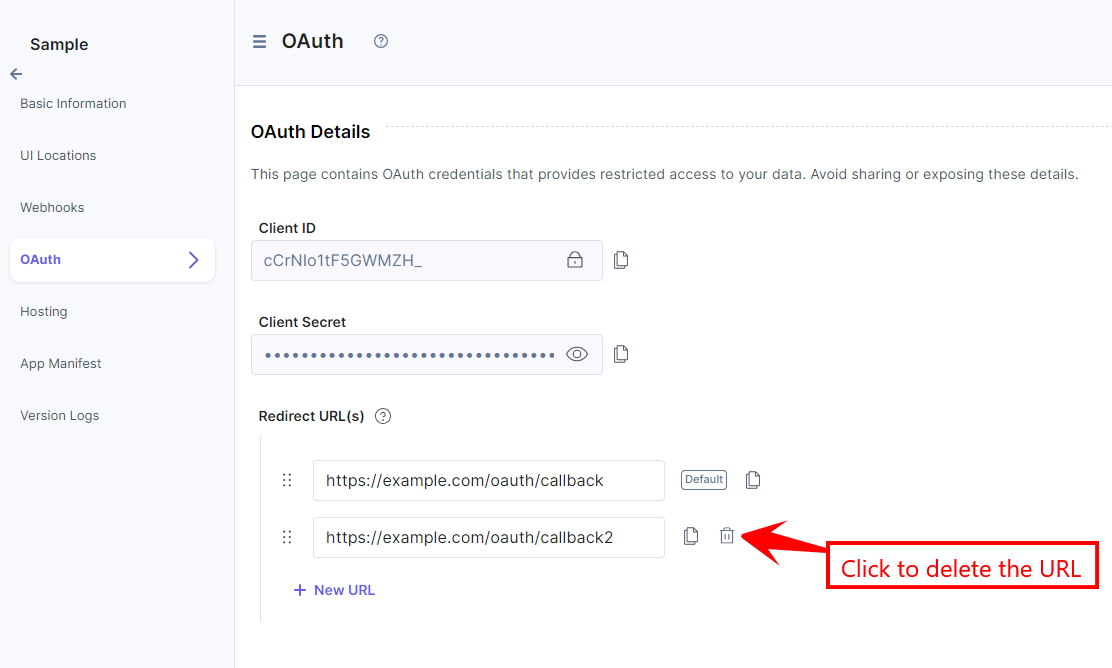
- Add the relevant app or user token scopes.
- Click Save to save your OAuth configurations.
Note: User permission scopes can be passed dynamically in the Authorization URL while authorizing a user.
Next, you can check out how to add the App and User Token Scopes.
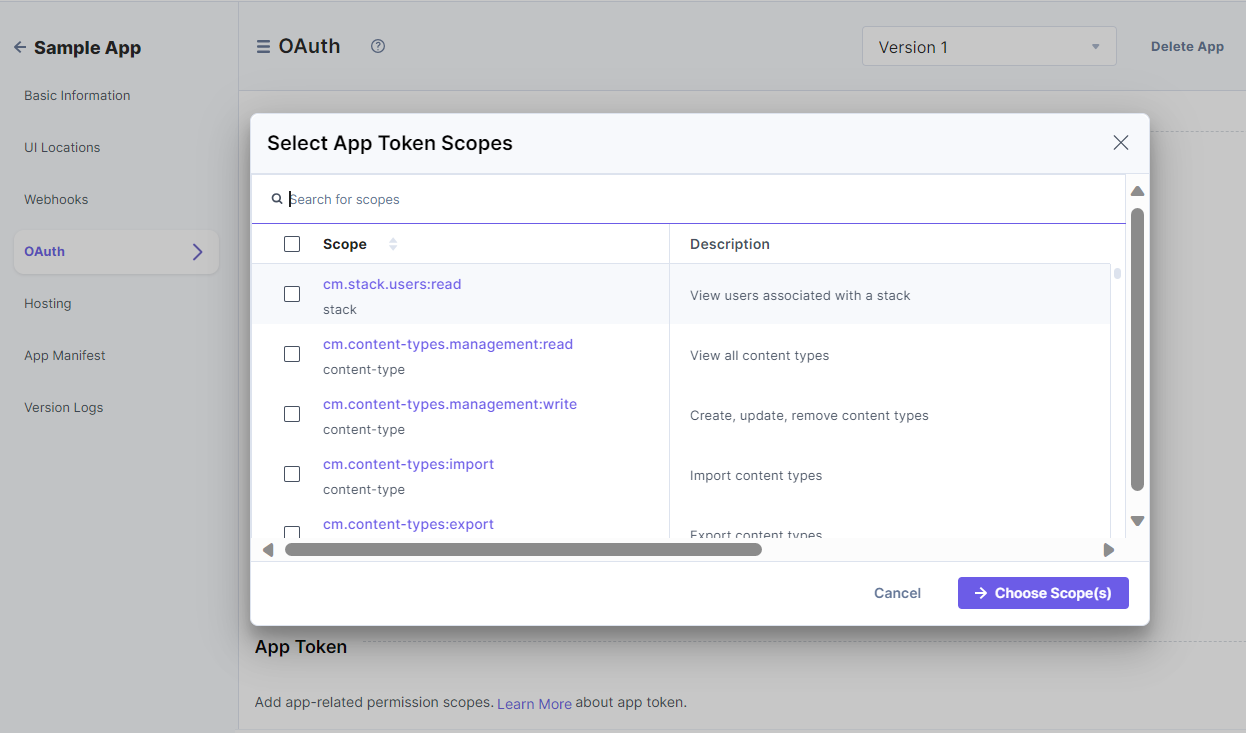
Add App Token Scopes
In the OAuth page, you will find the App Token section that lets you add app-related permission scopes.
To do so, perform the following steps:
- Click + App Scopes.
- From the resulting Select App Token Scopes pop-up window, select the permission you want to set up for your application.
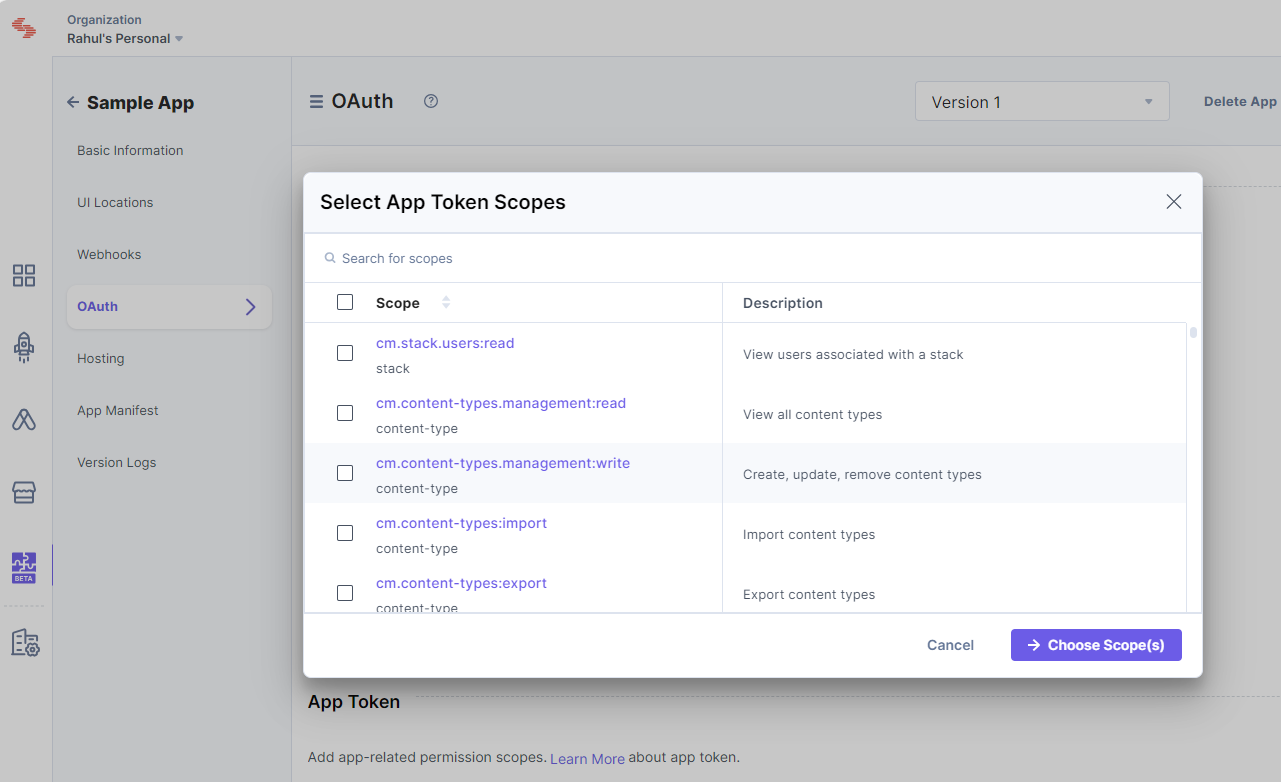
- Once done, click Choose Scope(s).
Add User Token Scopes
In the OAuth page, you will find the User Token section that lets you add user-related permission scopes.
To do so, perform the following steps:
- Click the + User Scopes button.
- From the resulting Select User Token Scopes pop-up window, select the permissions you want to set up for your users.
- Once done, click Choose Scope(s).
Additional Resource: Learn more about the app and user token scopes from the OAuth Scopes document.
Authorizing Standard App
Construct your authorization URL
The following parameters describe the Authorization URL:- BaseURL: The base URL of Contentstack where your app is installed. This will be different for each Region. Please use the relevant one where the user organization is located.
BaseURL for different regions supported by Contentstack are:
- North America: https://app.contentstack.com
- Europe: https://eu-app.contentstack.com
- Azure NA: https://azure-na-app.contentstack.com
- Azure EU: https://azure-eu-app.contentstack.com
- GCP NA: https://gcp-na-app.contentstack.com
- GCP EU: https://gcp-eu-app.contentstack.com
- client_id: The app’s client ID.
- redirect_uri: The redirect URL where Contentstack will send the user.
- scope: The permission scopes set for your application.
The scopes configured in the app are used directly for the App token. Whereas, for the User token, the scopes in the authorization URL should be a subset of the scopes configured in the app.Additinal Resource:Refer to the OAuth Scopes document for a list of all the permission scopes for Contentstack OAuth.
- state: The URL where your app is hosted.
Note: You can find the App UID in the basic information section of the app. All query parameters should be URL-encoded.
App Token:
For instance, for North America (NA) region, the Authorization URL will look something like this:{BASE_URL}/apps/{app_uid}/installhttps://app.contentstack.com/apps/627e126bbe975e0*********/installUser Token:
For instance, for North America (NA) region, the Authorization URL will look something like this:{BASE_URL}/apps/{app_uid}/authorize?response_type=code&client_id={client_id}&redirect_uri={redirect_uri}&scope={scope}&state={state}https://app.contentstack.com/apps/627e126bbe975e0*********/authorize?response_type=code&client_id=428ub0q0w*******&redirect_uri=https://example.com/oauth/callback&scope=user:read- BaseURL: The base URL of Contentstack where your app is installed. This will be different for each Region. Please use the relevant one where the user organization is located.
Request for an Authorization Code
Implement the flow described below to obtain an authorization code using App and User token. Once you get the authorization code > exchange it for an access token.
Authorize OAuth Apps using App Token
- Log in to your Contentstack account.
- Navigate to the application you want to generate an app token for and click Install.
- Once you install your app, the authorization page appears that contains the authorization URL. Through this page, you request access and permission scopes.
Alternatively, you can visit the URL formed in the previous section. For instance:https://app.contentstack.com/apps/627e126bbe975e0*********/install - Install or cancel installation based on scopes requested on the OAuth authorization page.
- Accepting the authorization leads the user to the configured redirect URI along with the authorization code. An example of the redirect URI with authorization code and location:
https://example.com/oauth/callback?code={authorization_code}&location=NA Note: This code is only valid for 60 seconds.
Authorize OAuth Apps using User Token
- Log in to your Contentstack account.
- Request for auth code against a client ID having a redirect URI and for a list of scopes.
- Visit the Authorization URL formed in the previous step. For instance:
https://app.contentstack.com/apps/627e126bbe975e0*********/authorize?response_type=code&client_id=428ub0q0w*******&redirect_uri=https://example.com/oauth/callback&scope=user:read - Accept or deny permissions (scopes) requested on the OAuth authorization page.
- Accepting the authorization leads the user to the configured redirect URI along with the authorization code. An example of the redirect URI with authorization code and location:
https://example.com/oauth/callback?code={authorization_code}&location=NANote:
- This code is only valid for 60 seconds.
- If a user requests re-authorization for the same set or subset of scopes that were once granted, the user is automatically redirected to the redirect URL.
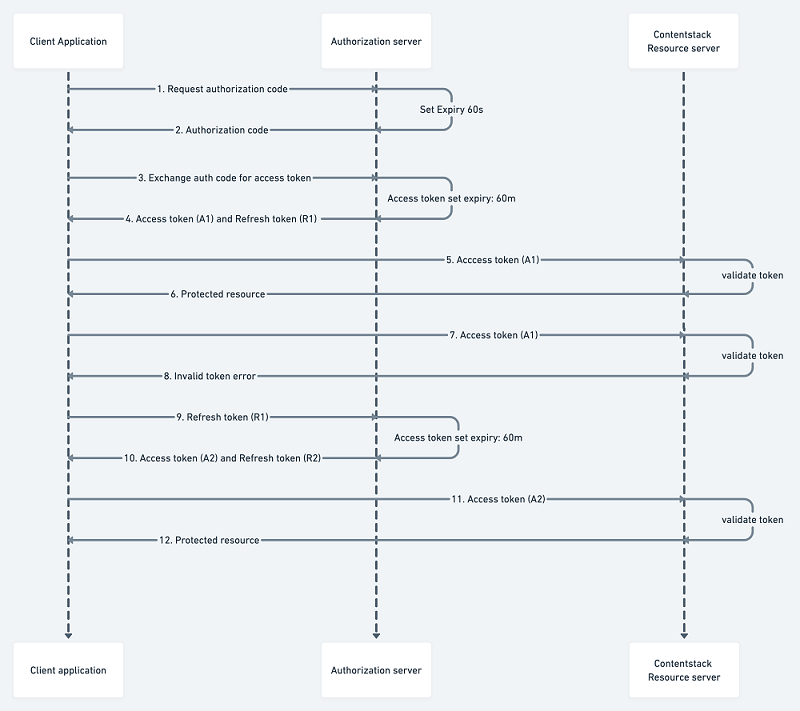
Exchange Auth Code for Access Token
Exchange the authorization code for the access token by calling the token endpoint having the grant type of authorization_code and the parameter code containing the newly generated code from the previous step. For instance:
POST {BASE_URL}/apps-api/token
Headers:
  Content-Type: application/x-www-form-urlencoded
Request Body:
  grant_type:authorization_code
  client_id:{client_id}
  client_secret:{client_secret}
  redirect_uri:{redirect_uri}
  code:{authorization_code}
The request in curl takes the following form:
curl --location --request POST 'https://app.contentstack.com/apps-api/token' \
--header 'Content-Type: application/x-www-form-urlencoded' \
--data-urlencode 'grant_type=authorization_code' \
--data-urlencode 'client_id=your_client_id' \
--data-urlencode 'client_secret=your_client_secret' \
--data-urlencode 'redirect_uri=your_redirect_uri' \
--data-urlencode 'code=your_auth_code'
On the success of the token call, an access token is provided along with the refresh token.
The response will look something like this:{ "access_token": "c89977e8de8bafcac88d************", "refresh_token": "e5998ca04d0b2f72b72c************", "token_type": "Bearer", "expires_in": 3600, "location": "NA", "organization_uid": "bltbab185**********", "authorization_type": "app", }Note:This token is only valid for 60 minutes.
Use access token with Contentstack APIs
Your access token allows you to call the methods described by the permission scopes you set during authorization. For instance:
Scope: cm.stacks.management:read
API Call:
API_BASE_URL for different regions supported by Contentstack are:- US (North America, or NA): https://api.contentstack.io
- Europe (EU): https://eu-api.contentstack.com
- Azure NA: https://azure-na-api.contentstack.com
- Azure EU: https://azure-eu-api.contentstack.com
You can use the endpoint as per the designated region.
GET {API_BASE_URL}/v3/stacks
Headers:
  authorization: Bearer your_access_token
  organization_uid: your_organization_uid
The request in curl takes the following form:
curl --location --request GET 'https://api.contentstack.io/v3/stacks' \
--header 'authorization: Bearer your_access_token' \
--header 'organization_uid: your_organization_uid'
Refresh Token
The OAuth flow begins with a user interacting with your app and ends with your app authorized to access Contentstack resources in a way dictated by the user.
The access token allows you to access the app's data. With a regular expiration for your access token, the danger of the token falling into the wrong hands is reduced. But to maintain control over app data, your app needs a way to request a new access token regularly.
A refresh token allows your app to rotate its access tokens seamlessly, using the same token endpoint to acquire a new access token with the help of previously generated refresh token.
On the access token expiry, pass the refresh token obtained from the previous access token call in the code parameter. For instance:POST {BASE_URL}/apps-api/token Headers: Content-Type: application/x-www-form-urlencoded Request Body: grant_type:refresh_token client_id:{client_id} client_secret:{client_secret} redirect_uri:{redirect_uri} refresh_token:{refresh_token}The request in curl takes the following form:
curl --location --request POST 'https://app.contentstack.com/apps-api/token' \
--header 'Content-Type: application/x-www-form-urlencoded' \
--data-urlencode 'grant_type=refresh_token' \
--data-urlencode 'client_id=your_client_id' \
--data-urlencode 'client_secret=your_client_secret' \
--data-urlencode 'redirect_uri=your_redirect_uri' \
--data-urlencode 'refresh_token=your_refresh_token'
Authorizing Machine to Machine Apps
Standard apps use the authorization_code and refresh_token grant types. Additionally, our OAuth framework supports the client_credentials grant type, designed specifically for Machine-to-Machine (M2M) apps.
Additional Resource: For more details on M2M apps, refer to the Machine-to-Machine Apps documentation.
The client_credentials grant allows Machine-to-Machine (M2M) apps to obtain an access token without user interaction. This is ideal for applications that need to access resources autonomously.
Obtaining an Access Token
To obtain a token using the client_credentials grant, send a POST request to the token endpoint with the following parameters:
POST {BASE_URL}/apps-api/token
Headers:
Content-Type: application/x-www-form-urlencoded
Request Body:
grant_type: client_credentials
client_id: {client_id}
client_secret: {client_secret}
Upon successful authentication, the token endpoint returns a JSON response containing the access token. This token can then be included in the authorization header of subsequent API requests to access protected resources.
You can check the Use access token with Contentstack APIs section.
This flow enables Machine-to-Machine (M2M) applications to securely authenticate and access resources without requiring user credentials. To maintain security, it is essential to protect the client_secret from unauthorized access.
The request in curl takes the following form:
  curl --location --request POST 'https://app.contentstack.com/apps-api/token' \
--header 'Content-Type: application/x-www-form-urlencoded' \
--data-urlencode 'grant_type=client_credentials' \
--data-urlencode 'client_id=your_client_id' \
--data-urlencode 'client_secret=your_client_secret' \
Token Introspection
The recommended approach for applications to retrieve access token details is through the Token Introspection endpoint. This endpoint allows clients to verify a token's validity and, if valid, determine its associated scopes.
Introspecting a Token
To introspect a token, send a POST request to the introspection endpoint with the following parameters:
POST {BASE_URL}/apps-api/introspect
Headers:
Content-Type: application/x-www-form-urlencoded
Request Body:

token:{token_value}
token_type_hint:access_token
- token: The access token to be introspected.
- token_type_hint (Optional): A hint about the type of the token. For refresh tokens, use refresh_token. By default all tokens are considered access_token
Response:
If the token is valid, the response will include the "active" field as true and may also provide additional details, such as the token's associated scopes.
{
"active": true,
"scope": "user:read user:write"
}
If the token is invalid or expired, the response will only contain:
{
"active": false
}
Applications should use the active field to verify a token's validity before accessing protected resources. If active is false, the token is invalid, and the application should request a new one. If active is true, the application can use the token and leverage additional response details, such as scope, to enforce authorization policies.
This endpoint offers a standardized and secure method for applications to manage and validate access tokens, playing a crucial role in maintaining API security.
More articles in "Contentstack OAuth"
