


.jpg?format=pjpg&auto=webp)


Set Up SCIM Provisioning with Okta Native App
You can configure Contentstack as a provisioning app in Okta. This allows you to use Okta to provision or deprovision users automatically with Contentstack.
Note: Before proceeding with this guide, ensure that SCIM is a part of your Contentstack plan.
Here’s a step-by-step guide that explains how you can do this.
- Enable SCIM in Contentstack
- Add the Contentstack App to Okta
- Configure Provisioning in Okta
- Assign Users and Groups to your Application
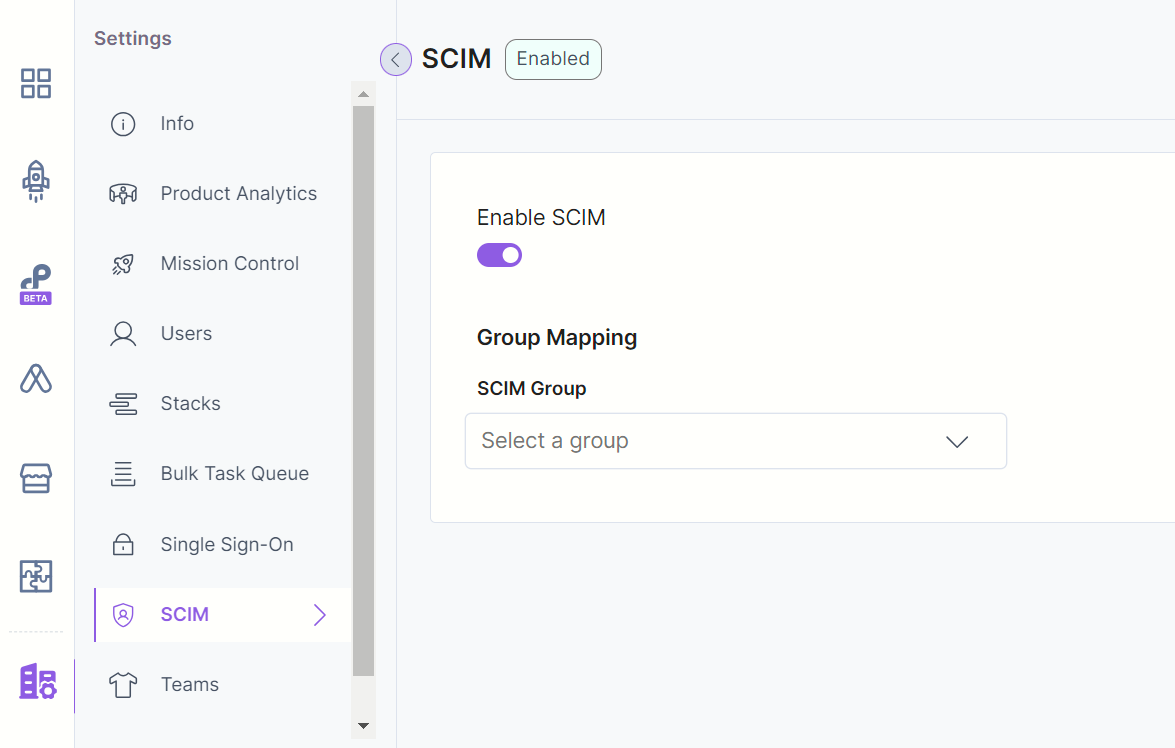
- Create Group Mapping in Contentstack
Prerequisite
- Okta tenant that has permission to configure provisioning
- Contentstack account
-
Enable SCIM in Contentstack
Note: Only the Owner or Admin users of an organization in Contentstack can perform this step.
To allow provisioning of users in Contentstack’s organization through Okta Native App, you need to enable SCIM in Contentstack by performing the following steps:
- Log in to your Contentstack account.
- Click on the “Org Admin” icon in the left navigation panel.
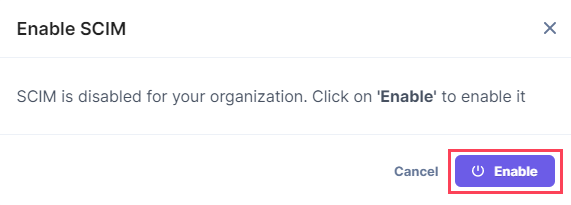
- Click on the SCIM tab and enable the Enable SCIM toggle switch.
- On the resulting Enable SCIM modal, click Enable
-
Add the Contentstack App to Okta
Note: In order to add Contentstack to the Okta application integration, you must be an administrator. If you've already created an app for Contentstack, you can skip this step.
- Log in to your Okta Admin account.
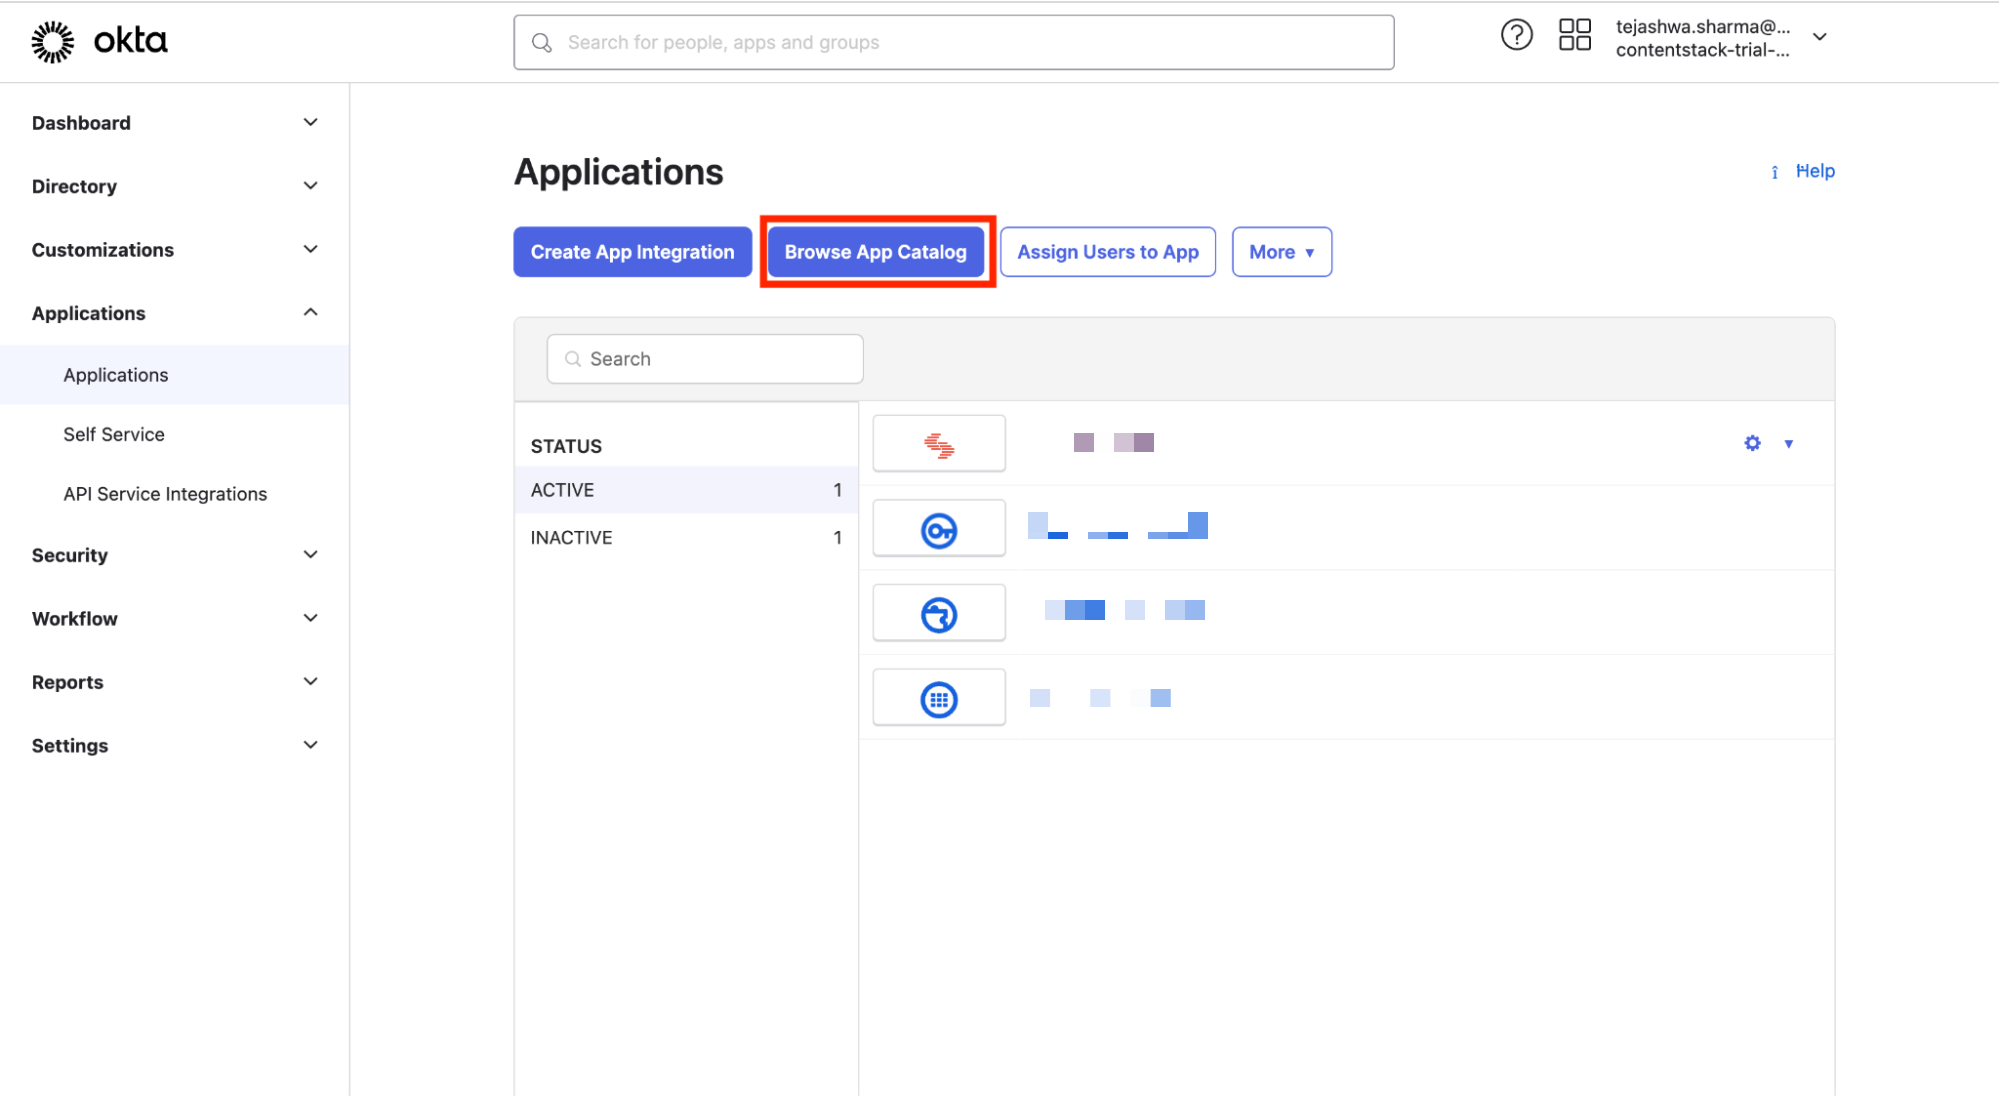
- After logging in, you will see the Okta dashboard. Click on the Application tab and select Applications.
- In the Applications page, you will see your already created applications, if any.
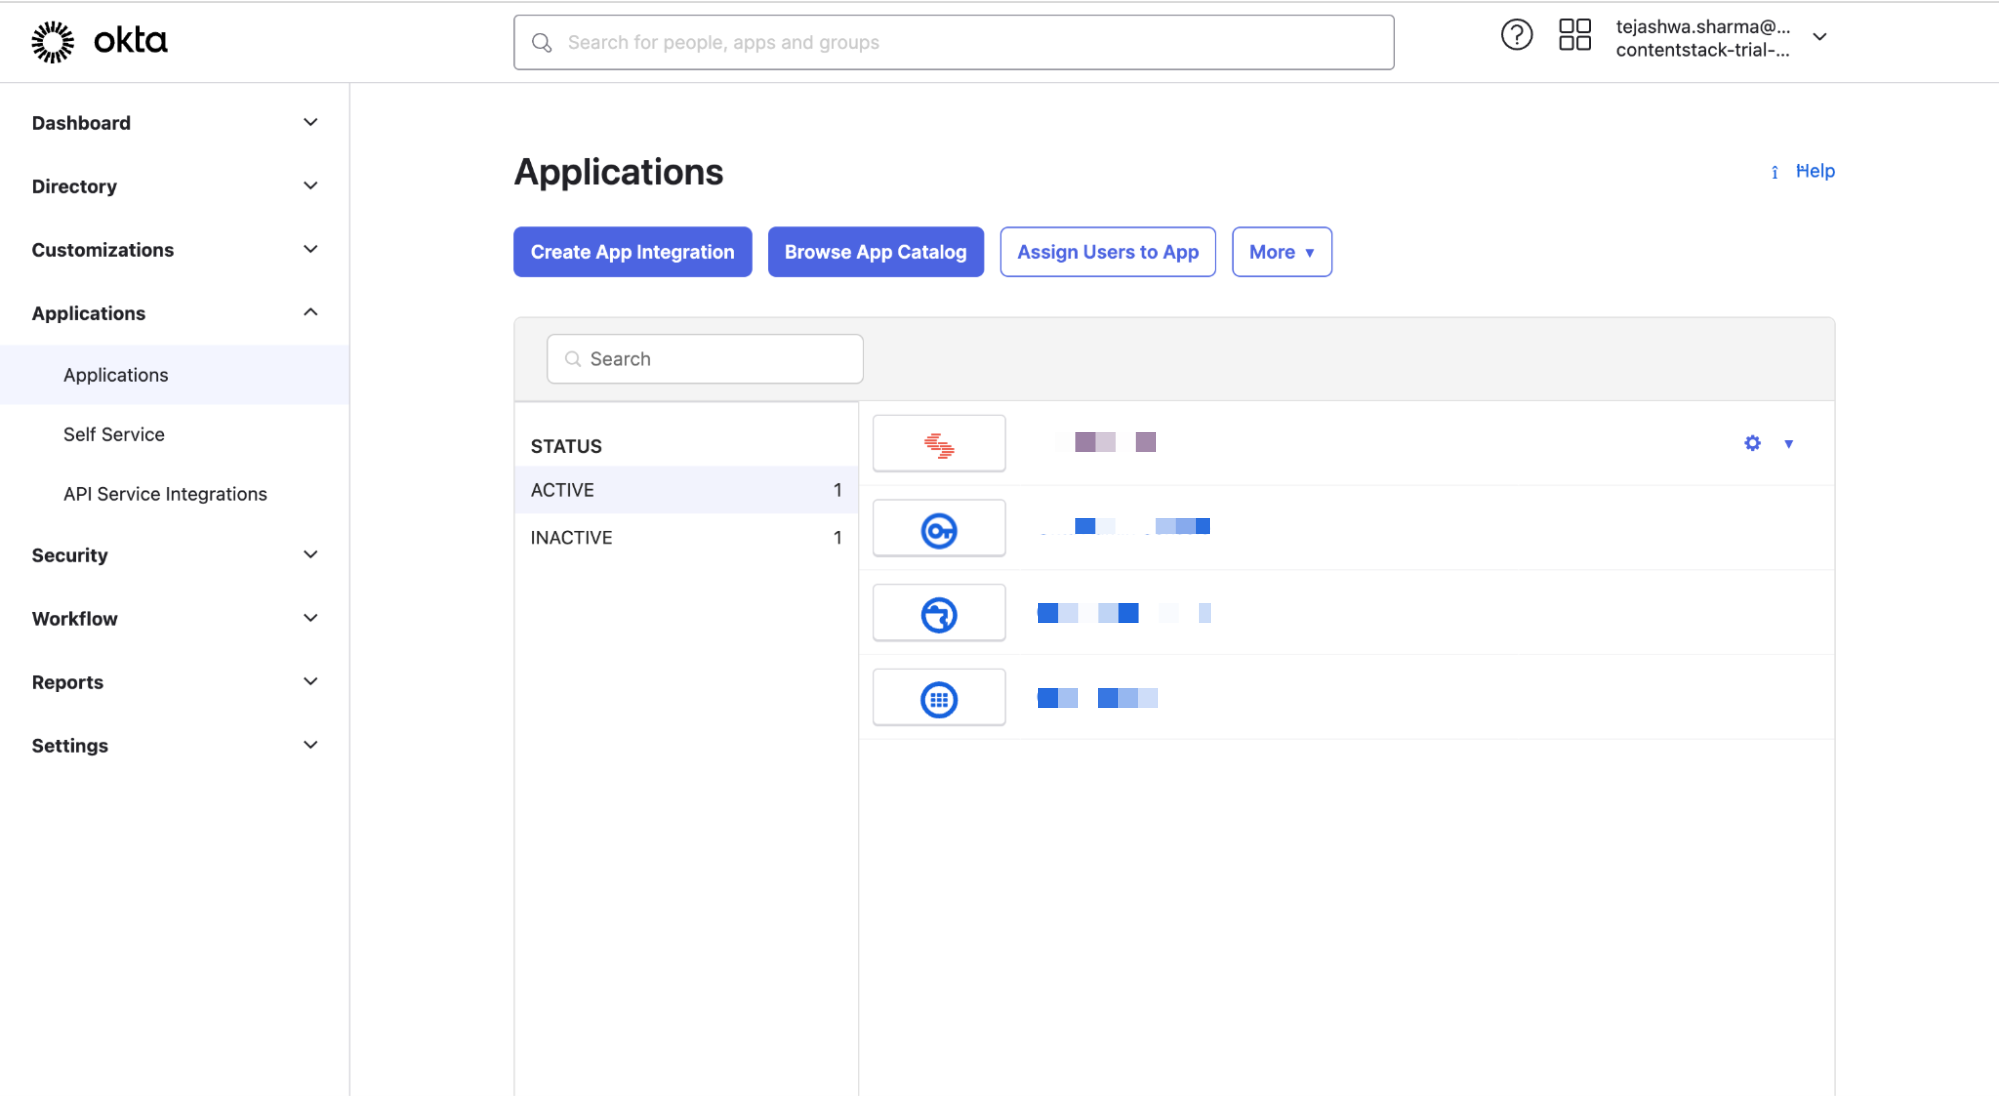
- Click the Browse App Catalog to set up an application for Contentstack.
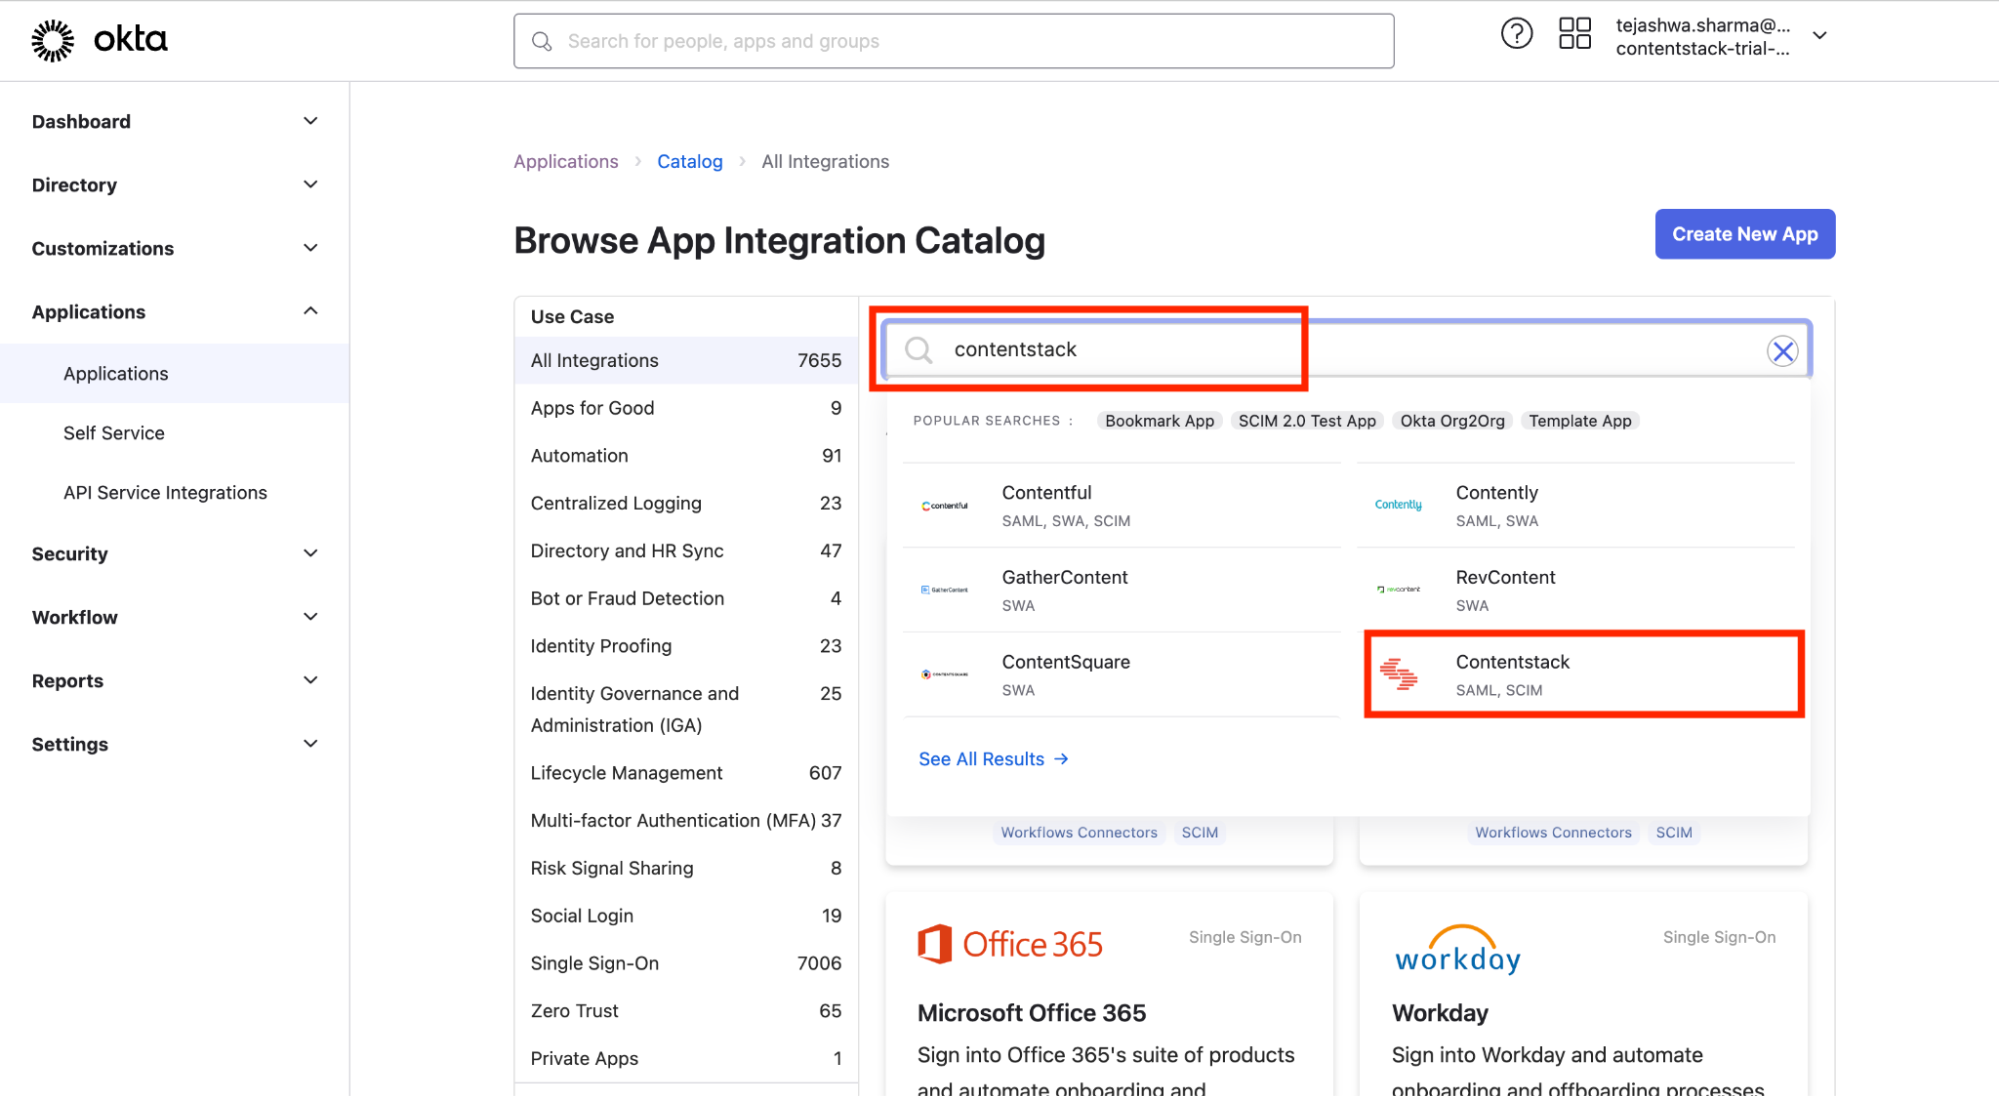
- Search for “Contentstack” within the Browse App Integration Catalog section and select the Contentstack app.
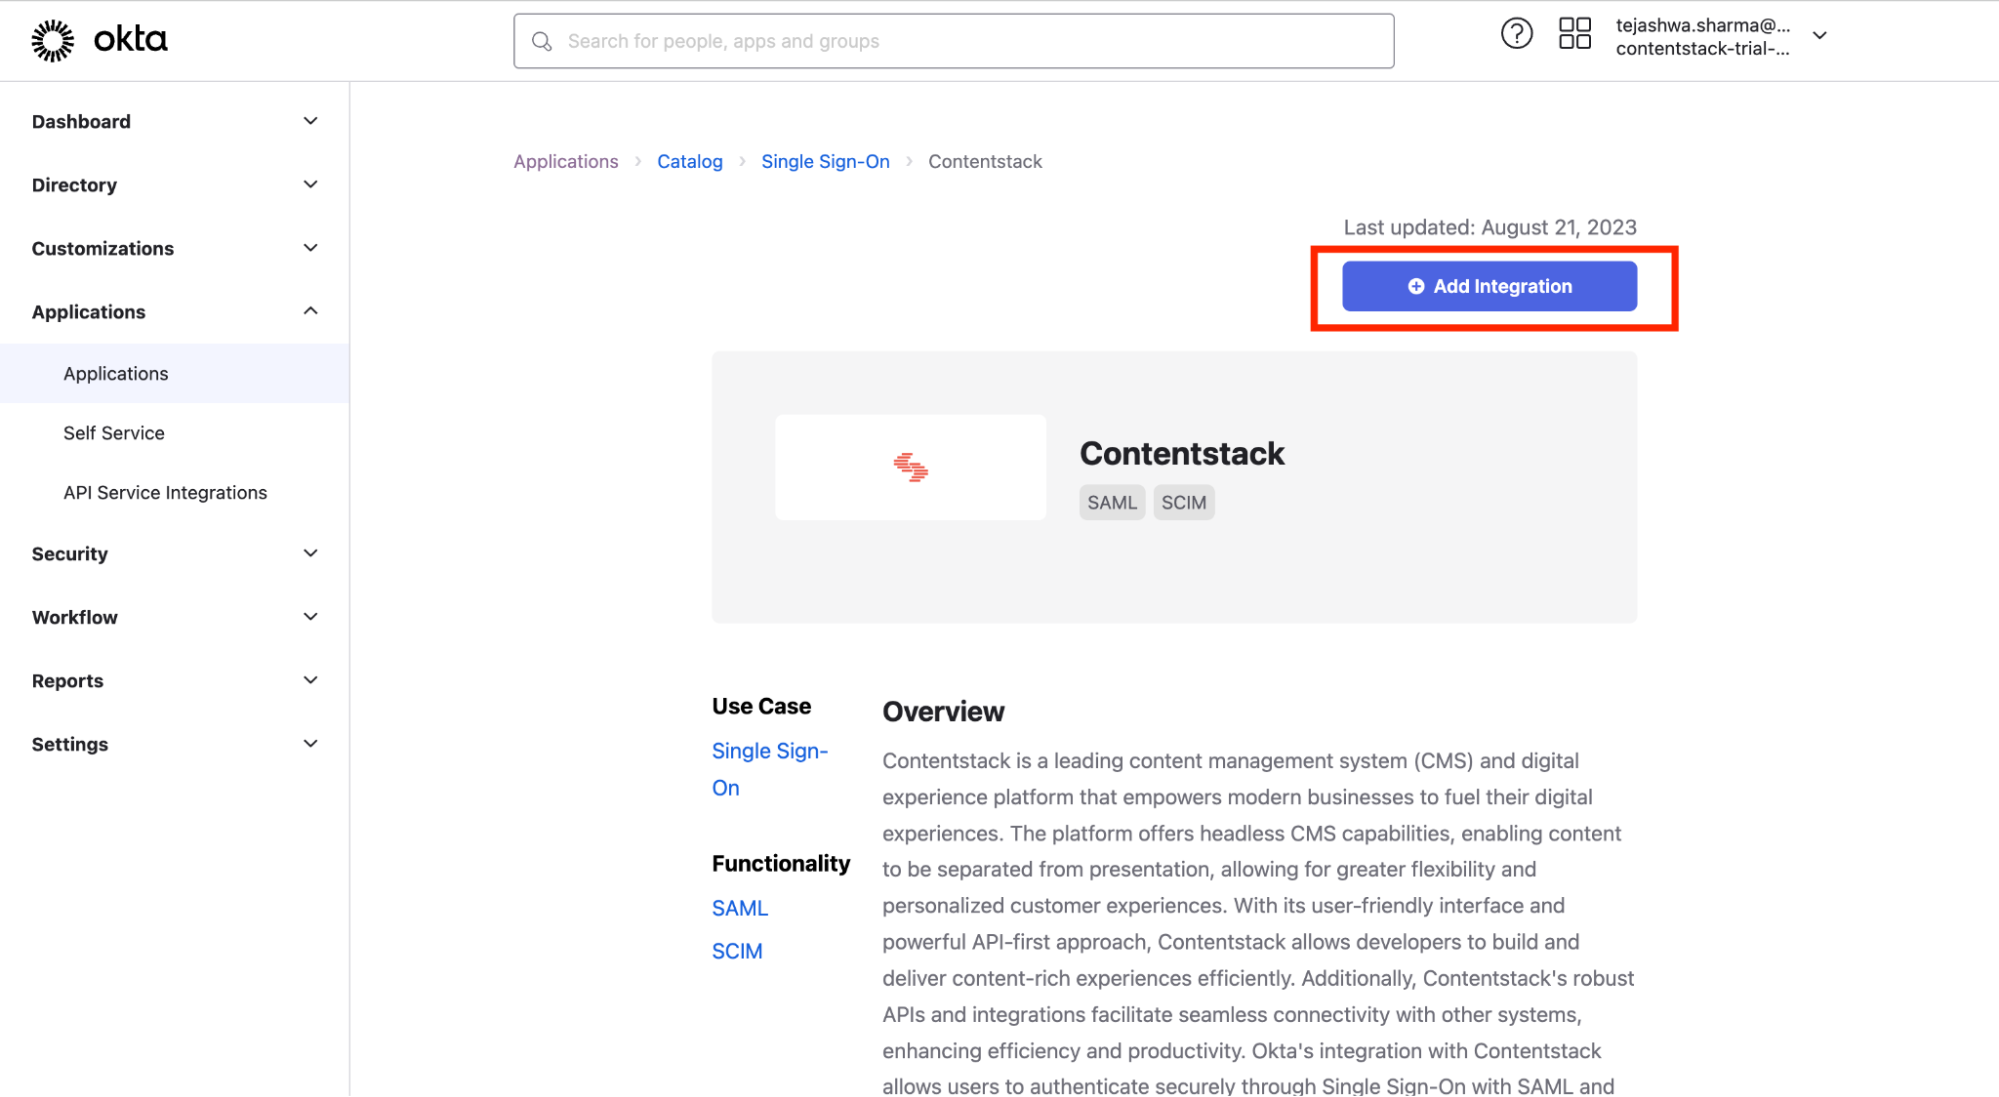
- You will be redirected to the Contentstack application. Click on the Add Integration button.
- You can edit the Application label as per your preference and click on Done.
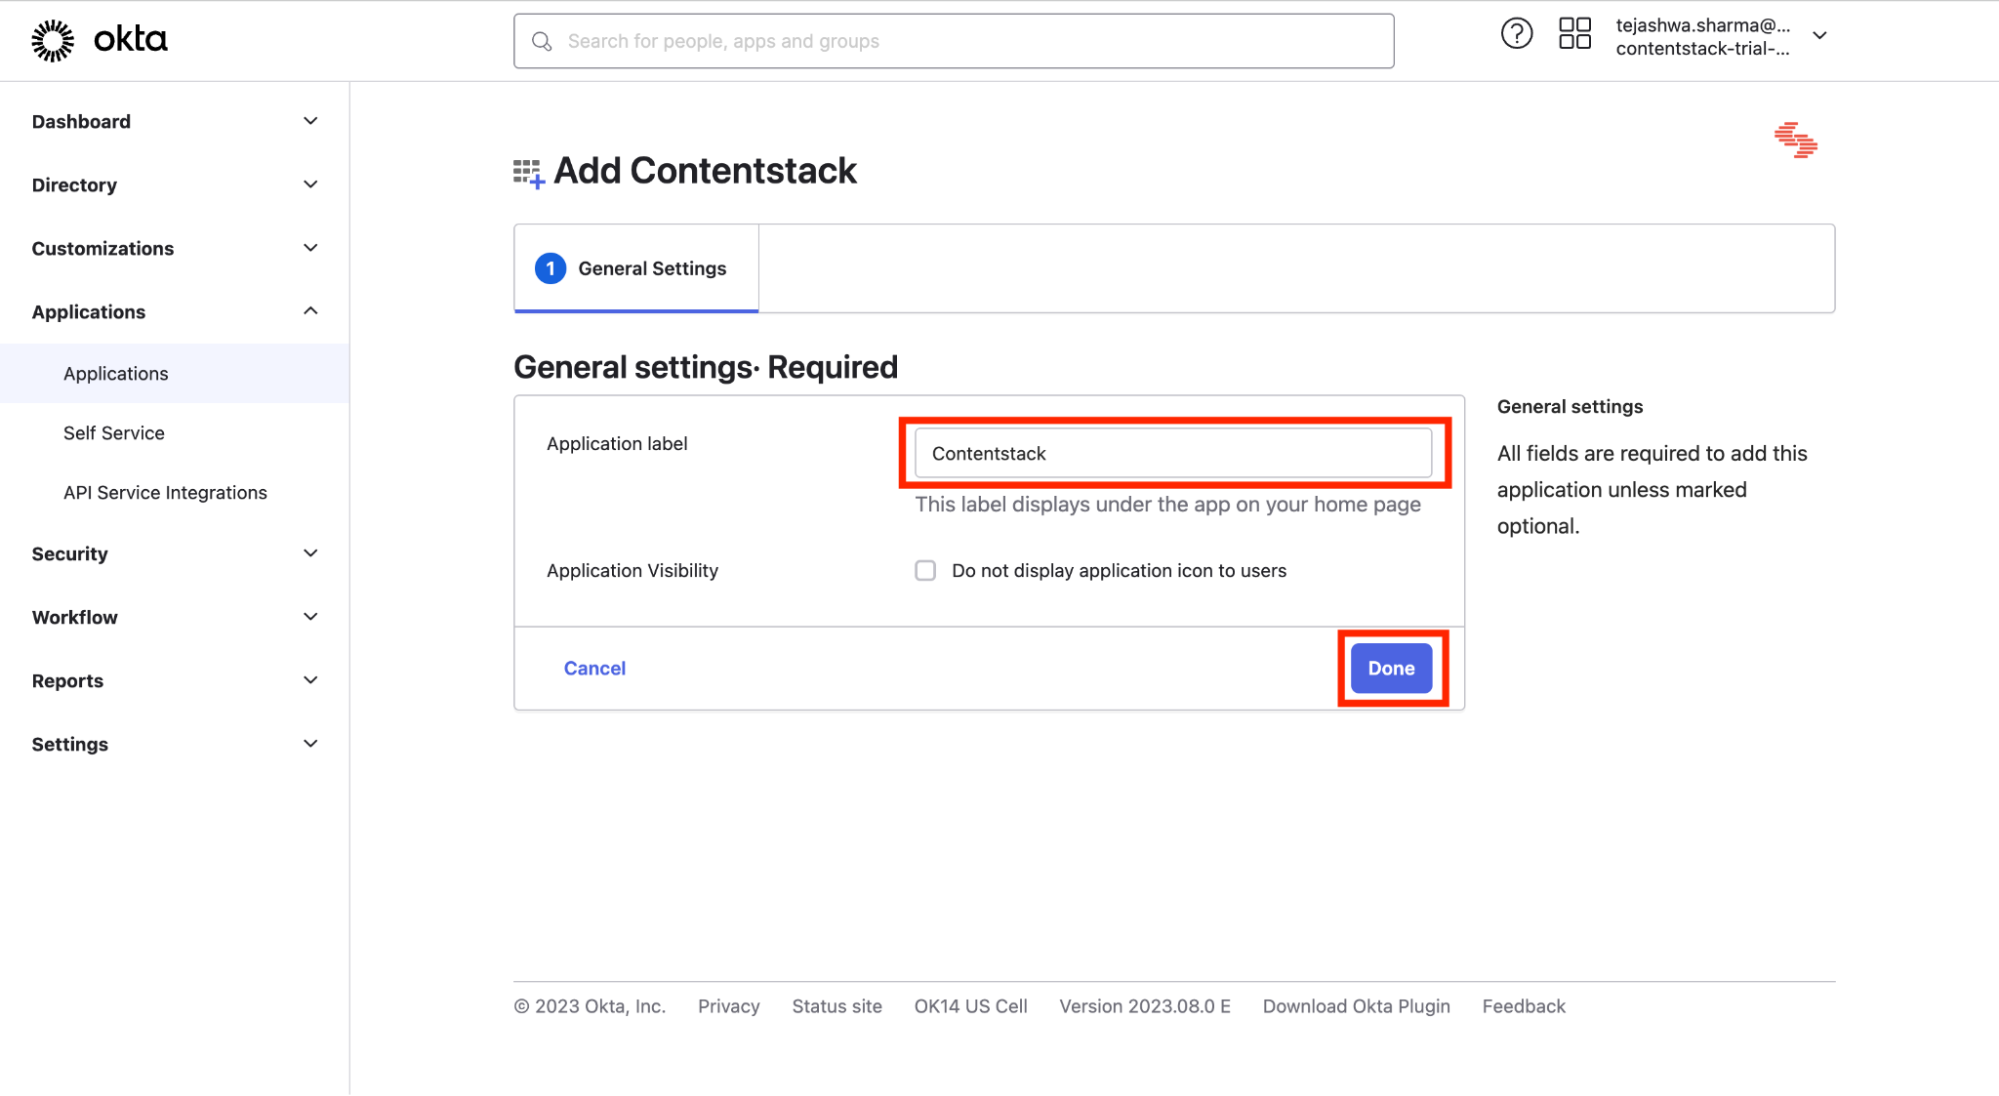
- Click Save.
- Log in to your Okta Admin account.
-
Configure Provisioning in Okta
To enable your app to use the provisioning feature, you need to perform the following steps:
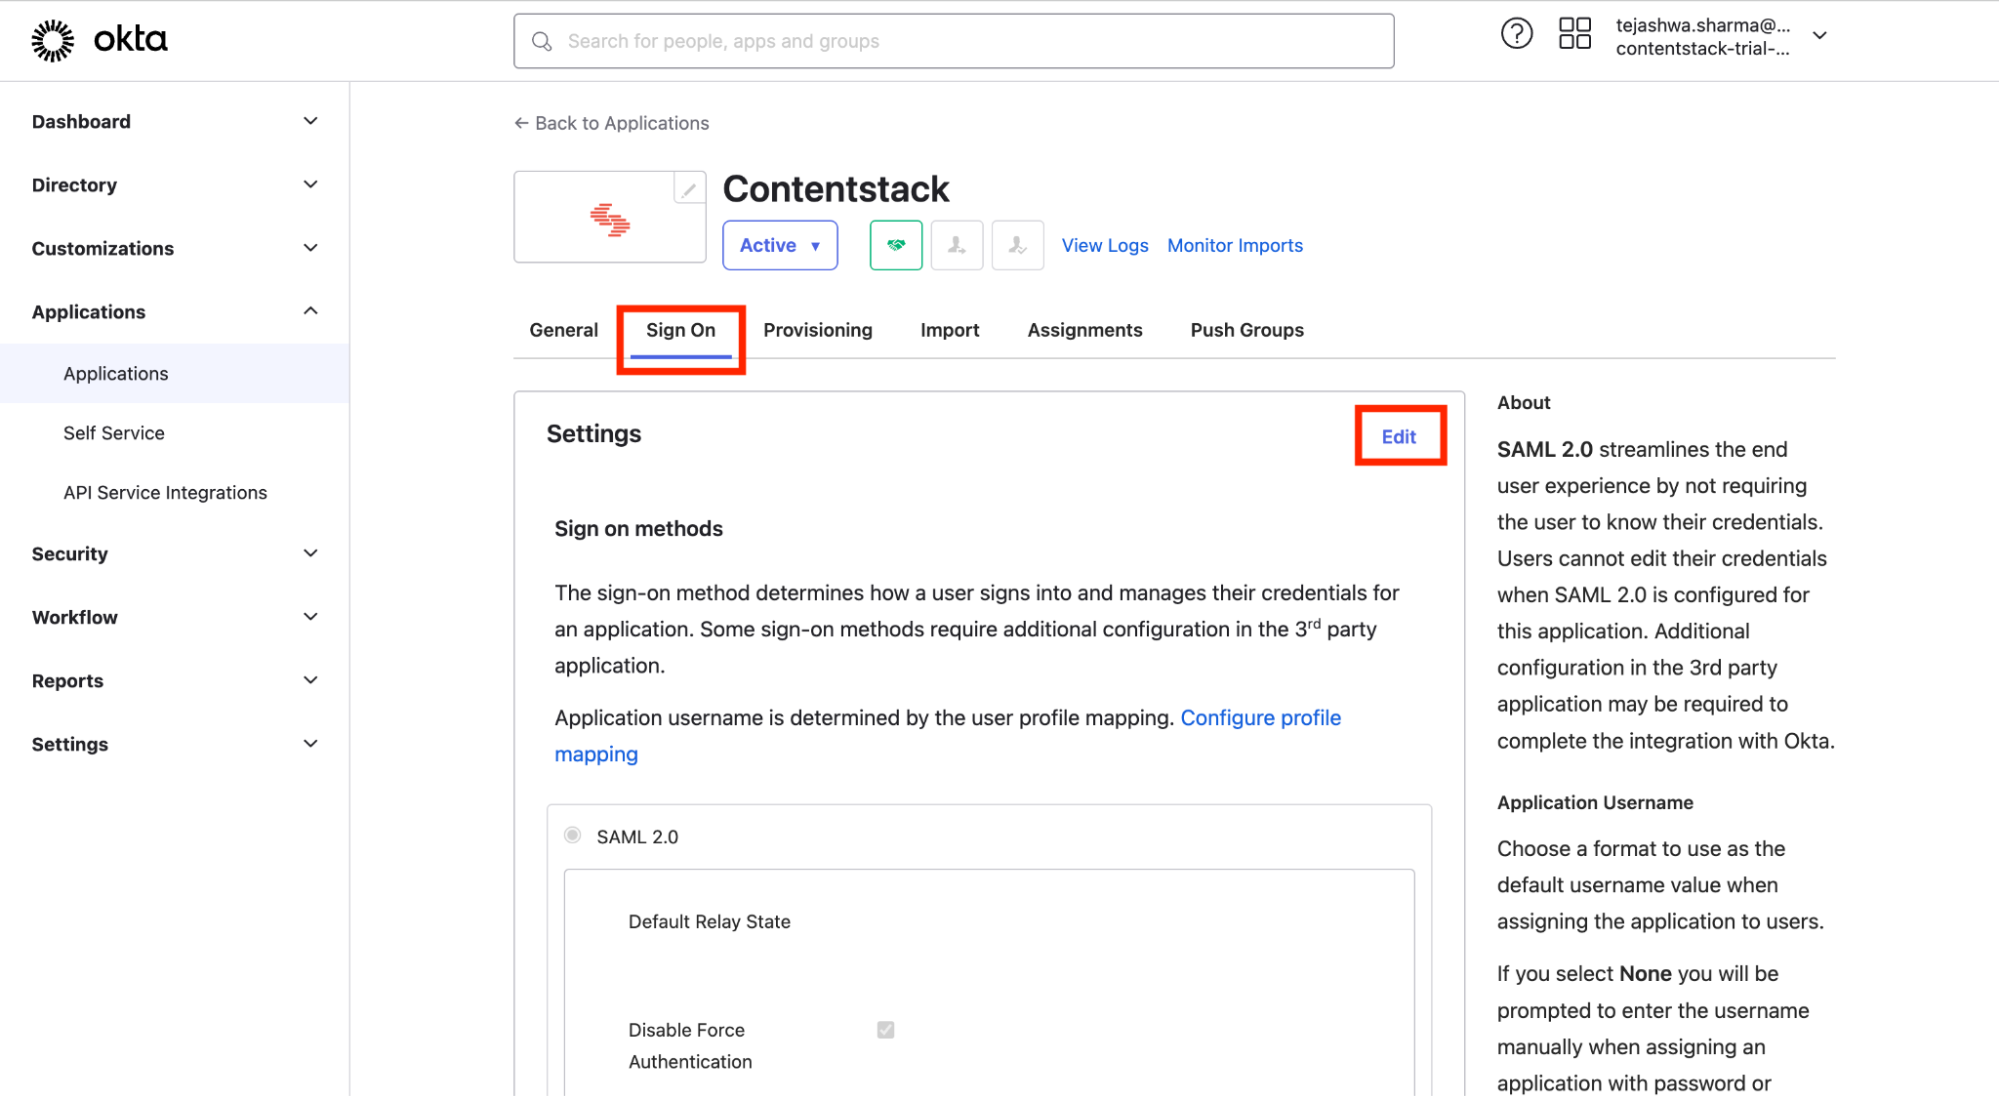
- Locate the Sign On tab and click the Edit button on Okta Configured App.
- Enter the region-specific Application URL of the Contentstack app, as follows, to authorize Okta with SCIM in Contentstack.
- For North American region, use https://app.contentstack.com
- For Europe region, use https://eu-app.contentstack.com
- For Azure NA region, use https://azure-na-app.contentstack.com
- For Azure EU region, use https://azure-eu-app.contentstack.com
- For Application username format, select Email from the dropdown.
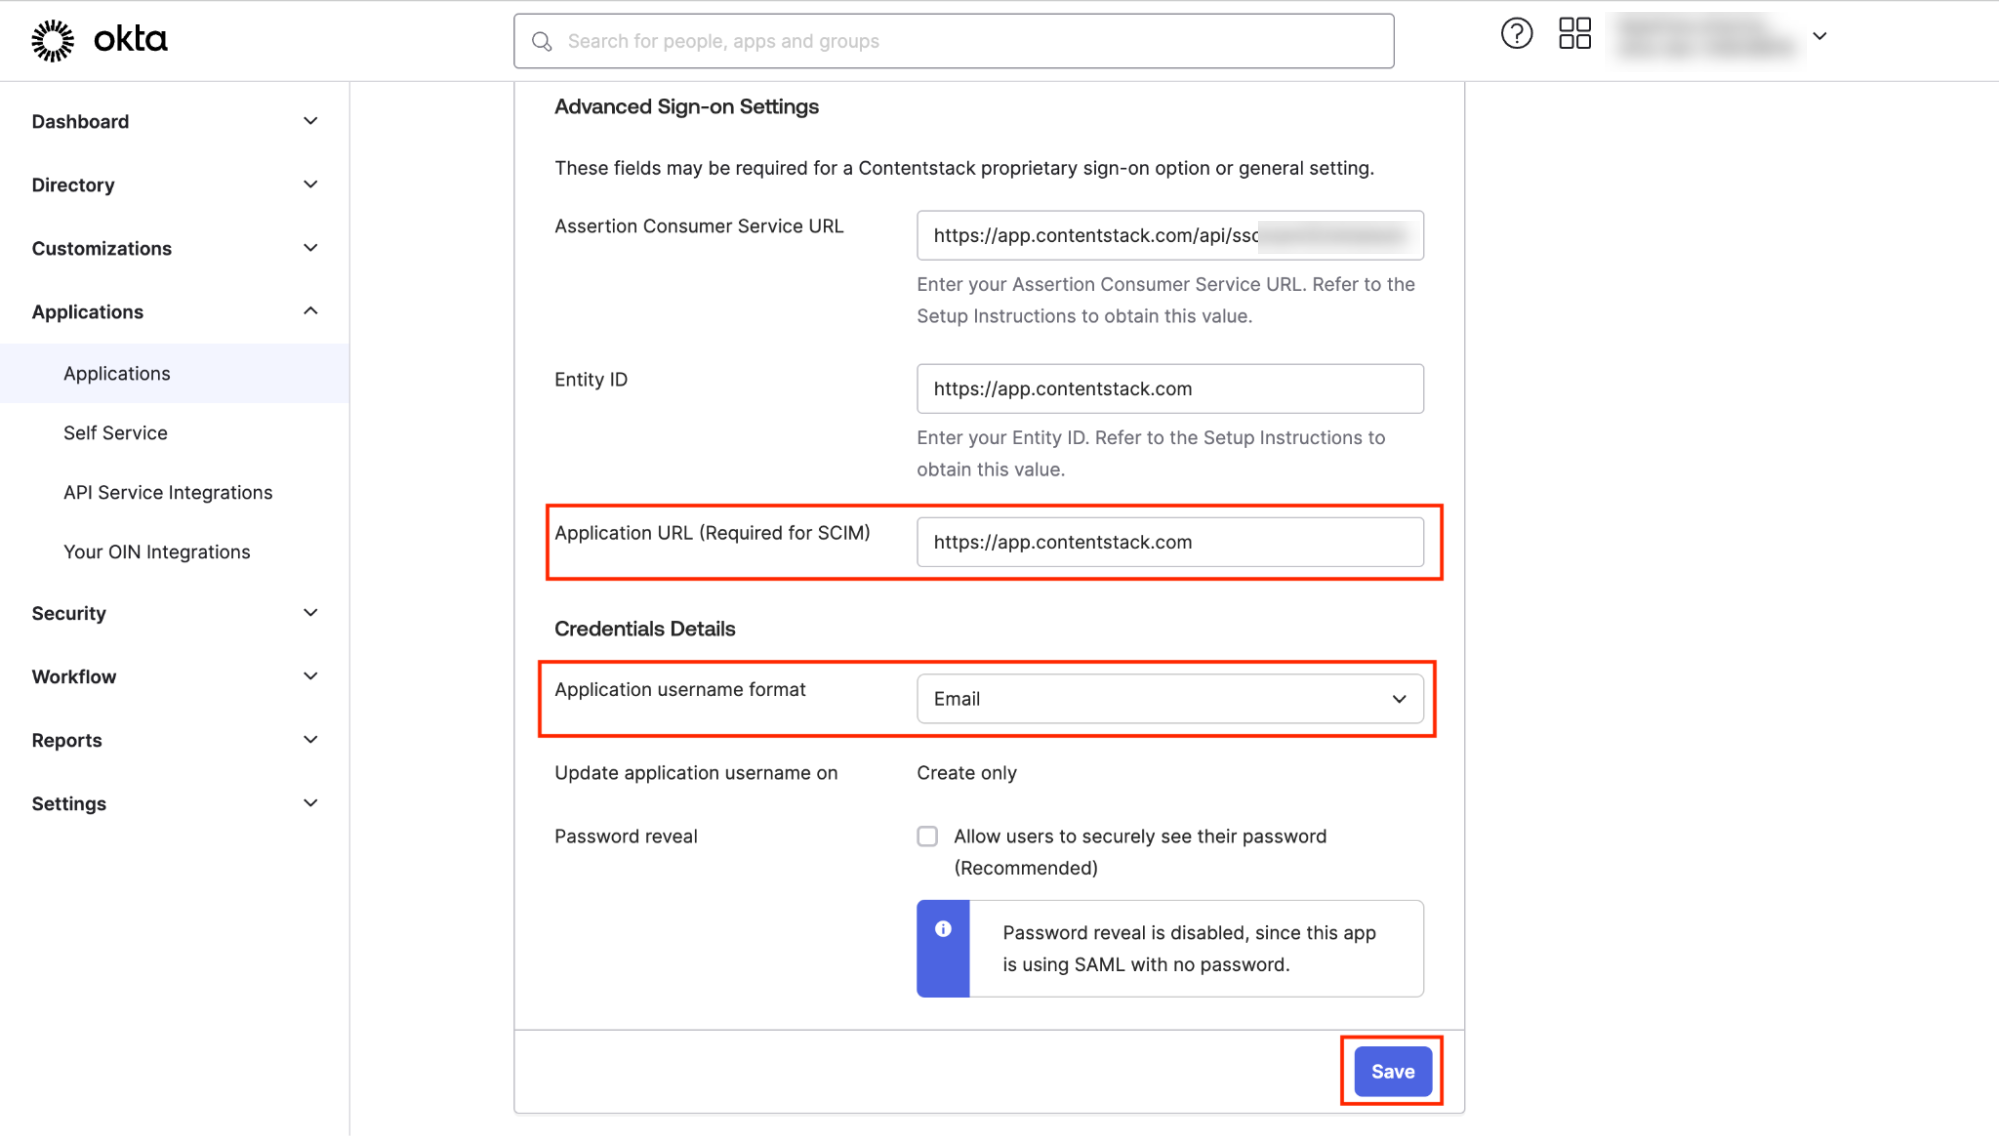
- Click Save.
- Click on Provisioning and then on Configure API Integration.
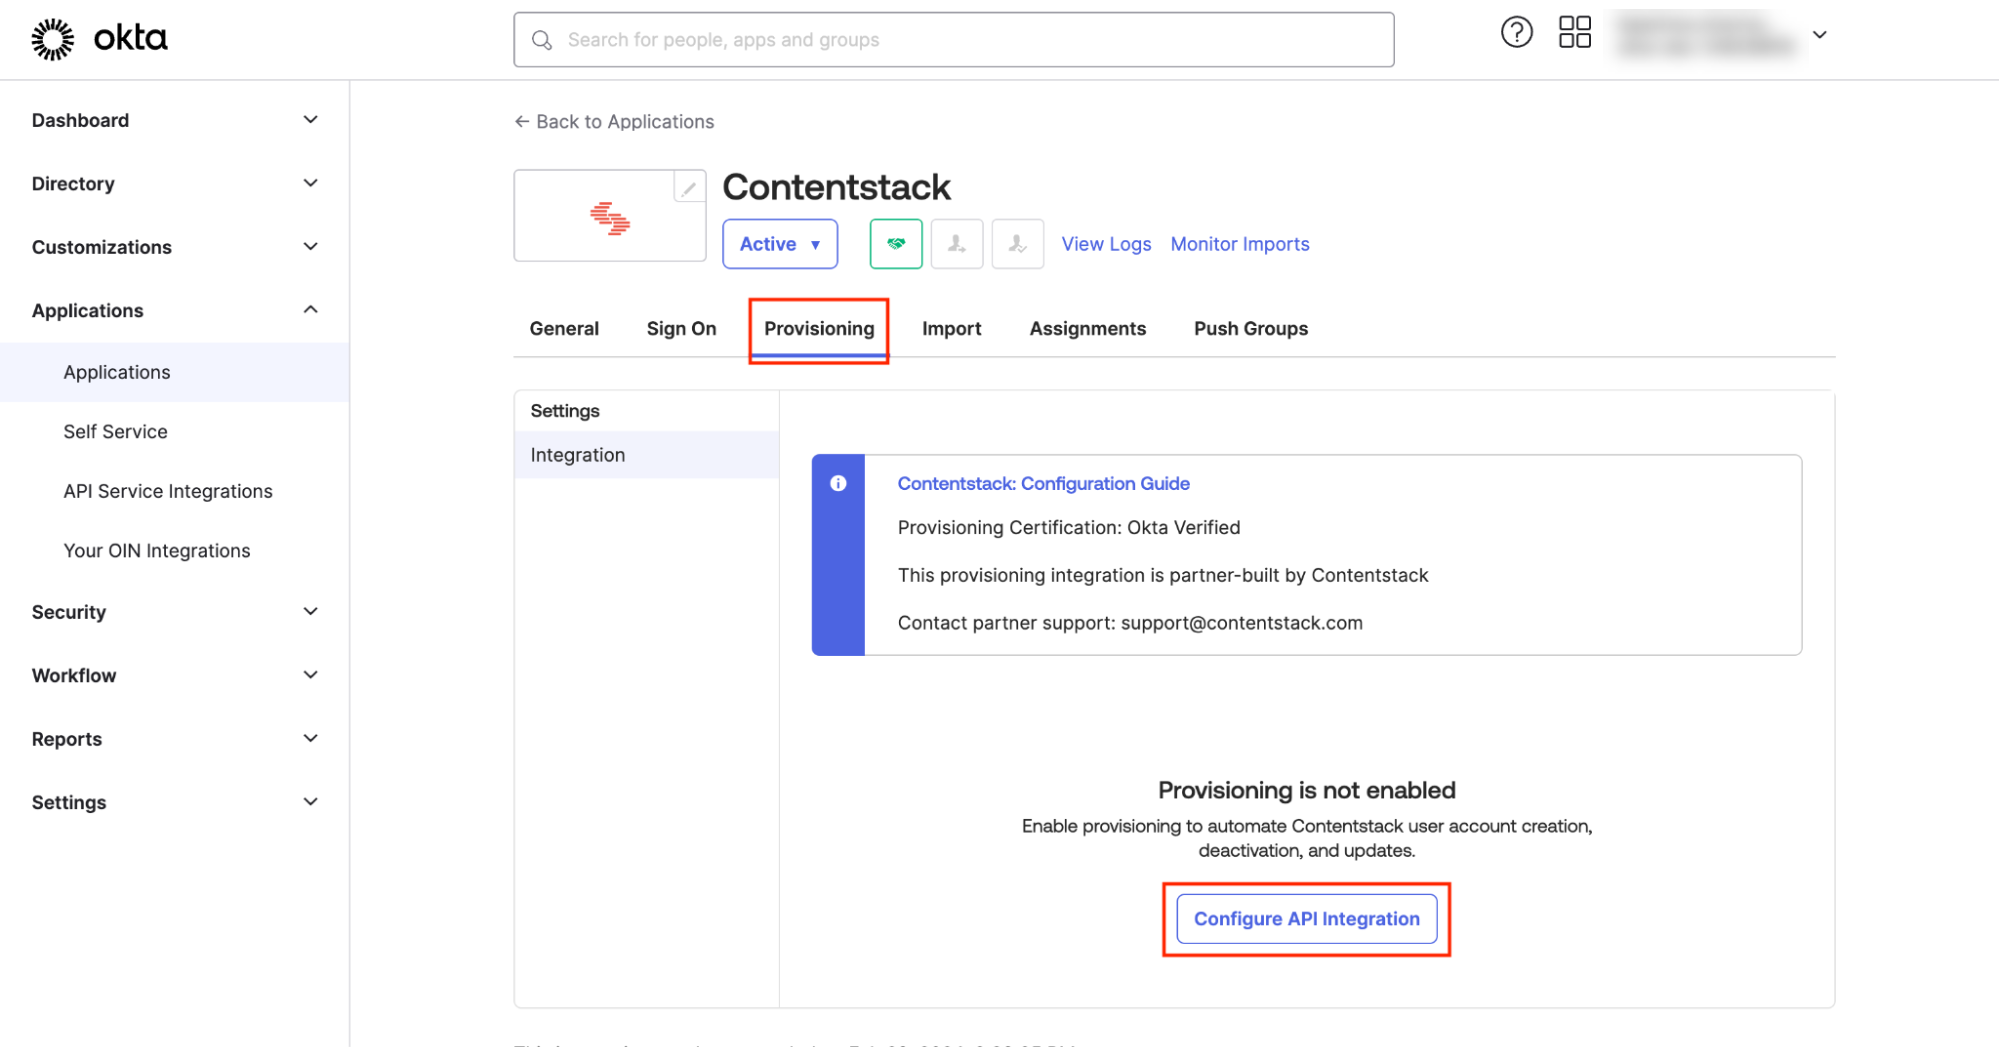
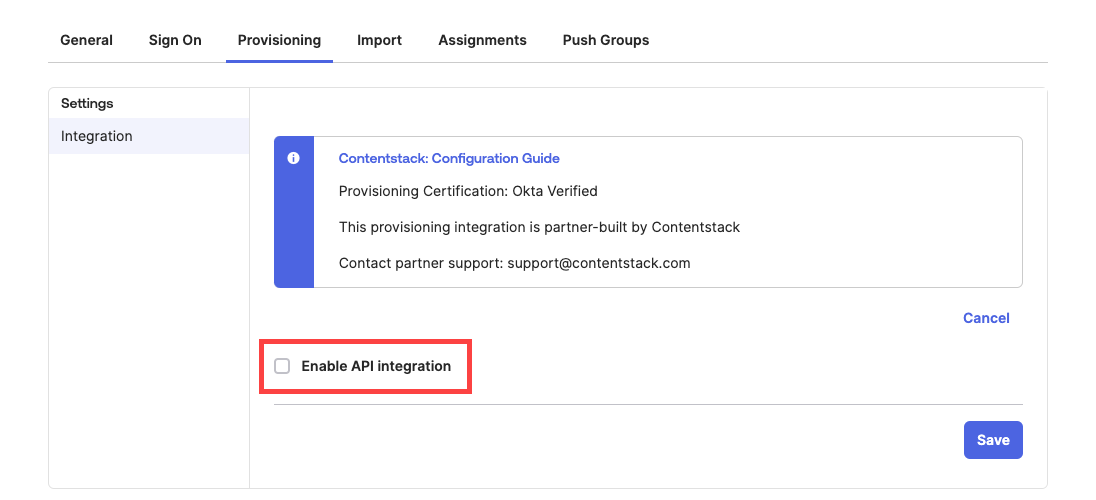
- Select Enable API integration.
- Navigate back to Contentstack. Click on the “Org Admin” icon and from the Organization Info page, copy the Organization ID.
- Next, you need to create the Base URL for the Contentstack Auth API. To do so, select the region-specific URL mentioned below, and replace ORG_ID with the Organization ID value you copied in the above step
Region Base URL North American https://auth-api.contentstack.com/scim/v2.0/organizations/ORG_ID Europe https://eu-auth-api.contentstack.com/scim/v2.0/organizations/ORG_ID Azure NA https://azure-na-auth-api.contentstack.com/scim/v2.0/organizations/ORG_ID Azure EU https://azure-eu-auth-api.contentstack.com/scim/v2.0/organizations/ORG_ID - Now enter this URL beside the Base URL field as shown below:
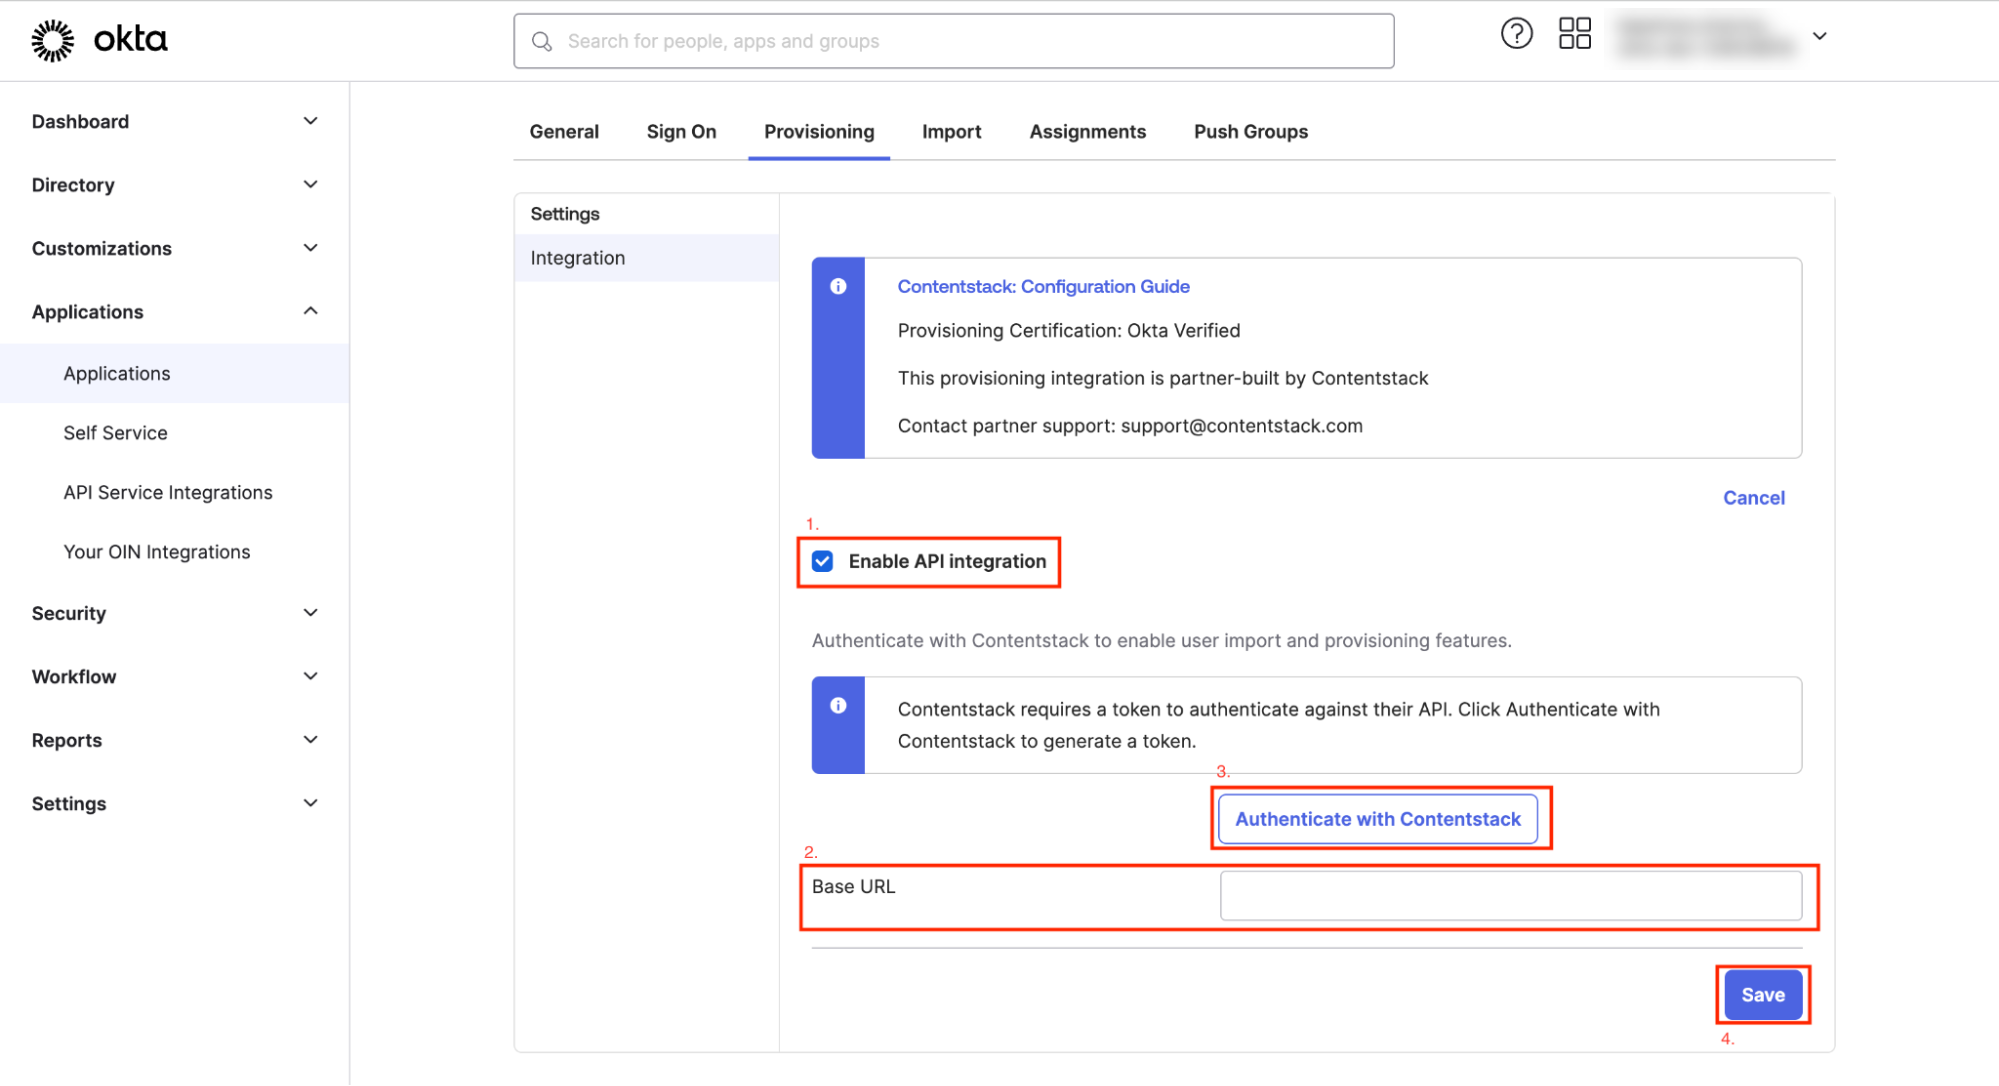
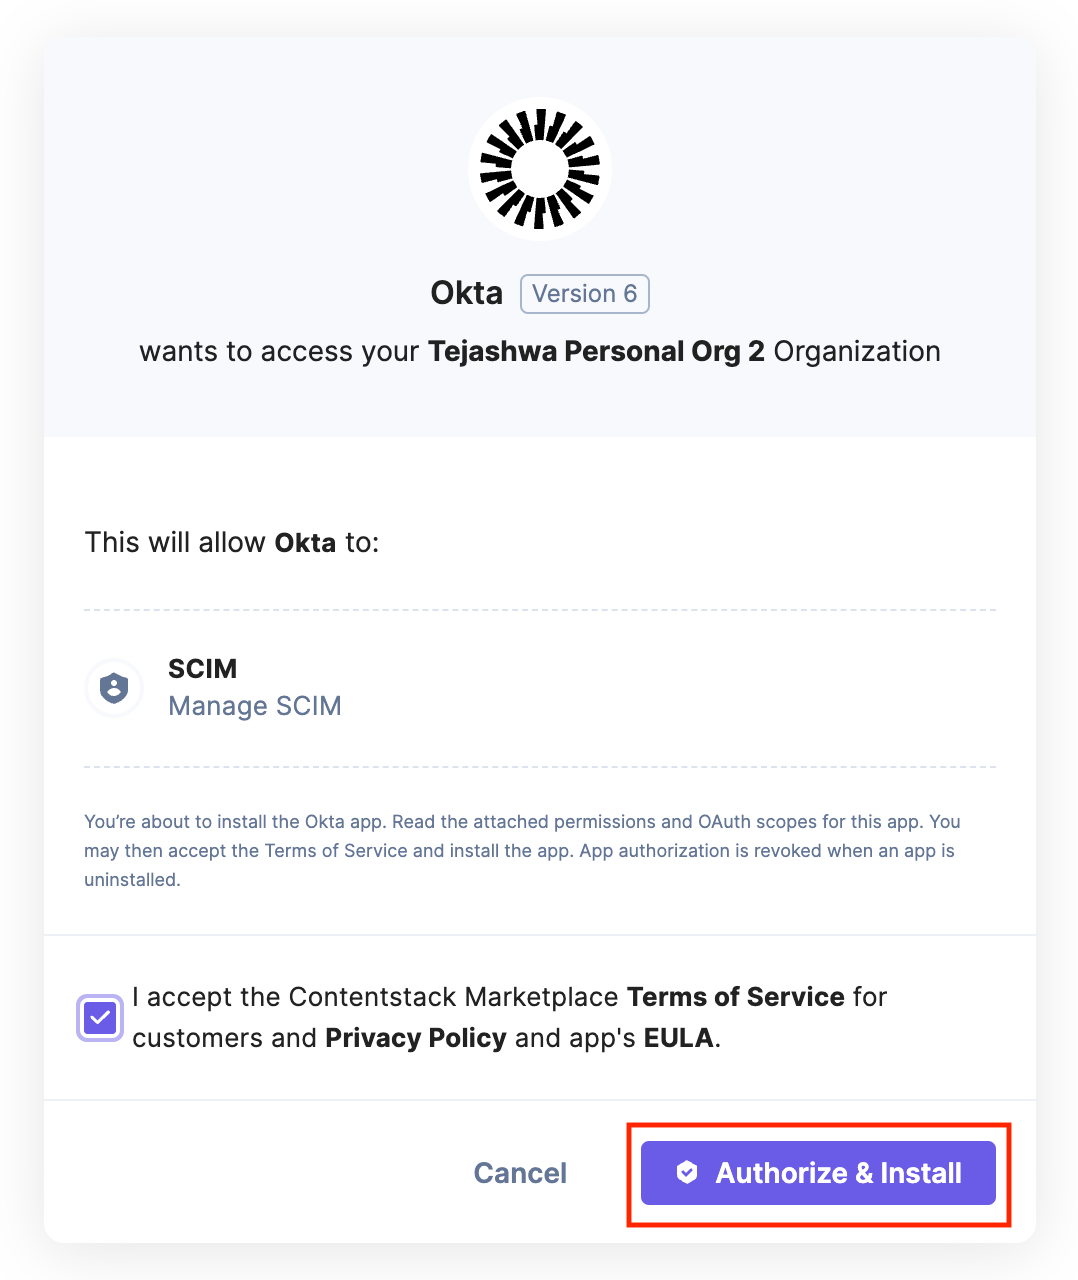
- Click on Authenticate with Contentstack and you will be redirected to the Contentstack Okta app to authorize.
- Click on Authorize & Install.
- Go to To App on the left under the Settings menu. Make sure you check all the values (as shown in screenshot below).
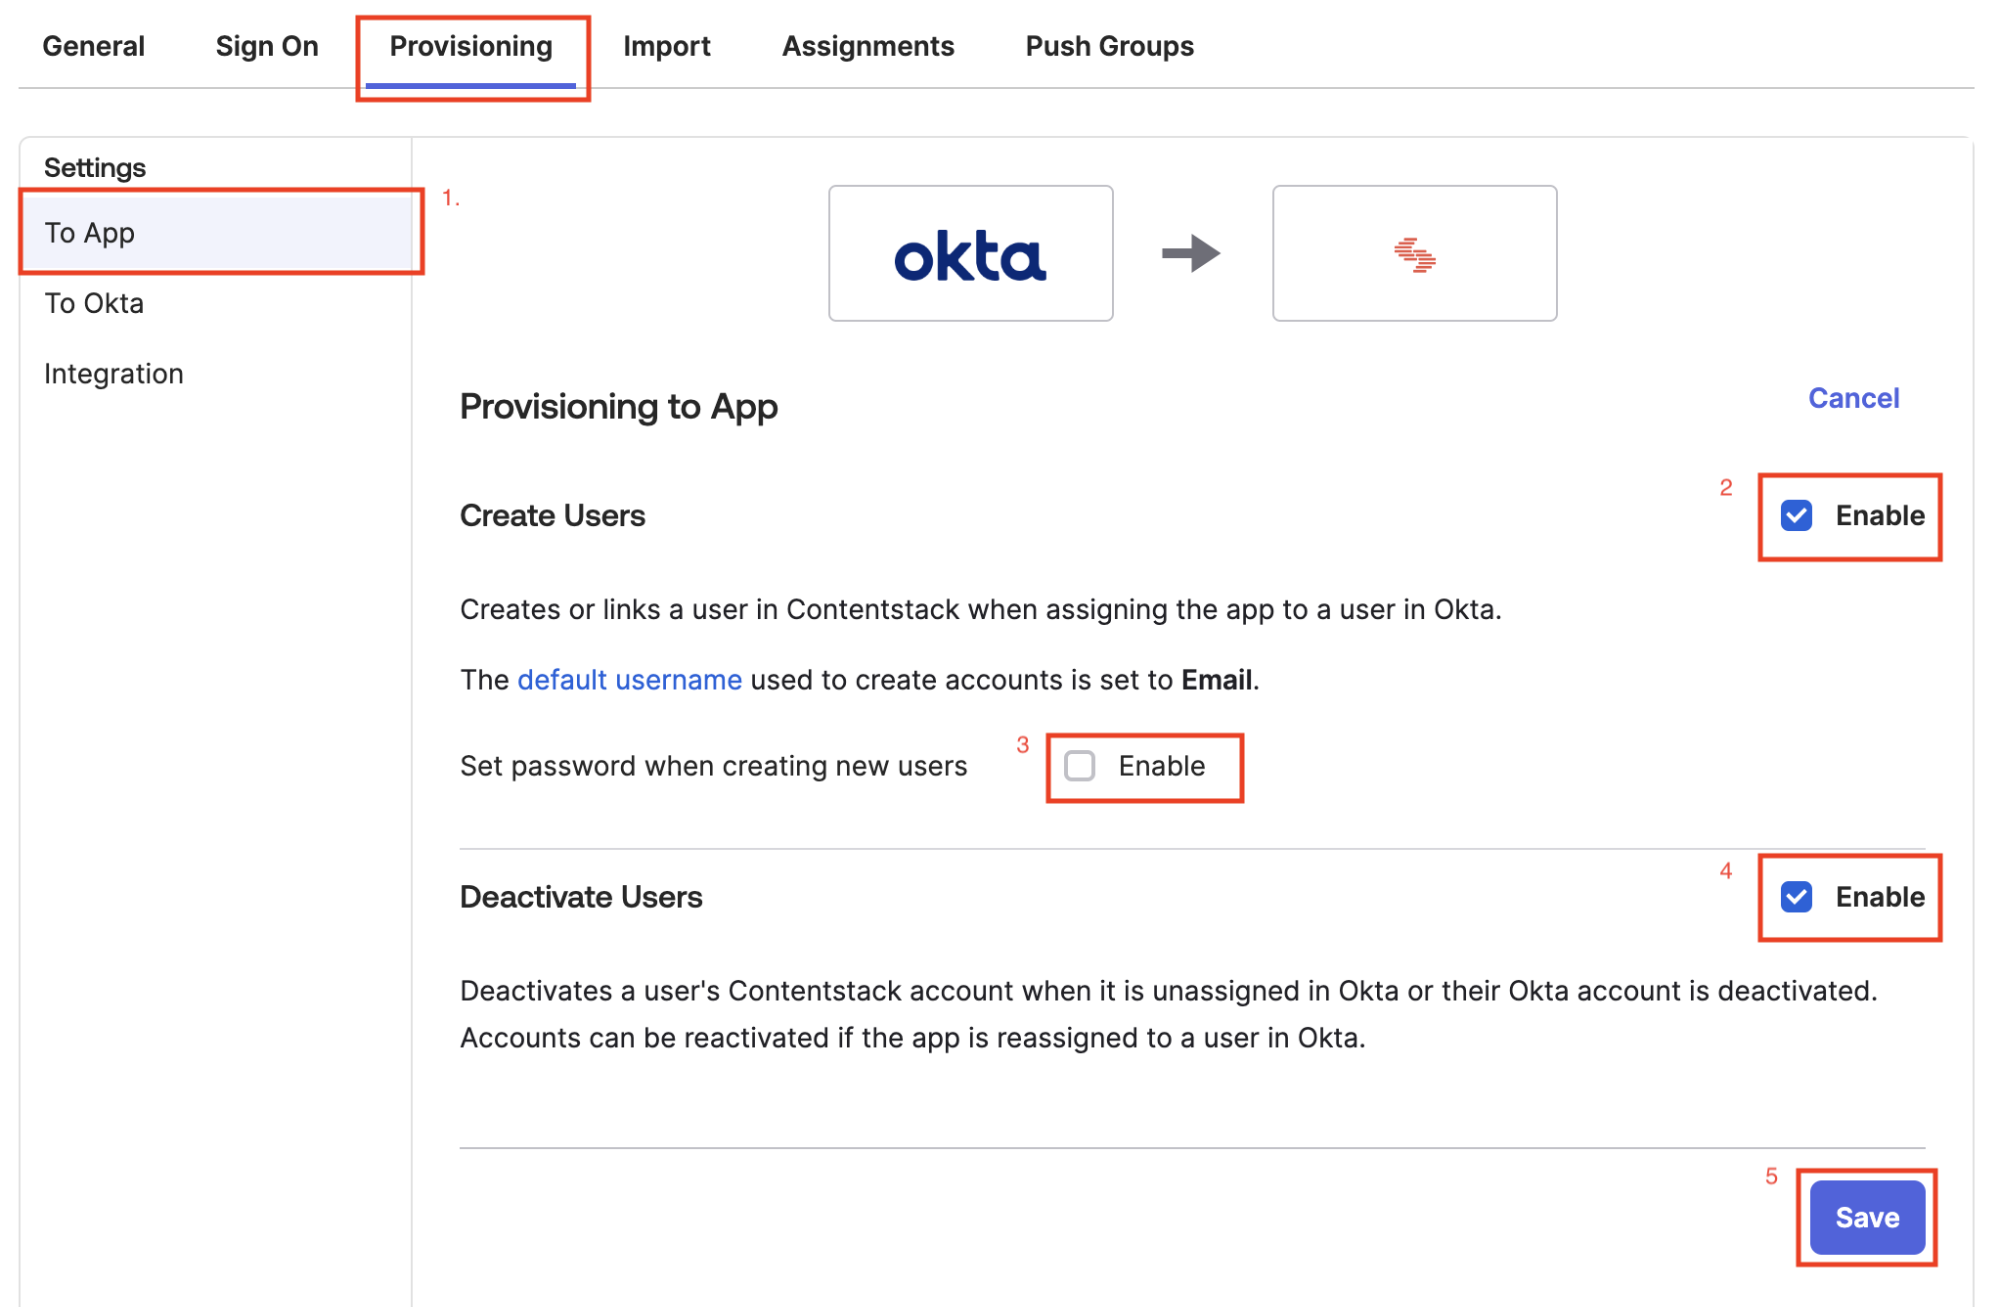
- Click Save.
- Locate the Sign On tab and click the Edit button on Okta Configured App.
-
Assign Users and Groups to your Application
After configuring the provisioning settings, you need to assign either users or groups (of users) to your app. Let’s see how to do them both.
Assign People to your Application
To assign people to your application, perform the following steps:
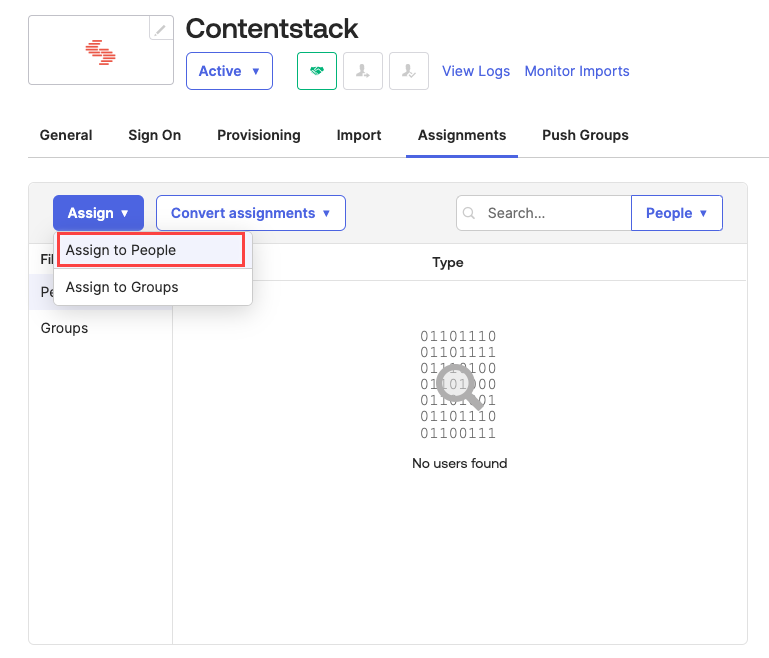
- Navigate to the Assignments tab. Click the Assign dropdown and select the Assign to People option.
- You need to provide the individual's email address and click the Assign button.
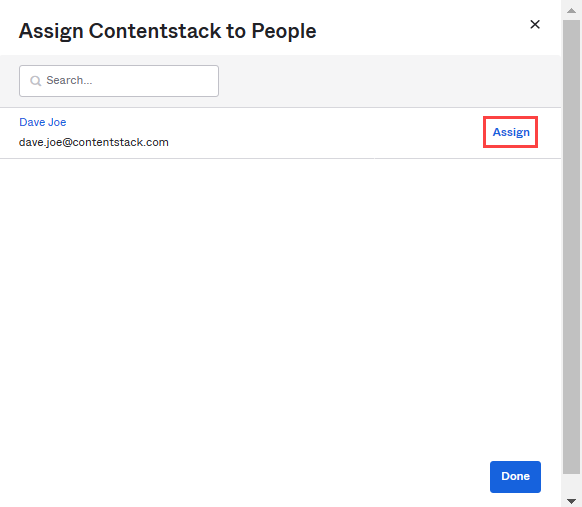
- In the resulting people assignment modal, click Save and Go Back.
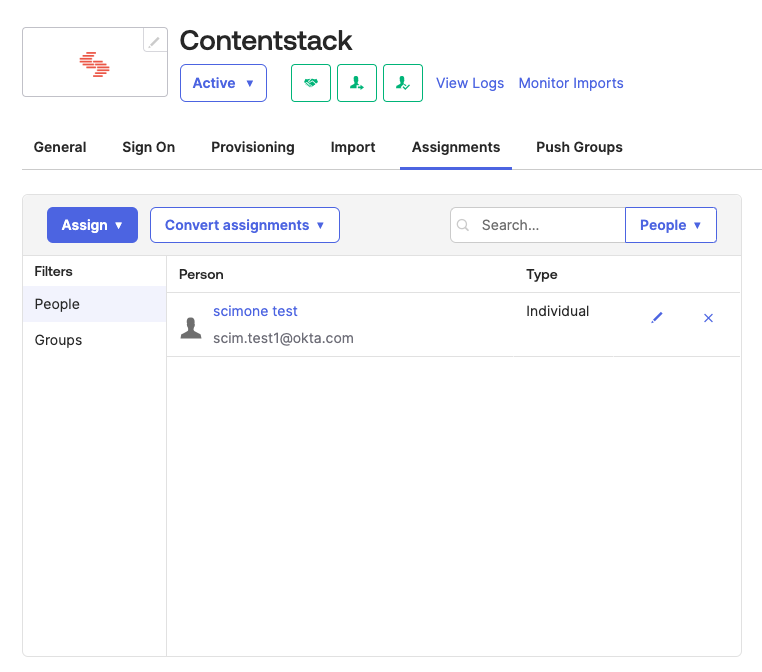
- Click Done to save the assignment. The people assignments are listed as shown below:
Assign Groups to your Application
To assign groups to your application, perform the following steps:
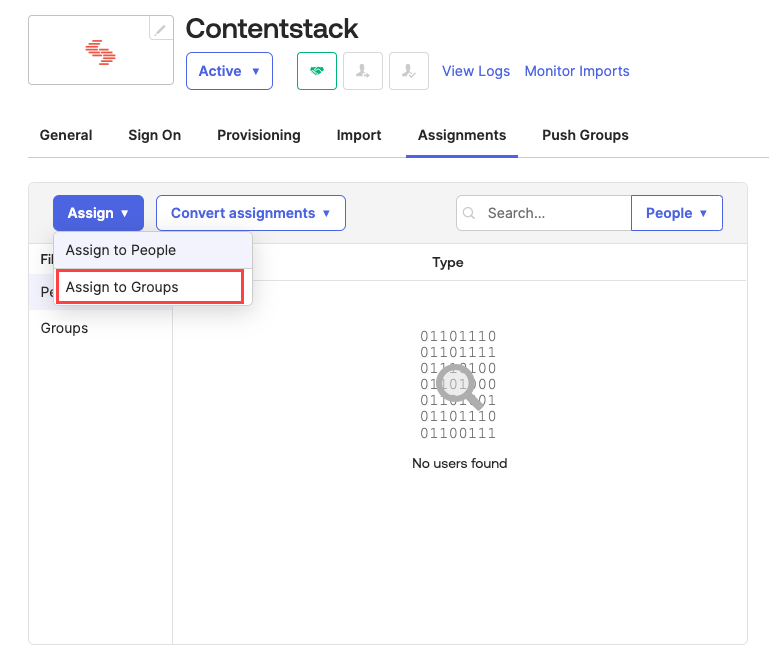
- Navigate to the Assignments tab. Click the Assign dropdown and select the Assign to Groups option.
- Click Assign against the group for assigning the group to your app.
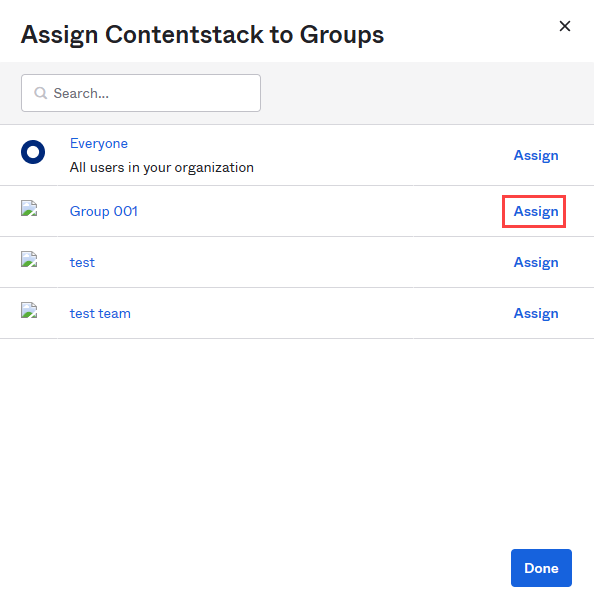
- In the resulting Assign Contentstack to Groups modal, provide the required information and click Save and Go Back. Then, click Done.
Another way to assign groups to your application is via the Push Groups method where you add rules and all groups that meet the rules will be added to the Contentstack app. Here’s how to do it:
- Navigate to the Push Groups tab. Click the Push Groups dropdown and select Find groups by rule.
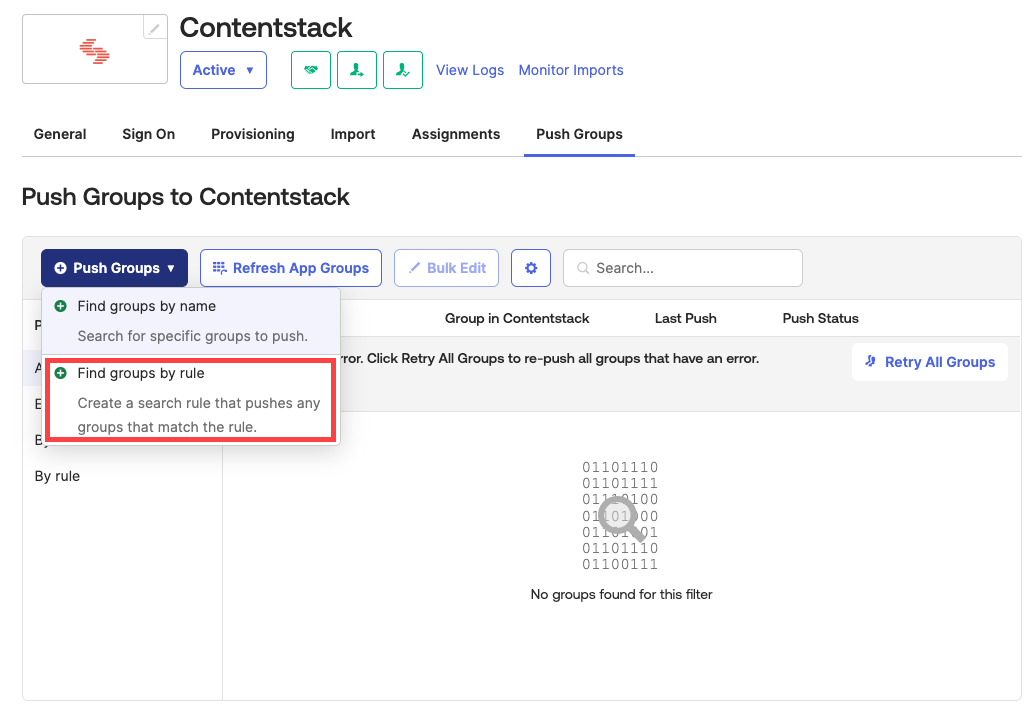
- In the resulting window, add some rules for the group and click Create Rule.
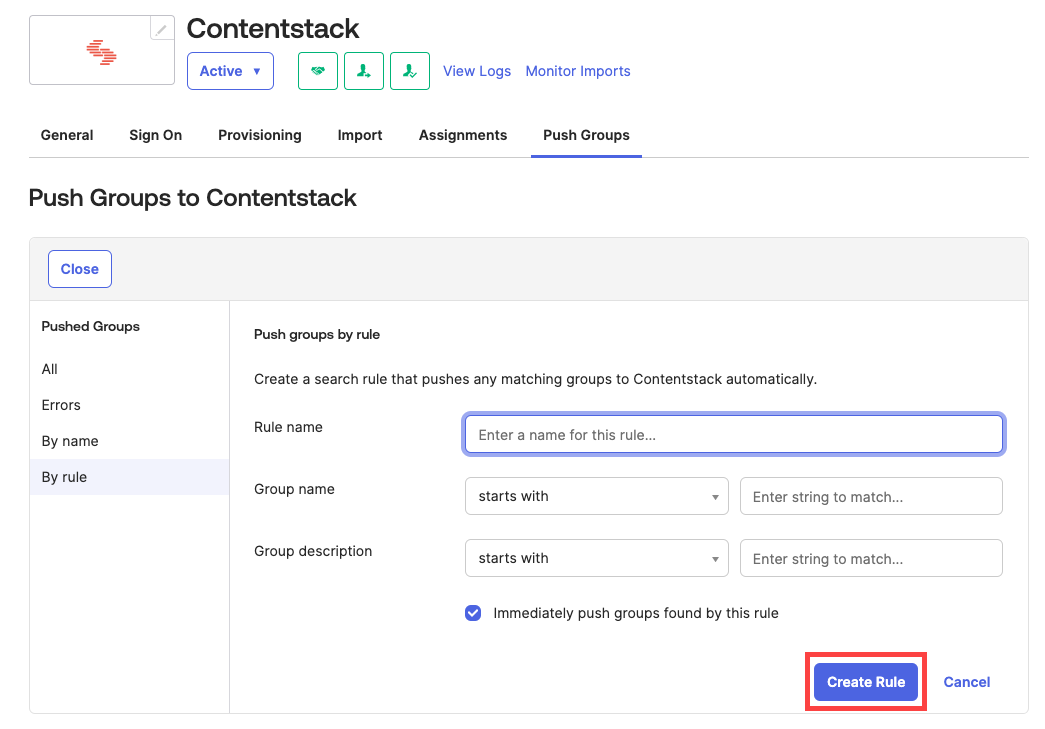
Create a rule that matches with the groups to be pushed to Contentstack. For example, if you have a rule created that will push all groups with a name that starts with “Contentstack” to your app (Contentstack).
- Navigate to the Assignments tab. Click the Assign dropdown and select the Assign to People option.
-
Create Group Mapping in Contentstack
Group mapping refers to the process of assigning permissions to the SCIM groups at the organization level and the stack level in Contentstack. The permissions you set for a particular group will be applicable to all the users added to that group.
To perform group mapping, perform the following steps:
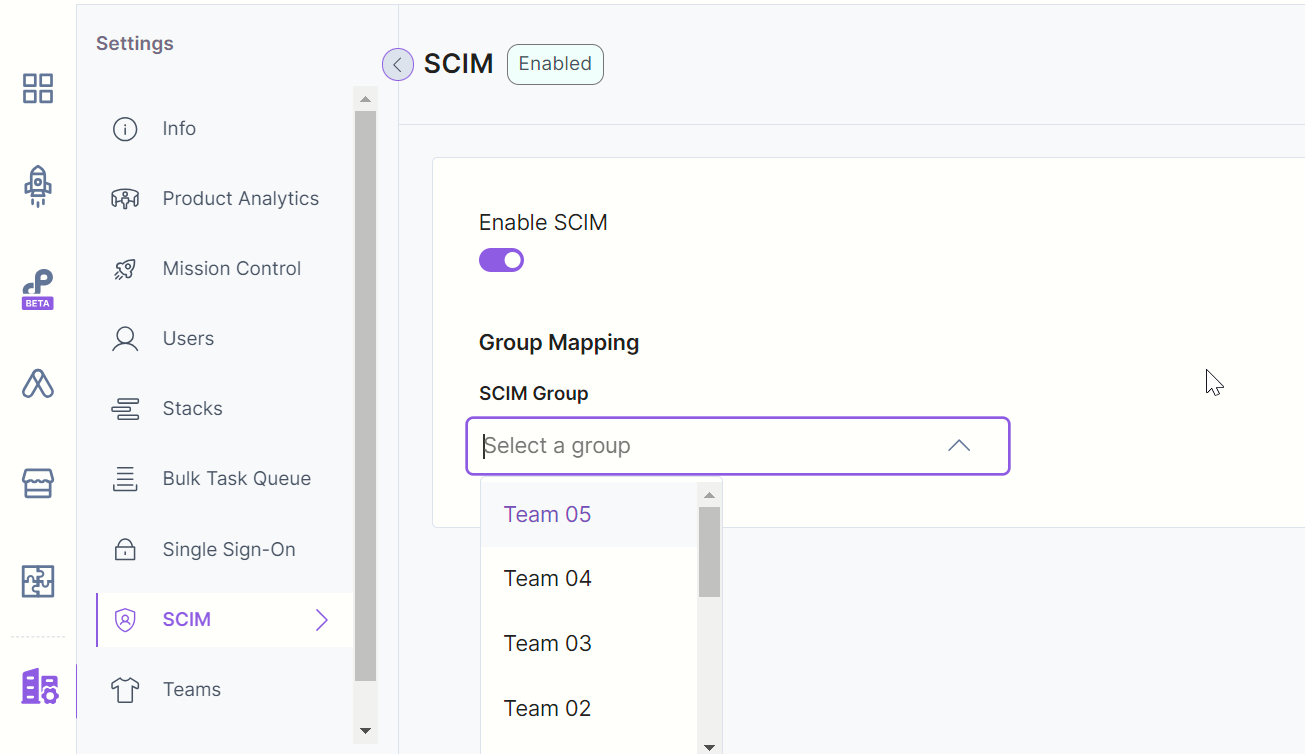
- Click on the Org Admin icon on the left and then to the SCIM tab.
- From the SCIM Group dropdown, select the group for which you want to set permissions.
- Select the Organization Role for the group.
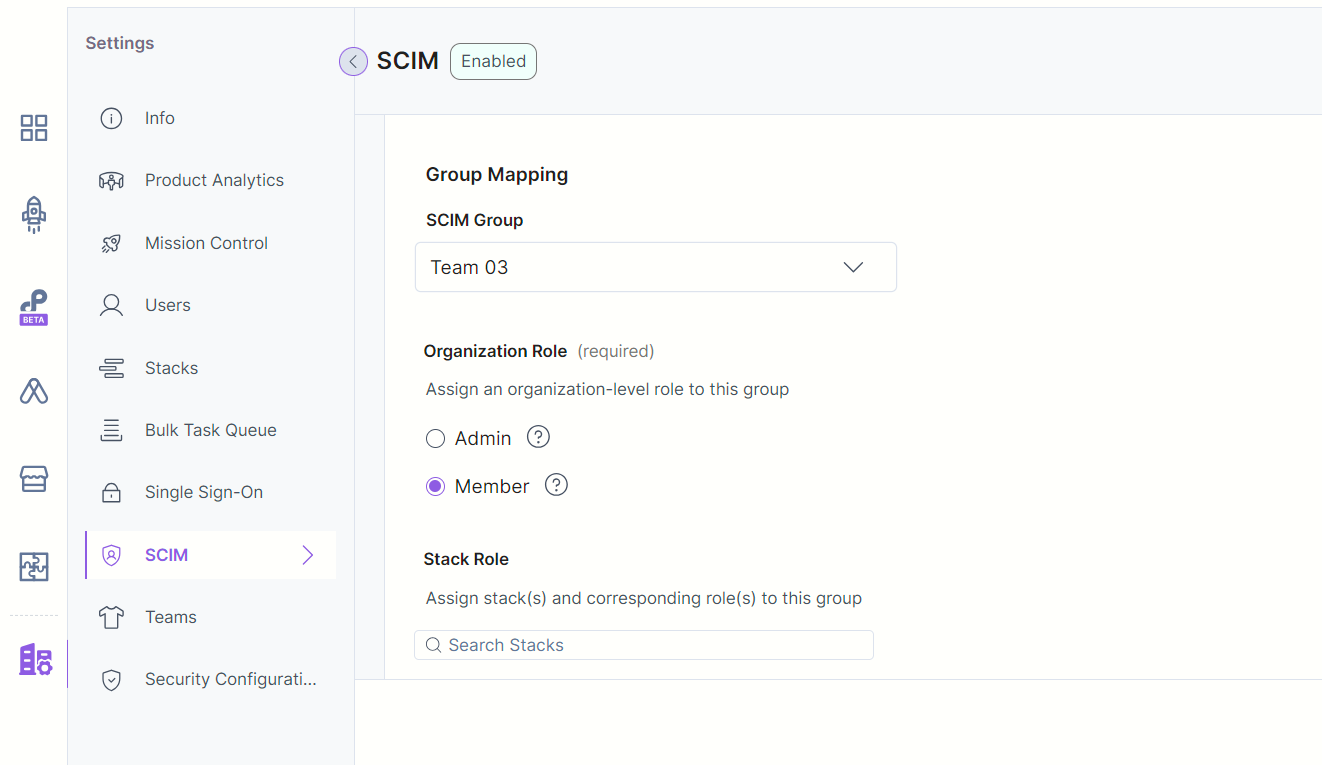
- Set Stack Role for the group. For example, if you set the “Developer” role for the “Developer stack” stack, users within the selected group will have a “Developer” role on that stack.
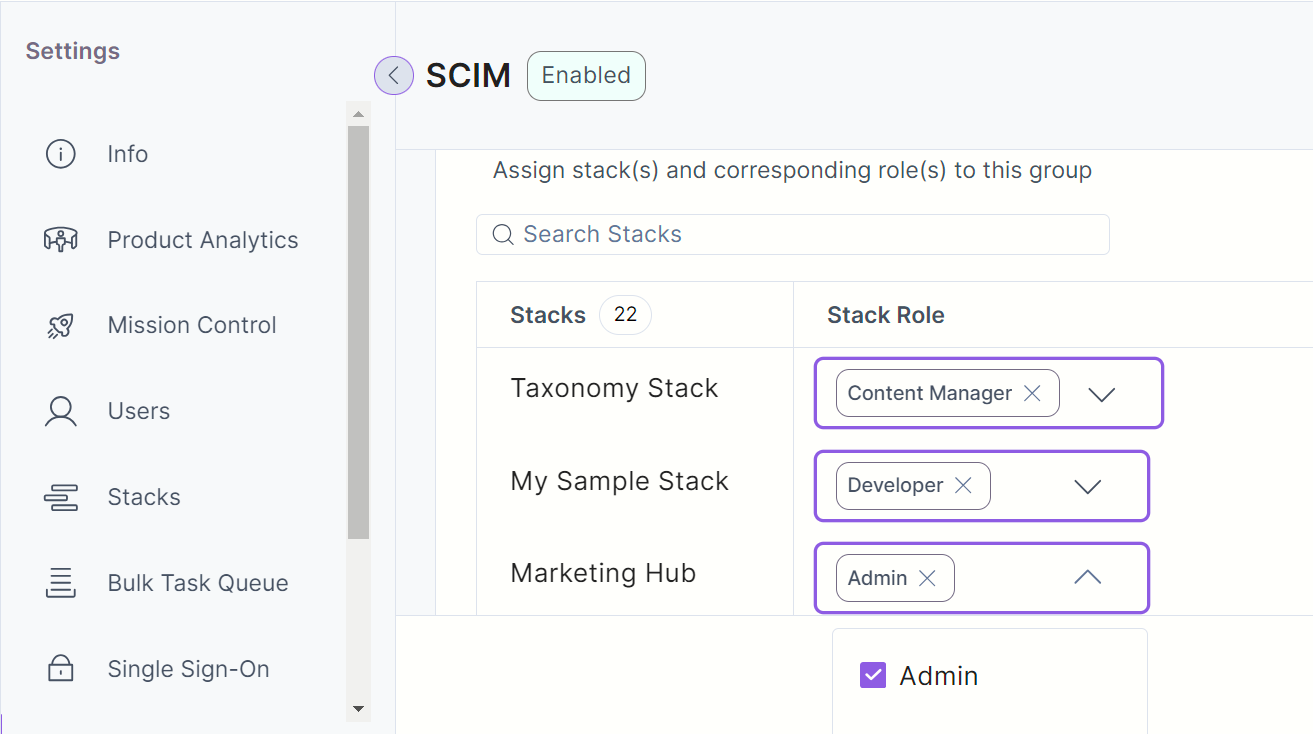
- Finally, click Update to update the changes in the group mappings.
- Click on the Org Admin icon on the left and then to the SCIM tab.
This process sets up the SCIM Provisioning for your Contenstack account with the Okta native app.
More articles in "SCIM Guides"
