


.jpg?format=pjpg&auto=webp)


Gatsby Preview
Preview, by Gatsby, is a service that lets you preview content changes as soon as you make them. The Gatsby Preview Sidebar Extension lets you use this service for your “Contentstack + Gatsby” websites and web apps. It allows content managers to preview content changes instantly.
This step-by-step guide explains how to use the Gatsby Preview prebuilt Sidebar Extension in Contentstack. The steps to be performed are as follows:
- Set up your Contentstack and Gatsby site
- Sign in and create a preview instance
- Configure your Gatsby site
- Set up the environment variable in Gatsby Preview
- Configure the Contentstack Preview Environment
- Configure Preview Webhooks
- Add the “Gatsby Preview” Sidebar Extension to your stack
- Use the extension
-
Set up your Contentstack and Gatsby site
Start by creating a Gatsby site. You can try using Contentstack’s gatsby-starter-contentstack starter kit to start building your Gatsby site.
Note: Gatsby Preview works best with Gatsby version 2.1.0 and higher. Make sure your site is built on the required Gatsby version.
Next, to preview your Gatsby site on Gatsby Preview, you need to enable your Gatsby site to pull data from Contentstack. To do so, use the gatsby-source-contentstack plugin.
Note: Make sure you add your Gatsby site’s source code on GitHub. This is essential for the next step i.e. when creating the preview instance.
For a detailed explanation of how to perform this and the following steps, you can follow the instructions provided in the Getting started with Gatsby Preview and Contentstack documentation.
Sign in and create a preview instance
- Open Gatsby Preview and select Sign in with GitHub.
- Authorize the Gatsby Preview app with your GitHub account. To request access to repositories, select “request access” or you can do that when adding a preview instance.
- Once authenticated with Preview and GitHub, go to the Create a new Preview instance page and select Add my own site.
- Next, you need to choose the repository that you want to build in a Gatsby Preview instance. Under Select a repository, select your Organization, and then, select your site’s GitHub repository from the list or using the search bar. You can work with repositories of more than one organization.
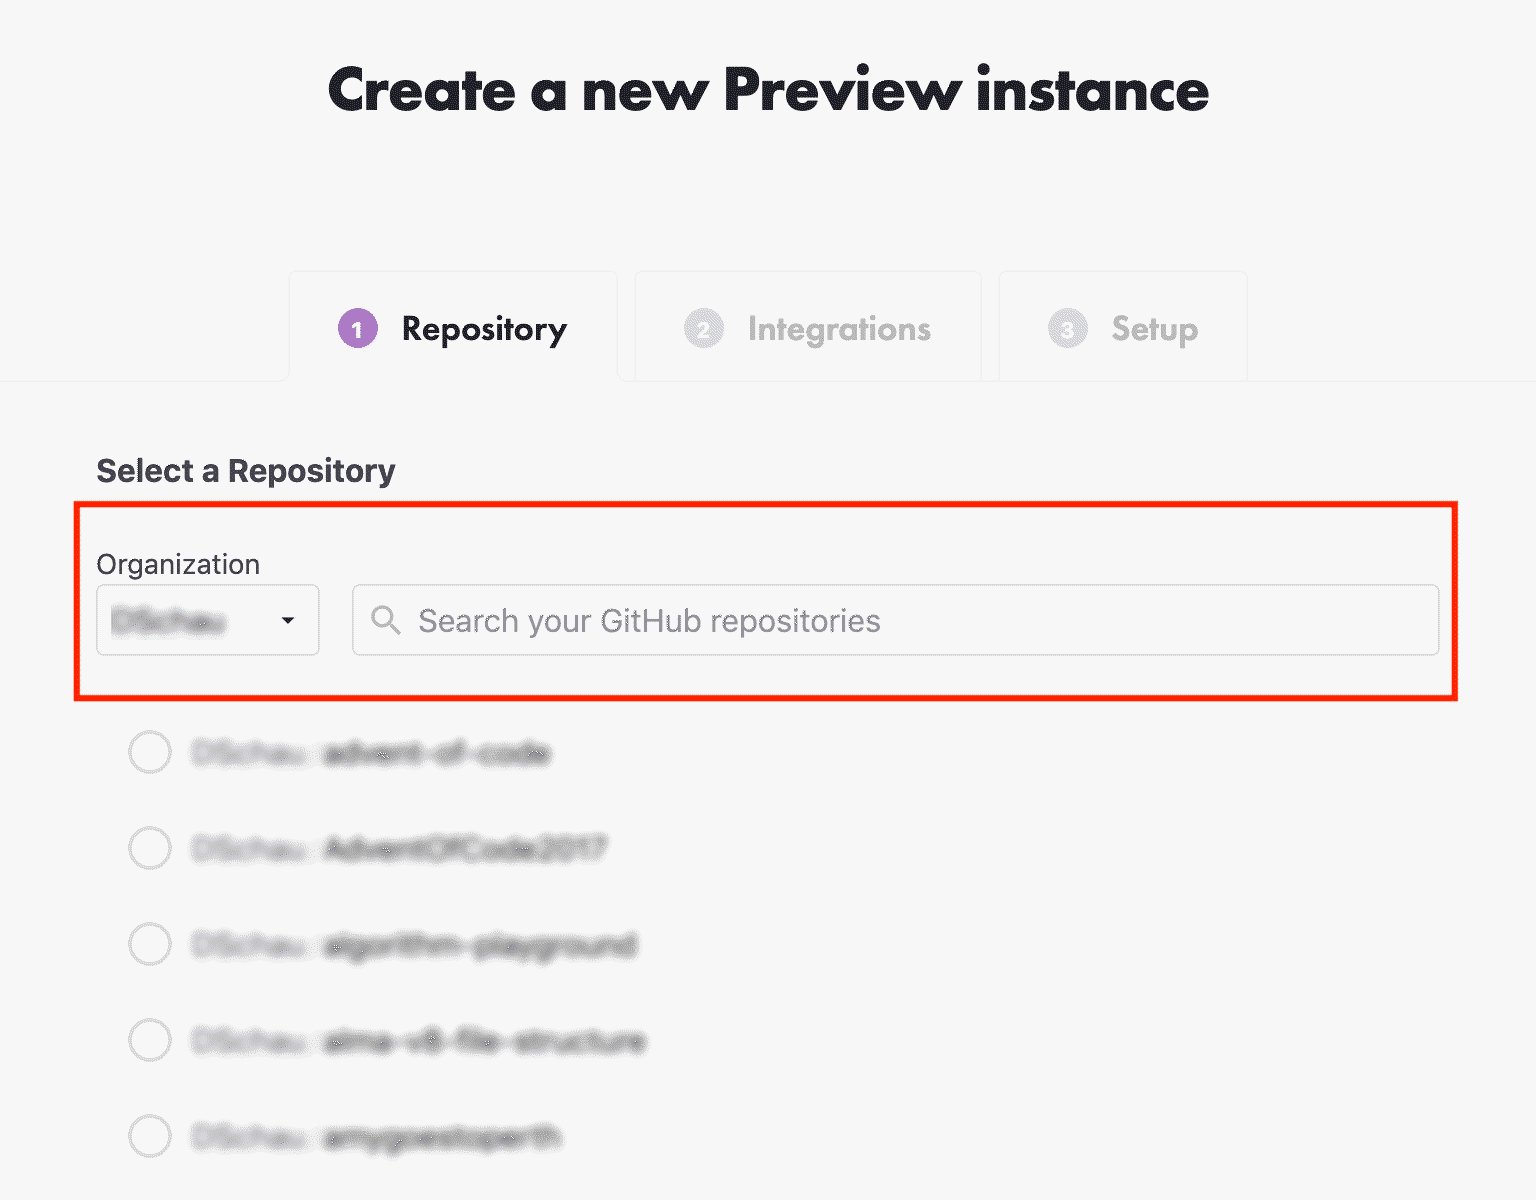
Note: If your Gatsby project isn’t in the root folder, you can add a path (e.g., /gatsby-site) configured at the root to be enabled. Gatsby Preview works best with Gatsby version 2.1.0 and higher.
Configure your Gatsby site
To configure your Gatsby site, you need to select the branch and then the publish directory of your Gatsby site. This directory should include the gatsby-config.js file.
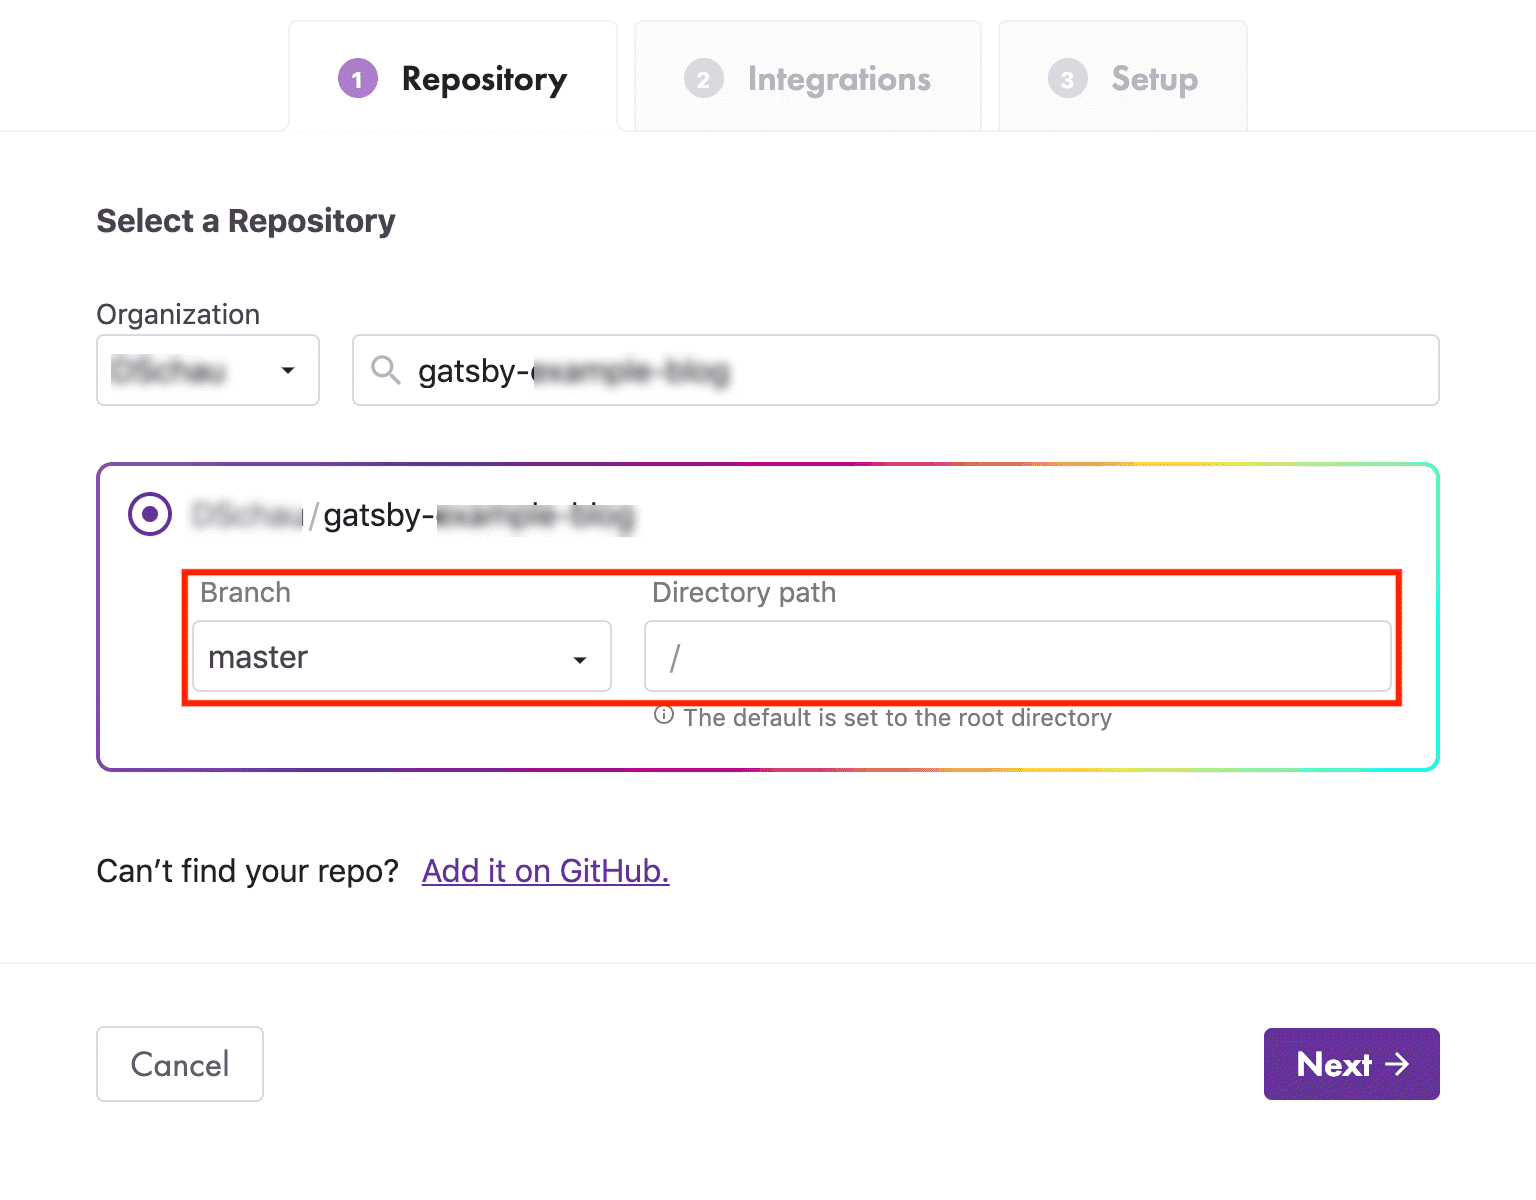
If you leave the repository field blank, it defaults to the root of the site.
Once done, click on Next. You will be led to the Integrations page. Since you have not configured an instance of Contentstack yet, you need to Skip this step.
For more details, refer to the Setting up a Contentstack and Gatsby site section.
Set up the environment variables in Gatsby Preview and Contentstack
Next, you need to set up the environment variables in Gatsby Preview. This variable will authorize your preview instance to pull data from Contentstack.
Gatsby Cloud will automatically try and detect environment variables that are present in your gatsby-config.js file.
Now, you need to create the corresponding environment (say, “Preview”) and its specific token in Contentstack.
Note: When creating the environment, leave the Base URL part blank for now as we will add here the Preview instance URL that will be generated after configuring the environment variable in Gatsby Preview.
If not present in your gatsby-config.js file, provide the API Key of the stack, the environment name, and the specific delivery token of the Contentstack environment to the environment variable in Gatsby Preview, and click on Next. This creates your preview instance URL. You will need this instance URL when configuring your Gatsby Preview extension in Step 5.
Note: You can create multiple preview instance URLs for multiple environment variables in Gatsby Preview as per your requirement. For more details, refer to the Setting up Environment Variables section within the Connecting to Contentstack documentation
Configure the Contentstack Preview Environment
After creating your “Gatsby Preview instance URL”, you need to configure your Contentstack Preview environment. To do so, log in to your Contentstack account and perform the following steps:
- Go to your stack and click on the “Settings” icon on the left navigation panel.
- Click on Environments.
- Select the Preview environment, and paste the “Gatsby Preview instance URL” under Base URL.
This configures your Contentstack Preview environment. Similarly, you can create multiple such preview environments as per your requirement.
Configure Preview Webhooks
Now, you need to add preview webhooks in Contentstack that will notify Gatsby Preview whenever you make changes to your website. To do so, perform the steps given below:
- Open the Settings page of your Gatsby Preview instance and copy the webhook URL
- Navigate to Contentstack and create a new “Gatsby Preview” webhook in Contentstack. Under URL to notify, add the copied Webhook URL.
You can add multiple webhooks that cater to different events, such as create, update, delete, publish, and unpublish, that you can perform on your content.
Note: For more details, refer to the Configuring the Preview Environment section within the Connecting to Contentstack documentation.
Next, you need to integrate the Gatsby Sidebar Extension with Contentstack stack.
Add the “Gatsby Preview” Sidebar Extension to your stack
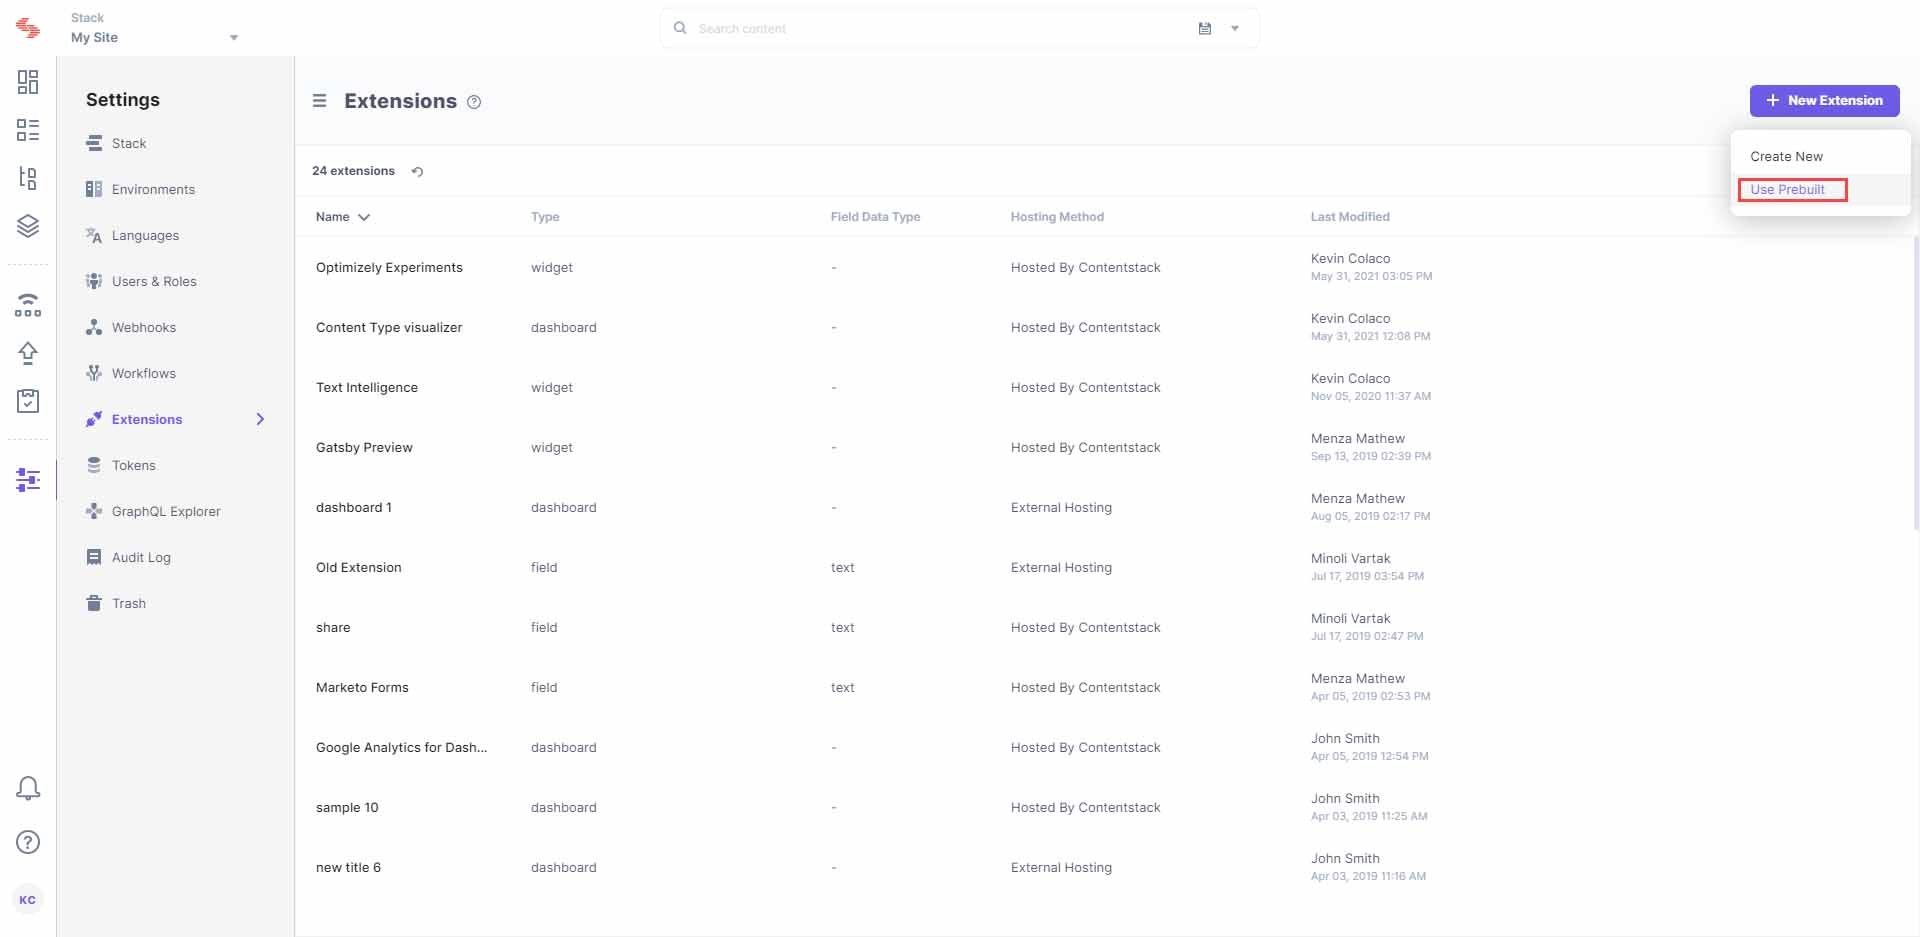
To add the Gatsby Preview Sidebar Extension, log in to your Contentstack account and perform the following steps:- Go to your stack and click on the “Settings” icon on the left navigation panel.
- Click on Extensions
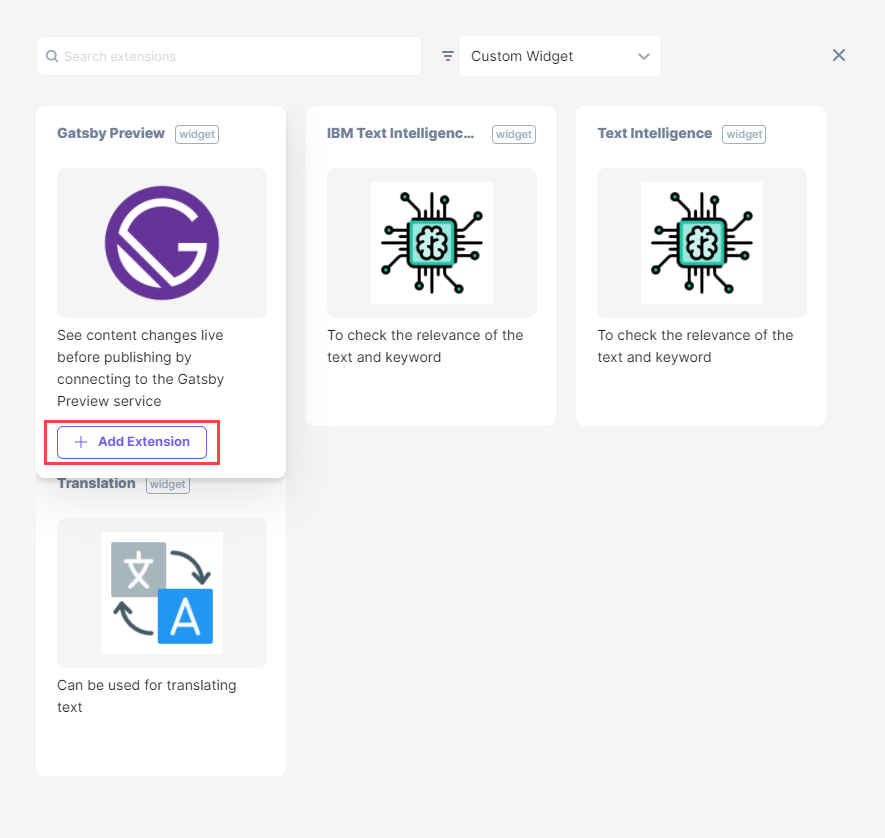
- Click on the + New Extension button on the top-right corner and select Use prebuilt.
- Click the filter dropdown and select Sidebar Extension.
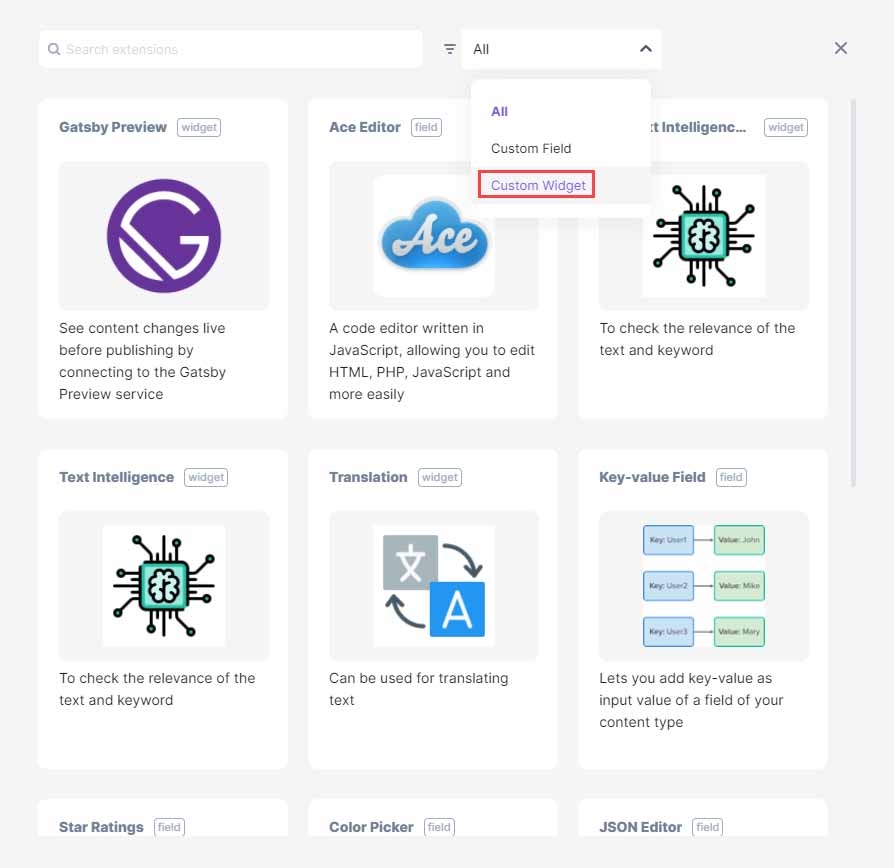
- From the available options, select Gatsby Preview and click on + Add Extension.
- You will see the Sidebar Extension configuration page, where most details of the fields would be pre-filled. Enter widget-specific details in the fields as given below:
- Title: Provide a suitable title. For example, Gatsby Preview
- Hosting method: By default, Hosted By Contentstack will be selected.
- External source code: In this field, you need to enter the extension code. If Extensions are part of your plan, contact our Support team to get the code for the extension.
The support team will provide you with the source code (src file). Copy the code from the index.html file located in the root folder and paste it in the "Extension source code" field. - Config Parameter: Enter the “Gatsby Preview instance URL” that you created in Step 4.
{ "siteUrl": "your_gatsby_preview_instance_url" } - Scope: You can choose to incorporate this Sidebar Extension in either All Content Types or Specific Content Types. Selecting the latter option displays a list of content types from which you can select the required ones.
- Click on Save. This will create your extension.
Now, let’s understand how to use this Sidebar Extension in your entries.
- Go to your stack and click on the “Settings” icon on the left navigation panel.
Use the extension
Once you have added this Sidebar Extension, you can use it in the entries of the selected content type(s). Let’s look at the steps involved in using this widget.
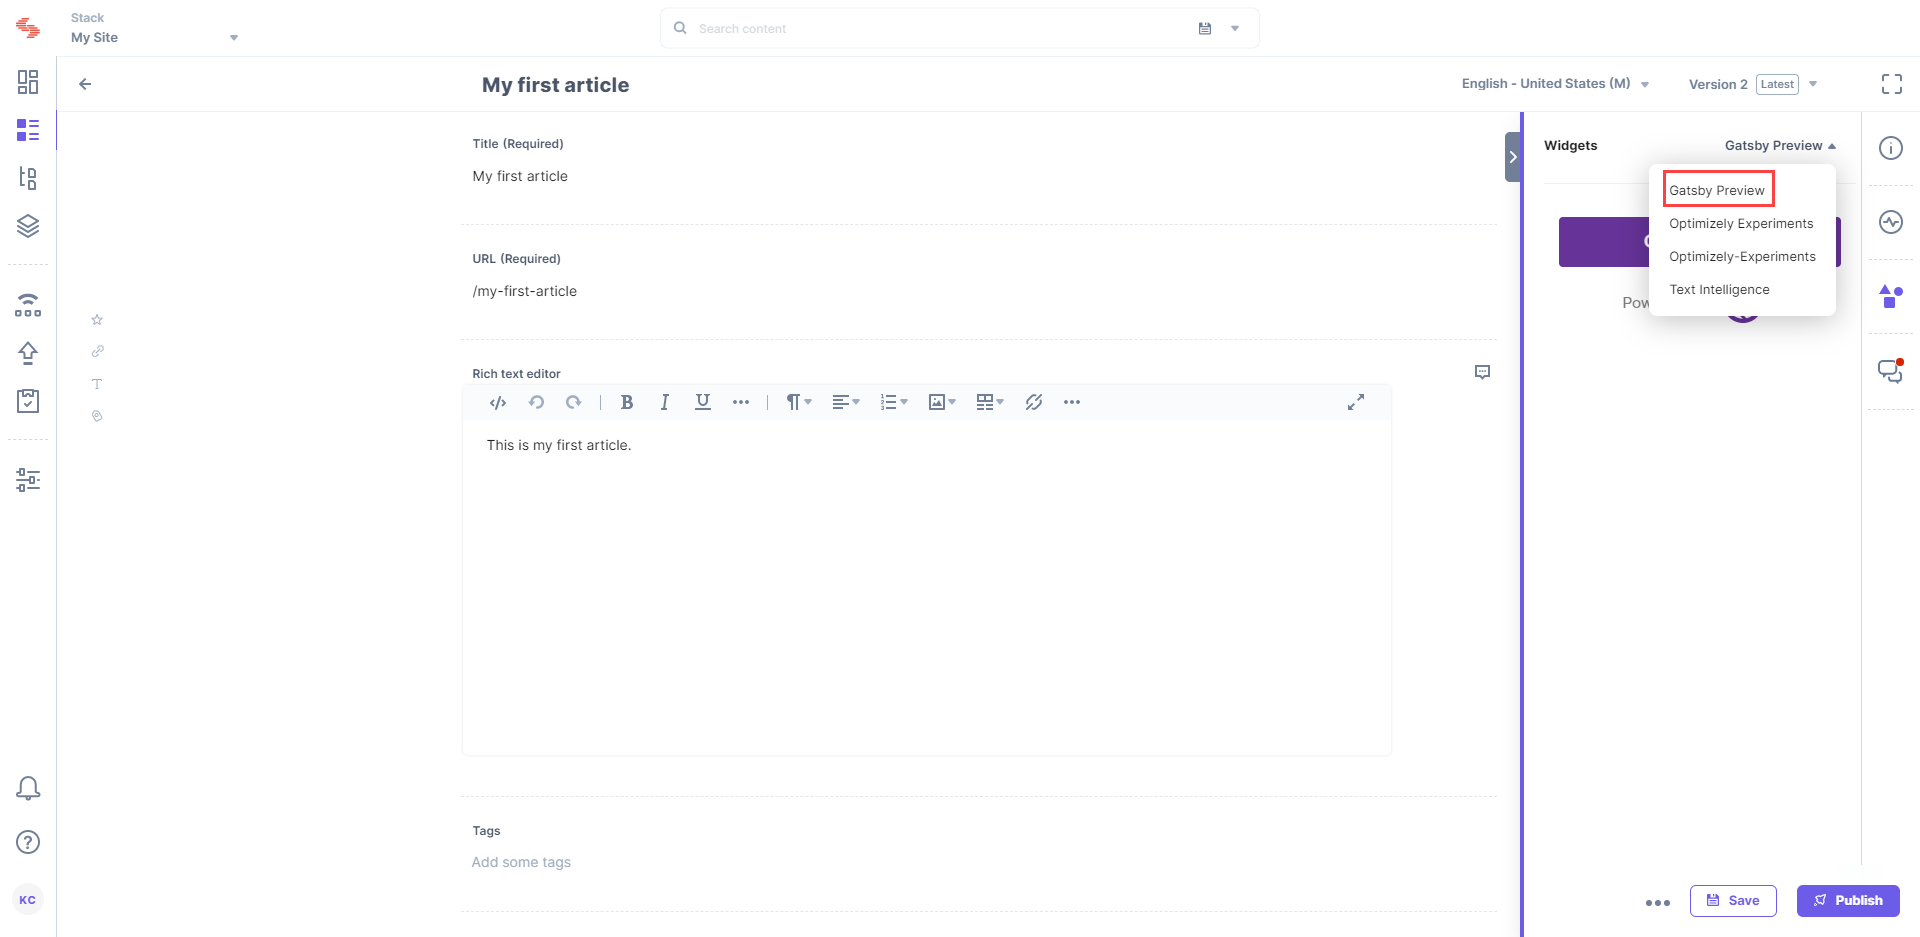
- Go to your stack and click on the “Entries” icon on the left navigation panel.
- Click on the content type for which you have enabled the Sidebar Extension and click on an entry
- Click the “Sidebar Extensions” icon on the right-hand side of the page to expand the sidebar.
- Select Gatsby Preview from the drop-down menu.
- The selected Sidebar Extension expands on the sidebar and you’ll see the Open Preview button.
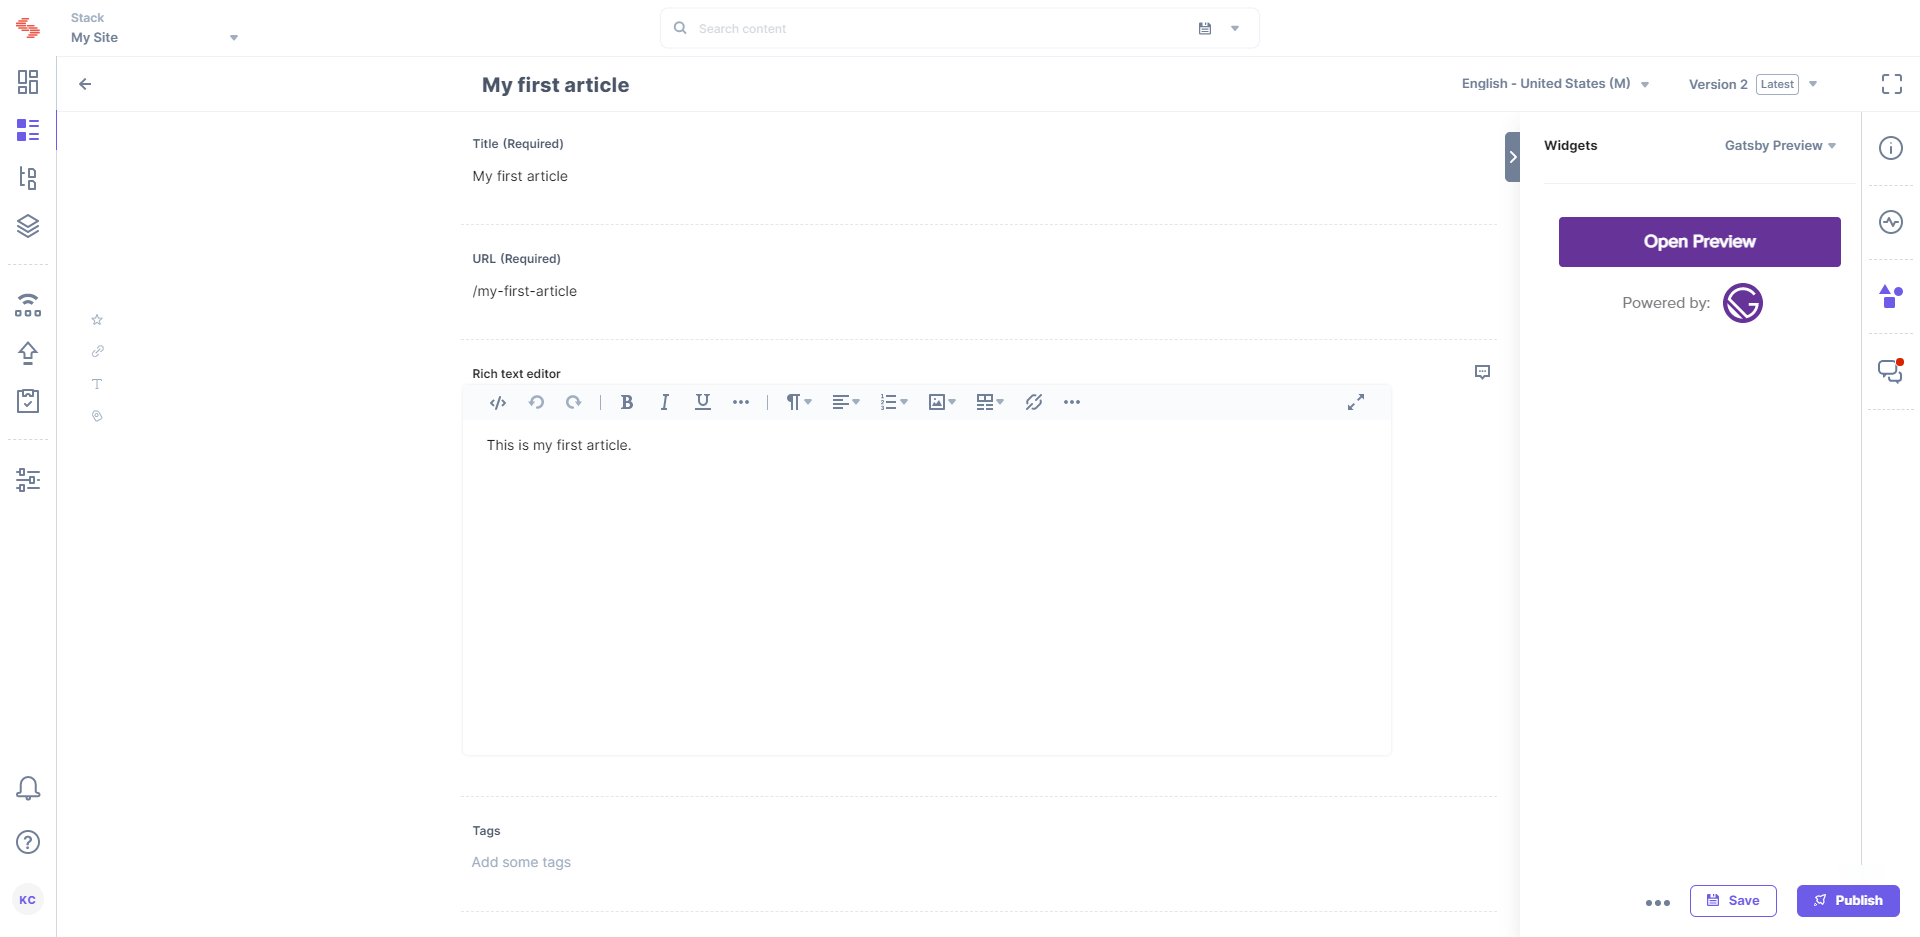
- After adding your entry content or making changes to your existing entry’s content, publish the entry.
- Click on Open Preview.
This will take you to the “Gatsby Preview instance URL” of your site. Once you open this URL, all the changes that you publish to your entry can be previewed instantly on this URL. Do not close the page until you are done working on the content. - Once done using the Sidebar Extension, click on the close (x) button.
Additional Resource: You can build your own app using Gatsby by refering the build a sample website using Gatsby and Contentstack document.
