Pathfora
Pathfora is the client-side presentation layer that translates Lytics audience data into visible on-site experiences. Once profiles are built and audiences are defined, Pathfora is how you act on that data in the browser — rendering modals, slideouts, bars, gates, and inline blocks targeted to the right visitors at the right moment. This section covers the architecture, the experience management workflow, the editor, the available widget types, common use cases, and how to interpret performance reporting so you can launch and optimize on-site personalization end-to-end.
Overview
Learning Objectives
By the end of this section, you will be able to:
- Explain what Pathfora is and how it works with the Lytics JavaScript tag
- Understand the role of on-site experiences in personalization strategy
- Navigate the Pathfora management UI to view and organize experiences
Overview
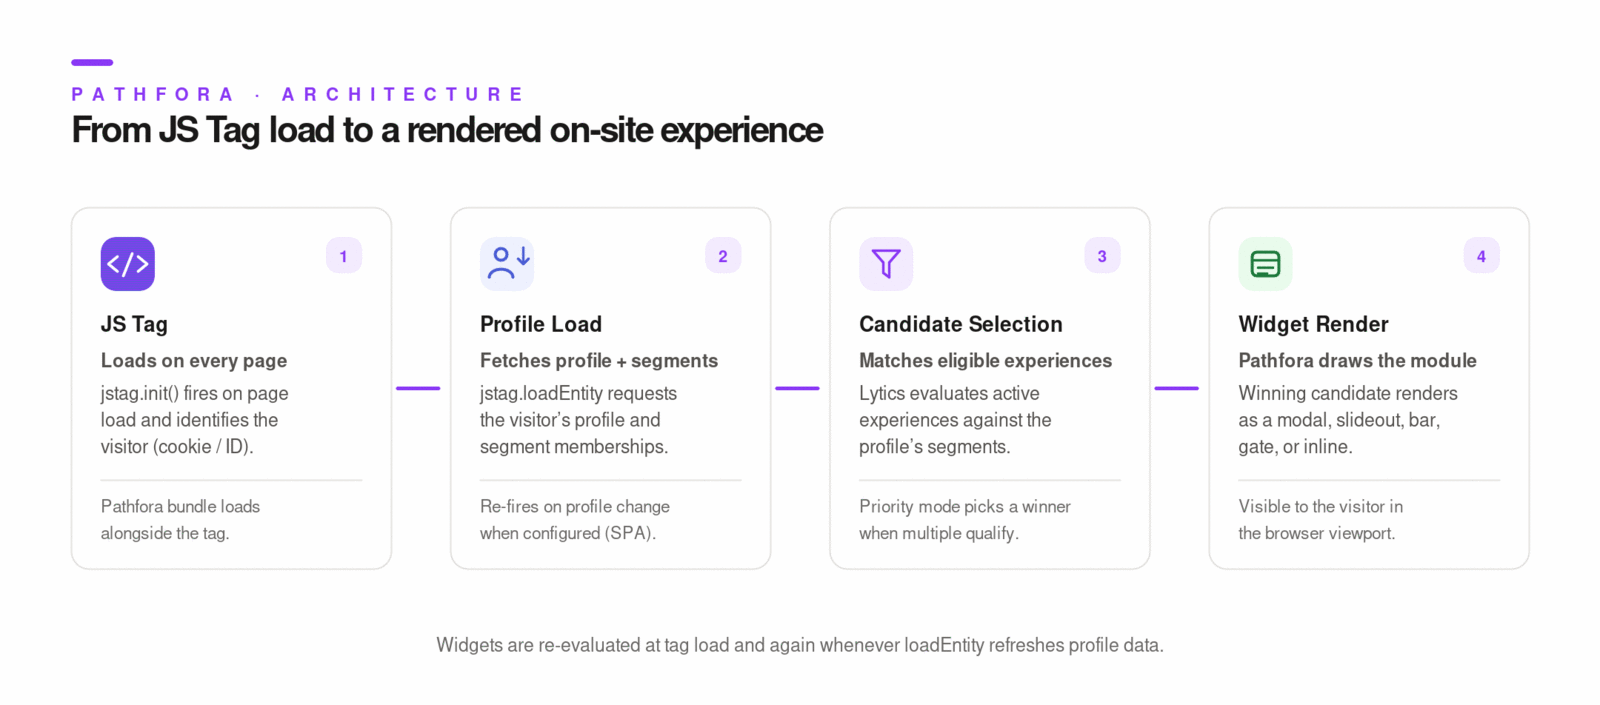
Pathfora is the client-side presentation engine used by Lytics web experiences. It renders on-site modules such as modals, slideouts, bars, gates, and inline blocks based on profile context and targeting rules.
Implementation typically uses two operating modes:
- Lytics-managed experiences: configured in the Lytics Experiences UI and delivered by the JS Tag integration.
- Custom Pathfora SDK usage: teams directly instantiate widgets in code for advanced customization.
Primary references:
Key Concepts
- Tag dependency: audience-aware targeting requires the Lytics JS Tag to load profile and segment data.
- Widget re-evaluation behavior:
- by default, widgets are evaluated at tag load,
- and re-evaluated when
jstag.loadEntityrefreshes profile data. - SPA optimization:
pathfora.publish.listenForProfileChange=truereduces unnecessary widget reloads by refreshing only dependency-based widgets. - Experience candidate model: experiences are selected from eligible candidates returned by Lytics and initialized in Pathfora.
- Preview support: preview URLs use query parameters to force rendering of specific preview candidates.
Step-by-Step
- Ensure JS Tag is installed and profile loading is verified.
- Open Experiences in Lytics to view existing experiences.
- Create a new Lytics experience or import supported external experiences.
- Configure targeting, display behavior, and schedule.
- Activate and validate rendering on eligible pages.
Examples
// SPA-friendly Pathfora behavior in JS Tag config
jstag.init({
  ...config,
  pathfora: {
    publish: {
      listenForProfileChange: true,
    },
  },
});
<!-- Custom Pathfora SDK load (for direct SDK-managed modules) -->
<script src="https://c.lytics.io/static/pathfora.min.js"></script>
Diagrams & Screenshots
Summary
Pathfora is the bridge between Lytics profile data and visible on-site action. It runs in the browser via the JS Tag, evaluates eligible experience candidates against the current visitor's profile, and renders the appropriate widget. Understanding the tag dependency, candidate selection model, and re-evaluation behavior is essential before configuring any targeting or display logic.
Documentation Links
Managing Experiences
Learning Objectives
By the end of this section, you will be able to:
- Create and organize experiences using folders and naming conventions
- Schedule and prioritize experiences to control when and how they appear
- Manage the experience lifecycle from draft through active to archived
Managing Experiences
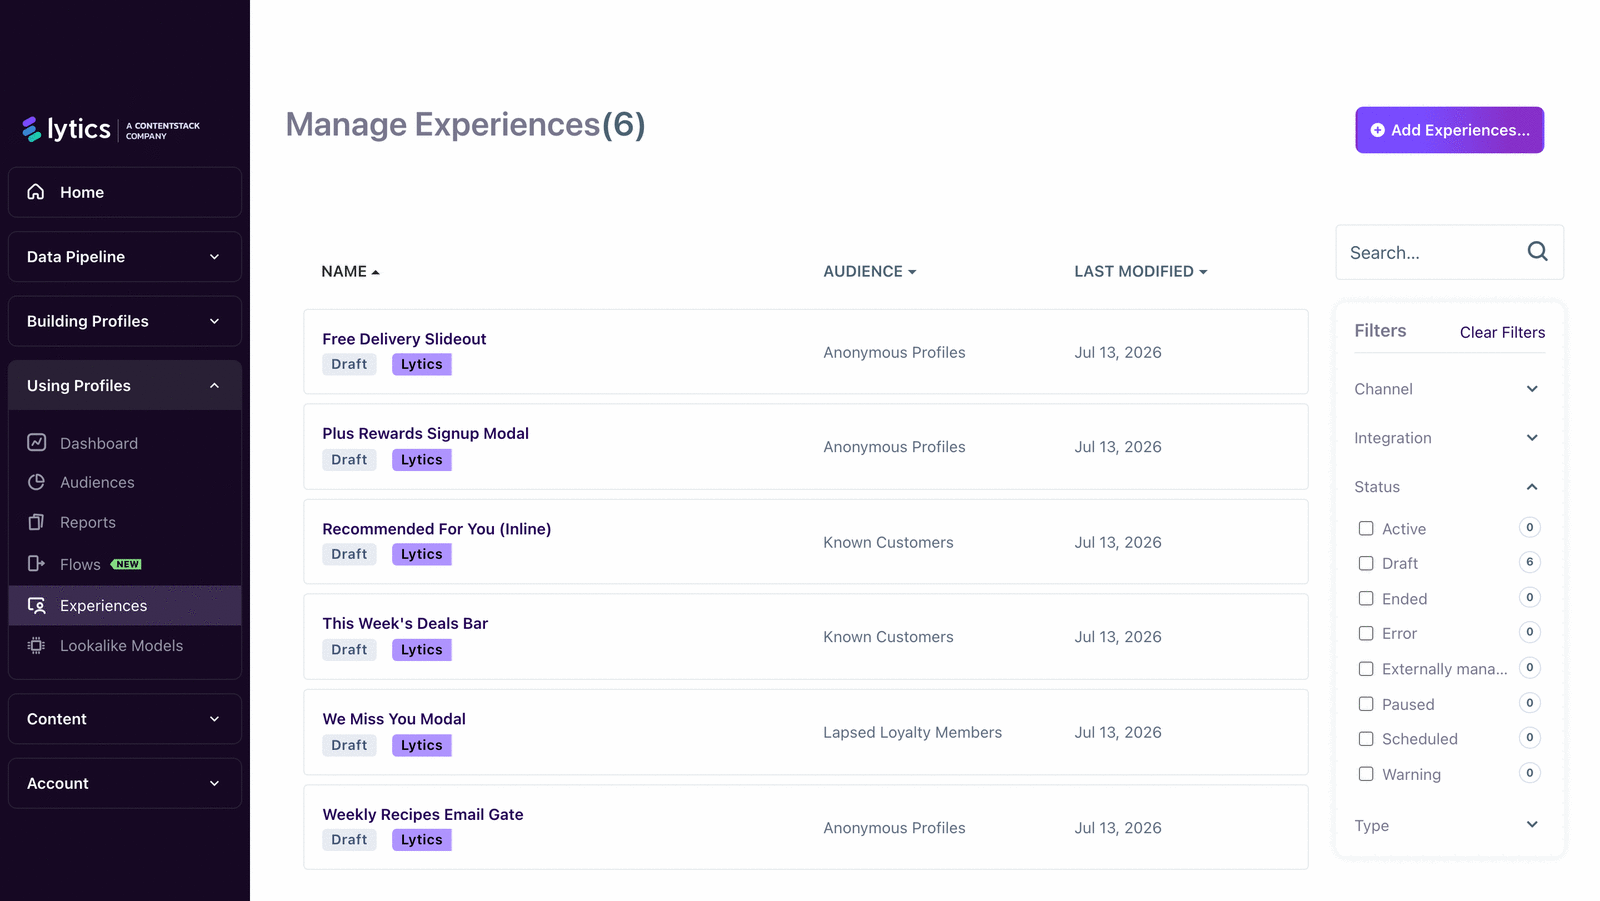
Experience operations happen in the Experiences list and each Experience summary page.
Key Concepts
- Creation modes:
- New experience (full editor flow).
- Import (supported external providers).
- List operations:
- search,
- filter by channel/integration/status/type,
- sort by name or last modified.
- Lifecycle and health statuses (system status):
- Draft,
- Active,
- Paused,
- Scheduled,
- Externally Managed,
- Ended,
- Warning,
- Error.
- Edit guardrail: active experiences must be paused before editing.
- Schedule behavior:
- future start date sets Scheduled status,
- automatic transition to Active at start,
- optional end date auto-transitions to Ended.
- Priority handling:
- when multiple candidates qualify, tag + Pathfora initialize eligible widgets using configured priority mode (default
orderedin tag integration).
Step-by-Step
- Open Experiences and click Add Experience.
- Choose New or Import.
- Name with consistent convention (channel, objective, audience, date).
- Configure target audience and display rules.
- Set date range (start/end).
- Save, activate, and monitor status on summary page.
- For edits to active experience:
- pause,
- edit and save,
- resume. - Archive or delete only after replacement/retirement plan is complete.
Examples
Recommended naming pattern:
[Channel]-[Objective]-[Audience]-[Quarter]
Example: Web-LeadCapture-UnknownVisitors-Q2
Status-driven operations:
- Draft -> finish configuration and activate
- Active -> monitor and optimize
- Paused -> edit safely
- Scheduled -> verify future launch timing
- Warning/Error -> investigate delivery or export health
Diagrams & Screenshots
Summary
The Experiences list is your operational control panel for all active, scheduled, and historical experiences. Consistent naming conventions, status-aware edit guardrails (pause before edit, resume after), and scheduled start/end dates keep a growing library of experiences manageable. Priority configuration controls which experience wins when multiple candidates qualify for the same visitor.
Documentation Links
Experience Editor
Learning Objectives
By the end of this section, you will be able to:
- Use the visual experience editor to design on-site experiences
- Customize experience appearance and behavior including layout, copy, and actions
- Preview experiences before publishing to verify they render correctly
Experience Editor
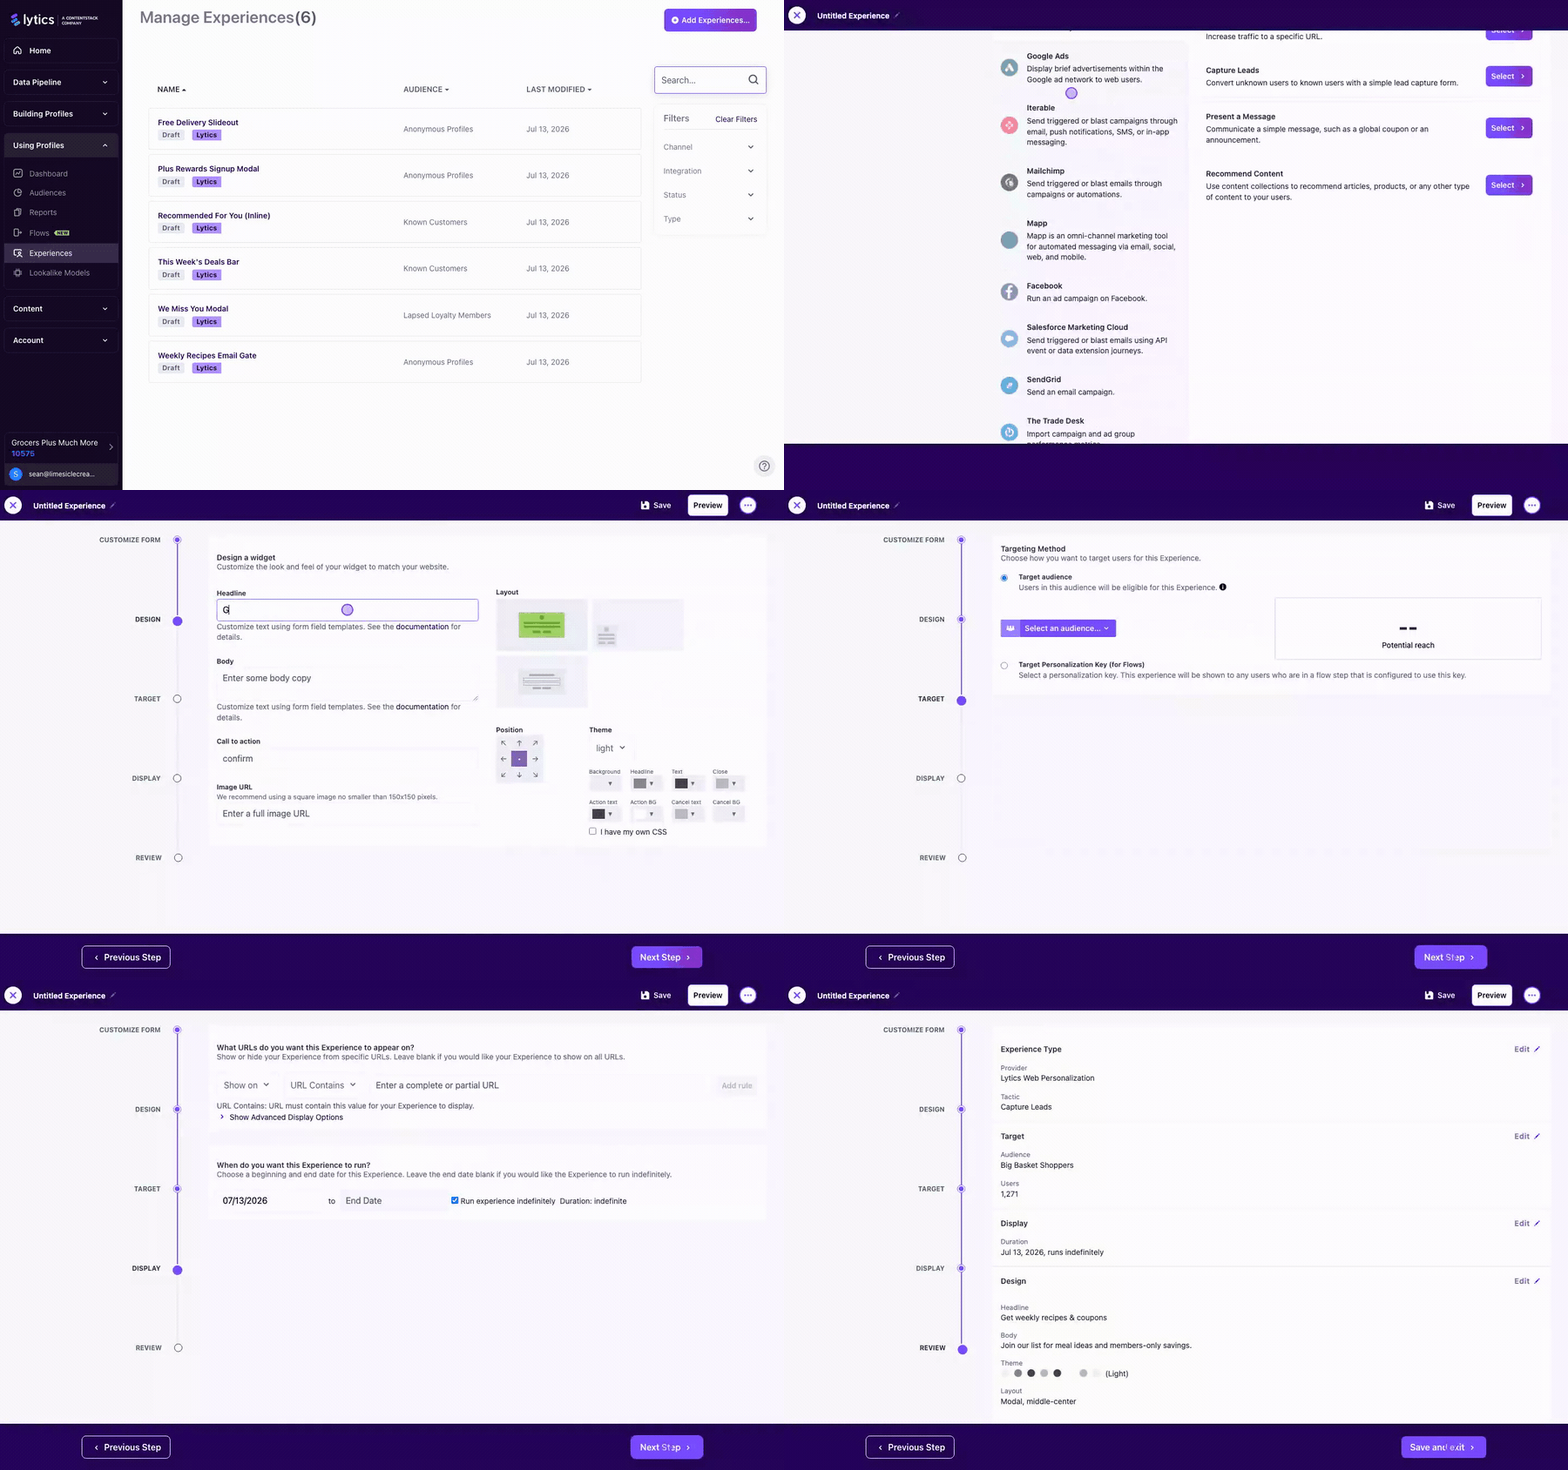
The Experience Editor is a guided wizard. Steps vary by provider/tactic, but Lytics experiences generally include design, targeting, display, and review.
Key Concepts
- Provider and tactic selection controls the available workflow.
- Lytics tactics include:
- Drive Traffic,
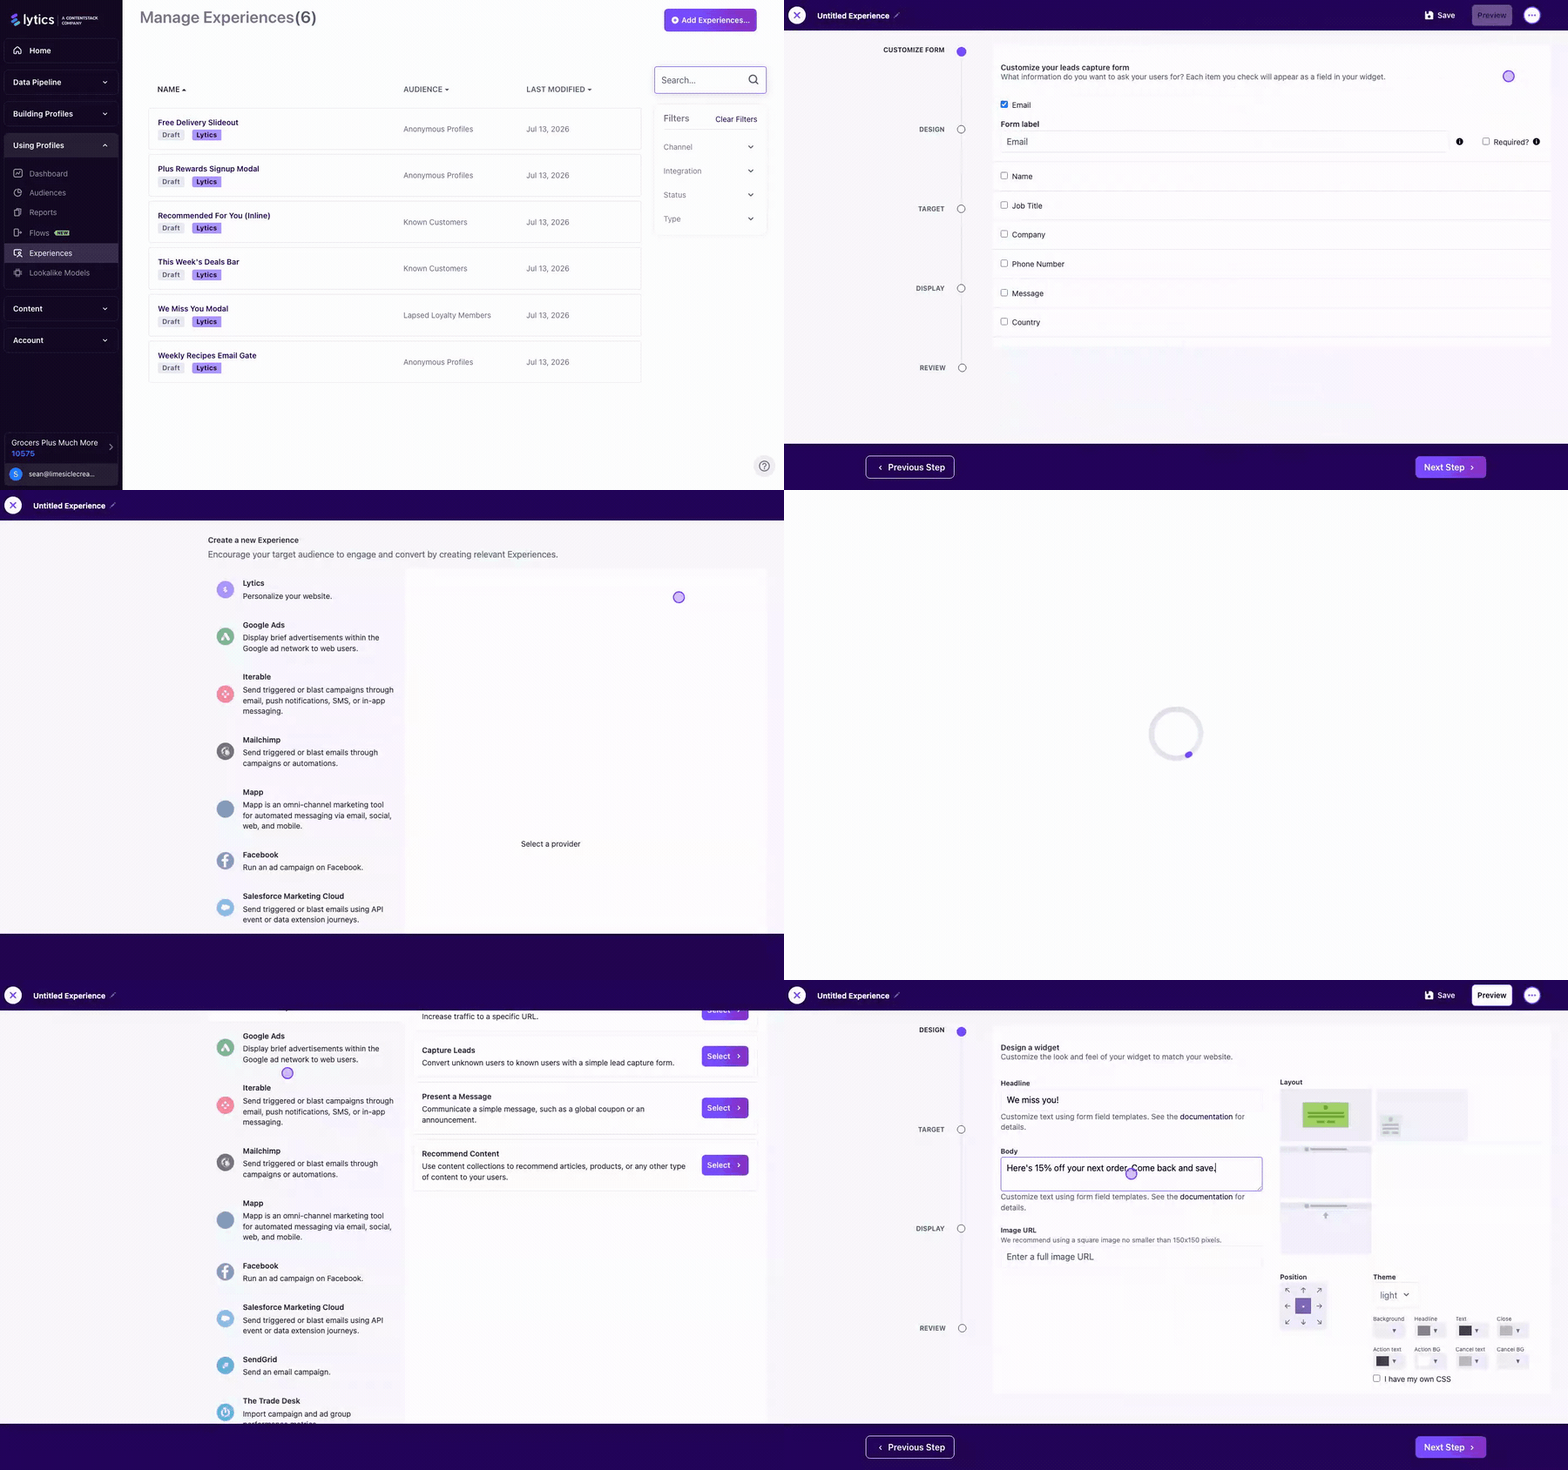
- Capture Leads,
- Present a Message,
- Recommend Content.
- Design step configures layout, position, copy, image, theme, and optional custom CSS.
- Target step binds the experience to an audience and shows potential reach.
- Display step controls:
- page matching rules (show/hide),
- trigger conditions,
- frequency caps,
- CTA/close follow-up behavior,
- date range.
- Preview requires URL match with display rules, but audience targeting is ignored in preview mode for testing.
Step-by-Step
- Create or open an experience and enter editor.
- Select provider and tactic.
- Complete tactic-specific setup (URL, form fields, or recommendation settings).
- In Design:
- choose layout,
- set copy and CTA,
- apply theme or custom CSS. - In Target:
- select audience,
- validate potential reach. - In Display:
- define appears-on rules,
- set trigger and frequency controls,
- set date range. - In Review:
- run preview on real URL,
- save and exit. - Activate from summary page.
Examples
Display rule strategy:
- Show on URL contains "/blog/"
- Hide on URL contains "/blog/admin"
- Trigger after 10 seconds and 50% scroll
- Show max 1 time per session
Capture Leads tactic form design:
- Enable: email, name
- Require: email
- CTA: "Get updates"
- Hide permanently after successful submit
Diagrams & Screenshots
Summary
The Experience Editor walks you through provider and tactic selection, design configuration (layout, copy, theme, CSS), audience targeting with reach validation, and display rules (page matching, triggers, frequency caps). Preview mode lets you verify rendering on a real URL without requiring audience membership, so you can confirm visual correctness before going live.
Documentation Links
Out-of-the-Box Experience Types
Learning Objectives
By the end of this section, you will be able to:
- Identify all built-in experience types including modals, slide-ins, bars, gates, and inline
- Choose the right experience type for your use case based on intrusiveness and goal
- Configure modals, slide-ins, bars, gates, and inline experiences with appropriate settings
Out-of-the-Box Experience Types
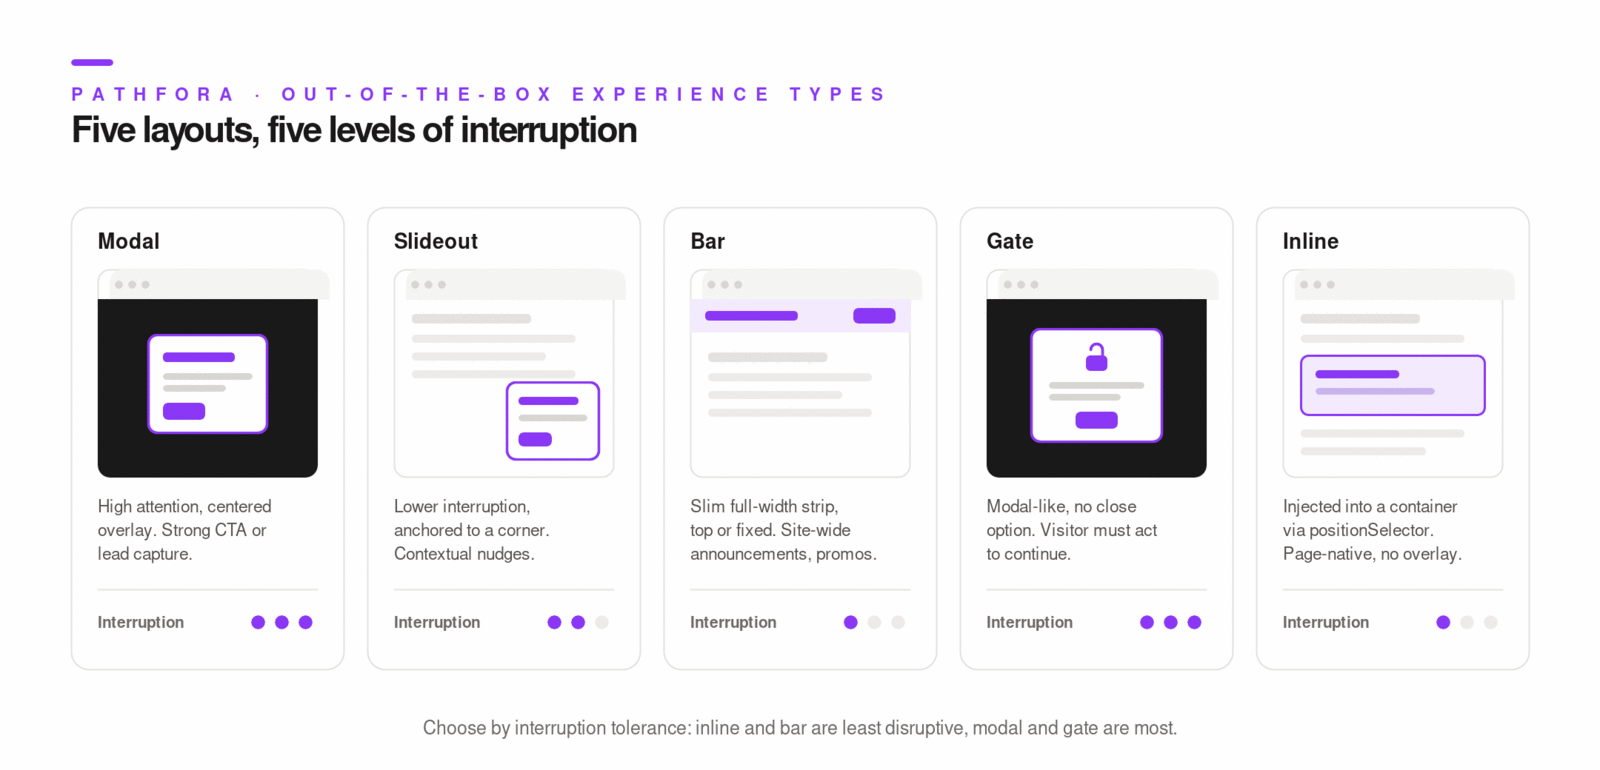
Pathfora supports multiple module types (message, form, subscription) and layouts. In Lytics training, focus on layouts most used for on-site experiences.
Key Concepts
- Modal:
- high attention,
- supports image,
- good for strong CTA or lead capture.
- Slideout:
- lower interruption,
- supports multiple corner/side positions,
- useful for contextual nudges.
- Bar / Sticky Bar:
- full-width slim message area,
- top or fixed positions,
- good for announcements/promotions.
- Gate:
- modal-like with no close affordance,
- user must act to continue,
- suited for high-value content gating.
- Inline:
- injected into specified container,
- ideal for embedded recommendations and page-native experiences.
Important behavior details:
- Gate unlock state is persisted via Pathfora cookie.
- Inline modules require
positionSelectorand do not use close/cancel behavior like overlays. - Bar layout does not use
headlinein the same way as modal/slideout.
Step-by-Step
- Pick objective: inform, convert, capture, gate, or recommend.
- Pick layout based on interruption tolerance and page context.
- Pick module type (
message,form,subscription) based on data collection need. - Configure layout-specific options (position, image, selector, push-down).
- Test on desktop and mobile before activation.
Examples
Layout selection by goal:
- Announcement banner -> Bar
- Newsletter capture -> Slideout form
- Resource lock + lead form -> Gate
- In-article recommendations -> Inline
- Urgent conversion prompt -> Modal
// Minimal custom Pathfora message example
const module = new pathfora.Message({
  id: "promo_bar_q2",
  layout: "bar",
  msg: "New feature release: explore what's new.",
  okMessage: "Learn more",
});

pathfora.initializeWidgets([module]);
Diagrams & Screenshots
Summary
Pathfora's five layout types — modal, slideout, bar, gate, and inline — cover the full range of on-site intervention patterns from low-interruption nudges to hard content gates. Choosing the right layout starts with the business objective, then factors in interruption tolerance and page context. Each layout has specific behavioral constraints (gate persistence via cookie, inline's positionSelector requirement, bar's headline behavior) that affect configuration and testing.
Documentation Links
Use Cases
Learning Objectives
By the end of this section, you will be able to:
- Identify common personalization use cases such as lead capture, content promotion, and engagement
- Design experiences for lead capture, content promotion, and visitor engagement scenarios
- Combine Pathfora experiences with audience targeting for precise personalization
Use Cases
Use Pathfora where real-time audience context should shape the on-site message, timing, or action path.
Key Concepts
- Unknown vs known journey: deliver identity-capture only to users who need it.
- Audience-specific messaging: tie creative to lifecycle state.
- Behavior-triggered timing: use display conditions (delay, scroll, pageviews, exit intent).
- Frequency governance: avoid fatigue with impression and session caps.
Step-by-Step
- Define audience and business outcome.
- Select layout and module type.
- Configure display triggers and frequency limits.
- Configure CTA action and post-action hide behavior.
- Launch, then optimize from reporting.
Examples
Lead capture for anonymous traffic:
- Audience: users without known email
- Type/layout: subscription slideout
- Trigger: show after 2 pageviews and 20 seconds
- Frequency: 1 per session, max 5 ever
- Post-submit: hide permanently
Content promotion for engaged users:
- Audience: high-affinity readers
- Type/layout: inline recommendation module
- Display: only on blog URLs
- Goal: increase click-through to recommended content
Exit-intent rescue:
- Audience: cart abandoners
- Type/layout: modal message or form
- Trigger: show on exit intent
- CTA: return to checkout with incentive
Diagrams & Screenshots
Summary
Effective Pathfora use cases share a common structure: a precisely defined audience, a layout chosen for the interruption level the moment warrants, display triggers calibrated to visitor intent signals, and frequency caps that prevent fatigue. Lead capture targets anonymous visitors, content promotion targets engaged known visitors, and exit-intent experiences target high-value drop-off moments — each requiring a different audience, trigger, and message strategy.
Documentation Links
Experience Reporting
Learning Objectives
By the end of this section, you will be able to:
- Access experience performance metrics from the reporting interface
- Interpret engagement and conversion data including impressions, clicks, and submissions
- Optimize experiences based on performance data to improve results over time
Experience Reporting
Performance review starts on each Experience summary page.
Key Concepts
- Core performance metrics:
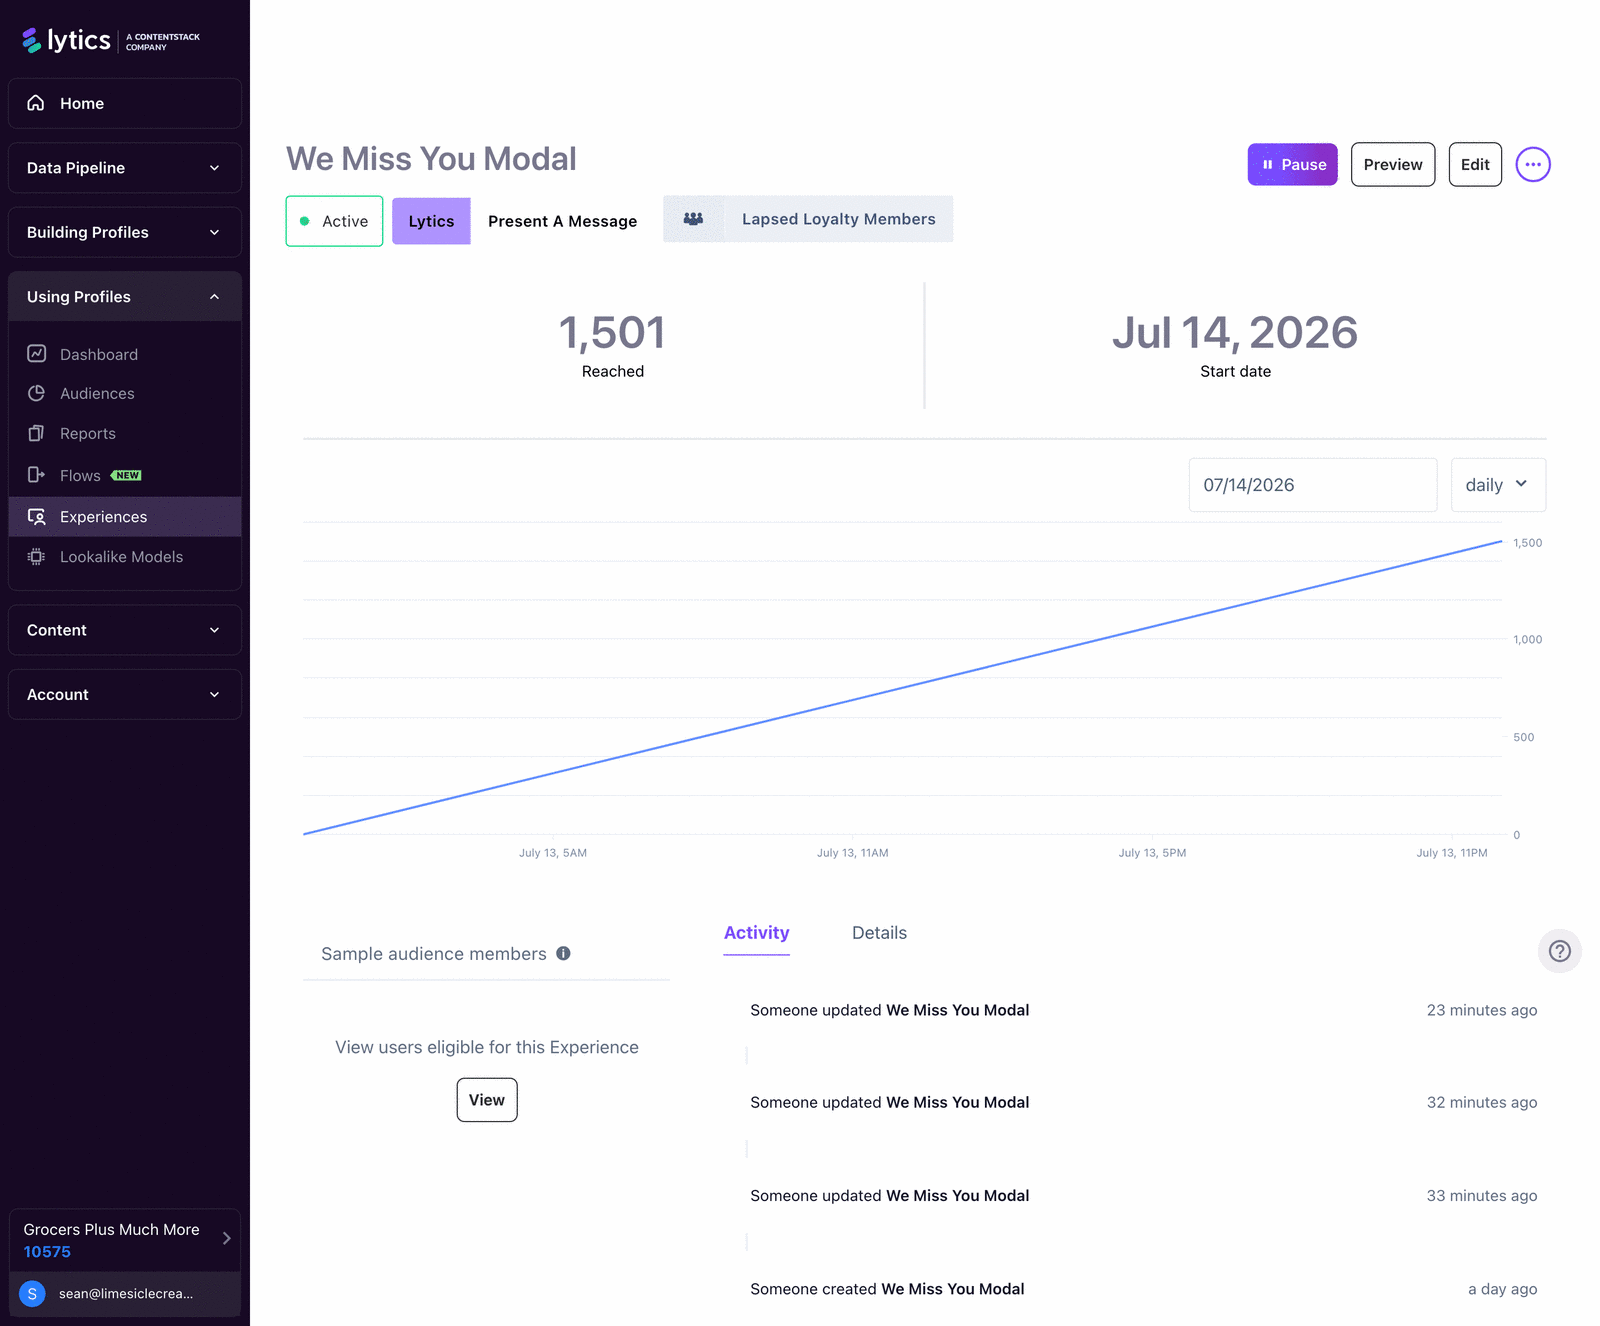
- Reached: unique users reached.
- Clicks: unique users who clicked.
- Click Rate: clicks divided by reached.
- Update cadence for these metrics is documented as every 2 hours.
- Optional Experience Intelligence modules may be available when Lytics View is enabled.
- Reporting should be paired with configuration context (target audience, triggers, frequency, schedule) to interpret results correctly.
Step-by-Step
- Open experience summary page.
- Review Reached, Clicks, and Click Rate trend.
- Compare against expected reach from target audience.
- If underperforming, diagnose in order:
- audience too narrow/broad,
- display rules too restrictive,
- trigger too late/early,
- CTA/copy mismatch,
- frequency too aggressive or too limited. - Pause, edit, and resume with one meaningful change at a time.
- Re-measure after sufficient volume accumulates.
Examples
Optimization loop example:
Week 1: low reached, low clicks -> broaden appears-on rule
Week 2: reached improves, click rate flat -> revise CTA copy/theme
Week 3: click rate improves -> lock baseline and test trigger timing
Diagnostic pattern:
High reached + low click rate -> message/layout issue
Low reached + good click rate -> targeting or display constraint issue
Diagrams & Screenshots
Summary
Experience reporting surfaces three core metrics — Reached, Clicks, and Click Rate — updated every two hours on each experience's summary page. The diagnostic approach pairs metric patterns against configuration: low reach points to targeting or display rule constraints, while high reach with a low click rate points to creative or layout issues. Optimizing one variable at a time, then re-measuring after sufficient volume, is the disciplined path to improving performance.
Documentation Links
What You've Learned
Pathfora closes the loop between Lytics audience data and the on-site visitor experience. You've learned how the JS Tag powers candidate selection and widget rendering, how to manage the experience lifecycle from draft through active and archived, how the editor's design-target-display-review workflow maps to production-ready configuration, which widget types to choose for which objectives, and how to interpret performance metrics to drive continuous optimization.
Key Terms
📘 Pathfora — The client-side JavaScript presentation engine that renders targeted on-site modules (modals, slideouts, bars, gates, inline blocks) based on Lytics profile and audience data.
📘 Experience — A configured, audience-targeted on-site interaction unit managed in the Lytics UI. Experiences have a lifecycle (Draft, Active, Paused, Scheduled, Ended) and deliver via Pathfora.
📘 Widget — A single Pathfora module instance: a specific layout type (
message,form,subscription) rendered to a visitor based on audience eligibility and display rules.📘 Experience Candidate — An experience that is eligible for a given visitor based on audience membership. Multiple candidates may qualify; priority configuration determines which is rendered.
📘 Display Rules — Configuration on an experience that controls which pages it appears on (appears-on / hide-on URL rules), when it triggers (time delay, scroll depth, exit intent), and how frequently it shows (per-session and lifetime caps).
📘 Reached — The count of unique users who were shown an experience. One of the three core performance metrics alongside Clicks and Click Rate.
📘 Gate — A Pathfora widget layout with no close affordance. The visitor must complete an action to proceed. Gate unlock state is persisted via a Pathfora cookie.
📘 Inline — A Pathfora widget layout injected directly into a specified page container via
positionSelector, delivering a page-native experience without overlaying the content.
