Integrations & Connections
Lytics connects to the rest of your marketing and data stack through a combination of prebuilt provider integrations, warehouse connections, and API-based exchange patterns. This section covers the full integration surface: how to authorize external systems, control what data flows out of Lytics and to whom, query warehouse data directly via Cloud Connect, and interact with profiles programmatically through the Attributes, Collect, and Personalize APIs. By the end, you will be able to configure, monitor, and troubleshoot every major integration pattern in the platform.
Overview
Learning Objectives
By the end of this section, you will be able to:
- Explain what integrations do in Lytics and why they are essential for data collection and activation
- Distinguish between import integrations (data in) and export integrations (data out)
- Navigate the integrations page, including viewing active connections, statuses, and configuration details
Integrations in Lytics
Integrations are how Lytics exchanges data with external systems. A connection — a configured link between Lytics and an external system or warehouse, with provider-specific settings and authorization — is the foundational unit of this exchange. Practically, this includes:
- importing data into Lytics,
- enriching profiles,
- exporting audiences/profile attributes/events to downstream tools.
You will work across these product surfaces:
- Data Pipeline > Jobs for most import/export integrations
- Cloud Connect for warehouse-backed connections and SQL-driven data models
- Account > Security > Authorizations for credential management
Key Concepts
- Import vs export: import builds profile context; export activates decisions.
- Job lifecycle: integrations run as jobs with statuses like running, sleeping, failed, paused, completed.
- Schema dependency: downstream activation quality depends on upstream field mapping quality.
- Operational observability: summaries and logs are required for troubleshooting and change control.
Step-by-Step
- Inventory required systems by use case (analytics, ESP, ads, CRM, warehouse).
- Decide per system whether you need import, export, enrichment, or bidirectional flows.
- Create required authorizations first.
- Configure connection/job with explicit naming conventions and descriptions.
- Validate logs and output payloads before campaign go-live.
- Set ownership and monitoring cadence for each active integration.
Examples
- Import events from server systems into Lytics to enrich profiles.
- Export audience membership changes in real-time to a webhook endpoint.
- Query warehouse data with Cloud Connect and map output into profile attributes.
Diagrams & Screenshots
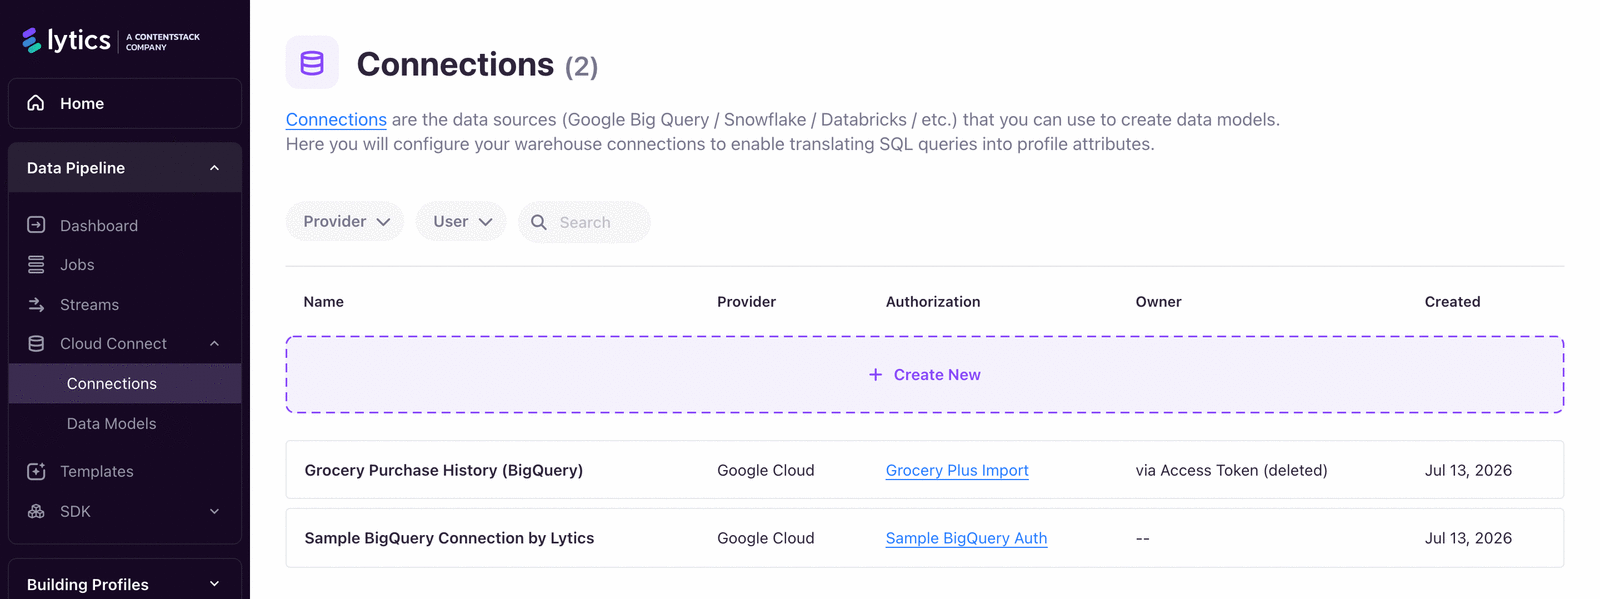
Summary
Integrations are the mechanism through which Lytics exchanges data with the rest of your stack. Import integrations build profile context; export integrations activate that context in downstream tools. Before configuring any job, you inventory the systems involved, create the necessary authorizations, and then set up and validate each connection. Logs and summaries are your primary operational tools for ongoing health monitoring.
Documentation Links
Authorizations
Learning Objectives
By the end of this section, you will be able to:
- Configure OAuth authorizations to connect Lytics with third-party platforms securely
- Manage API key credentials, including creation, scoping, and storage best practices
- Understand authorization security best practices such as least-privilege access and credential rotation
Managing Integration Authorizations
Authorizations are reusable credential objects used by jobs and connections. In Lytics, authorizations are managed centrally in Account > Security > Authorizations and then selected during job/connection setup.
Supported auth styles vary by provider:
- API keys
- OAuth variants
- user/password or token-based methods
- webhook-specific auth modes (no auth, header/parameter auth, OAuth client credentials)
Key Concepts
- Authorization health: Lytics tracks auth health (healthy/unhealthy/unknown) to surface risk early.
- Reuse with care: one authorization can back multiple jobs; changes have broad impact.
- Immutable config pattern: when core credentials must change, create a new authorization and migrate jobs.
- Least privilege: grant only required scopes/tables/actions.
Step-by-Step
- In Account > Security > Authorizations, create a new authorization.
- Select provider and method required by the target integration.
- Add clear label/description identifying owner and purpose.
- Enter credentials and save.
- During job/connection setup, select this authorization.
- Monitor health and rotate credentials on schedule.
Examples
Provider: Webhooks
Method: OAuth 2.0 Client Credentials Grant
Outcome: Lytics requests access token and sends webhook calls with Bearer token
Provider: Cloud Connect warehouse
Method: provider-specific API/JWT credentials
Outcome: Data models can query only authorized datasets/tables
Diagrams & Screenshots
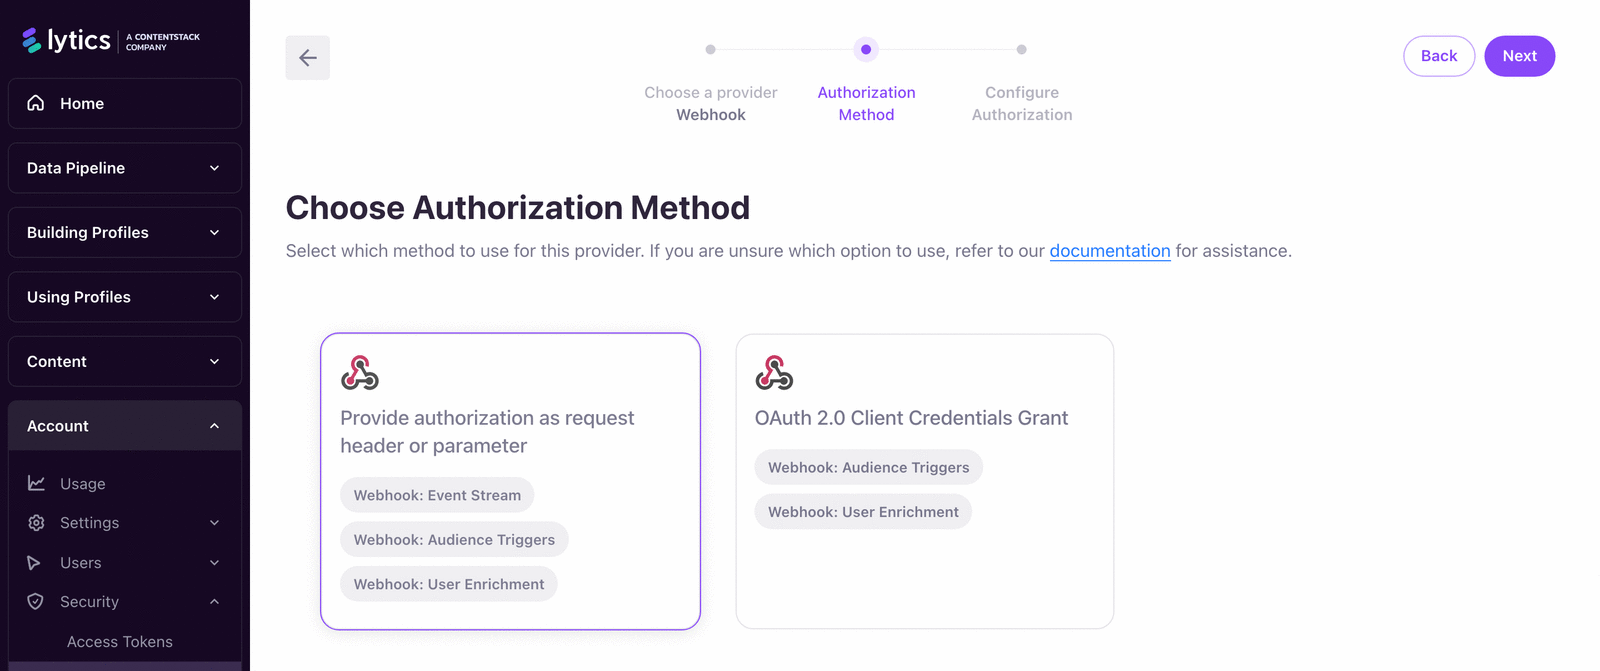
Summary
Authorizations are the credential layer that jobs and connections draw from. Managing them centrally in Account > Security > Authorizations means credential updates propagate to every dependent job at once — a powerful pattern that also means changes have broad impact. Apply least-privilege scoping at creation time, monitor authorization health proactively, and establish a rotation schedule for all API keys and OAuth tokens.
Documentation Links
Destination Filters
Learning Objectives
By the end of this section, you will be able to:
- Configure destination filters to control which fields and records are sent to export destinations
- Control which profile data is exported to ensure only relevant information reaches each platform
- Use destination filters to meet compliance requirements such as GDPR, CCPA, and consent management
Controlling Data Export with Destination Filters
Destination filtering is how you constrain outbound payloads and recipients. In practice, this can include:
- selecting specific profile fields for export,
- excluding users in disallowed audiences,
- restricting trigger windows and event types,
- applying template-level output shaping.
Lytics also supports segment exclusion operations for export workflows, allowing you to add/remove a segment from an export exclusion list.
Key Concepts
- Scope minimization: export only fields required by the destination contract.
- Policy enforcement: combine consent audiences with exclusion filters.
- Job-specific controls: each destination has different filtering knobs; standardize patterns internally.
- Field-level governance: avoid sending PII unless explicitly required and approved.
Step-by-Step
- Define outbound contract per destination (required IDs + allowed fields).
- Configure job-level field selection and filters.
- Add exclusion audiences for non-eligible users.
- Validate payload shape in test or logs.
- Reconcile destination acceptance/match metrics.
- Review filters quarterly for compliance drift.
Examples
Segment exclusion API pattern:
POST /v2/segment/exclude/{operation}?workflow={workflow_slug}&segment_id={segment_id}
operation: add | remove
Webhook export: send only first_name, email, and segment_events
instead of full profile payload.
Diagrams & Screenshots
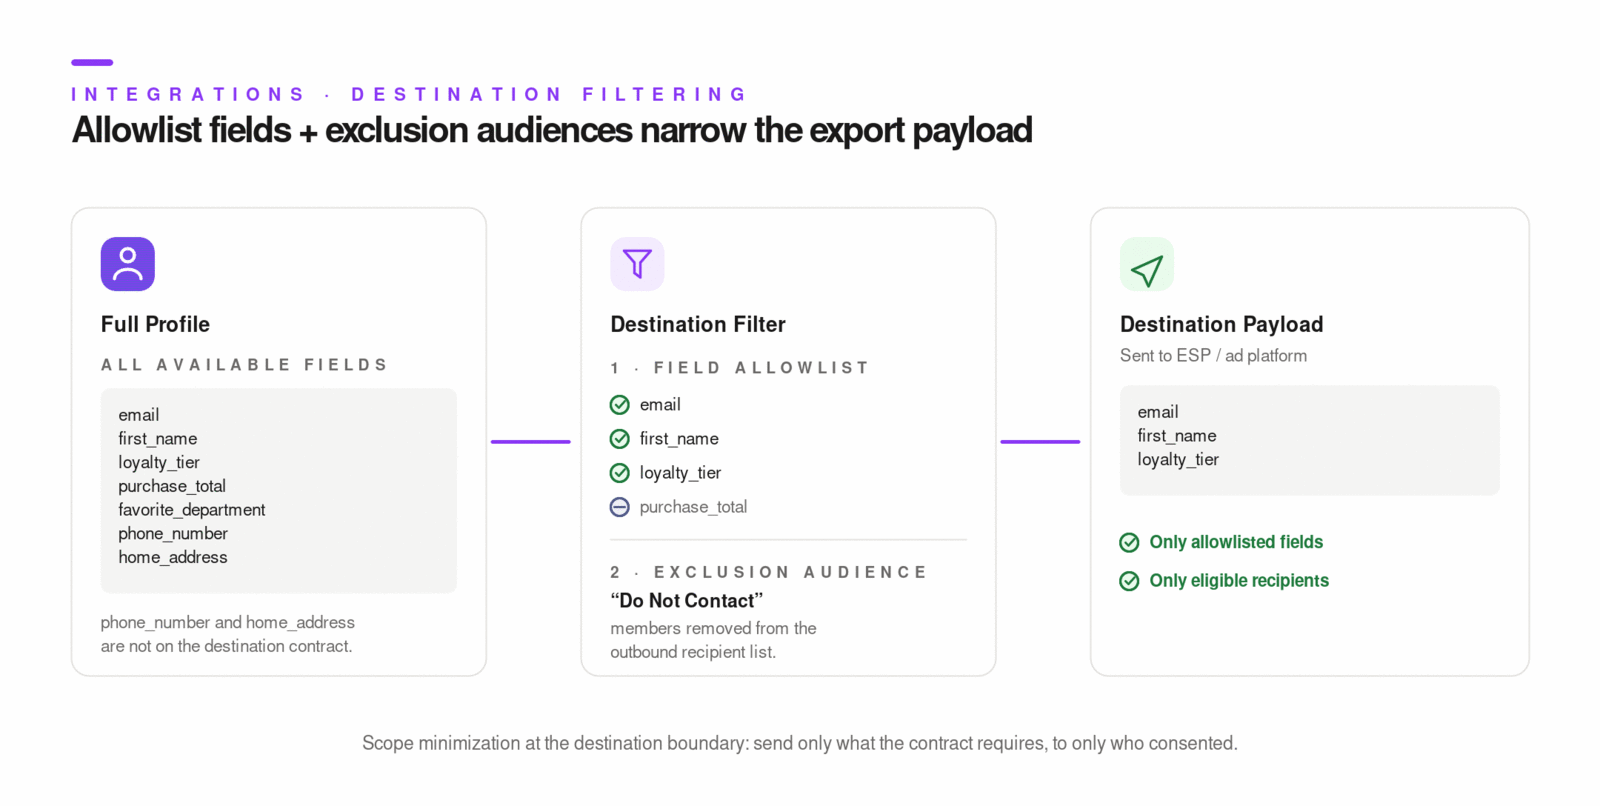
Summary
Destination filters give you precise control over what leaves Lytics and who receives it. Field selection limits exposure to only what each destination requires; audience exclusions enforce consent and suppression policies. Validate payload shape in logs before go-live and revisit filters quarterly to catch compliance drift as your data model and regulatory obligations evolve.
Documentation Links
Cloud Connect
Learning Objectives
By the end of this section, you will be able to:
- Explain how Cloud Connect uses warehouse queries to enrich profiles and audiences
- Create and manage warehouse connections securely
- Understand Cloud Connect architecture and common operational use cases
File-Based Data Exchange with Cloud Connect
Cloud Connect lets you run SQL directly against supported warehouses and map resulting records into Lytics profiles/audiences without replicating your full warehouse into Lytics.
Supported providers include common enterprise warehouses such as BigQuery, Snowflake, Redshift, Databricks, and Azure SQL variants (availability may vary by account setup).
In-product structure:
- Connections define warehouse access
- Data Models define SQL logic and materialization behavior
Key Concepts
- Warehouse remains source of truth: query only what you need for activation.
- Authorization governs table visibility: connection access is bounded by auth permissions.
- Cost awareness matters: query volume and row scans can impact warehouse cost.
- Model-driven enrichment: Cloud Connect enables complex joins/time-window logic before activation.
Step-by-Step
- Open Data Pipeline > Cloud Connect > Connections.
- Create connection (provider, type, authorization, config).
- Validate table visibility in the Explore tab.
- Create data model with SQL query.
- Map model output into schema fields/audiences.
- Monitor connection/model logs and query volume.
Examples
- Build
inactive_30_daysby querying last_login timestamps in warehouse. - Join account + user tables for B2B audience criteria.
- Compute LTV rollups and map to
lifetime_valuefield for downstream activation.
Diagrams & Screenshots
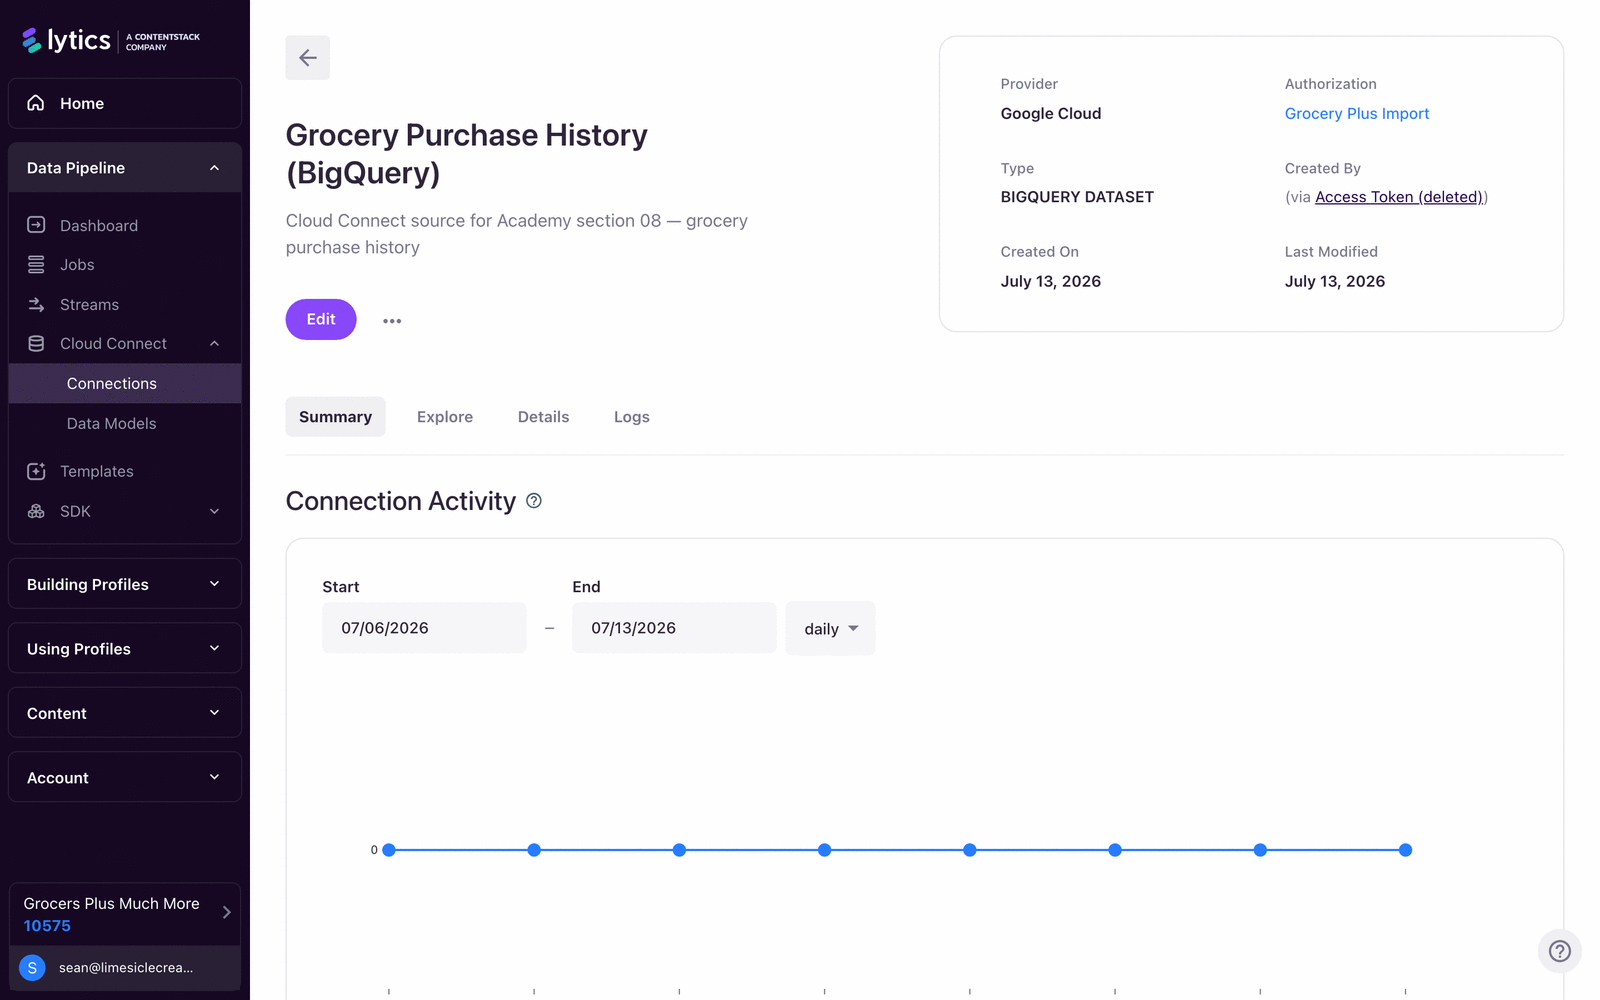
Summary
Cloud Connect bridges your warehouse and Lytics without full data replication. You define a connection with the appropriate authorization, write a SQL data model that extracts exactly the rows and columns you need, and map the output into profile attributes or audience membership. Keep query scope narrow to manage warehouse costs, and monitor model logs and query volume as data scales.
Documentation Links
Attributes API
Learning Objectives
By the end of this section, you will be able to:
- Use the Attributes API to retrieve and update profile attributes programmatically
- Choose between full replacement and partial update semantics
- Apply identity-key-based profile addressing safely in API workflows
Profile Enrichment via the Attributes API
The Attributes API supports CRUD-style operations on profile attributes addressed by table + identity key + identity value.
Endpoint pattern:
- /v2/attributes/{table}/{field}/{value}
Common methods:
- GET profile attributes
- PUT replace/update all supplied attributes
- PATCH partial update
- DELETE remove profile attributes
Key Concepts
- Identity addressing: correctness depends on stable identity keys (
email,_uid, etc.). - PATCH vs PUT semantics: PATCH for targeted updates; PUT when replacing a broader attribute set.
- Merge behavior: use
mergeExistingwhen needed to avoid destructive overwrites. - Operational safeguards: validate payloads and rate-limit upstream callers.
Step-by-Step
- Select the table (
userin most implementations). - Select identity key/value pair to target profile.
- Use
GETfirst to inspect current state. - Apply
PATCHfor incremental enrichment updates. - Verify response and downstream schema/audience effects.
- Monitor error responses for key/value mismatches.
Examples
GET /v2/attributes/user/email/[email protected]
PATCH /v2/attributes/user/email/[email protected]?mergeExisting=true
Content-Type: application/json

{
  "loyalty_tier": "gold",
  "external_audiences": ["spring_campaign"]
}
Diagrams & Screenshots
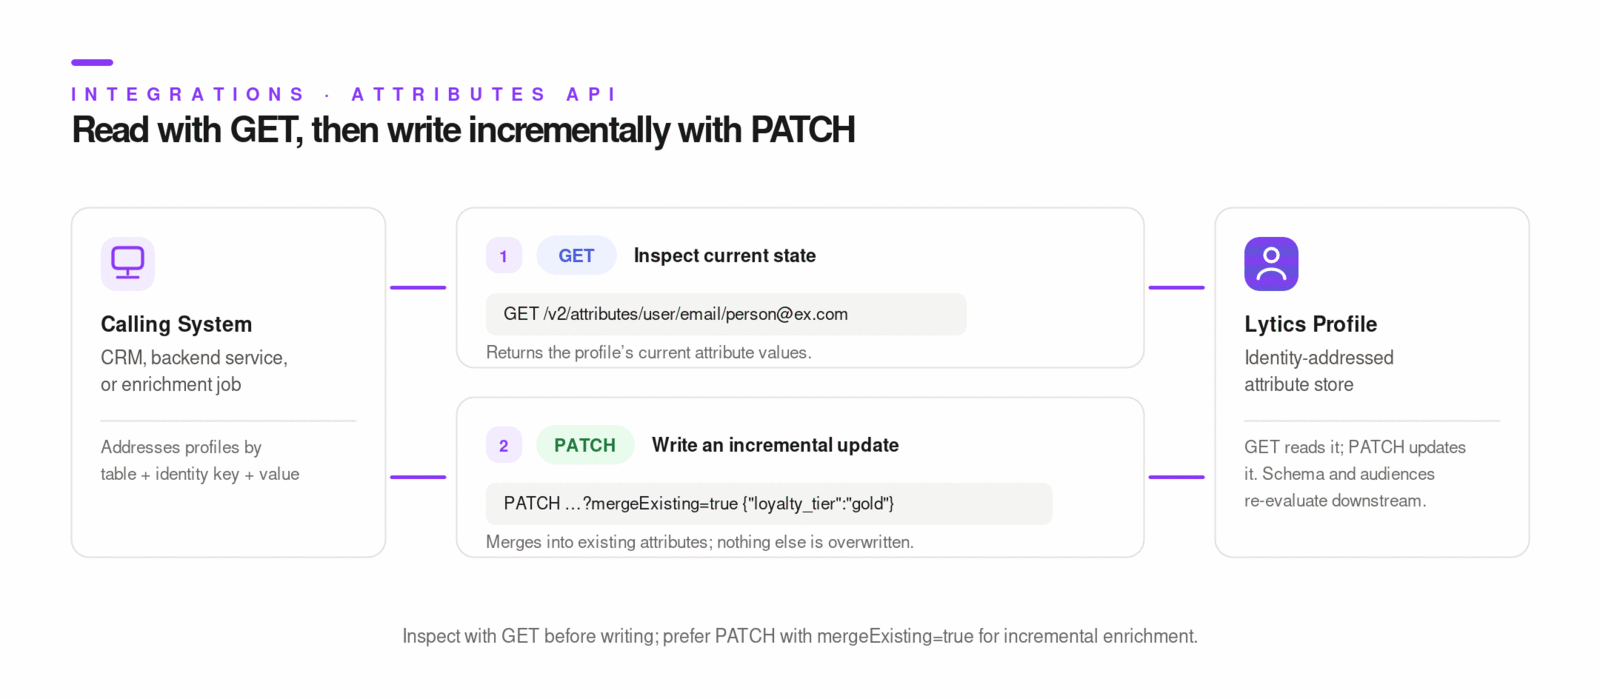
The diagram below traces a realistic enrichment scenario: an external system (a CRM, a backend service, or a batch job) needs to push a single new attribute — a loyalty tier — onto an existing Lytics profile without touching any of the other data on that profile.
Follow it left to right:
- The calling system addresses the profile by table + identity key + value (
user+email+[email protected]). This is how Lytics finds "the right profile" regardless of what platform is calling. - GET returns the profile's current attributes — first name, order count, whatever the tag and other integrations have already written. This step is optional but strongly recommended: it prevents you from overwriting something you didn't know was there.
- PATCH with
?mergeExisting=truesends the one field you want to add or update ({"loyalty_tier": "gold"}). Lytics merges it into the existing profile — every other field the profile already had is preserved. - The profile now carries
loyalty_tier: "gold"alongside everything it had before. Downstream audiences, schema mappings, and exports re-evaluate automatically against the new state.
The key mental model: PATCH with mergeExisting=true is additive, not destructive. Use it when your caller only knows about the fields it owns and shouldn't touch anything else. Use PUT (without mergeExisting) only when you deliberately want to replace a broader attribute set.
Summary
The Attributes API lets you read and write profile attributes by addressing profiles through a table, identity key, and identity value. Use GET to inspect current state before writing. Prefer PATCH with mergeExisting=true for incremental enrichment to avoid destructive overwrites. Validate that your identity keys are stable across systems, and monitor error responses for key/value mismatches as upstream data evolves.
Documentation Links
Prebuilt Integrations
Learning Objectives
By the end of this section, you will be able to:
- Evaluate when to use a prebuilt integration versus custom integration options
- Configure common job types with the appropriate provider authorization and settings
- Monitor and troubleshoot prebuilt integration jobs using logs and status views
Working with Prebuilt Integrations
Lytics ships many prebuilt provider integrations across ad platforms, marketing automation, messaging, analytics, and data infrastructure. These reduce implementation time versus fully custom pipelines.
A typical setup sequence:
1. create authorization,
2. create job,
3. configure provider-specific options,
4. validate logs,
5. monitor health.
Key Concepts
- Provider-specific behavior: each connector has unique required fields, schedule behavior, and limits.
- Template and field mapping support: many exports allow selectable fields or templating.
- Backfill vs real-time: understand initial sync behavior and ongoing cadence.
- Operational ownership: each live job needs owner, SLA, and alerting expectations.
Step-by-Step
- Identify target provider and intended use case.
- Read provider integration doc for required auth method and job type.
- Create authorization and job in Data Pipeline.
- Configure source audience/fields/template as required.
- Run test sync and validate provider-side receipt.
- Promote to production and monitor logs.
Examples
- Export modeled audience to ad platform with hashed identifiers.
- Sync segment events to messaging platform using webhook connector.
- Import source-system events into Lytics for enrichment and segmentation.
Diagrams & Screenshots

Summary
Prebuilt integrations cover the most common provider connections and significantly reduce setup time versus building custom pipelines. Each integration follows the same sequence: create the authorization, create and configure the job, validate via logs, and promote to production. Pay attention to provider-specific behavior around schedule cadence, required fields, and backfill behavior — these vary by connector and affect both initial sync quality and ongoing operational expectations.
Documentation Links
Webhook and Profile Templates
Learning Objectives
By the end of this section, you will be able to:
- Configure webhooks for audience-triggered payload delivery
- Use templates to reshape outbound payloads for destination-specific contracts
- Test and validate template output before enabling production jobs
Custom Data Delivery with Webhooks and Templates
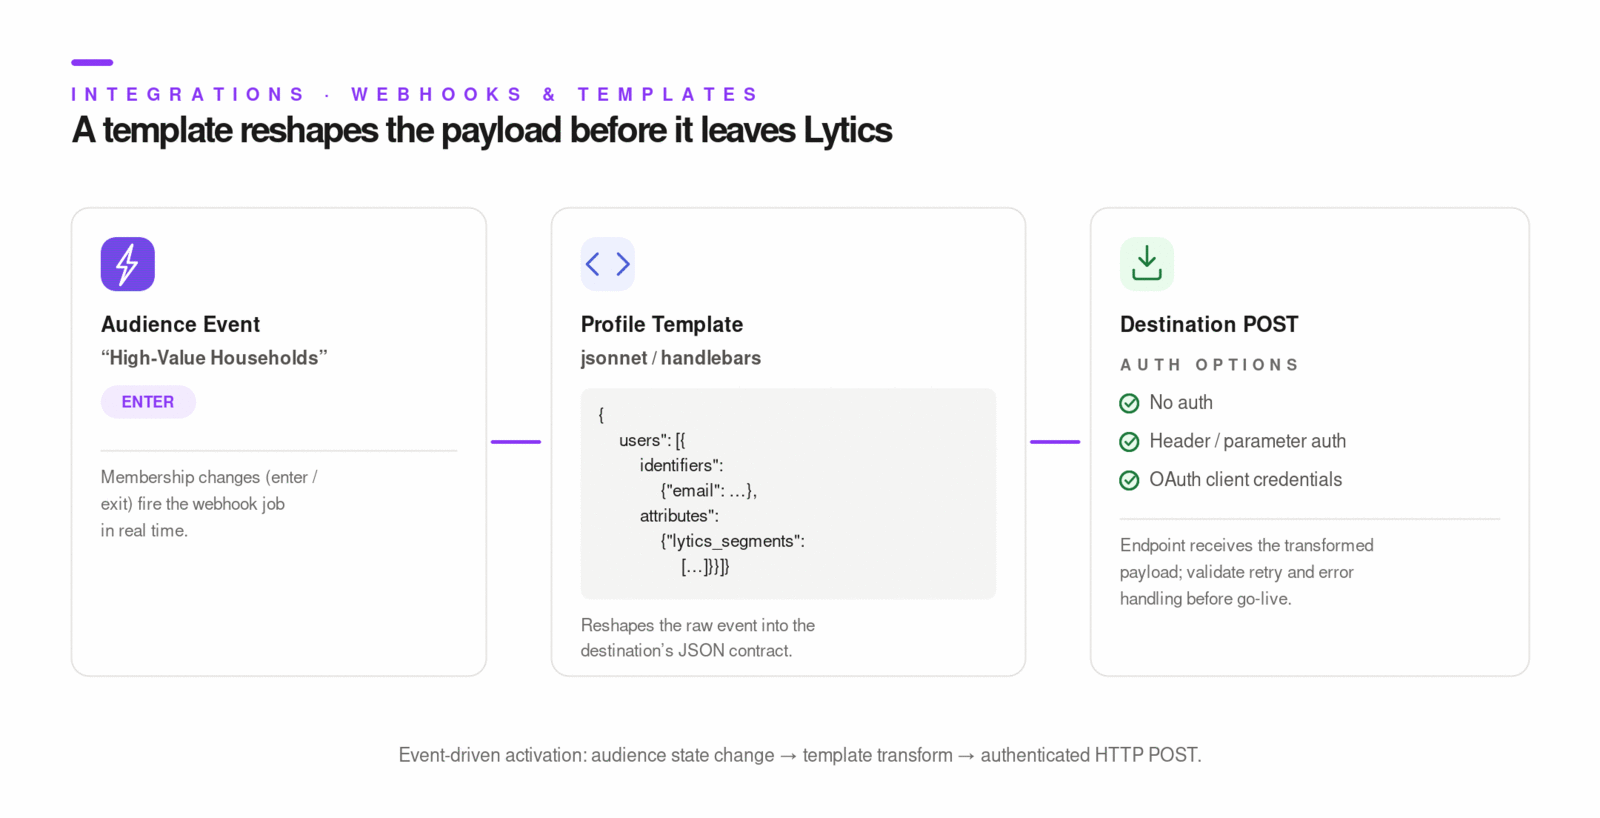
Webhooks are a flexible server-side integration pattern for sending audience enter/exit/change events to external endpoints.
Template support allows payload transformation before send:
- template types include jsonnet and handlebars
- templates can be created/listed via /template
- webhook jobs can reference template IDs for structured payload delivery
Key Concepts
- Event-driven activation: webhooks notify systems when user state changes.
- Payload contracts: templates enforce destination-specific JSON shape.
- Auth options: no auth, header/param auth, OAuth client credentials.
- Audience update caution: if audience logic changes significantly, validate webhook behavior and replay strategy.
Step-by-Step
- Create webhook authorization with required method.
- Create or select source audience.
- Build template definition (jsonnet/handlebars) for destination contract.
- Create webhook job and attach template.
- Test with controlled audience events.
- Validate endpoint responses and retry/error behavior.
Examples
Template API:
POST /template?name=insider_temp&type=jsonnet
GET  /template
{
  "users": [
    {
      "identifiers": {
        "email": "[email protected]"
      },
      "attributes": {
        "lytics_segments": ["high_value"]
      }
    }
  ]
}
Diagrams & Screenshots
Summary
Webhooks enable event-driven activation by notifying external endpoints when audience membership changes. Templates (in jsonnet or handlebars) reshape the outbound payload to match the destination's contract before the call is made. Always test with controlled audience events and validate endpoint responses, including retry and error handling behavior, before enabling a webhook job in production.
Documentation Links
Collect API
Learning Objectives
By the end of this section, you will be able to:
- Send server-side events to Lytics using the Collect API
- Use stream strategy and identity fields correctly for profile stitching
- Implement resilient server-side event ingestion patterns
Server-Side Ingestion with the Collect API
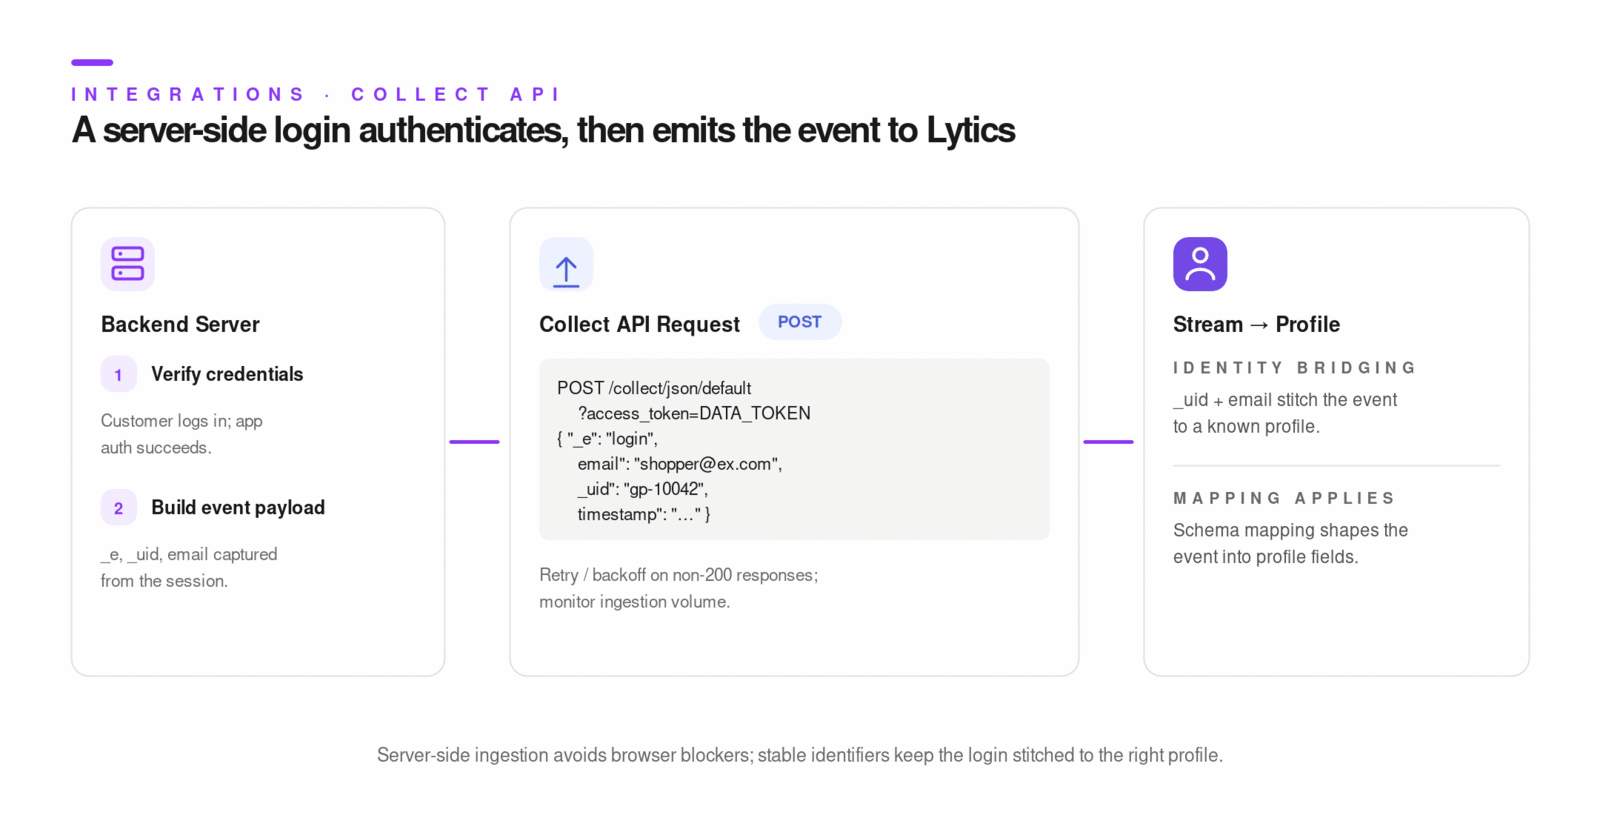
The Collect API is the server-side ingestion endpoint for JSON events. It is the standard option when data should be sent from backend services instead of client-side tags.
Endpoint:
- POST /collect/json/{stream} with required data API token
Common required event fields for identity-oriented events include:
- _e event type/name
- _uid (if available)
- stable identifiers like email or customer ID
Key Concepts
- Server-side reliability: avoids browser blockers and client runtime failure modes.
- Identity bridging: including
_uid+ known identifiers improves stitching. - Stream discipline: different streams may require dedicated mappings.
- Ingestion contracts: validate payload shape and timestamp behavior.
Step-by-Step
- Select stream name and ensure schema mappings exist for that stream.
- Capture required identity/event fields in backend flow.
- Send JSON payload to collect endpoint with access token.
- Handle non-200 responses with retries/backoff.
- Verify ingestion in Lytics stream data and profile outcomes.
- Monitor ingestion volume and error rates.
Examples
curl -X POST \
  'https://api.lytics.io/collect/json/default?access_token=YOUR_DATA_API_TOKEN' \
  -H 'Content-Type: application/json' \
  -d '{
    "_e": "login",
    "email": "[email protected]",
    "_uid": "12345-67890-abcdef",
    "timestamp": "2026-02-16T10:30:00Z"
  }'
Diagrams & Screenshots
Summary
The Collect API is the primary server-side ingestion path for JSON events. POST to /collect/json/{stream} with a data API token, including _e, _uid, and any stable identity fields to support profile stitching. Implement retry/backoff logic for non-200 responses, and monitor ingestion volume and error rates in production to catch payload or mapping issues early.
Documentation Links
Personalize API
Learning Objectives
By the end of this section, you will be able to:
- Retrieve user entity/profile data for personalization use cases
- Request only required fields and segment context for low-latency decisions
- Integrate Personalize API calls safely into server-side or edge decision flows
Real-Time Personalization with the Personalize API
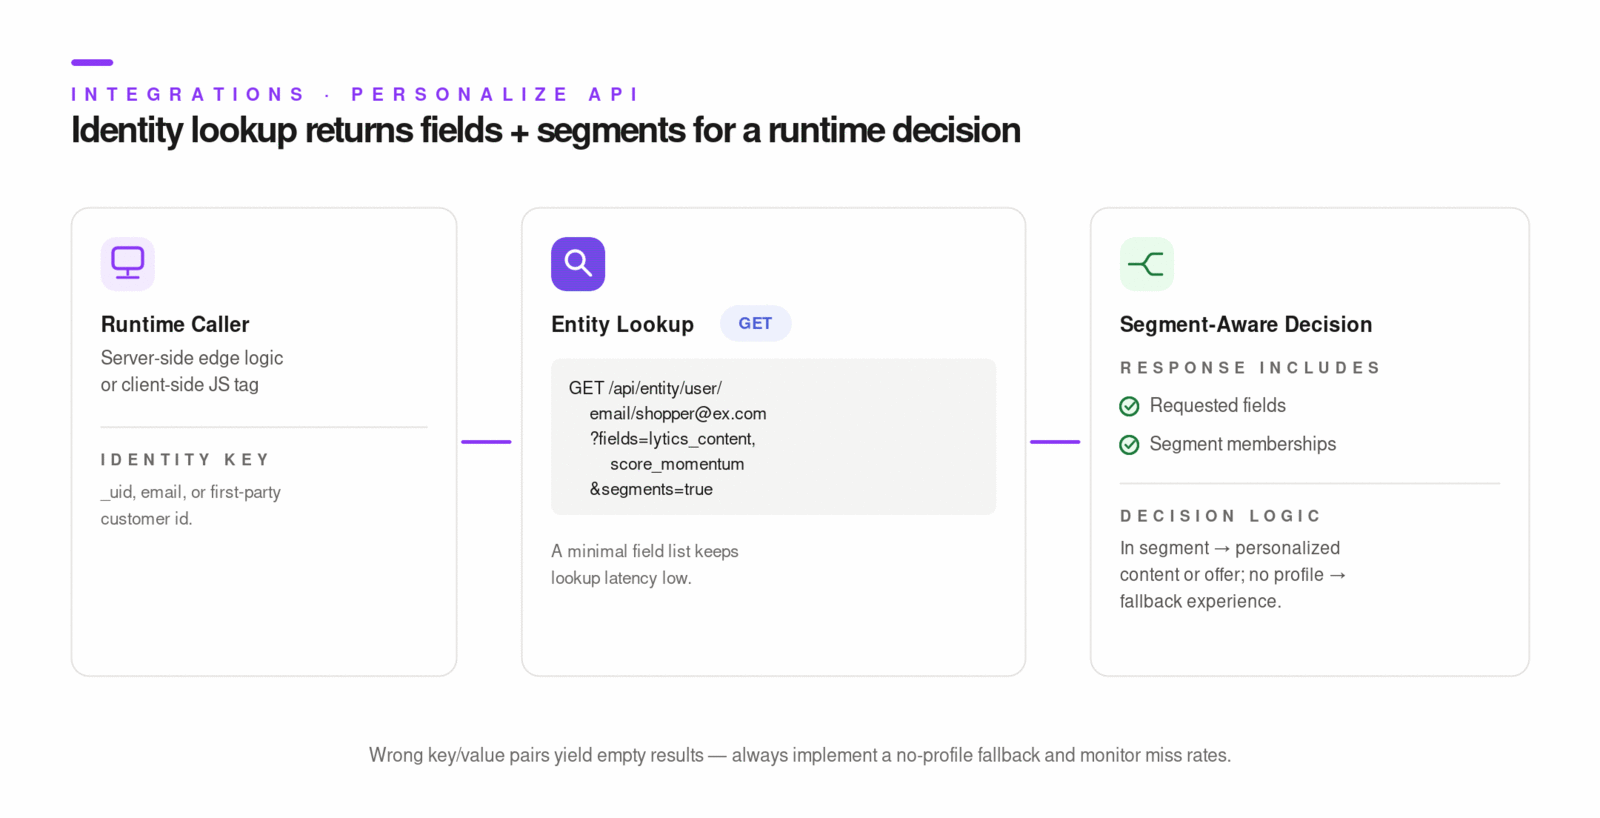
The Personalize API exposes user entity data by identity key/value and is used by web personalization patterns and server-side decisioning.
Core endpoint family — all paths perform the same entity retrieval:
- /api/entity/{table}/{fieldname}/{fieldval} — authenticated lookup (requires Authorization header)
- /api/personalize/{accountid}/{table}/{fieldname}/{fieldval} — public variant used by client-side personalization (no auth; account ID scopes the request)
Common query options:
- fields include-list
- segments toggle
- meta toggle
- fieldBlocklist exclusion list
The JS tag uses the /api/personalize/{accountid}/... public form under the hood when loading entity data client-side.
Key Concepts
- Identity lookup correctness: wrong key/value pair yields empty or wrong profile retrieval.
- Latency optimization: request only required fields for runtime decisions.
- Audience-aware decisions: segment membership can drive channel/content selection.
- Data minimization: keep PII exposure bounded to true runtime need.
Step-by-Step
- Choose lookup key/value strategy (
_uid,email, or stable first-party key). - Define minimal field list required for decisioning.
- Call personalization endpoint and parse entity response.
- Handle no-profile cases with fallback logic.
- Apply decision and log attribution context.
- Monitor response quality and lookup miss rates.
Examples
# Lookup by user_id
curl -H "Authorization: $LIOKEY" \
  "https://api.lytics.io/api/entity/user/user_id/user123?fields=first_name,segment_prediction_percentile&segments=true"
# Lookup by email
curl -H "Authorization: $LIOKEY" \
  "https://api.lytics.io/api/entity/user/email/[email protected]?fields=lytics_content,score_momentum"
Diagrams & Screenshots
Summary
The Personalize API retrieves unified profile data at runtime for server-side and edge decisioning. Address profiles by table, field name, and field value; request only the fields you need to keep latency low and PII exposure minimal. Always implement fallback logic for no-profile cases, and monitor lookup miss rates to detect identity key mismatches before they degrade personalization quality in production.
Documentation Links
What You've Learned
You now have a complete picture of how Lytics connects to external systems — from the credential layer that underlies every connection, through the filtering controls that govern what leaves the platform, to the warehouse-native enrichment patterns of Cloud Connect and the API surface for programmatic profile interaction. You've seen how prebuilt integrations and webhooks handle the most common activation patterns, and how the Collect and Personalize APIs extend those patterns to server-side ingestion and real-time decisioning. Together, these capabilities form the integration foundation that makes your unified profile data actionable across every channel in your stack.
Key Terms
📘 Connection — A configured link between Lytics and an external system or warehouse, with provider-specific settings and authorization.
📘 Authorization — A reusable credential object (API key, OAuth token, etc.) managed centrally in Account > Security and referenced by jobs and connections.
📘 Destination Filter — A job-level control that limits which profile fields and which users are included in an export payload.
📘 Cloud Connect — A Lytics feature that lets you run SQL queries directly against supported data warehouses and map results into profile attributes or audiences without full data replication.
📘 Attributes API — A REST API for reading and writing profile attributes, addressed by table, identity key, and identity value.
📘 Collect API — The server-side JSON event ingestion endpoint (
POST /collect/json/{stream}), used when data should be sent from backend services rather than client-side tags.📘 Personalize API — A REST API that retrieves unified profile data by identity key/value for runtime personalization and server-side decisioning.
📘 Webhook — An event-driven integration pattern that sends audience enter/exit/change notifications to an external HTTP endpoint when user state changes.
📘 Profile Template — A
jsonnetorhandlebarstemplate that reshapes the outbound payload of a webhook or export job to match a destination's required JSON contract.
