Flows
Flows is Lytics' visual orchestration engine for building multi-step profile journeys. Where an audience answers the question "who is this person right now?", a flow answers the question "what should happen next, and when?" This section walks you through the flow builder UI, the available components, common orchestration patterns, and the build-validate-publish process so you can confidently design and operate lifecycle automations in production.
Overview
Learning Objectives
By the end of this section, you will be able to:
- Explain what flows are and when to use them for automated orchestration
- Navigate the flow builder UI and identify its key areas
- Understand the flow execution model including how users enter, progress, and exit flows
Overview
Flows is Lytics' visual orchestration system for profile journeys. A flow defines:
- how a profile enters (triggered by audience membership conditions),
- what should happen next (wait, split, export),
- and when the profile should move through each step.
Use flows when you need lifecycle automation across profile state and channel activation, especially when timing and branch logic matter.
Key docs for reference:
Key Concepts
- Flow state lifecycle:
draft: editable and not processing users.running: live and processing users.draining: no new entries, existing users continue until they exit.- Versioned model: running versions are protected; you create a new draft version to make changes.
- Builder anatomy:
- Flows list: create/open/search flow definitions.
- Canvas: visual DAG of steps and paths.
- Drawer: step-level configuration.
- Publish modal: validation and export activation checks.
- Entry model: trigger step is required and cannot be removed.
- Profile visibility: active flow step slugs can be exposed on user profiles as
flows_step_slugsfor personalization checks.
Step-by-Step
- Open Flows from the left navigation.
- Select Create New and choose either:
- a template, or
- Build Your Own. - Name the flow and open the canvas.
- Configure the trigger step first (audience, entry condition, re-entry behavior).
- Add steps in sequence and label each step clearly.
- Open Publish to run validation and resolve any configuration issues.
- Activate exports from the publish flow, then publish.
Examples
Appropriate flow scenarios:
- Lifecycle onboarding with timed follow-ups.
- Multi-channel re-engagement with different branches.
- Triggering exports only after profile conditions are met.

Scenarios better handled outside flows:
- One-time static export without branching or timing.
- A simple audience build problem that has no orchestration need.
Diagrams & Screenshots
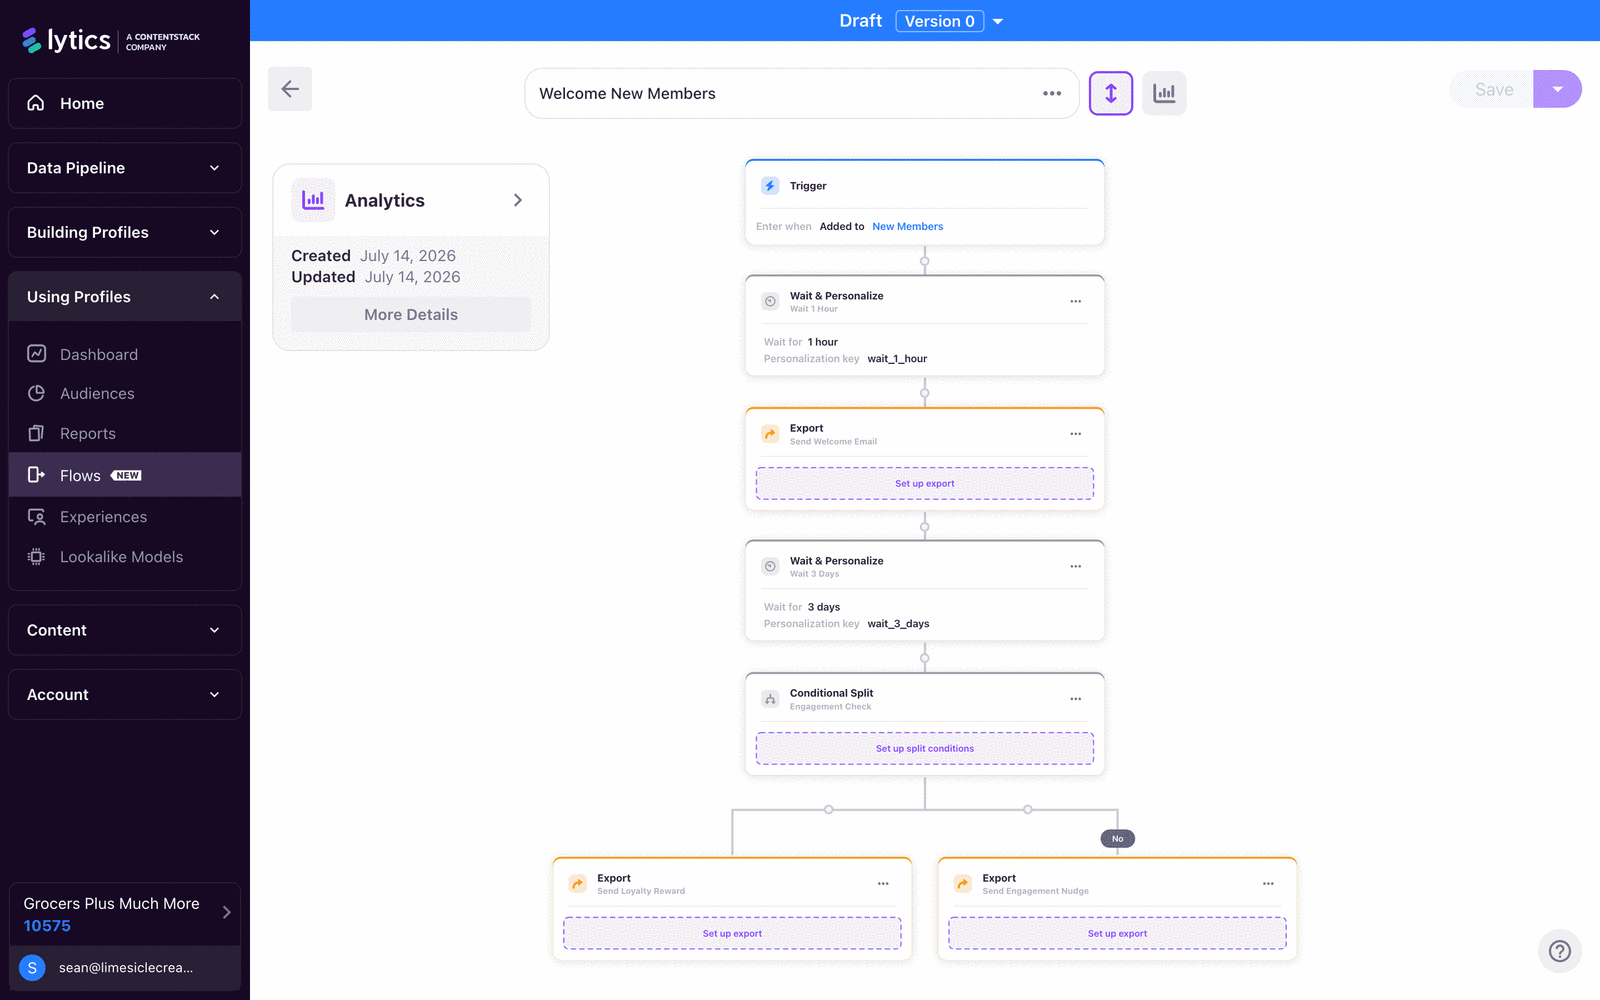
Summary
Flows provide a visual, versioned orchestration model for profile journeys. The three lifecycle states — draft, running, and draining — enforce a disciplined change process: you build and validate in draft, run live, and drain safely before retiring a version. The builder's canvas, drawer, and publish modal work together so you can configure, validate, and activate each step before committing to production.
Documentation Links
Components
Learning Objectives
By the end of this section, you will be able to:
- Identify all flow component types available in the builder
- Understand the purpose and behavior of triggers, actions, conditions, delays, and splits
- Configure each component type with appropriate settings
Components
Flow components map directly to the available step types in the builder: Trigger, Wait & Personalize, Conditional Split, and Export.
Key Concepts
- Trigger (required):
- Defines who enters the flow.
- Uses an audience and entry condition.
- Cannot be deleted.
- Wait:
- Wait for fixed time, or wait until a condition becomes true.
- Can include a personalization key slug for in-session targeting.
- Conditional Split:
- Branches users into Yes and No paths based on profile conditions.
- Uses the same filtering model as audience logic.
- Export:
- Sends users to an external destination/workflow.
- Must be valid and active before flow publish.
Trigger options to teach exactly as shown in UI:
- Begin this Flow when a user is:
- Added to (
on_segment_entry) - Member of (
in_segment) - Allow re-entry:
- No (single-pass)
- Yes (with re-entry condition and delay)
- Re-enter this Flow when a user:
- Enters the audience again
- Enters or remains in the audience
- Re-entry delay:
- minimum is 1 hour in the UI.
Wait options to teach exactly as shown in UI:
- Wait for a set amount of time (days/hours/minutes)
- Wait until a condition is true (plus maximum time to wait)
- Optional Personalization key (stored as
slug; UI normalizes spaces to underscores)
Publish validation behavior to teach:
- flow needs at least one step beyond trigger,
- trigger must be valid,
- each wait must have a valid delay/condition,
- split needs defined conditions,
- export steps must be configured and activated.
Step-by-Step
- Configure trigger first:
- select entry audience,
- choose Added to or Member of,
- set re-entry rules if needed. - Add a Wait step:
- choose time-based or condition-based mode,
- if condition-based, define max wait time to avoid indefinite waits. - Add a Conditional Split for business logic branches.
- Add Export steps on each branch as needed.
- Give each step a descriptive label so metrics and profile troubleshooting are readable.
- Run publish validation and resolve every warning/error before activation.
Examples
Example component chain:
Trigger: Added to "new_subscriber"
-> Wait: 1 day + personalization key "welcome_day_1"
-> Conditional Split: profile.email exists?
  -> Yes: Export to ESP welcome campaign
  -> No: Export to webhook for lead enrichment
Example re-entry configuration:
Trigger: "cart_abandoners_24h"
Allow re-entry: Yes
Re-entry condition: Enters the audience again
Re-entry delay: 24 hours
Diagrams & Screenshots
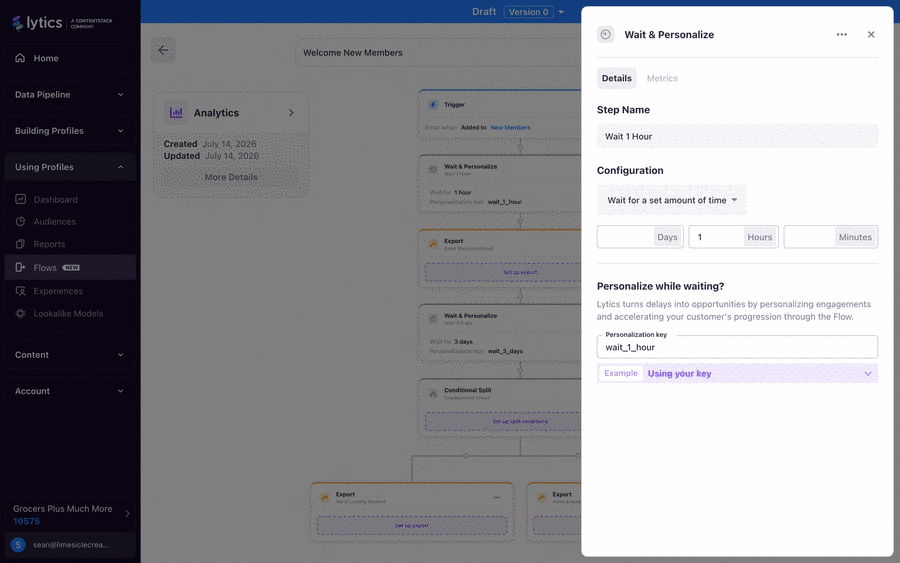
Summary
Each flow step type has a distinct role: the Trigger controls entry (by audience membership, with optional re-entry rules), Wait steps pause progression by time or condition, Conditional Splits route profiles into Yes/No branches based on profile logic, and Export steps push profiles to external destinations. Publish validation enforces that every step is correctly configured before the flow goes live.
Documentation Links
Use Cases
Learning Objectives
By the end of this section, you will be able to:
- Identify common flow patterns such as onboarding, re-engagement, and nurture sequences
- Match business use cases to the appropriate flow configurations
- Plan a flow design for a given business requirement before building it
Use Cases
Flows are most valuable when teams need controlled, repeatable progression logic from audience membership to downstream activation.
Key Concepts
- Pattern over one-off: design flows as reusable operating patterns.
- Audience quality first: trigger audience quality determines flow quality.
- Branch intentionally: every split should map to a business decision.
- Measure per step: optimize by locating drop-off/wait bottlenecks.
Step-by-Step
- Start from the business objective (activate, recover, qualify, suppress, convert).
- Define the trigger audience and entry model.
- Choose time-based and condition-based waits based on user behavior expectations.
- Add splits only where business outcomes differ.
- Attach exports aligned to each branch outcome.
- Define success metrics before publish.
Examples
Welcome and activation flow:
- Trigger: Added to "new_users"
- Wait: 1 day
- Export: Welcome email
- Wait: until profile has first_session=true or max 7 days
- Split: first_session true?
  - Yes: Export to product tips campaign
  - No: Export to activation reminder campaign
Re-engagement and suppression flow:
- Trigger: Member of "at_risk_users"
- Export: Winback message
- Wait: 3 days
- Split: recent_purchase within 7 days?
  - Yes: Exit path / add to retention nurture
  - No: Export to higher-intent offer
Lead qualification flow:
- Trigger: Added to "new_leads"
- Wait: until profile.email exists, max 48 hours
- Split: lead_score >= threshold?
  - Yes: Export to CRM high-priority queue
  - No: Export to nurture sequence
Diagrams & Screenshots
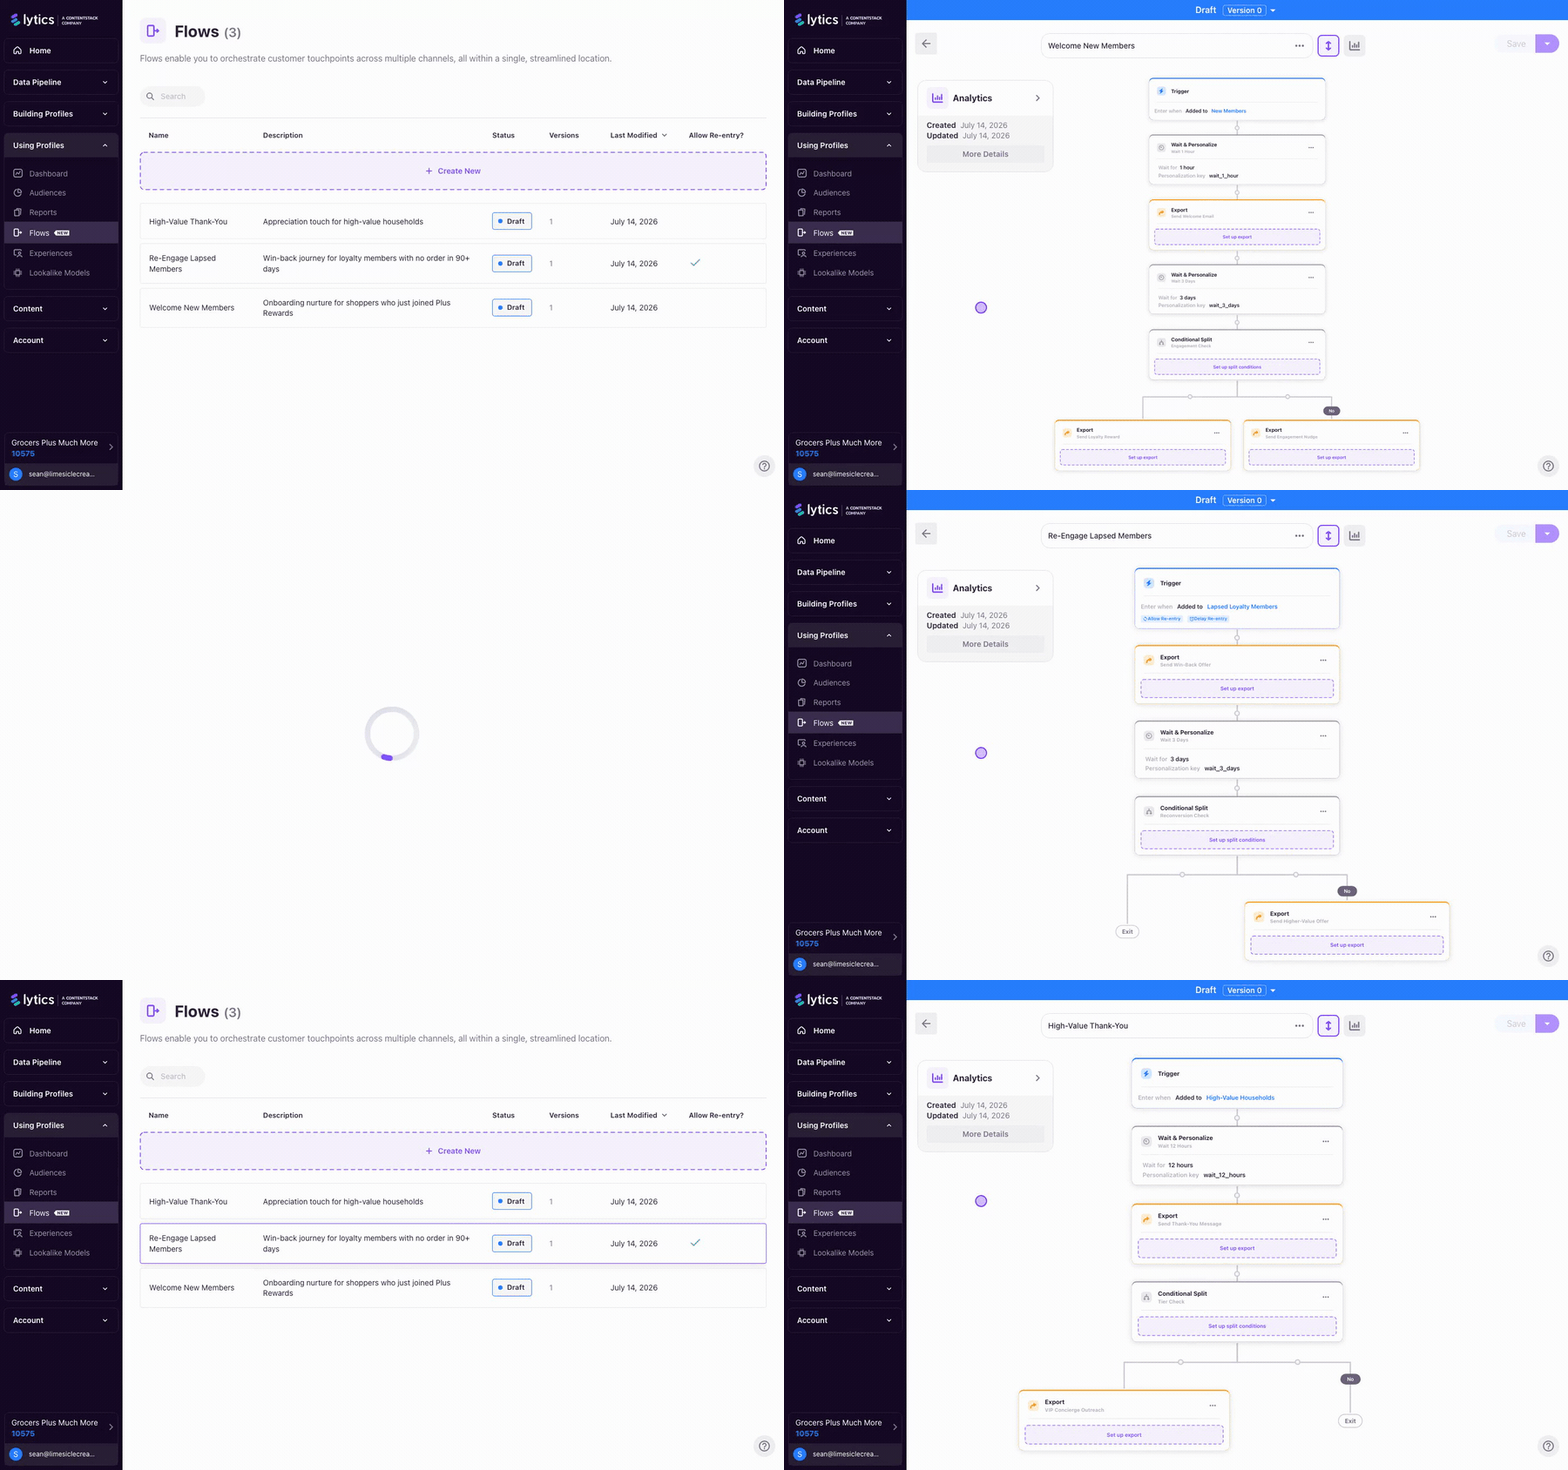
Summary
The most common flow patterns — welcome and activation, re-engagement, and lead qualification — share the same structural logic: an audience-triggered entry, one or more wait steps that pause on time or condition, conditional splits that branch on profile state, and exports that deliver the right action to the right destination. Designing flows around these patterns before opening the builder ensures each branch has a clear business purpose.
Documentation Links
Tips and Tricks
Learning Objectives
By the end of this section, you will be able to:
- Debug flow execution issues using logs, status indicators, and test profiles
- Optimize flow performance by reducing unnecessary steps and managing audience sizes
- Avoid common flow pitfalls such as infinite loops, race conditions, and over-triggering
Tips and Tricks
Operational reliability comes from clear naming, careful re-entry settings, and disciplined validation before publish.
Key Concepts
- Step names matter: labels appear in metrics and help debugging.
- Re-entry control prevents over-messaging: always set intentional delays.
- Condition waits need max guardrails: avoid trapping users forever.
- Exports are dependencies: keep credentials and destination configs current.
- Version discipline: never assume you can hot-edit running flow logic.
Step-by-Step
- If users are not entering:
- verify trigger audience membership,
- confirm trigger condition (Added tovsMember of),
- confirm flow state isrunning. - If users stall in flow:
- inspect wait condition logic,
- check max wait values,
- review split condition logic for impossible criteria. - If exports fail:
- open publish panel and validate export state,
- re-activate steps if needed after new version creation,
- check destination-side credentials or schema expectations. - If volume spikes unexpectedly:
- audit re-entry settings,
- review audience churn rules,
- reduce broadMember ofusage unless intentionally needed.
Examples
Common misconfiguration:
- Trigger set to "Member of" on a very large audience
- Result: large immediate entry burst on publish
- Safer alternative for most campaigns: "Added to"
Common wait pitfall:
- Wait-until condition with no realistic match and no practical max wait
- Result: active count accumulates in wait step
- Fix: tighten condition and set business-appropriate maximum wait
Diagrams & Screenshots
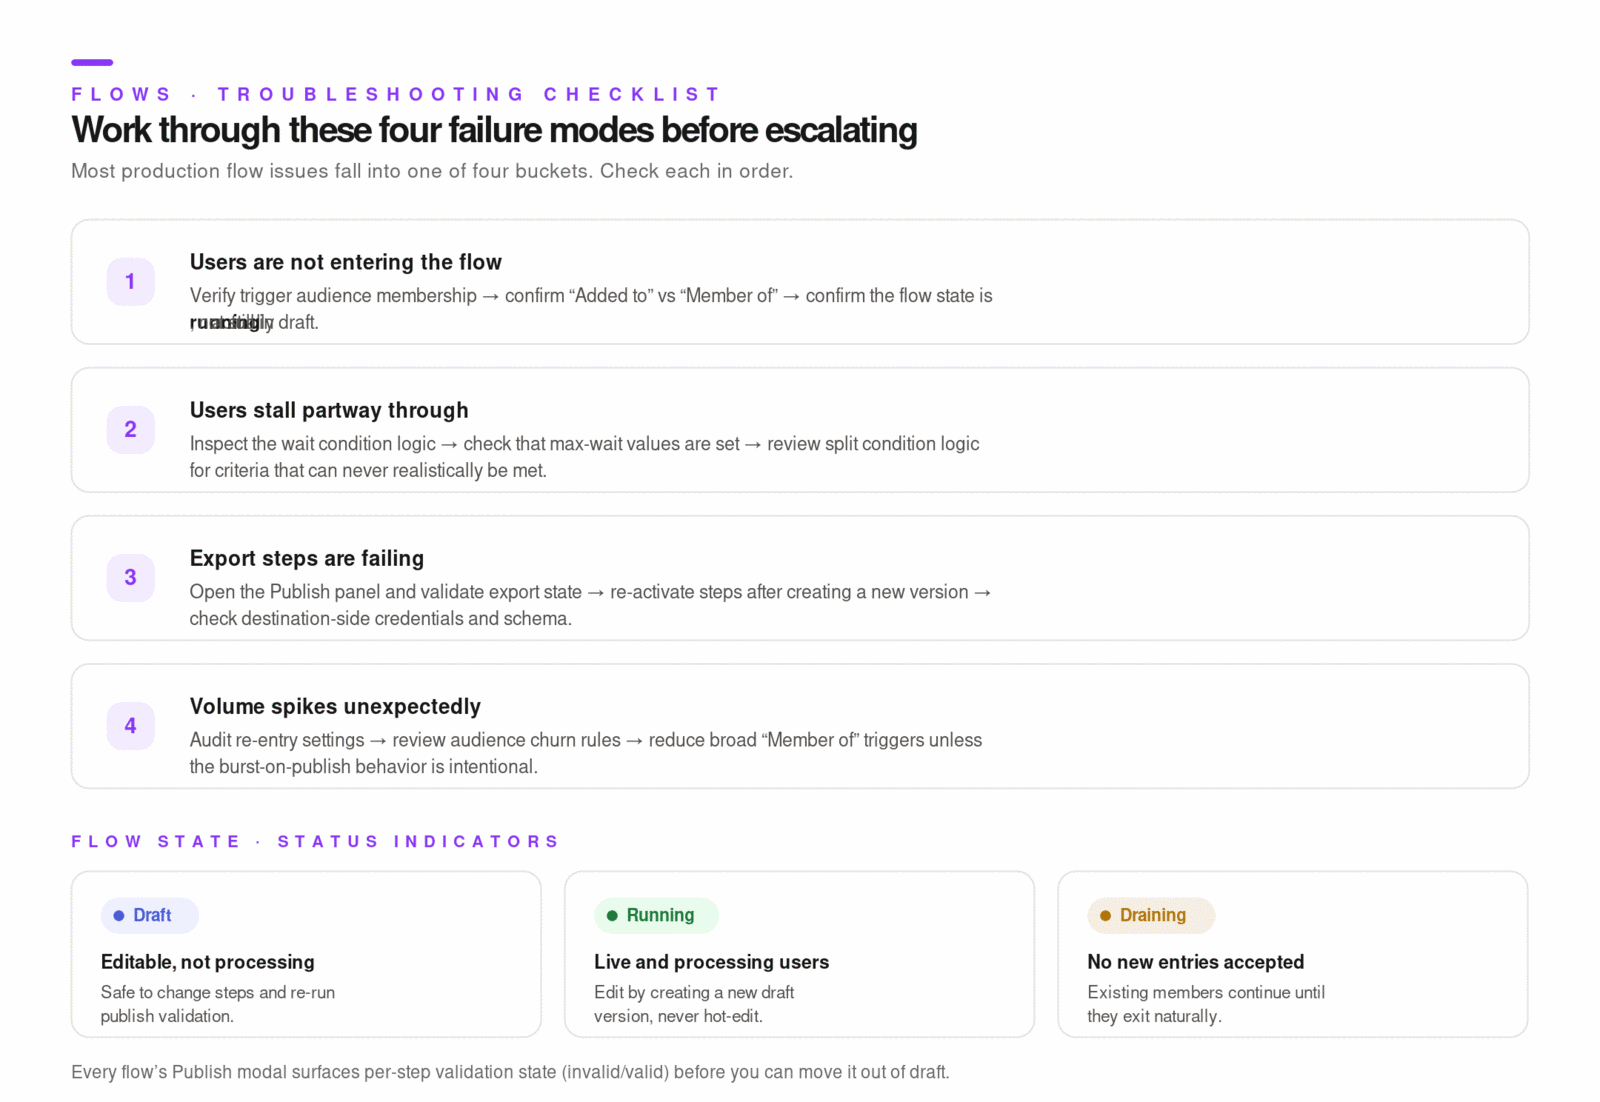
Summary
Most flow production issues fall into four categories: users not entering (check audience membership and trigger condition), users stalling (check wait logic and max-wait guardrails), export failures (validate export state and destination credentials), and unexpected volume spikes (audit re-entry settings and trigger type). Clear step labels, intentional re-entry delays, and condition-wait maximums prevent the majority of these issues before they occur.
Documentation Links
Define Goal and Journey
Learning Objectives
By the end of this section, you will be able to:
- Define clear flow goals before building, including desired outcomes and success metrics
- Map out the user journey from entry trigger through each decision point to exit
- Identify required audiences, actions, and integrations needed for the flow
Define Goal and Journey
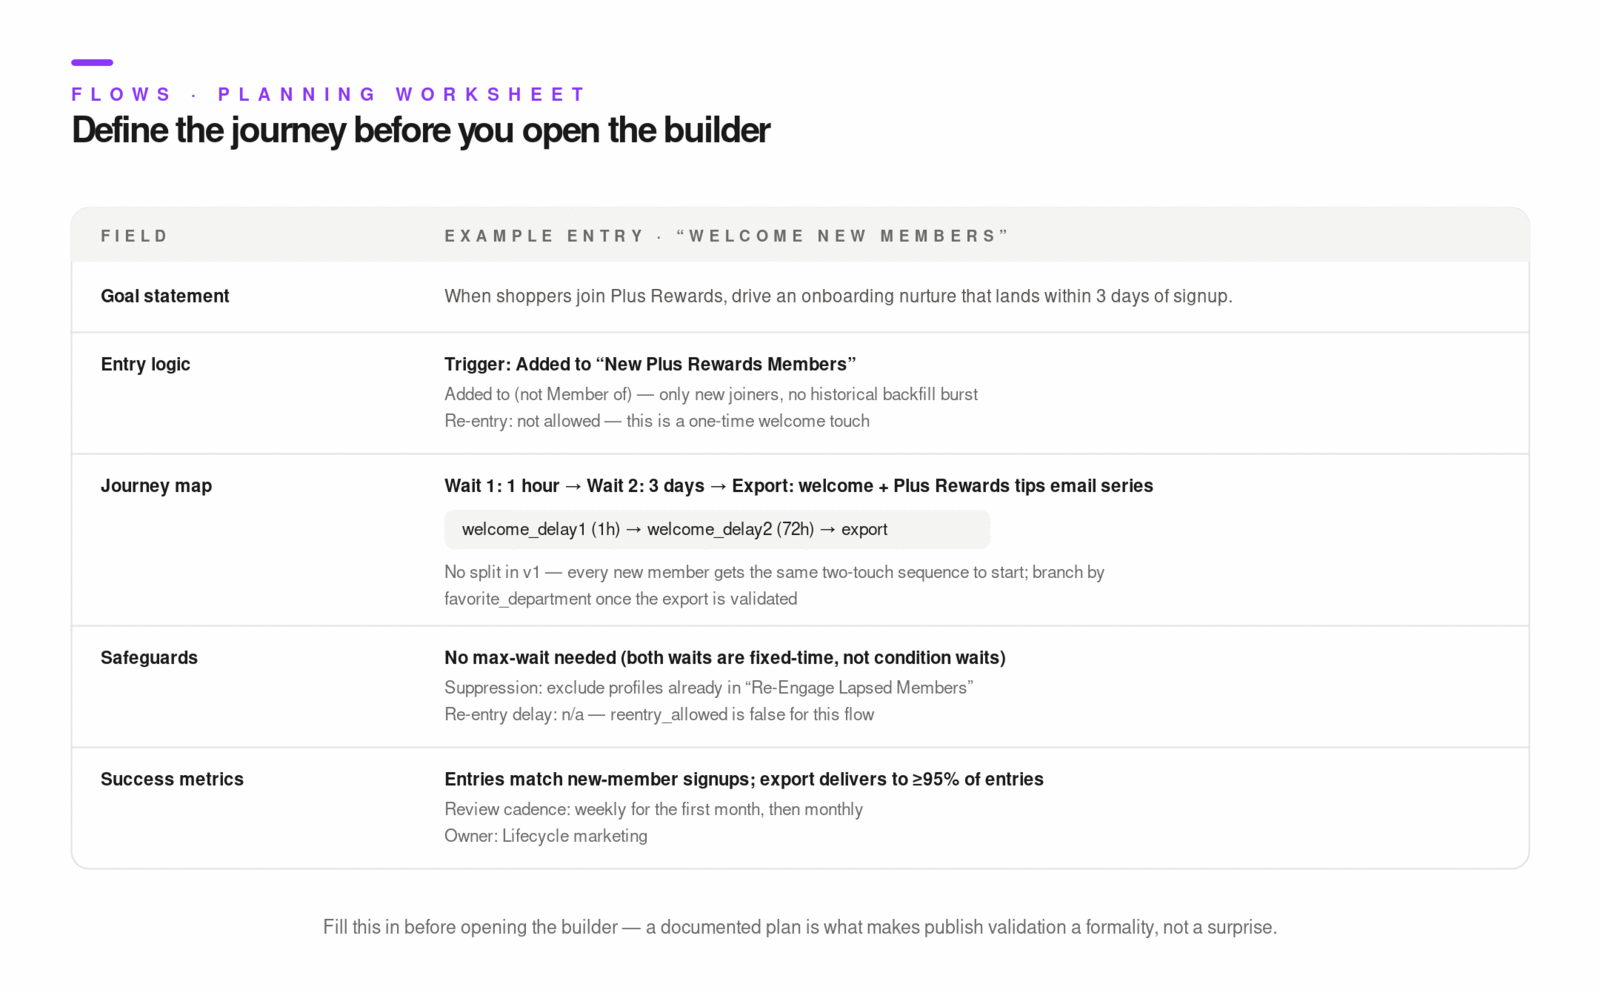
Begin with a one-page journey plan before you open the UI so your flow design is deterministic and testable.
Key Concepts
- One primary objective per flow: acquisition, activation, conversion, retention, or recovery.
- Success criteria must be measurable:
- entries,
- completion,
- branch distribution,
- downstream action rate.
- Journey contract: each step should have a clear business purpose.
- Dependency mapping: audience definitions, profile fields, exports, and consent requirements must exist before publish.
Step-by-Step
- Define goal statement:
- "When profiles enter audience X, drive outcome Y within Z days." - Define entry logic:
- source audience,
-Added tovsMember of,
- re-entry requirements. - Map journey states:
- each wait,
- each decision split,
- each export action,
- terminal outcomes. - Define safeguards:
- max waits,
- suppression conditions,
- re-entry delay constraints. - Define metric targets and review cadence.
Examples
Journey design worksheet (example)
Goal: Convert trial users to first key action in 7 days
Trigger: Added to "trial_started"
Wait 1: 1 day
Action 1: Product onboarding email export
Wait 2: until key_action_completed=true, max 5 days
Split: key_action_completed?
- Yes -> export to success tips stream
- No  -> export to assisted onboarding queue
Success metric: >=30% branch to "Yes" within 7 days
Diagrams & Screenshots
Summary
A well-defined journey plan — one primary objective, a measurable success criterion, a step-by-step map of waits and splits, and an explicit list of audience and export dependencies — eliminates ambiguity before you touch the builder. Flows built from a documented plan are easier to validate, easier to hand off, and easier to optimize once live because every step has a stated purpose you can evaluate against.
Documentation Links
Create and Validate Flow
Learning Objectives
By the end of this section, you will be able to:
- Build a flow step-by-step in the UI following the journey map
- Test and validate flow execution using test profiles and preview tools
- Monitor flow performance after launch and identify issues early
Create and Validate Flow
Treat build and validation as a release process: draft, validate, activate dependencies, publish, monitor, iterate by version.
Key Concepts
- Validation is mandatory before publish.
- Export activation is part of publish readiness.
- New versions are the safe change path for running flows.
- Metrics update every 24 hours, not in real-time; evaluate with this reporting cadence in mind.
Step-by-Step
- Build draft flow from your journey map.
- Configure trigger and all downstream steps.
- Label steps and check each branch path for completeness.
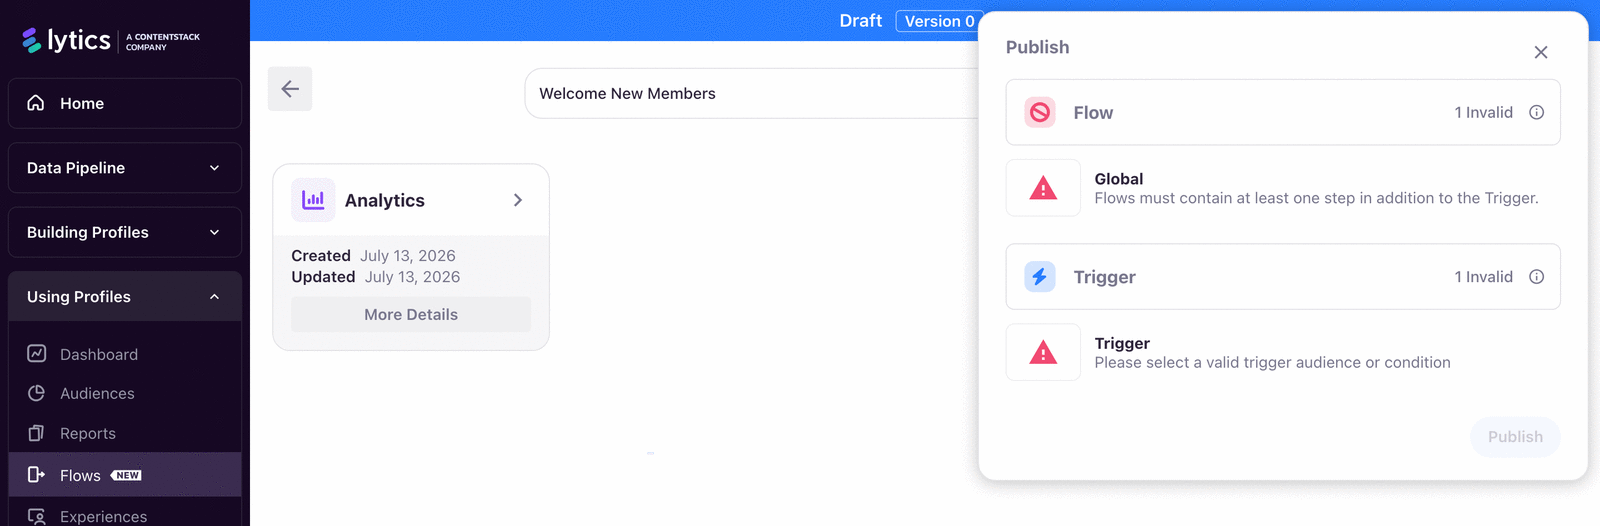
- Click Publish to run validation.
- Resolve all invalid trigger, wait, split, or export states.
- Activate every required export from publish flow.
- Publish and confirm state moves to
running. - Monitor initial entries and branch behavior.
- For updates, create a new version, edit draft, and republish.
Examples
Validation pass criteria before publish:
- Trigger audience selected and entry condition intentional
- At least one non-trigger step exists
- All wait steps have valid time/condition values
- All splits have valid conditions
- All exports configured and activated
Post-launch checks (first 24-48h):
- Entry volume matches audience expectations
- No branch starvation or impossible condition paths
- Export destinations receiving expected payloads
- Active vs completed counts moving in expected direction
Diagrams & Screenshots
Summary
Building and publishing a flow is a structured release process: draft from your journey plan, run publish validation to surface every misconfiguration, activate required exports, publish, and monitor the first 24–48 hours to confirm entries, branch distributions, and downstream payloads are behaving as expected. When changes are needed on a running flow, create a new version rather than editing live — the versioned model is the safe path for all production modifications.
Documentation Links
What You've Learned
Flows give you a production-grade orchestration layer on top of Lytics audiences. You've learned how the versioned lifecycle — draft, running, draining — enforces a safe change process, how to configure each step type (Trigger, Wait, Conditional Split, Export), and how common patterns like onboarding, re-engagement, and lead qualification translate into concrete flow designs. You've also worked through the planning and validation discipline that separates flows that run reliably in production from ones that require constant intervention.
Key Terms
📘 Flow — A visual, versioned orchestration definition that controls how profiles enter, progress through steps, and exit based on audience membership and profile conditions.
📘 Trigger — The required entry step of a flow. Defines which audience drives entry and whether profiles enter once or can re-enter after a delay.
📘 Wait Step — A flow step that pauses a profile's progression for a fixed duration or until a profile condition becomes true, with an optional maximum wait time.
📘 Conditional Split — A flow step that evaluates a profile condition and routes the profile to a Yes or No branch, using the same filter logic as audience building.
📘 Export Step — A flow step that sends a profile to an external destination or workflow. Must be configured and activated before the flow can be published.
📘 Flow State — The operational status of a flow version:
draft(editable, not processing),running(live and processing), ordraining(no new entries, existing profiles continue to completion).📘 Personalization Key — An optional slug on a Wait step that is written to the profile's
flows_step_slugsfield, making the current flow position available for on-site targeting decisions.
