

.svg?format=pjpg&auto=webp)
.svg?format=pjpg&auto=webp)
.png?format=pjpg&auto=webp)


.png?format=pjpg&auto=webp)
Image Preset Builder App Installation Guide
A preset is a customized version of an image, pre-configured with specific formatting and sizing constraints. You can build customized presets for any image file to tailor your assets as per your business requirements.
The Image Preset Builder app helps you to create and optimize image presets using the Assets Sidebar Widget within the Contentstack environment. It allows you to define parameters such as size, format, quality, compression level, background color, contrast, and other settings of the images in a preset configuration file. It ensures that all images are optimized for web performance while maintaining visual appeal. The app supports JPG, JPEG, and PNG image file formats.
Prerequisites
- Contentstack account
- Access to the Contentstack Organization/ Stack as the Owner/ Admin
Let's follow this step-by-step guide to install and configure the Image Preset Builder app within your stack.
Steps for Execution
- Install and Configure the Image Preset Builder app in Contentstack Marketplace
- Use Image Preset Builder within your Stack
- Use Image Presets within your Entry
- Render Images using Image Preset Builder
-
Install and Configure the Image Preset Builder app in Contentstack Marketplace
Follow the steps to install the application in Contentstack.
- Log in to your Contentstack account.
- In the left-hand side primary navigation, click the Marketplace icon to go to the Marketplace.
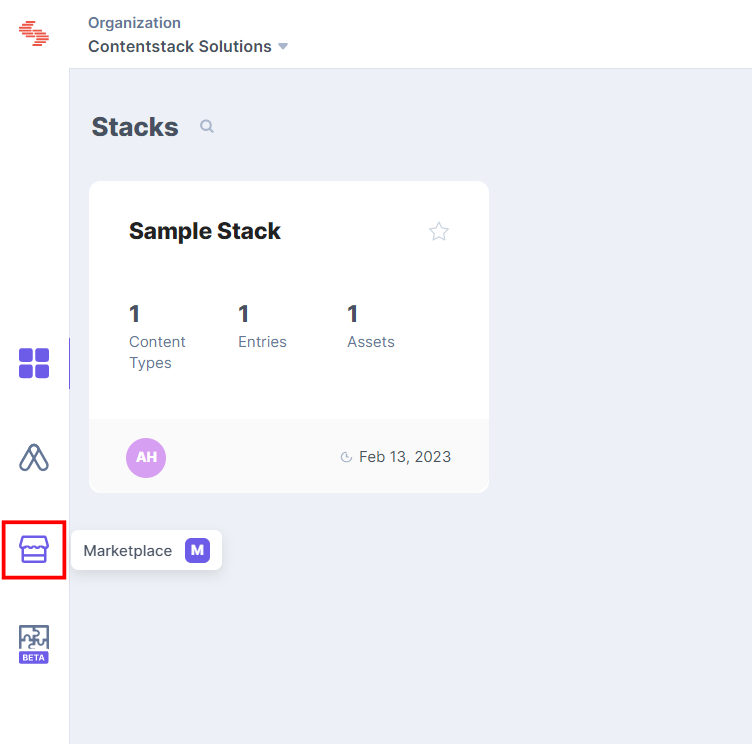
- Click Apps from the left panel.
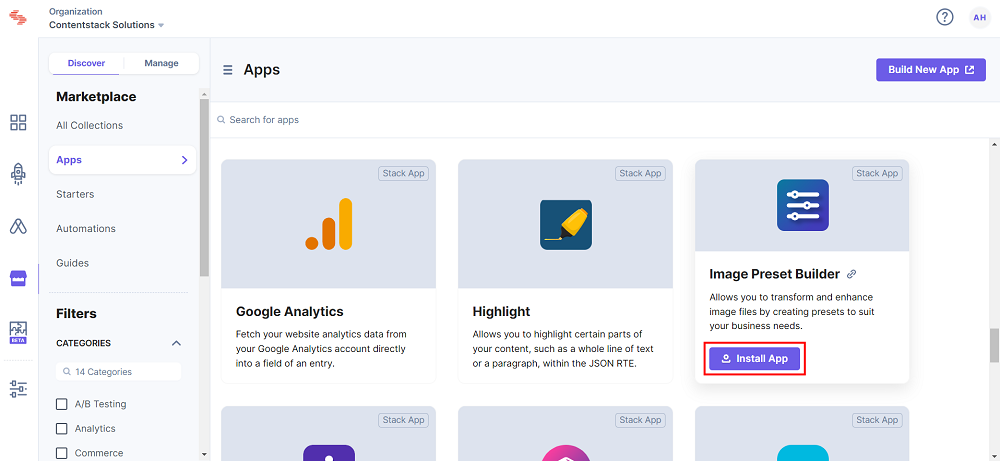
- Within the Marketplace, you can see all the available apps. Hover over the Image Preset Builder app and click Install App.
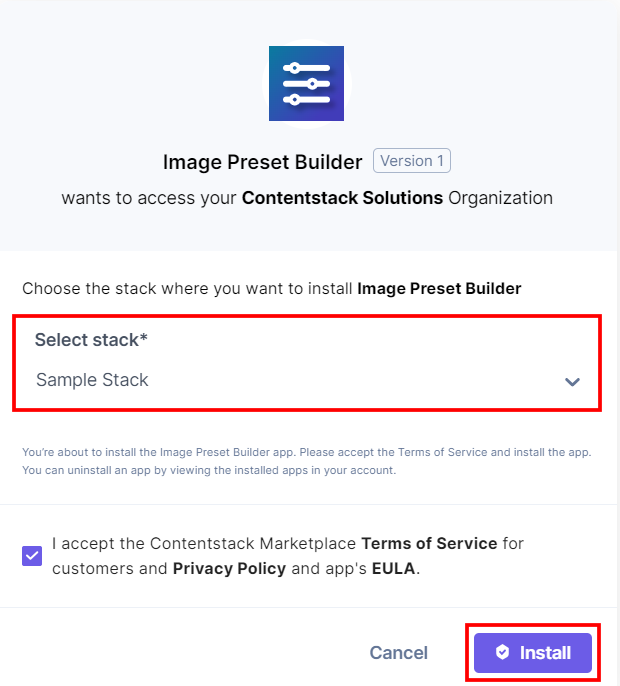
- In the popup window, select the stack where you want to install the Image Preset Builder app and click the Install button.
- The Image Preset Builder app is auto configured.
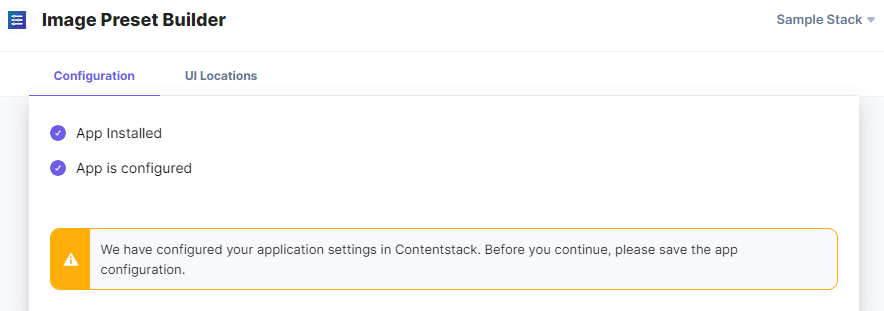
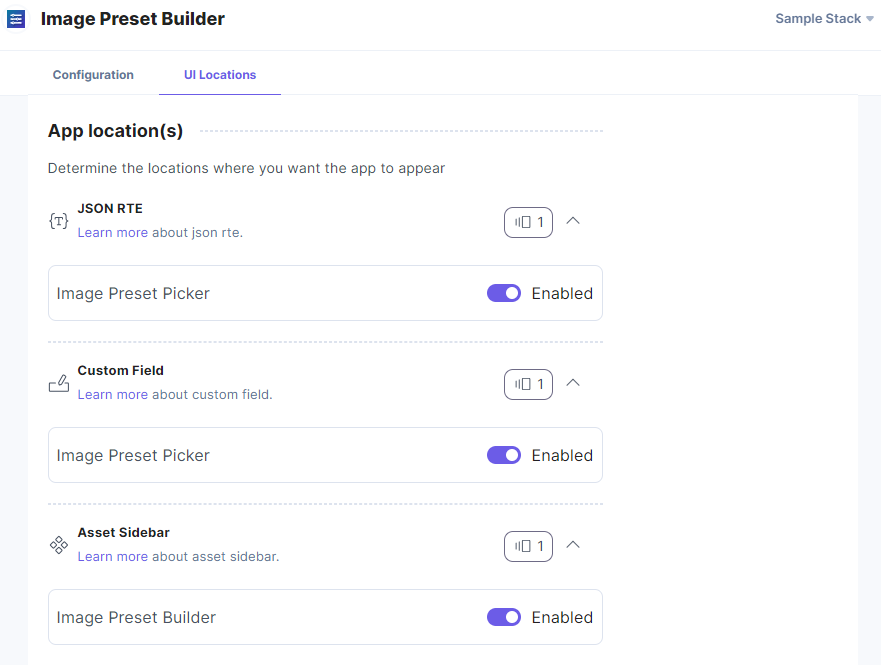
- On the UI Locations tab, you can see the predefined app locations. You can use the toggle button corresponding to each UI location to enable or disable it based on your requirements.
-
Additional Resource: For more information on UI locations, please refer to the Installed Apps guide.
- Click the Save button.
- Click Open Stack to start using the Image Preset Builder application.
-
Use Image Preset Builder within your Stack
To use the Image Preset Builder app within your stack, follow the steps given below:
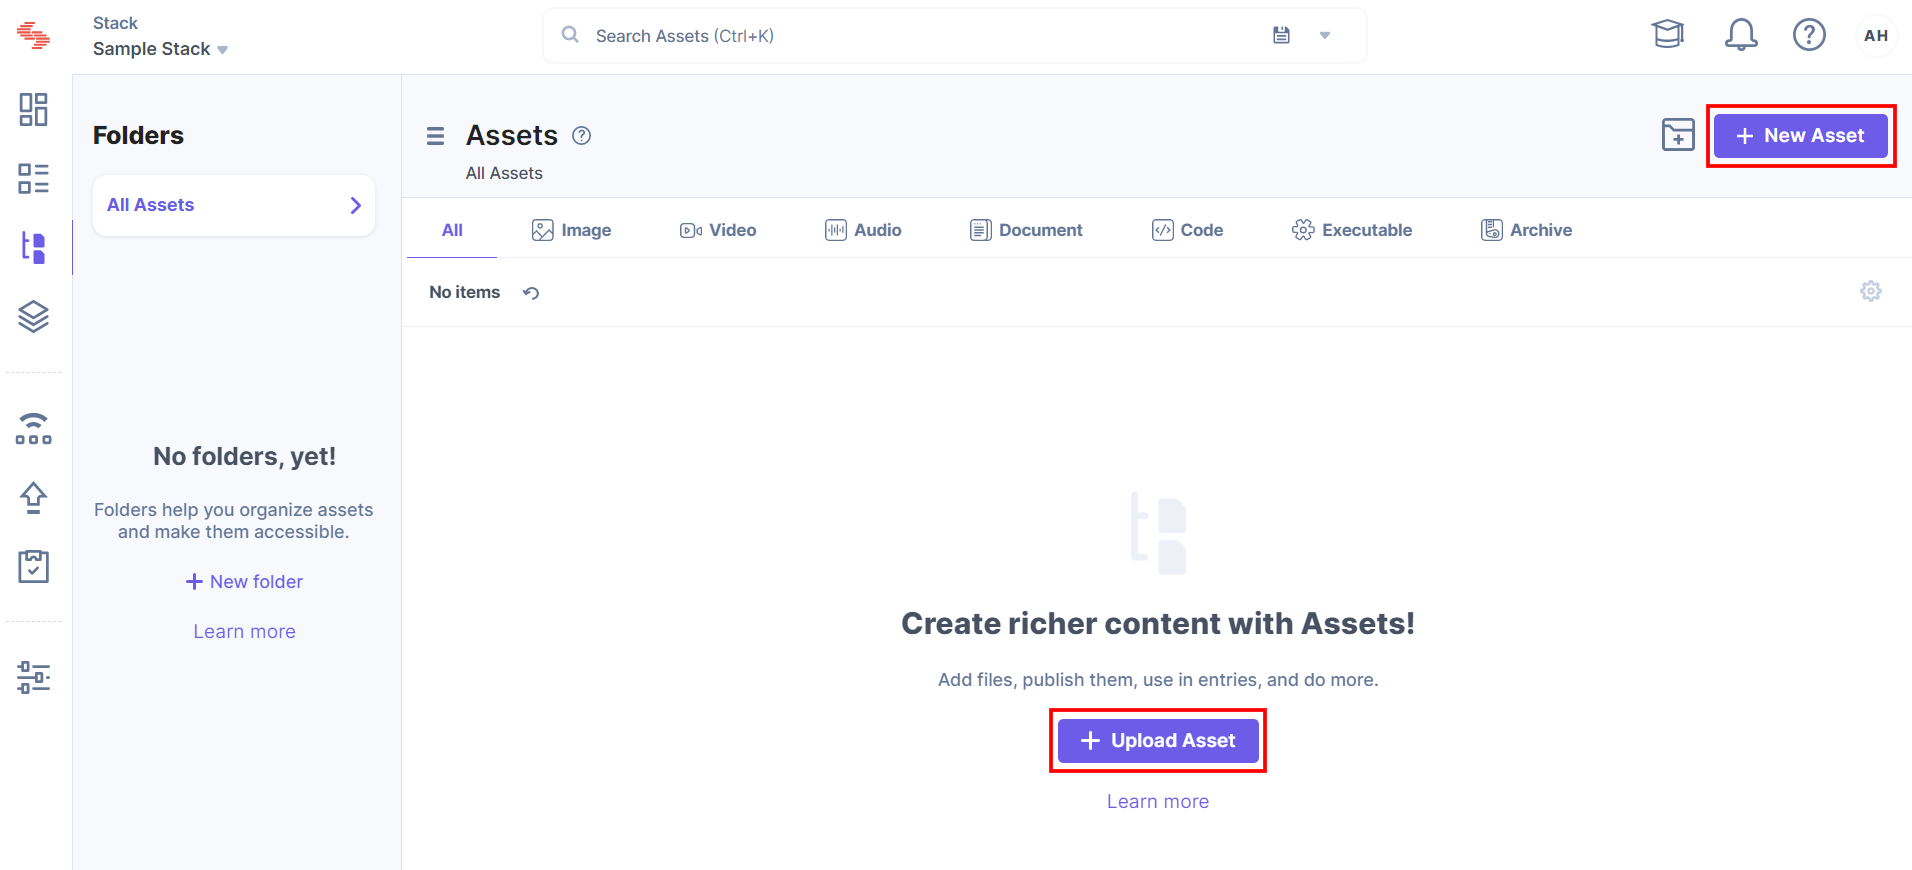
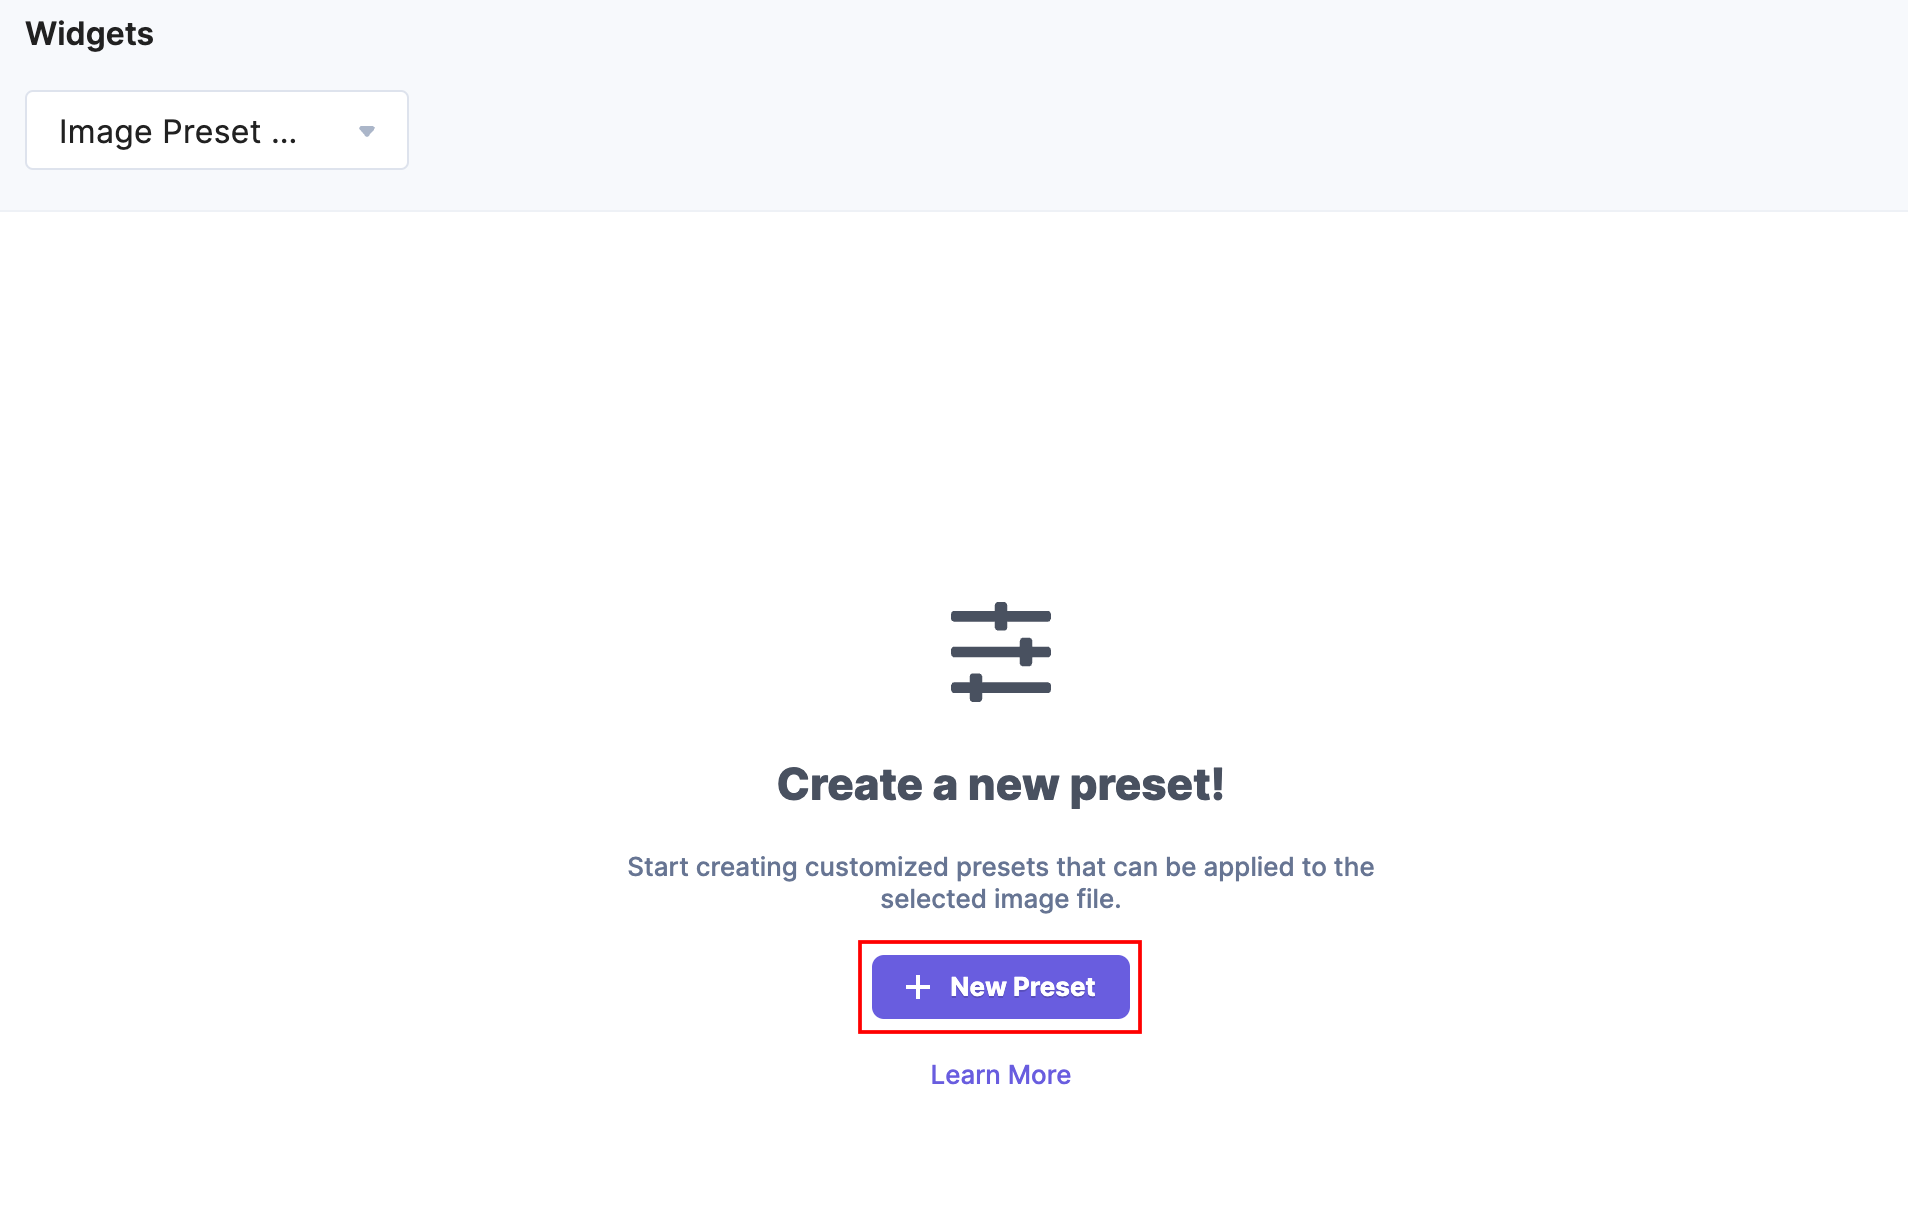
- Go to your stack dashboard and click the Assets icon in the left-hand side primary navigation panel. You can add or upload a new image file or use any existing asset.
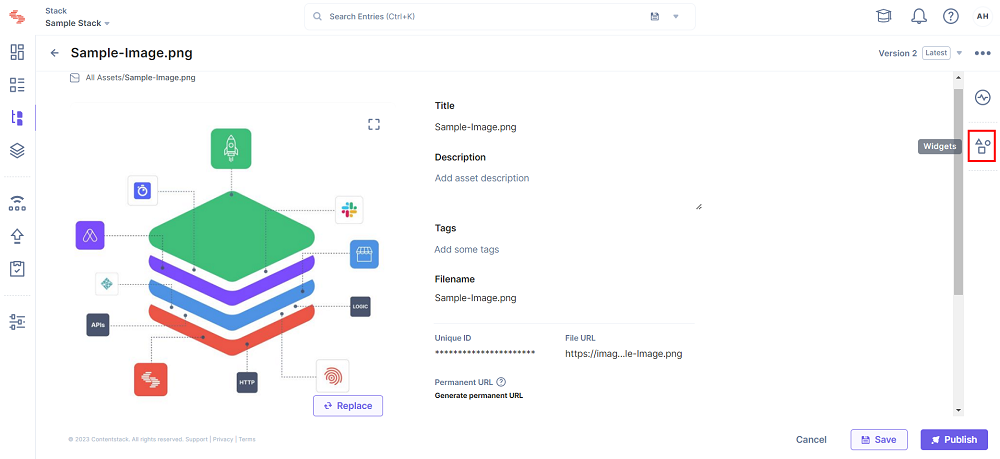
- Open the image and click the Widgets icon in the right-side navigation panel.
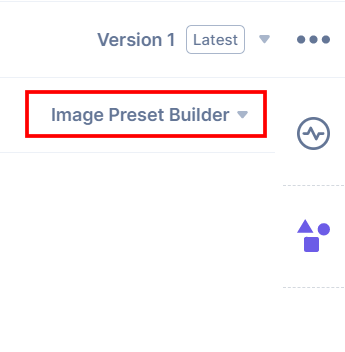
- Select the Image Preset Builder option from the dropdown.
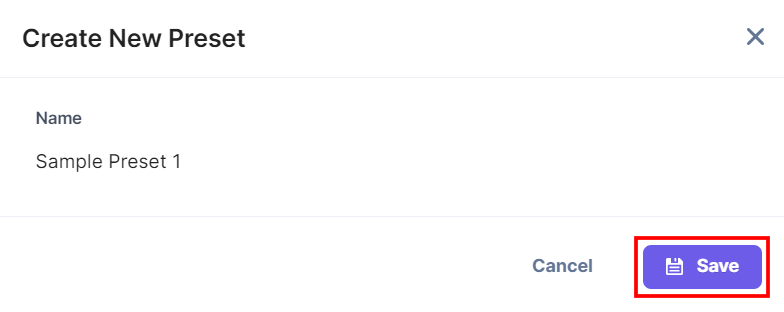
- Now, click the + New Preset button to create image presets.
- Add a preset name and click Save.
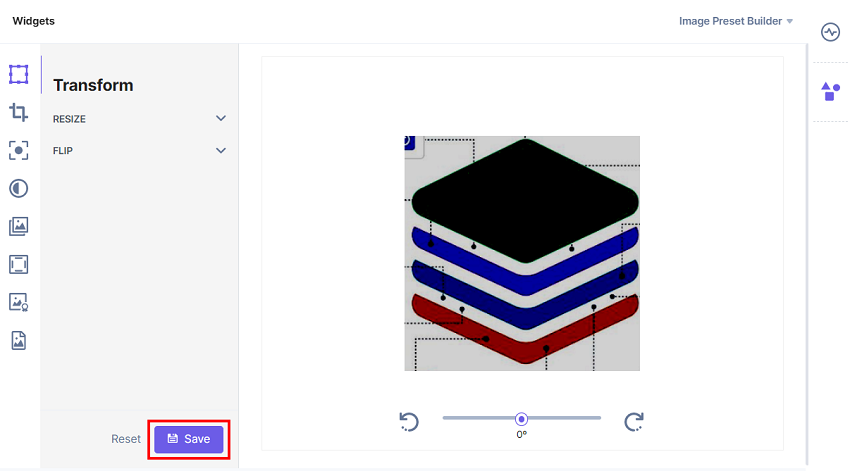
- You can improve your image files by optimizing and transforming them, and then click Save to save the preset settings.
You can view all the image presets.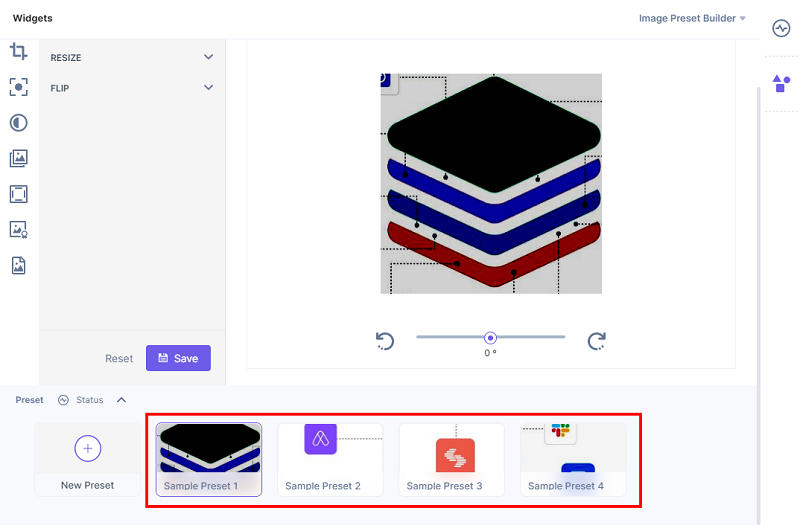
You can edit, copy, delete the image preset, and copy the image preset URL.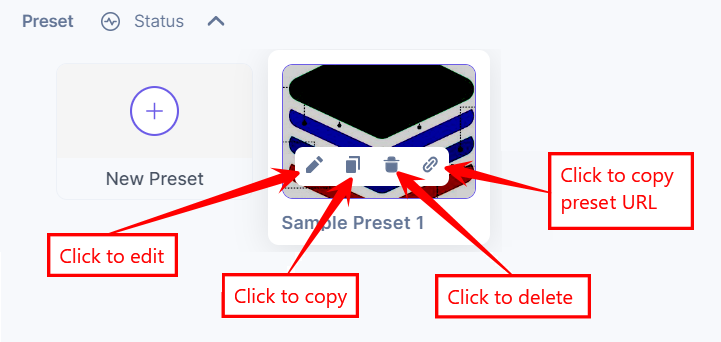
- After creating presets, Save and Publish your asset.
- Go to your stack dashboard and click the Assets icon in the left-hand side primary navigation panel. You can add or upload a new image file or use any existing asset.
-
Use Image Presets within your Entry
Image Preset Builder allows you to use varied preset versions of assets across your entries. With the help of this app, you can add image presets to fields such as Custom field and JSON Rich Text Editor field.
To use the Image Presets Builder application within an entry of your stack, follow the steps given below:
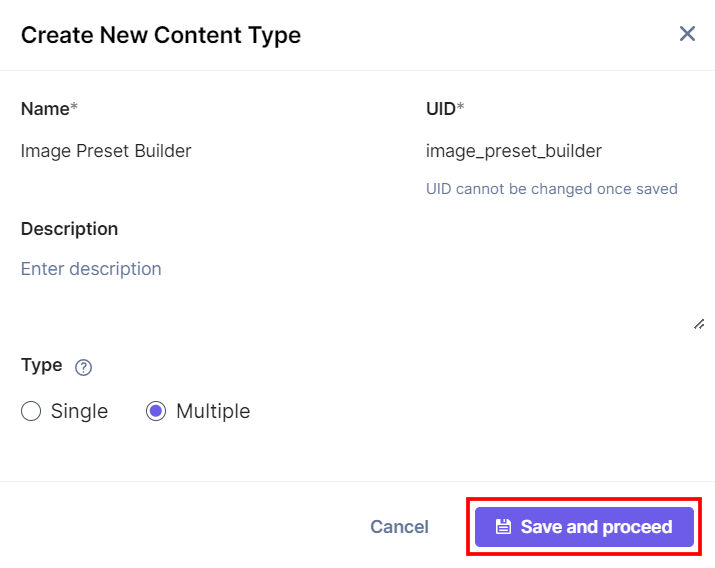
- Go to your stack, click the Content Models icon in the left navigation panel, and click the + New Content Type button.
- Create a content type by adding relevant details as displayed below:
There are two ways to add Image Presets in your entry:
Steps to add Image Presets within Custom Fields
- In the Content Type Builder page, add a Custom field in your content type by clicking the Insert a field link represented by a + sign.
- Under Select Extension/App, select Image Preset Picker, and then click the Proceed button.
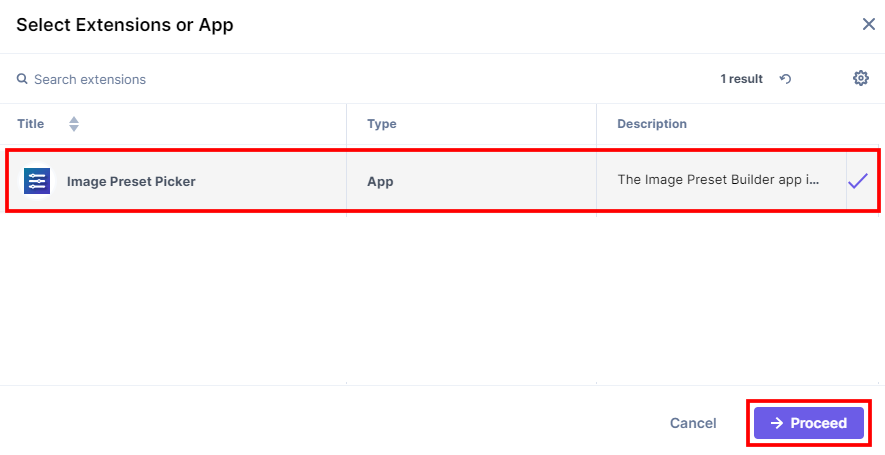
Image Preset Picker is added in the custom field.
- After adding the custom fields for the app, click Save or Save and Close to save your changes.
- To use the Image Preset Builder app, create an entry for this content type. In the left navigation panel, navigate to the Entries page and click + New Entry to create a new entry for the above content type, and then click Proceed.
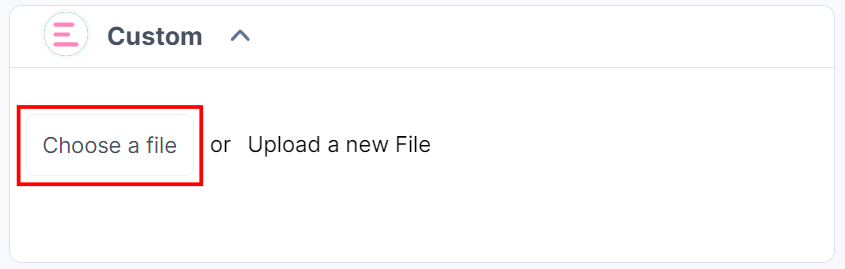
You can see the Image Preset Builder app’s custom fields on your entry page as shown below: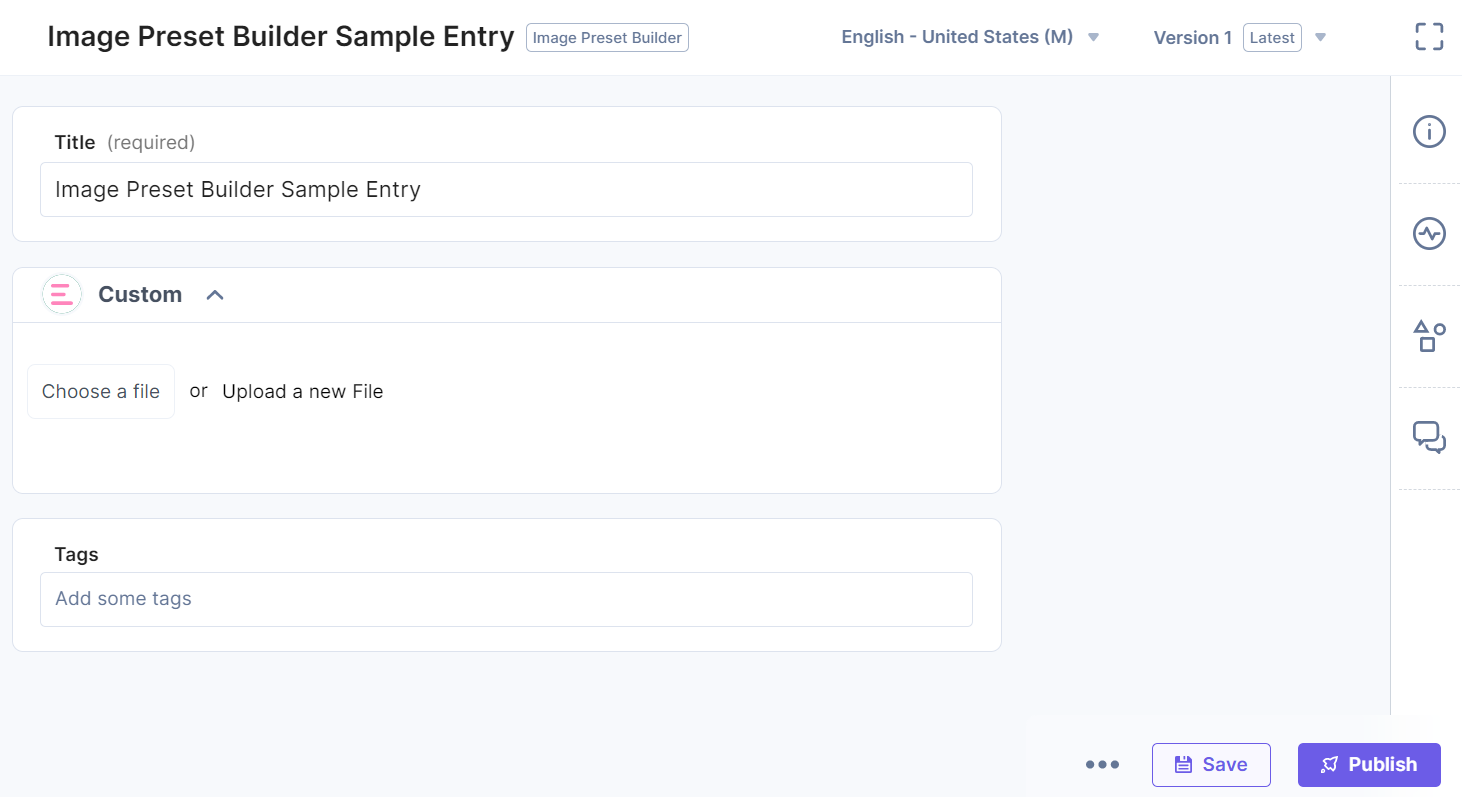
- Click the Choose a file button to add an asset to the custom field.
- In the Select Asset Modal, you can add the original asset or the specific image preset. Click Add Selected Asset to add the selected asset or preset to the Custom field.
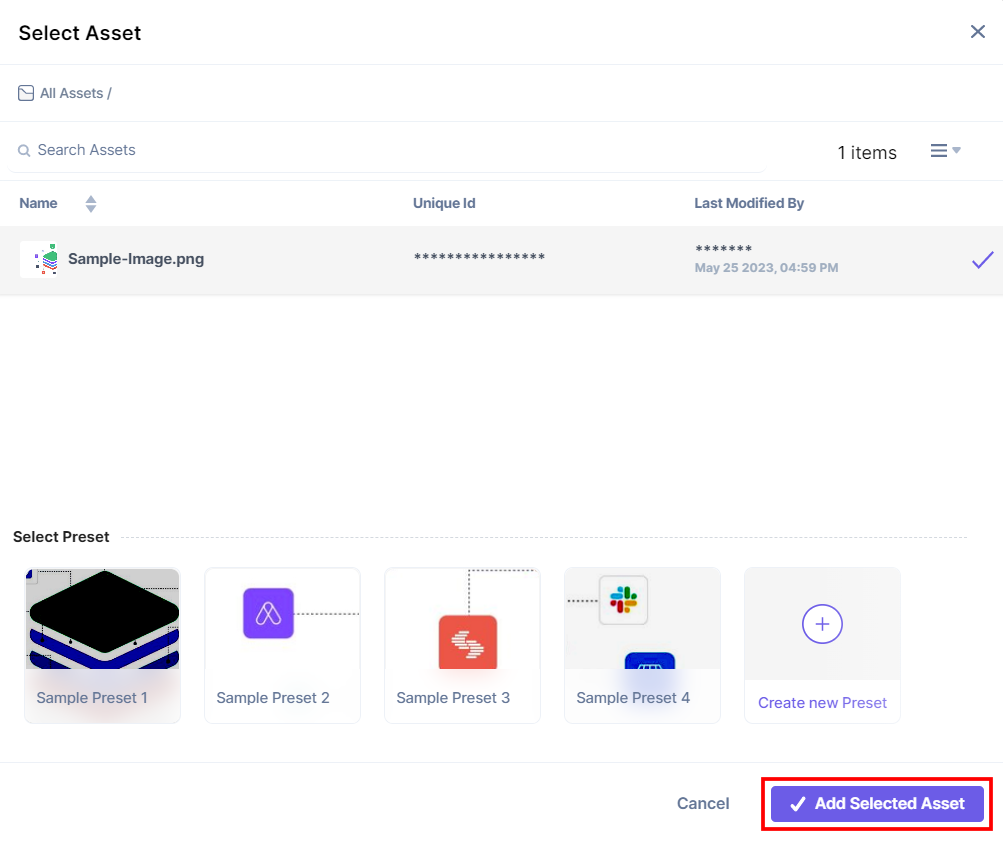
Note: You can directly create a new preset version of the selected image to add to the Custom field.
You can view the selected asset or preset in the custom field.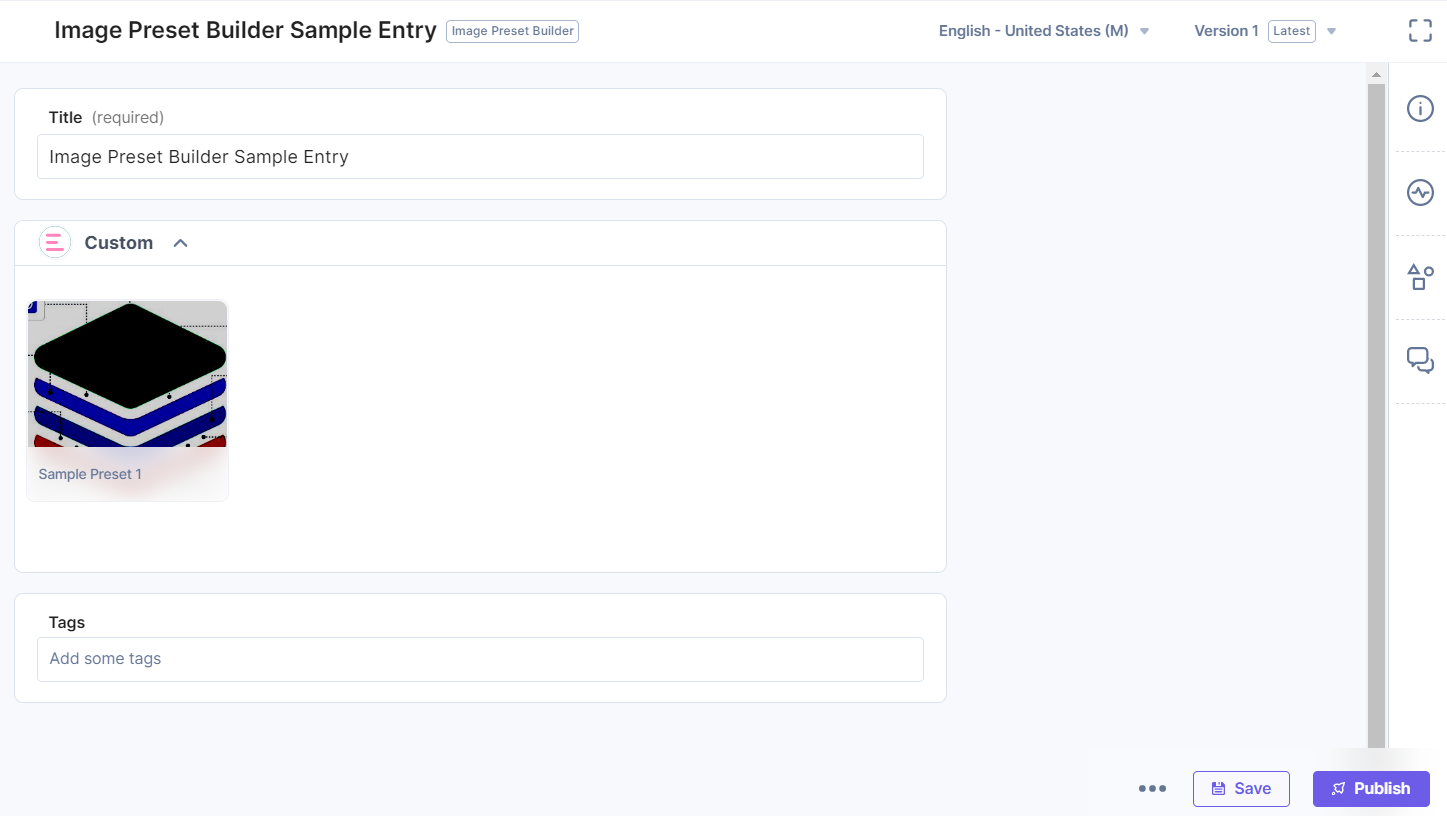
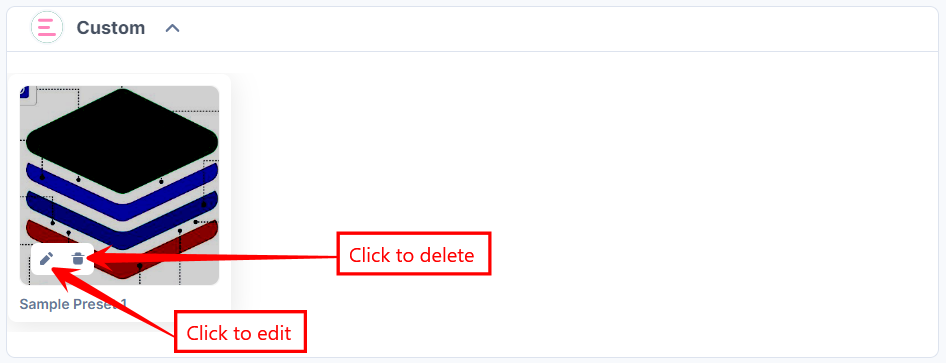
- Hover over the image to use the options to edit and delete the asset or preset.
- Once done, Save and Publish your entry.
Steps to add Image Presets within JSON Rich Text Editor Fields
- In the Content Type Builder page, add a JSON Rich Text Editor field in your content type by clicking the Insert a field link represented by a + sign.
- Under Select JSON RTE Plugin(s), select Image Preset Picker, and then click Add Plugin(s).
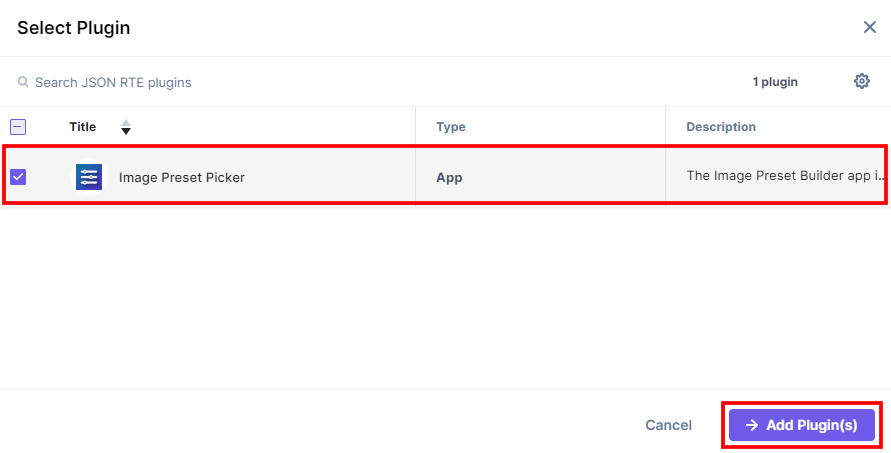
Image Preset Picker is added in JSON Rich Text Editor.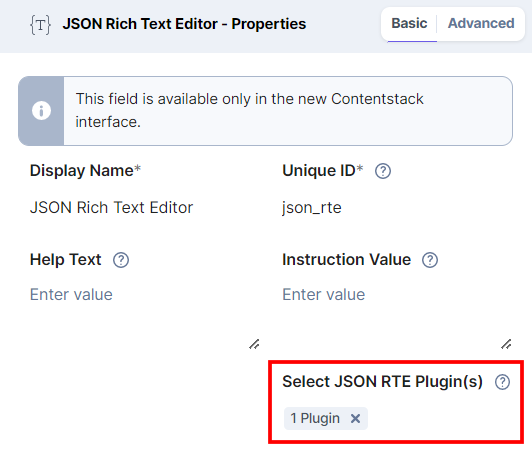
- After adding the app in a JSON Rich Text Editor field, click Save or Save and Close to save your changes.
- To use the Image Preset Builder app, create an entry for this content type. In the left navigation panel, navigate to the Entries page and click + New Entry to create a new entry for the above content type, and then click Proceed.
You can click the Assets icon in the JSON Rich Text Editor field on your entry page, as shown below: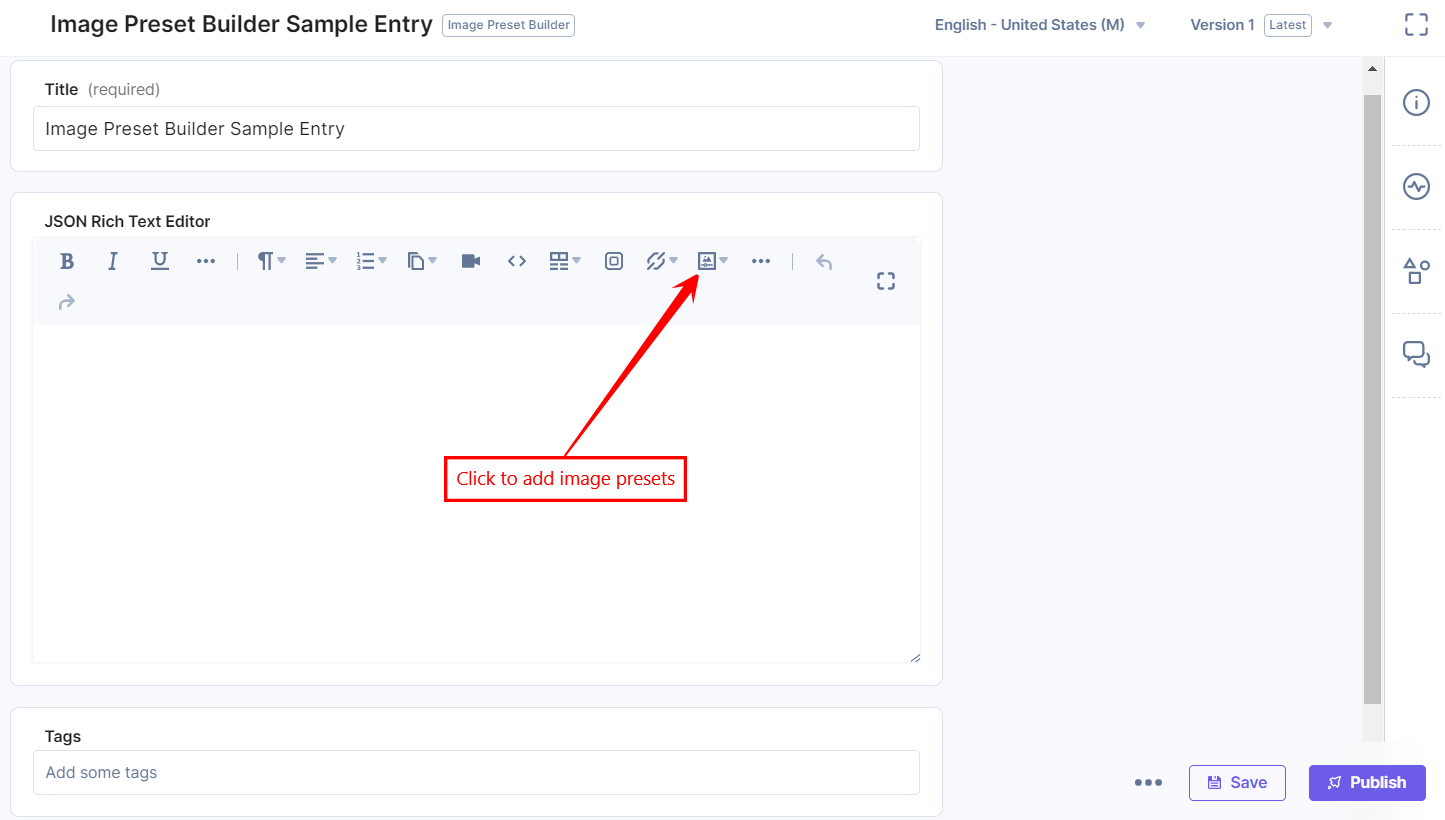
- Select the Choose from Assets option to add an asset to the JSON Rich Text Editor field.
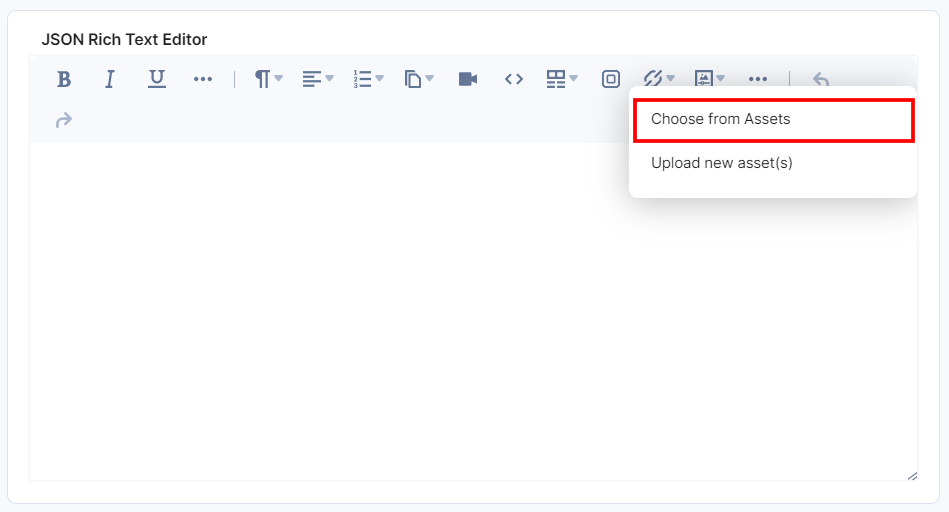
- In the Select Asset Modal, you can add the original asset or the specific image preset. Click Add Selected Asset to add the selected asset or preset to the JSON Rich Text Editor field.
Note: You can directly create a new preset version of the selected image to add to the JSON Rich Text Editor field.
You can view the selected asset or preset in the JSON Rich Text Editor field.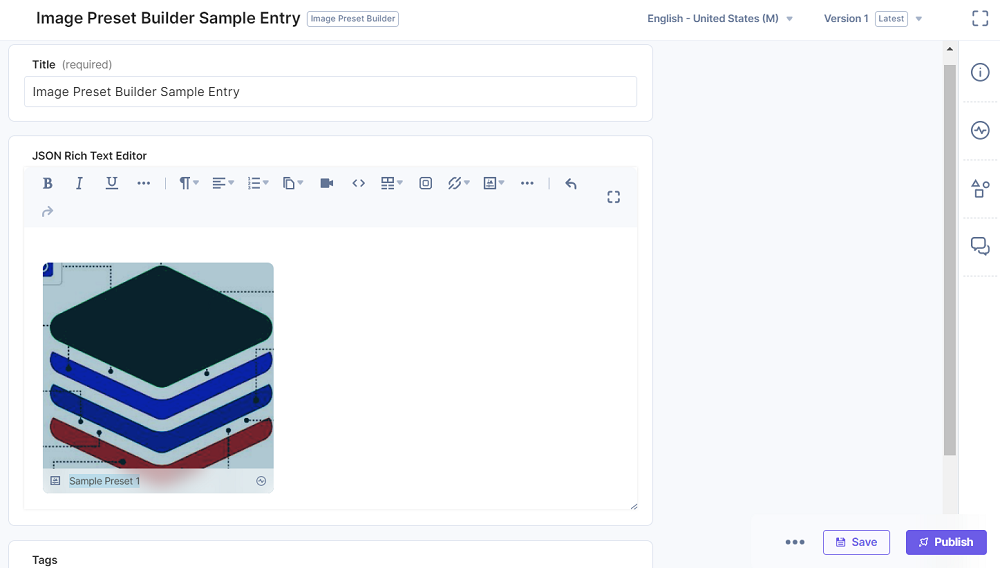
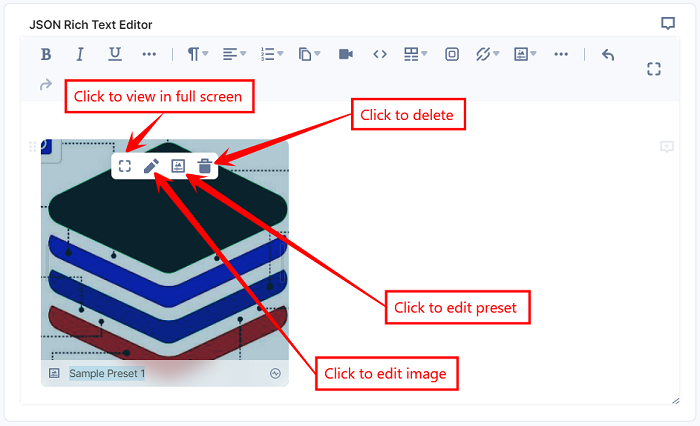
- Hover over the image to use the options to view in full screen, edit the image, edit the preset, and delete the asset or preset.
- Once done, Save and Publish your entry.
-
Render Images using Image Preset Builder
You need to use the Utils functions to render the image presets built using the Image Preset Builder app in your project.
Get ImageTransformation Utilities from the app-utils Repository
Follow the steps to add the image transformation function to your project, which can help you apply image style and formatting:
- Go to image-preset-builder inside the @contentstack/app-utils repository in GitHub, and you can see the utility functions that help you to render your image preset.
- Now, open the folder that contains functions suitable to your project's programming language. Inside this folder, you can view a file that contains the formatting functions, for example, ImageTransformation.js in JavaScript.
- Copy the file into your project. This file contains all the functions you need to render your image.
Generate URLs and Styles for Images
Image Preset Builder allows you to build a preset of different styles offered by Contentstack or other CSS building sources. The server will not generate styles for certain scenarios, such as Image Focal Point Definitions and Image Rotation Axis Points. In some transformation projects, you can define CSS styles locally or use third-party packages.
To apply the style and formatting to your image presets, follow the steps:
- Generate Image URL: You can use the resolvePresetByPresetUID() function from the ImageTransformation file to generate a URL for the image that contains the preset information. This function takes one object as an argument, and the object requires the asset, presetUID, and extension_uid. You can extract these values from the Custom field or JSON RTE schemas defined in the Field Schema for Reference section.
For example, you can extract assets from custom-image-field.asset, presetUID from custom-image-field.metadata.preset.uid, and extension_uid from custom-image-field.metadata.extension_uid. This function returns a new asset object that contains the new image URL. Now, pass the new image URL to the image tag’s src attribute. - Generate CSS Styles for Image Presets: To generate the CSS styles from the preset, you can use the resolvePresetStylesByPresetUID() function. This function accepts one object as an argument, and the object requires the asset, presetUID, and extension_uid. You can extract these values from the Custom field or JSON RTE schemas defined in the Field Schema for Reference section.
The resolvePresetStylesByPresetUID() function returns inline styles for the image. These styles could be added to the image tag.
Handle Image Focal Point
Now, if applicable, you can handle the focal points of your image preset. To retrieve the focal point coordinates, you can use the fetchPresetByPresetUID() function. This function accepts one object as an argument, and this object requires the asset, presetUID, and extension_uid. You can extract these values from the Custom field or JSON RTE schemas defined in the Field Schema for Reference section. The fetchPresetByPresetUID() function returns a preset object.
Here is an example of the schema for the returned preset object:
{
    "uid": "sample-uid",
    "name": "Focal Point",
    "options": {
        "transform": {
            "width": 864,
            "height": 712
        },
        "quality": "100",
        "image-type": "jpeg",
        "focal-point": {
            "x": -0.5701133487044711,
            "y": 0.030206030249075533
        }
    }
}
You can retrieve the focal point coordinates from the focal-point object. To render the preset, you need third-party packages that accept the coordinates and display the image accordingly. For example, you can use the image-focus library for JavaScript.
Field Schema for Reference
-
Custom Field
Let's consider that an entry has a Custom field with the name custom-image-field.
When you fetch an entry, its schema will appear as follows:In the above schema, you can find the preset and extension_uid information under the metadata object, and the asset data is returned at the root level of the Custom field schema.{ "title": "Preset Picker Demo", "custom-image-field": { "uid": "sample-uid", "metadata": { "preset": { "uid": "sample-preset-uid", ... }, "extension_uid": "sample-extension-uid" }, "asset": { "url":"https://example.com/image.jpg", ... } } } -
JSON Rich Text Editor Plugin
Let's consider that an entry has a JSON Rich Text Editor field with the name json_rte. This field contains a plugin of type reference.
When you fetch an entry, its schema will appear as follows:In the above schema, the JSON RTE plugin is of reference type. You can find the preset and extension_uid information under the attrs object of the JSON RTE schema. You can find the asset information under the _embedded_items object at the root level of the entry schema.{ "title": "Preset Picker Demo", "json_rte": { "uid": "v4-uid", "children": [ { "uid": "v4-uid", "type": "reference", "attrs": { "asset-uid": "sample-asset-uid", "extension_uid": "sample-extension-uid", "preset": { "uid": "sample-preset-uid" }, ... }, "children": [{ "text": "" }] } ], "type": "doc" }, "_embedded_items": { "json_rte": [ { "uid": "sample-asset-uid", "url": "https://example.com/image.jpeg", ... } ] }, ... }
Additional Resource: To learn more about Embedded Items in JSON RTE, refer to Embedded Entries or Assets within JSON RTE documentation.
More articles in "Digital Asset Management"
