Bynder App Installation Guide
Bynder is a cloud-based Digital Asset Management (DAM) platform that enables organizations to manage, share, and distribute their digital content from a centralized location.
With its user-friendly interface, the marketing team can create, find, and utilize digital assets such as images, videos, and documents efficiently.
By installing the Bynder app from the Contentstack Marketplace, you can use it within your stack to fetch and display digital assets from Bynder accounts within your entries.
Prerequisites
- Bynder account
- Contentstack account
- Access to the Contentstack Organization/Stack as the Owner/Admin
Lets follow this step-by-step guide to install and configure the Bynder app within your stack.
Steps for Execution
- Get your Bynder Organization URL
- Install and Configure the Bynder App in Marketplace
- Use the Bynder App within your Stack
-
Get your Bynder Organization URL
To configure the Bynder app, you first need to create an account in Bynder. To do that, follow the steps given below:
- Go to https://www.bynder.com/en/ and create a new account. It is recommended to use the partnership account by purchasing the license. The free trial account will not work as expected.
- To get your Bynder organization URL, please refer to the Get a Personalized URL for your Bynder Portal document.
-
Install and Configure the Bynder App in Marketplace
To install the app in Contentstack, log in to your Contentstack account and follow the steps below:
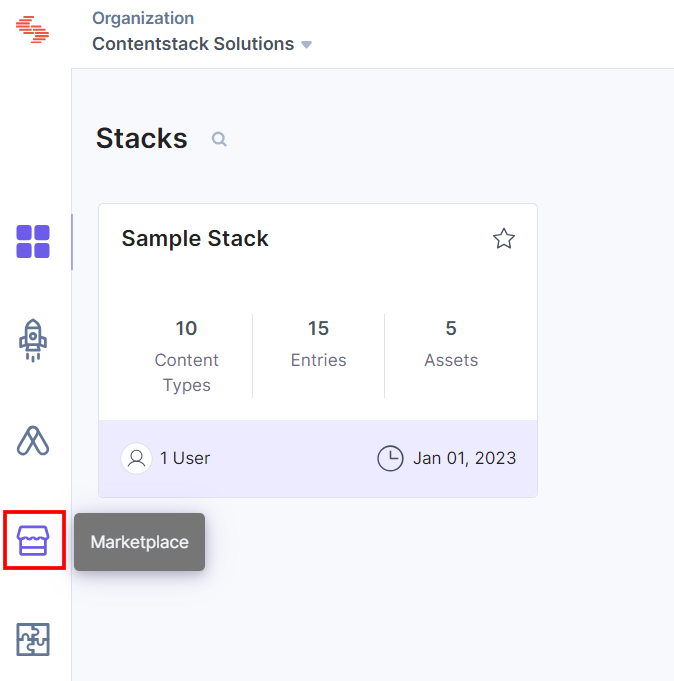
- From the left-hand side primary navigation, click the Marketplace icon.
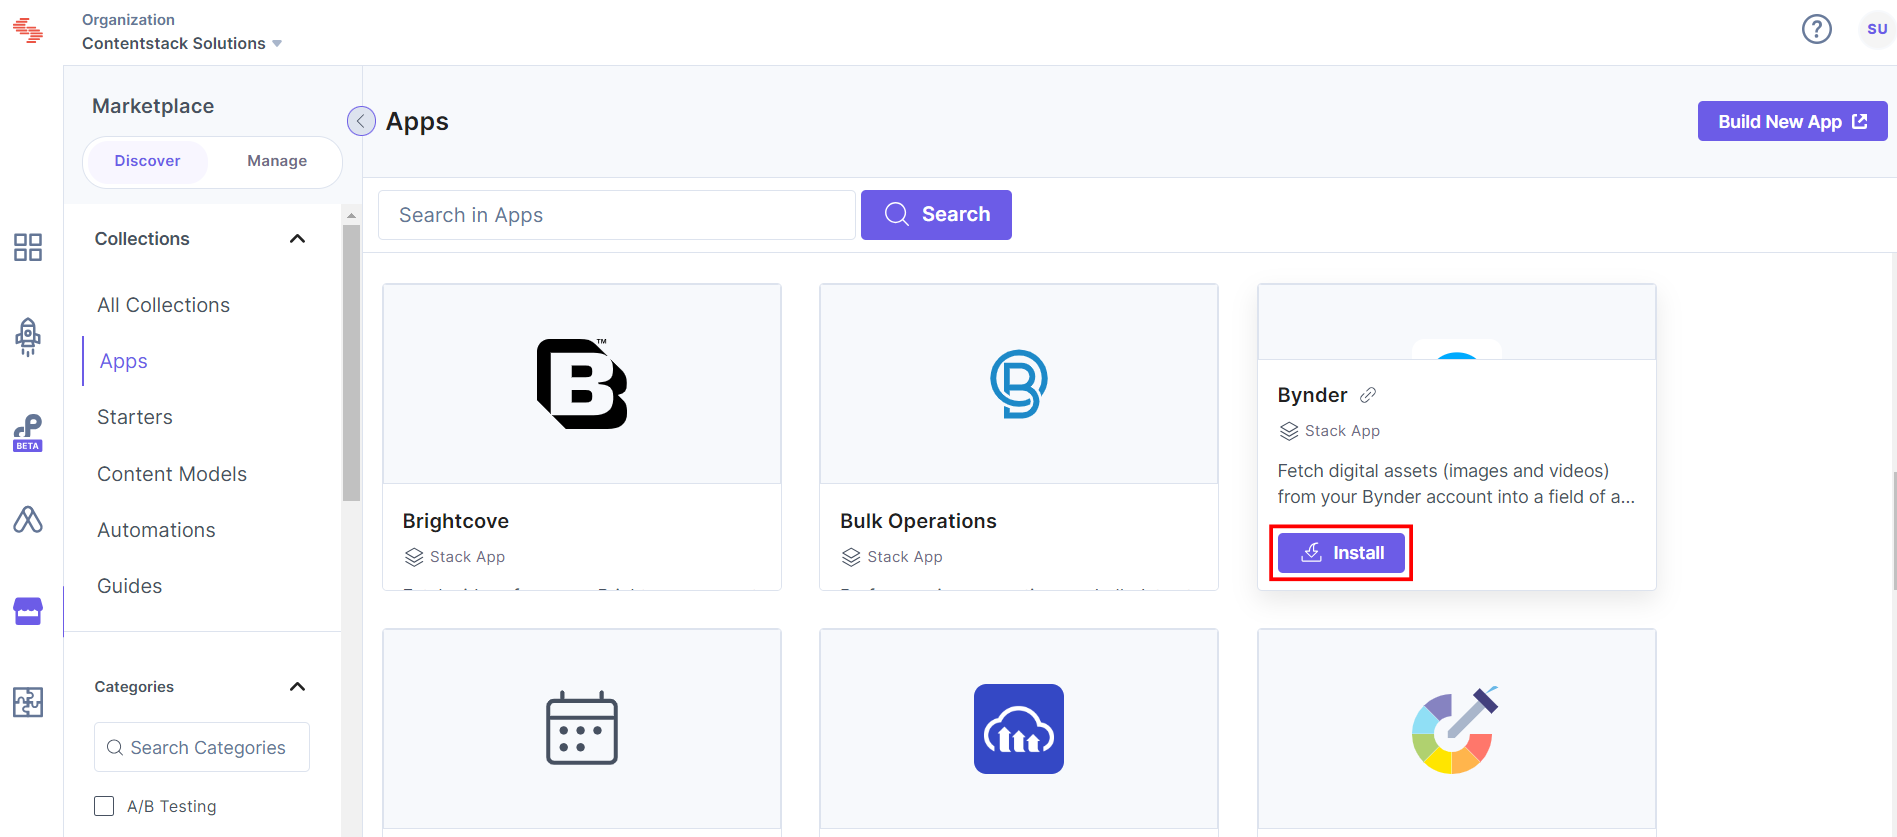
- Click Apps from the left panel.
- Within the Marketplace, you can see all the available apps. Hover over the Bynder app and click Install.
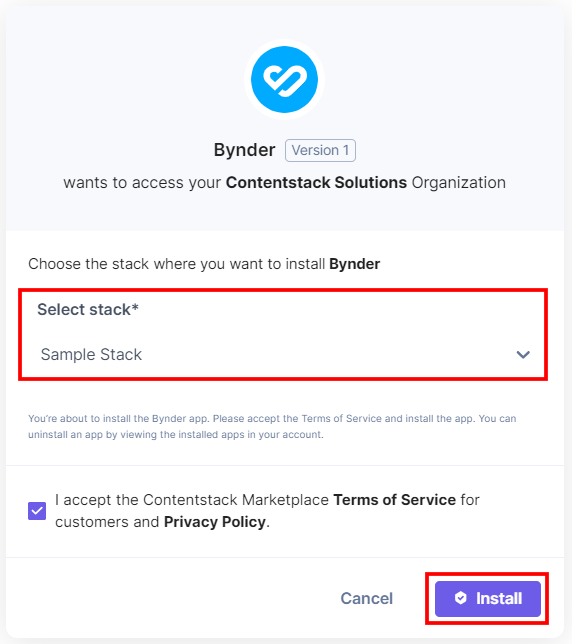
- In the pop-up window, select the stack where you want to install the Bynder app, accept the Terms of Service, and click the Install button.
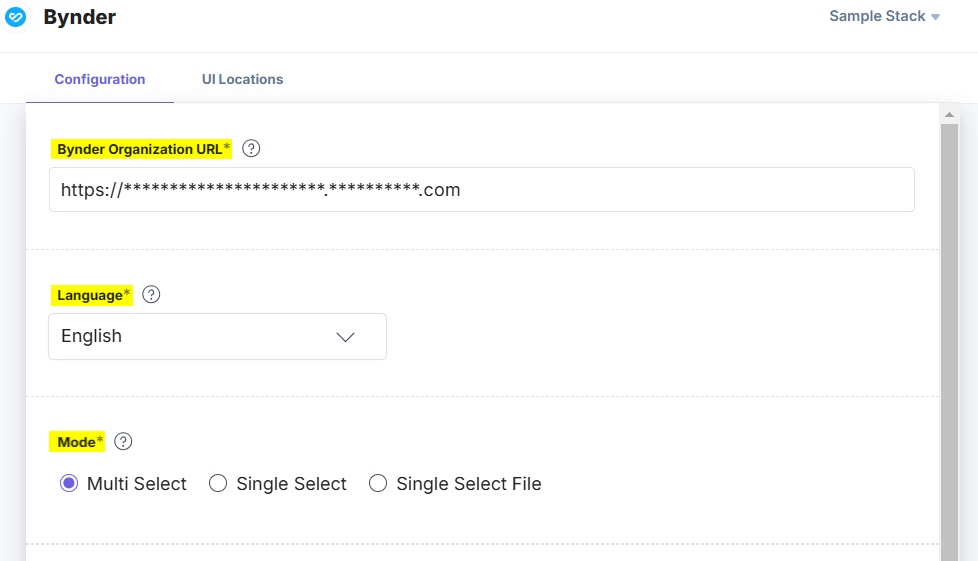
- On the Configuration page, provide the following:
- Bynder Organization URL: Enter the Bynder Organization URL you retrieved from Bynder in
Step 1. - Language: Select the language from the Language drop-down.Note:
- By default, the Bynder app is set to the English language.
- The language selected here is not related to the locale in Bynder.
- Mode: Select a Mode.
- If you want to select multiple assets in your entry, select Multi Select.
- If you want to select a single asset in your entry, select Single Select.
- If you want to enable the Dynamic Asset Transformations (DAT) feature on a single asset, select Single Select File. In this case, only a single file can be selected.
Note: Multi Select is the default selected option.
- Choose the Bynder Keys to Save in Entry: Select your preferred method for saving the data retrieved from the Bynder account into Contentstack entries.
If you select the All Fields option, you can select only a limited number of assets in the entry. For Custom Fields, you can search and add specific Bynder Keys you want to save in entries.
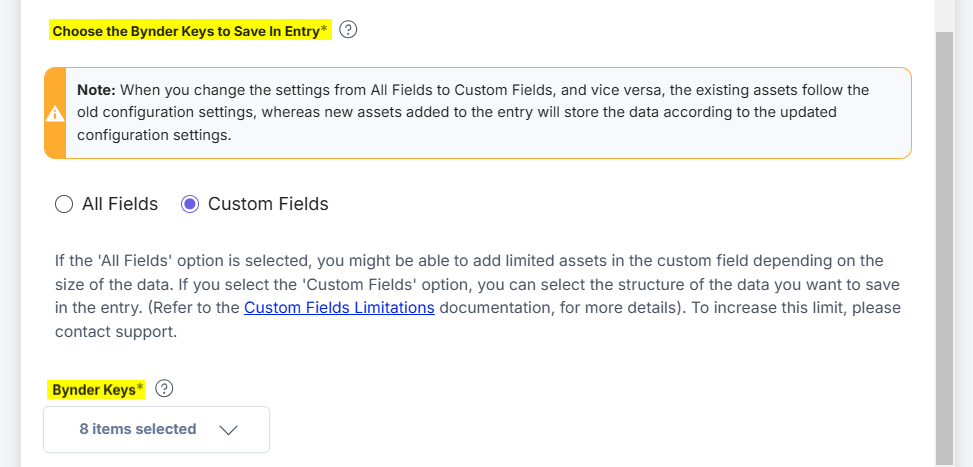
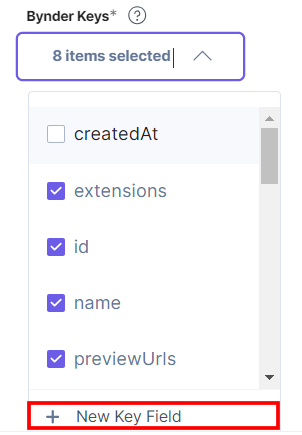
If you select Custom Fields, then the Bynder Keys drop-down appears. By default, extensions, id, name, previewUrls, type, files.webImage, url, and additionalInfo options are already selected inside the dropdown. If you want to create a new key, click the + New Key Field option.
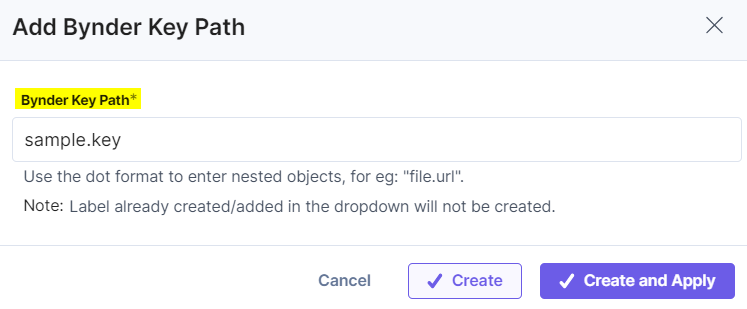
In the Add Bynder Key Path modal, enter the Bynder Key Path and click the Create or Create and Apply button to create a new key.
- Bynder Organization URL: Enter the Bynder Organization URL you retrieved from Bynder in
- Click Save.
- On the UI Locations tab, you can see the predefined app locations. You can use the toggle button corresponding to each UI location to enable or disable it based on your requirements.
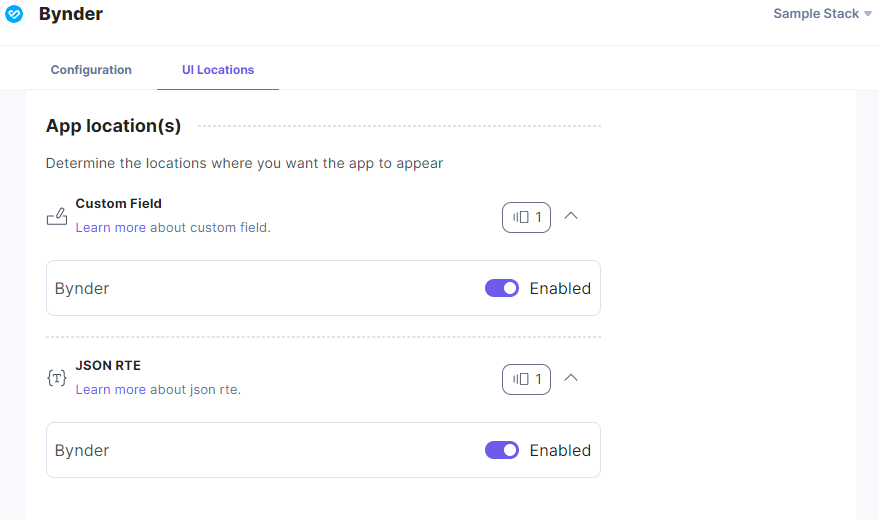
Additional Resource: For more information on UI locations, please refer to the Installed Apps guide.
- Click Open Stack to start using the Bynder application.
- From the left-hand side primary navigation, click the Marketplace icon.
-
Use the Bynder App within your Stack
To use the Bynder app within an entry of your stack, follow the steps given below:
- Go to your stack, click the Content Models icon from the left navigation panel, and click the + New Content Type button.
- Create a content type by adding relevant details as displayed below:
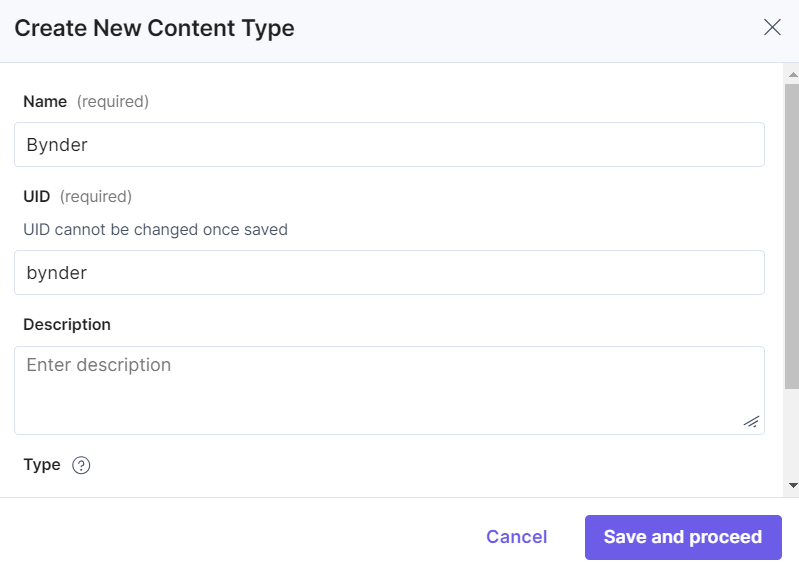
There are two ways to use the Bynder app in your entry:
Steps to Use the Bynder App as a Custom Field
- In the Content Type Builder page, add a Custom field in your content type by clicking the Insert a field link represented by a + sign.
- Under Select Extension or App, select Bynder and then click Proceed.
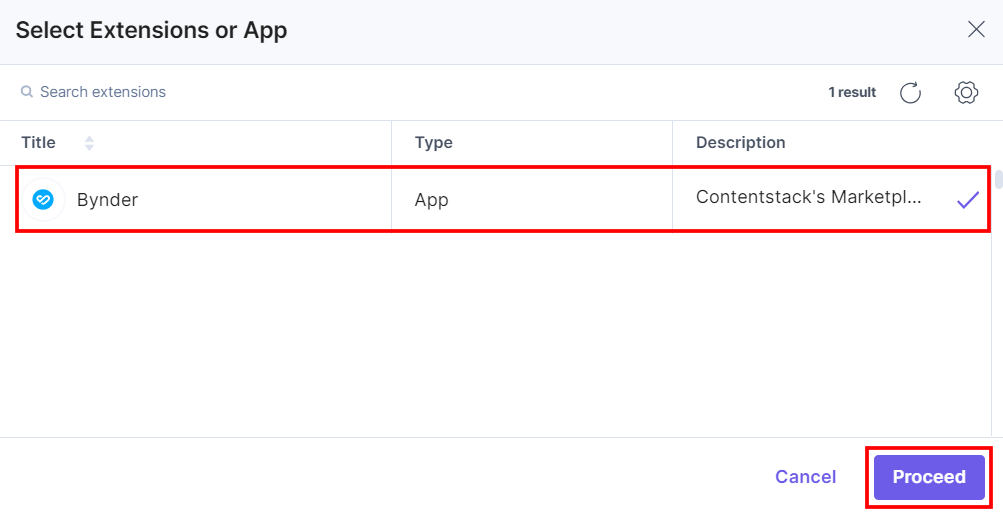
This adds Bynder in the custom field.
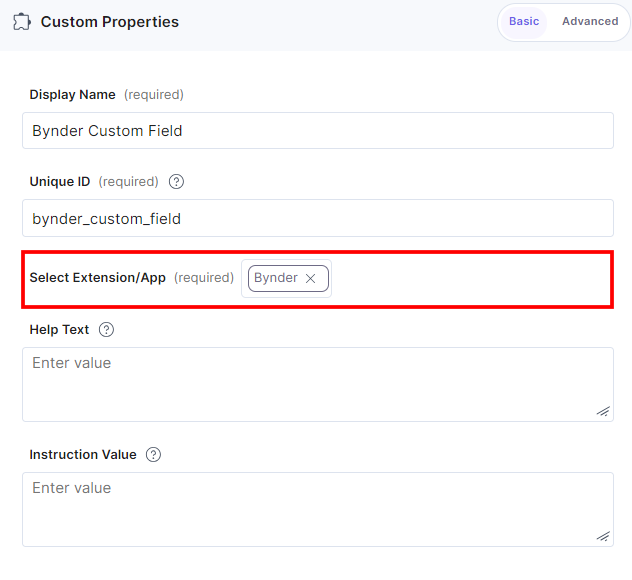
-
Under Advanced properties, you have the option to set the Config Parameter for all entries of a particular content type. If you do so, it overrides the default app configuration you set at the time of app installation on the Configuration screen.
The key:value passed in the configuration object overrides the default app configuration settings.
-
DAT Feature Support for Multi Select Mode (optional): For the multi-select DAT feature, you can apply predefined transformations ("thumbnail", "mini", "transformBaseUrl", "medium", "small", "large", "online") to assets by including them in the options list.
These transformations will only be applied if they are available for the selected assets. If a selected transformation is unavailable, the default transformation ("webImage") will be applied instead.
You can also apply custom transformations to assets through the transformation_options object by specifying a unique key name and providing the corresponding rule as its value.
{
  "custom_settings": {
    "dat_settings": {
      "options": [
        "webImage",
        "mini",
        "transformBaseUrl",
        "medium",
        "small",
        "large"
      ],
      "default": "webImage",
      "transformation_options": {
        "flip_rotate": "io=transform:flip&io=transform:rotate,angle:70",
        "crop": "io=transform:crop,height:400,width:300,path:square"
      }
    }
  }
}
Additional Resource: For more details on specifying rules for custom transformations, refer to the DAT documentation.
- Custom Settings (optional): In compact_view_options, assetType_in and tagNames_in can be used to display assets with specific asset types and tags on the Selector page:
{
  "custom_settings": {
    "compact_view_options": {
      "assetFilter": {
        "assetType_in": ["IMAGE"],
        "tagNames_in": ["bottle_with_food"]
      }
    }
  }
}
Additional Resource: You can include optional parameters in the compact_view_options object, except for attributes containing a period (e.g., portal.url) or those with callback functions. For detailed description of these optional parameters, refer to the Bynder Compact View documentation.
- Max Limit (optional): You can set the maximum number of assets, in the Config Parameter, that can be added in the Custom field for all entries of a particular content type.
{
        "advanced": {
           "max_limit":5
        }
}
-
- After adding the app in a custom field, click Save or Save and Close to save your changes.
- Now to use the Bynder app, create an entry in this newly created content type. In the left navigation panel, navigate to the Entries page, click + New Entry to create a new entry for the above content type, and then click Proceed.
You can see the Bynder app’s custom fields on your entry page as shown below:
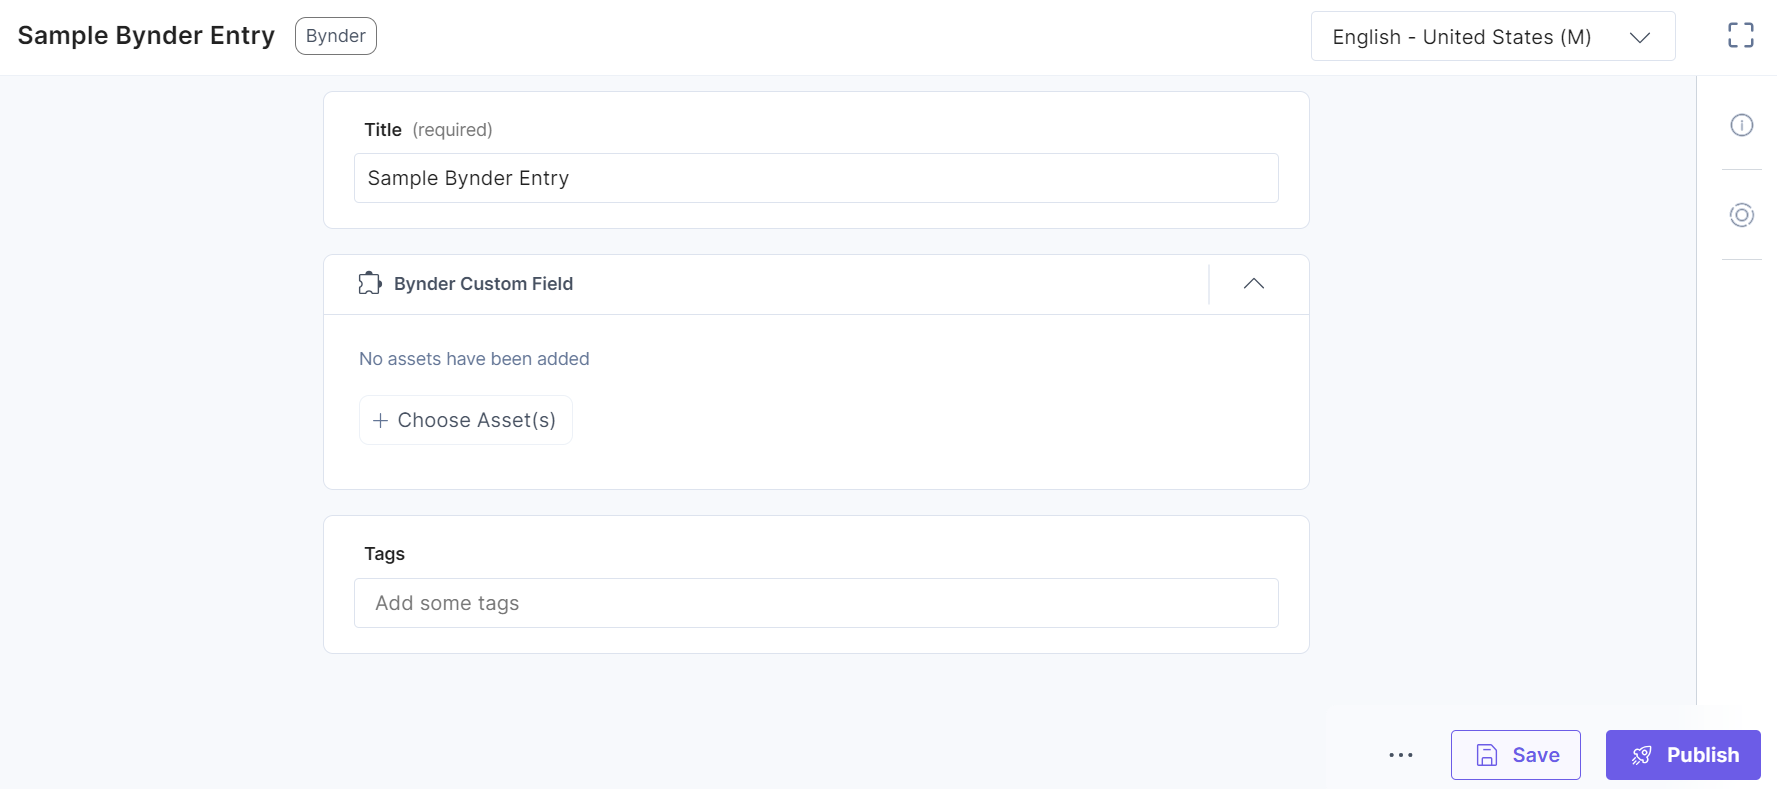
- Click + Choose Asset(s) to select assets from your Bynder account and add them to your entry.

Note: If you are using the Bynder app for the first time, the app will redirect you to connect the app with the portal. Click the Connect button to connect and proceed towards the authentication screen.
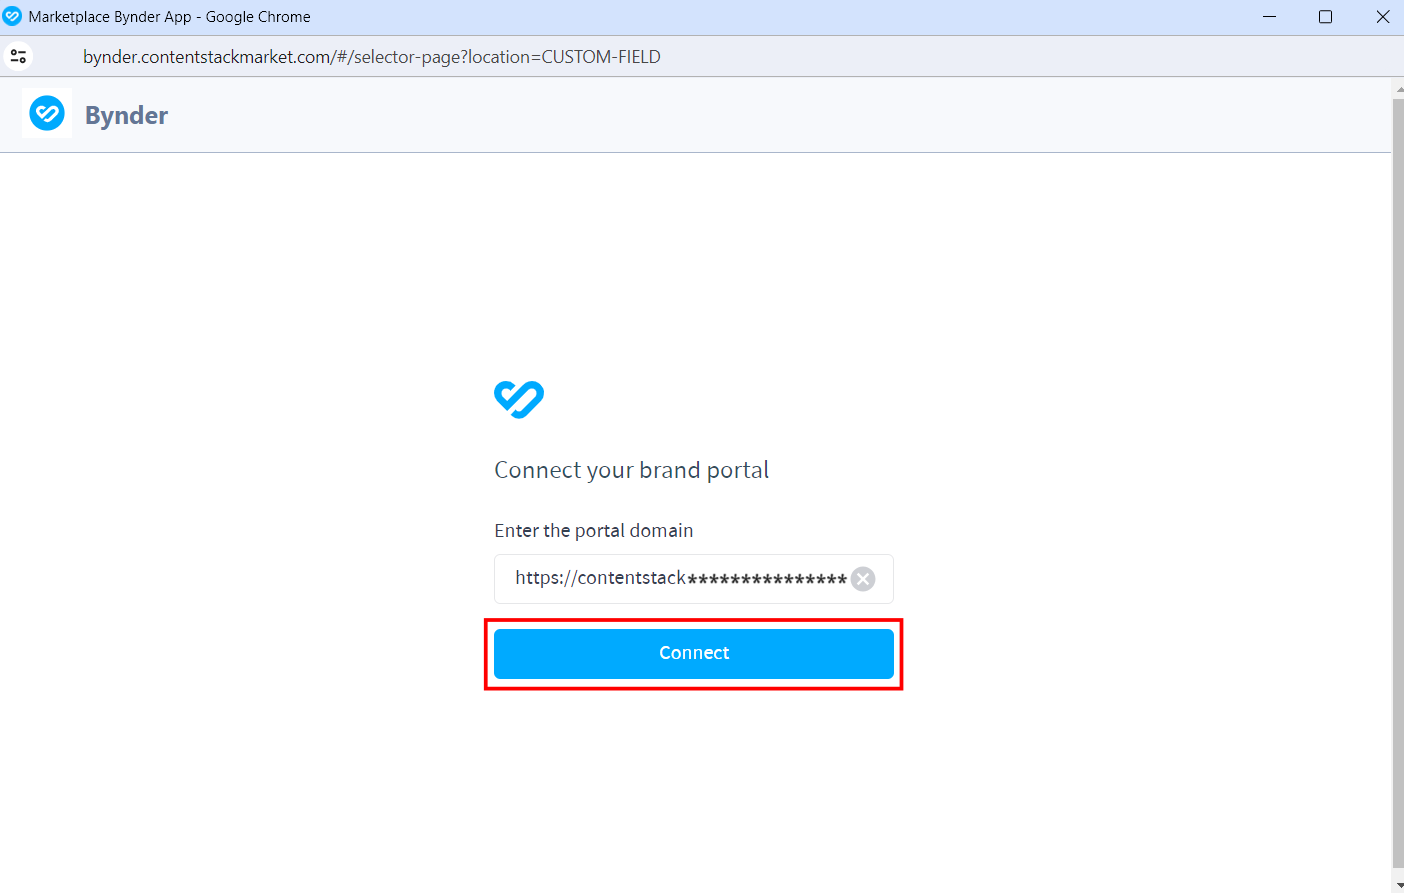
Provide the username and password and login to the Bynder dashboard.
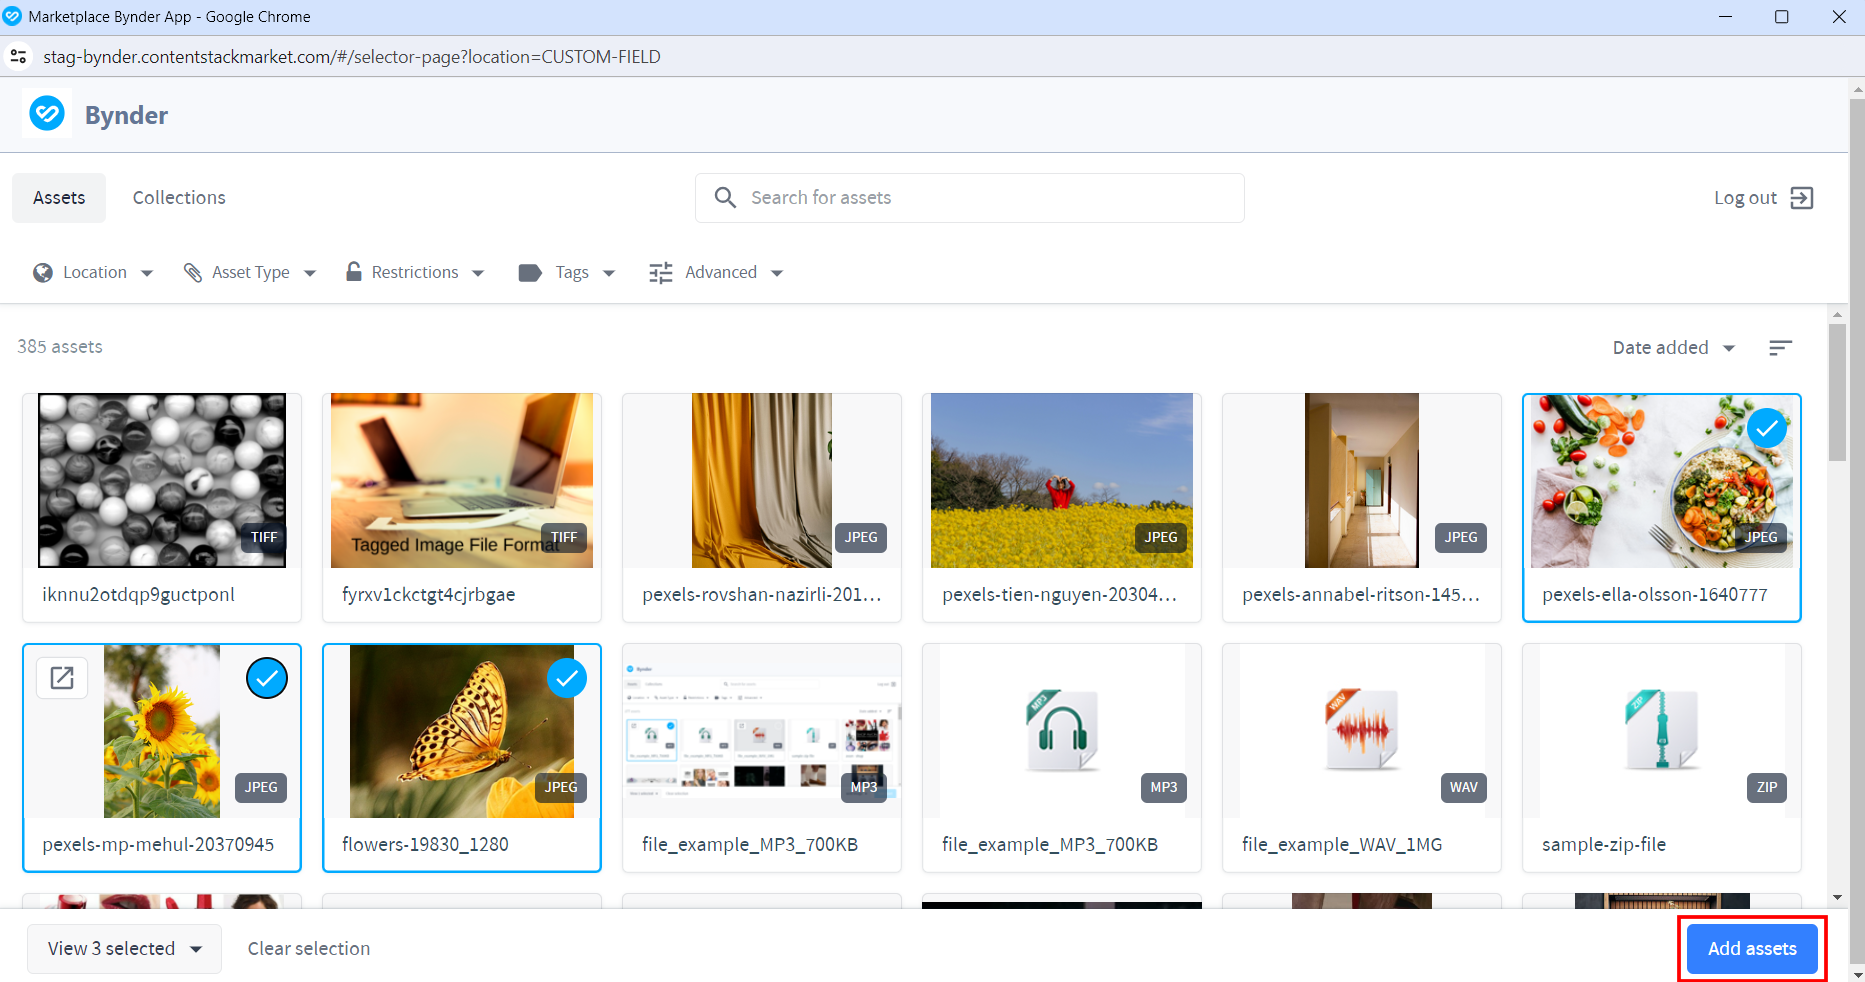
- Now, you can choose assets from the Bynder selector page:
- Single Select File or Single Select mode
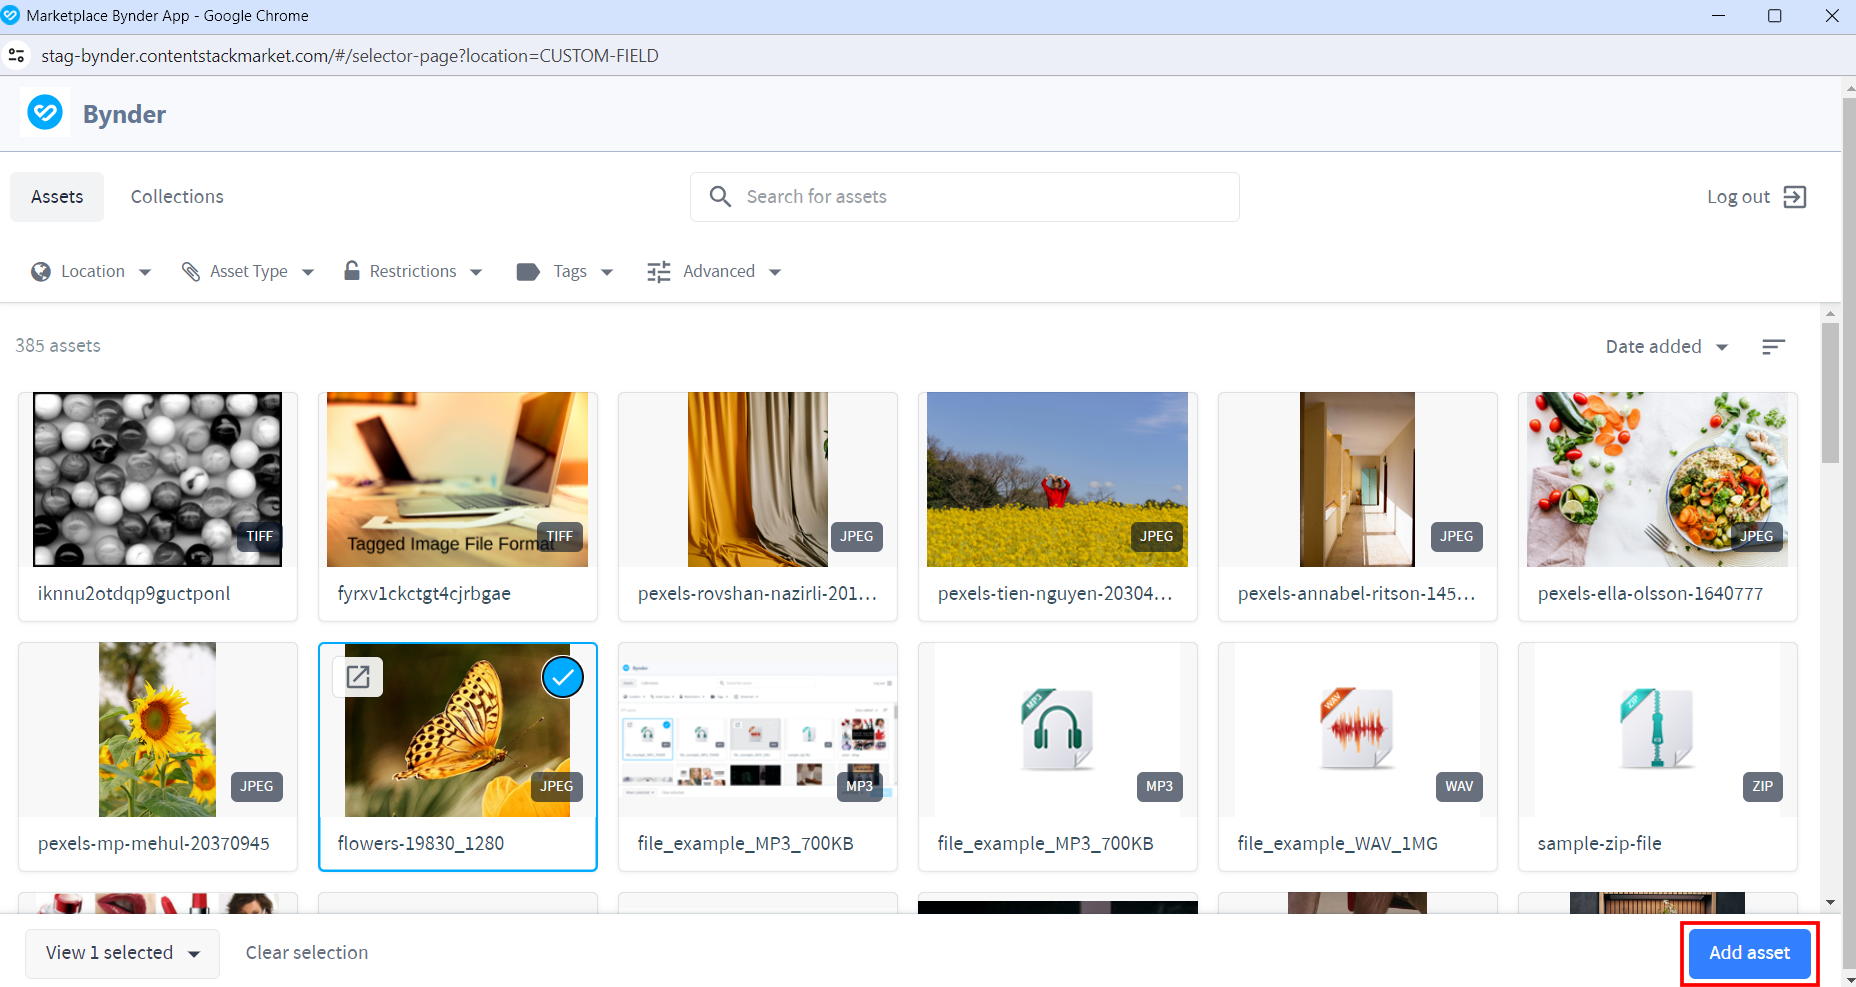
- Multi Select mode
When the Advanced config is added for DAT, the Selector page drop-down for Multi-Select mode displays different transformations as options:
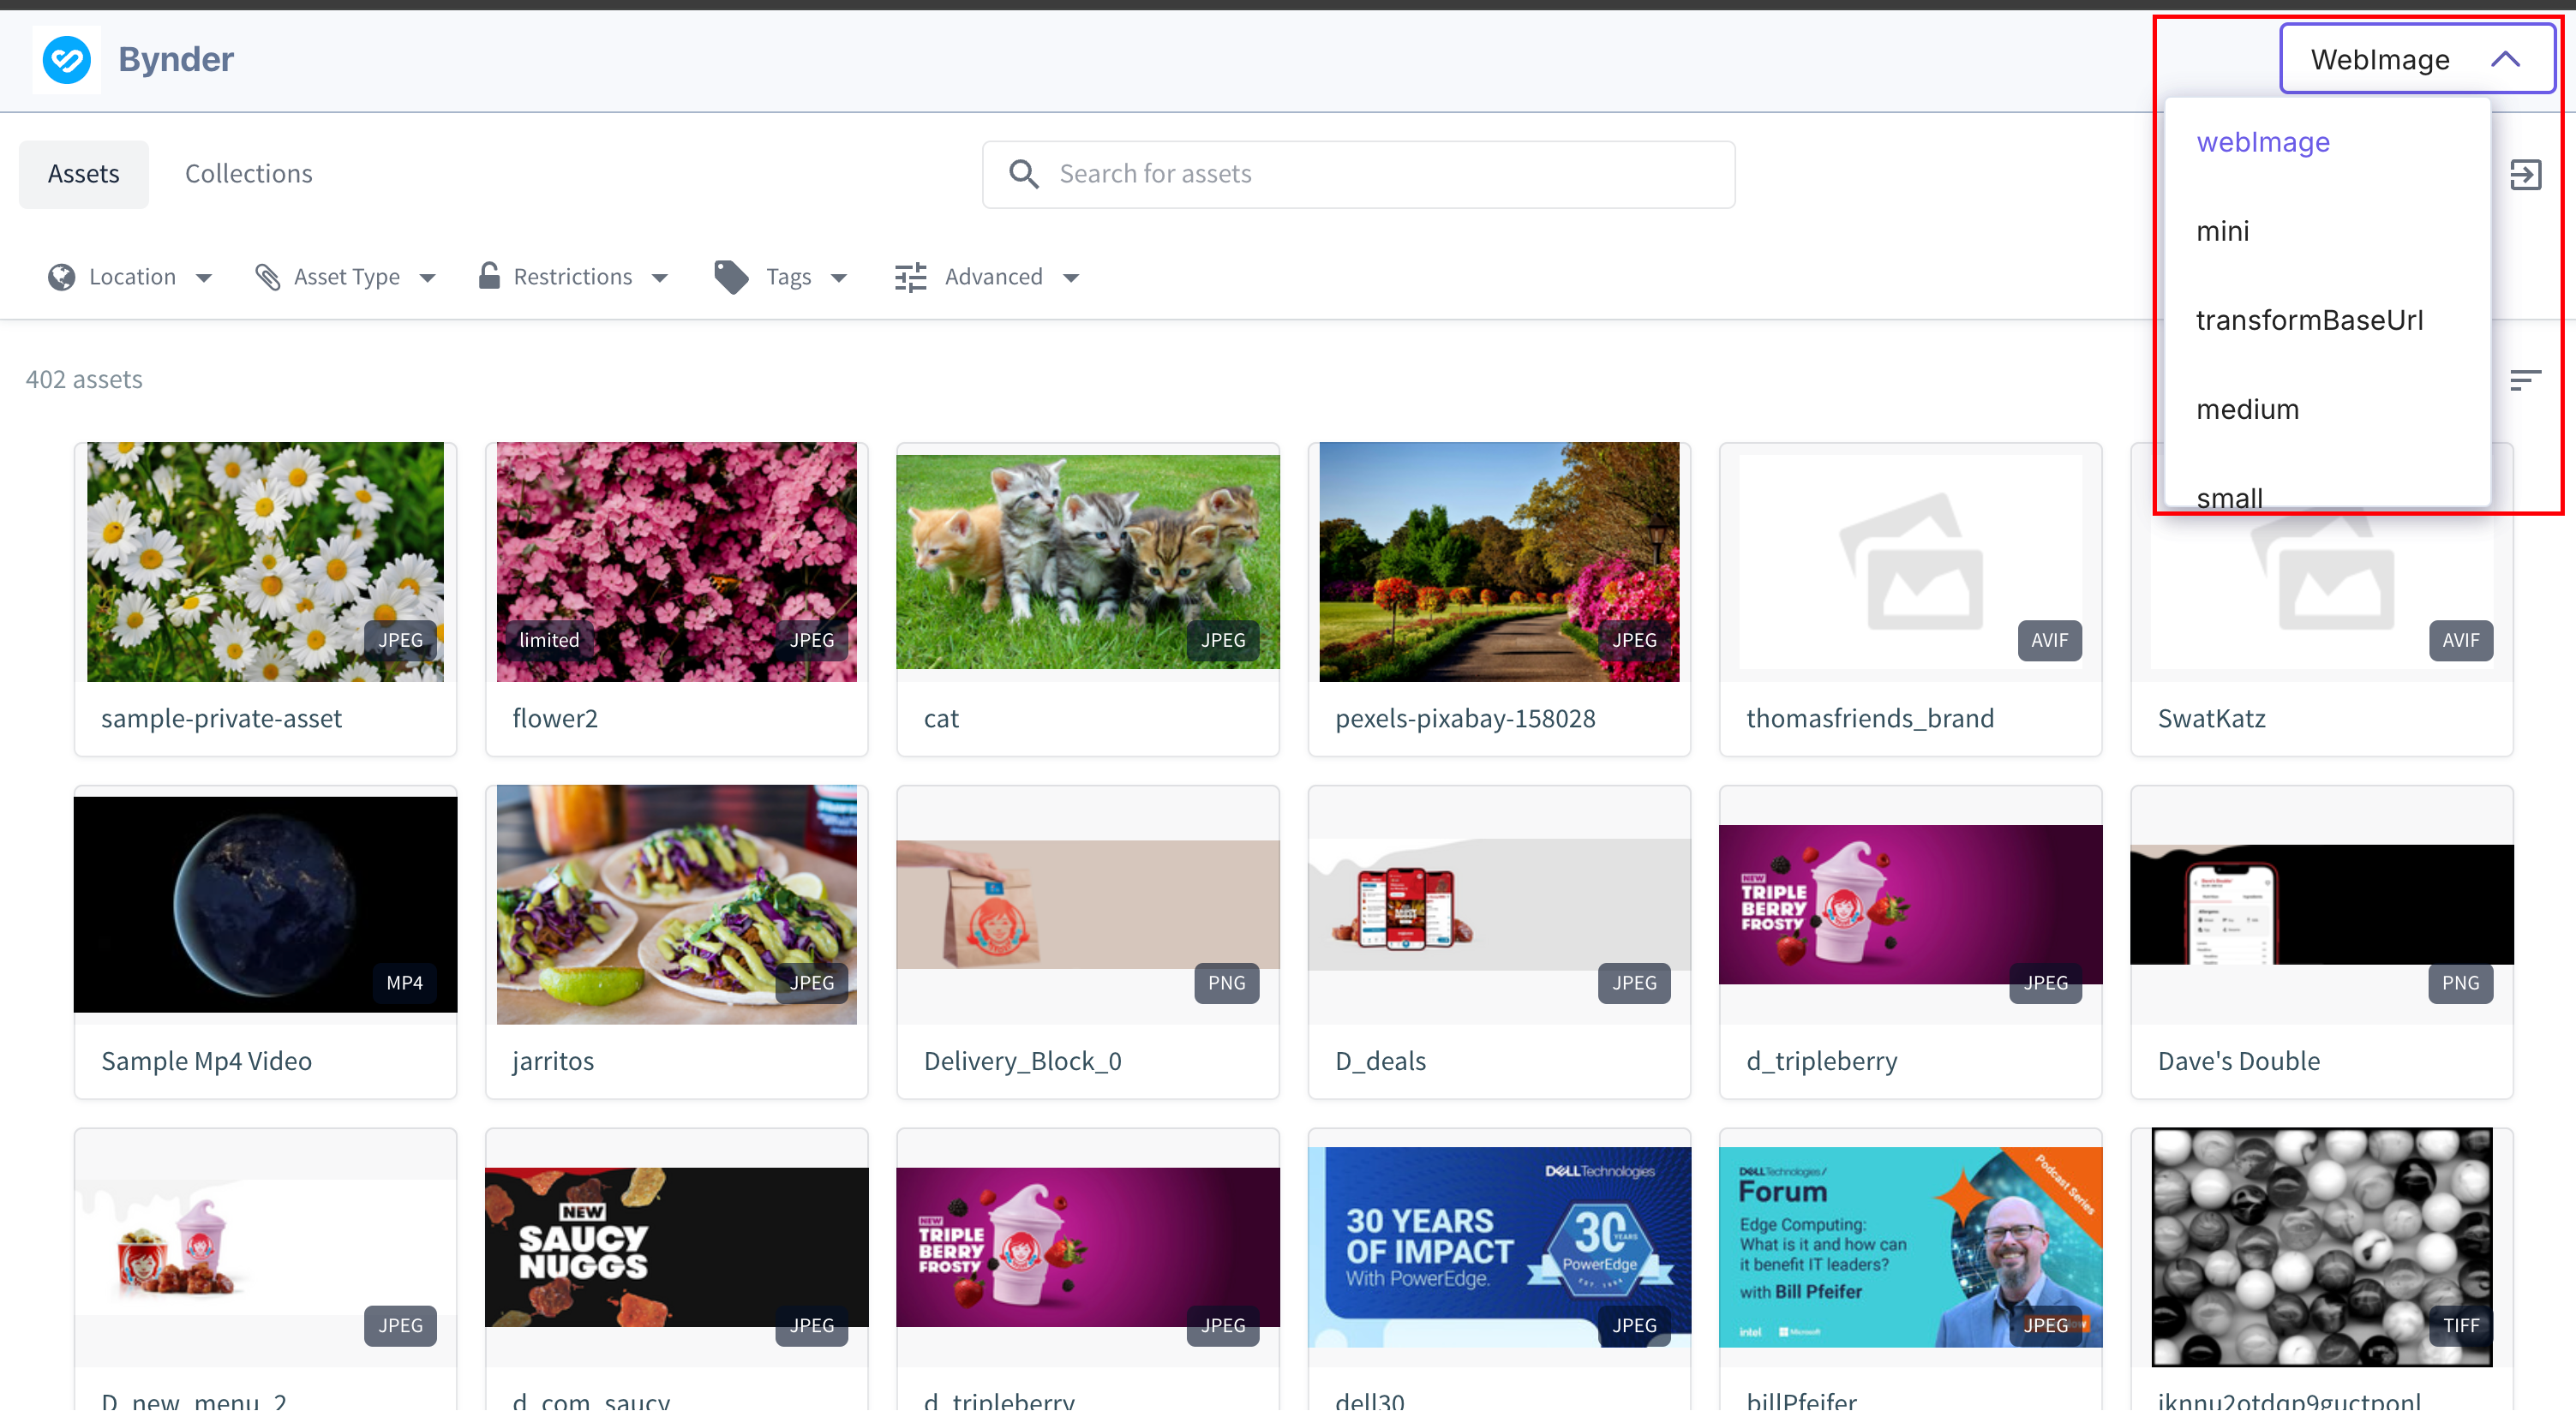
The selected transformation will be applied to all chosen assets.
Note:- In Single Select File and Multi Select mode, Bynder's DAT feature is enabled. This feature allows you to choose a derivative of the selected asset.
- Bynder DAT feature is not available for Single Select mode.
The assets you select get added to your entry in the thumbnail view.
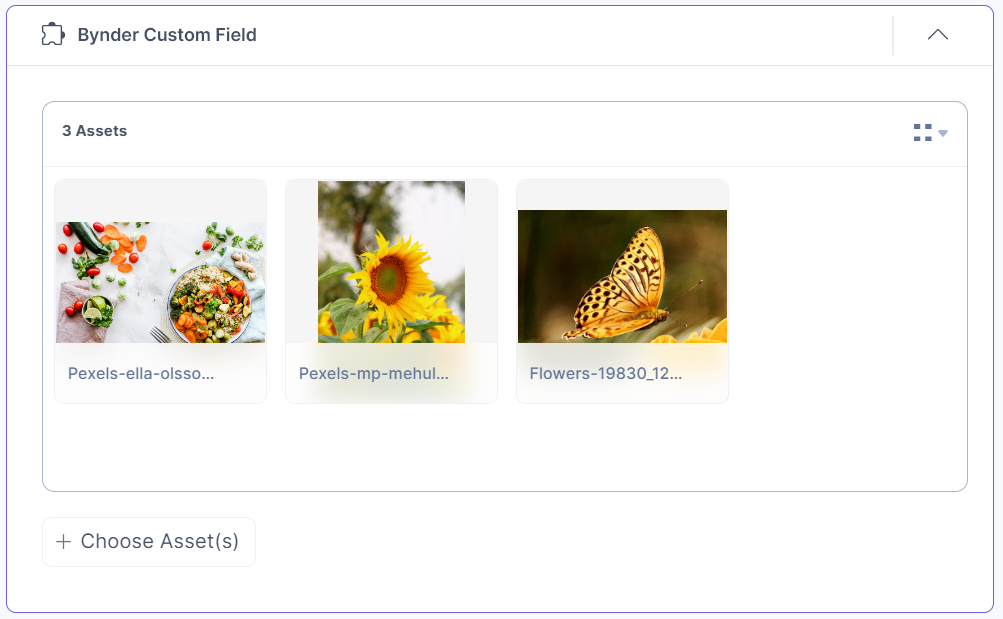
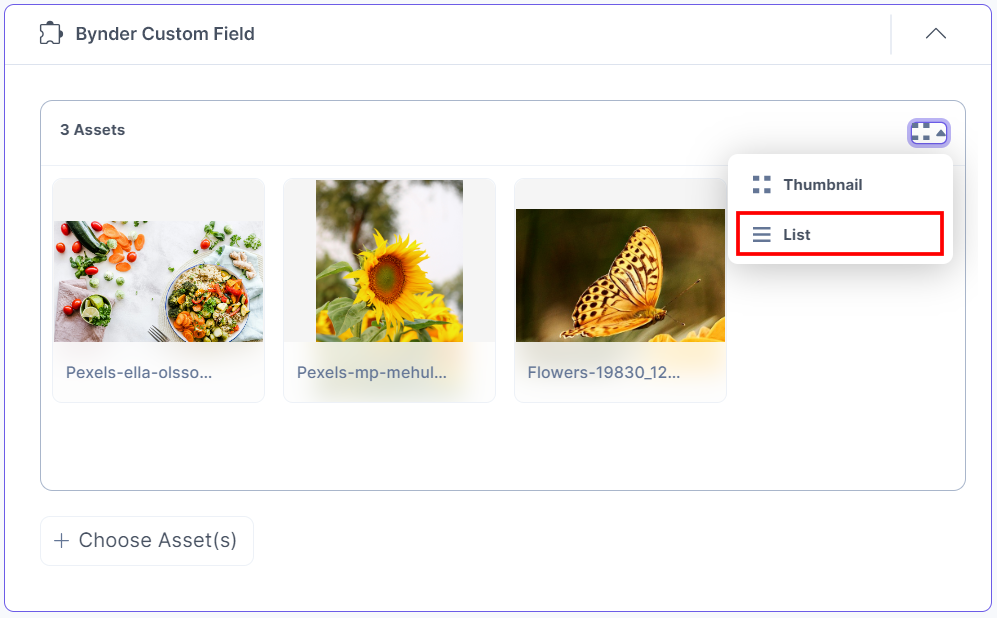
To view the assets in the list view, select the List view option from the dropdown.
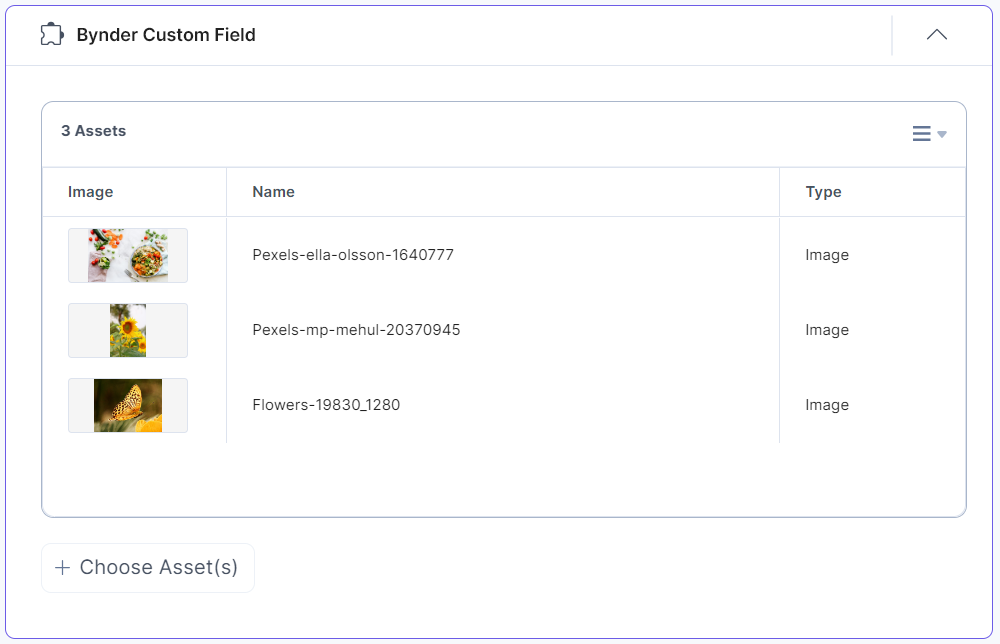
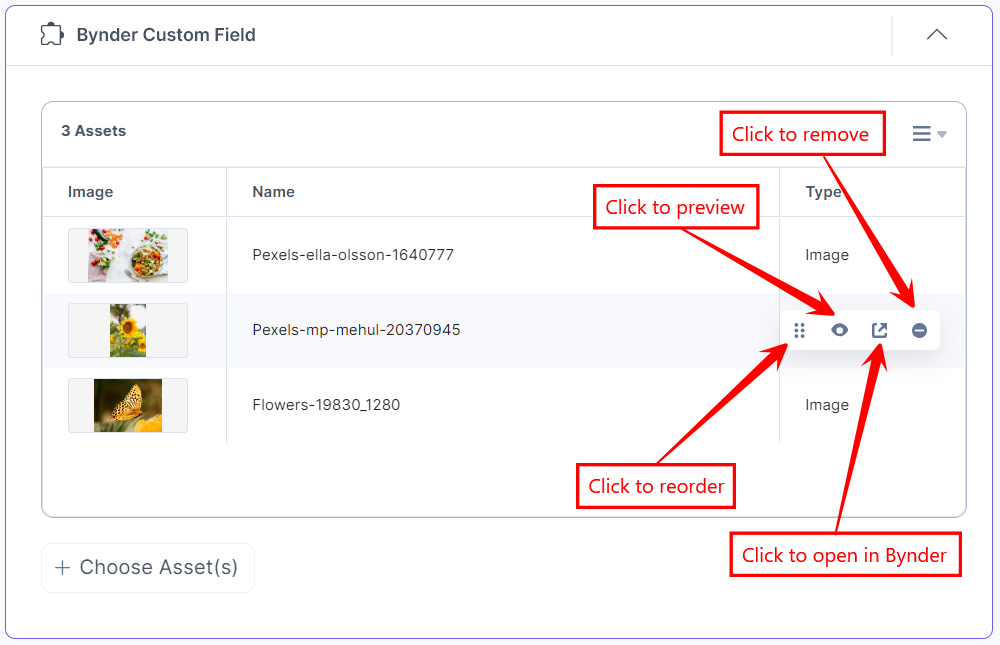
The assets you select get added to your entry in the list view.
- Single Select File or Single Select mode
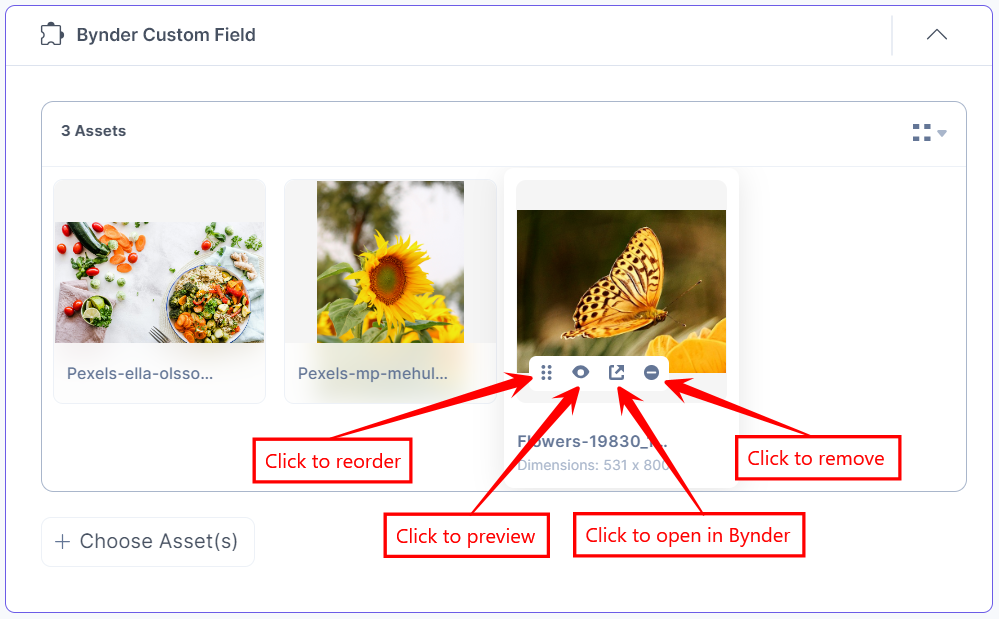
- To reorder, preview, open in Bynder, or remove the image, hover over the image to get the options available, then perform the following:
- Click the Reorder icon to drag and reorder the image.
- Click the Preview icon to view the image.
- Click the Open in Bynder icon to open the image in the Bynder app.
- Click the Remove icon to delete the selected image.
Thumbnail View
List View
- After adding the asset(s), Save and Publish your entry.
Steps to Use the Bynder App in a JSON Rich Text Editor Field:
- In the Content Type Builder page, add JSON Rich Text Editor in your content type by clicking the Insert a field link represented by a + sign.
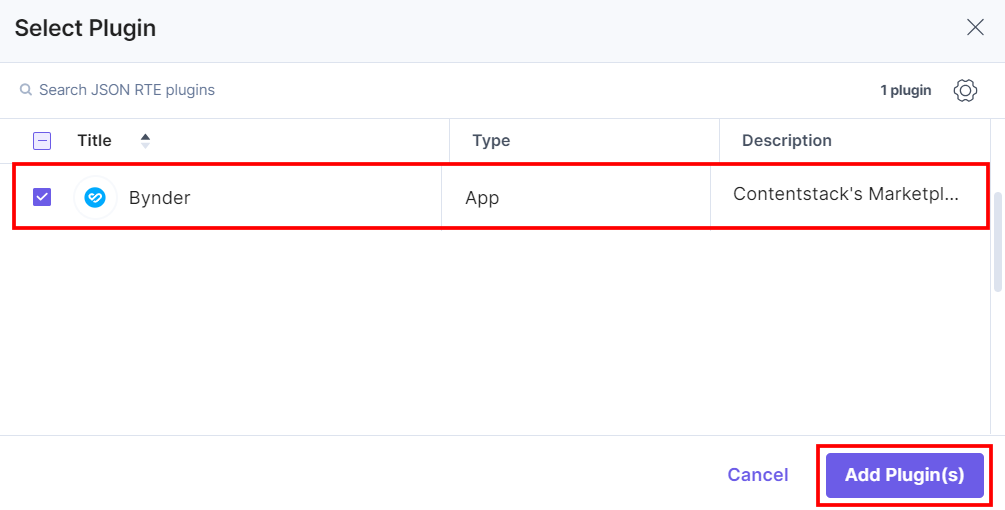
- Under Select Plugin, select Bynder, and then click Add Plugin(s).
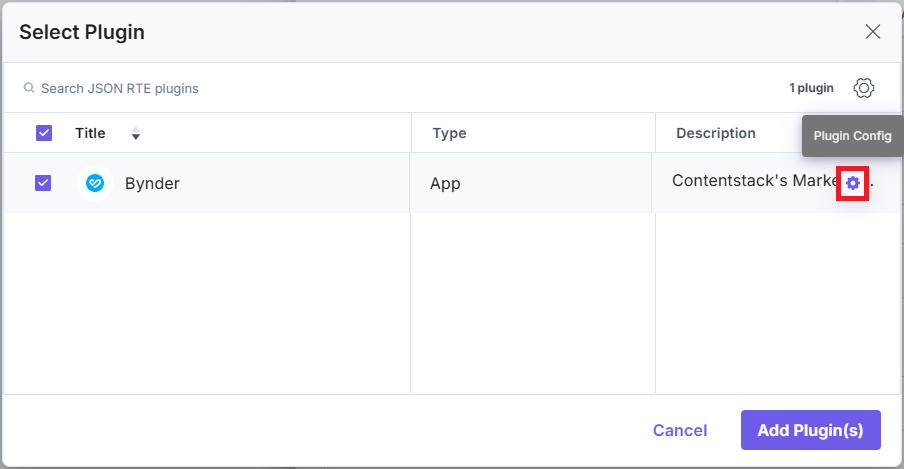
To add the Config Parameter in the JSON RTE field, click the Plugin Config gear icon on the app plugin selector page.
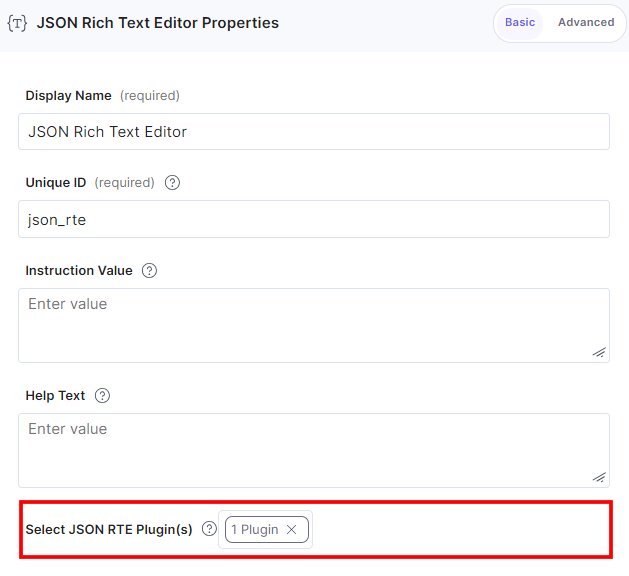
You can set the following validations for the JSON RTE field:
-
DAT Feature Support for Multi Select Mode (optional): For the multi-select DAT feature, you can apply predefined transformations ("thumbnail", "mini", "transformBaseUrl", "medium", "small", "large", "online") to assets by including them in the options list.
These transformations will only be applied if they are available for the selected assets. If a selected transformation is unavailable, the default transformation ("webImage") will be applied instead.
You can also apply custom transformations to assets through the transformation_options object by specifying a unique key name and providing the corresponding rule as its value.
{
  "custom_settings": {
    "dat_settings": {
      "options": [
        "webImage",
        "mini",
        "transformBaseUrl",
        "medium",
        "small",
        "large"
      ],
      "default": "webImage",
      "transformation_options": {
        "flip_rotate": "io=transform:flip&io=transform:rotate,angle:70",
        "crop": "io=transform:crop,height:400,width:300,path:square"
      }
    }
  }
}
Additional Resource: For more details on specifying rules for custom transformations, refer to the DAT documentation.
- Custom Settings (optional): In compact_view_options, assetType_in and tagNames_in can be used to display assets with specific asset types and tags on the Selector page:
{
  "custom_settings": {
    "compact_view_options": {
      "assetFilter": {
        "assetType_in": ["IMAGE"],
        "tagNames_in": ["bottle_with_food"]
      }
    }
  }
}
Additional Resource: You can include optional parameters in the compact_view_options object, except for attributes containing a period (e.g., portal.url) or those with callback functions. For detailed description of these optional parameters, refer to the Bynder Compact View documentation.
This adds Bynder in the JSON Rich Text Editor.
-
- After adding the plugin, click Save or Save and Close to save your changes.
- To use the Bynder app, create an entry for this content type by clicking Entries from the left navigation panel. Click + New Entry to create a new entry for the above content type, and then click Proceed.
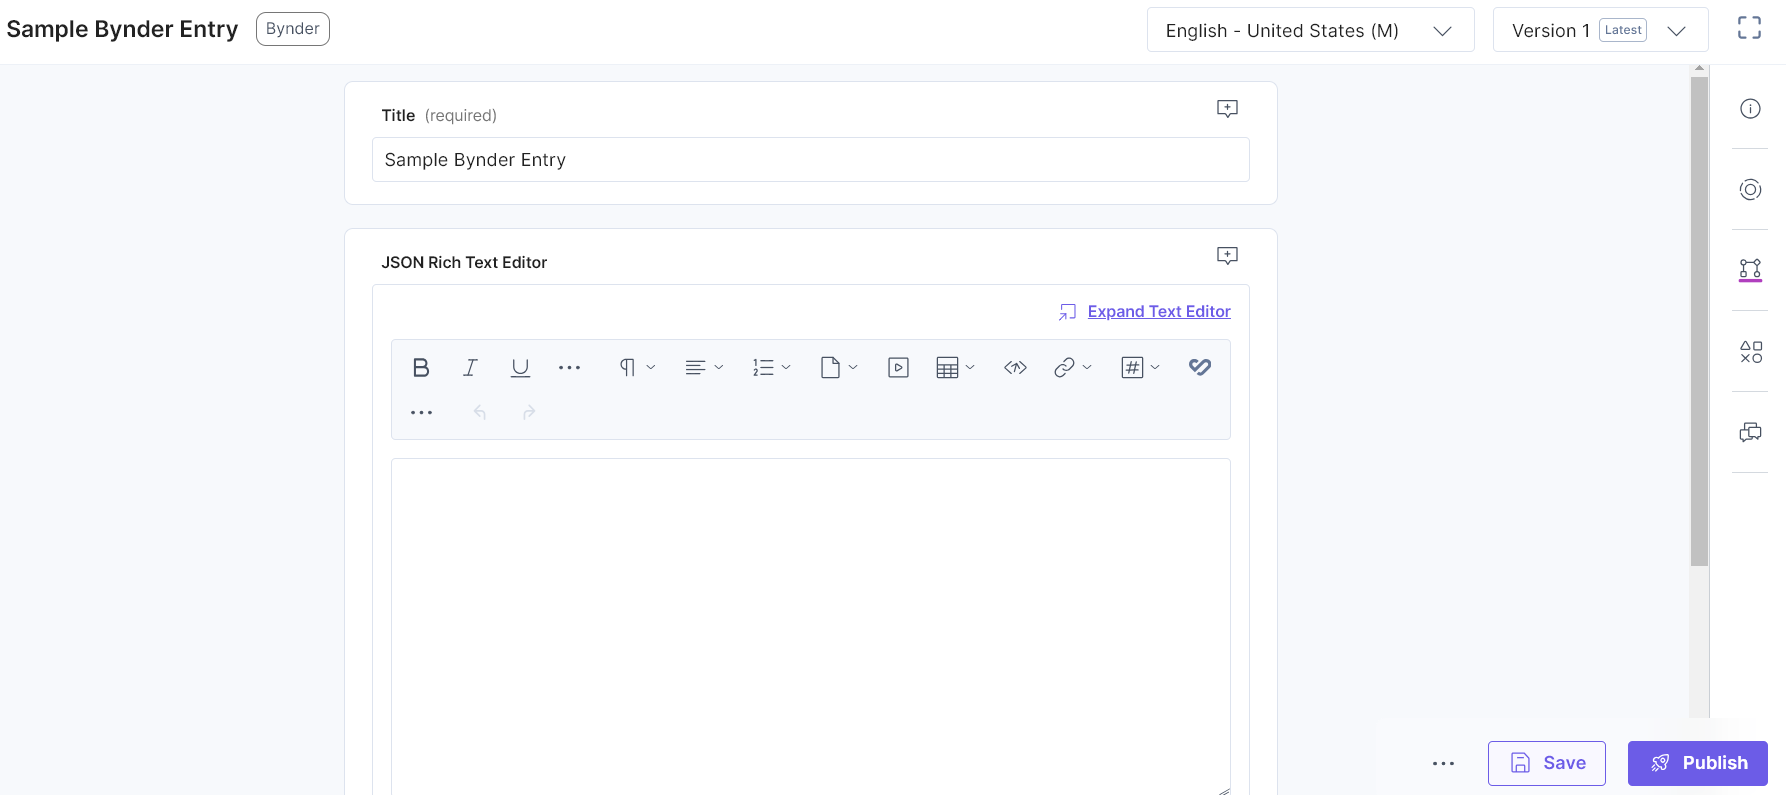
You can see the Bynder icon in the JSON Rich Text Editor field on your entry page as shown below:
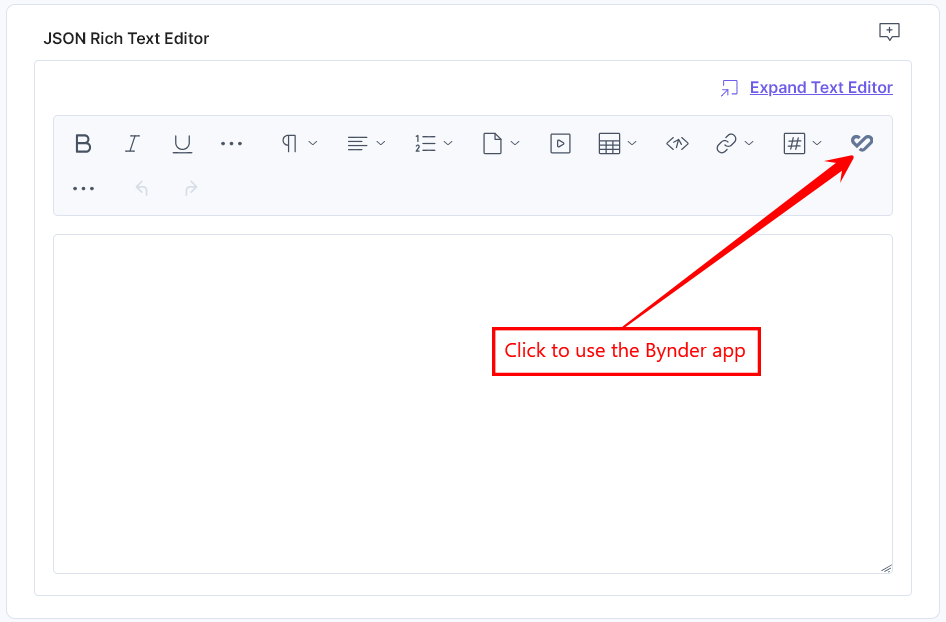
- Click the Bynder app icon.
Note: If you are using the Bynder app for the first time, the app will redirect you to connect the app with the portal. Click the Connect button to connect and proceed towards the authentication screen.

Provide the username and password and login to the Bynder dashboard.
- Now, you can choose assets from the Bynder selector page:
- Single Select File or Single Select mode

- Multi Select mode

When the Advanced config is added for DAT, the Selector page drop-down for Multi-Select mode displays different transformations as options:

The selected transformation will be applied to all chosen assets.
Note:- In Single Select File and Multi Select mode, Bynder's DAT feature is enabled. This feature allows you to choose a derivative of the selected asset.
- Bynder DAT feature is not available for Single Select mode.
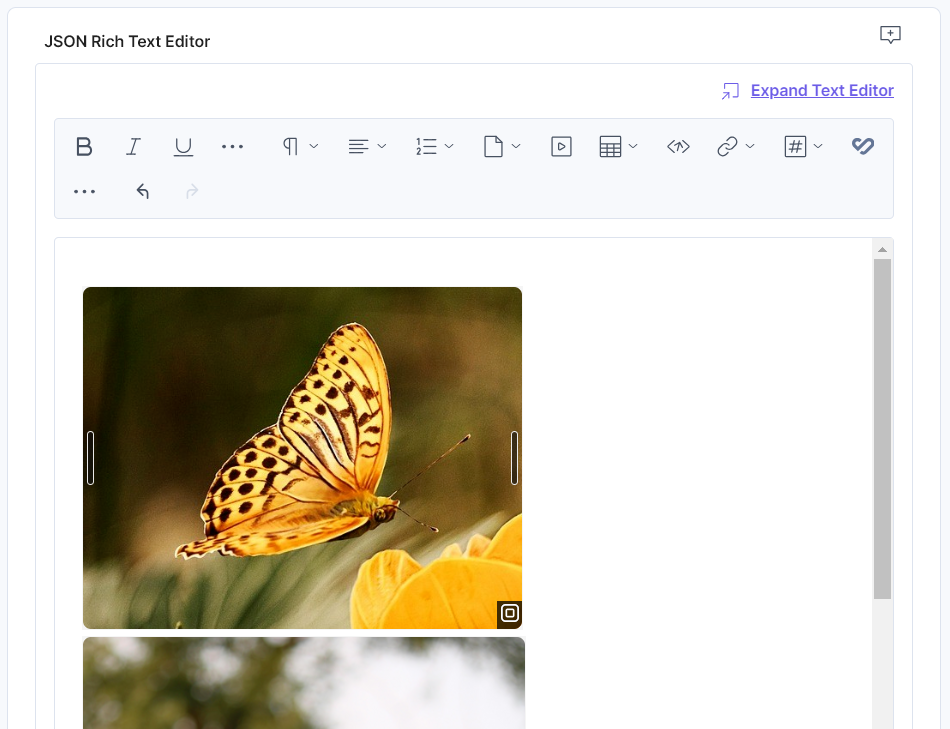
The assets you select get added to your entry.
- Single Select File or Single Select mode
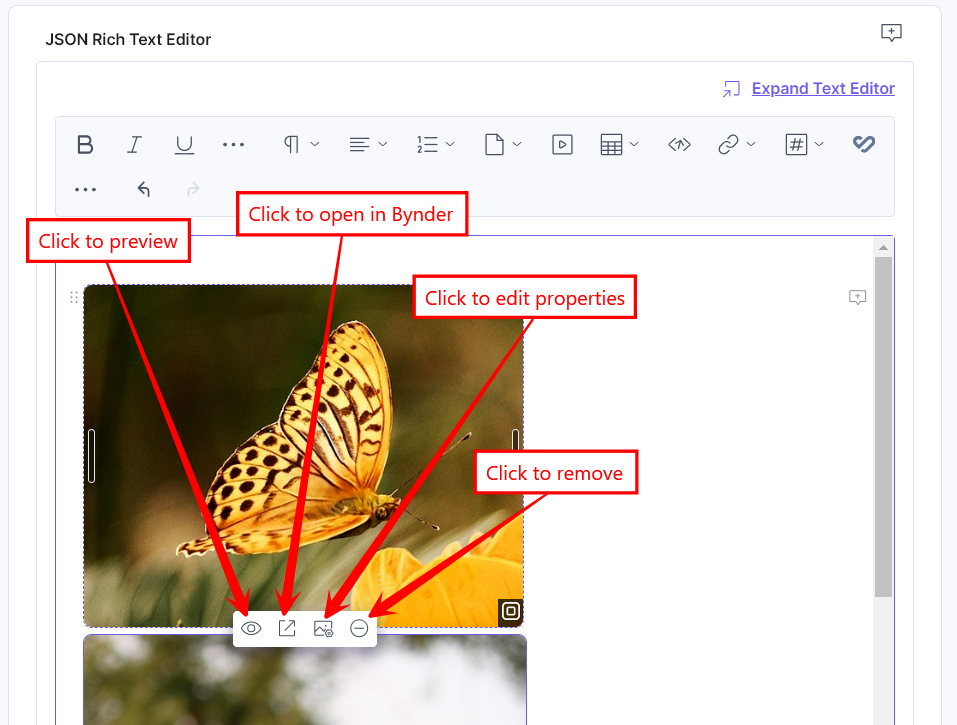
- To resize the image, drag the corner of the image and adjust the size as required. Hover over the image to view the options to preview, open in Bynder app, edit properties, and remove the asset.
Additional Resource: You can use alignment and inline asset features to edit the asset placement within the JSON Rich Text Editor field.
- After adding the asset(s), Save and Publish your entry.
Note: If you selected the Single Select File or Multi Select mode to add assets to your entry, you can view the information of the selected DAT derivative of the asset in their JSON object, in an additional parameter titled additionalInfo.


.svg?format=pjpg&auto=webp)
.svg?format=pjpg&auto=webp)
.png?format=pjpg&auto=webp)


.png?format=pjpg&auto=webp)