

.svg?format=pjpg&auto=webp)
.svg?format=pjpg&auto=webp)
.png?format=pjpg&auto=webp)


.png?format=pjpg&auto=webp)
Preview Content Instantly
Contentstack provides webhooks using which you can automate a series of events. By using webhooks, you can set up a system that’ll enable you to preview content changes instantly on the front-end application.
This document will guide you through the steps for setting up such a system by automating the process of updating and publishing content.
Overview of the process: In Contentstack, when a user creates or updates an entry, a webhook is triggered. This webhook will invoke the AWS Lambda function to publish content on the specified environment, such as “preview” or “staging.” When this function publishes the content on the environment, another webhook is triggered via the front-end application. Then, the webhook will notify Pusher to send a real-time reload request to the content, thus letting you preview the content changes instantly.
Pre-requisites
- Contentstack account
- An account with Pusher and some working knowledge of it
- AWS account
- Basic knowledge of AWS Lambda and AWS API Gateways
- Management token
To accomplish this, we will divide the task into two sections:
Let's discuss the steps in detail.
Auto-publishing an Entry
In the following steps, you’ll set up a system that'll auto-publish an entry using AWS Lambda when you either create or update an entry.
-
Set up an AWS Lambda and API Gateway
- On the Functions page, click on the Create function button to create a lambda function.
- Then, on the Create function page, select the Author from Scratch option, enter the function name (for example, “auto-publish”), and choose Runtime as any latest version of Node.js.
- Click on the Create function button. This will create your lambda function and take you to the lambda function’s page.
- Download the index.zip file and unzip it on your machine.
- On your Lambda function’s page, scroll down to the Code source section, click the Upload from dropdown menu, choose the zip file option, and upload the index.zip file you’ve downloaded
To use the Europe region, go to the index.js file and change the uri from https://api.contentstack.io to https://eu-api.contentstack.com. Similarly, to use the Azure North America region, change the value to https://azure-na-api.contentstack.com, and to use the Azure Europe region, change the value to https://azure-eu-api.contentstack.com.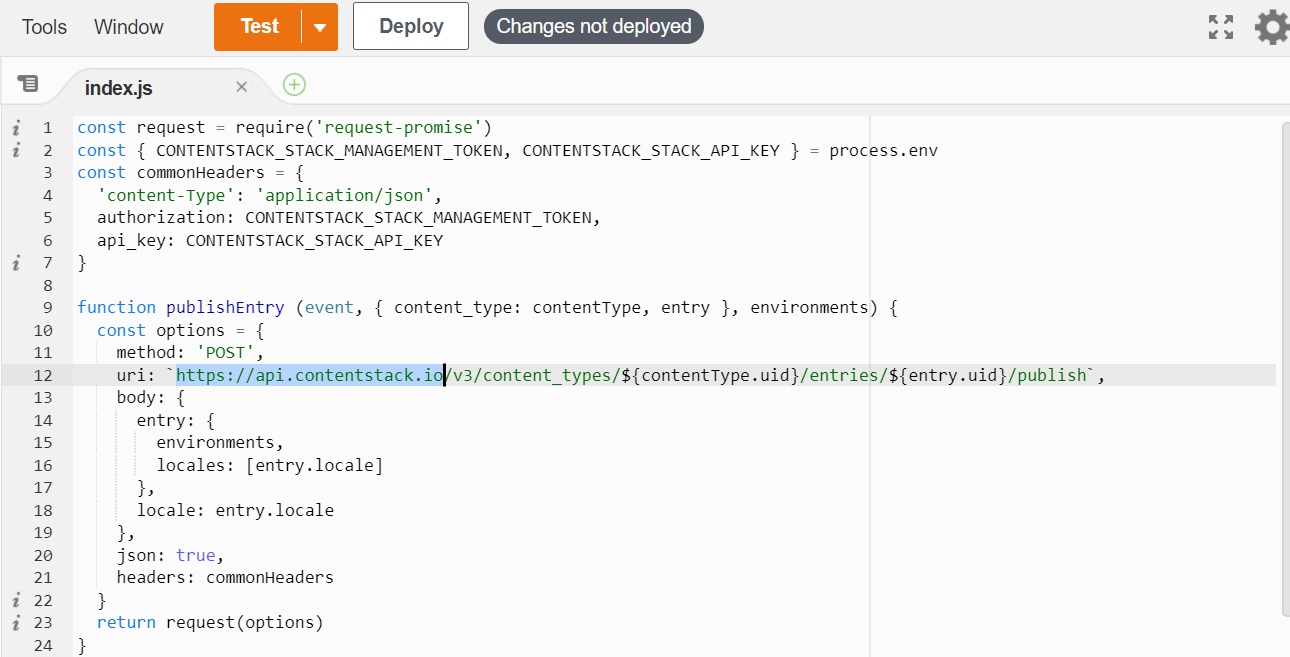
- Once we have uploaded the code in the editor, set up the environment variables by going to the Configuration tab and then to the Environment variables section.
- In the Environment variables section, click the Edit button, and then click the Add environment variable button.
-
Add the following environment variables:
CONTENTSTACK_STACK_MANAGEMENT_TOKEN= your_stack_management_token CONTENTSTACK_STACK_API_KEY= your_stack_api_key - Once you add the environment variables, click Save.
- Next, set up an API gateway for the webhook to trigger an event on the lambda function. To do so, on your lambda function’s page, in the Function overview section, click the + Add trigger button.
- From the Trigger configuration dropdown menu, select the API Gateway option.
- Then, from the API dropdown menu, select Create an API option.
- Select API type as REST API, keep Security as Open, and click Add.
- You’ll be redirected to the Triggers section. Expand the Details link to get the API Endpoint URL. You’ll need this URL while creating a webhook in Contentstack.
With this, you have set up the Lambda Function to publish the entry on the specified environment when it is saved -
Create a Webhook for Auto-publishing the Page
To create a webhook to listen to the “create” and “update” on an entry, log in to your Contentstack account, go to your stack, and perform the following steps:
- Click the “Settings” icon (press “S”) on the left navigation panel.
- Select Webhooks (press “alt + W” for Windows OS, and “option + W” for Mac OS), and click on + New Webhook
- Enter any valid name for your webhook, for example, Instant Preview.
- In the URL to notify field, enter the API endpoint URL (generated in the above step)
- Under the Custom headers option, enter the parameter as target_environments. As a value, enter a comma-separated list of environments where you will publish the content, for example, stage, pre-prod, and so on.
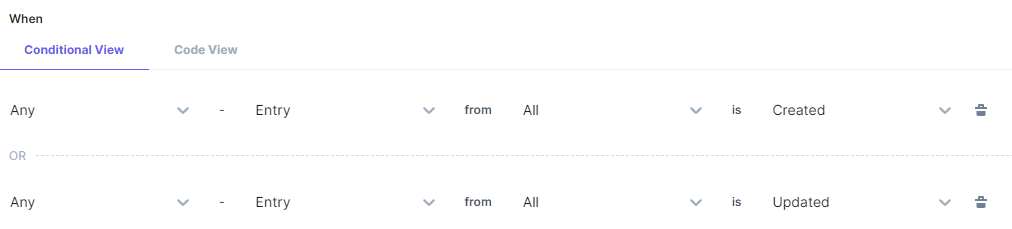
- Under the When section, inside Conditional View, add the conditions to trigger when all entries of any content type are created or updated:
- Select the Enable Webhook checkbox option and Save the webhook.
With this, you have completed the basic setup to execute the first task — publishing an entry. Now create and save your entry. As soon as you save your entry, AWS Lambda will publish it on your specified environment(s).
Auto-reloading the Page
Move ahead and set up a system for auto-reloading the page when the entry is auto-published on an environment by performing the following steps:
-
Create a Pusher Channel Account
In this example, we’ll use Pusher. It is a hosted service that you can use to add real-time bi-directional functionality via WebSockets (with HTTP-based fallbacks) to mobile or web applications.
Using Pusher, set up a system for auto-reloading the content whenever you create or update an entry. Get started by creating a Pusher account by performing the following steps:
- Create a Pusher account.
- On successful creation of the account, go to the Pusher Dashboard, and create a channel by clicking the Get started button in the Channels card.
- On the “Welcome” card, provide the necessary details and click the Create app button.
- Then, go to the App Keys section from the side navigation panel, and note down the keys (“app_id,” “key,” “secret,” and “cluster”) as you’ll need them while configuring your front-end app.
This will enable your app to communicate with Pusher using the keys so that Pusher can generate content previews instantly. -
Update the Existing Website Code
The next step is to install Pusher and configure it in your front-end website code. Execute the following steps at the server-side:
-
Install Pusher to your app’s source code by running the following command in your terminal (command prompt):
npm install pusher --save
-
Next, connect your project with Pusher by creating a realtime.js file inside the lib folder of your project and adding the following code to it:
const Pusher = require('pusher'); const pusher = new Pusher({ appId: 'APP_ID', key: 'APP_KEY', secret: 'APP_SECRET', cluster: 'APP_CLUSTER' }); const broadcast = (channel, event, data={}) => pusher.trigger(channel, event, data); module.exports.broadcast = broadcast;Note: Add your Pusher’s account keys to the code.
-
The next step is to update the webhook route to broadcast any “publish” event on the channel with the name set to the UID of the published entry. You can either create or update the routes > webhook.js file with the following code:
const broadcast = require('../lib/realtime').broadcast app.post('/webhook', function(req, res){ res.header("Content-Type", "text/plain"); res.header("statusCode", "200"); res.set("Connection", "close"); res.status(200) res.send('success') broadcast(req.body.data.entry.uid, 'publish') }) -
The last step is to make the client side changes in the HTML file by adding the Pusher client library as follows:
<script src="https://js.pusher.com/4.3/pusher.min.js"></script>Add the following JavaScript snippet to the client-side which will listen for the “publish” events on channel:
var pageRef = document.body.getAttribute('data-pageref');

var pusher = new Pusher("APP_KEY", {

      cluster: "APP_CLUSTER",

      forceTLS: true

});

var channel = pusher.subscribe(pageRef);

channel.bind("publish", function(data) {

    location.reload();

});
With these steps, you have configured Pusher in your web app.
-
-
Create a Webhook for Auto-refreshing the Page
- Go to your stack, click the “Settings” icon on the left navigation panel.
- Select Webhooks, and click on + New Webhook
- Enter any valid name for your webhook.
- In the URL to notify field, enter your app's URL where your app is deployed, where the webhook will notify about the save events.
- In the Conditional View section, inside the Conditional View, add the conditions as shown below:

- Select the Enable Webhook checkbox option and Save the webhook.
-
Try out the Setup
Create or update an entry to test the auto-publishing functionality. Then, visit the webpage to see the content changes.
More articles
