

.svg?format=pjpg&auto=webp)
.svg?format=pjpg&auto=webp)
.png?format=pjpg&auto=webp)


.png?format=pjpg&auto=webp)
Creating an Automated System to Add Redirect URLs Using Webhooks and AWS Lambda
During the course of time, we keep changing the URLs of entries as and when required. And if we have several such entries, adding a redirect URL for each entry not only consumes time but also takes effort if we do it manually.
At times, we may even forget to add a redirect URL to an entry which can result in our users getting a 404 error, if they have bookmarked that page.
Therefore, in this guide, we will discuss how we can create a system that adds a redirect URL automatically when the URL field in an entry is changed or updated.
Prerequisites
- Contentstack account
- AWS account and access to AWS Lambda
- Working knowledge of AWS Lambda
Process Overview
To understand how this example works, we will create a content type named “Redirect Rules” with a specific schema and add a blank entry in it at the start. When we update the URL of any entry, of any content type of a stack, a webhook gets triggered. This webhook then invokes an AWS lambda function that creates a redirect entry automatically inside the Redirect Rules content type with the required details.
Steps for Execution
- Download the code
- Create the “Redirect Rules” content type
- Add the AWS Lambda Function
- Create an API Gateway
- Deploy your API
- Create a Webhook in Contentstack
- Try it out
Let's now move ahead with the steps and create the required system.
Download the Code
Go to our GitHub page and download the code for this exercise. We have already created the required functions that take care of creating this system. You just have to upload this project to your AWS Lambda Function as discussed below.
Create the “Redirect Rules” Content Model
For this exercise, we will create a content type named Redirect Rules and add an entry inside it. Log in to your Contentstack account and perform the steps given below to create this content type:
- Go to your stack and click the “Content Models” icon (press “C”) on the left navigation panel.
- Click on the + New Content Type button.
- On the Create New Content Type modal, name the content type as Redirect Rules. Add an optional description if you want but ensure that Multiple is selected as we want several entries (with the same structure) to be created for every URL change, automatically.
- Click on Create and Add fields as depicted in the following screenshot:

- On the Content Type Builder page, add the following fields to your content type. To add a field, click on the “Insert a schema” (+) icon that appears below your default fields:
- Title (default field)
- URL (default field)
- Single Line Textbox (name it “From”) to show the old URL
- Single Line Textbox (name it “To”) to show the new (changed) URL
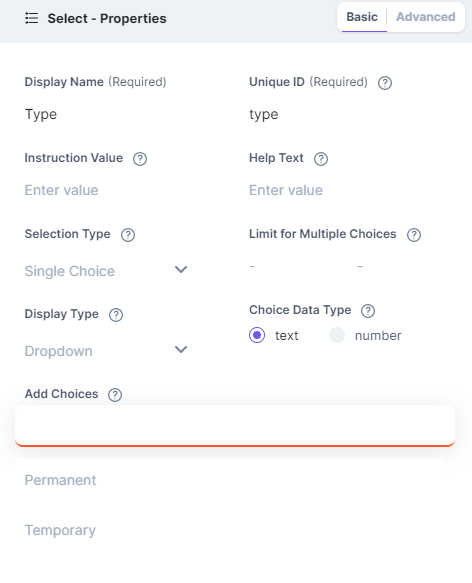
- Select Field (name it “Type”). Add two choices as Permanent and Temporary in the Add Choices option as shown below:
- Multiline Textbox (name it “Notes”) if you want to add any notes for the redirect.
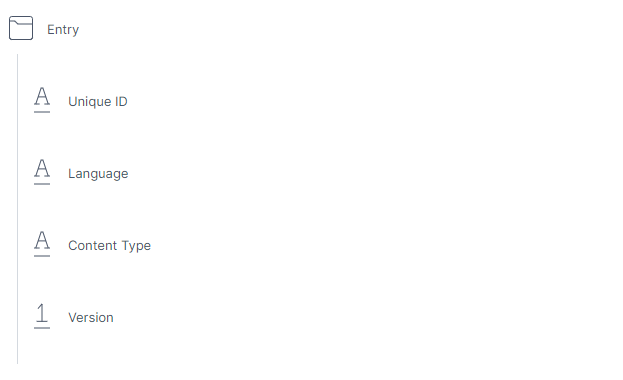
- Group Field (name it “Entry”) and add 4 Single Line Textbox with the following names:
- Once you have added these fields to your content type, click on Save and Close.
With these steps, we have created our content type that will hold all our redirected URLs. The group field that we have added provides useful information about the entry that had the URL changed.
- It will provide the version number of the entry in which the URL was changed
- The content type it belonged to
- Its locale information
- Its UID
Open this content type, add a blank entry in it, and save it. Let's now move ahead and create the Lambda Function.
Add the AWS Lambda Function
Perform the following steps to set up the AWS Lambda function:
- Login to your AWS Management Console, and select Lambda from the Services list.
- Click on the Create Function button and then Author from Scratch.
- Configure the lambda based on your requirements. Choose Node.js 12.x as your run-time language and click on the Create function button.
- AWS Lambda offers an inline code editor. You can write your lambda code here or alternatively upload the code. For our example, we have created a sample code that you can download or clone from our GitHub repository.
After cloning the repo, move inside the project root directory and install the modules. Create a production build by running the npm run build command from the command prompt and then zip it. - Then, upload the zip on Lambda by selecting the Upload a .zip file option from the Code entry type drop-down. Change the Handler to index.create and click on Save.
This is how it will look when you upload the code in the editor: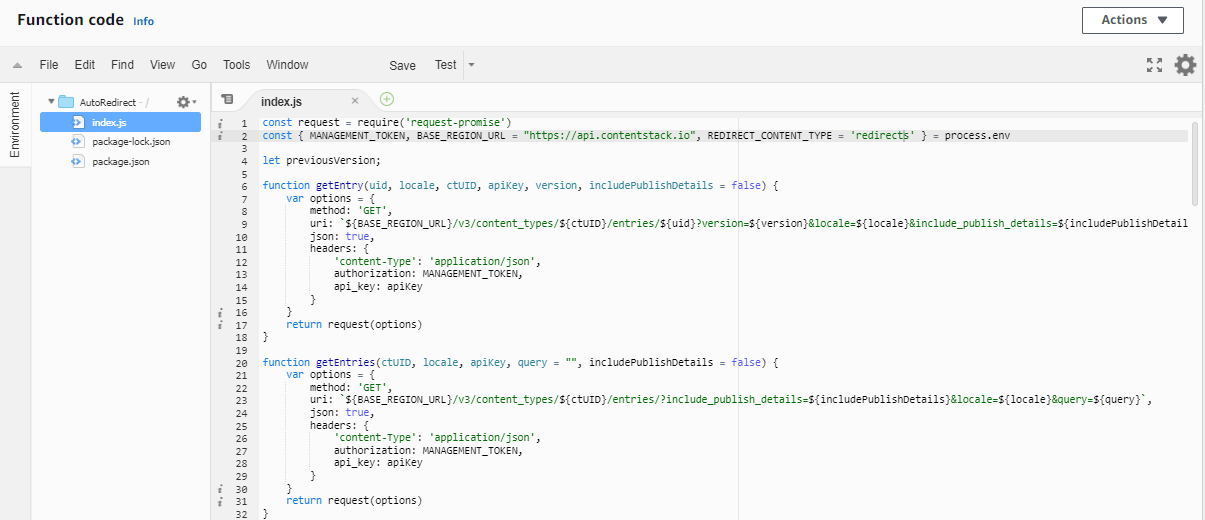
- Once we have uploaded the code in the editor, let's now set up the Environment variables by adding your Contentstack's credentials as follows:
BASE_URL_REGION: <<YOUR BASE URL REGION>>
MANAGEMENT_TOKEN: <<YOUR STACK's MANAGEMENT TOKEN>>
REDIRECT_CONTENT_TYPE: <<UID of the CONTENT TYPE>> Note:You can name the content type as you want. However, ensure that the content type UID that you mention in the environment variable is the same that you use in the code (note the second line of the code where you need to enter the UID of the content type).
- For North American, set the Base URL region as https://api.contentstack.io/.
- For Europe, set the Base URL region as https://eu-api.contentstack.com/.
- For Azure North America, set the Base URL region as https://azure-na-api.contentstack.com/.
- For Azure Europe region, set the Base URL region as https://azure-eu-api.contentstack.com/.

Note: You have to disable the 2FA (if enabled) to ensure the Lambda Function works as expected.
- Once you have added these environment variables, click on Save.
With these steps, we have set up our Lambda Function. Let's now move ahead with creating an API gateway.
Create an API Gateway
Execute the following steps to create the API Gateway:
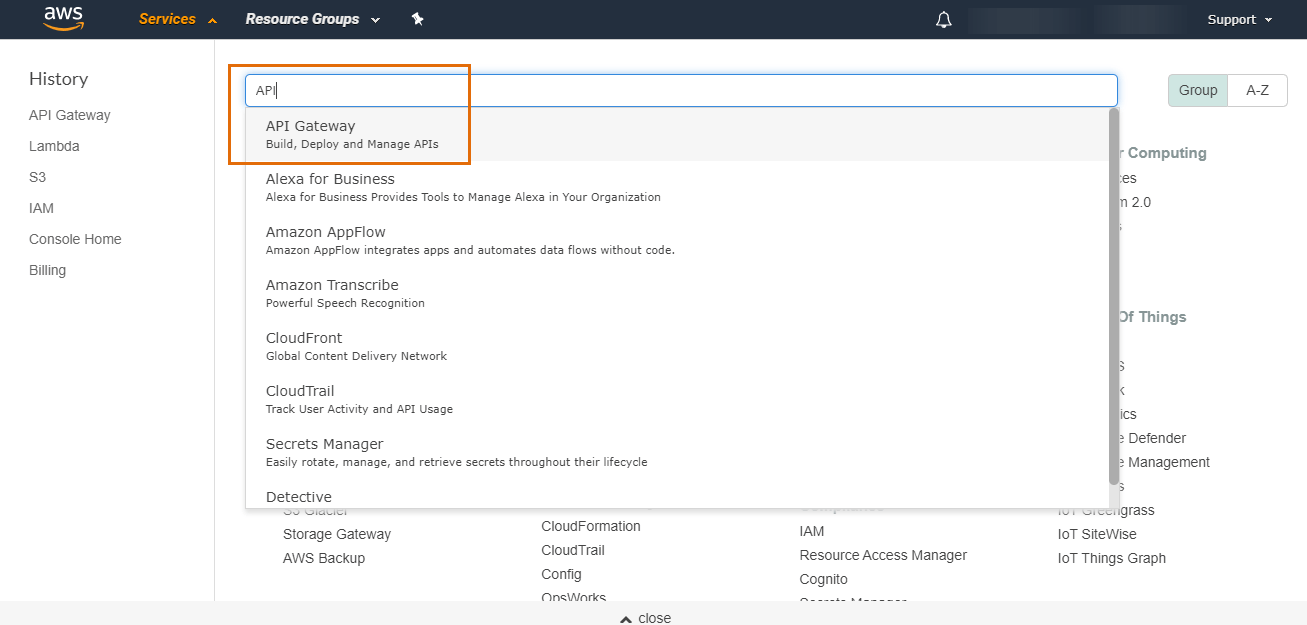
- Login to AWS Management Console (if you have logged out) and select API Gateway from the Services list. You can also type “API” in the search box to locate it quickly as shown:
- Click on the Getting started or the Create API button (depending on whether you have an API already configured or not).
- On the Choose an API type page, go to the REST API option (the public one) and click on Build.
- On the next screen, ensure that Choose the protocol section has REST selected and the Create new API section has New API selected. Enter the API name and a description (optional) in the Settings section and click on Create API.
- On the next page, from the Actions drop-down in Resources, select Create Method.
- From the resultant drop-down, select POST and click on the checkmark.
- Select your Lambda function by typing the name of your function (it auto-populates) in the Lambda Function field. Ensure the Use Lambda Proxy integration option is checked, as shown below, and click on Save.
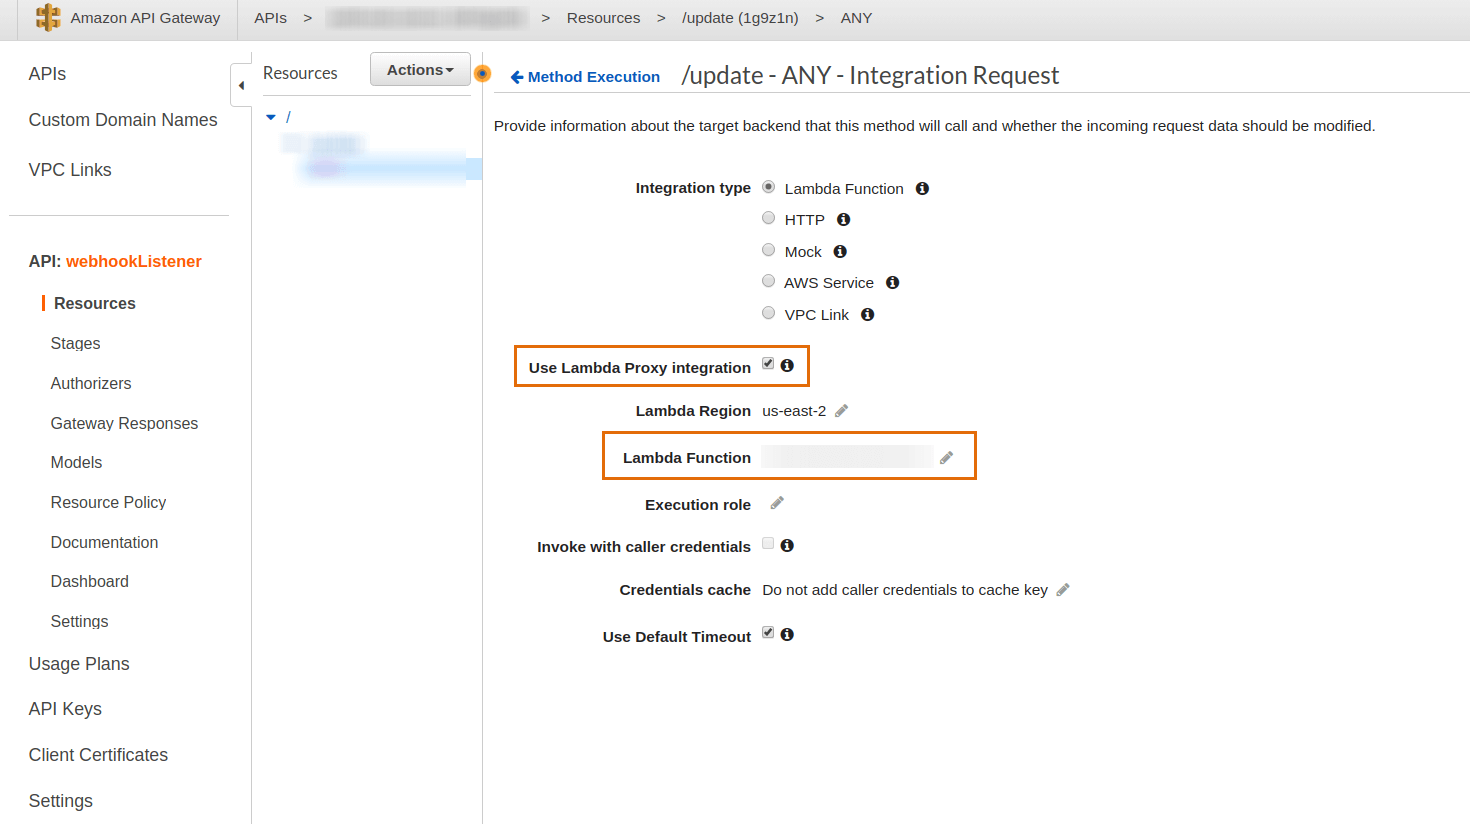
- You'll get the Add Permission to Lambda Function pop-up, click on OK.
With these steps, we have created the required API Gateway. Let's now deploy this API.
- Login to AWS Management Console (if you have logged out) and select API Gateway from the Services list. You can also type “API” in the search box to locate it quickly as shown:
Deploy your API
Next, we need to deploy our API by following the steps given below:
- From the Actions drop-down in Resources, select the Deploy API option.
- Select [New Stage] in the Deployment stage and enter “prod” (or anything you like to identify this stage with) in the Stage name.
- Click on the Deploy button.
- On the next screen, you will get your deployed API under Invoke URL. We will use this URL in the next step when we create a webhook to initiate notifications to our Lambda function.
Once you have deployed your API, your Lambda Function will look similar to this:
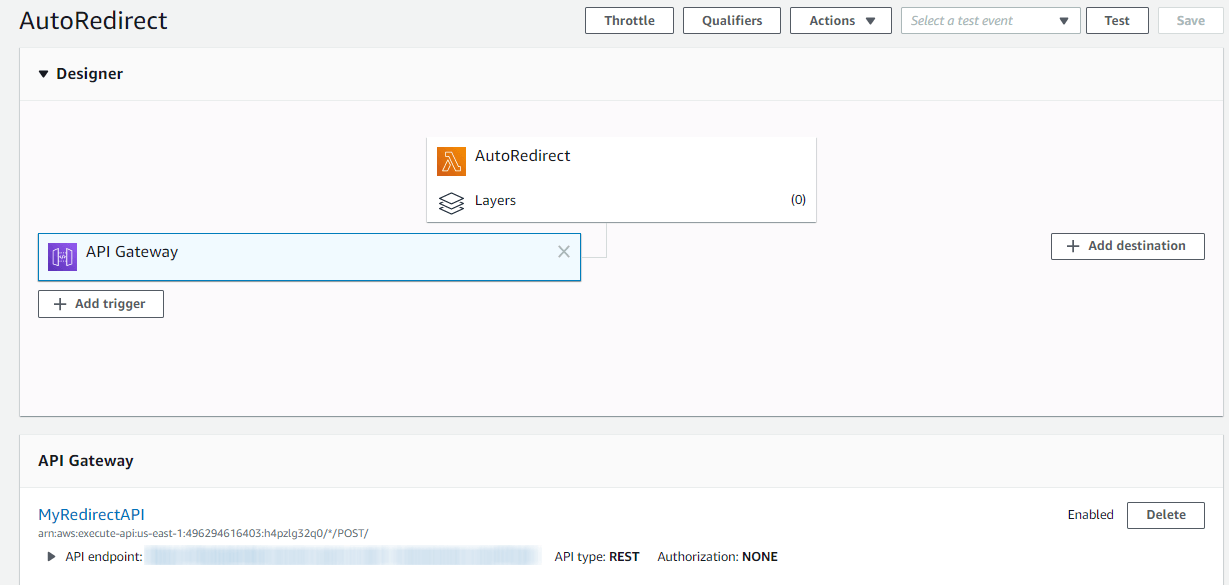
That's it! We have created the Lambda Function and have deployed the API to invoke it.
Create a Webhook in Contentstack
Let's now create a webhook in Contentstack to invoke the Lambda Function through the API that we just created. To do this, follow the steps given below:
- Log in to your Contentstack account, go to your stack, and click on the Settings icon (press “S”) on the left navigation panel.
- Then, click on Webhooks (press “alt + W” for Windows OS, and “option + W” for Mac OS). On the Webhook page, click on + New Webhook.
- On the Create Webhook page, fill up the Name field (for example, Redirect1). In the URL To Notify field, enter the URL that you generated when you deployed your APIs, in the previous step.
- Scroll down to the Branch-level Scope section for creating a trigger for the webhook as shown below:
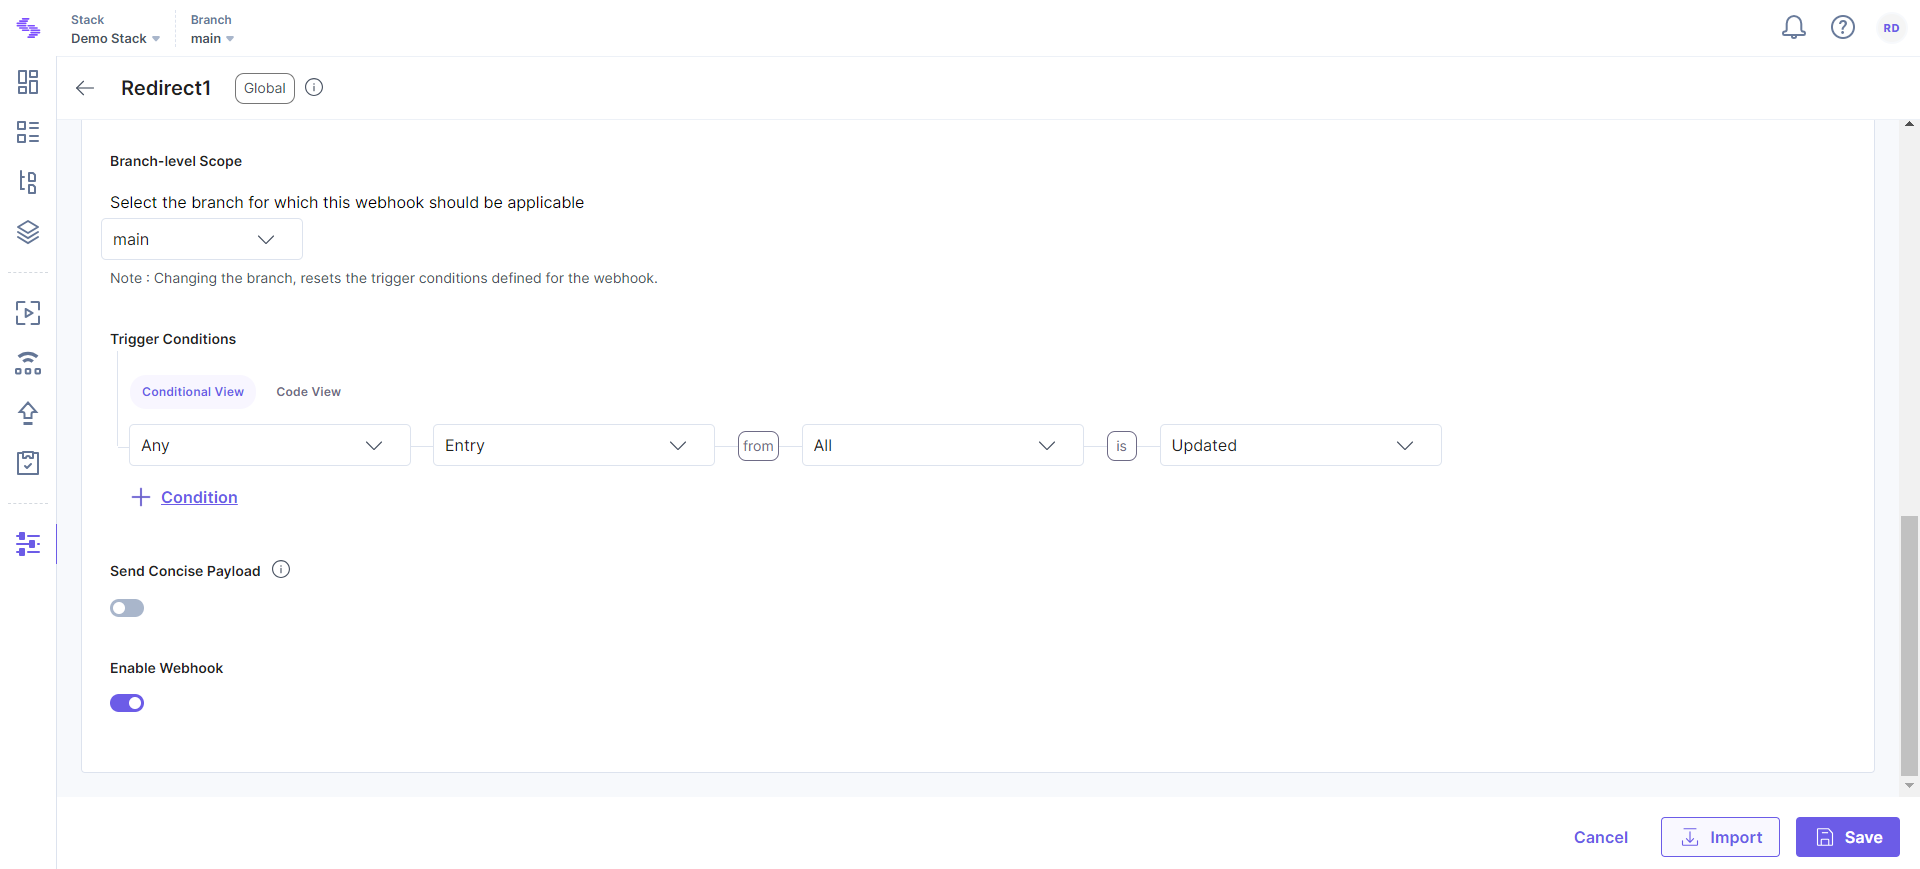
- Click on Save to save your Webhook settings.
Your webhook is now ready to invoke the Lambda Function when the URL field of any entry in any content type of that stack is updated.
Note: It is possible to limit the webhook to only content types needed - the example runs on all entries from all content types.
Try it Out
The entire set up is done and you are ready to try this out.
- Navigate to your entry and try changing the URL of an entry.
- Save your entry after changing the URL. Upon saving, the webhook triggers. It then invokes the Lambda Function through the APIs and creates a new entry in the Redirect Rules content type.
- Go to the Redirect Rules content type, you should see a new entry inside it.
- Open, the entry that was just created, you should see details of the old and new URL. And, in the group field named Entry, you will see the entry details.
Tip: To manage redirects from the application side, set up a middleware function to your application. It will make a specific call to find if the Redirect Rules content type has the current URL. If it finds an entry in Redirect Rules content type with the current URL, then you can redirect your current page to the ‘from’ URL of the entry.
Additional Resource: To know more about how to integrate Webhooks with AWS Lambda, refer our Webhook Integrations page for more details.
More articles
