Build Personalized Experiences
Take a deeper dive into building and hosting Personalized Experiences in Lytics.
Introduction
Overview
Note: On January 10, 2023, we upgraded our UI with a new, refreshed interface. All of the underlying functionality is the same, but you will notice that things look a little different from this Academy guide. The most notable change is that the navigation menu has moved from the top of the app to the left side. We appreciate your patience as we work on updating our Academy.
In this training, we will walk you through how to build out-of-the-box Modals (also known as Interstitials, pop-ups, slide-ins, or welcome ads) using the Experience Editor in Lytics.
We will cover:
- How to successfully build and host Experiences within Lytics
- Share best practices and nuances to consider when creating an Experience
- Introduce the other Experience types that are available in Lytics
- Social, ads, email
What is the difference between a Modal and a Personalize Experience? Nothing, in Lytics these two terms are interchangeable!
By the end of this training, you will have learned - What is an "Experience" in Lytics - How to build and host a basic Experience - What other Experiences are availableKey Terminology
Before you get started, here are some key terms that are useful to understand when creating Experiences in Lytics.
Key Terms:
- Experience: Marketing tactics that can be executed in different channels depending on the provider, allowing you to present tailored messaging to specific audiences.
- Personalize: Personalize is very similar to “Experiences”. Personalize enables you to host simple modals and interstitial campaigns. This tab is a legacy function which will eventually be deprecated in favor of “Experiences”.
- Goal: high-level objectives that measure marketing success, such as improving conversion rates, decreasing churn, and increasing customer lifetime value (LTV).
- Canvas: The UI view of Lytics Goals that allows users to manage Stages and Experiences all from one place.
For more information, see:
Which channel can you activate an Experience on?
A. Website
B. Social (Ex. Facebook)
C. Ads (Ex. Google Ads)
D. Email (Ex. Mailchimp)
E. All of the above
F. None of the above
Answer: E
Getting Started
What do I need to create a Personalize Experience?
Here are some questions you might want to ask yourself prior to setting up an Experience:
- What is the goal of this experience?
- Drive Traffic
- Capture Leads
- Present a Message
- Recommend Content
- Do I have all the necessary creative to set up my campaign? For example: Custom CSS, images, etc.
- What audience is this campaign targeting? Does it already exist in Lytics? If not, we recommend first creating your target audiences in Lytics.
- Is my "URL allow list for Orchestrate" up to date? For directions on how to set this up, check out our FAQ.
During this training, we will only cover Lytics out-of-the-box functionality. Here is how you get started creating a Personalize Experience in the UI:
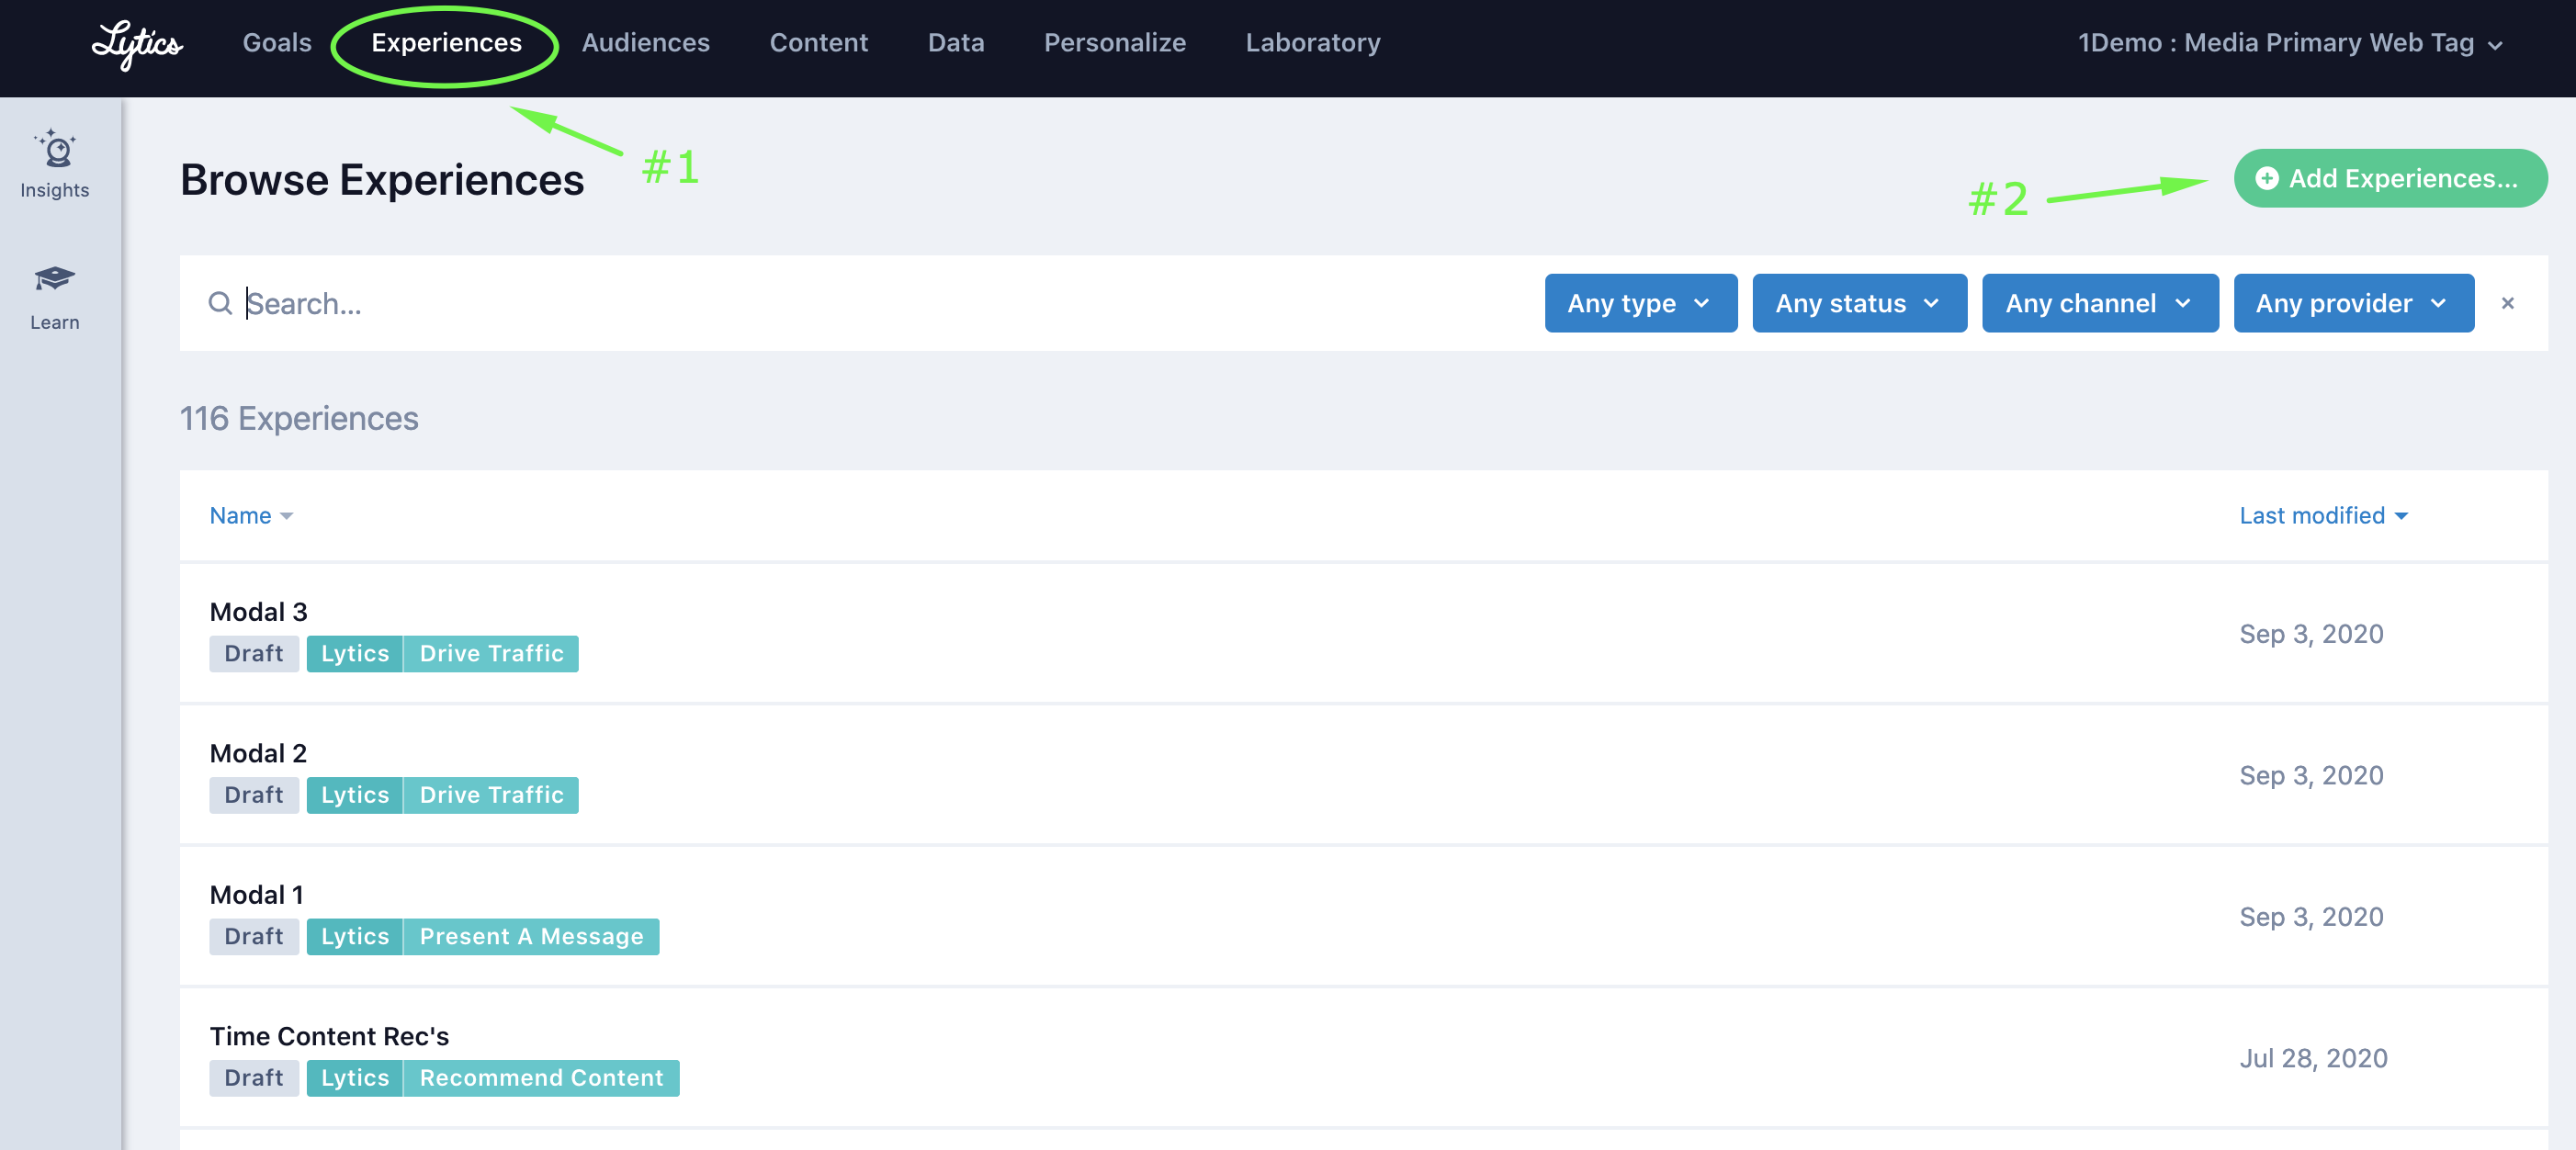
Once you click "Add Experience" you would have the option to either import an existing experience or create a new experience. During today's training, we will choose "New" to create a new experience.
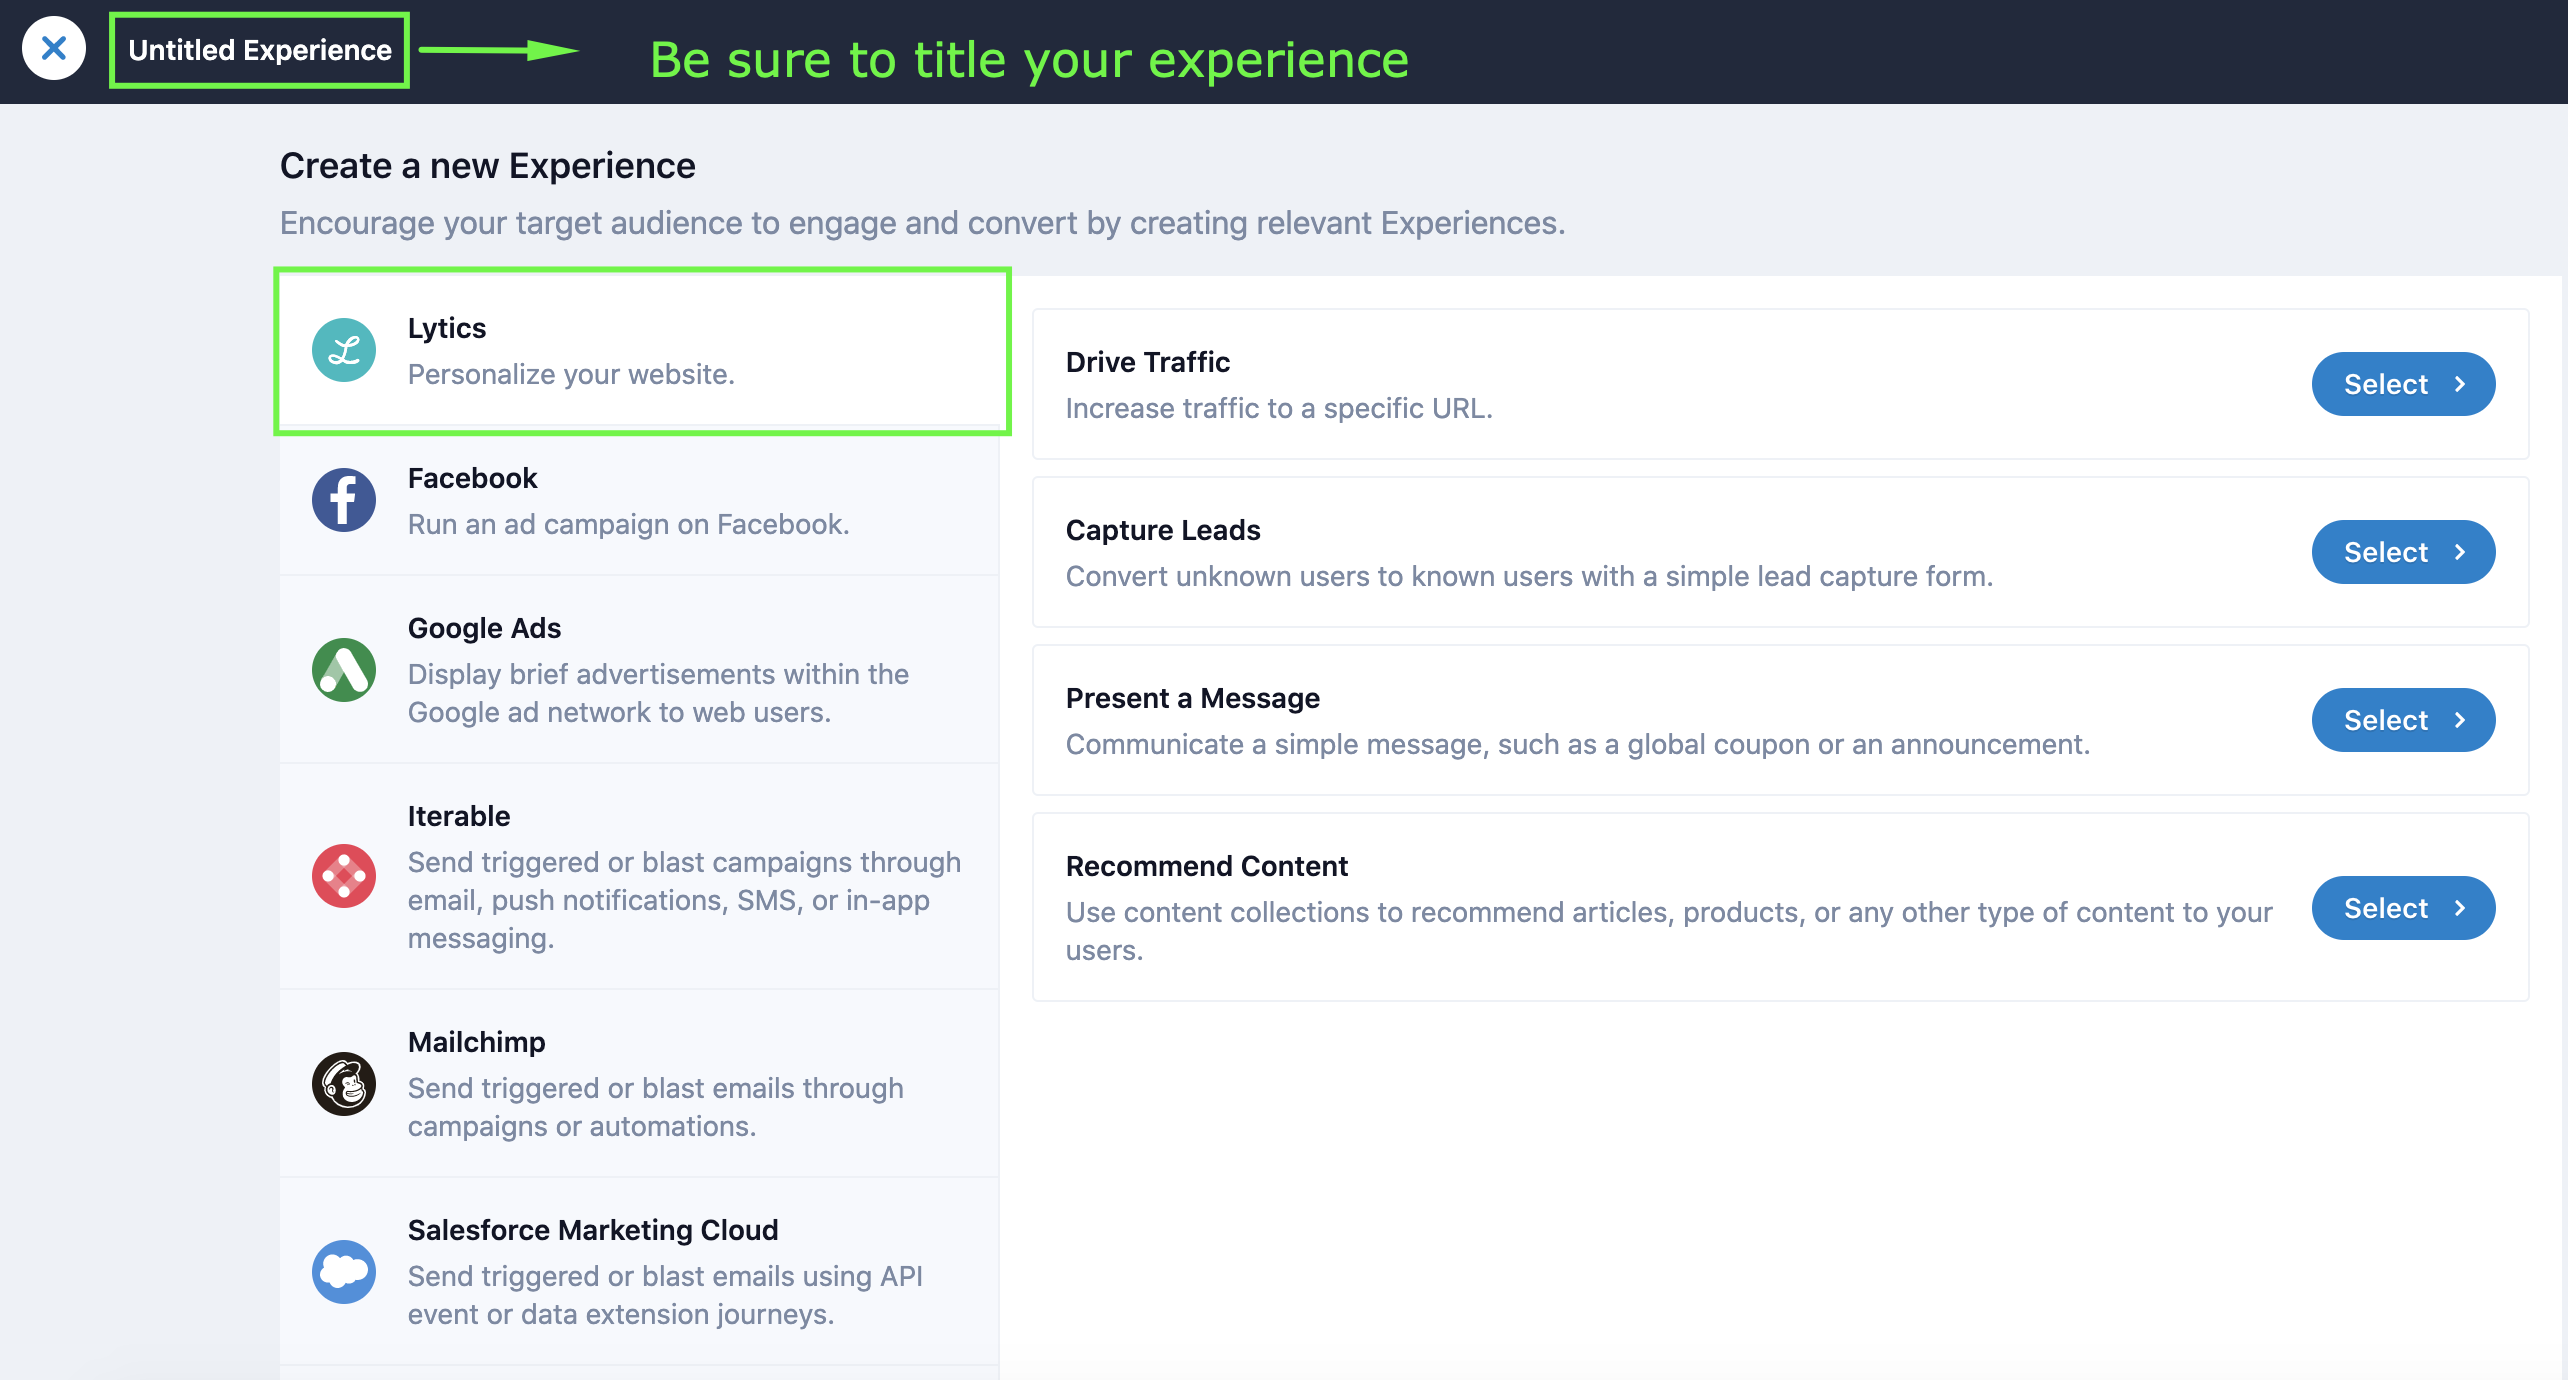
Next we will build out a Personalize Experience for "Present a message."
Design
Video Tutorial
If you're interested in watching this process in real time, see the step-by-step video tutorial titled "Build Personalized Experiences" (~6.5 mins).
If video learning is not your style, feel free to skip and continue reading on. Each step in the video is covered in more detail in the following sections, including best practices and key takeaways to help you successfully deliver Personalized Experiences using Lytics.
Designing an Experience
Designing a Campaign
Here we'll review the out-of-the-box design functionality that Lytics provides.
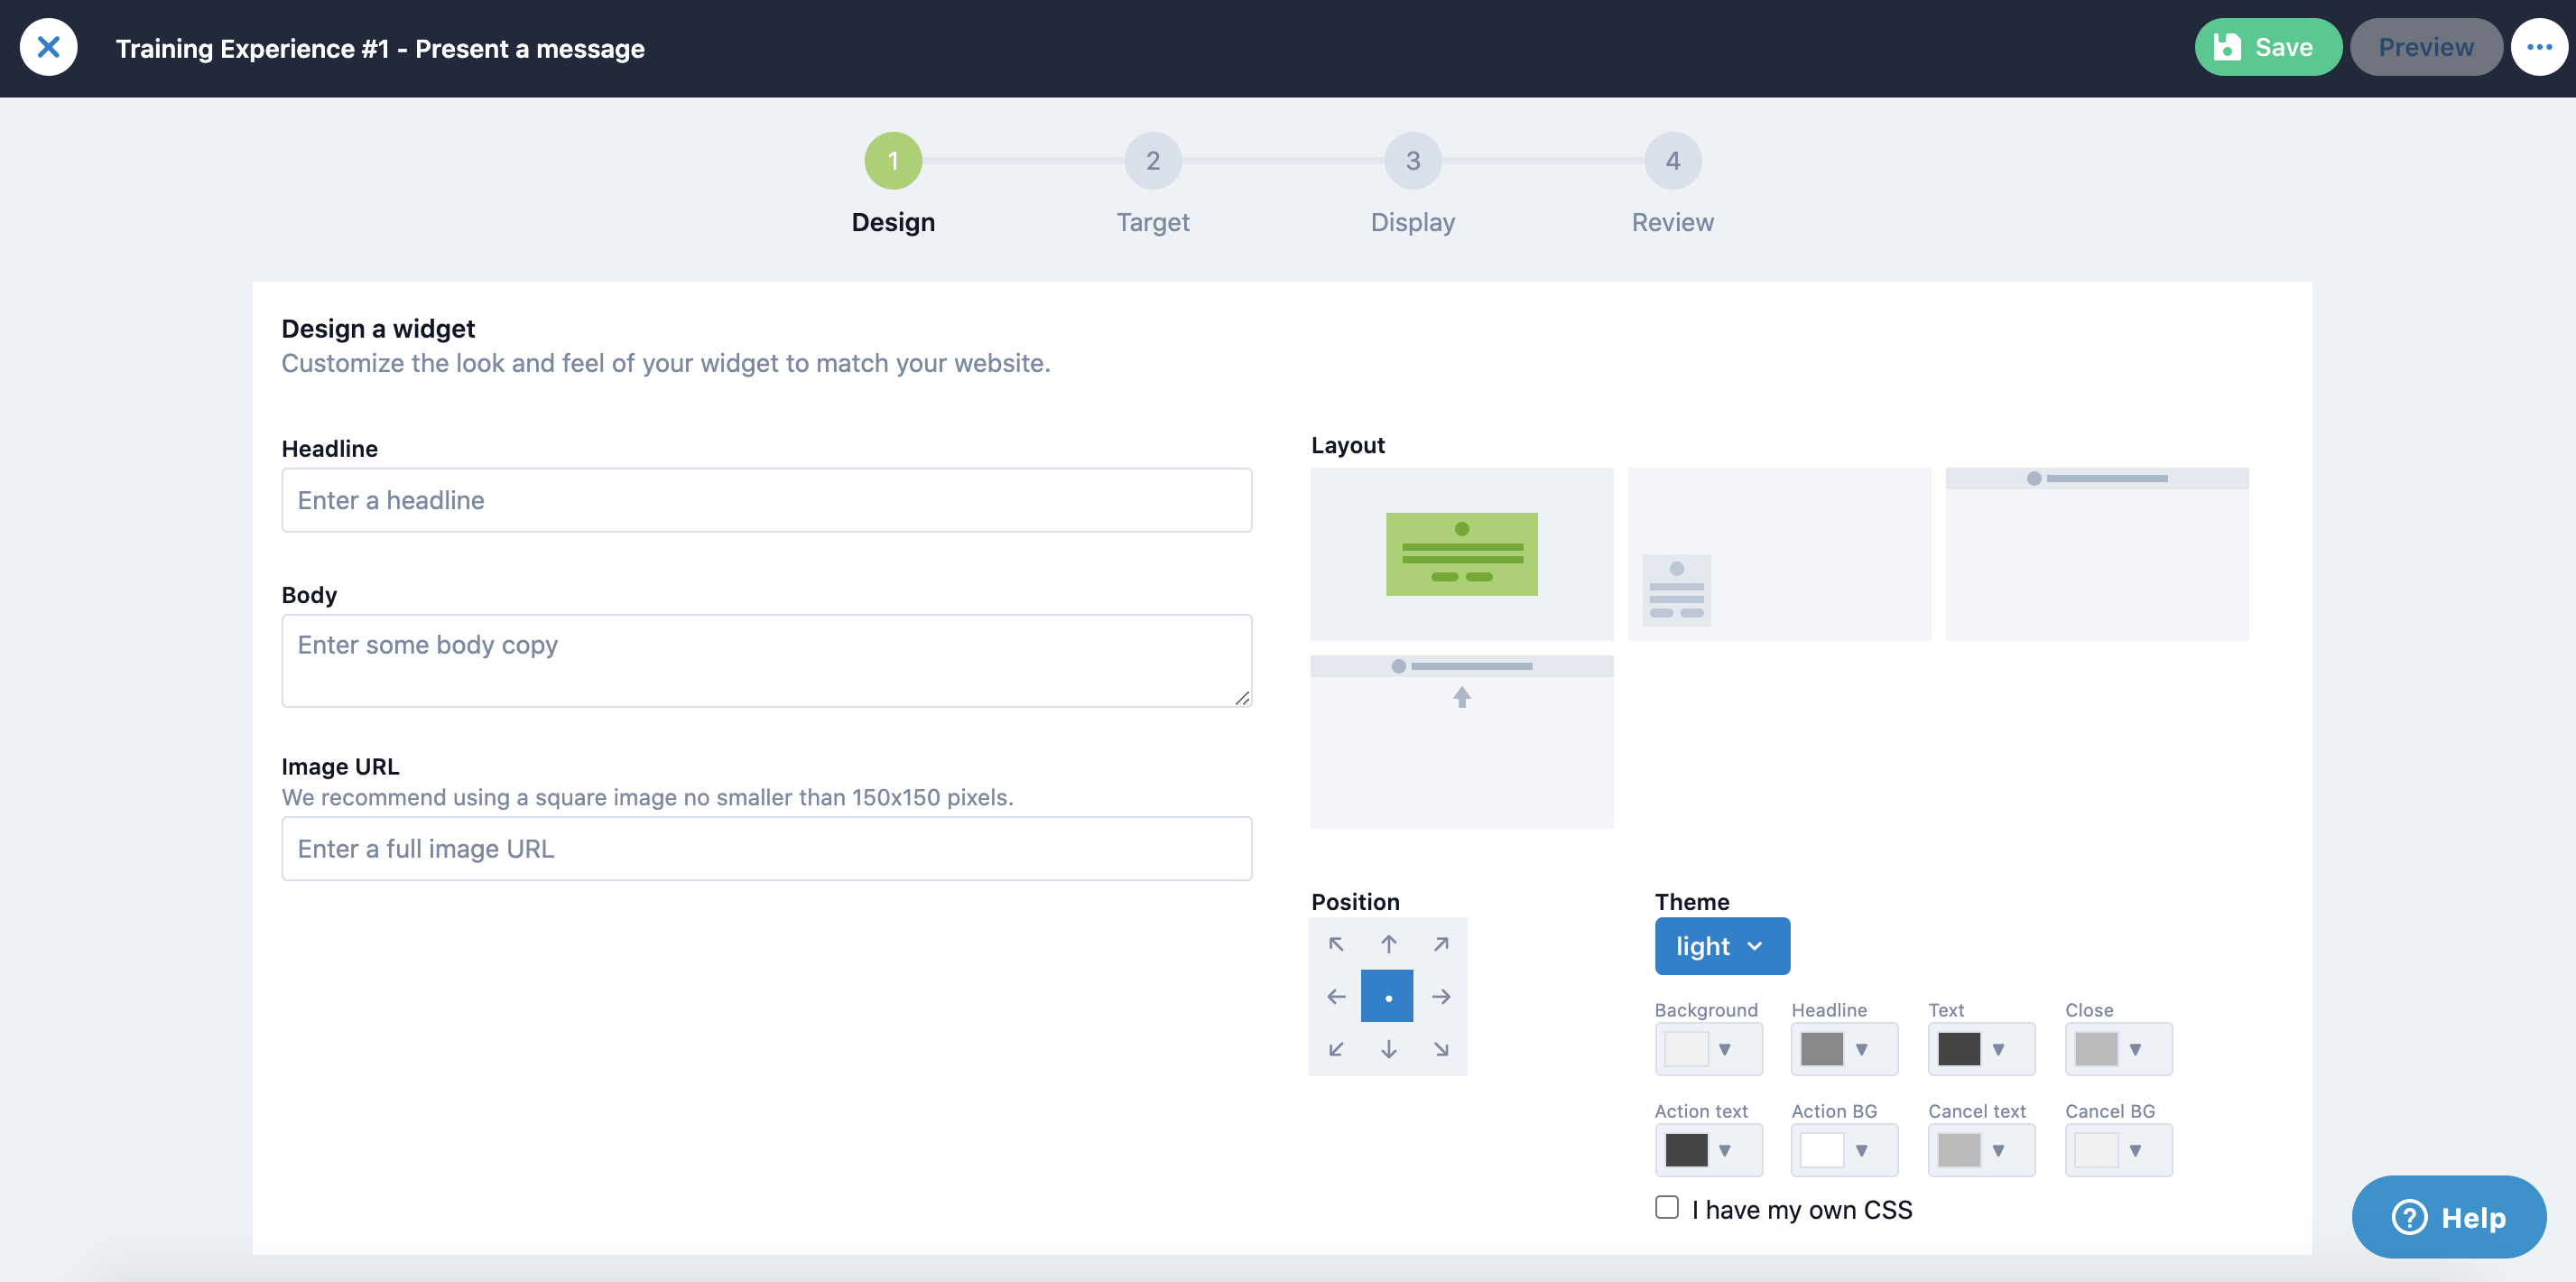
First add the Headline & Body of your experience. You also have the option to add an image URL (no smaller than 150 X 150 pixels).
Next choose your Layout from the follow options:
- Modal: A full screen takeover experience that can be closed by clicking outside the modal, clicking the close button of the modal, or taking the intended call to action.
- Slideout: A small widget that occupies a corner of the screen. It does not interrupt the user's current task.
- Bar: A short widget that takes the full width of the screen and sits at the top of the page.
- Sticky-bar: A bar that scrolls with the page.
Once you choose your layout, choose the positioning of your experience. It's worth noting that Lytics campaigns can show up in various positions on a web page depending on the layout of the widget. The allowed positions will always show up as a dark gray color while the unallowed positions will be light gray. The active position is blue.
To learn more about Campaign types & Compatibility check out our Compatibility Matrix.
Campaign Theme
There are three ways to theme a campaign:
- Choose a theme: Lytics provides a Light and Dark theme out of the box.
- Build a custom theme: There are eight color options (described below) available to build a theme in the campaign editor.
- Use Custom CSS: By using your own custom CSS, Lytics provides no theme information, relying on CSS to style all campaign widget elements. *CSS must be hosted by customer*
Custom Theme Color Options
- Background: The color of the background color of the widget.
- Headline: The text color of the headline message.
- Body Text: The text color of the body text.
- Close Button: The color of the '×' shape used as a close button.
- Submit Button Text: The color of the text in the call-to-action (or submit) button.
- Submit Button: The background color of the call-to-action (or submit) button.
- Cancel Button Text: The color of the text in the cancel (or dismiss) button.
- Cancel Button: The background color of the cancel (or dismiss) button.
To learn more about all of the custom theming options Lytics has available check out our Pathfora SDK Custom CSS doc.
If you use your own Custom CSS: We recommend adding all custom CSS files to one global style sheet as Lytics will not support numerous independent CSS files. The workaround here in ensuring all CSS files reside in the same style sheet.
When using custom CSS for Lytics Experiences, the style sheet must be hosted by the customer.
A. True
B. False
Answer: A
Once all of the design elements are complete you can click "Next step". In the next section we will decide which audience this campaign is going to target.
Target
Select An Audience to Target
Target
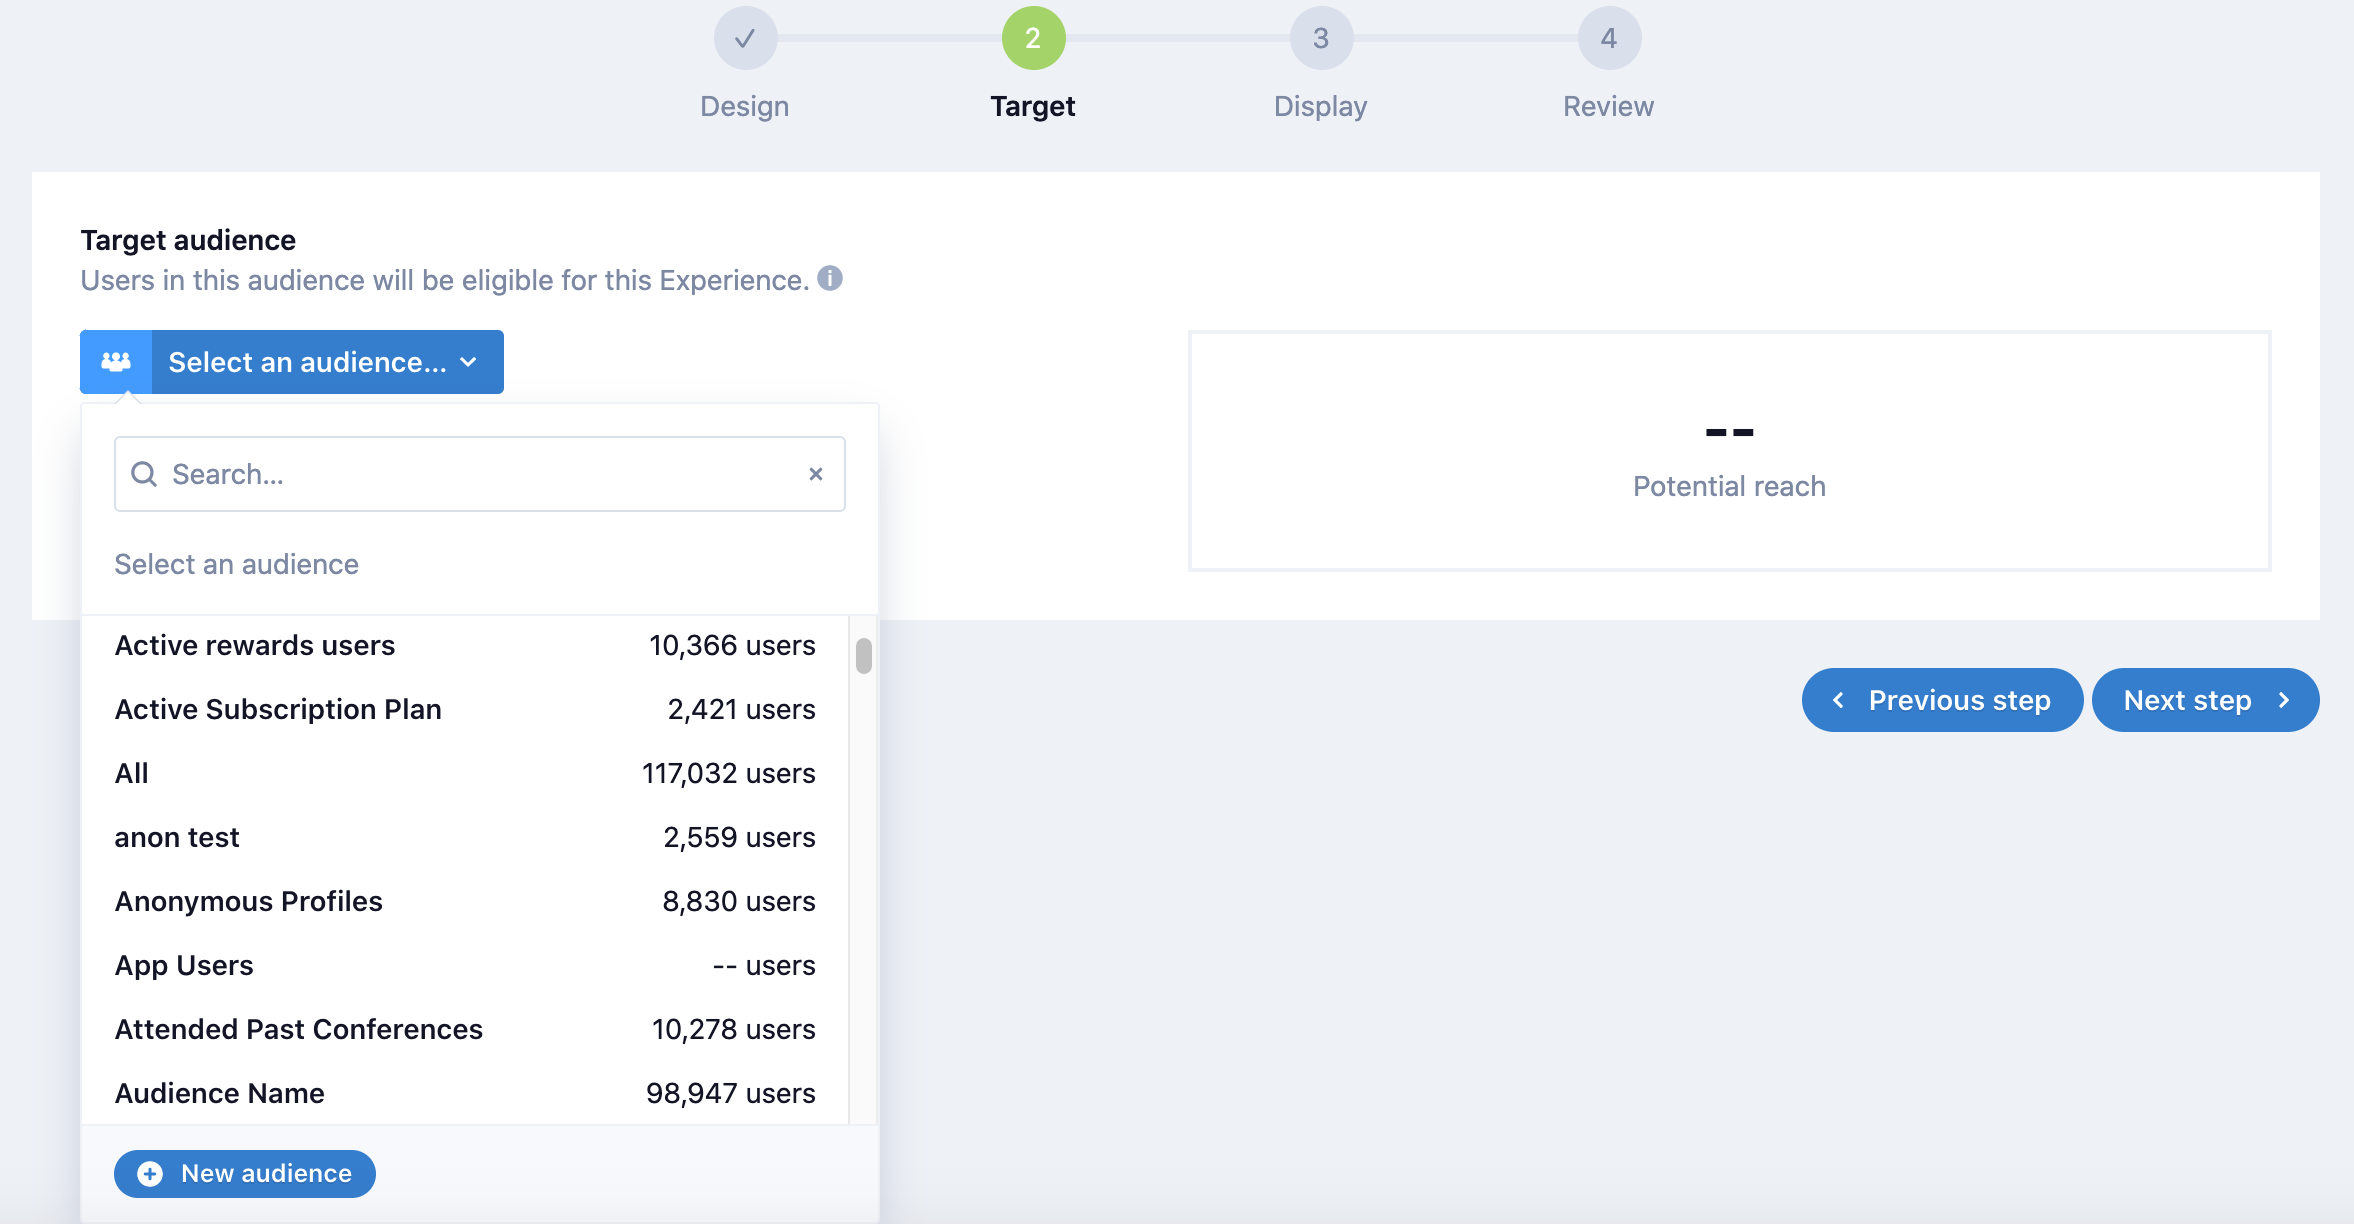
Choose the audience you'd like to target with this experience or if the audience doesn't exist click "New audience."
Additional Considerations
Lytics encourages users to add additional data-driven elements into the targeting strategy. Here's one example:
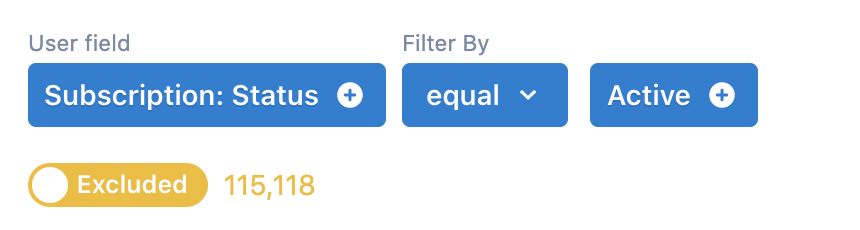
Let's say you're presenting a message to offer a 20% discount code to users who aren't currently a paid subscriber. First you want to make sure you exclude any active subscribers in your audience.
Now that you've ensured a good user experience by excluding all active subscribers, we recommend layering in Lytics out-of-the-box behavioral audiences to help improve targeting. In this instance adding "Frequent Users" is a good option.
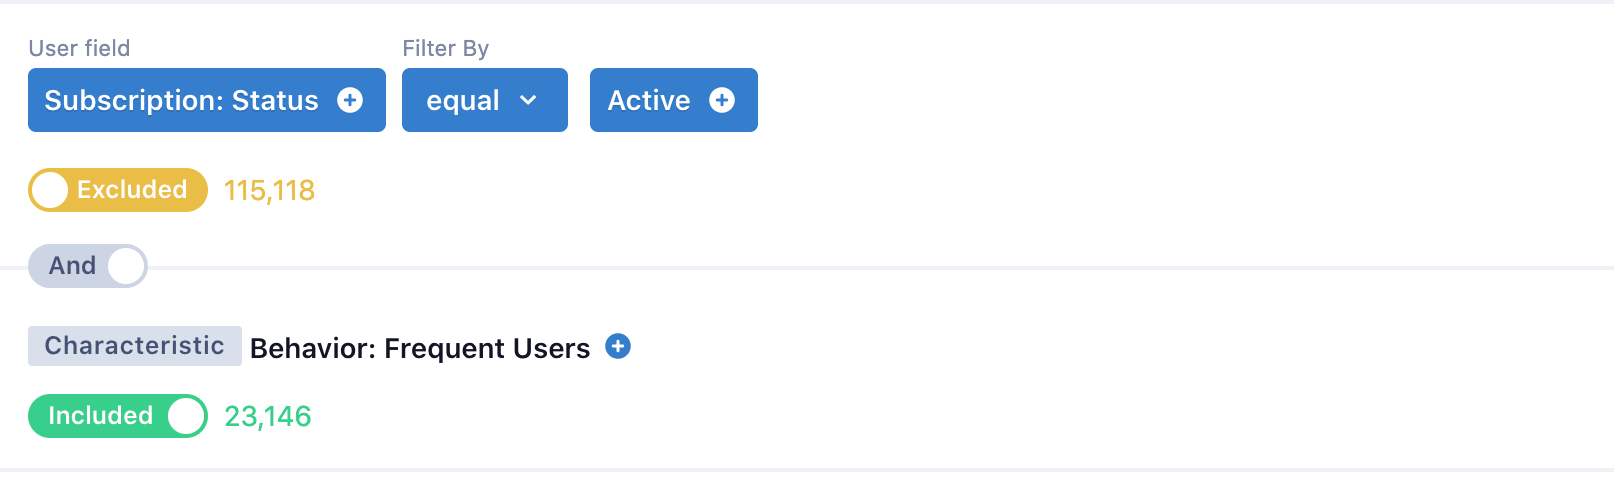
If you're curious what variables go in our behavioral audiences, check out our Out-of-the-box Behavioral Audiences docs.
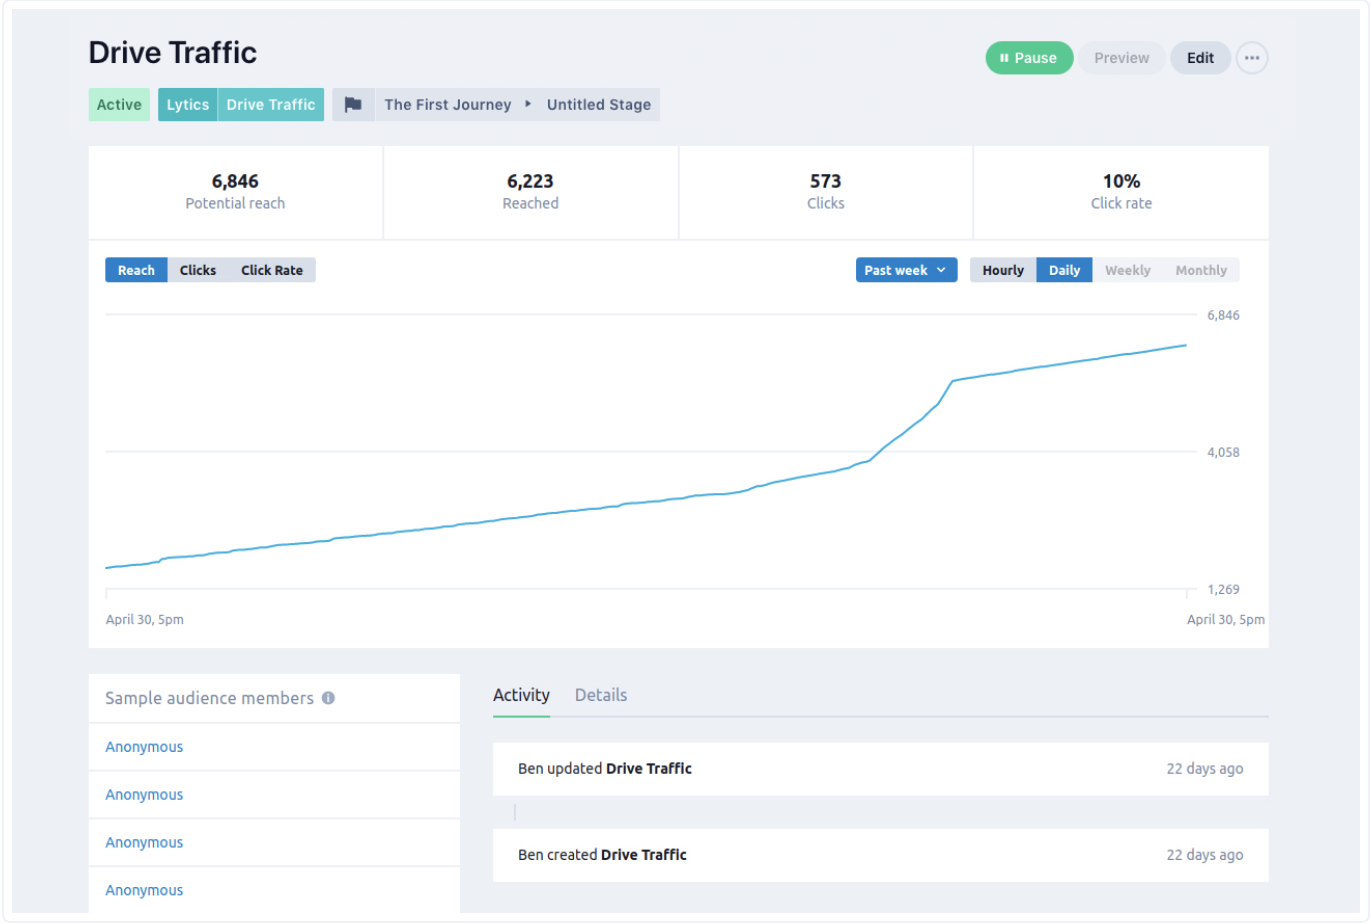
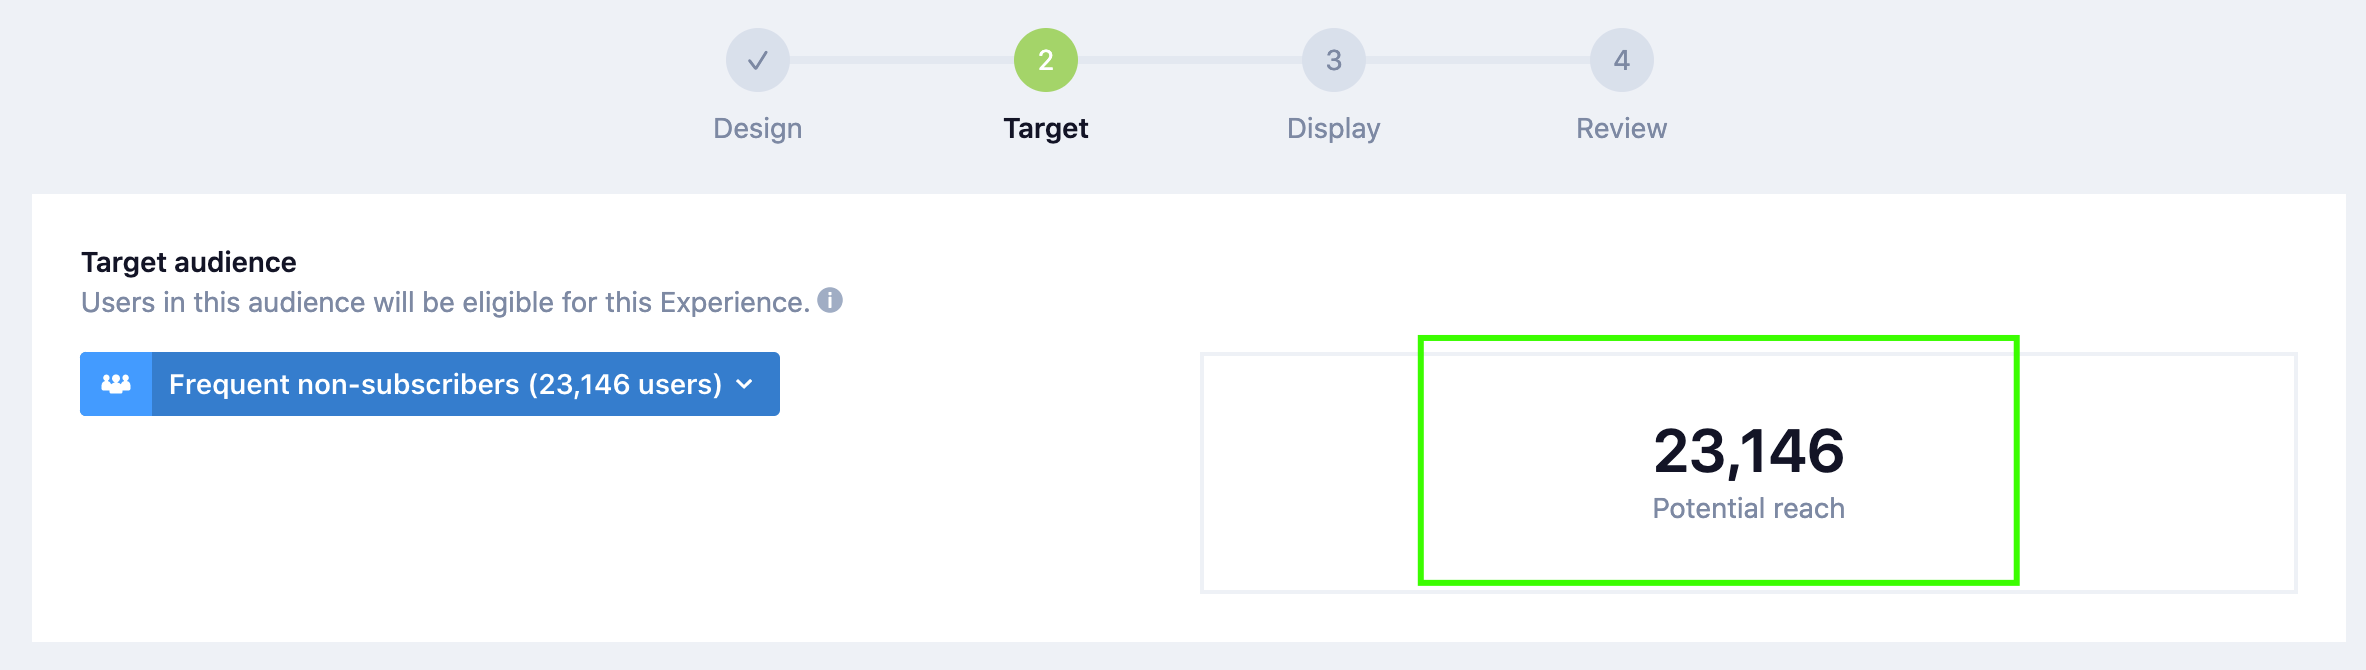
Now that you have a hyper-targeted audience of "Frequent non-subscribers" to activate against you can see your potential campaign reach (outlined with a green box).
Next, let's set up display options!
Display
Set up Display Rules
With our basic display options, you will decide which URL's you would like to either show or hide your experience on and how long you would like it to run. If is an evergreen campaign, you can leave the end date blank and it will run indefinitely.
If you'd like to add additional display settings, check out our "Advanced Display Options"
In the advanced display options you can add additional customization to your experience, such as: Display Trigger and Display Frequency:
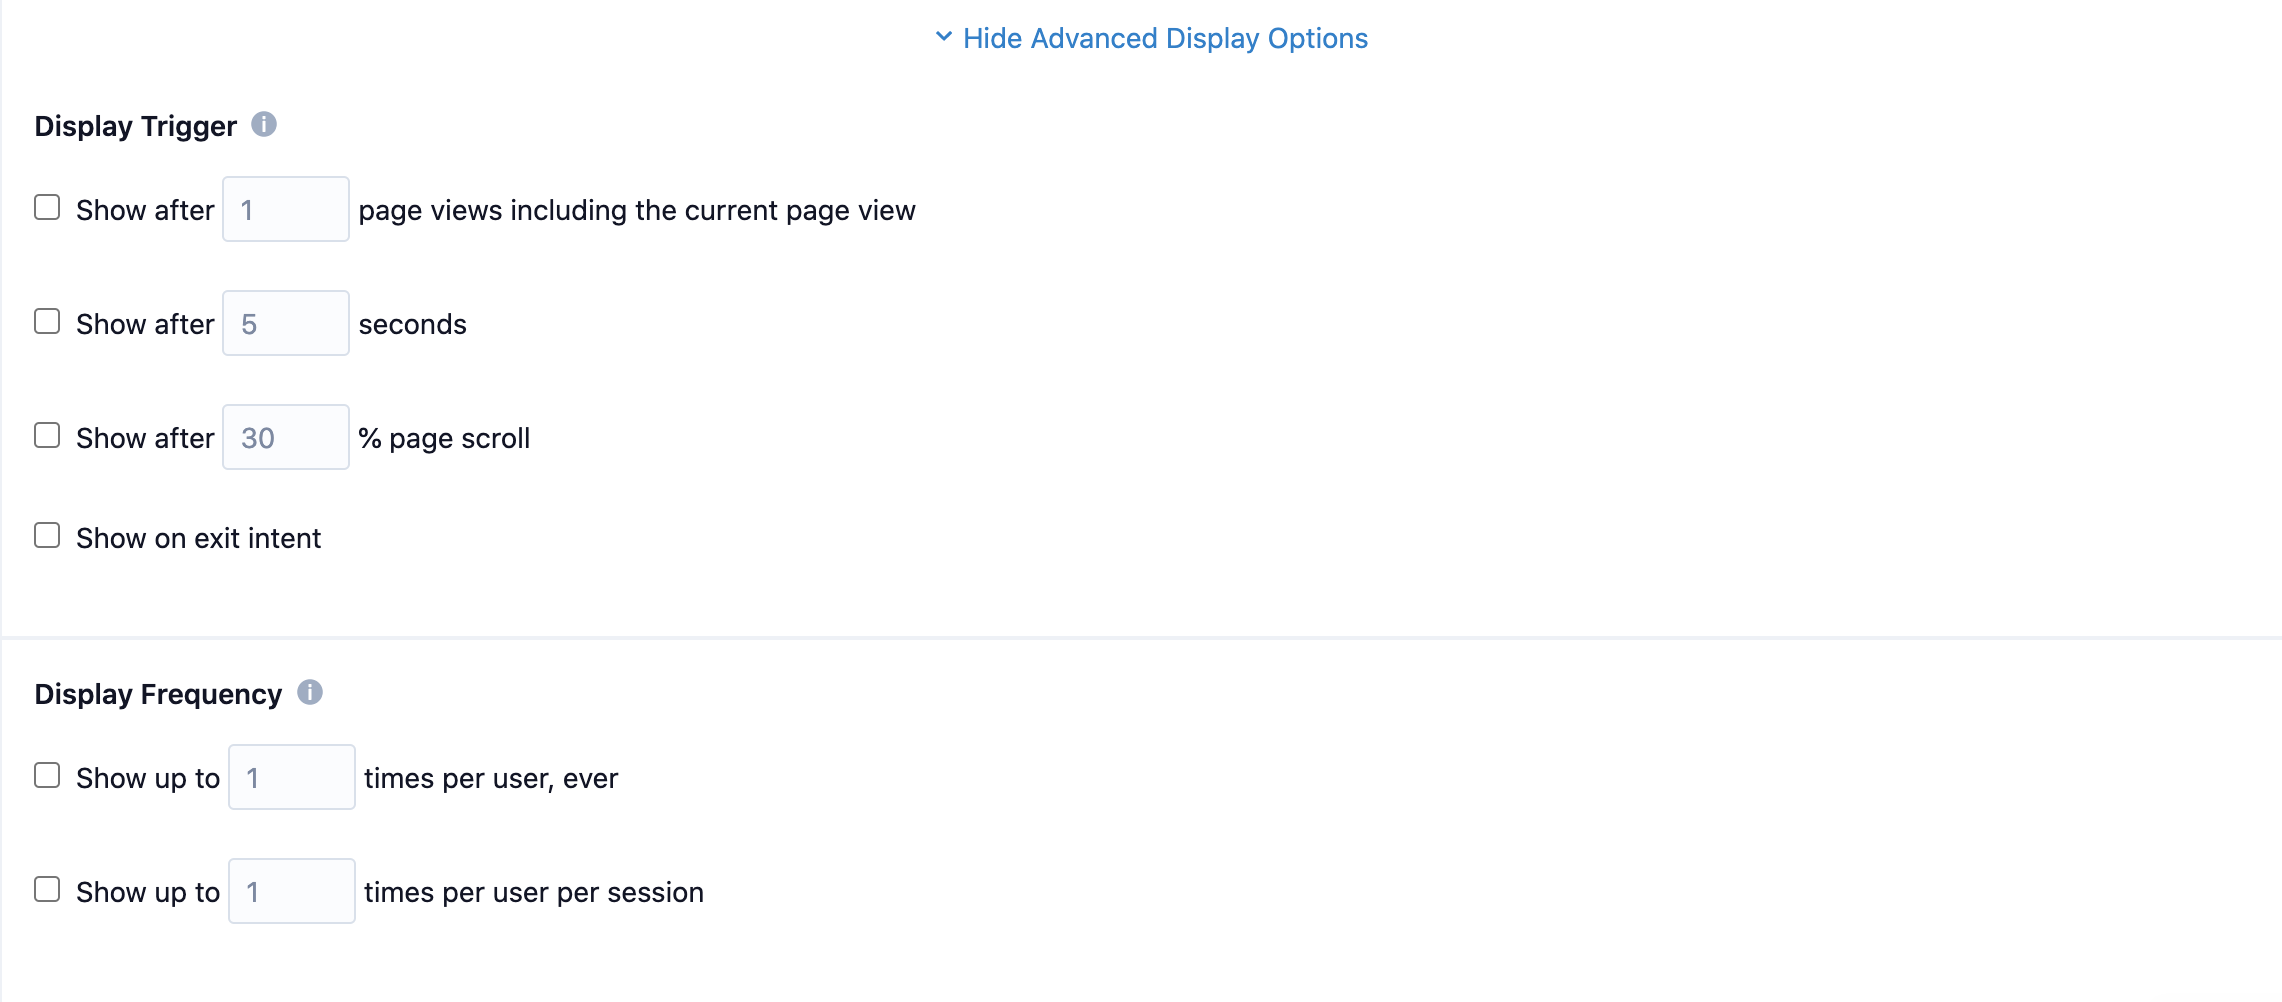
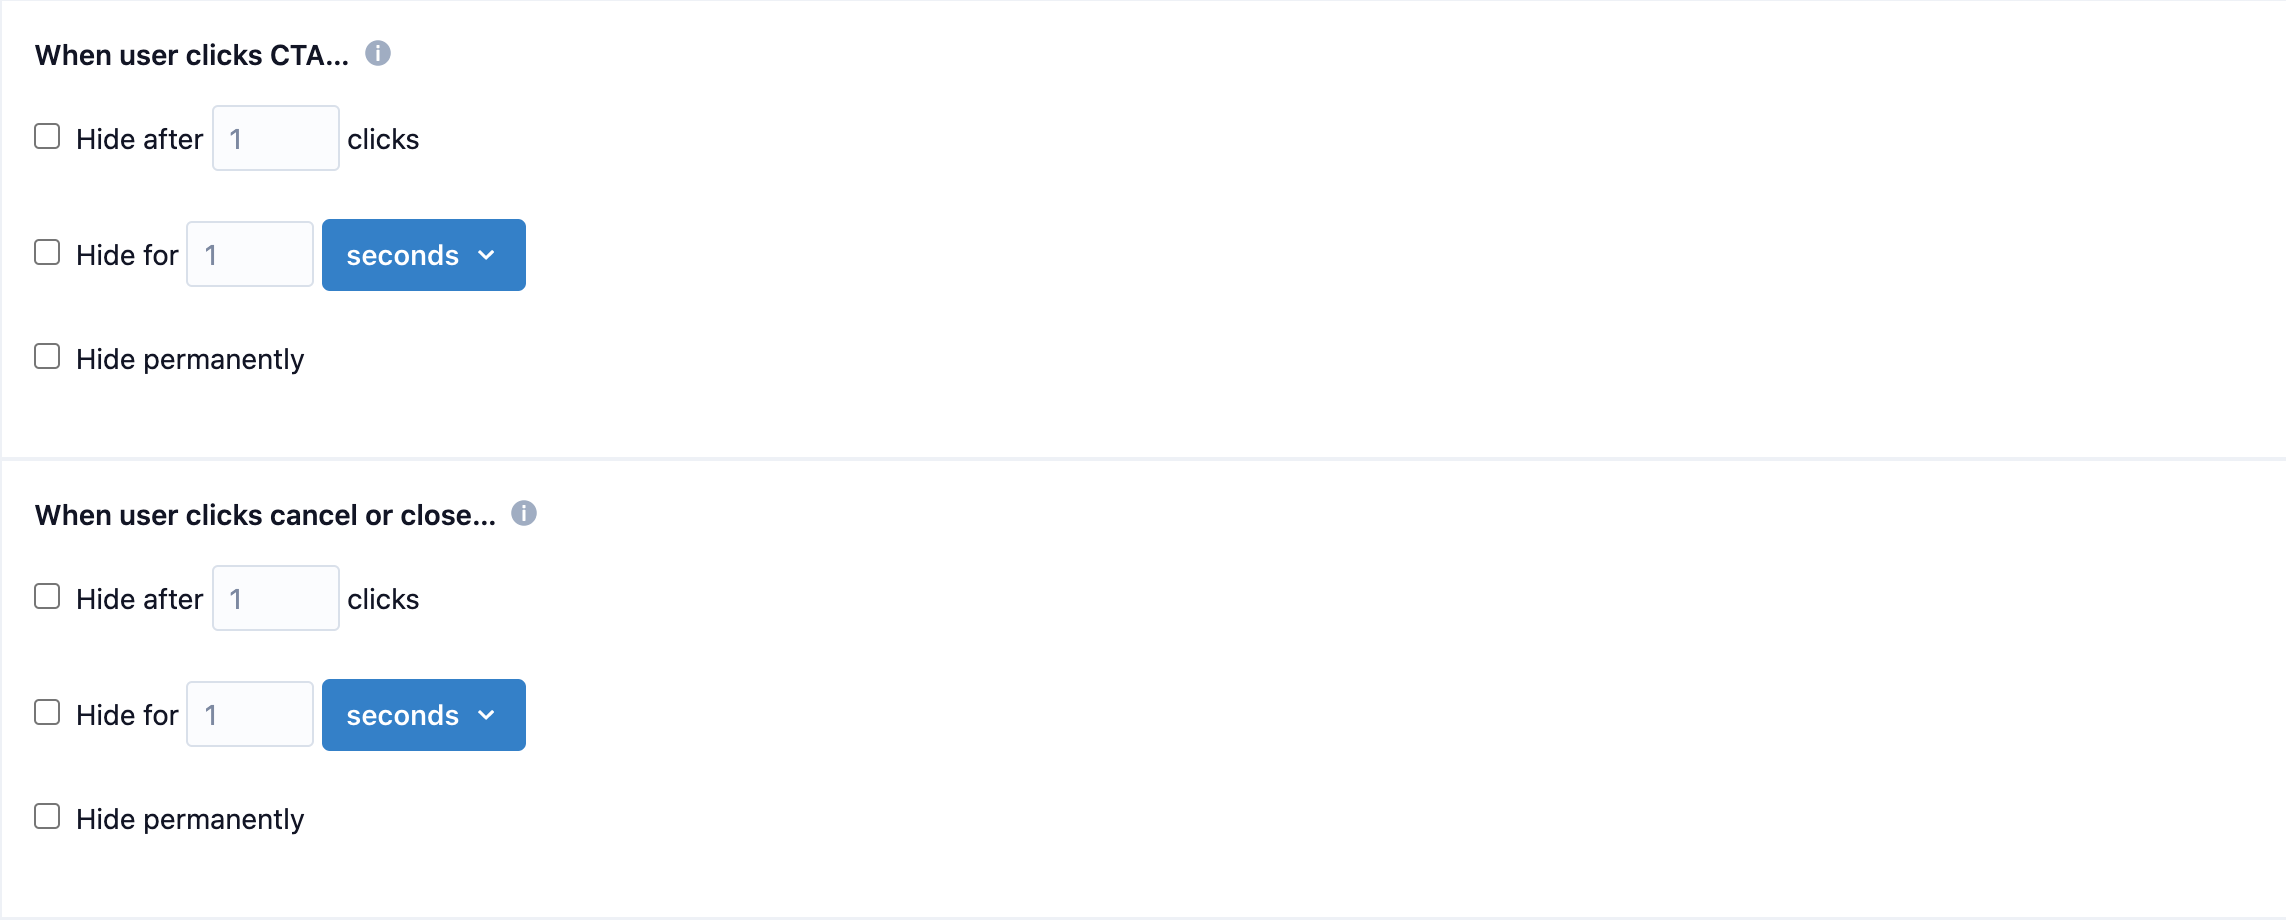
You can also set what happens when a user clicks the call to action or cancel/close
We recommend leveraging the advanced display options to create a more pleasant user experience! A couple display options that we've seen success with are:
- "Show after % of page scroll"
- "Show after X page views"
This way, you are certain the user has shown intent and is ready for the experience!
Now that the experience is complete, it's time to review and preview the campaign.
Review
Preview
In the final step you can confirm everything is set up correctly for your experience and preview it on site:
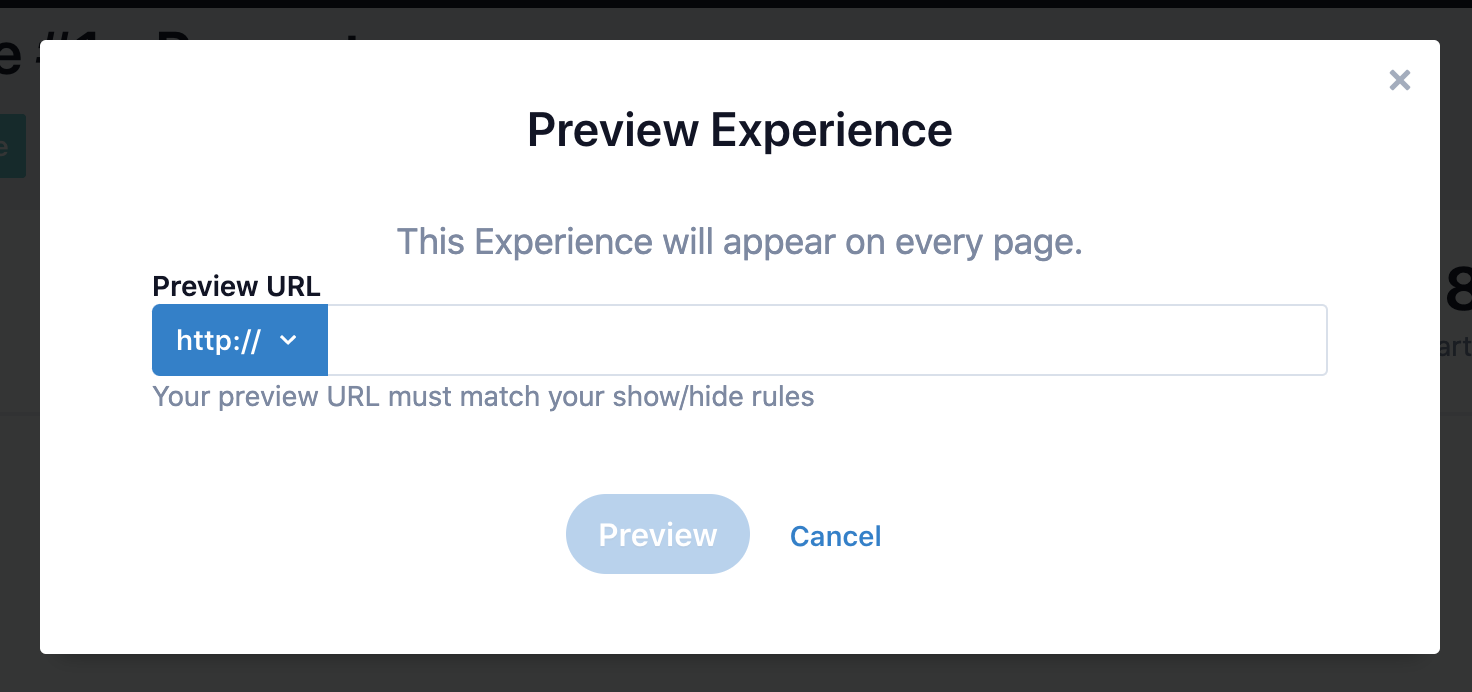
If you're running into trouble previewing your experience, here are a few "gotchas" that are worth noting:
- Check that the Lytics JavaScript tag installed on that page of your website. Lytics experiences require the JavaScript tag to be installed.
- Check your display conditions. You may have a display trigger that is preventing the campaign from being shown right away. Try scrolling down the page, or refreshing the preview page to the appropriate number if you are using one of these display conditions.
- If the preview was working previously and is no longer showing, check if you have any of the "Display Frequency", "When the user clicks CTA...", or "When user clicks cancel or close..." options enabled. If so, try clearing any items in your cookies and session storage that are prefixed with "Pathfora".
Best Practice: Testing Process - We encourage users to implement a repeatable process when previewing/testing campaigns that can be adopted across all Lytics users. This helps eliminate confusion and is considered a best practice when leveraging a CDP.
Which of the following are required to have Lytics Experiences display on your website? Select all that apply.
A. Lytics JavaScript tag is installed
B. Display URL is included in your URL Allowlist account settings
C. Advanced Display Options are configured
Answer: A, B (Advanced Display Options are not required, but recommended to create a better user experience)
Now that we've reviewed and previewed the campaign, it's ready to go live!
In this next section, we will share a high level overview of the additional experiences we have available in Lytics.
Third-Party Experience Providers
Now that you know how to create a Personalized Experience, you can start leveraging the additional channels we have available in Lytics!
We're continuing to build out our integrations to support more third-party tools for Experiences. As of right now, here is a list of the supported experience providers available in Lytics:
To learn more, check out Experiences: Providers & Tactics
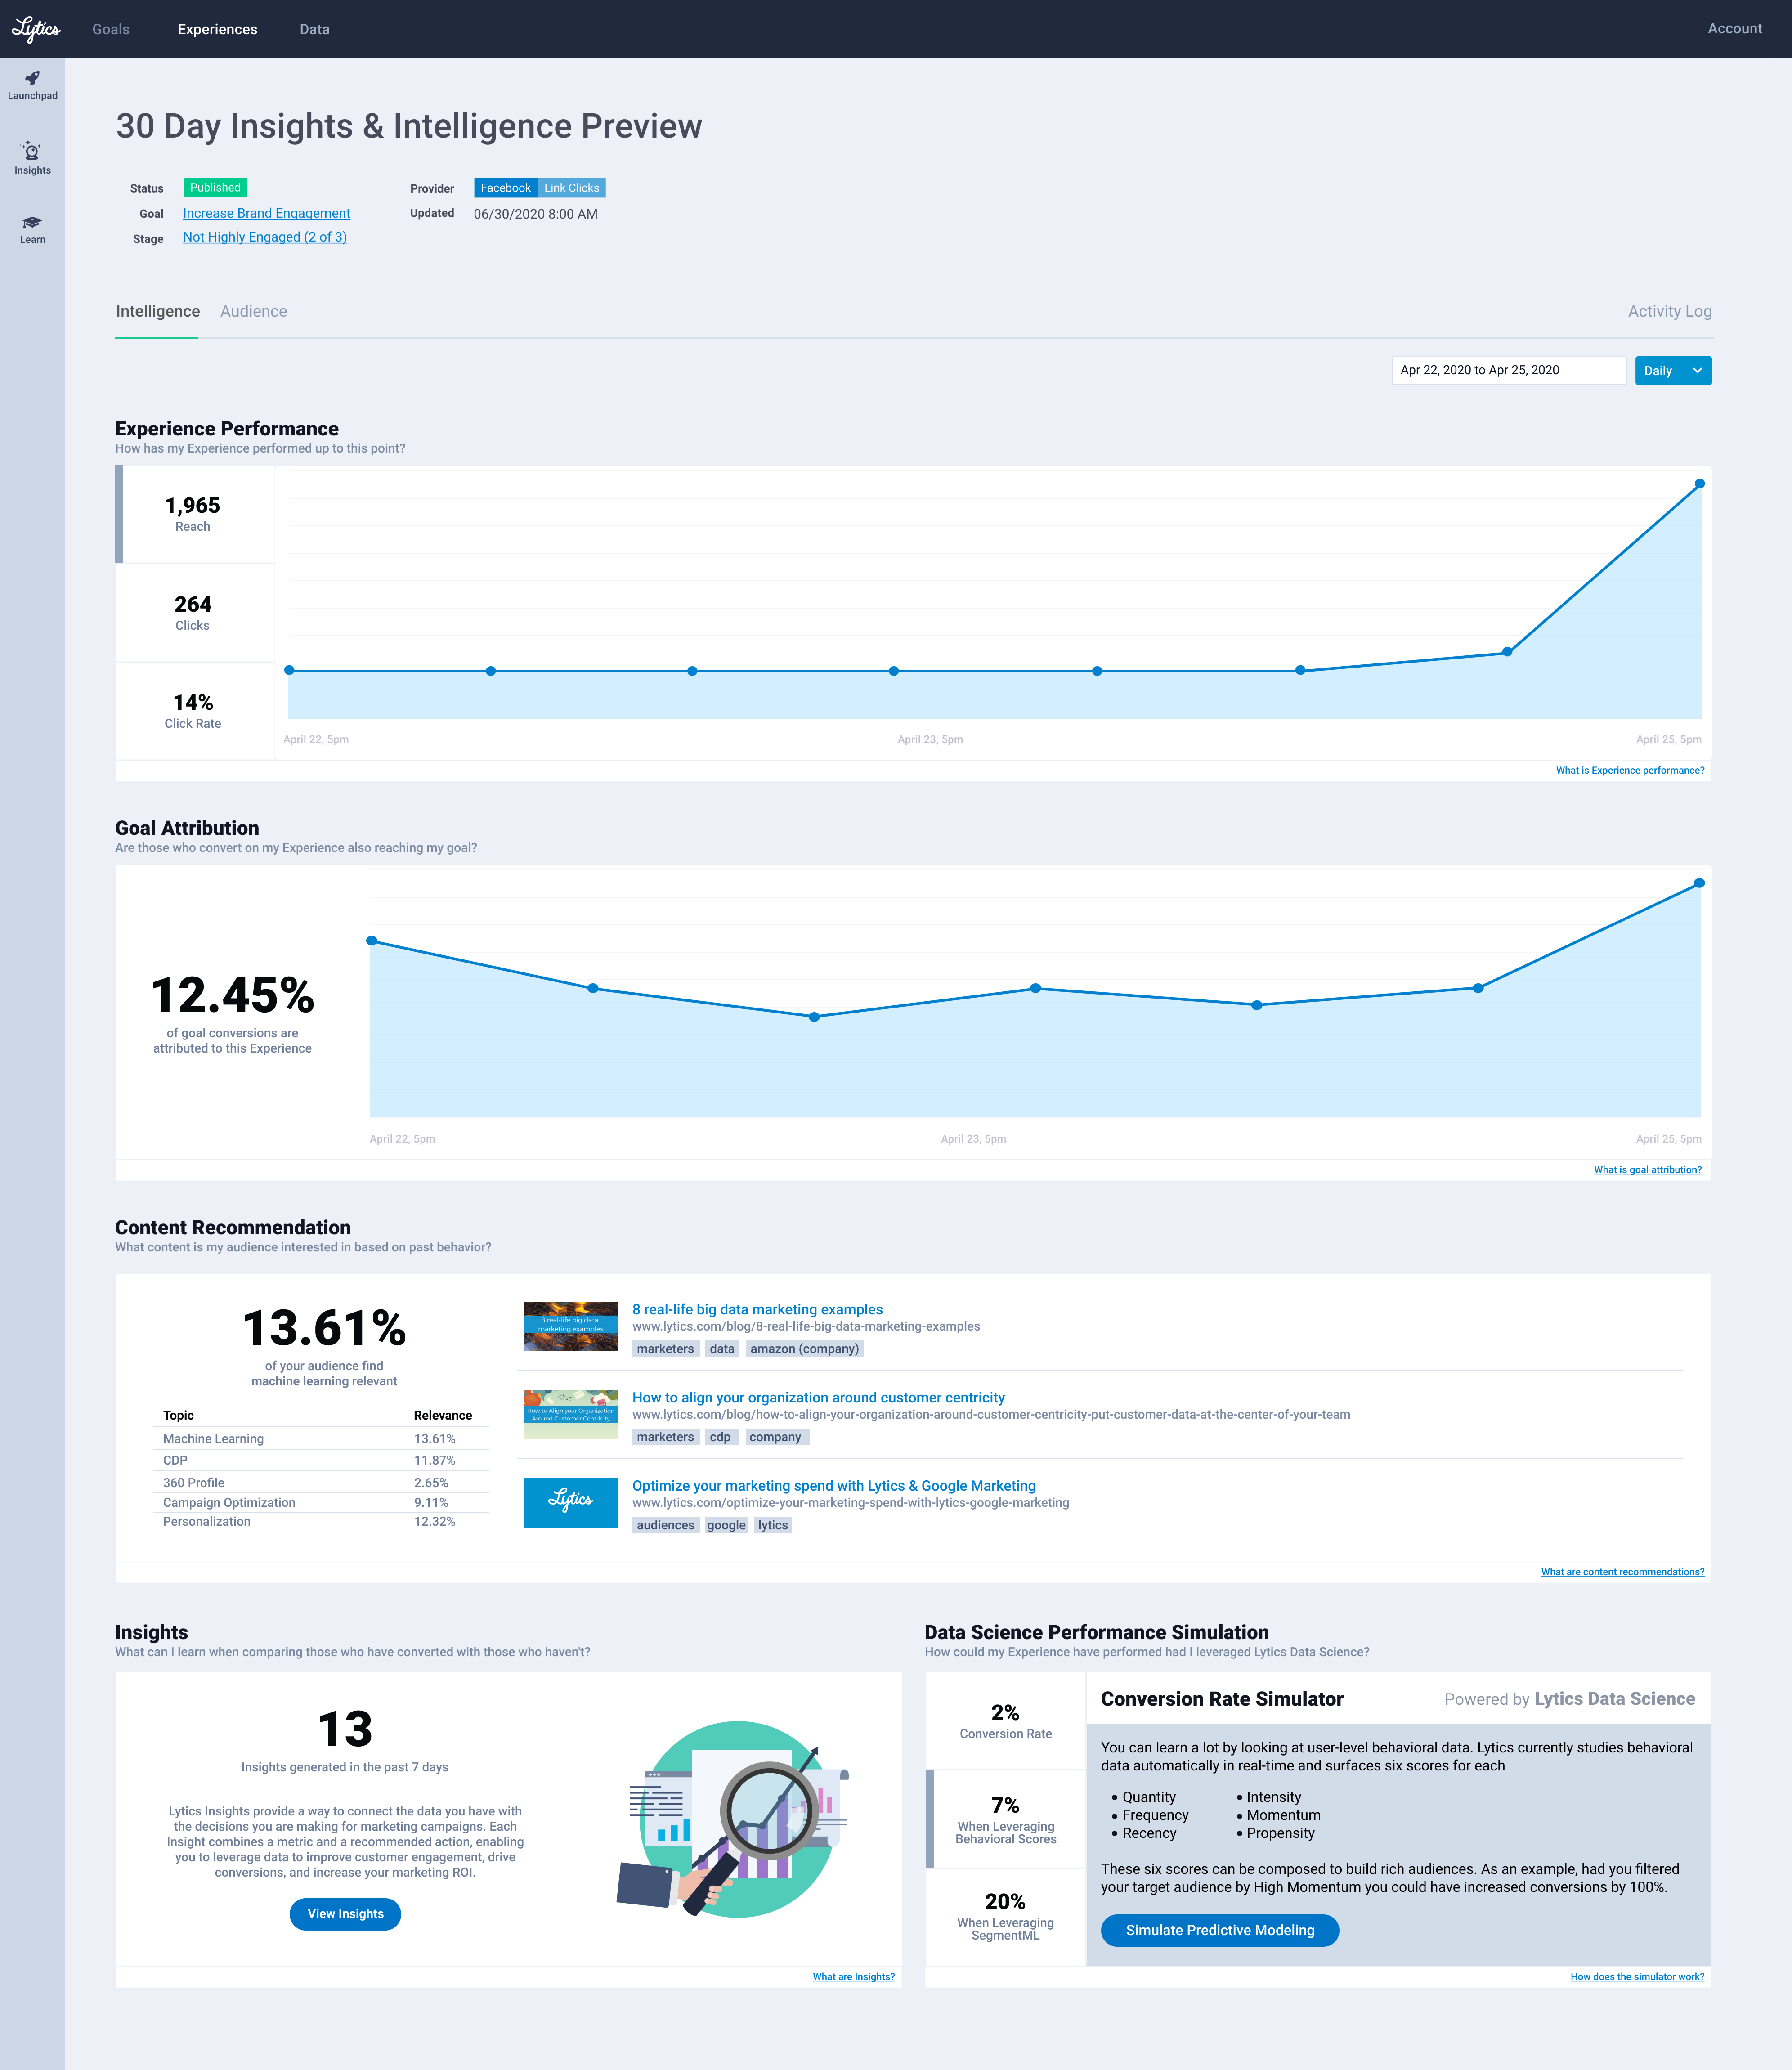
We also have additional intelligence around experience performance. We will dig into this in our guide on the Goal Canvas. But for now, here is a high level overview of what you can expect: Experience Intelligence.
Recap
More Resources
Recommended Resources
See our Experiences documentation for more information.
Ready to dive deeper and customize your Lytics Experiences? Check out our use case documentation.