

.svg?format=pjpg&auto=webp)
.svg?format=pjpg&auto=webp)
.png?format=pjpg&auto=webp)


.png?format=pjpg&auto=webp)
SAP Commerce Cloud App Installation Guide
SAP Commerce Cloud is one of the most flexible and efficient eCommerce project development platforms, specifically for B2B businesses and retailers. Using SAP Commerce Cloud, businesses can adapt to various demands and reduce their dependency on different application modules. It allows you to set up an online store to sell your products.
With the Contentstack Marketplace SAP Commerce Cloud app, you can use and refer to the products and categories from your SAP Commerce Cloud account within your Contentstack entries.
Prerequisites
- SAP Commerce Cloud account
- Contentstack account
- Access to the Contentstack Organization/Stack as the Owner/Admin
This step-by-step guide explains how to install and configure SAP Commerce Cloud within your stack.
Steps for Execution
- Retrieve Configuration Details for SAP Commerce Cloud
- Install and Configure SAP Commerce Cloud in Contentstack Marketplace
- Use SAP Commerce Cloud within your Stack
-
Retrieve Configuration Details for SAP Commerce Cloud
To get your configuration details for SAP Commerce Cloud, follow the steps given below:
- Log in to the SAP Cloud Portal using your SAP Commerce Cloud account credentials.
- Click Environments in the left panel, and then click the environment for which you must retrieve the configuration details.
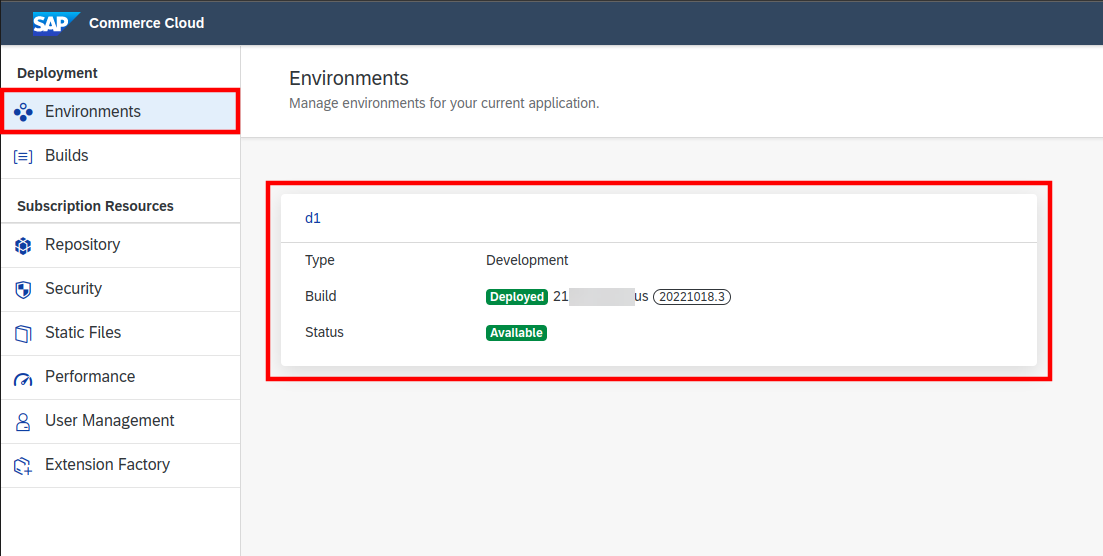
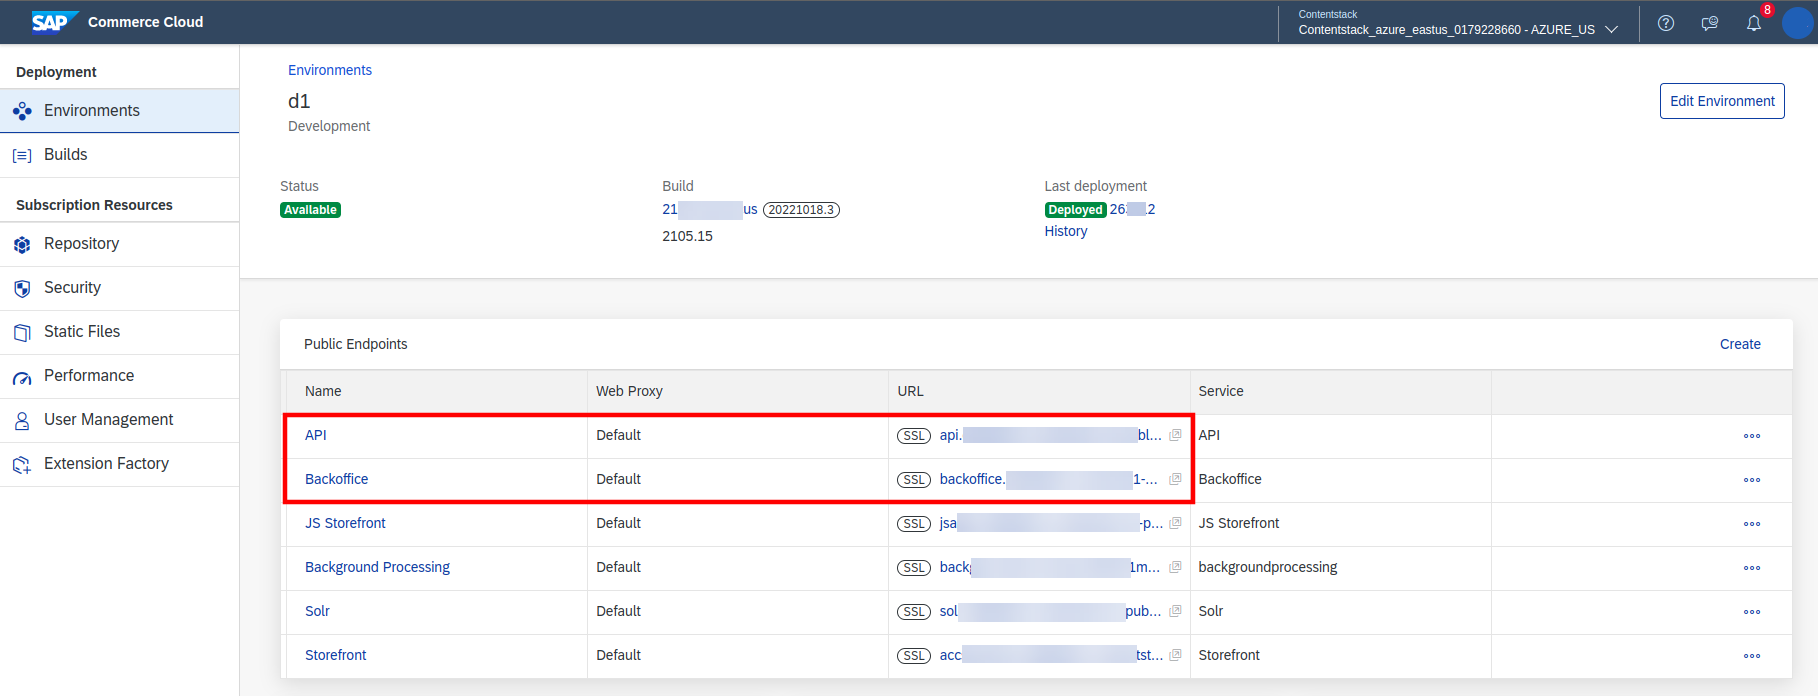
- Copy the API and Backoffice URLs.
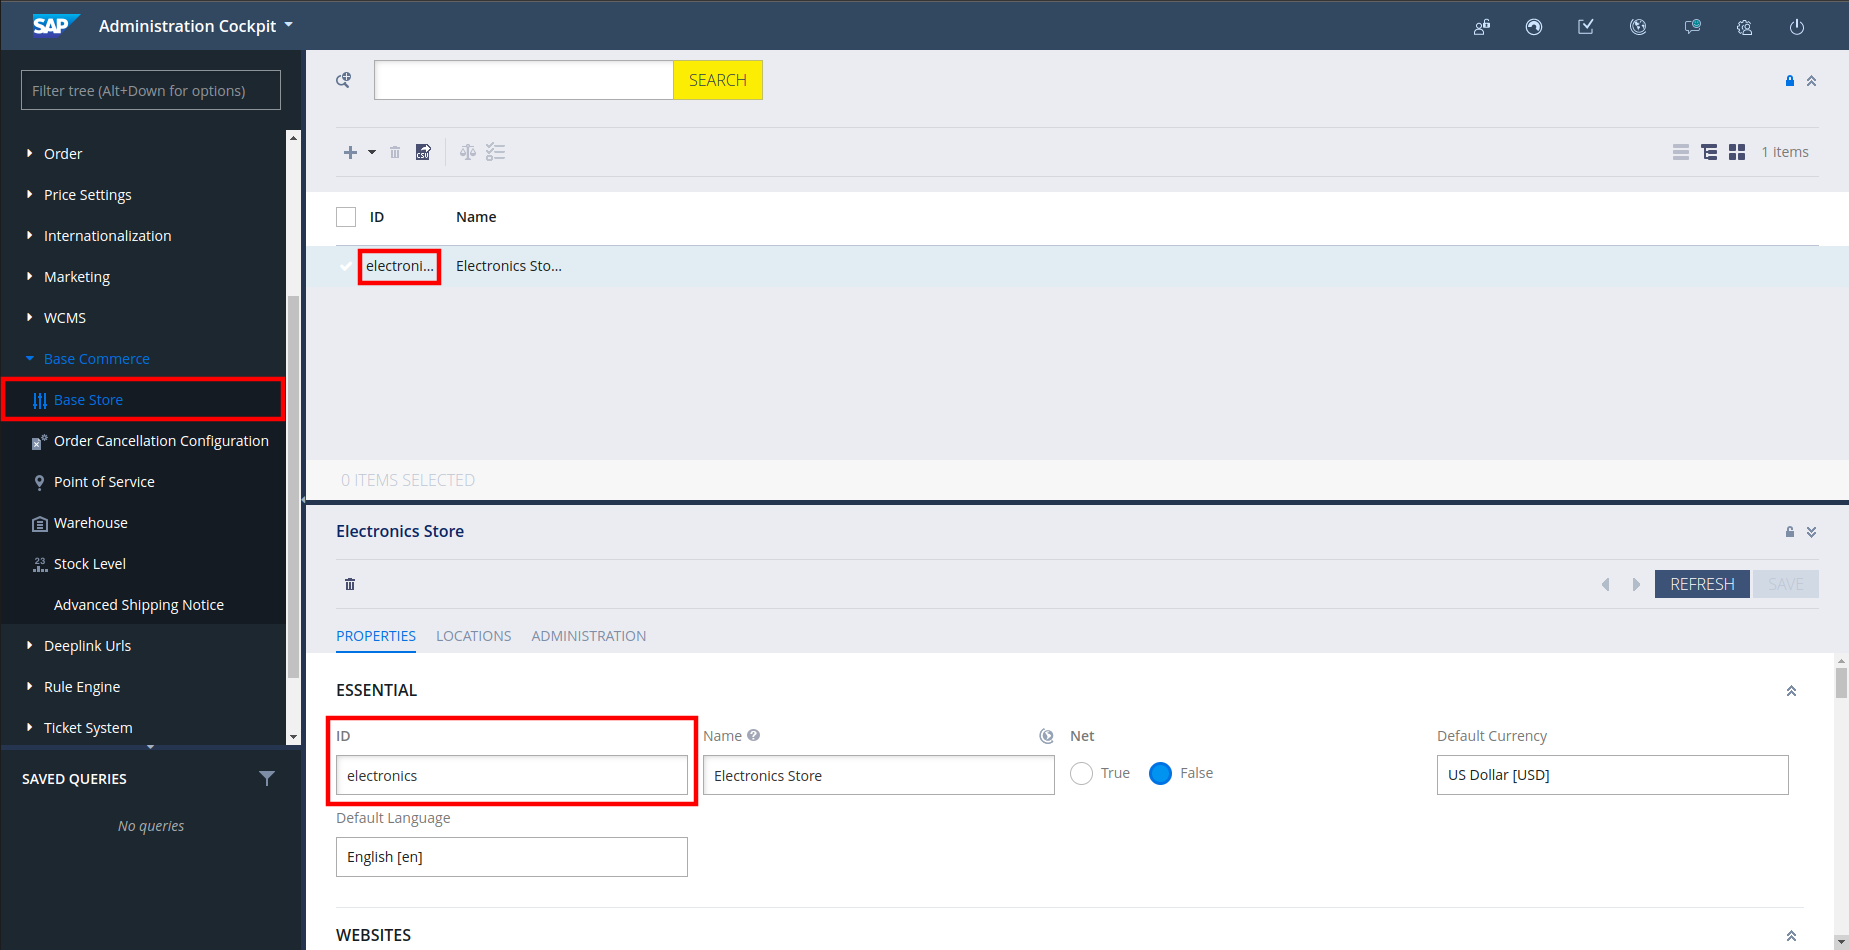
- To retrieve the Base Site ID, follow the steps below:
- Click the Backoffice URL and log in using your SAP Commerce Cloud account credentials.
- Under Base Commerce, in the left panel, click Base Store.
- Click the Base Site whose Base Site ID you want to retrieve.
You will find the Base Site ID under the PROPERTIES section.
-
Install and Configure SAP Commerce Cloud in Contentstack Marketplace
To install the application in Contentstack, follow the steps below:
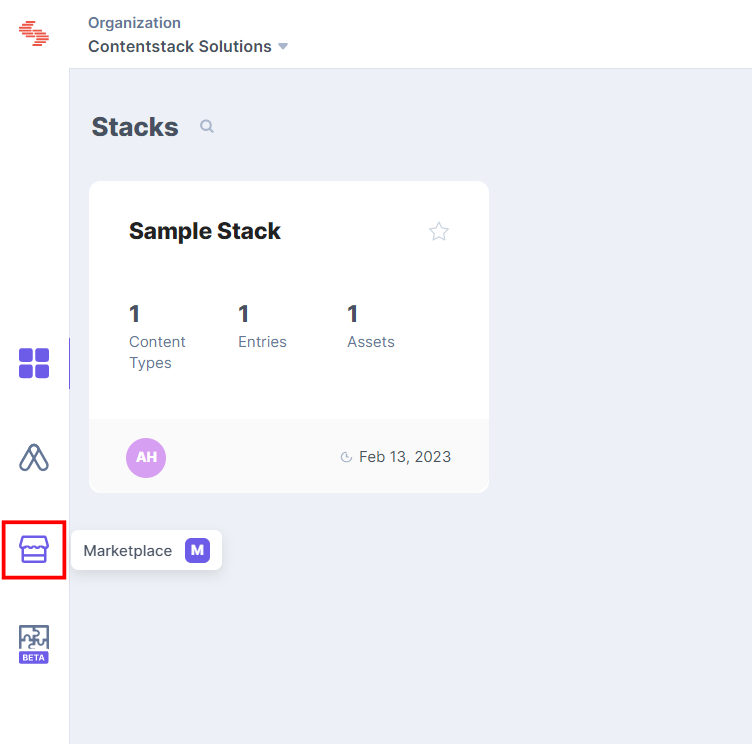
- Log in to your Contentstack account.
- In the left-hand side primary navigation, click the Marketplace icon to go to the Marketplace.
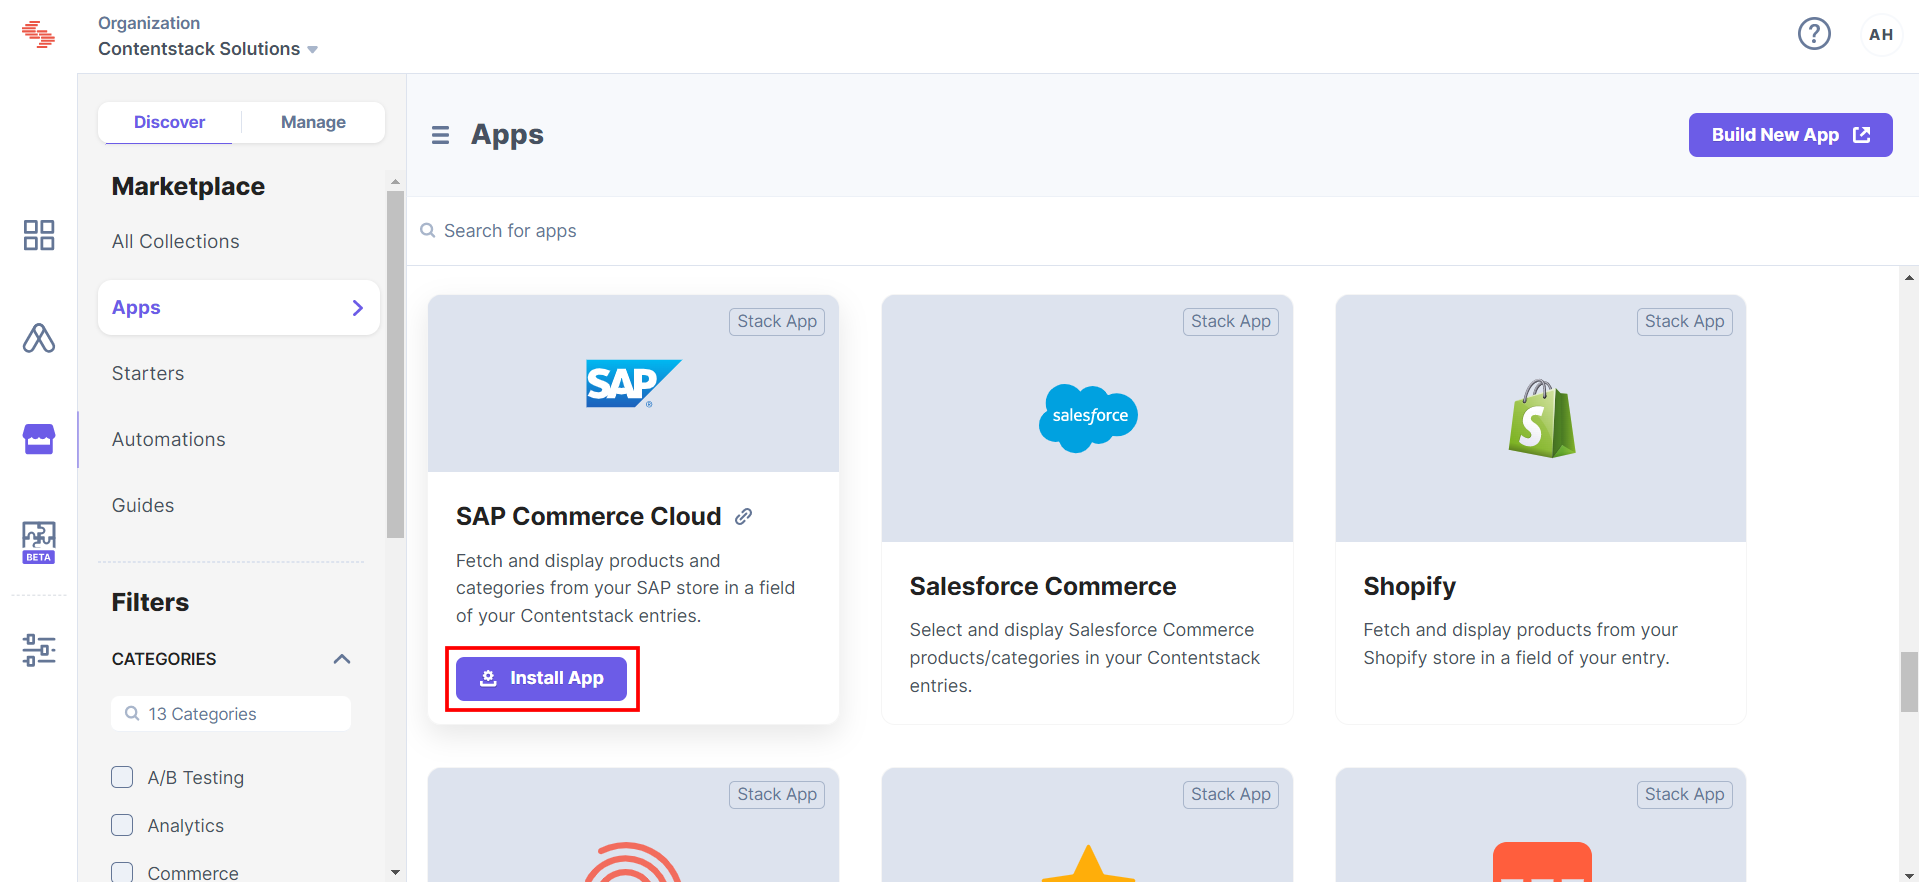
- Click Apps from the left panel.
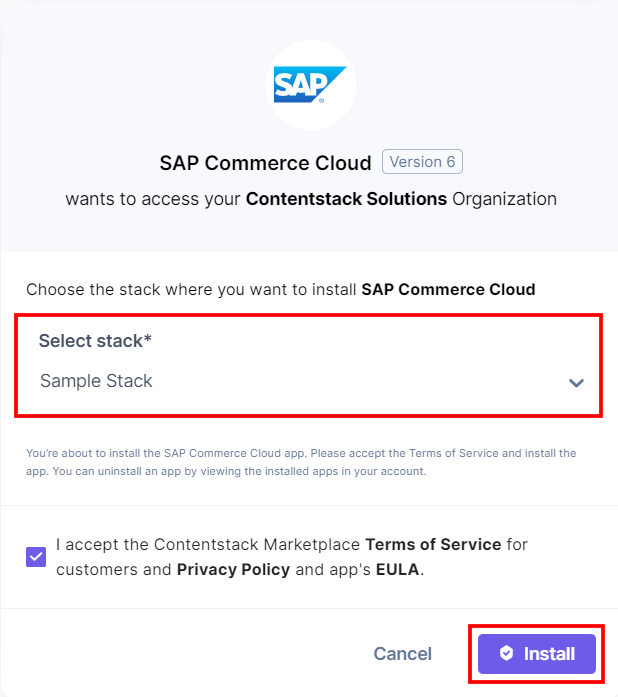
- Within the Marketplace, you can see all the available apps. Hover over the SAP Commerce Cloud app and click Install App.
- In the popup window, select the stack where you want to install the SAP Commerce Cloud app and click the Install button.
- On the Configuration screen, enter the following details retrieved from your SAP Commerce Cloud Account:
- SAP URL Structure: Choose the type of URL you want to use in your configuration.
- For OCC URL (Omni Commerce Connect URL): You can provide the API Base URL retrieved from the SAP Commerce Cloud dashboard.
- For Custom URL: If you are not using OCC URL (Omni Commerce Connect URL) from the SAP Commerce Cloud, you can select Custom URL and provide the respective API Base URL and API Route.
Note: Please choose Custom URL if the URL does not start with https://your-base-url/occ/v2.
- API Base URL and API Route
- Base Site ID
- Backoffice URL
- Save in Entry: Choose how you want to save your data in the entry.
- If you select Whole JSON, you can select only a limited number of products.
- For Custom JSON, you should search and add specific SAP Commerce Cloud Keys you want to fetch. By default, the code and name of the products are selected.
- On the UI Locations tab, you can see the predefined app locations. You can use the toggle button corresponding to each UI location to enable or disable it based on your requirements.
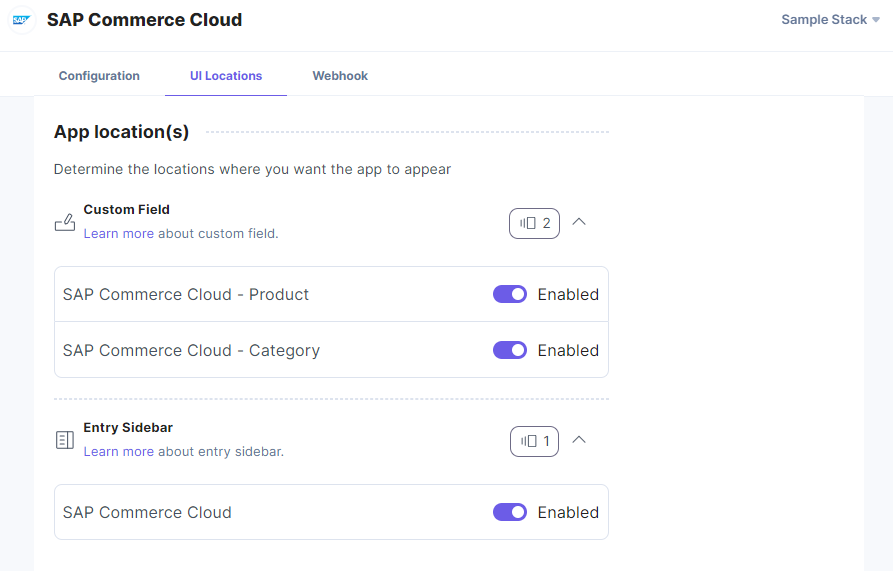
- If the webhook is enabled for your app, you can view the webhook logs under the Webhook tab.
- Click the Save button.
- Click Open Stack to start using the SAP Commerce Cloud application.
Note: Enter the URL starting from api.

Additional Resource: For more information on UI location and webhooks, please refer to the Installed Apps guide.
-
Use SAP Commerce Cloud within your Stack
To use the SAP Commerce Cloud application within an entry of your stack, follow the steps given below:
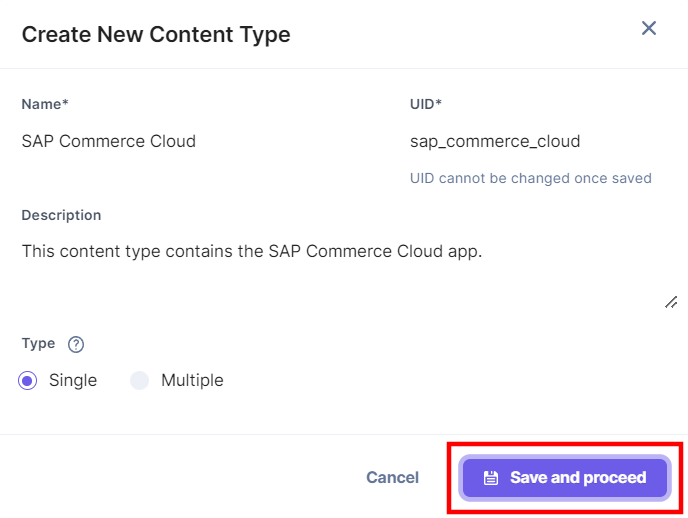
- Go to your stack, click the Content Models icon in the left navigation panel, and click the + New Content Type button.
- Create a content type by adding relevant details as displayed below:
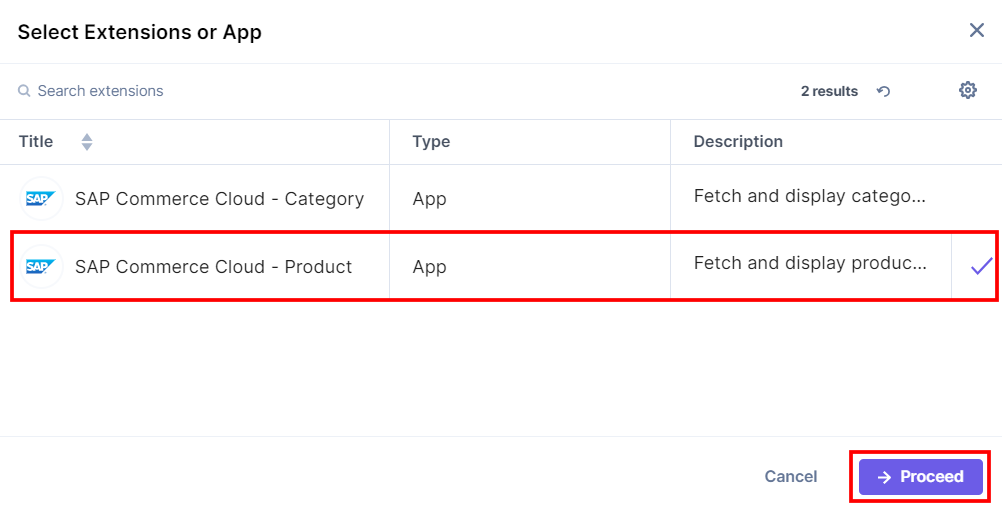
- In the Content Type Builder page, add a Custom field for product in your content type by clicking the Insert a field link represented by a + sign.
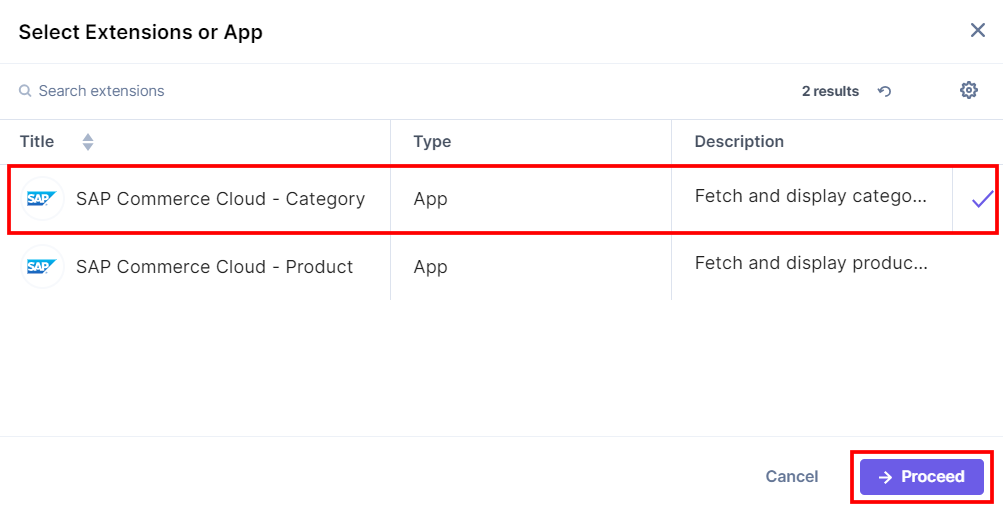
- Under Select Extension/App, select SAP Commerce Cloud - Product and click the Proceed button.
- Add another Custom field for category in your content type by clicking the Insert a field link represented by a + sign.
- Under Select Extension/App, select SAP Commerce Cloud - Category and click the Proceed button.
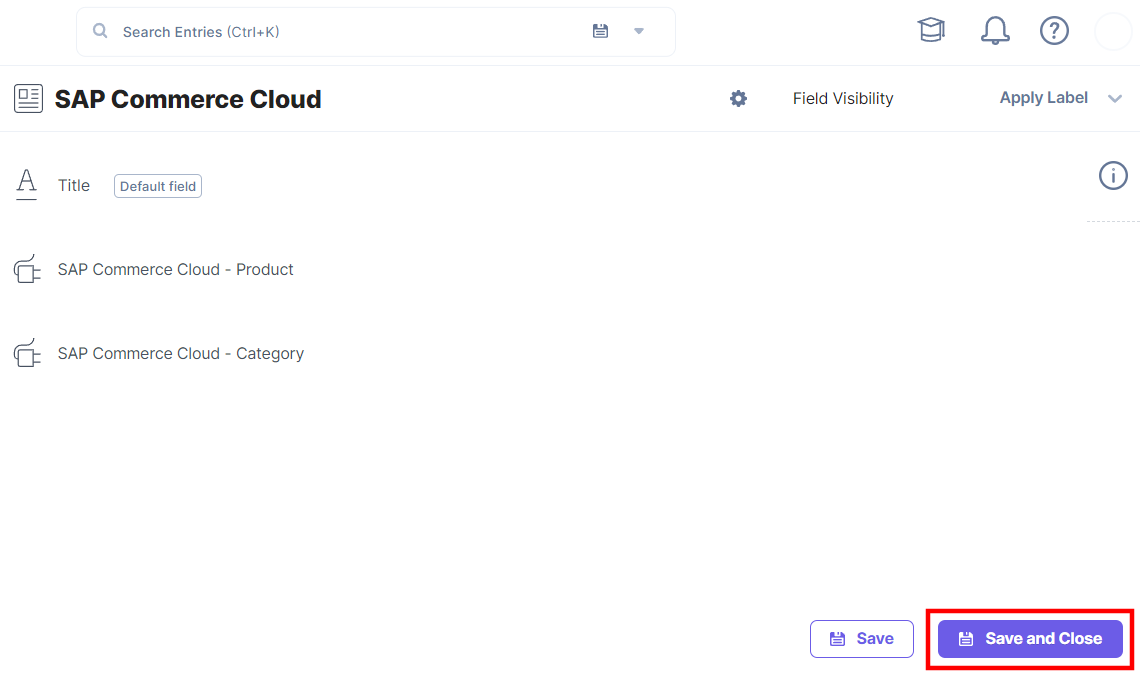
- After adding the app, click Save or Save and Close to save your changes.
- In the left navigation panel, navigate to the Entries page and click + New Entry to create a new entry for the above content type. And then click Proceed.
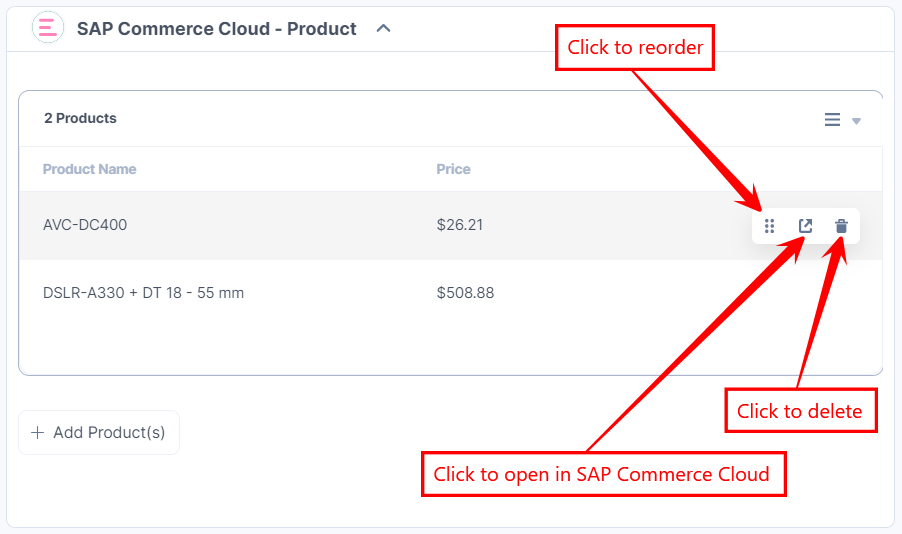
You will see the SAP Commerce Cloud custom fields on your entry page as shown below: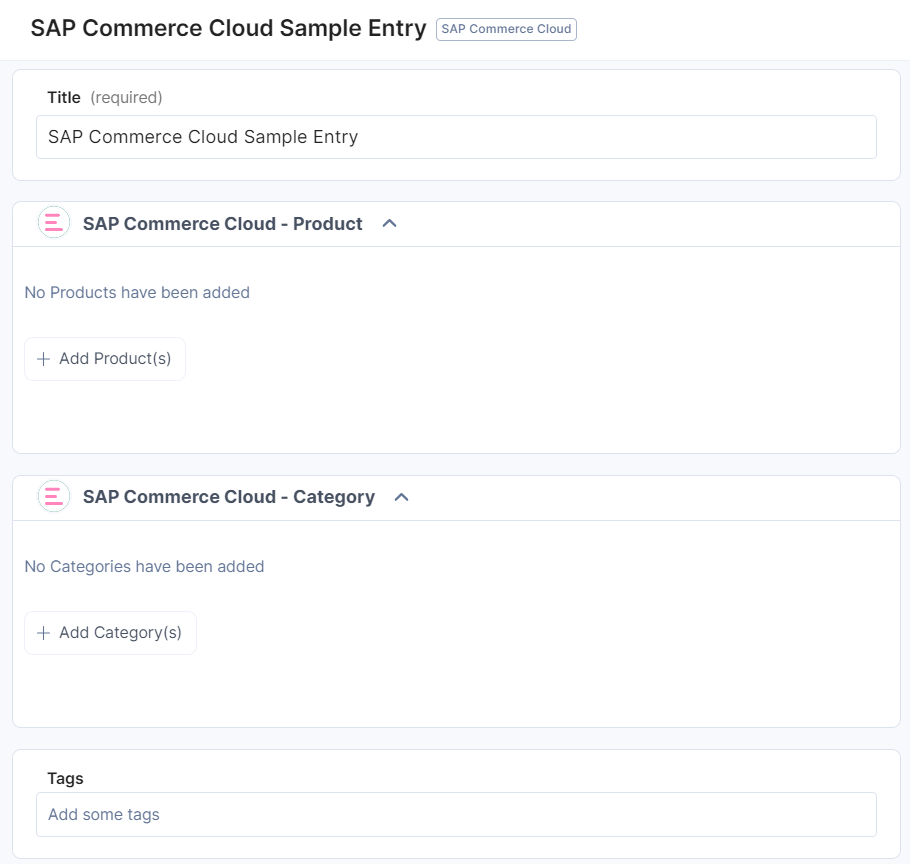
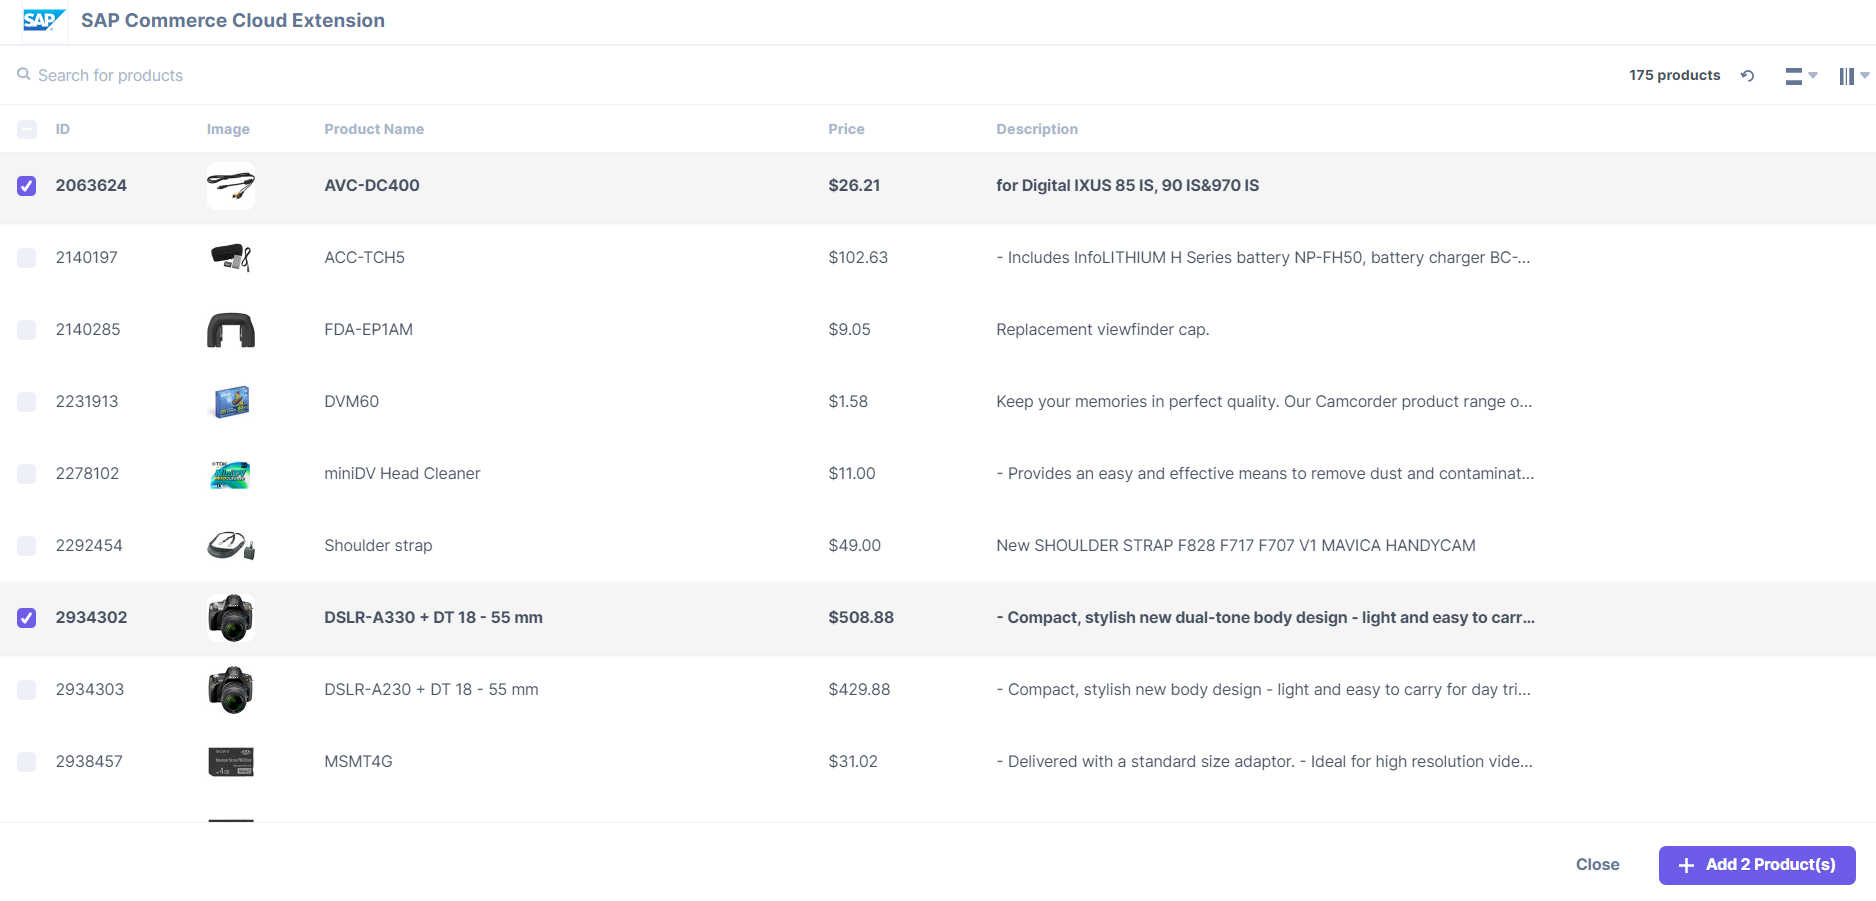
- Click the Add Product(s) button, select the products from your SAP Commerce Cloud store and add them to your entry.
- To reorder, open in SAP Commerce Cloud or delete the selected product, hover over the product to get the options available, then perform the following:
- Click the Drag icon to drag and reorder the product.
- Click the Open in SAP Commerce Cloud icon to open the product in the SAP Commerce Cloud app.
- Click the Delete icon to delete the product.
- Click the Save button to save your entry.
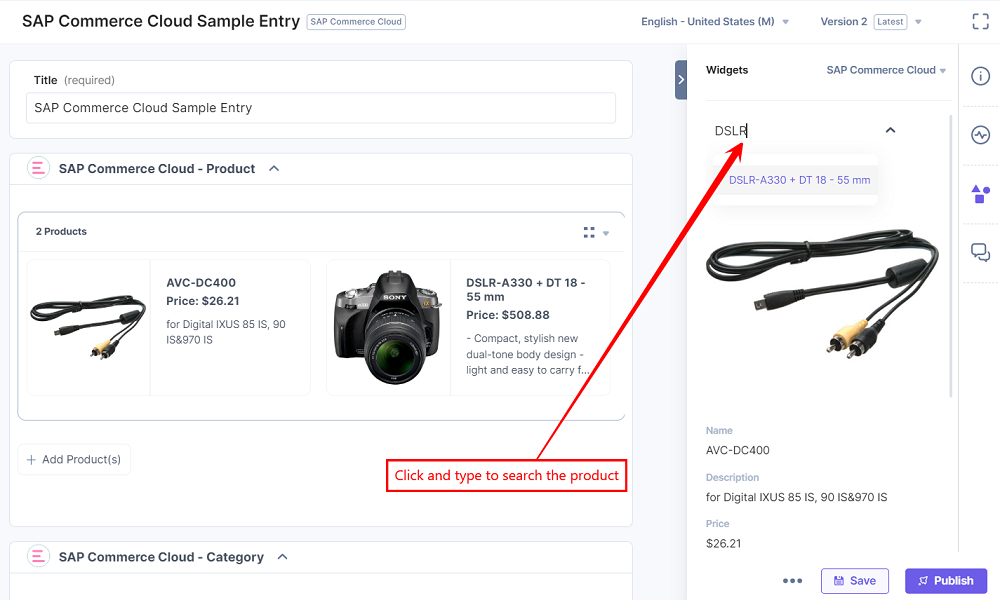
- In the right navigation panel, select Widgets, and then select SAP Commerce Cloud to view the product details.
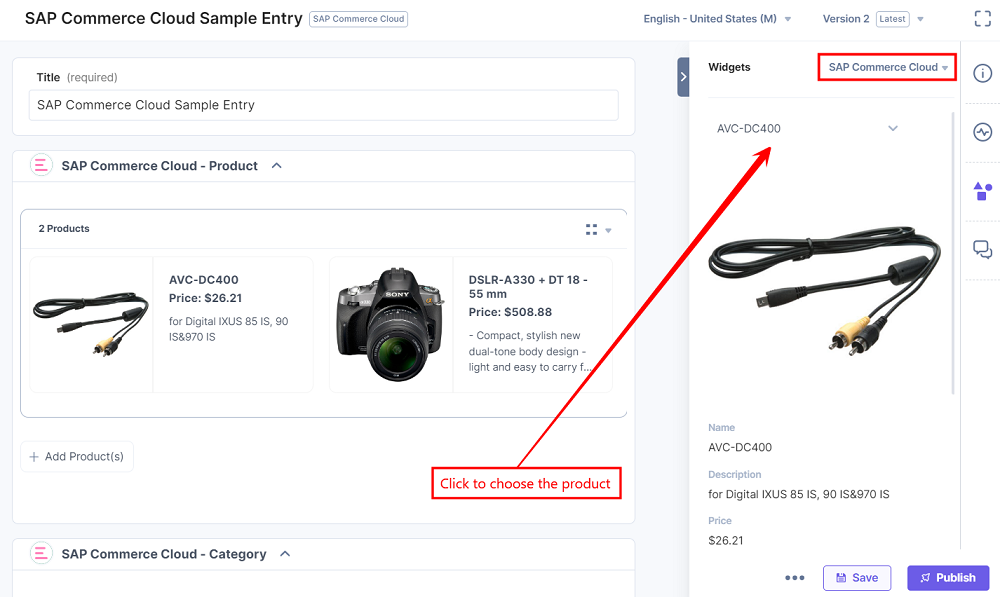
- Enter the product name in the dropdown to search and view the product details.
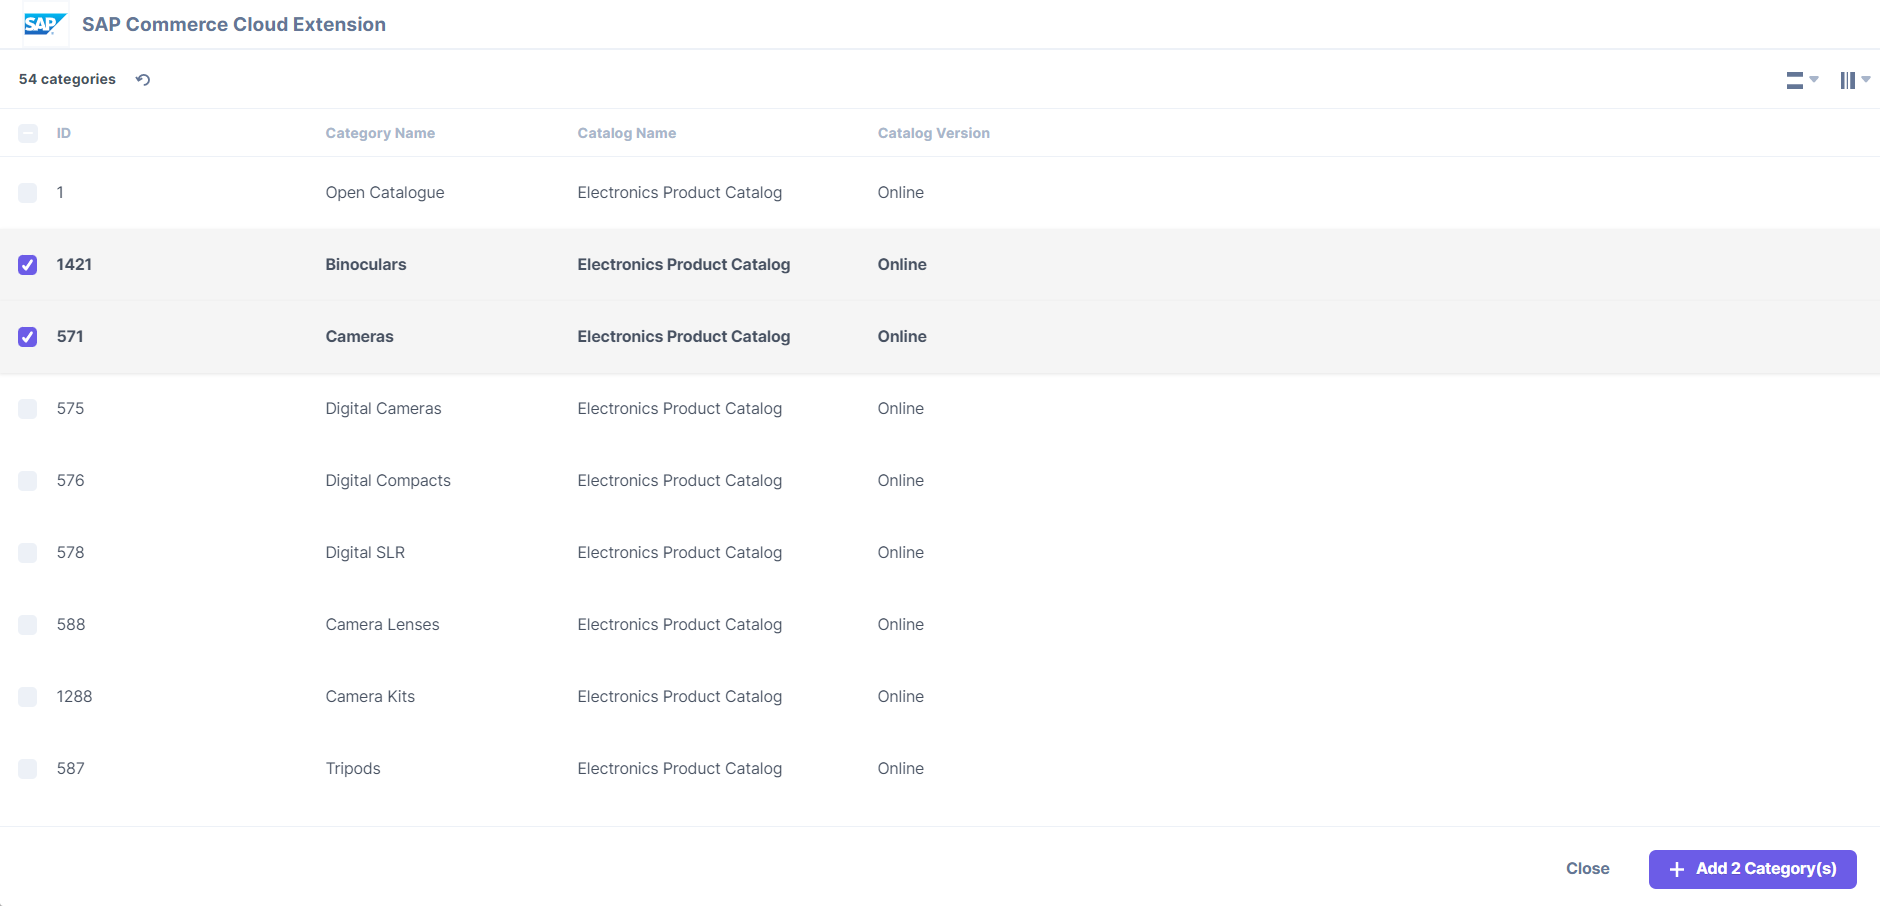
- Click the Add Category(s) button, select the categories from your SAP Commerce Cloud store and add them to your entry.
The categories you selected are referenced within your entry.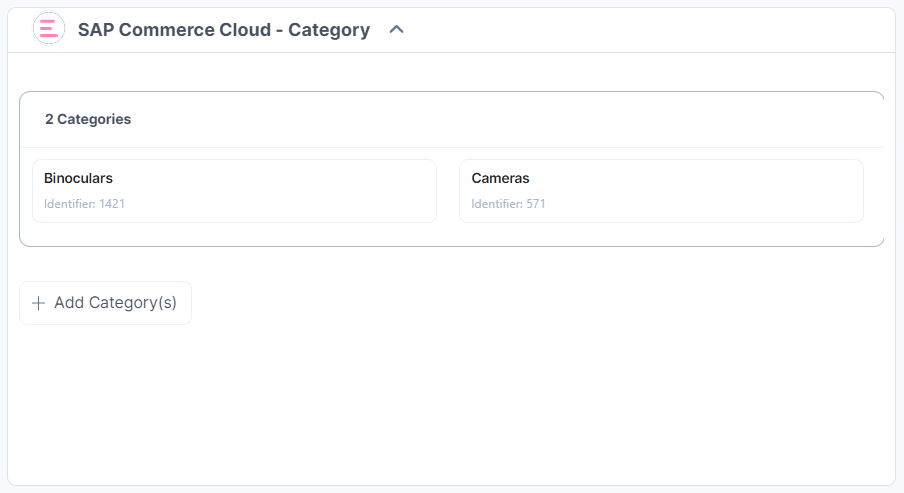
- To remove the selected category, hover over the category and click the Remove icon.
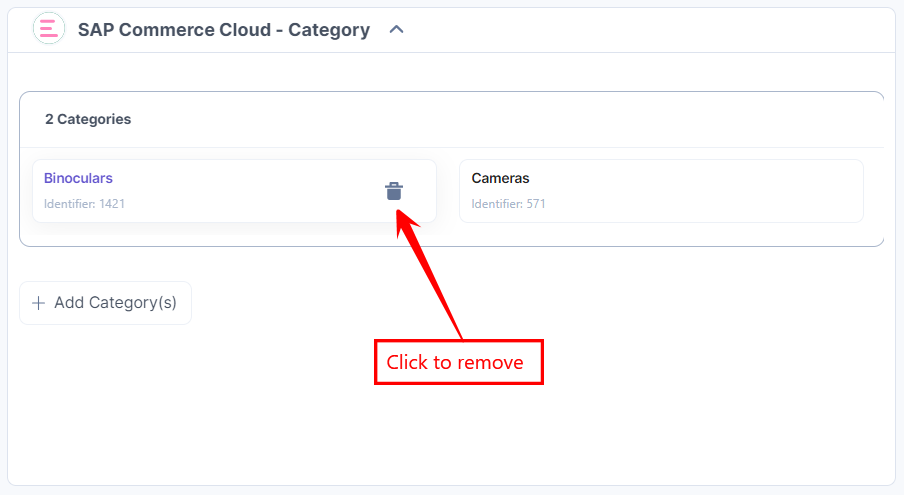
- Click the Save button to save your entry.
The products you selected are referenced within your entry in the thumbnail view: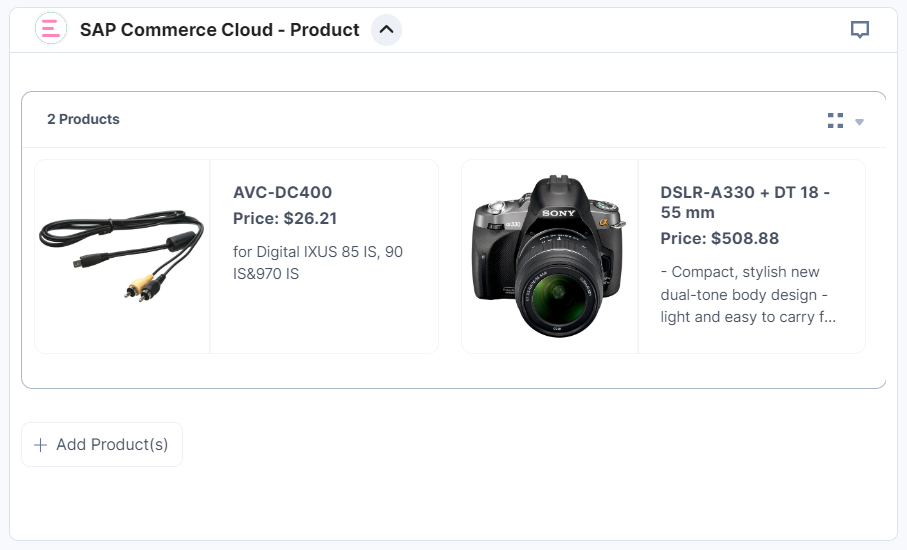
To view the products in list view, select the list view option from the dropdown as given below: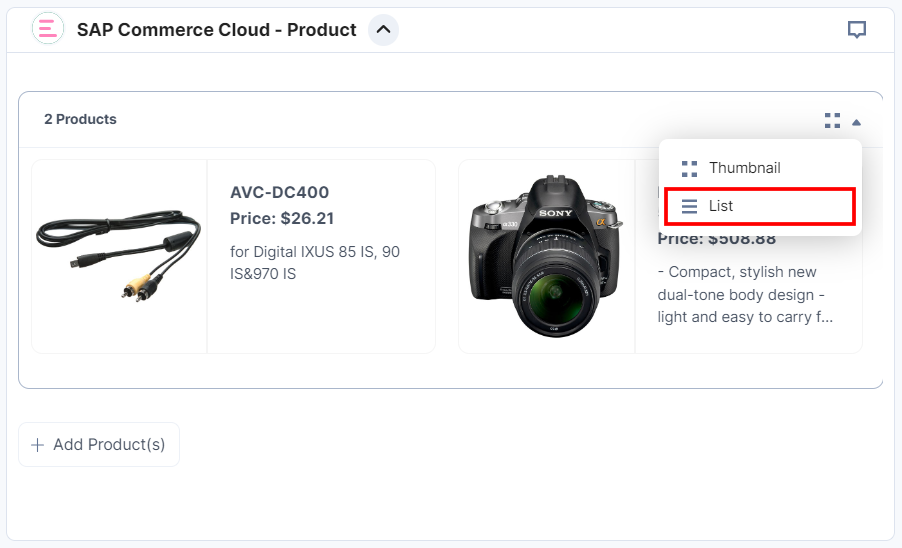
The products you selected are referenced within your entry in the list view: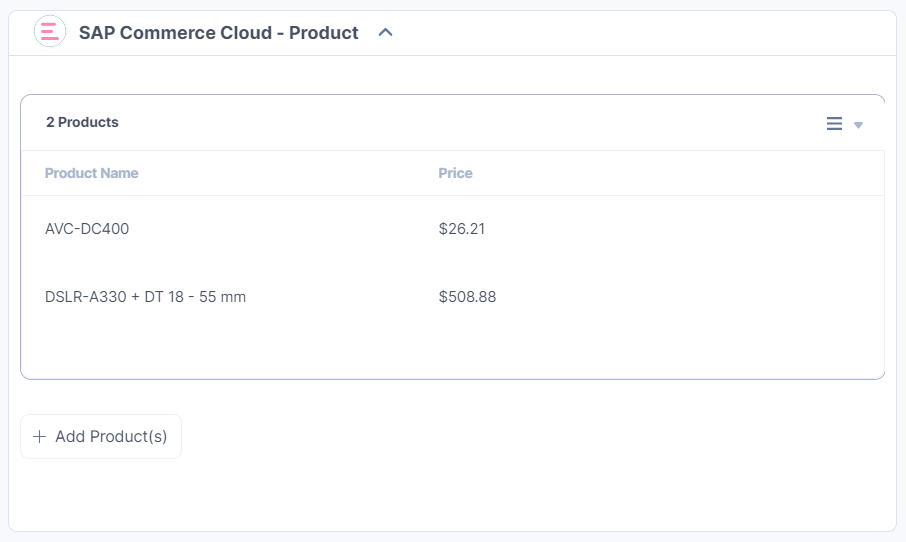
Thumbnail View

List View
You can view more product details in the Sidebar Widget.
Note: You must save your entry to get the product details in the Sidebar Widget.
More articles in "Commerce"
