Custom Reference Field
Note: Experience Extensions use the legacy approach with extensions. We recommend using the Custom Field UI location for the Contentstack App Framework to extend the functionality of your apps.
The Reference field custom extension allows you to fetch entries from multiple content types of your stack into a field of your content type. It allows you to access and use entries from the referenced content types as inputs within your field.
Additionally, the Reference field extension also allows you to add raw queries to get specific entries as required.
For example, if you want to fetch entries with title "Home", you can add a raw query to fetch entries titled "Home". Such queries can be added as config parameters while setting up the extension (discussed later in the guide).
Users can also modify this implementation to add new functionalities to the custom reference field extension as per their use cases.
This step-by-step guide explains how to create a Reference field custom extension for your content types.
Steps for Execution:
-
Create Custom field Extension
To set up the Reference field extension in Contentstack, log in to your Contentstack account.
For the extension, we have created a sample code that you can download from our GitHub repository.
After downloading, unzip the folder that contains the following two files:- reference-field: Navigate to reference-field/build/index.html file. The code inside this file will be uploaded in the extension source code field of our extension in the next step.
- reference-field-popup: Navigate to reference-field-popup/build/index.html. Upload this file as an asset in your stack by referring to the Create/Upload Assets guide. After uploading this file, make a note of the asset URL. To view the asset URL, open the asset and copy the File URL.
Once you have logged in to your Contentstack account, follow the steps given below:
- Go to your stack, navigate to the “Settings” gear icon on the left navigation panel, and select Extensions (“alt + X” for Windows OS users, and “option + X” for Mac OS).
- Click on the + New Extension button, and select Create New.

- Select the Custom Field option from the Select Extension Type screen as shown below:

- On the Create New Extension page, enter values in the fields as given below:
- Title (required): Provide a suitable title, for example “Reference field” for your custom field. This title will be visible when you select the extension in the custom field in your content type.
- Field data type (required): Select the data type in which the input data of the field should be saved in Contentstack. In this case, select Reference.
- Multiple(required): Check this field.
- Hosting method (required): Select the Hosted by Contentstack option.
- Extension Source Code (required): You'll be asked to provide the extension source code. To add the code in this field, navigate to reference-field/build/ (in the code folder that you downloaded earlier), copy the code from index.html file, and paste it here.
- Config Parameter (required): Enter the following configuration details as the extension's config parameter:
{ “redirectUrl”: <<"URL of the asset file">> “query”: <<"{'$and':[{'title': 'Test'},{'author': 'abc'}">> }- redirectUrl: The redirectURL is the URL of the asset file that you uploaded to assets in the above section.
- query(optional): Add the raw query in this section. The extension field will only fetch entries as per the condition mentioned in this query.
Additional Resources: Read this guide for detailed information on how to use certain queries to fetch filtered results.
- Confirm your settings by clicking on the Save button.
Your extension is now ready, let's move ahead and use this extension in your content type.
- reference-field: Navigate to reference-field/build/index.html file. The code inside this file will be uploaded in the extension source code field of our extension in the next step.
-
Use your Custom Field
Once you have added a custom field, you can use it in your content type like any other field. To add a custom field in your content type, perform the following steps:
- In your stack, click on “Content Models” on the left navigation panel. By default, you will be on the Content Type page.
- Create a content type by clicking on the + New Content Type. button. Enter the relevant details for the content type and click on Save. This leads you to the Content Type Builder page where you can add the relevant fields.
- Under the Select Extensions, select the “Reference field” extension that you created and select the content types you want to refer, under the Referenced Content Type section.

- Once that is done, click on Save and Close to save your changes.
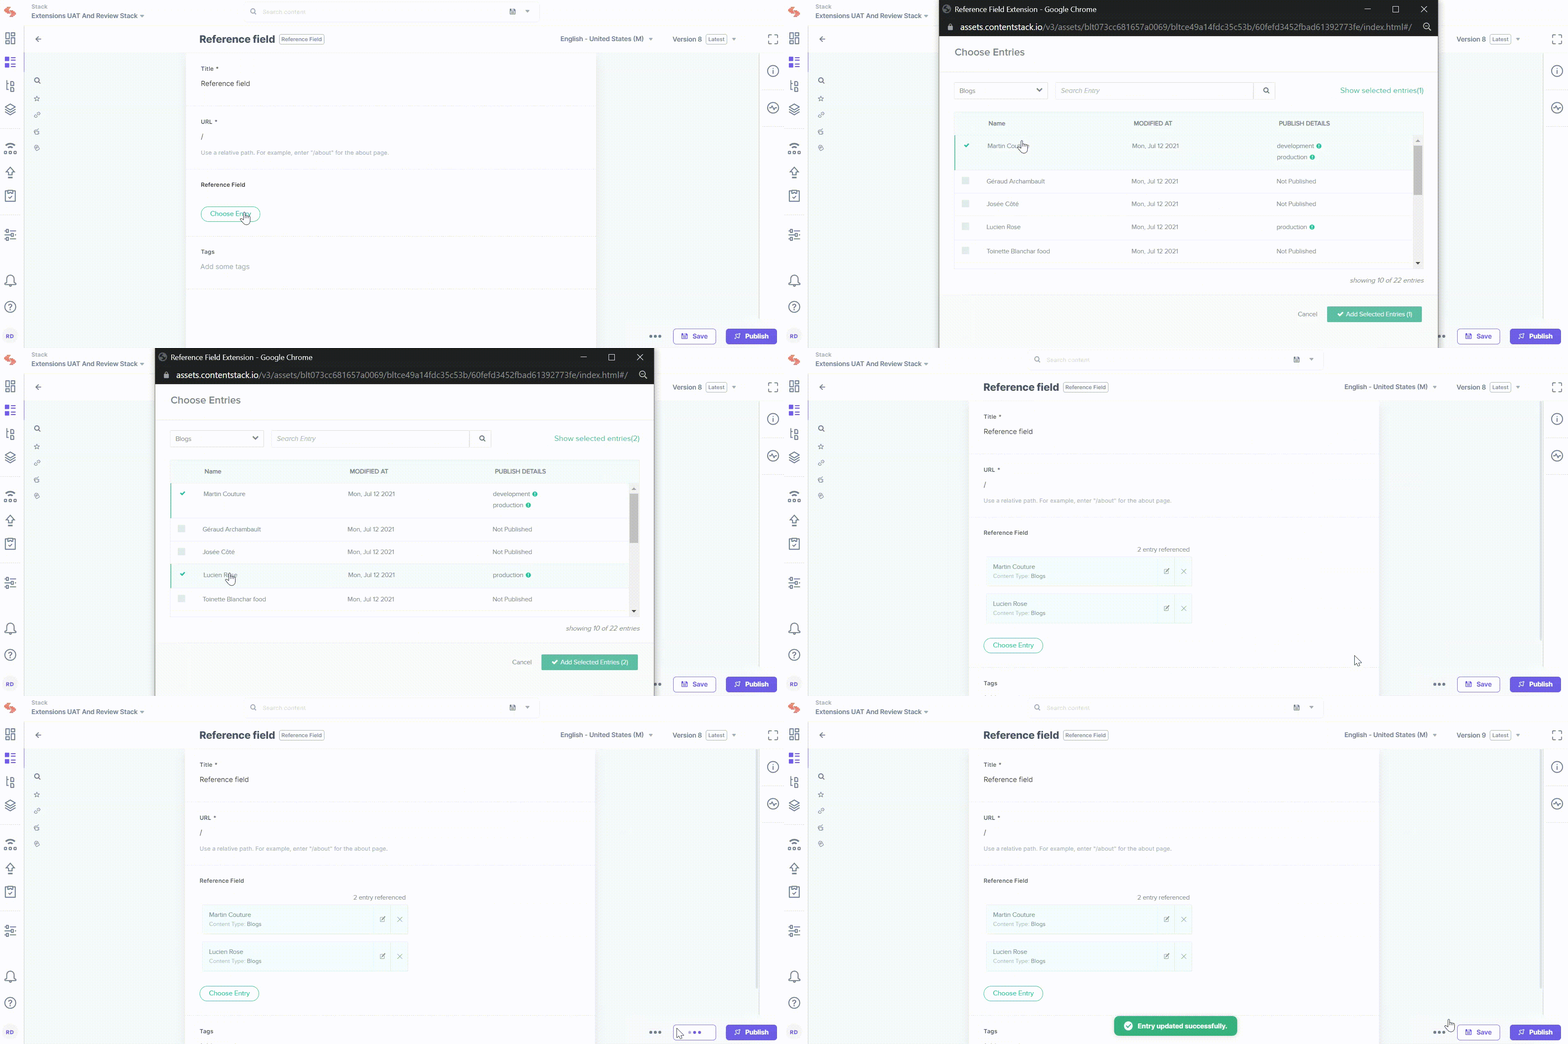
- Now create an entry in this newly created content type and you will see the Reference field custom field in action.
- Click on the Choose Entry button. You will see the list of entries from the referenced content type you selected.
- Select the entries you want to refer through this custom field and click on Add Selected Entries to view the entries in your field.
If you want to add entries from more than one content type, select the content type first and then the entry/entries you want to add. - Lastly, click on the Save button to save your changes in the entry.


.svg?format=pjpg&auto=webp)
.svg?format=pjpg&auto=webp)
.png?format=pjpg&auto=webp)


.png?format=pjpg&auto=webp)