

.svg?format=pjpg&auto=webp)
.svg?format=pjpg&auto=webp)
.png?format=pjpg&auto=webp)


.png?format=pjpg&auto=webp)
Build a Web Application Using Contentstack Java SDK and Spring Boot
Spring Boot is an open-source framework that offers Java developers a platform to create auto configurable production-grade Spring applications. It saves development time by quickly preparing and configuring Spring applications.
This sample web application is built using Contentstack's Java SDK and Spring Boot. It uses Contentstack to store and deliver the content of the web application.
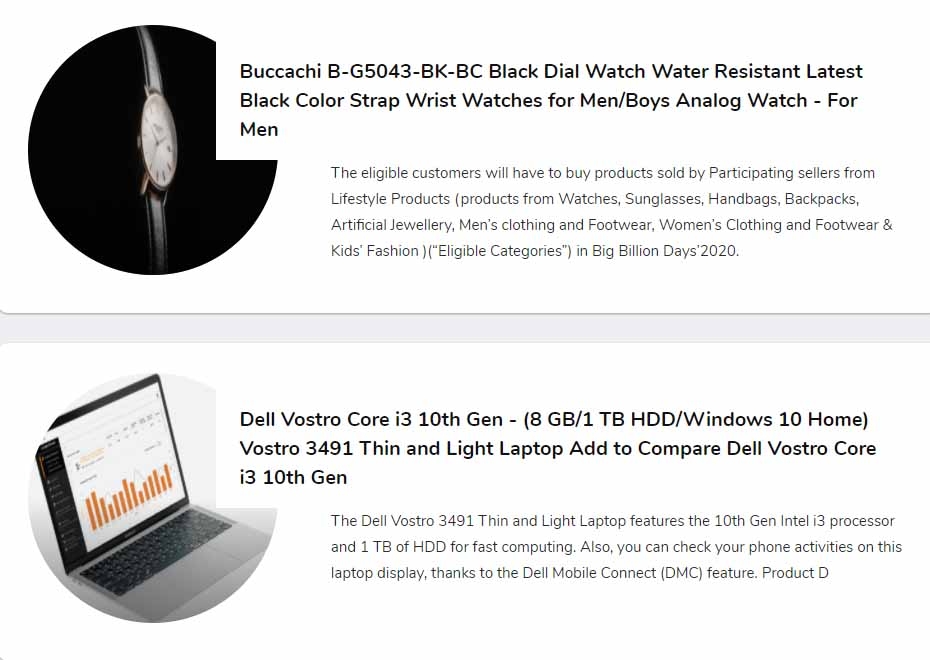
Screenshots


Warning: This sample app is no longer maintained. It remains available for reference. If you have questions regarding this, please reach out to our support team and we will do our best to help!
Quickstart
Here’s a quick guide on how to create a web application using Contentstack's Java SDK and Spring Boot.
This step-by-step guide details how you can use the Spring Boot framework along with Contentstack's Java SDK to create a web application.
Note: For this tutorial, we have assumed that you are familiar with Contentstack and the Spring Boot framework. If not, then please refer to the docs (Contentstack and Spring) for more details.
In this tutorial, we will first go through the steps involved in configuring Contentstack, and then look at the steps required to customize and use the presentation layer.
Prerequisites
- A text editor or an IDE, for example IntelliJ IDEA
- JDK 1.8 or later
- Gradle 4+ or Maven 3.2+
- Spring Tool Suite (STS)
- Contentstack Account
To start building your web project, start by visiting Spring Initializr, enter your project details as shown below:
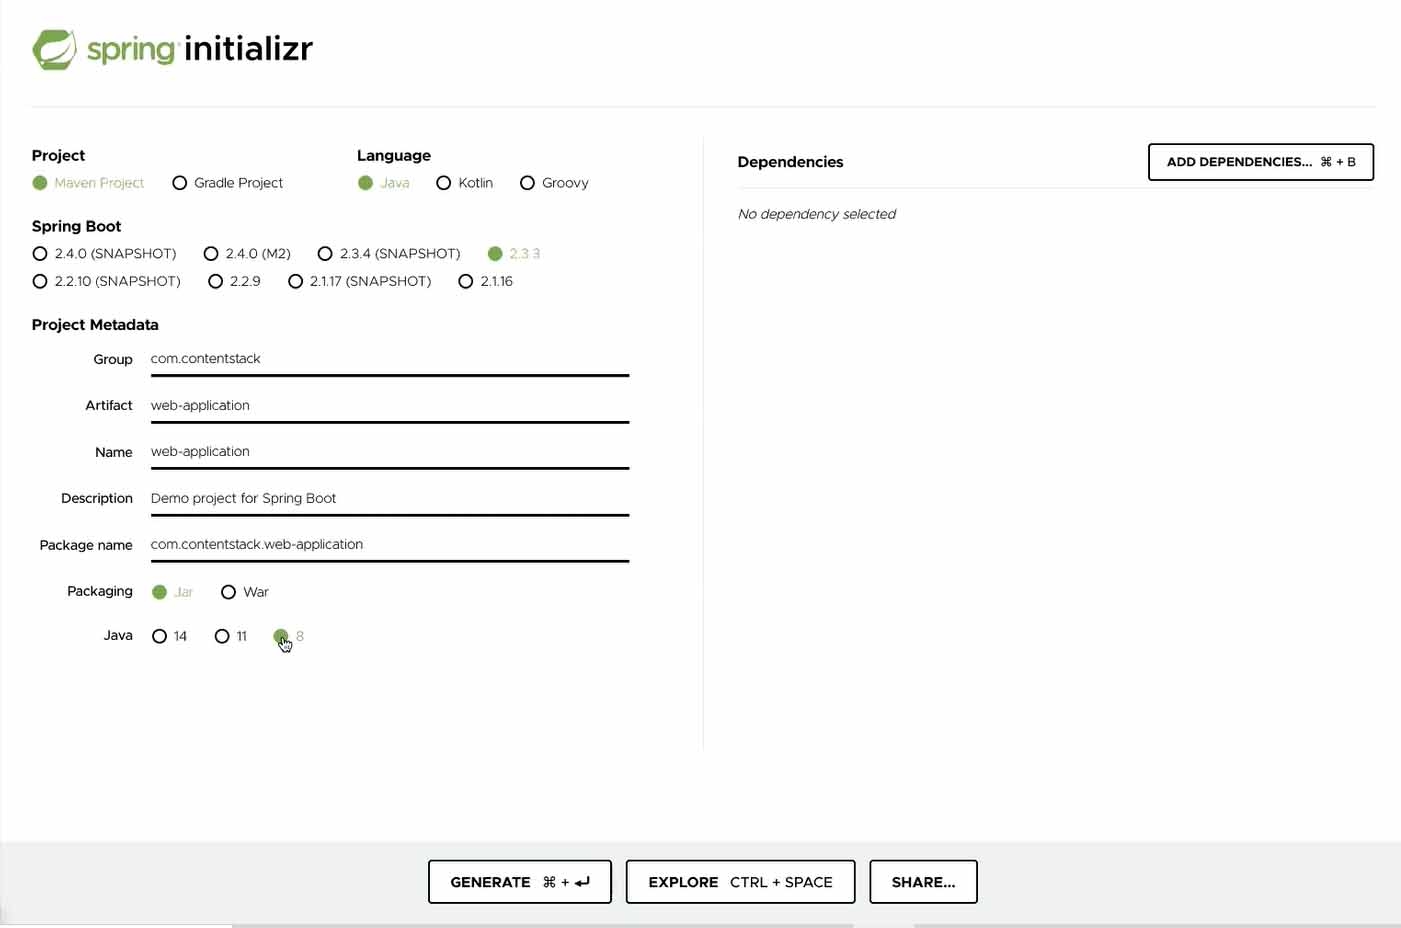
Then, click on ADD DEPENDENCIES and add Spring Web and Thymeleaf dependencies by searching them in the available options.
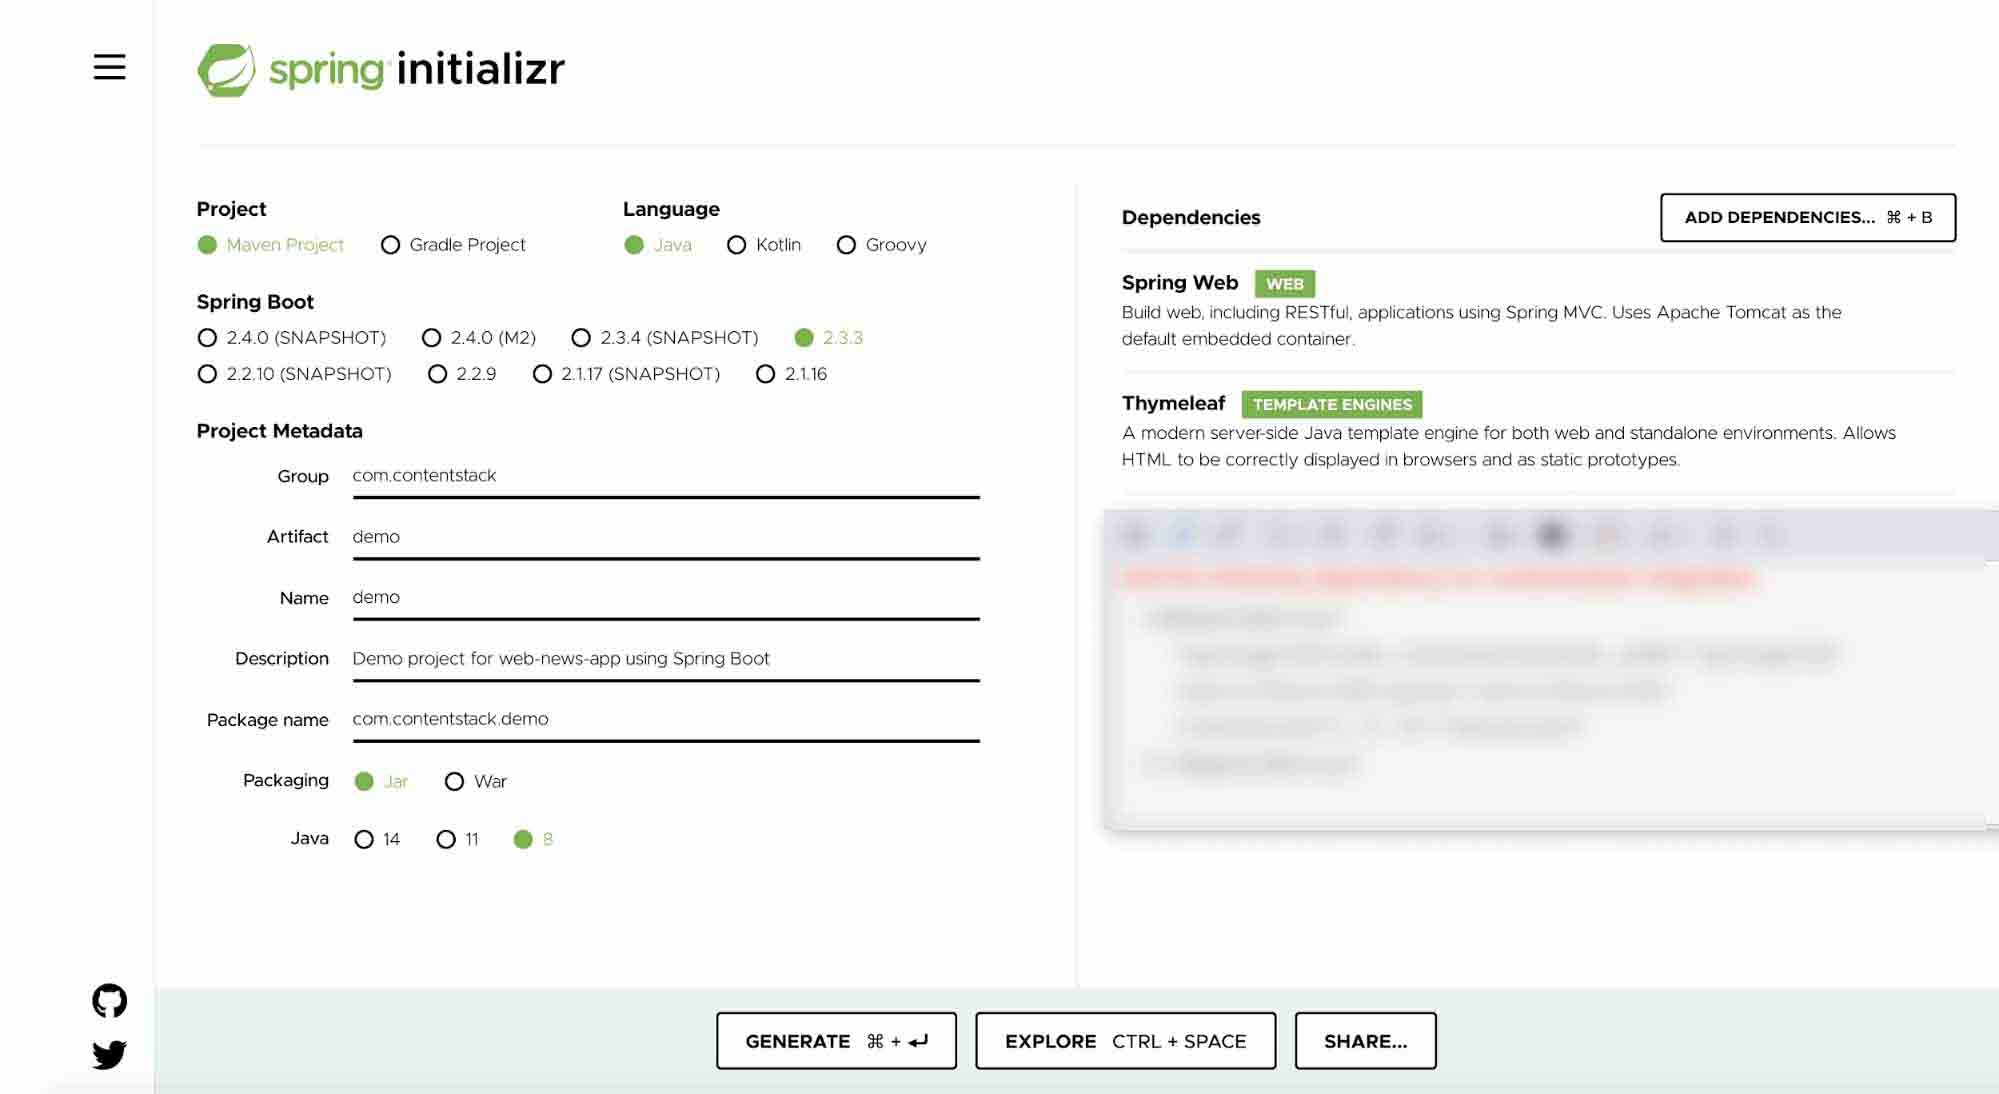
Once you have done that, click on GENERATE and the project will be downloaded as a zip file.
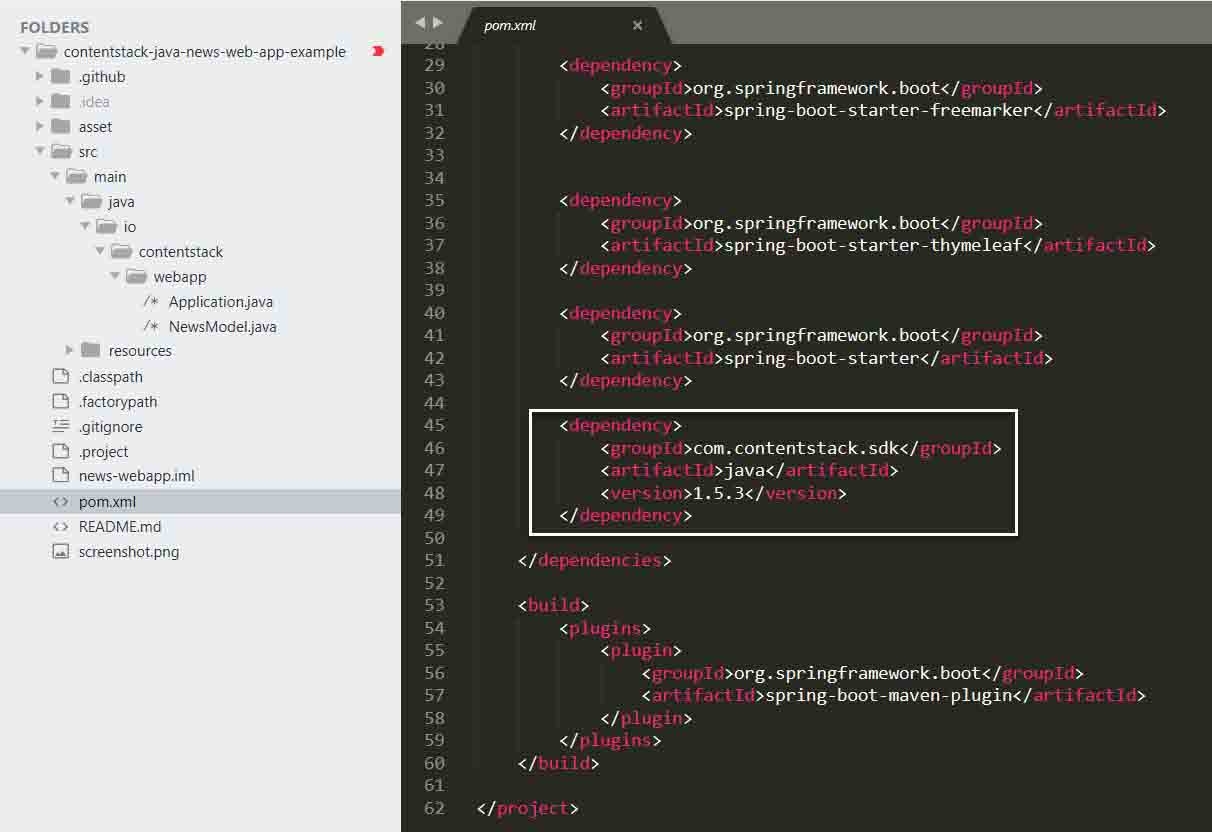
Open the project in a code editor or an IDE of your choice, for example IntelliJ, and open the pom.xml file. You will see the dependency section. You need to add one more dependency in the file as shown below:
Save the file and then follow the instructions given in the "Run the Application" section given below.
If you want to skip setting up the project (as mentioned above) and want to create the web app quickly, follow the instructions given below. We have created a sample app with the required details for quick integration.
Create a Stack
Log in to your Contentstack account, and create a new stack. This stack will hold all the data, specific to your website.
Add a Publishing Environment
To add an environment in Contentstack, navigate to Settings and then Environment. Click on the + New Environment tab. Provide a suitable name for your environment, say “‘staging’.” Specify the base URL (e.g., ‘http://YourDomainName.com’), and select the language (e.g., English - United States). Then, click on 'Save'.
Import Content Type
A content type is like the structure or blueprint of a page or a section of your web or mobile property. For this app, we need one content type named News. We need this content type to add the content for our app.
For quick integration, we have already created the content type. Download the content type and import it to your stack. You can also create your own content type if required.
Now that your content type is ready, let’s add some content for your app.
Add Content
Create and publish entries for the News content type that you just downloaded and imported as discussed in the above step.
Now that we have created the sample data, it’s time to configure the presentation layer.
Download the Code and Configure the App
Download and unzip the source repository for this guide, or clone the repository by using the following command:
git clone https://github.com/contentstack/contentstack-java-news-web-app-example.gitOnce the project has been downloaded, move inside the project directory (cd into contentstack-java-news-web-app-example root directory).
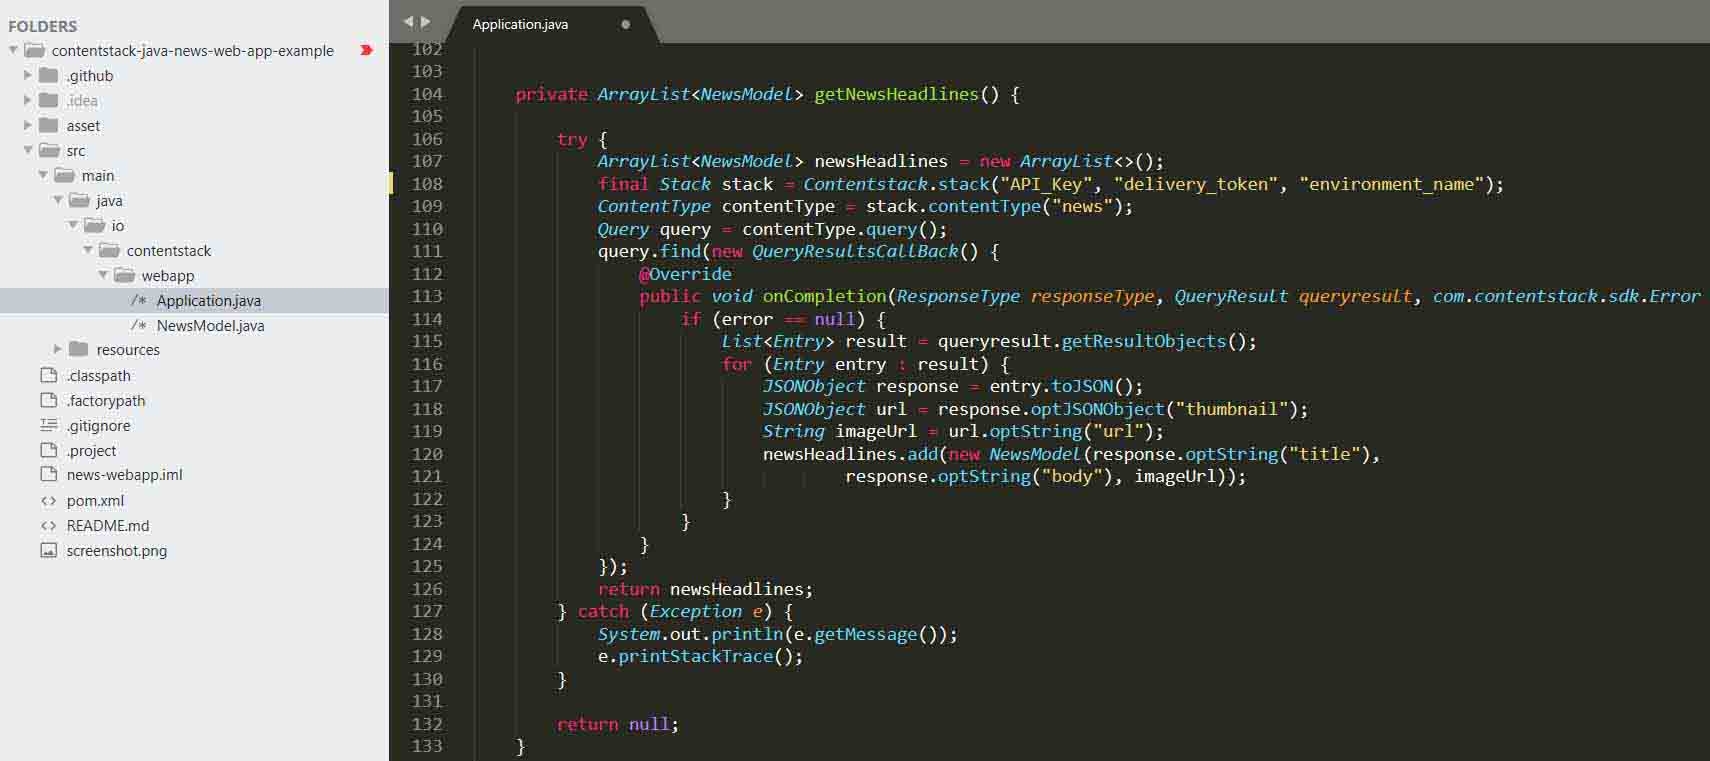
Then open the Application.java file which is inside \contentstack-java-news-web-app-example\src\main\java\io.contentstack.webapp folder and update your stack credentials (Stack API key, Delivery Token, and Environment name) as follows:
Run the Application
To run the application, open the downloaded code in any IDE of your choice. For this project, we have used IntelliJ IDE. Once you open the application in IntelliJ, it looks like this:
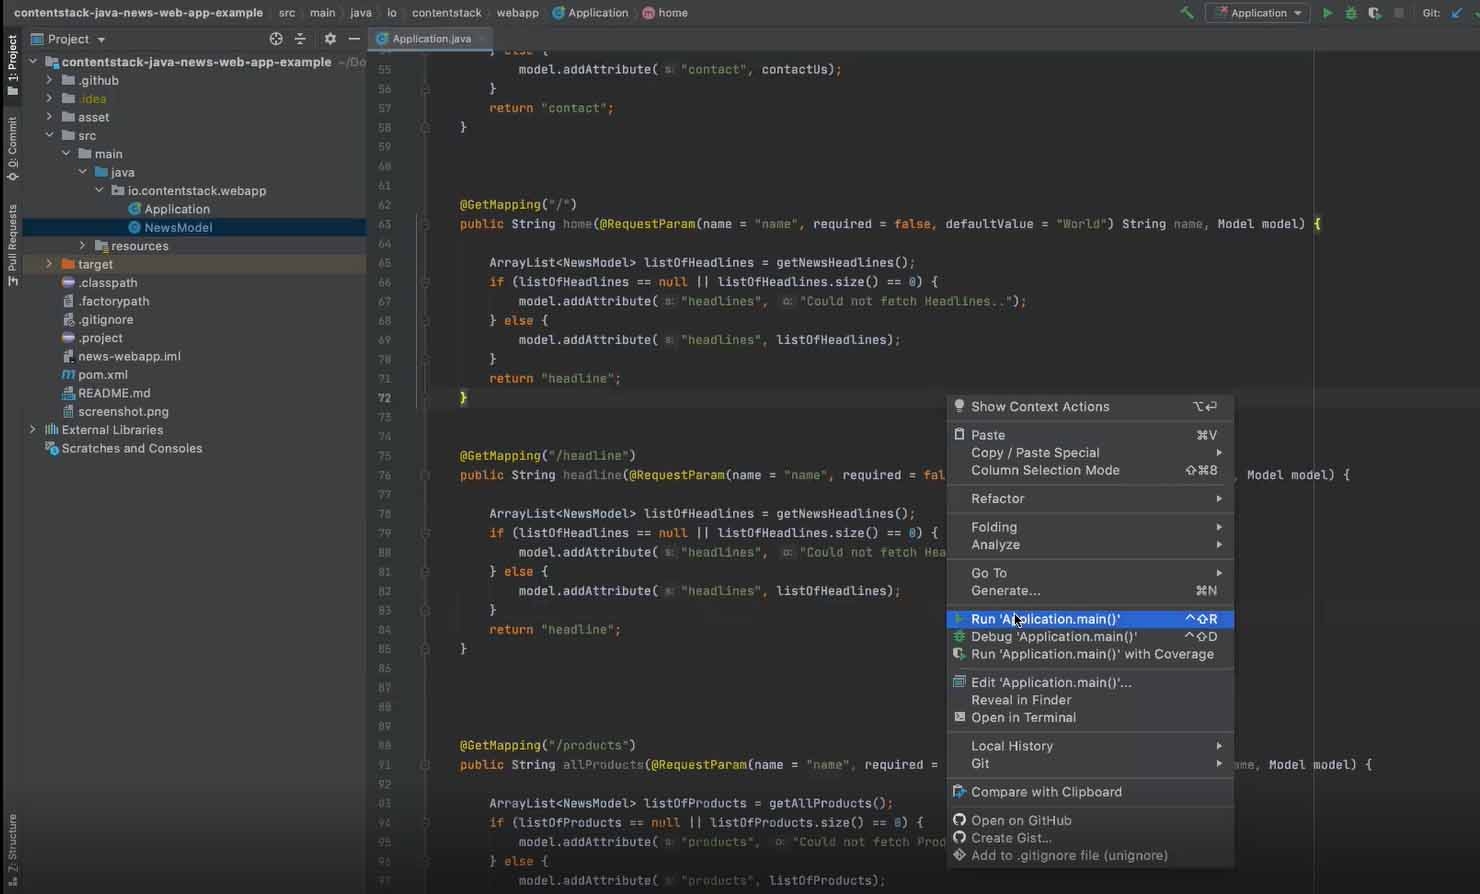
Right click on the interface (as shown above), and click on Run Application.main. The application runs and notifies that the application can be viewed at port number 8080.
Alternatively, you can execute the following command from the command prompt of the IDE. To do this, go to the root directory of the application and run the command:
- if you have selected Gradle while setting up the project:
./gradlew bootRun
- If you are using Maven, run the following command:
./mvnw spring-boot:run
Now run the service with curl (in a separate command prompt window), by executing the following command:
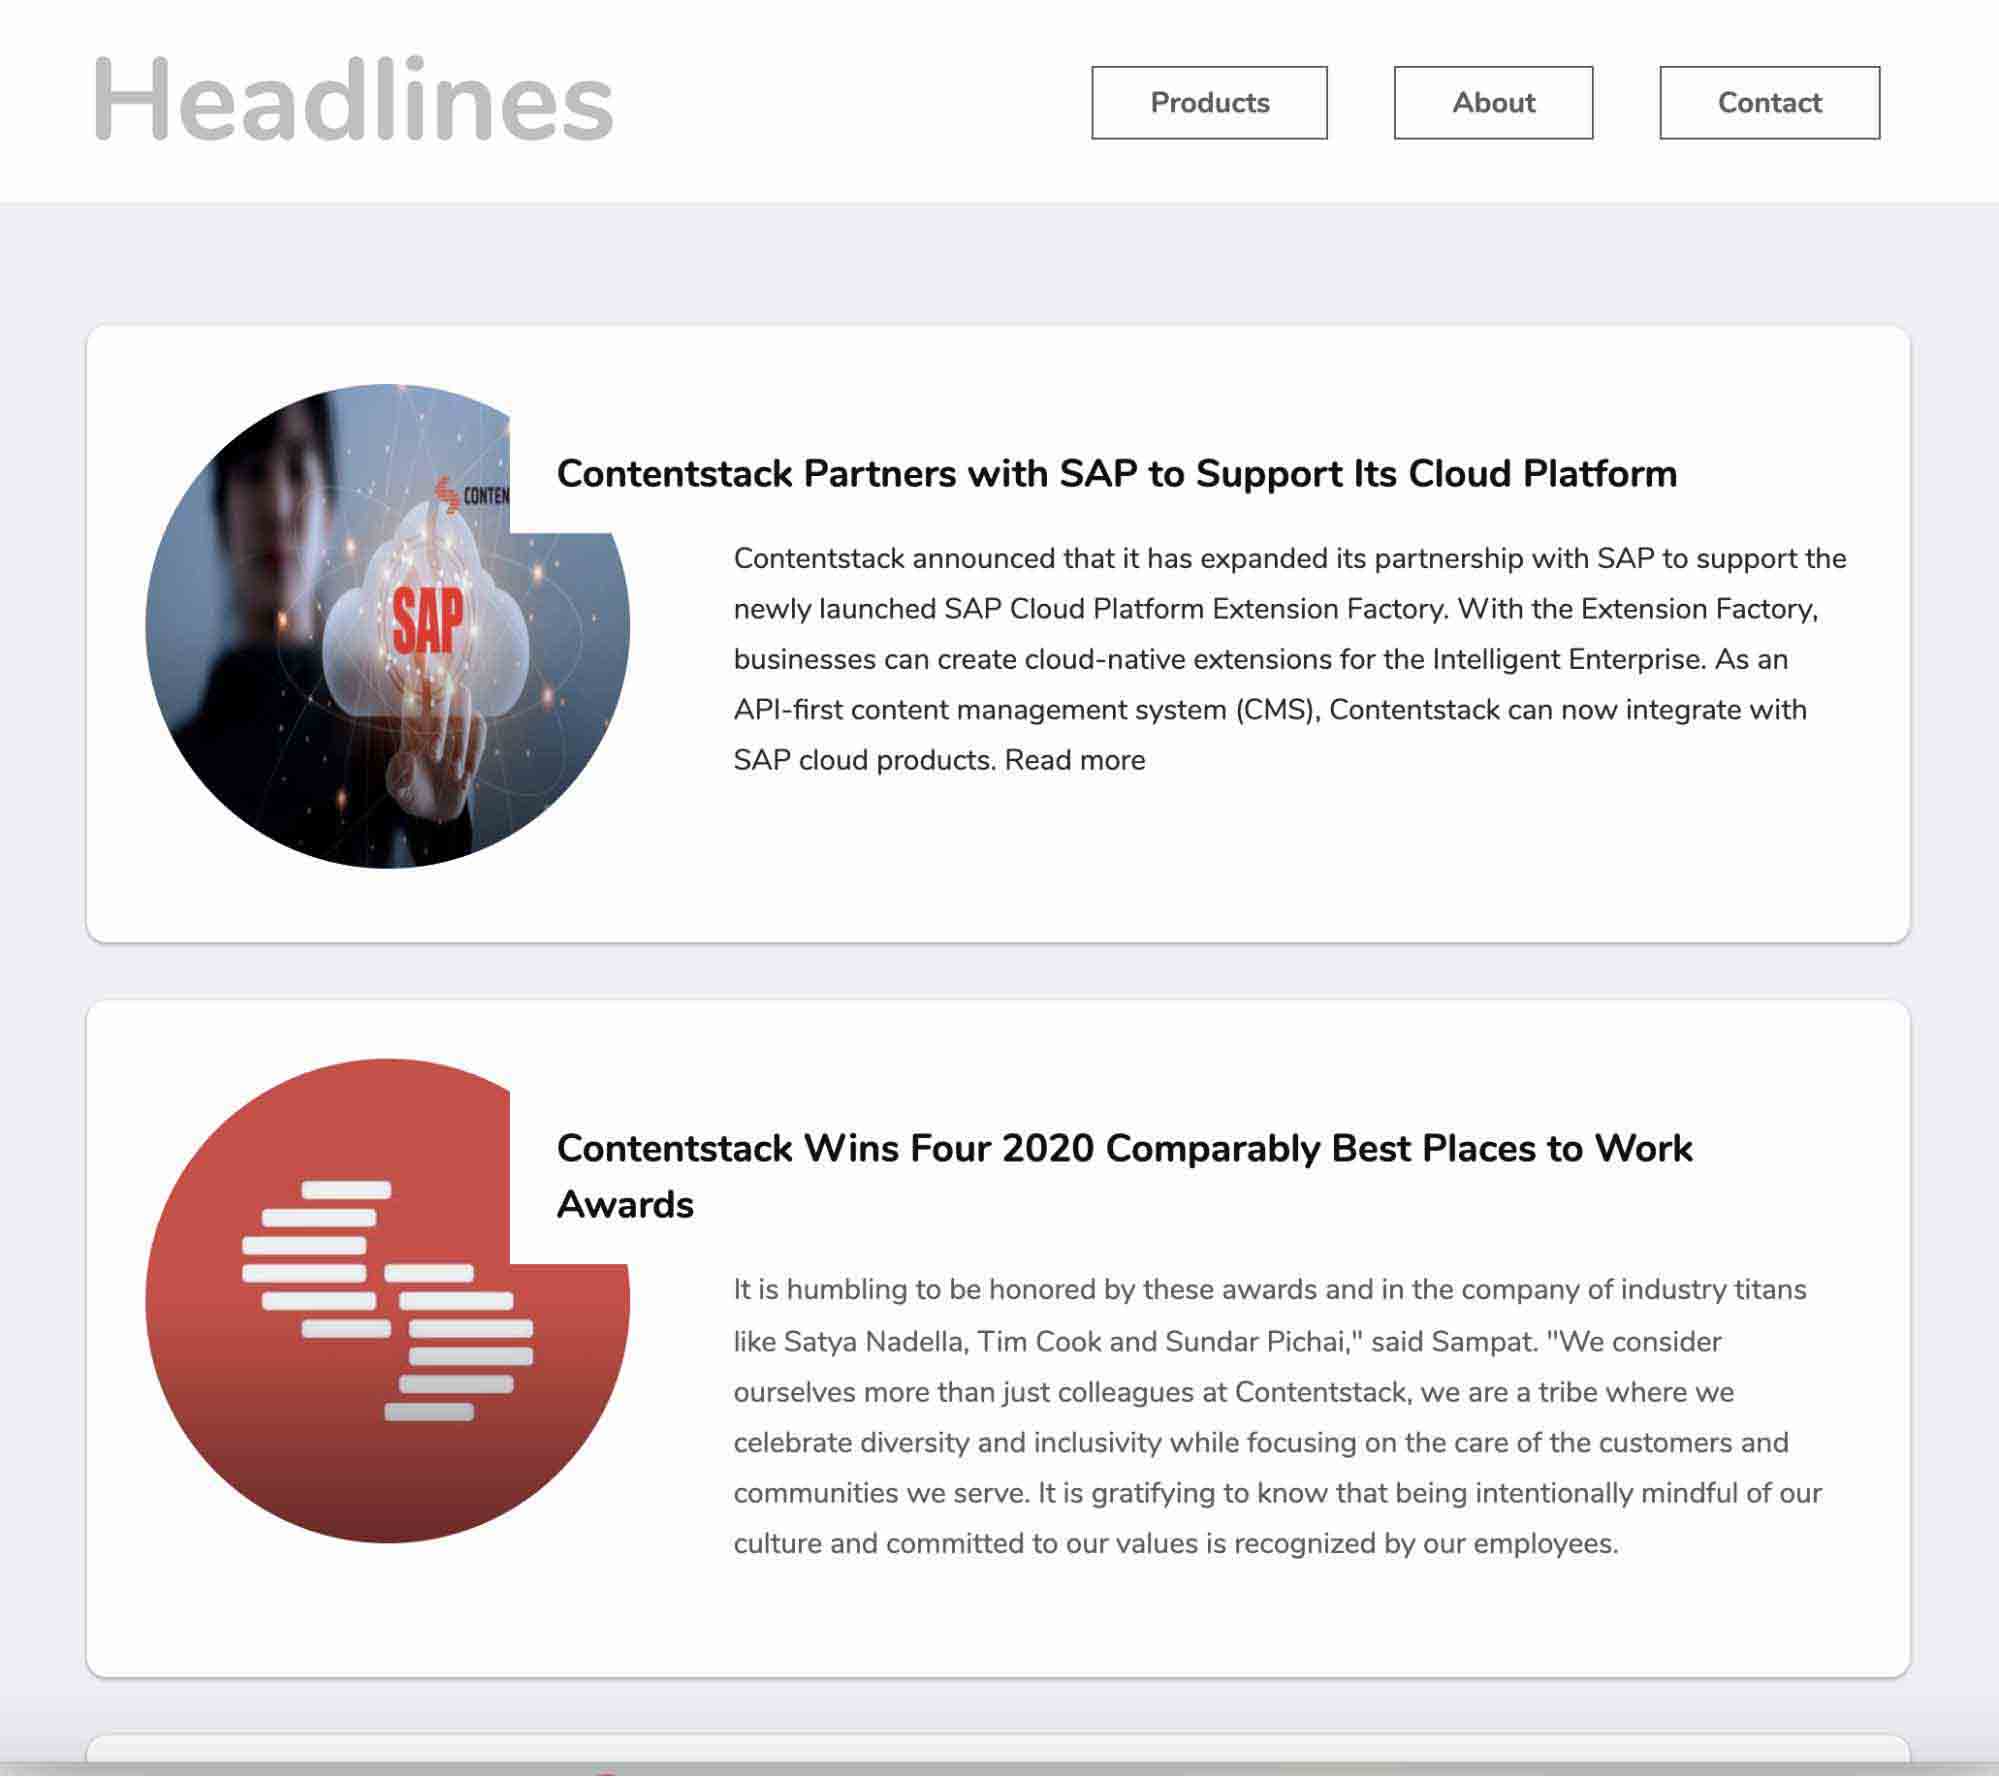
$ curl localhost:8080You will see the application running at port 8080 as shown below:
- if you have selected Gradle while setting up the project:
Additional Resource: You can also use the Contentstack Java SDK to build a news app. Read our Build a news app using Contentstack and Contentstack Java SDK guide for more details.
More resources
