
JW Player App Installation Guide
JW Player is a media player for streaming audio and video on websites and mobile devices. It provides an easy-to-use interface to upload, manage, store, deliver, and publish your media files.
Its simple drag-and-drop feature lets you quickly organize and publish your videos and audio on the web or mobile devices. It supports various file formats, including MP4, WebM, Ogg, and HLS, and the playback of DRM-protected content.
The app also enables users to watch live streams, playlists, and videos in full-screen mode and access advanced playback options such as captions, speed control, and picture-in-picture.
Contentstack Marketplace lets you install and use the JW Player application within your stack to fetch and display videos from the JW Player account within your entries.
Prerequisites
- JW Player account
- Contentstack account
- Access to the Contentstack Organization/Stack as the Owner/Admin
Let's follow this step-by-step guide to install and configure the JW Player app within your stack.
Steps for Execution
- Retrieve the Credentials from the JW Player Account
- Install and Configure the JW Player app in Contentstack Marketplace
- Use the JW Player app within your Stack Entry
Retrieve the Credentials from the JW Player Account
To get the access token for JW Player, follow the steps given below:
- Log in to the JW Player account using your JW Player account credentials.
- Click the gear icon in the top-right corner of the JW Player dashboard, and then click API Credentials.Click to enlarge
- Now, click Show Credentials to view and copy the API Key.Click to enlarge
- To generate the Secret, click Add.Click to enlarge
- In the API Key modal, provide Name, select User Role from the dropdown, set the Properties checkboxes, and click Save.Click to enlarge
- Go to the recently created API Key and click Show Secret to view and copy the client secret.Click to enlarge
Install and Configure the JW Player app in Contentstack Marketplace
Follow the steps given below to install the application in Contentstack.
- Log in to your Contentstack account.
- Navigate to the “App Switcher” icon in the top-right corner and click Marketplace.Click to enlarge
- Click Apps from the left panel.
- Within the Marketplace, you can see all the available apps. Hover over the JW Player app and click Install.Click to enlarge
- In the pop-up window, select the stack where you want to install the JW Player app, accept the terms of service, and click the Install button.Click to enlarge
- On the Configuration screen, enter the following details:
- JW Player Credentials: Enter the API Key and Client Secret retrieved from your JW Player account in step 1.
- Choose the JW Player Keys to Save in Entry: Choose how to save the data fetched from the JW Player account in Contentstack entries.
- If you select the All Fields option, you can select only a limited number of videos in the entry.
- For Custom Fields, you can search and add specific JW Player Keys you want to save in entries.
Click to enlarge
If you select Custom Fields then the JW Player Keys dropdown appears. By default, mediaid, title, image, pubdate, description, and link options are already selected inside the dropdown. If you want to create a new key, click the + New Key Field option.Click to enlarge
In the Add Key Path modal, enter the JW Player Key Path and click the Create or Create and Apply button to create a new key.Click to enlarge
- On the UI Locations tab, you can see the predefined app locations. You can use the toggle button corresponding to each UI location to enable or disable it based on your requirements. Click to enlarge
- If the webhook is enabled for your app, you can view the webhook logs under the Webhook tab.
Additional ResourceFor more information on UI location and webhooks, please refer to the Installed Apps guide.
- Click the Save button.
- Click Open Stack to start using the JW Player application.
Use the JW Player app within your Stack Entry
To use the JW Player application within an entry of your stack, follow the steps given below:
- Go to your stack, click the Content Models icon in the left navigation panel, and click the + New Content Type button.
- Create a content type by adding relevant details as displayed below:Click to enlarge
There are two ways to use the JW Player application in your entry:
Steps to use the JW Player application using a Custom field:
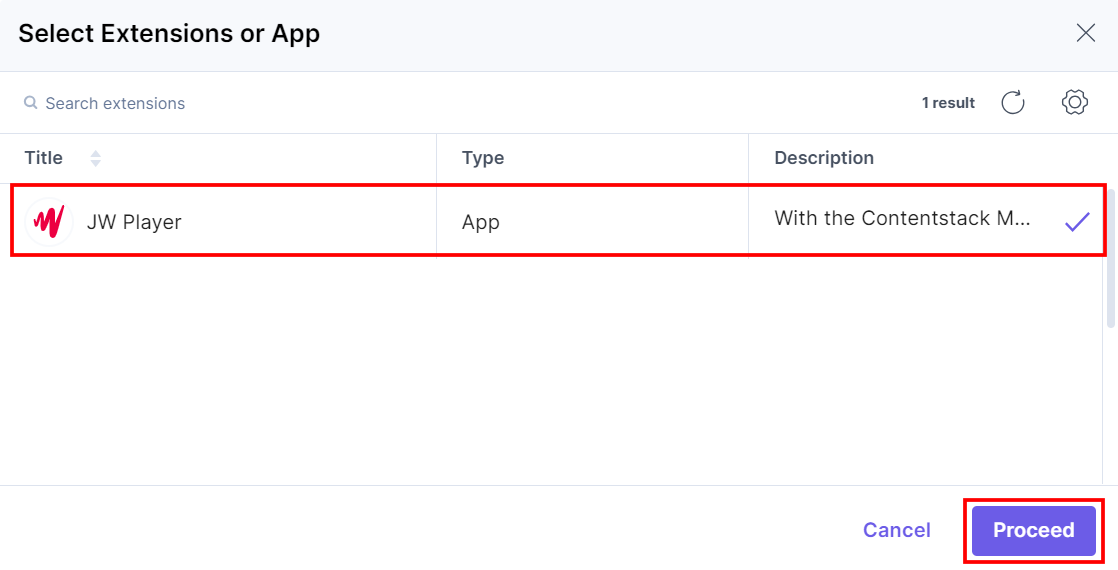
- In the Content Type Builder page, add a Custom field in your content type by clicking the Insert a field link represented by a + sign.
- Under Select Extension/App, select JW Player, and click the Proceed button.
 Change the Display Name of the custom field to your choice, for example, JW Player Custom Field. Optionally, you can add Help Text and Instruction Value for your custom field. This adds the JW Player app in the custom field.
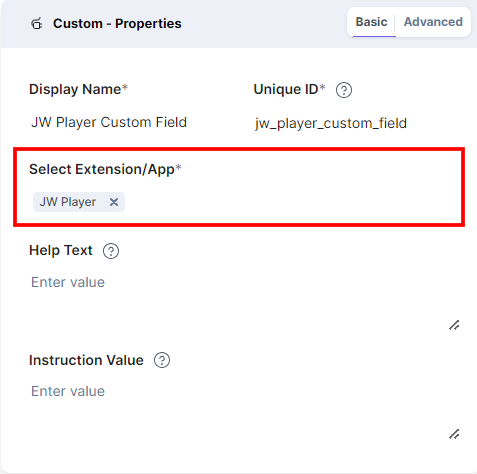
- After adding the app in a custom field, click Save or Save and Close to save your changes.
- To use the JW Player app, create an entry for this newly created content type. To do this, in the left navigation panel, navigate to the Entries page, click + New Entry to create a new entry for the above content type, and then click Proceed.
You can see the JW Player app’s custom field on your entry page as shown below: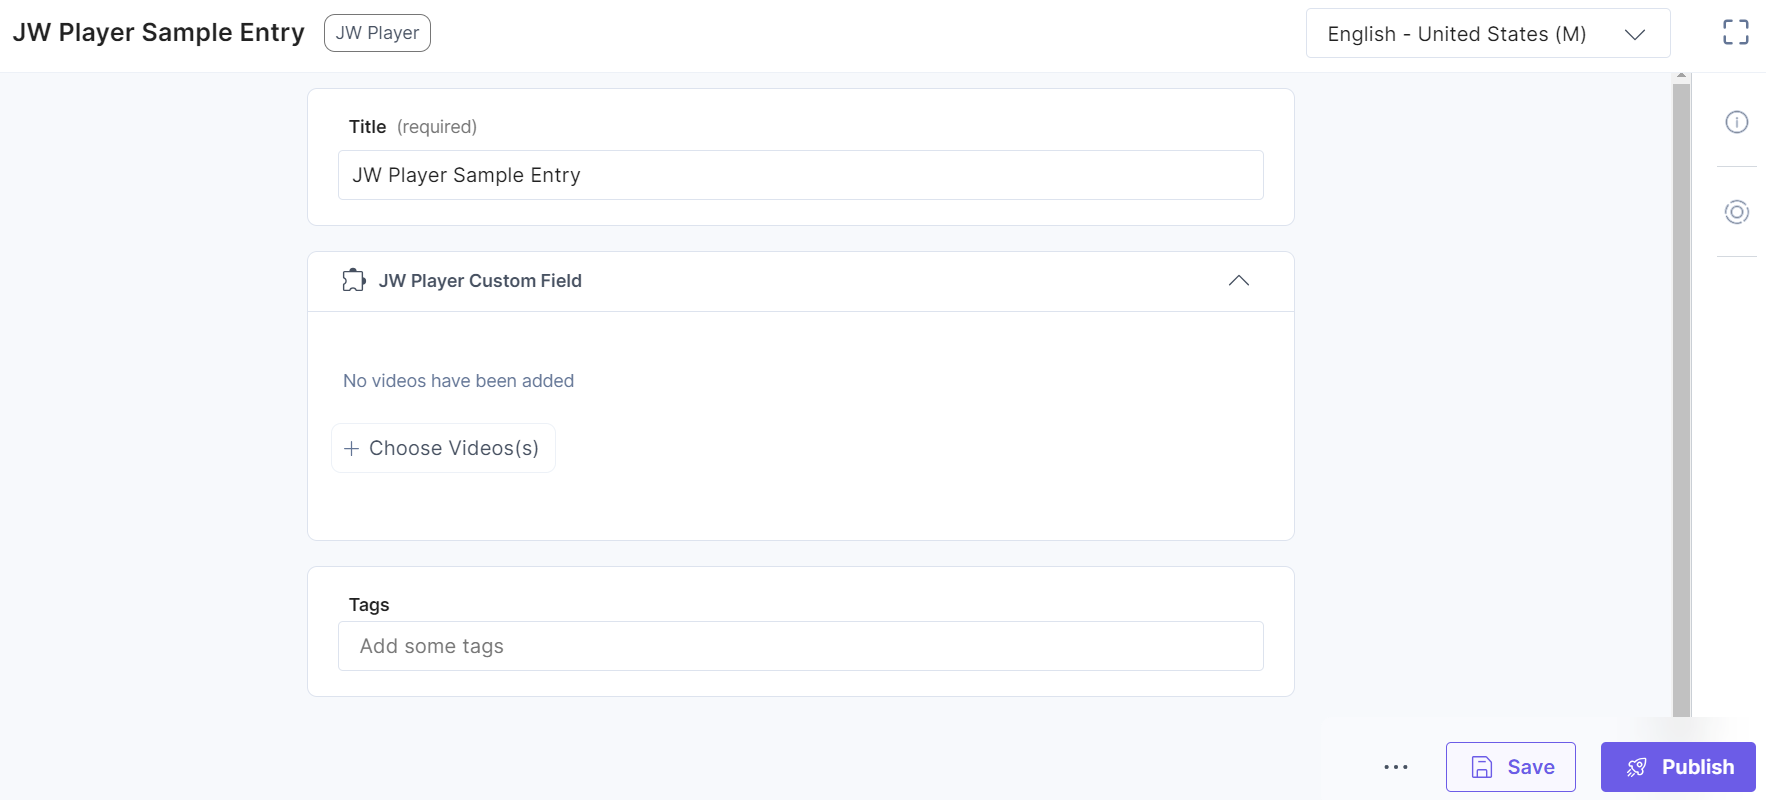
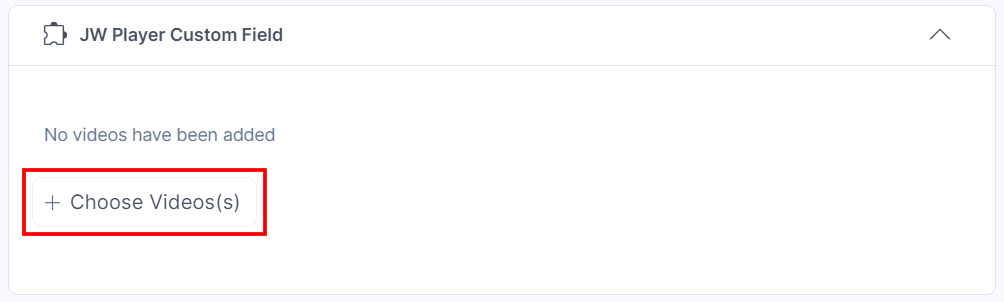
- Click the + Choose Video(s) button.
- Select the video(s) from your JW Player selector page and click the Add Videos(s) button to add them to your entry.
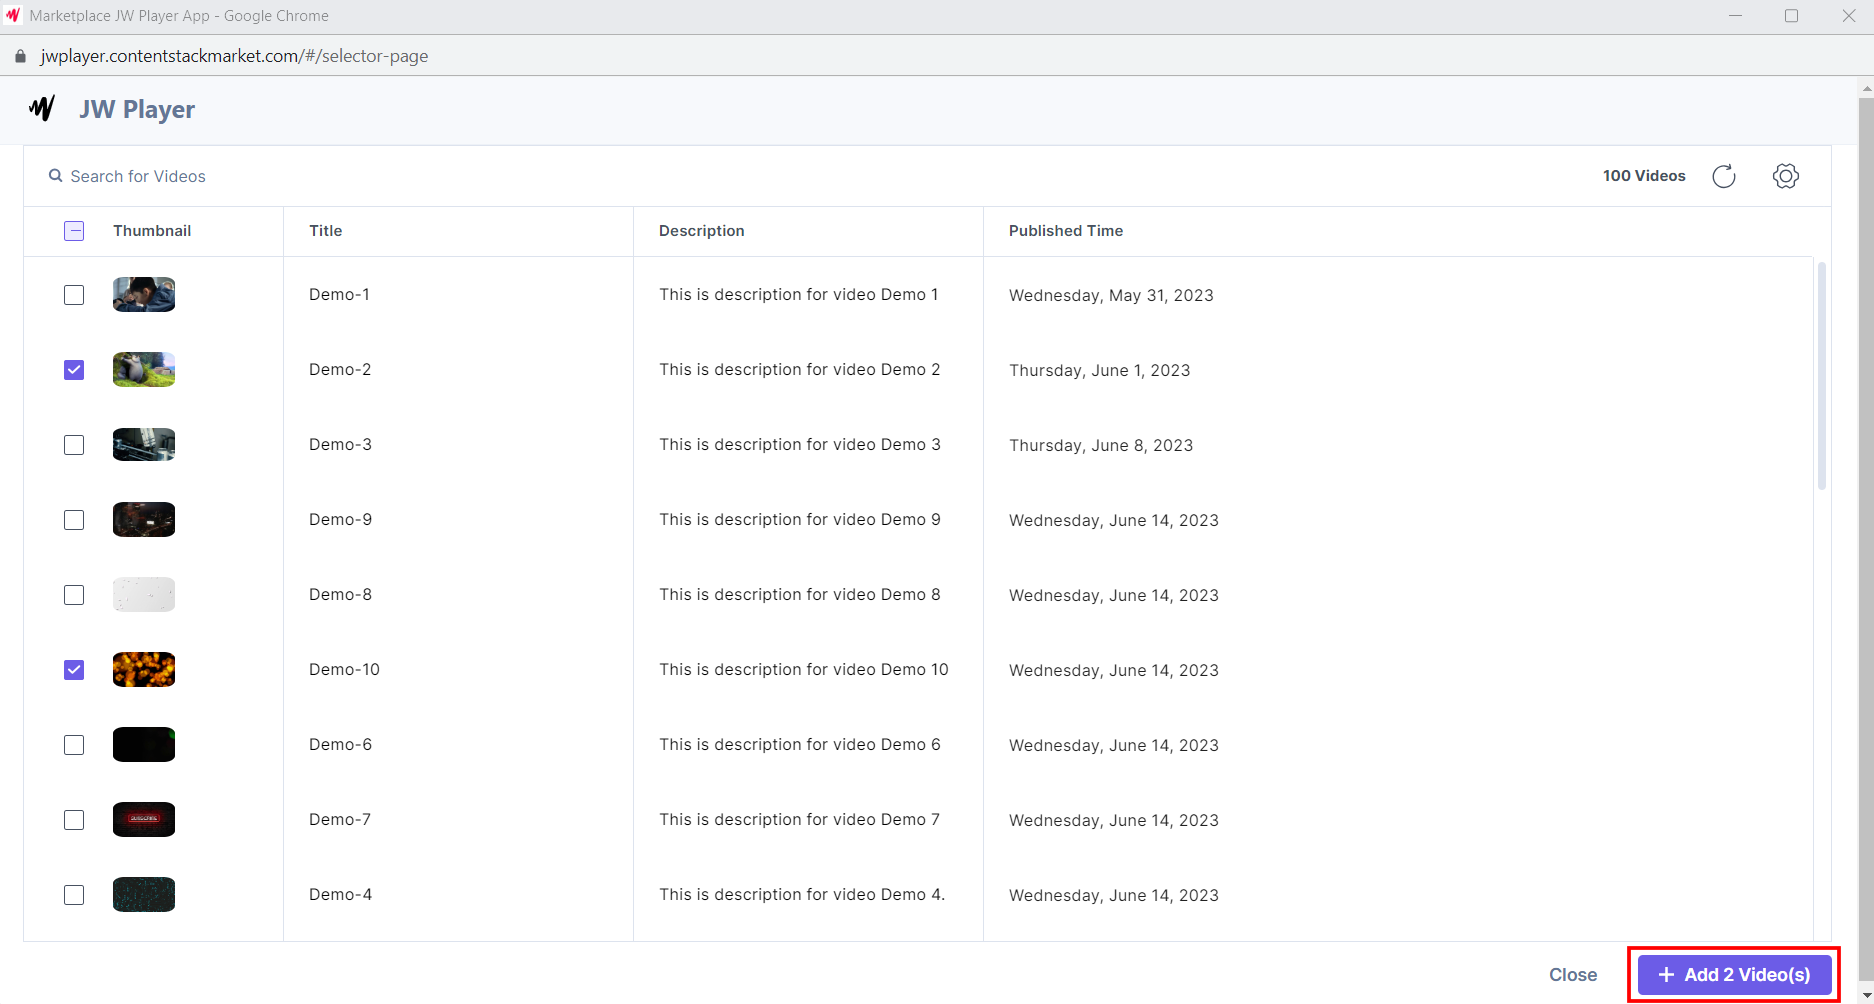
Note: You can add multiple videos in one go.
You can search for videos on the JW Player selector page.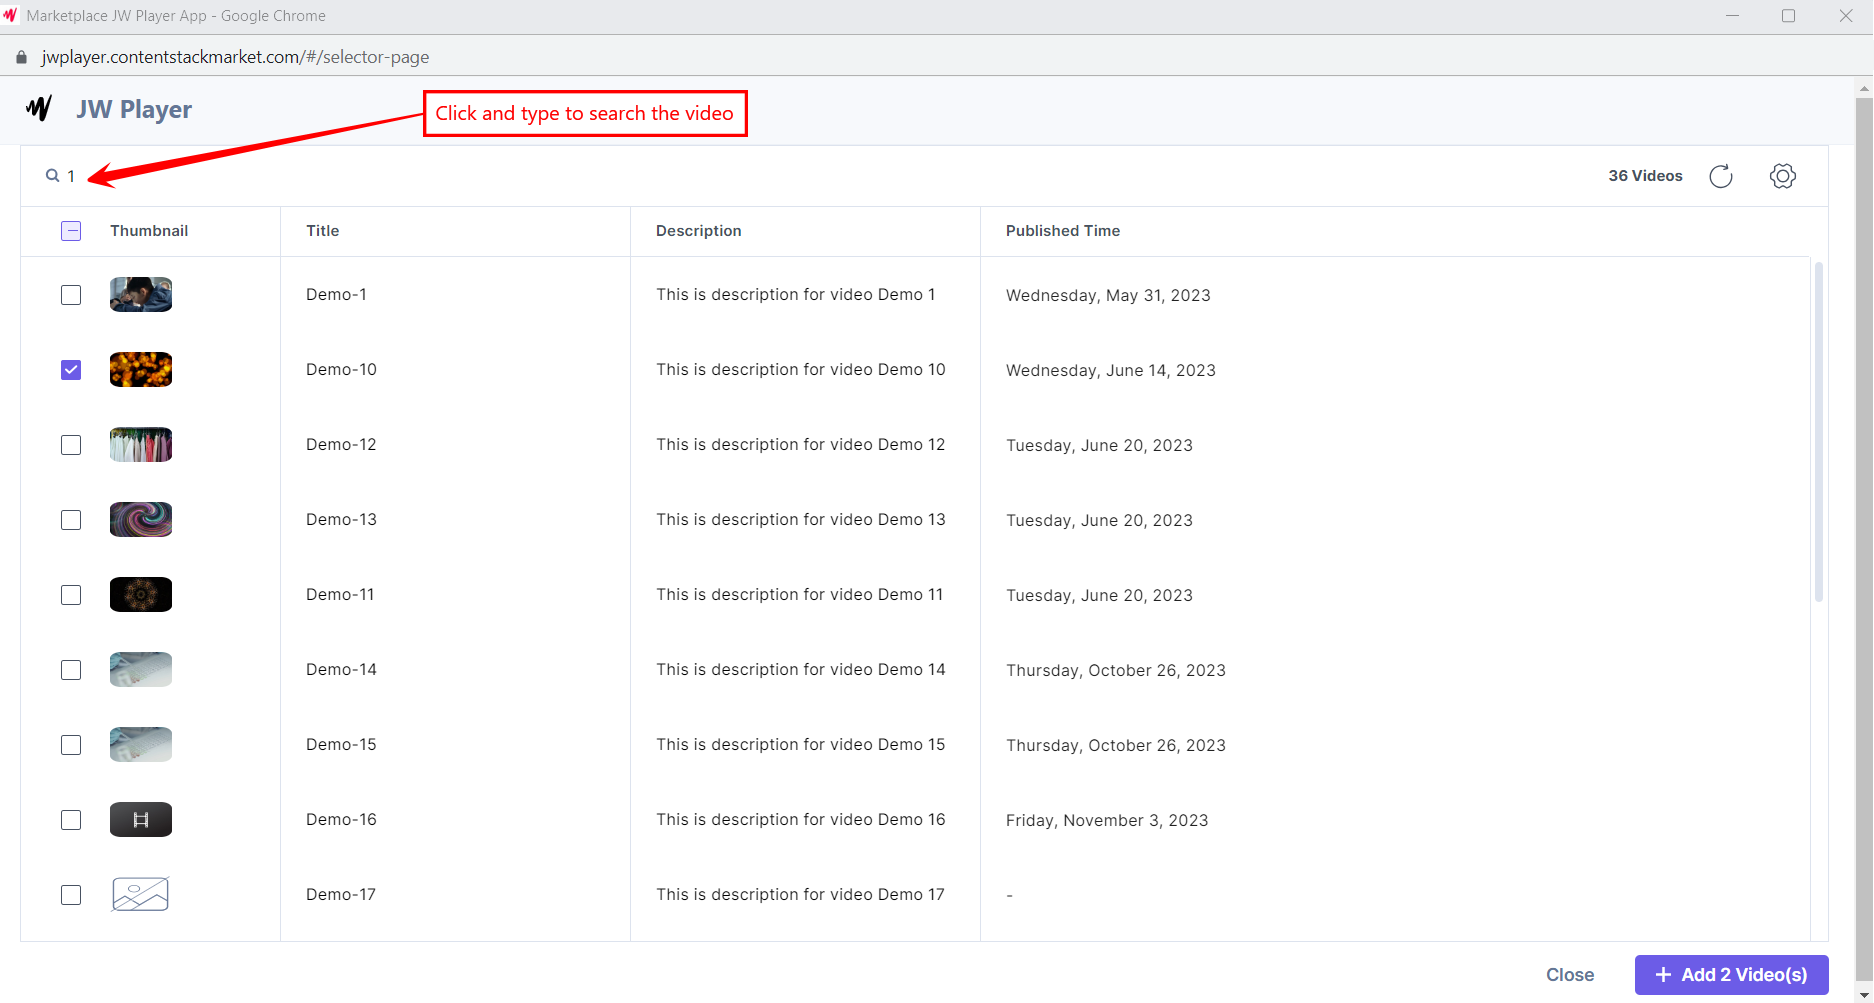 Also, you can view the videos in a Comfortable or Compact view. By default, the Comfortable view is selected.
Hover over the video on the JW Player selector page, and you can see the Open in JW Player option to go directly to the JW Player platform. The selected video(s) are referenced in the thumbnail view within your entry.
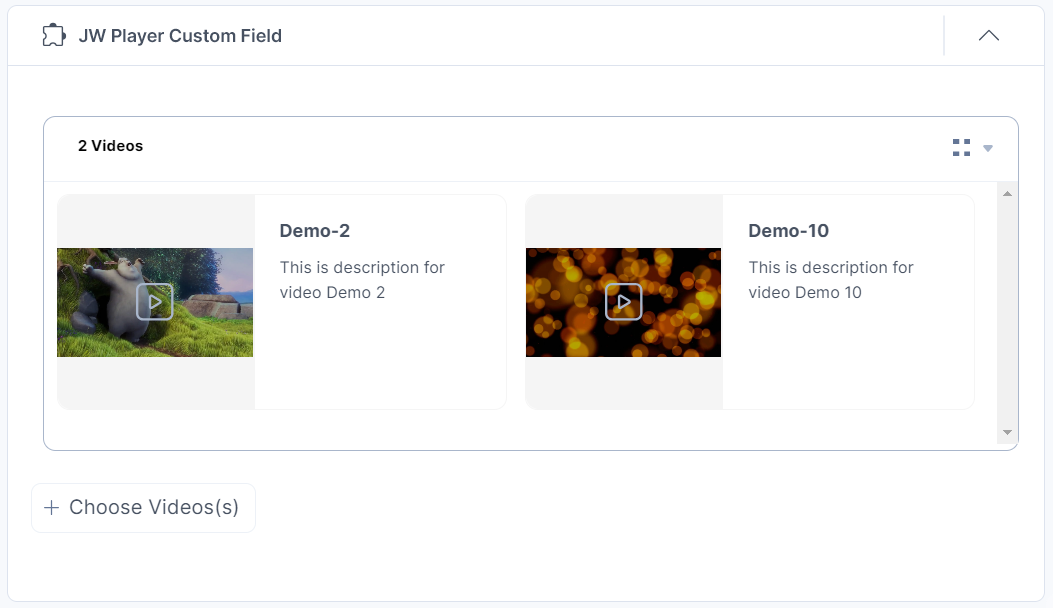 Select the list view option from the dropdown to view the video(s) in the list view.
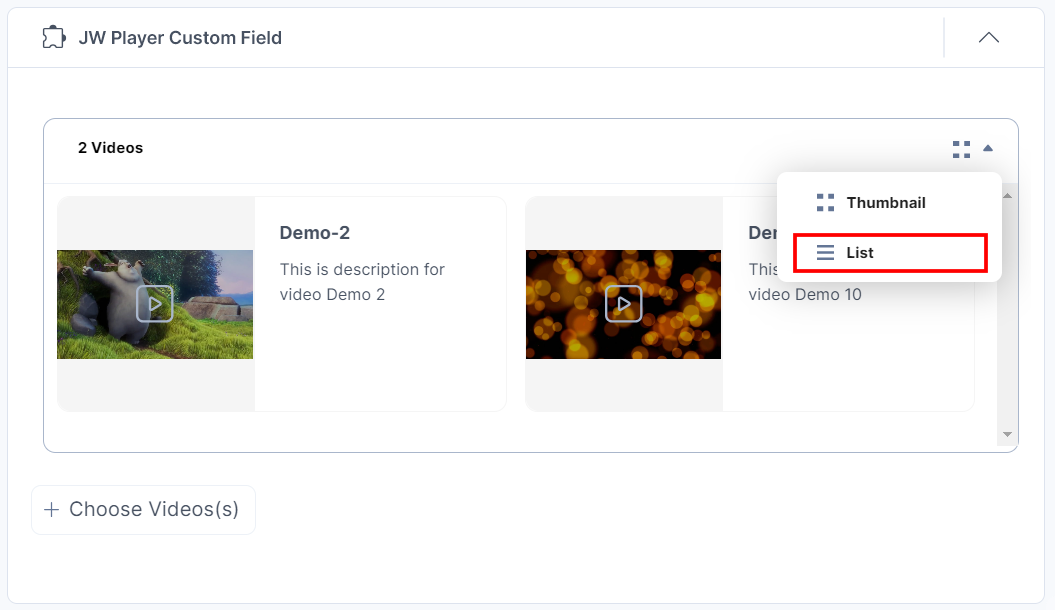 The selected video(s) are referenced in the list view within your entry .
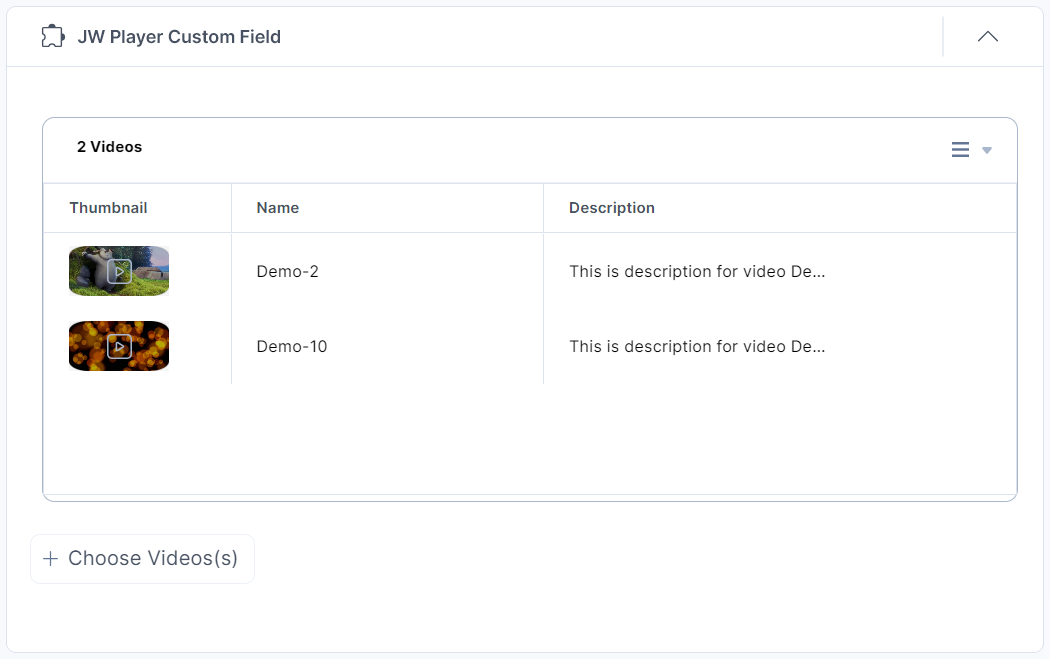
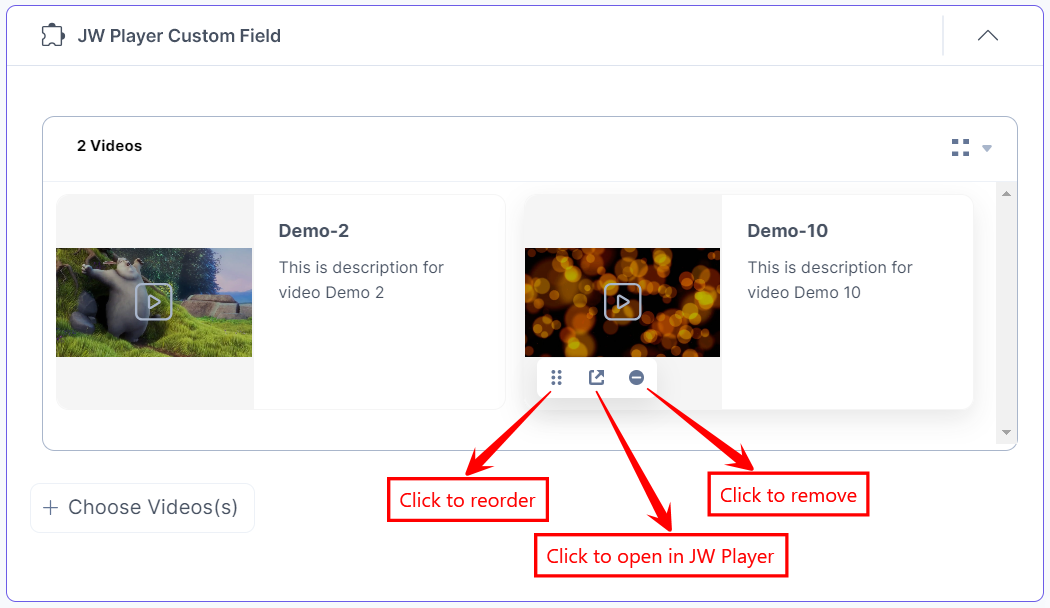
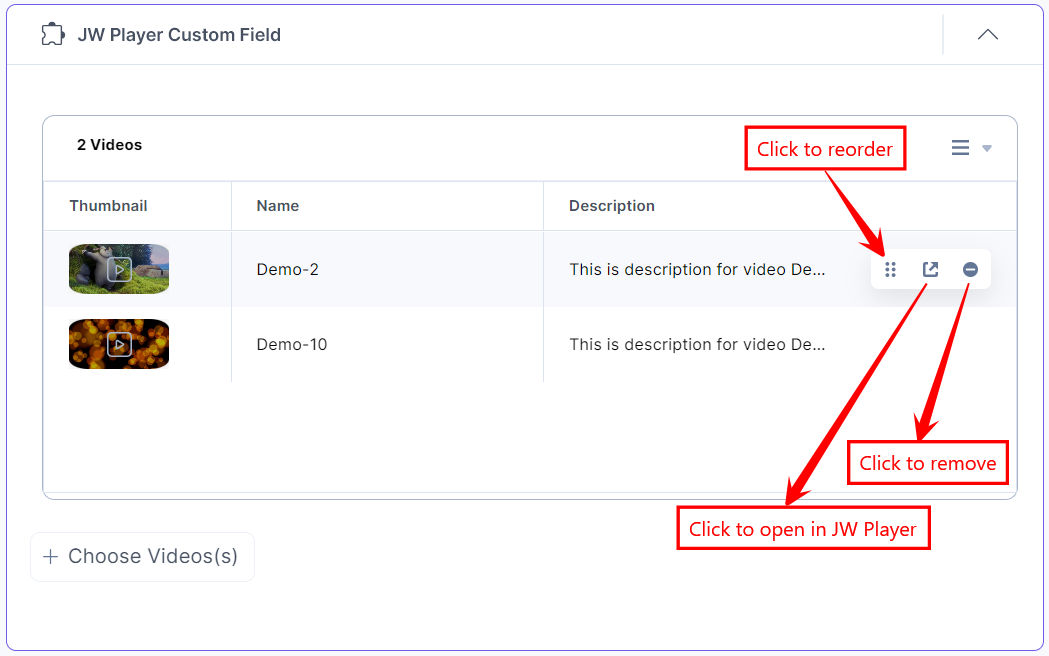
- Hover over the video to access these features:
- Click the Reorder icon to drag and reorder the video.
- Click the Open in JW Player icon to open the video on the JW Player platform.
- Click the Remove icon to remove the video.
Thumbnail View
List View
- After adding the video(s), Save and Publish your entry.
Steps to use the JW Player application using a JSON Rich Text Editor field:
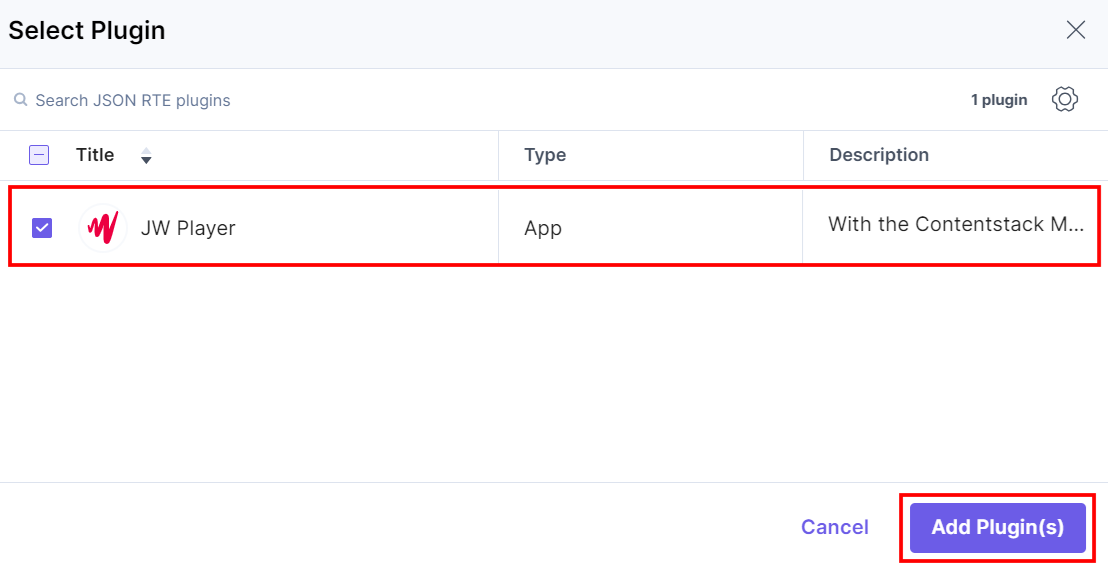
- In the Content Type Builder page, add a JSON Rich Text Editor field in your content type by clicking the Insert a field link represented by a + sign.
- Under Select JSON RTE Plugin(s), select JW Player, and then click Add Plugin(s).
 This adds JW Player in the JSON Rich Text Editor field.
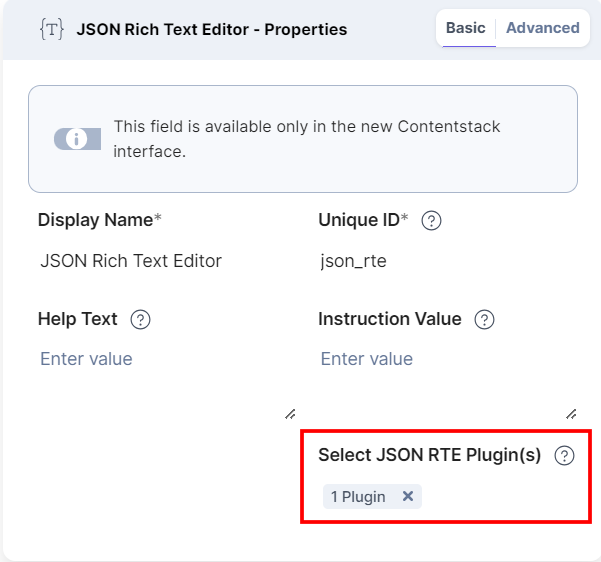
- After adding the app in a JSON Rich Text Editor field, click Save or Save and Close to save your changes.
- To use the JW Player app as a JSON RTE plugin, create an entry for this content type. In the left navigation panel, navigate to the Entries page, click + New Entry to create a new entry for the above content type, and then click Proceed.
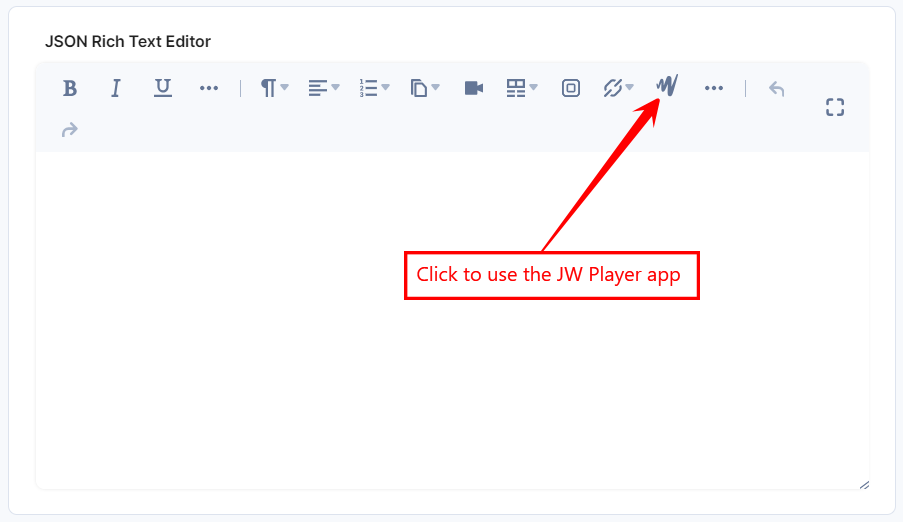
You will see the JW Player app icon inside the JSON RTE field in your entry page as shown below: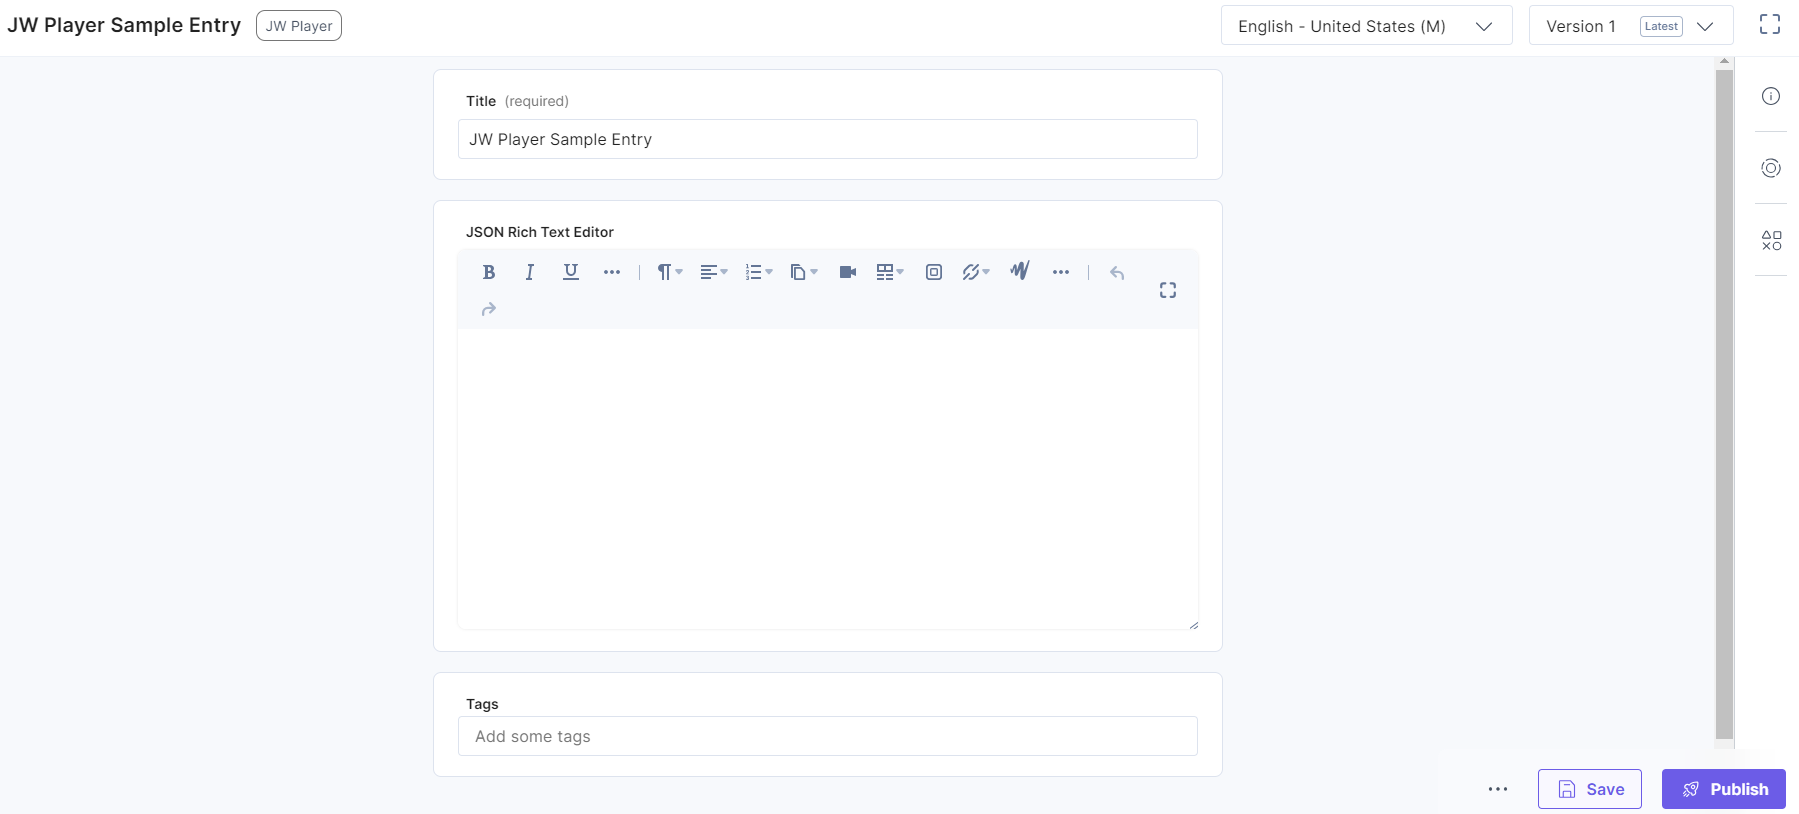
- Click the JW Player app icon.
- Select the video(s) from your JW Player selector page and click the Add Videos(s) button to add them to your entry.
Note: You can add multiple videos in one go.
You can search for videos on the JW Player selector page.Also, you can view the videos in a Comfortable or Compact view. By default, the Comfortable view is selected.
Hover over the video on the JW Player selector page, and you can see the Open in JW Player option to go directly to the JW Player platform.The videos you selected get referenced within your entry:
- To resize the video, drag the corner and adjust the size as required. Hover over the video to access these features:
- Click the Preview icon to preview the video on the JW Player platform.
- Click the Edit icon to edit the video.
- Click the Remove icon to remove the video.

Additional Resource: You can use alignment and inline asset features to edit the video placement within the JSON Rich Text Editor field.
- After adding the video(s), Save and Publish your entry.