

.svg?format=pjpg&auto=webp)
.svg?format=pjpg&auto=webp)
.png?format=pjpg&auto=webp)


.png?format=pjpg&auto=webp)
Validating Modular Blocks using Contentstack Webhooks and AWS Lambda
Modular Blocks allow you to create and manage components of a page dynamically. You can add more blocks (loaded with multiple sets of fields), rearrange those blocks, or remove them from the entry as per the requirements at your front-end application.
With this flexibility, it's possible that more than the required number of blocks get added in the entry, causing unnecessary addition of blocks. To avoid this, we can set up specific rules on modular blocks.
In this guide, we will learn how to set these rules using Contentstack Webhooks and AWS Lambda.
Process overview: We will create a content type and add a modular block field in (along with a few other fields). The block names will be Disclaimer, Banner, Testimonial, and so on. We will also set up a workflow with three stages: Draft, Rejected, and Approved.
We will then create an AWS Lambda Function which will validate the number of occurrences of “Disclaimer” & “Banner” blocks in the entry. For the “Disclaimer” block our rule will validate exactly one “Disclaimer”. Similarly, for “Banner” blocks the rule will validate one to three “Banners”.
If the validation fails, the entry’s workflow stage will change to “Rejected” and automatically assign it to the user who last updated the entry via an email. The email explains why the entry was rejected.
Let’s get started!
Prerequisites
- Working knowledge of AWS Lambda and AWS API Gateways
- Access to AWS environment
- Contentstack account
- Access to Workflows in your Contentstack account
- Management token
Steps for Execution
- Set up the essentials
- Set up the Workflow
- Get Workflow UIDs
- Set up an AWS lambda function
- Create a webhook in Contentstack
- Try out the setup
-
Set up the Essentials
To set up the essentials, log in to your Contentstack account and follow the steps given below:
-
We’ve created a sample content type for this guide which you can download from the GitHub repository.
-
After downloading the content type, unzip the downloaded zip file and import this content type to your stack.
Once done, edit the content type. You will notice that it has the following schema: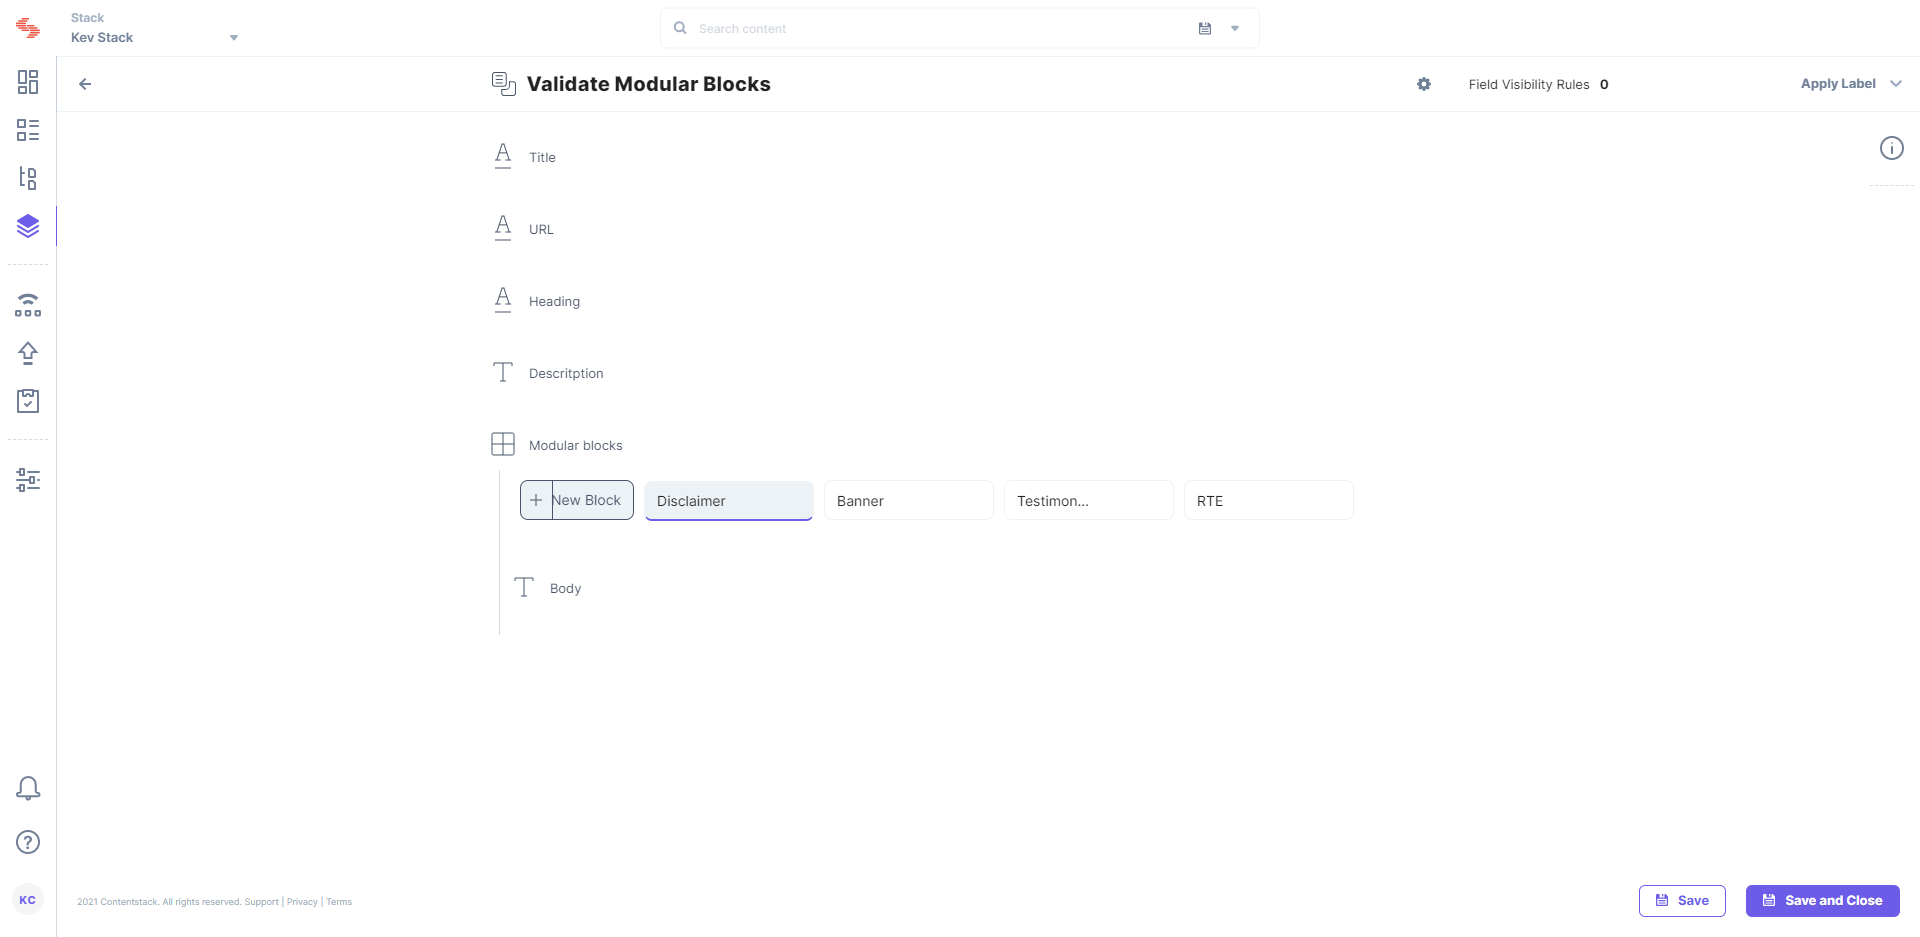
Note that we have added a Modular Block field with the following details:
Disclaimer: Contains an RTE field named "Body"
Banner: Contains a single line, a RTE and a file field
Testimonials (optional): Contains a single line and file fields
Note: We will perform validations on “Disclaimer” and “Banner” blocks. Hence, these two blocks are mandatory while others blocks are optional. You can add blocks according to your preferences.
With these steps we have the essentials ready, let's move ahead and create a workflow.
-
-
Set up the Workflow
You need to set up a Workflow in Contentstack that functions in the following way:
- When modular blocks fail validation, the workflow stage changes from “Draft” to “Rejected”. Accordingly, the user will be notified about the rejection’s reason via email.
- When modular blocks pass validation, the workflow stage changes from “Draft” to “Approved.”
To achieve this functionality using workflow, perform the following steps:
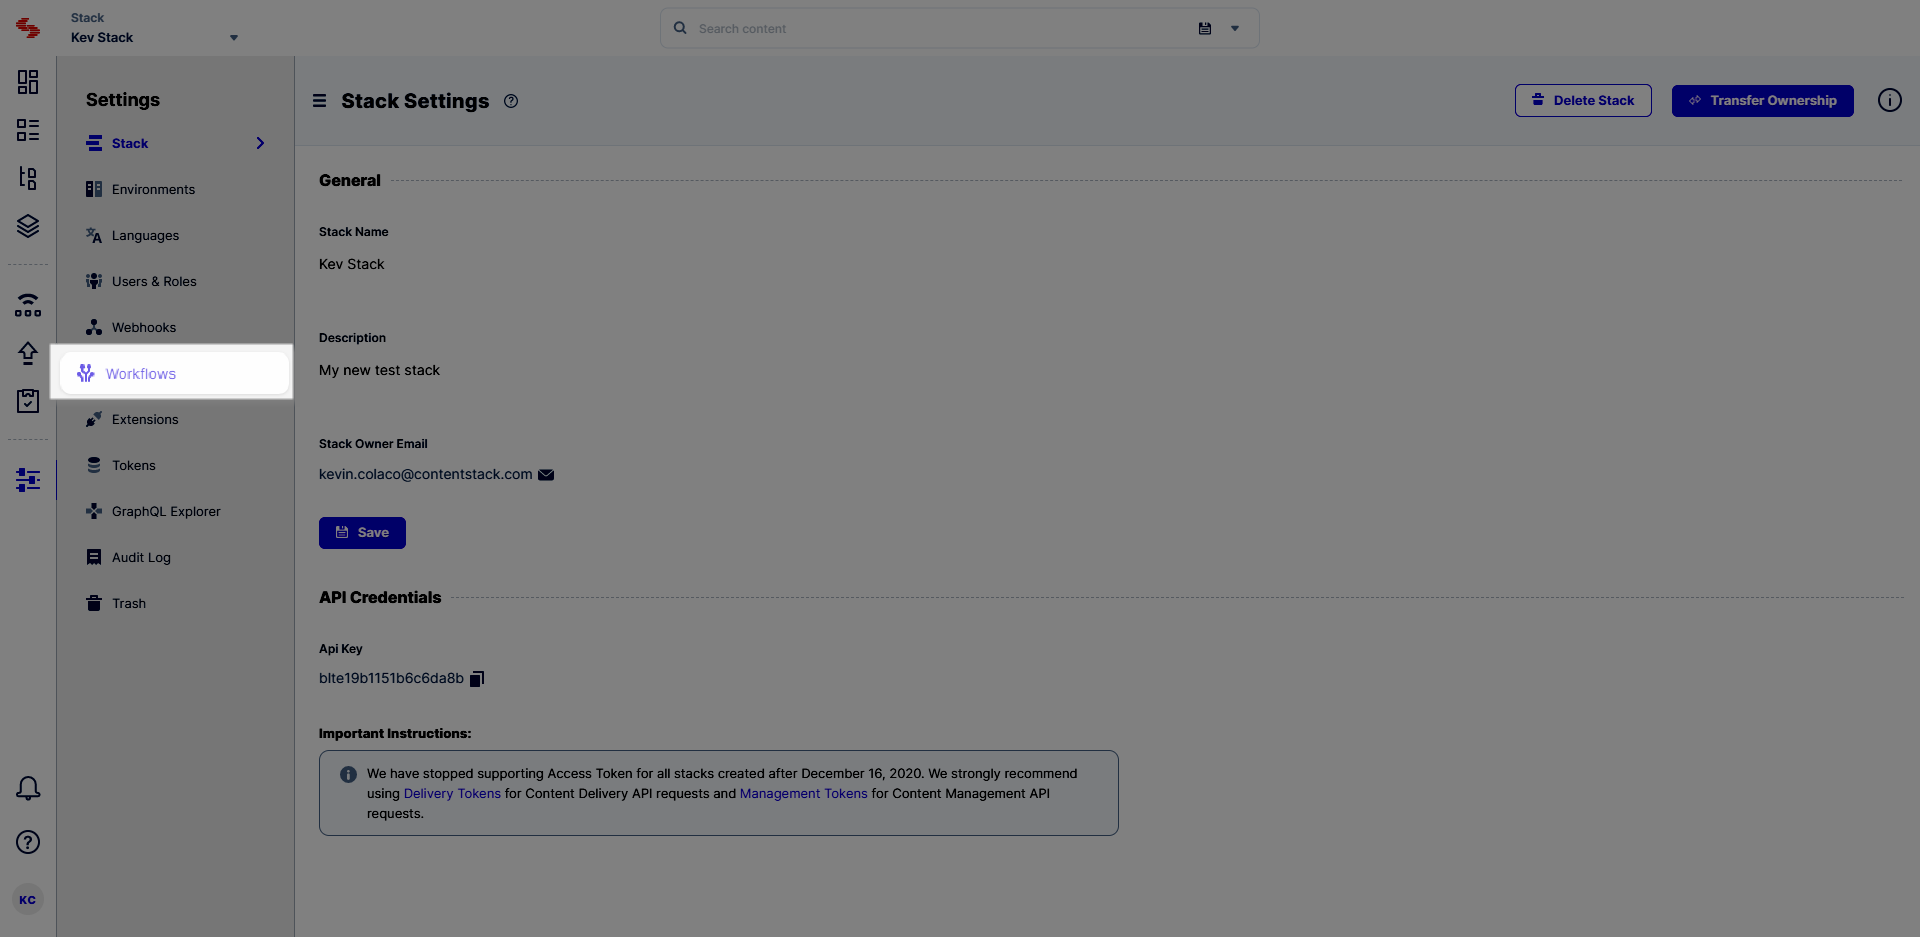
- Click over the “Settings” icon on the left navigation panel, and click Workflows.
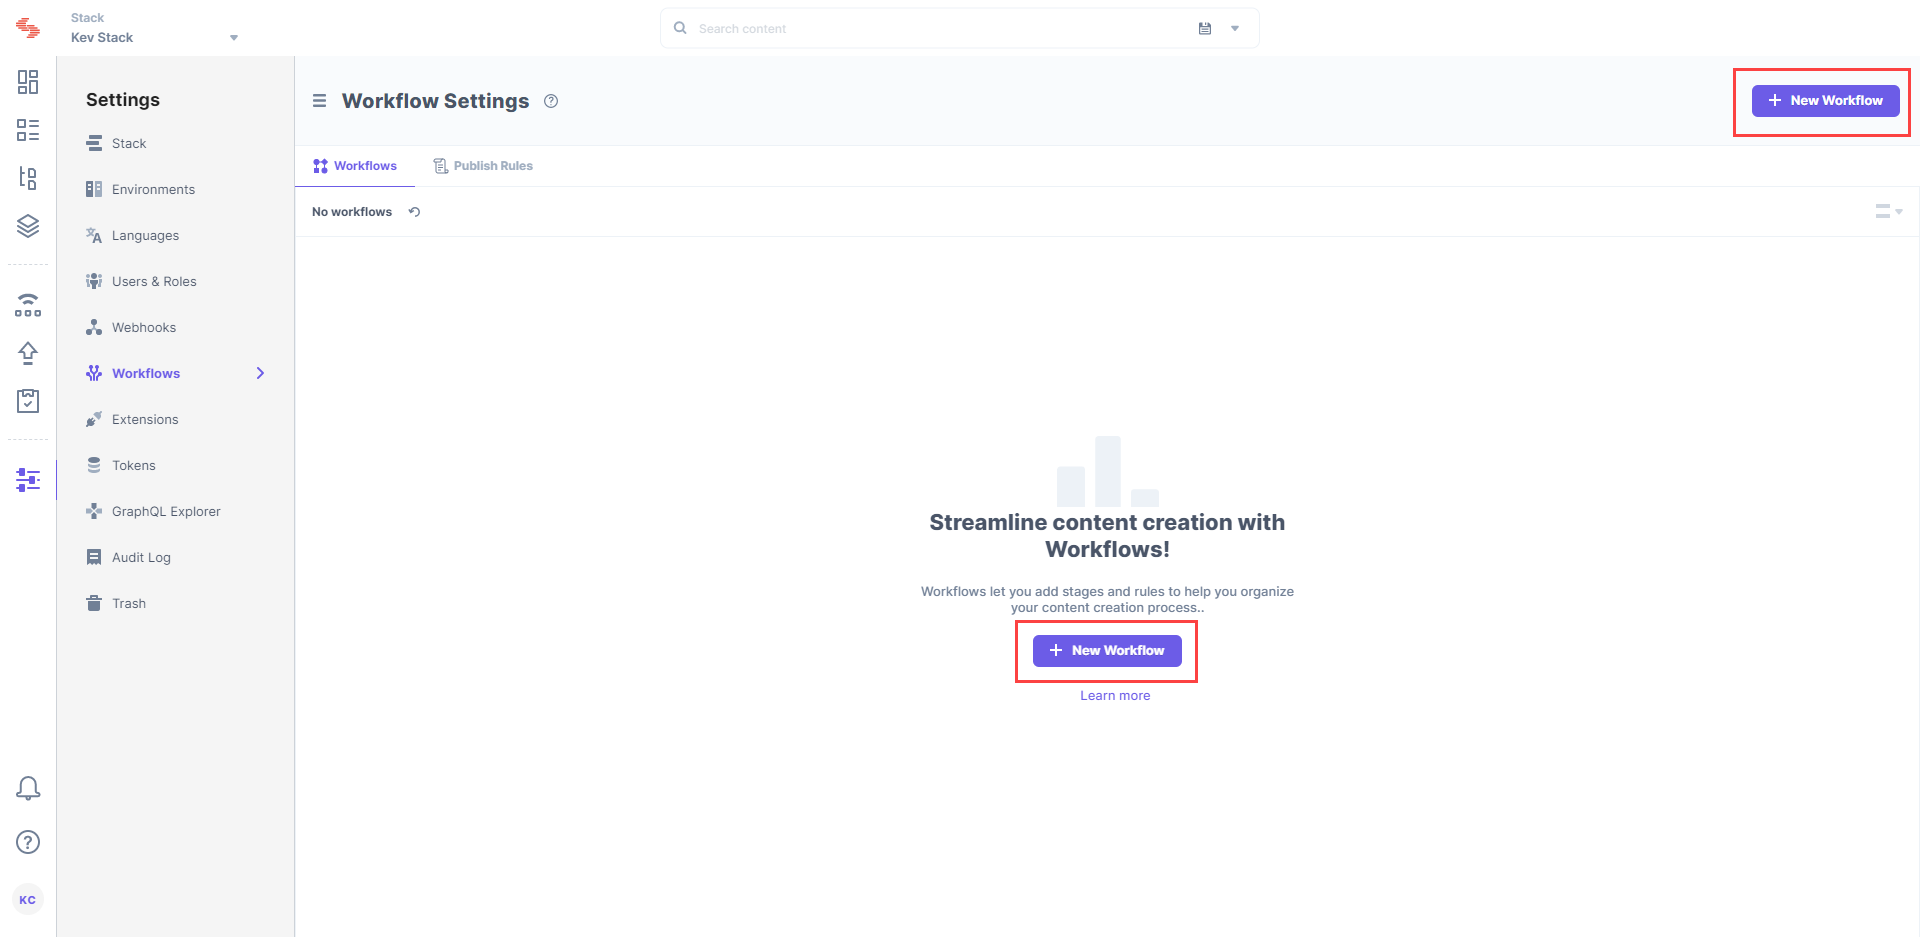
- On the Workflow Settings page, click + New Workflow.
- Name your workflow and add an optional description.
- Under the Scope option, select if this workflow should be applied to All Content Types or Specific Content Type(s). For our example, we will select the Specific Content Types(s) option and then select our content type, Blog, and then click Add button.
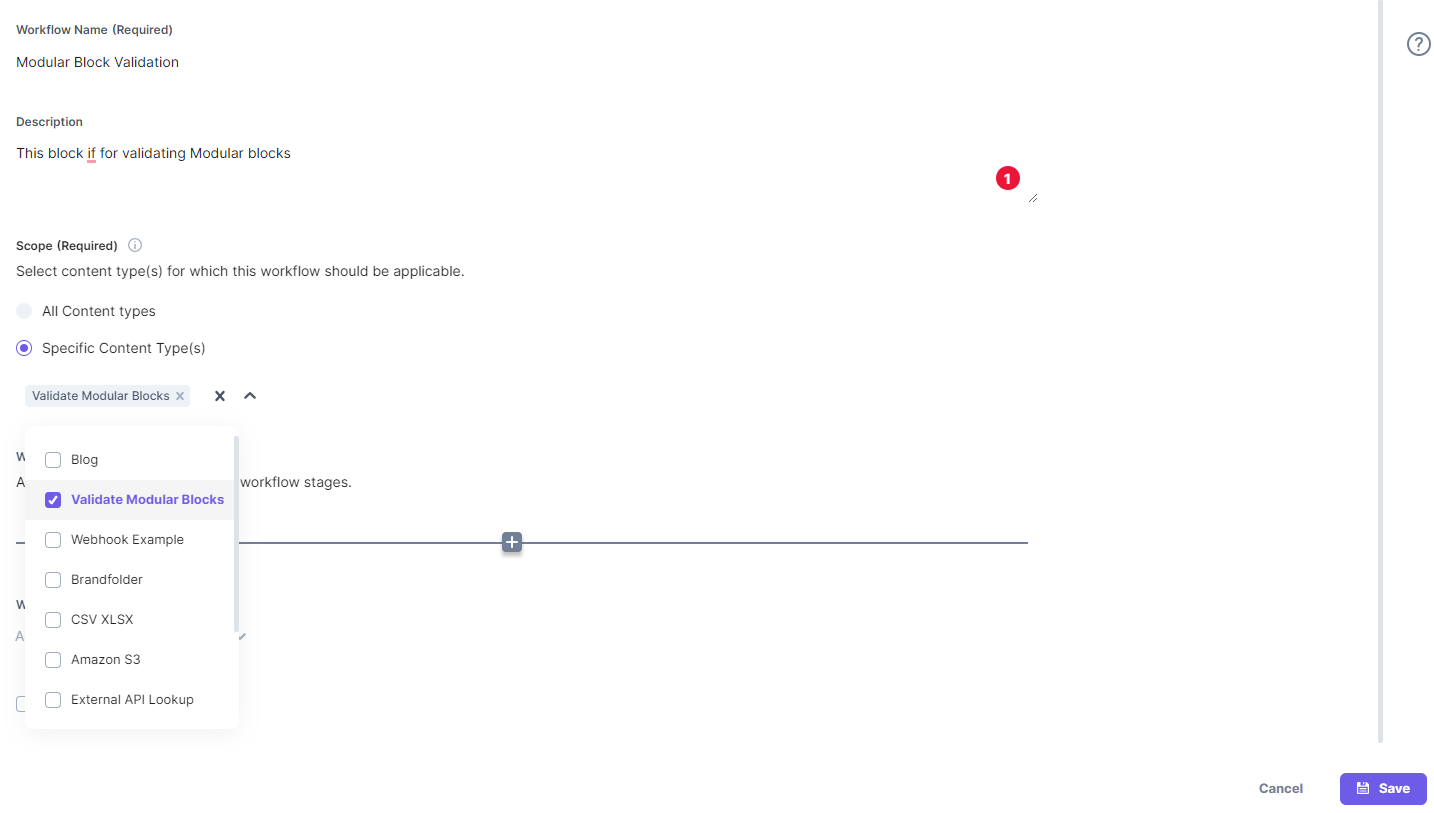
- Add these three stages in the WORKFLOW STAGES option: Draft, Rejected, and Approved.
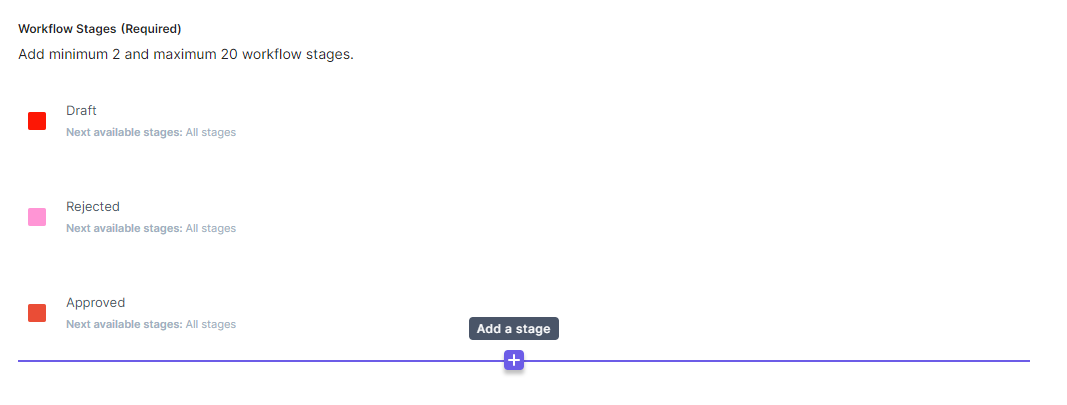
- Select the Enable Workflow checkbox and Save your settings.
Note: For this exercise, we don't need Stage transition and access rules in any of the stages.
-
Get Workflow UIDs
For the AWS Lambda function to update the workflow stages in the entry, it will require the UIDs of the “Approval” and “Rejected” stages.
To get the required workflow UIDs, perform the following steps:
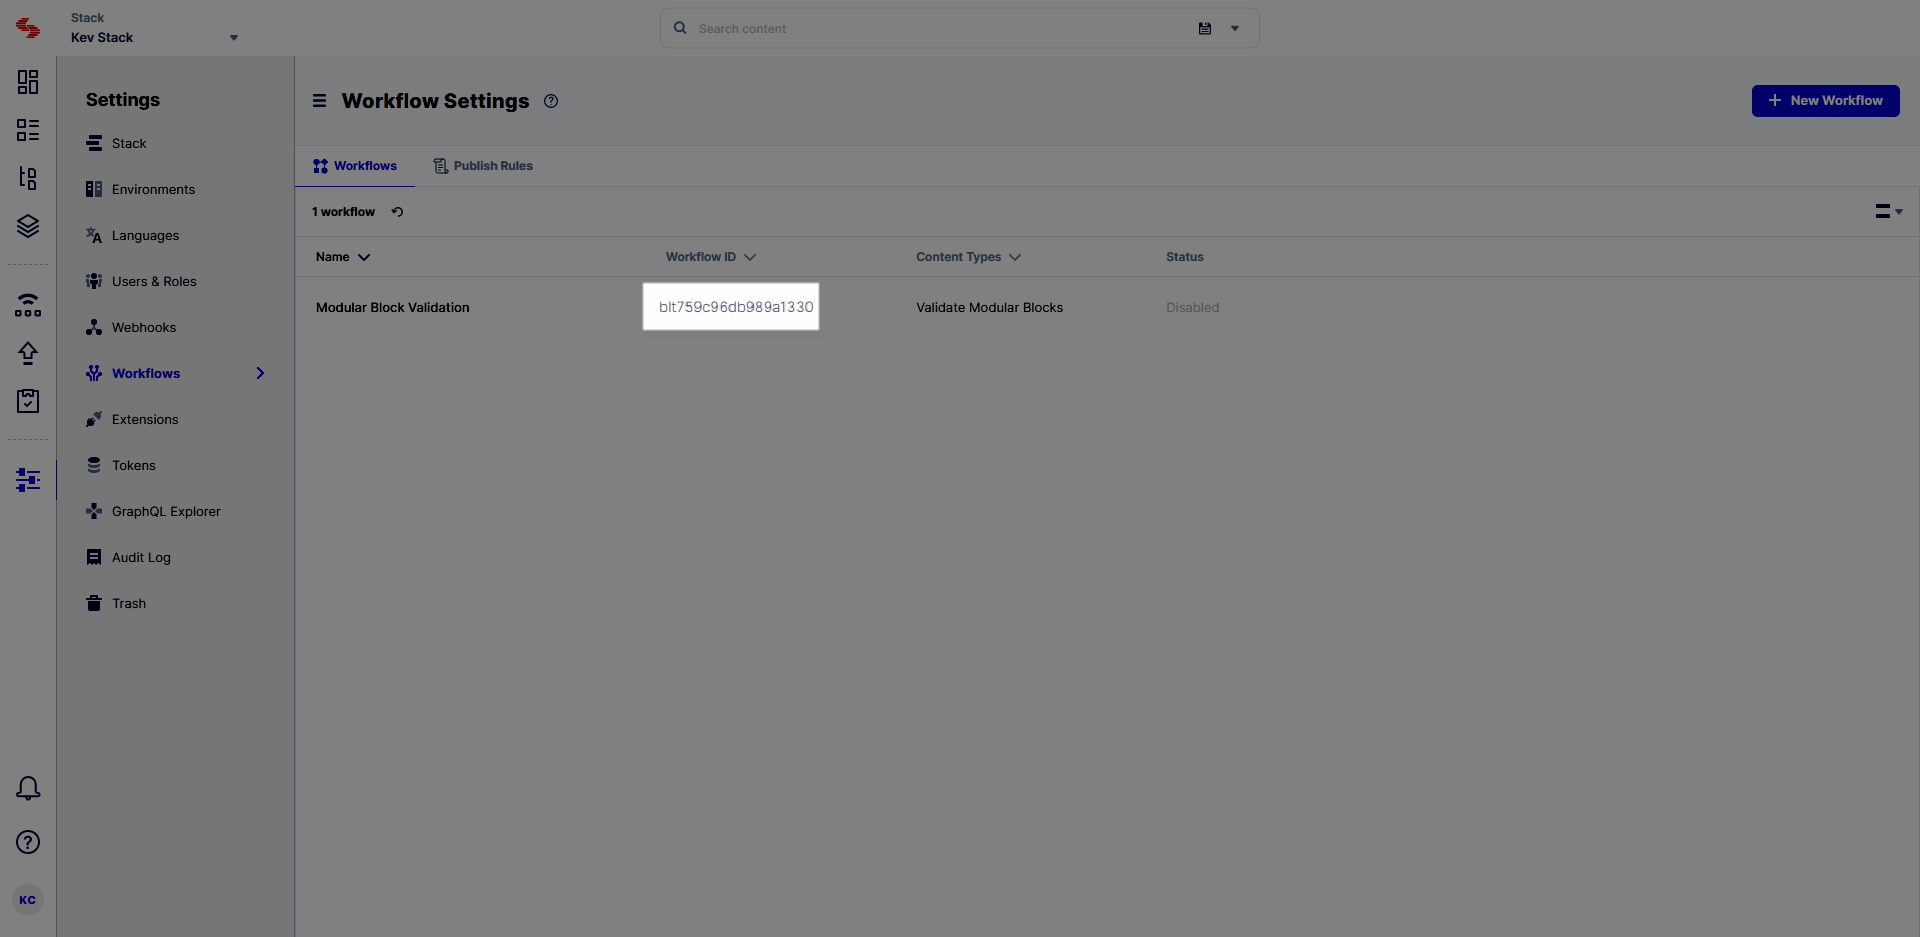
- Go to the Workflows Settings page in your stack and copy the workflow ID mentioned in the WORKFLOW ID column as shown in the image below:
- Open Postman or any other API collaboration & development platform and make the following API request:
HTTP Method: GET
URL:
- For “North America” endpoint: https://api.contentstack.io/v3/workflows/{your_workflow_uid}
- For “Europe” endpoint: https://eu-api.contentstack.com/v3/workflows/{workflow_uid}
- For "Azure North America" endpoint: https://azure-na-api.contentstack.com/v3/workflows/{workflow_uid}
- For "Azure Europe" endpoint: https://azure-eu-api.contentstack.com/v3/workflows/{workflow_uid} Request Headers:
- api_key: Provide value of the API key of your stack
- authorization: Provide value of the management token
- Content-Type: Provide “application/json” as its value
- Go to the Workflows Settings page in your stack and copy the workflow ID mentioned in the WORKFLOW ID column as shown in the image below:
-
Set up an AWS Lambda Function
We will use an AWS Lambda Function that will help us perform the required validation on our modular blocks. To do this, perform the following steps:
- Log in to your AWS Management Console, select Lambda from the Services dropdown list at the header.
- On the Functions page, click the Create function button to create a lambda function.
- Then, on the Create function page, select the Author from Scratch option, enter the Function name, and choose Runtime as the latest version of Node.js.
- Click the Create function button.
- For this exercise, we have created a sample code that will help you set up the system. You can download it from our GitHub repository.
-
On your lambda function’s page, scroll down to the Code source section, click the Upload from dropdown menu, select the .zip file option, and upload the index.zip file that you just downloaded.
Note: The logic that helps us perform the validation is added in the example code.
This code line validates there is a minimum of 1 and maximum of 3 banner blocks. Also, this logic validates that there is only one disclaimer block. If you want to have a different number of occurrences for them, you can change the logic accordingly.
blockObj.banner > 0 && blockObj.banner <= 3 && blockObj.disclaimer == 1 - Keep Handler as index.handler and click Save.
-
To add environment variables, go to the Configuration tab, click Environment variables, and then the Edit button. Add the following environment variables:
- baseUrl: For North American region: https://api.contentstack.io/. For Europe region: https://eu-api.contentstack.com/. For Azure North America region: https://azure-na-api.contentstack.com/. For Azure Europe region: https://azure-eu-api.contentstack.com/.
- managementToken: Value of the management token
- stageApprovedUid: UID of the “Approved” workflow stage
- stageRejectedUid: UID of the “Rejected” workflow stage
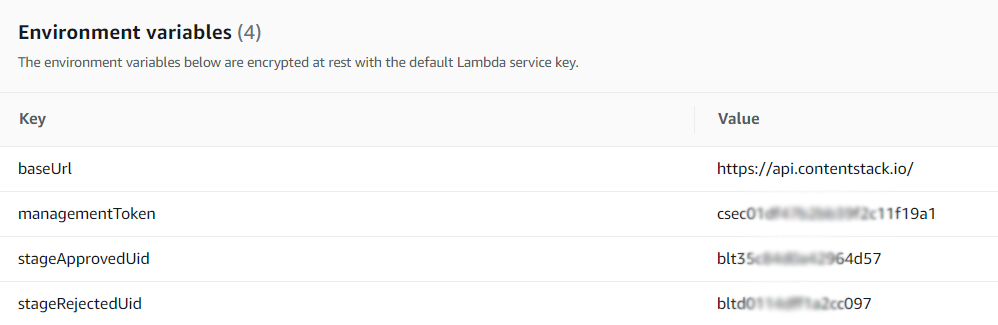
- Once you have added these environment variables, click Save.
With these steps, we have set up our lambda function. Let's now move ahead with creating an API gateway. - Scroll up to the Function overview section and click the + Add trigger button.
- From the Trigger configuration dropdown menu, select the API Gateway option.
- Then, from the API dropdown menu, select Create an API option.
- Select API type as REST API, keep Security as Open, and click Add.
You’ll be redirected to the Triggers section. - Expand the Details link to get the API endpoint URL. We will use this URL while setting up a webhook in Contentstack in the next step.
That's it! We have set up the lambda function and created an API Gateway to invoke it. -
Create a Webhook in Contentstack
Let's now create a webhook in Contentstack to invoke the lambda function by performing the following steps:
- Go to your stack, click the “Settings” icon on the left navigation panel, and click Webhooks.
- On the Webhook page, click + New Webhook.
-
On the Create Webhook page, provide the following details:
- Name: Provide a name for the webhook.
- URL to notify: Enter the API Endpoint URL generated in Step 4
- Scroll down to the When section for creating a trigger for the webhook as shown below:
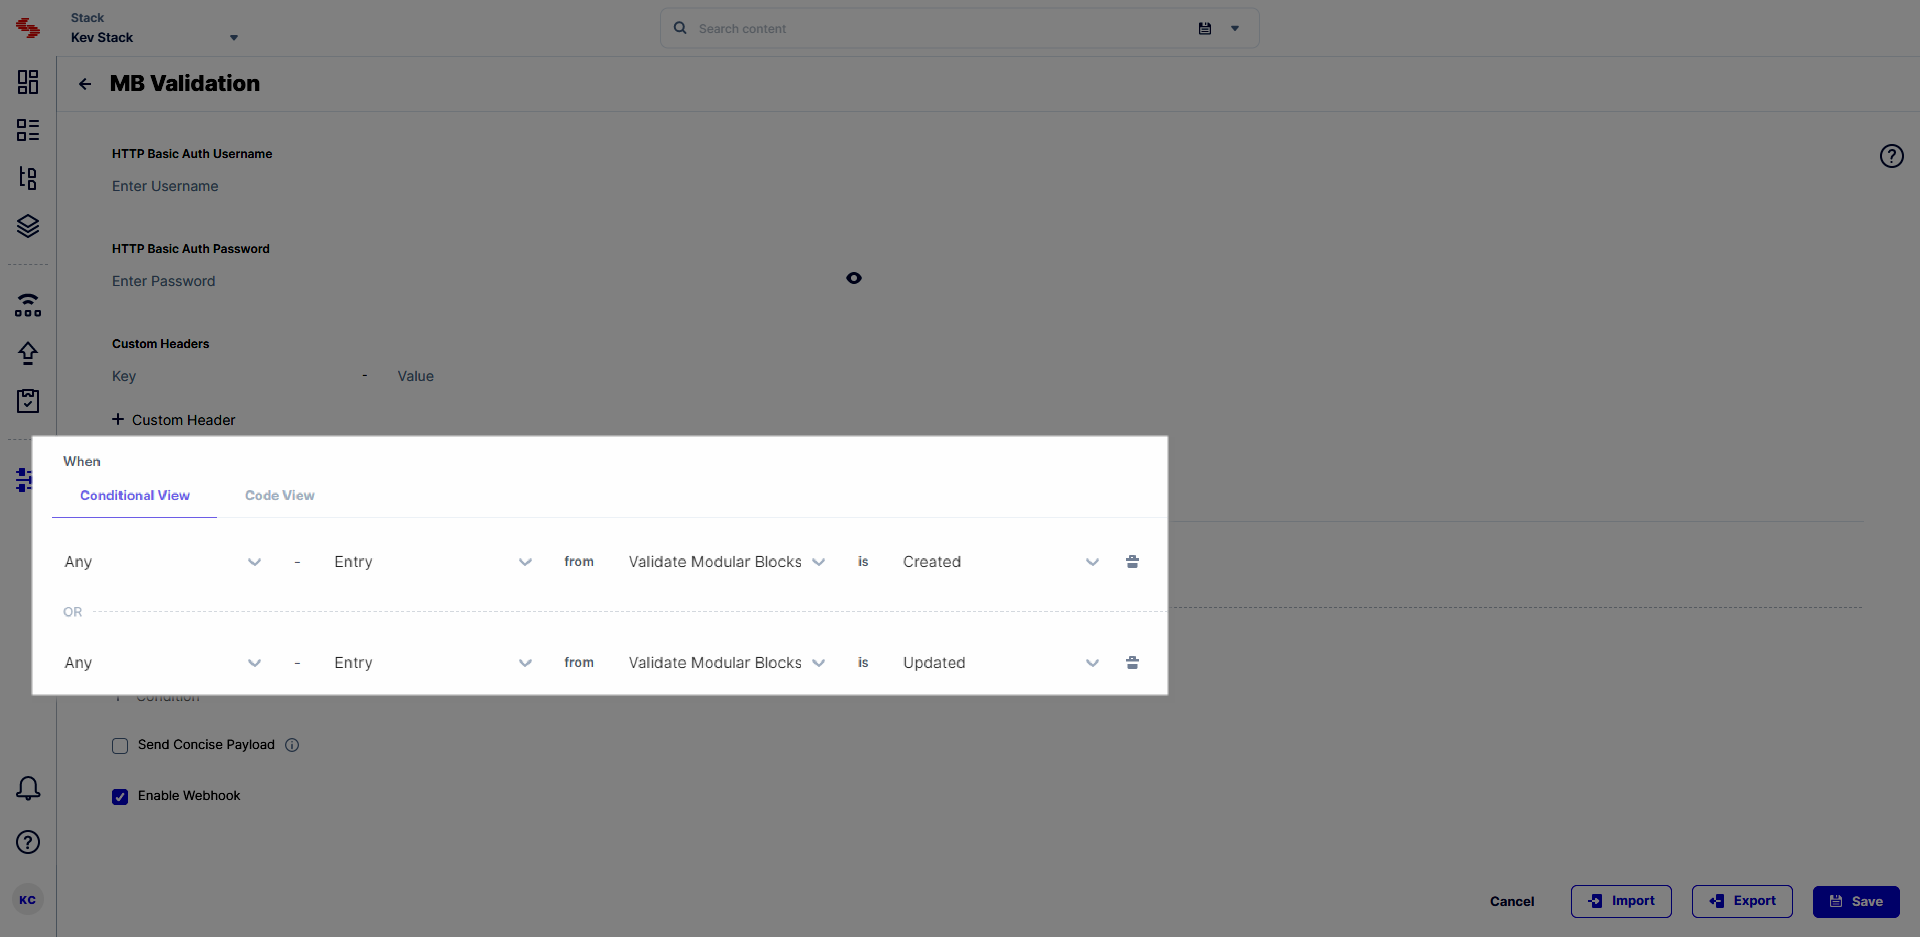
- Ensure that the Enable Webhook option is selected and Save the webhook.
Your webhook is now ready to invoke the lambda function. Now proceed to create or update an entry
Note: To get the desired output, leave the concise payload check-box unchecked in the webhook settings.
-
Try Out the Setup
We are now ready to test the setup by following the steps given below:
- Create an entry for the “Validate Modular Blocks” content type.
-
Under Modular Blocks click “+ Disclaimer” and “+ Banner” button to add blocks to your entry and click the Save button.
The webhook listener will validate the number of block instances in an entry and change the workflow stage to either the “Rejected” or “Approval” stage accordingly.
- Refresh the page to see the updated workflow stage of the entry.
- If the entry fails validation, its workflow stage changes to “Rejected.” And, the user who recently updated the entry gets an email notification stating the reason for rejection.
But if the entry passes validation, its workflow stage changes to “Approved.”
Additional Resources: To learn more about Workflows API requests, refer to the Workflows API requests documentation.
After successfully running the API request, you will get the following response displaying the UIDs of the “Rejected” and “Approved” workflows stages
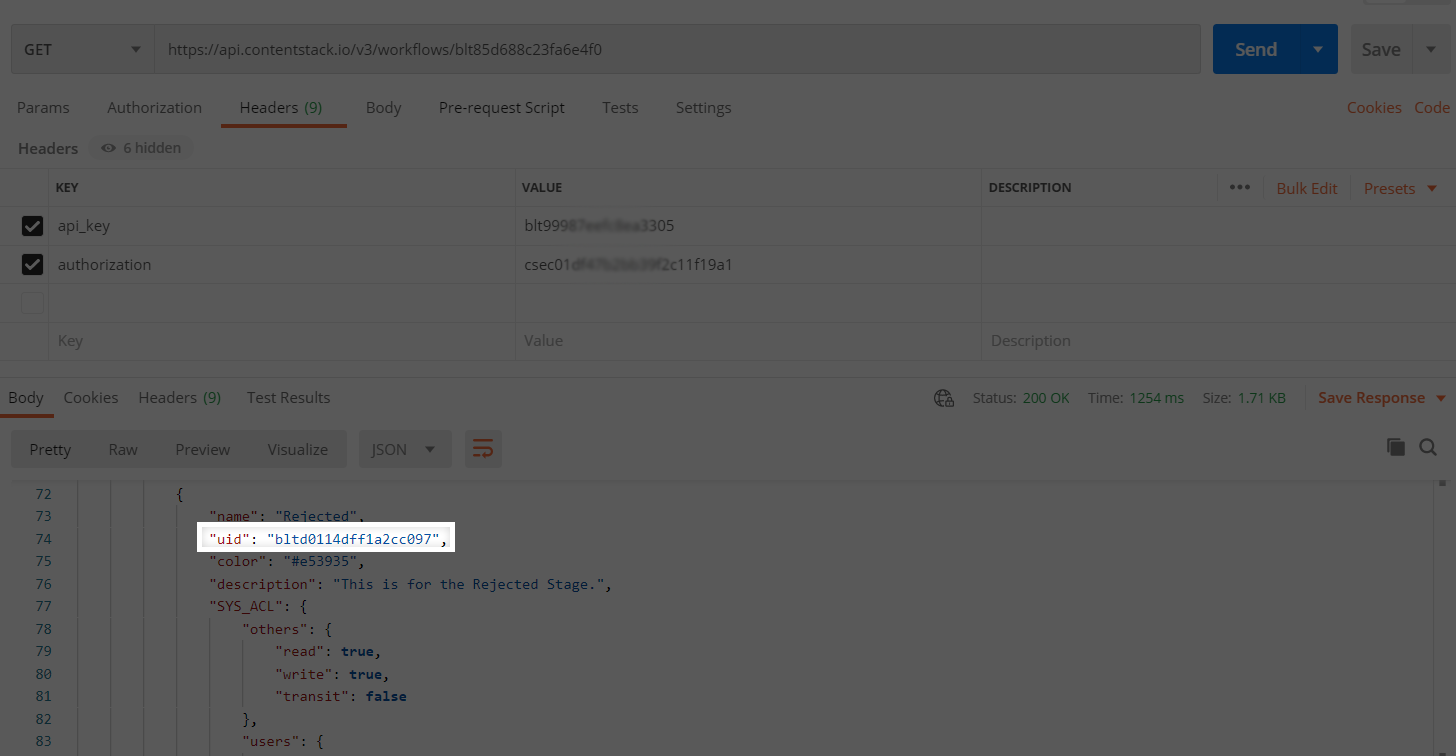
The Rejected stage UID is highlighted below:
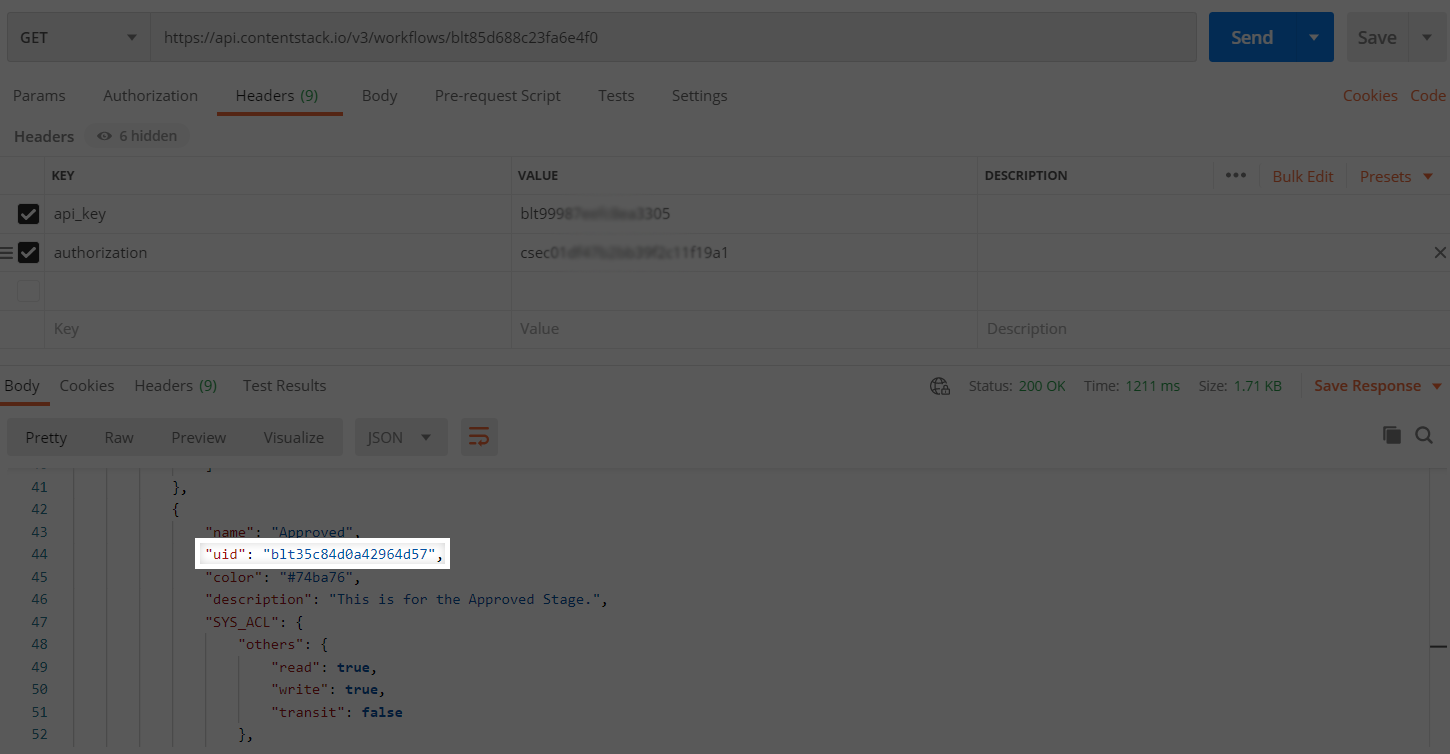
Note: Make a note of the UID of both stages as highlighted above. You’ll need them when setting up environment variables in the AWS Lambda function.
More articles
