

.svg?format=pjpg&auto=webp)
.svg?format=pjpg&auto=webp)
.png?format=pjpg&auto=webp)


.png?format=pjpg&auto=webp)
Sharing Assets Between Stacks Using an Extension
To manage our website content effectively, we often make use of multiple stacks and store content and related assets in respective stacks.
In this guide, we will discuss how to share and re-use assets between stacks. We will create two stacks and by using an extension in one of the stacks, we will fetch assets from the other stack into this stack.
Prerequisites
- Contentstack Account
- ngrok for creating a secured tunnel
Process overview: We will create two stacks: Stack A and Stack B. We will create an extension in one of the content types in Stack B and fetch the assets from Stack A through the extension that we have created in Stack B.
The extension will allow us to choose multiple assets from Stack A and save it in an array of a JSON response. It will store the UIDs of the assets (and the assets itself) that you have selected from the Stack A.
Steps for Execution
- Download the code
- Create an extension in stack B
- Create a build for the extension
- Create a public URL using ngrok
- Use your custom field extension
-
Download the Code
For this exercise, we have created a sample extension. The first step is to download the code from our GitHub repository. We will use this code when we create an extension.
This extension will help us fetch assets from Stack A in one of the content types in Stack B. You can use any code editor of your choice and open this code in it to see how we have structured it. Let's now create an extension in Stack B.
-
Create an Extension in Stack B
Log in to your Contentstack account and follow the steps given below to create a custom field extension:
- In your stack, navigate to the “Settings” icon on the left navigation panel, and select Extensions.
- On the Extensions page, click on the + New Extension button, and select Create new.
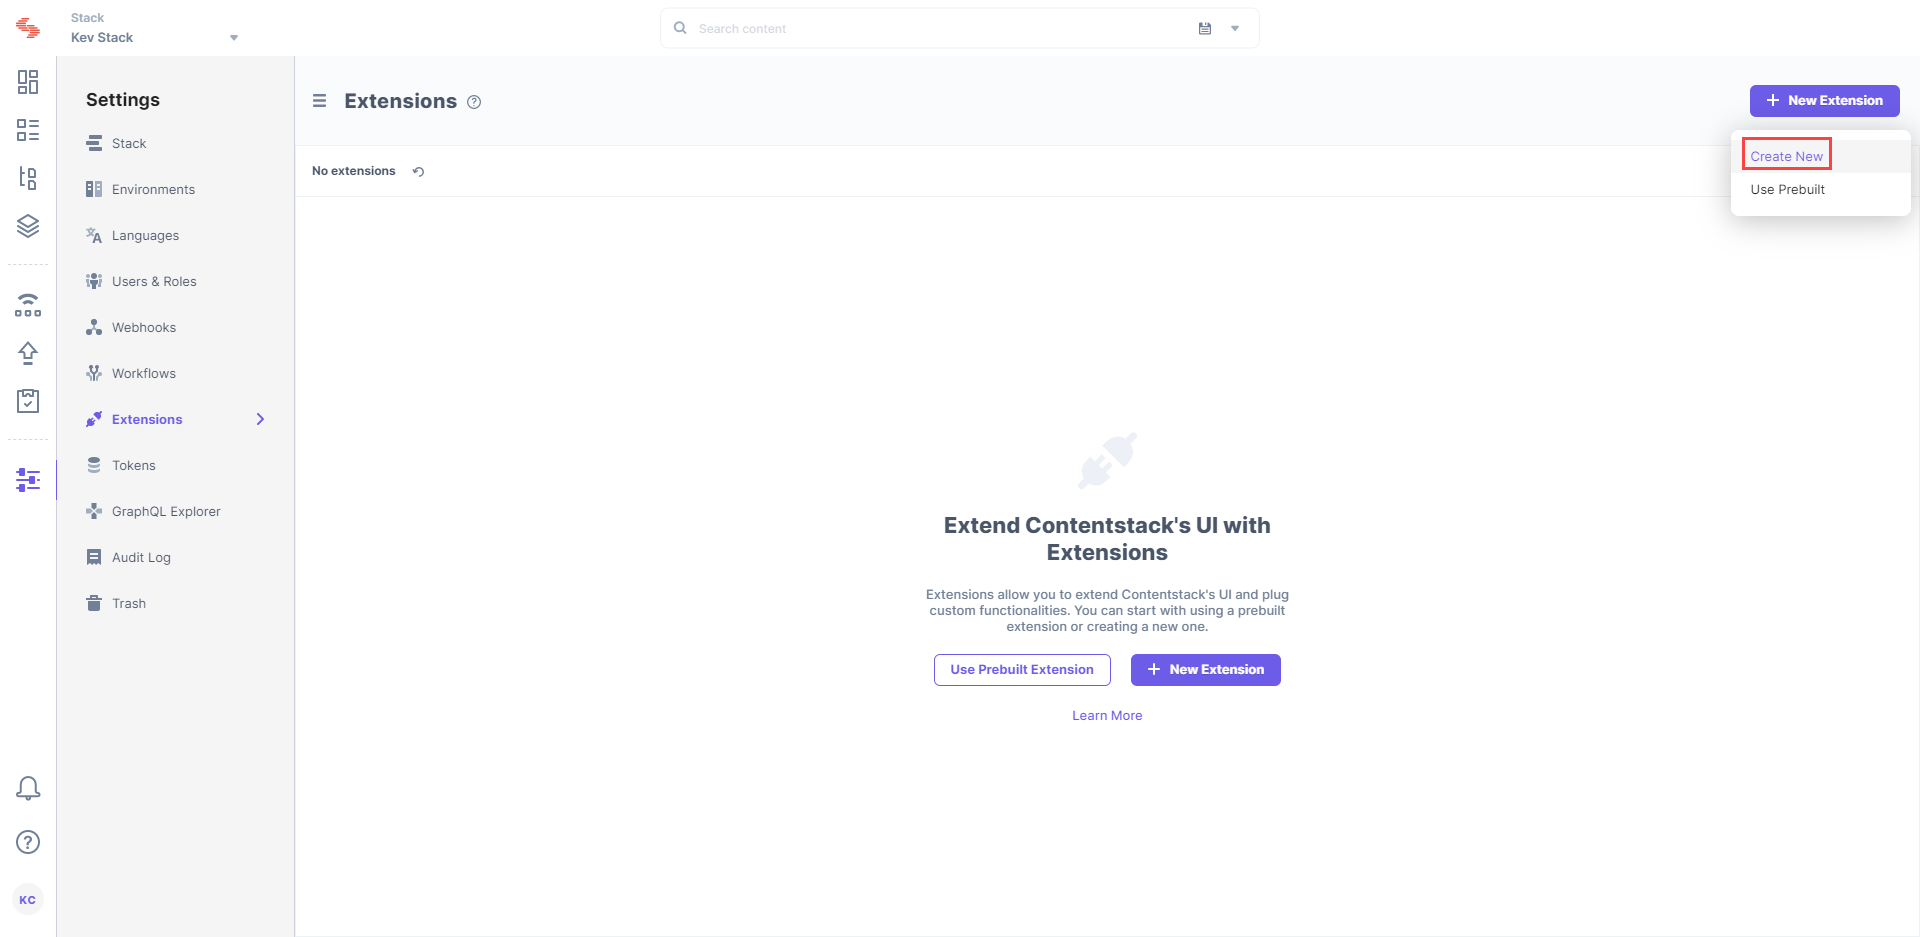
- In the Select Extension Type window, select Custom Field.

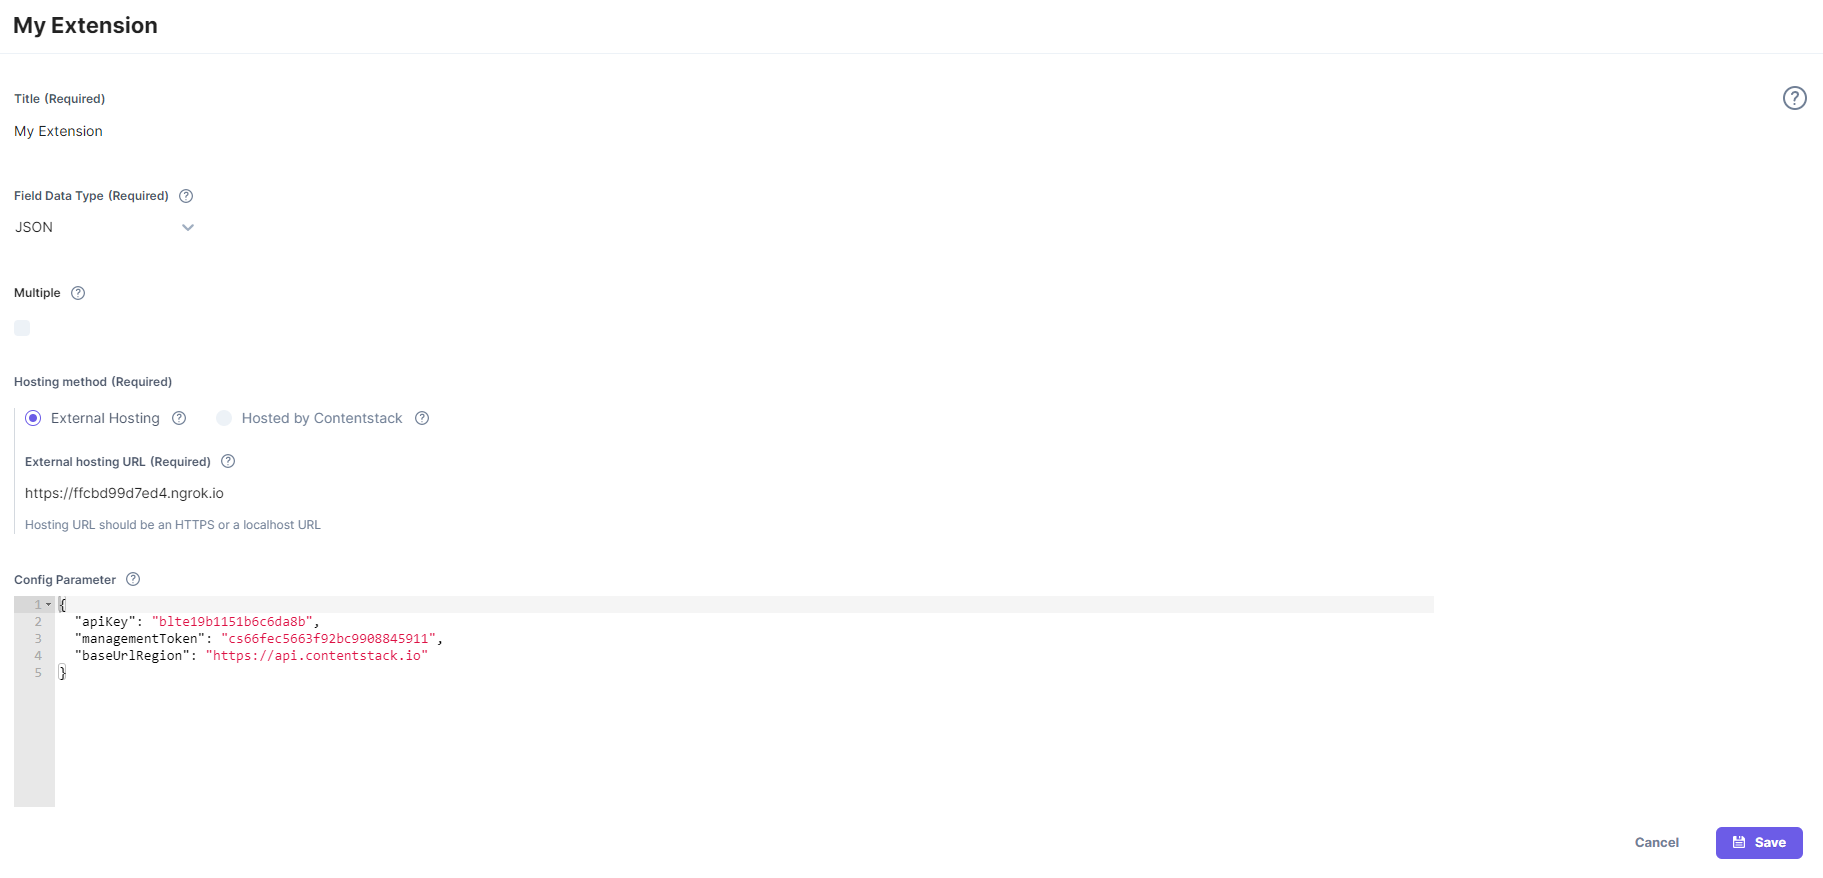
- On the Create New Extension page, enter values in the fields as given below:
- Title: Provide a suitable title for your custom field. This title will be visible when you select the extension in the custom field in your content type.
- Field data type: Select the data type in which the input data of the field should be saved in Contentstack. In this case, select JSON.
- Multiple: You can leave this field unchecked or select it if your custom field will expect multiple values. In such a case, the field will save the input values in an array. For this example, keep this option checked as we will be adding multiple files.
- Hosting method: Select the External hosting option and we will add the URL where the code is hosted. For now leave this blank, we will add the URL later.
- Config parameter: Here, specify the required configuration parameter for your extension. Use the following lines of code as your config parameter:
{ "apiKey": "source stack APIkey", "managementToken": "source stack managementToken", "baseUrlRegion": <region url> e.g. https://api.contentstack.io/ }In the above code, enter the API key and the management token of the source stack, that is Stack A. As we will be fetching the assets from Stack A, we need access to that stack. That's why we need the API key and Management Token of that stack.Note: By default, Contentstack operates in the North American region. To use a different region, configure the appropriate API endpoint as follows:
- Europe (default infrastructure): https://eu-api.contentstack.io/
- Azure – North America: https://azure-na-api.contentstack.io/
- Azure – Europe: https://azure-eu-api.contentstack.io/
- GCP – North America: https://gcp-na-api.contentstack.io/
- GCP – Europe: https://gcp-eu-api.contentstack.io/
- You will not be able to save the changes yet as we have not yet updated the URL. So move on to the next step to creating a production build for the extension.
Note: if you want to host the extension in Contentstack, then copy the code from the index.html file (available as part of the code that you downloaded in step 1) and paste it in Hosted by Contentstack in the Hosting method section (step 4.3).
Create a Build for the Extension
To install the production build for the extension, follow the steps given below:
- Fire up your terminal and move inside the project root directory that you have downloaded in the first step.
- Then, install the required dependencies, run the following command, staying inside the project directory:
npm install gulp-cli -g
npm install
- To create a new build for the extension, run the following command (index.html):
gulp build
- Now create a server using the Lite Server npm module. Before that, install the Lite Server module by using the following command:
npm install -g lite-server
- Then, run the lite-server — in the root folder — by using the following command:
lite-server
After running the above command, you will get the following screen:
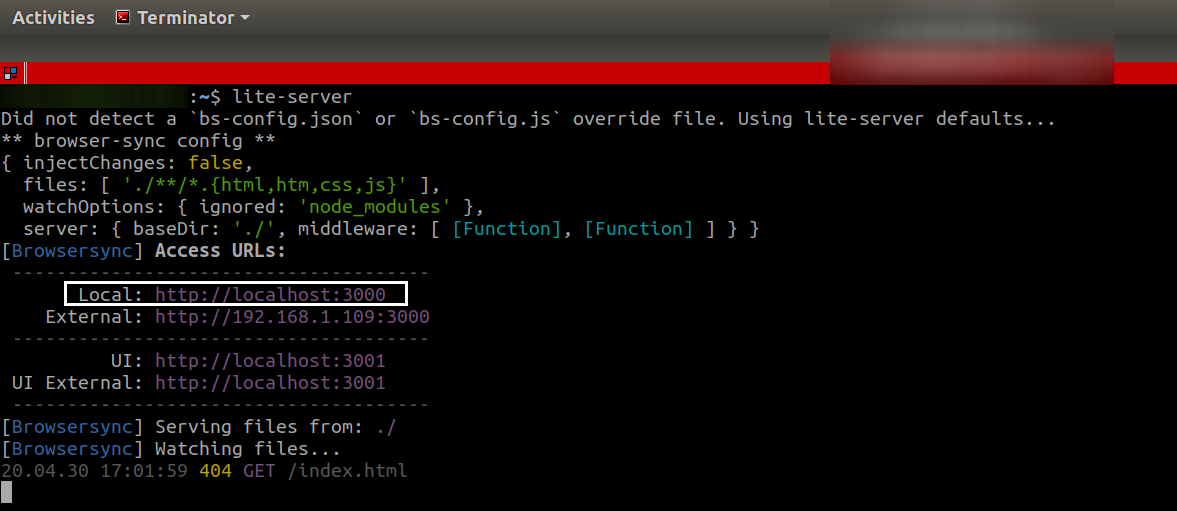
Make note of the port no in Access URLs (the localhost URL) as highlighted in the above screenshot. -
Create a Public URL Using ngrok
Next, we need to install ngrok to build secure tunnels from a public endpoint (that is the internet) to a locally running server. To do this, follow the instructions given below:
- Open another command prompt, move inside the project root directory that you downloaded in step 1, and install ngrok by using the following command:
npm install ngrok -g
- Then, issue the following command:The port number is the one that you generated in the above steps, in our case it is 3000.
ngrok http <<port number>>
- Once you run the above command, the following screen pops up:
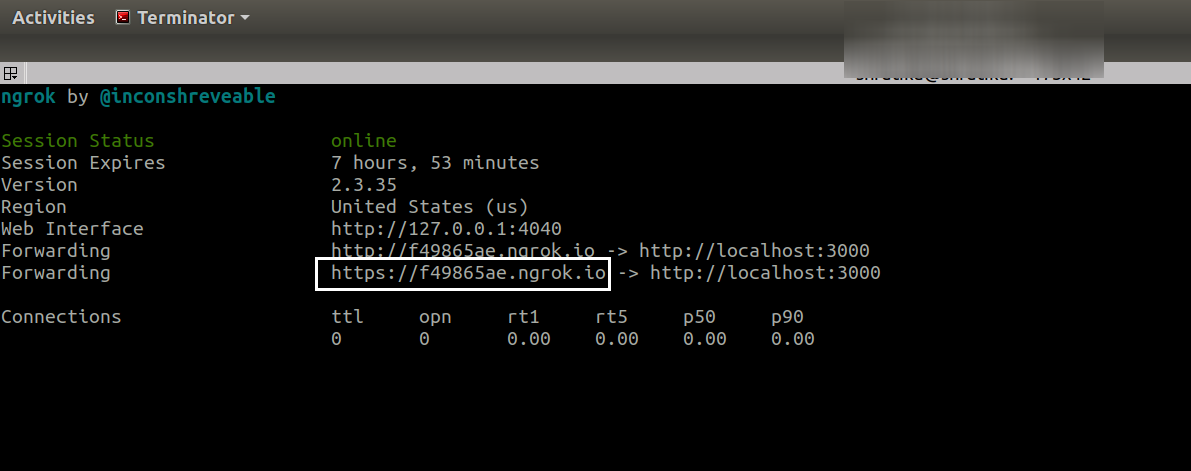
- Make note of the forwarding URL. This URL will be one that will provide our extension the public access.
- Now open the extension that we have created earlier and paste this public URL (generated above) in the External hosting URL field as shown below:
- Click on Save to save your extension's settings.
- Open another command prompt, move inside the project root directory that you downloaded in step 1, and install ngrok by using the following command:
-
Use Your Custom Field Extension
Once you have added a custom field, you can use it in your content type like any other field. Log in to Contentstack and open Stack B. Then, to add a custom field in your content type, perform the following steps:
- Create a content type and add the Custom field to it.
- Hover over the Custom field and click the “Settings” gear icon.
- Under Select Extension, select the extension that we have created for this exercise.
- After adding other relevant fields in your content type, click on either Save or Save and Close to save your changes
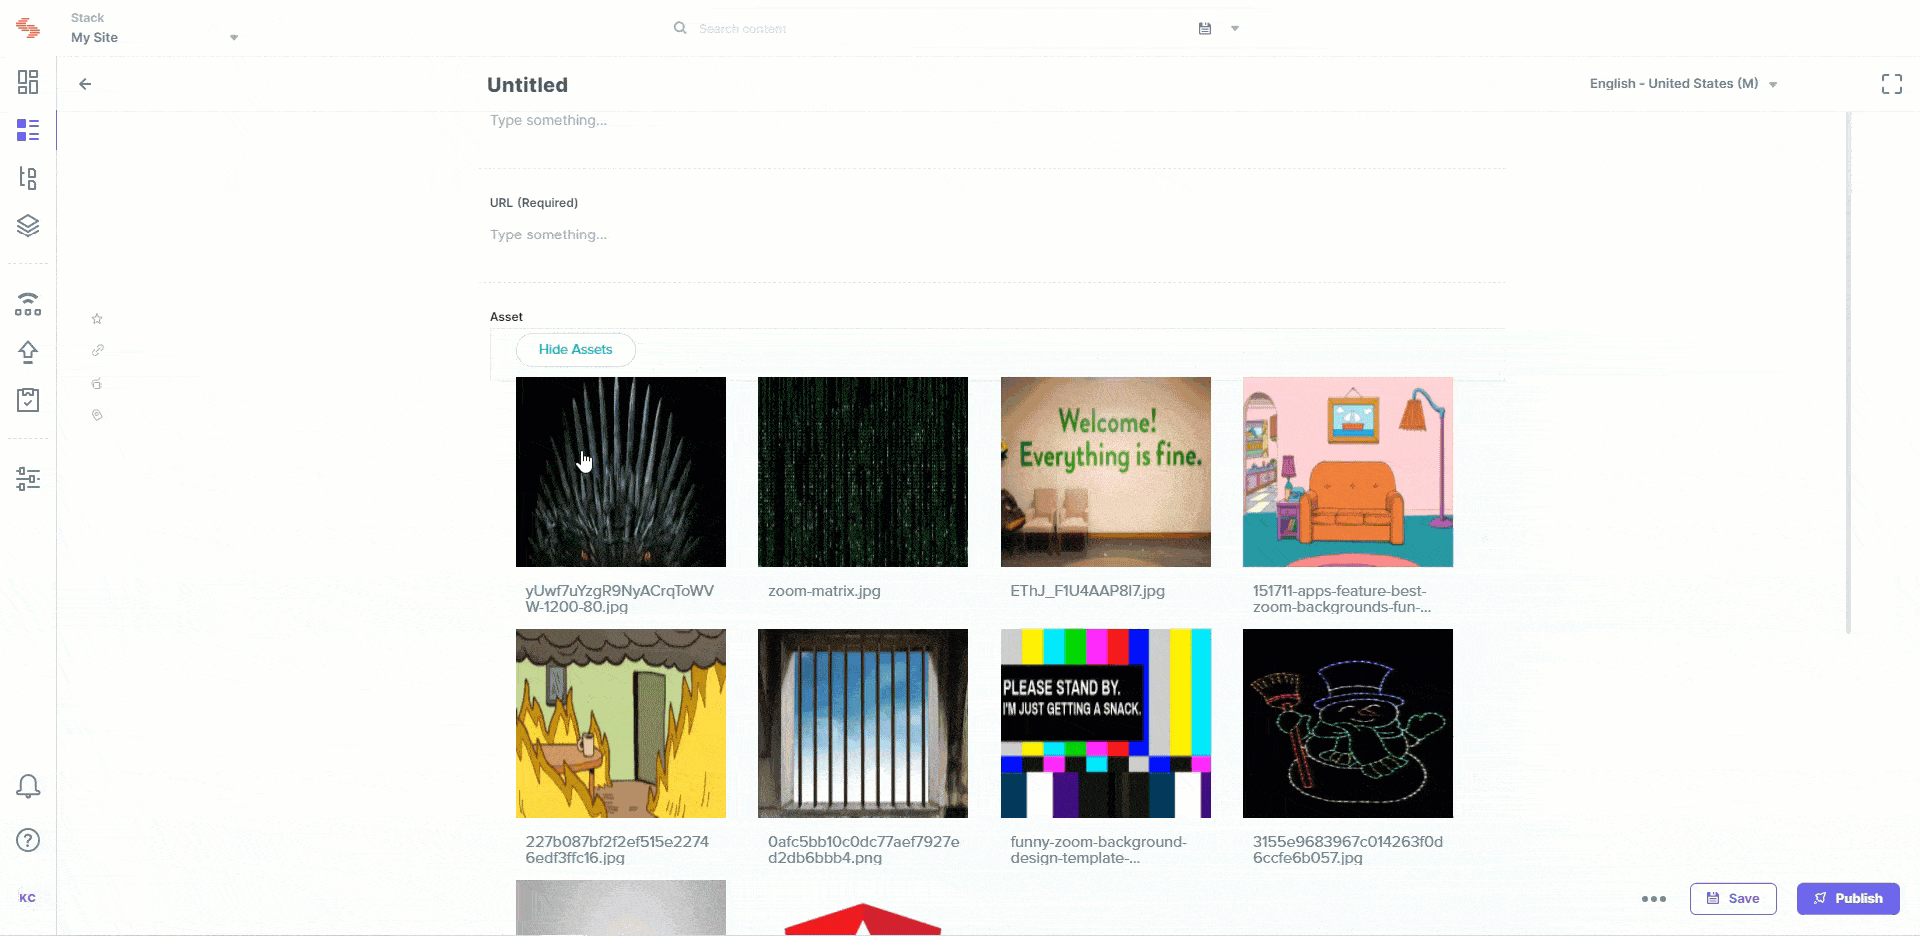
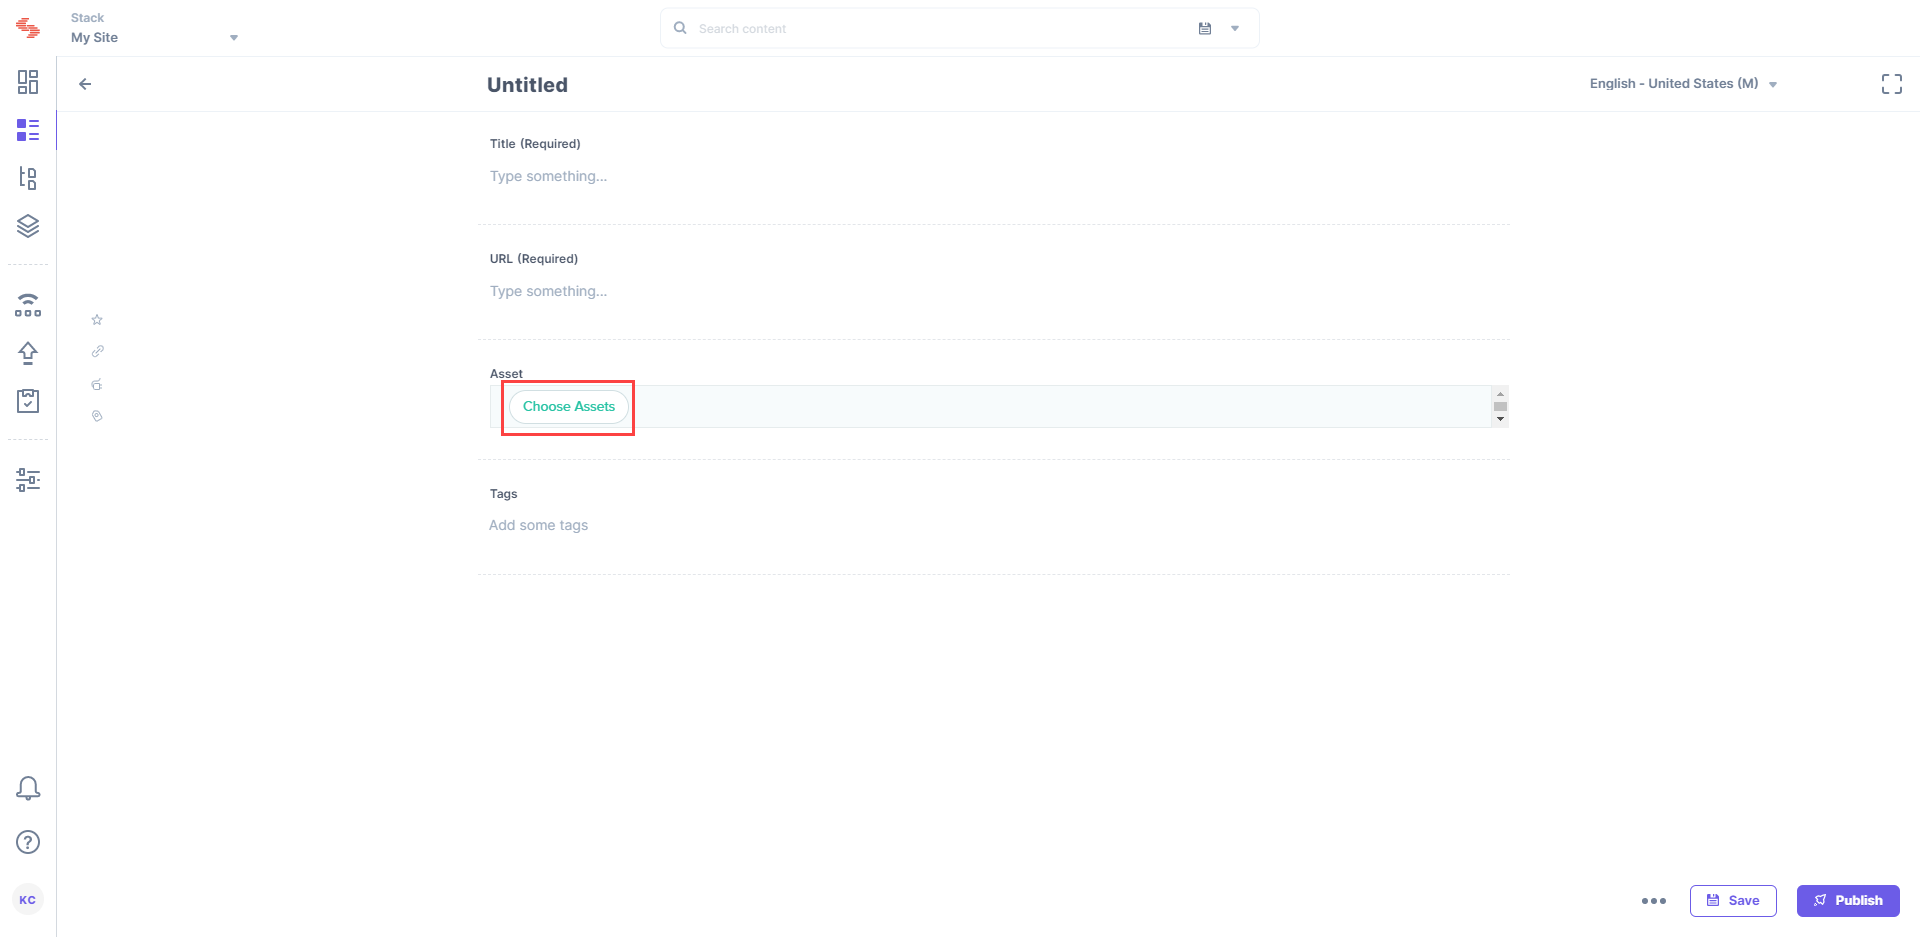
- Next, create an entry for this content type, and you will see your custom field (the name of our custom field is "asset") in action.
- Click on the Choose Assets button as shown in the following screenshot:
- When you click on Choose Assets, a window pops up that allows you choose assets from Stack A as shown below:
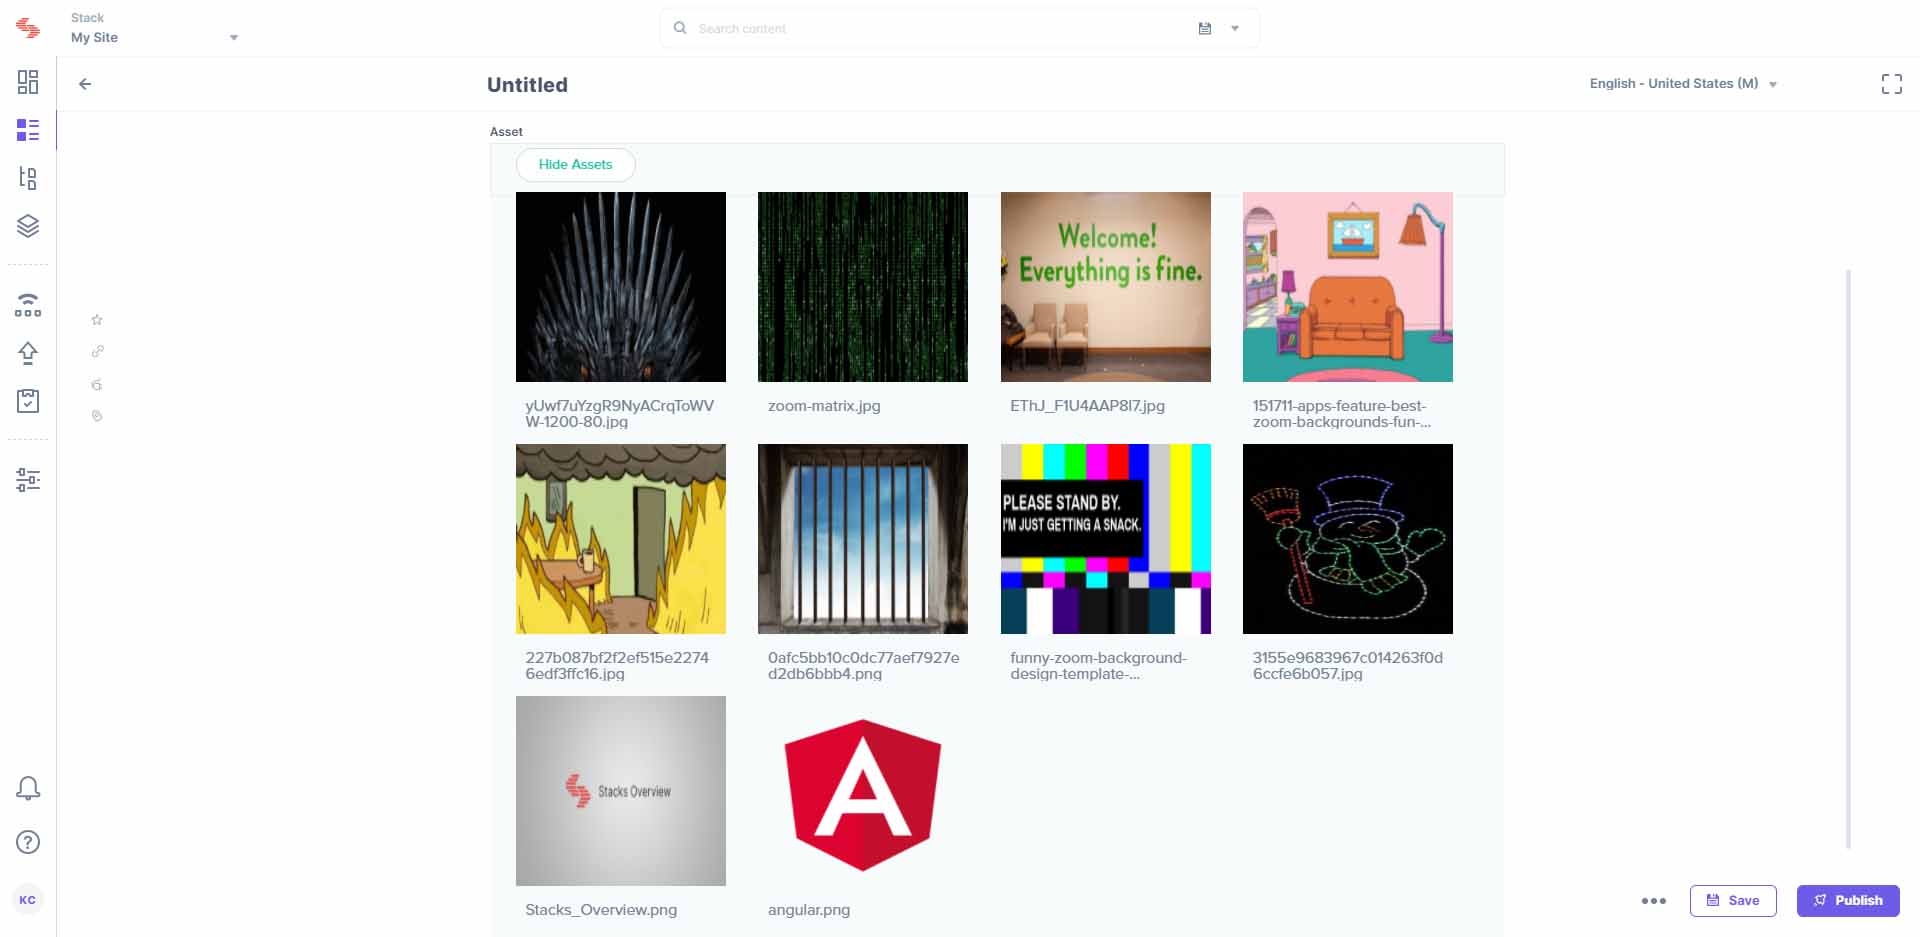
- As you can see above, multiple assets are fetched from Stack A and in the following screenshot, you can see two images are selected to be saved in our Stack B entry:
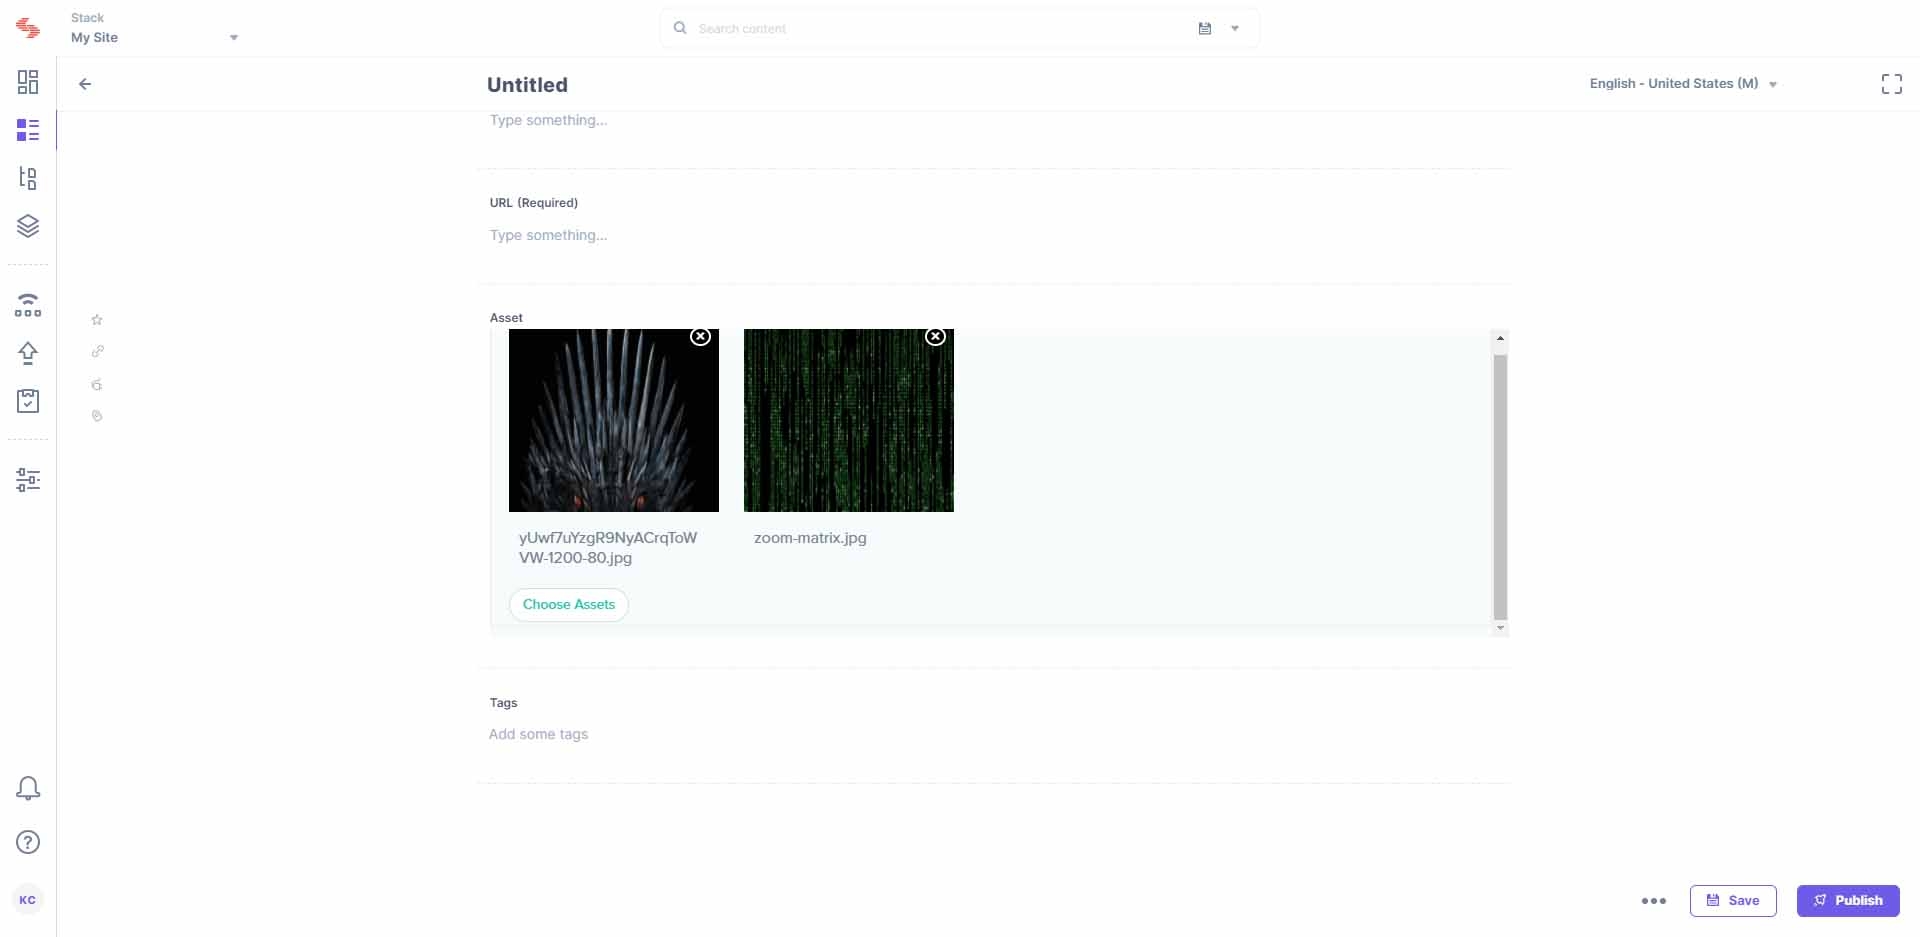
This is how you can set up a system that fetches assets from one stack to another using a custom field extension.
More articles
