

.svg?format=pjpg&auto=webp)
.svg?format=pjpg&auto=webp)
.png?format=pjpg&auto=webp)


.png?format=pjpg&auto=webp)
Share Content Between Stacks Using a Web Proxy
There can be many instances where we must use content stored in one stack in another stack. This sharing of data between stacks is a common practice when we have a lot of content spread across multiple stacks.
In this guide, we will discuss how to create a system that can help us share data between stacks by using a sample app and web proxy.
Process Overview: We will begin by building two stacks: Stack A (parent Stack) and Stack B (child Stack.) The sample app will consist of a header, footer, home page, error page, and a contact page as default components from the parent stack (stack A). This app will display previews of the recent blogs added in the child stack (stack B).
Prerequisites
- Contentstack account
- ExpressJS 4.17 or above
- Basic knowledge of Contentstack CLI
Steps for Execution
- Download the code from our GitHub repository
- Create Stacks and Import Content
- Configure the code
- Execute the code
Download the code from our GitHub repository
For this exercise, we will first start by downloading the code bundle from our GitHub repository. Within this code bundle, you will find the “stack-data” folder, which has two subfolders “parent-stack-data” and “child-stack-data” from which we will import the data into the stacks that we will create in the next step.
Create Stacks and Import Content
When creating stacks for this exercise, remember that we need two separate stacks, a parent stack and a child stack.
After you create the stacks, use the Contentstack CLI to import entries and assets to both the parent as well as the child stacks. Perform the following steps in order to do this:
Perform the following steps in order to do this:- Install the Contentstack CLI.
npm install -g @contentstack/cli
- Authenticate yourself with CLI:
csdx auth:login - Import the content types, assets, and entries:
csdx cm:import -A -s <stack_ApiKey> -d <path_of_folder_where_content_is_stored>- -A, --auth-token: To use the auth token of the current session. It is automatically generated and stored in the session after running the login command.
- -s, --stack-uid-stack-uid: The API key of the target stack
- -d, --data=data: The path or the location in your file system where the content, you intend to import, is stored. For example, -d "C:\Users\Name\Desktop\cli\content"
Repeat the above steps to import data into the child stack.
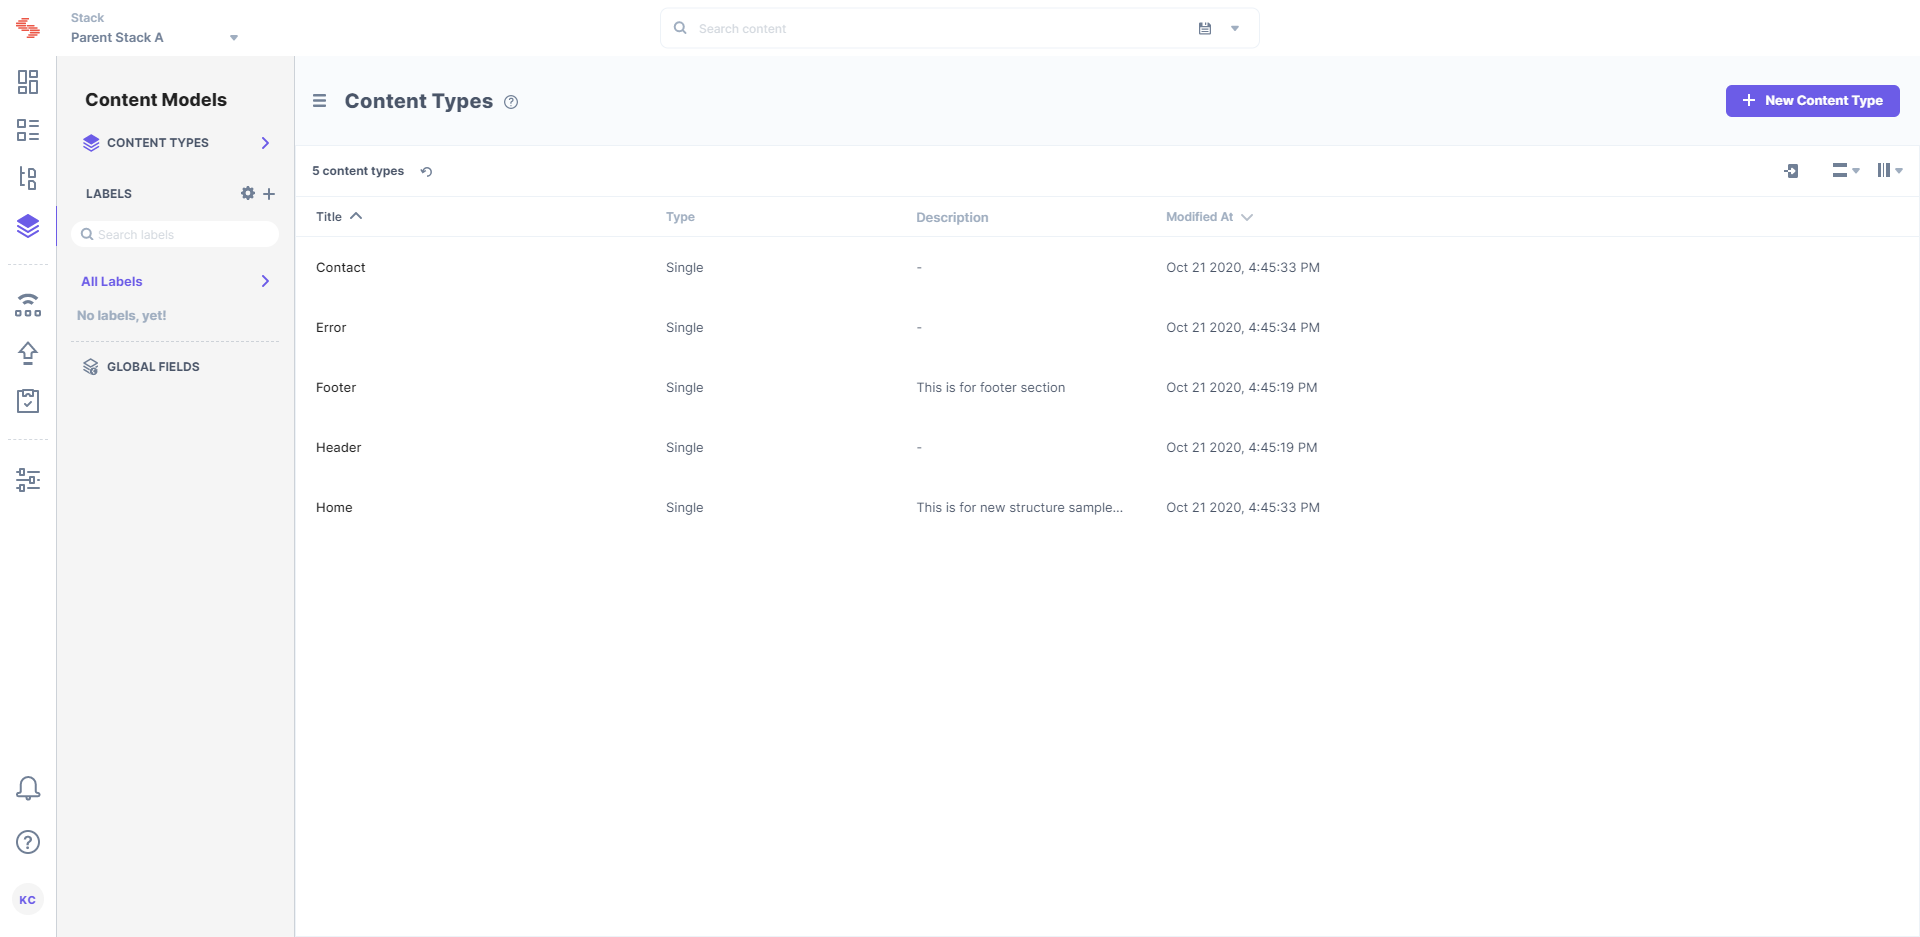
So far, we have created the following content types and imported entries and assets into them.
Note: For this exercise, you need to ensure that both the parent and child stack should have en-us set as the master language.
For the parent stack (stack A) we have added the following content types:
- Home
- Header
- Footer
- Error
- Contact
Once you have imported entries and assets to the content types, they will look like this:
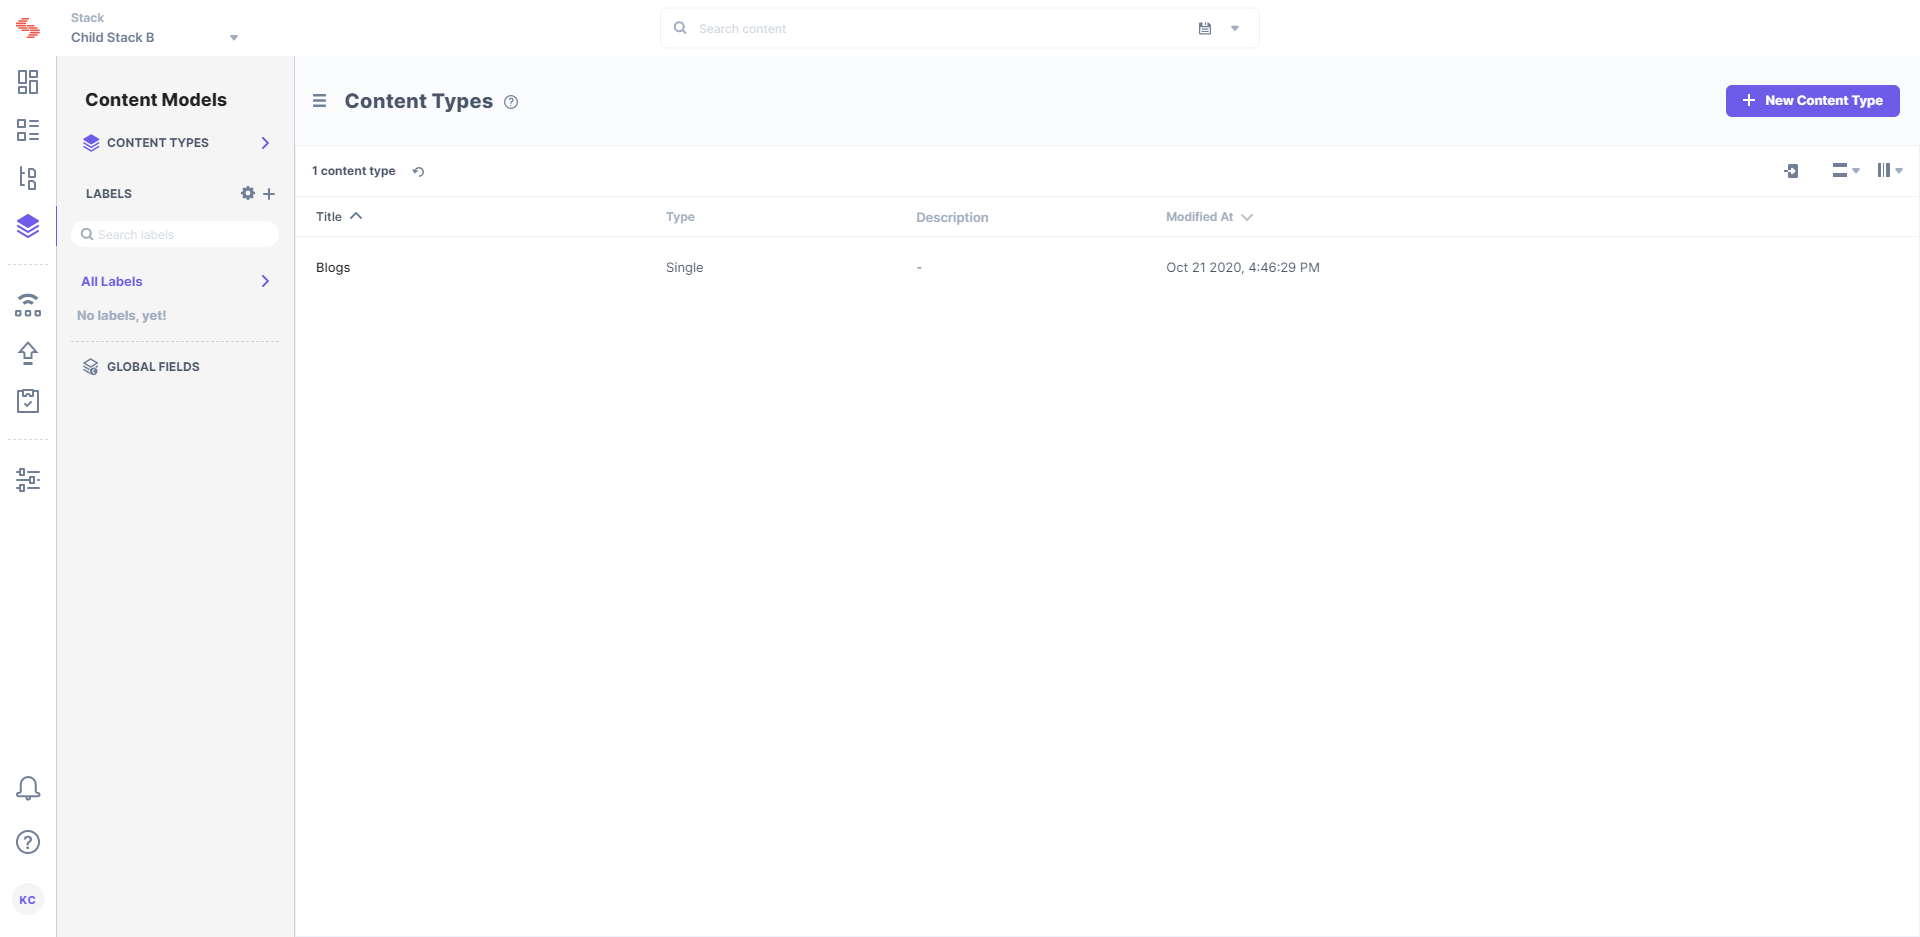
For stack B, we have imported the Blogs content type and its entries. When completed, it will look like this:
- Finally, publish the imported content of all the content types in both the stacks, A and B.
- Install the Contentstack CLI.
Configure the code
Now that your stacks are ready with the content types and the respective entries, let us move ahead with configuring the code of the sample app.
- Open the downloaded code in any appropriate code editor application.
- Open the command prompt and move inside the project root directory. Then, run the command npm install to install the required dependencies.
- After installing the dependencies for your code, navigate to the .env file.
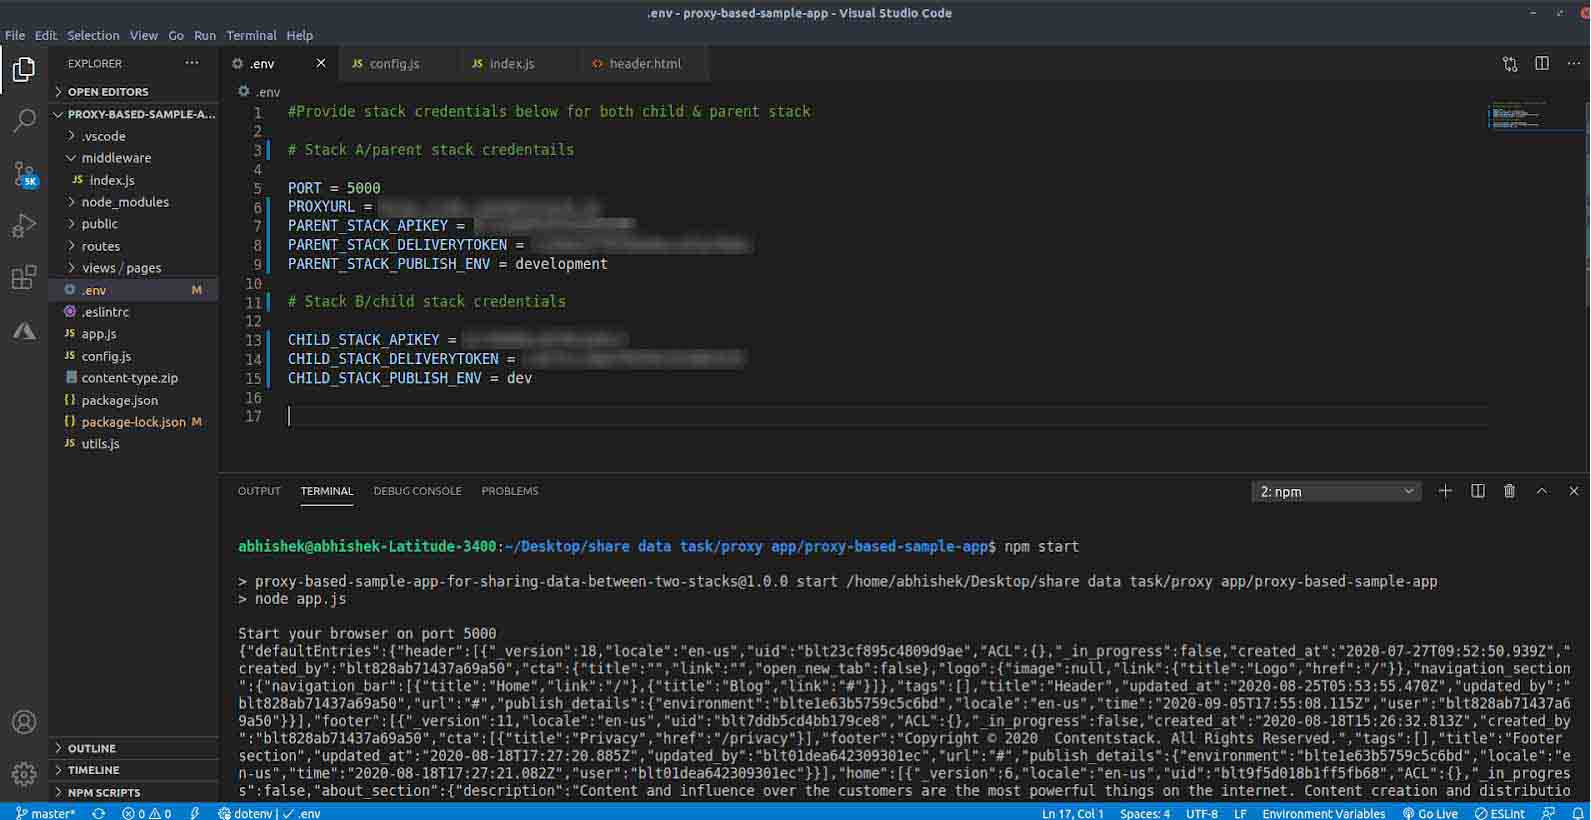
- Mention the required details for Stack A:
- Port
- Proxy URL:
North America: https://api.contentstack.io/
Europe: https://eu-api.contentstack.com/
Azure NA: https://azure-na-api.contentstack.com/
Azure EU: https://azure-eu-api.contentstack.com/- Stack API Key
- Stack Delivery Token
- Stack Publish Env
- For Stack B, mention the following details:
- Stack API Key
- Stack Delivery Token
- Stack Publish Env
- In the config.js file, provide the UIDs of the default content types and the blog content type, as shown below:
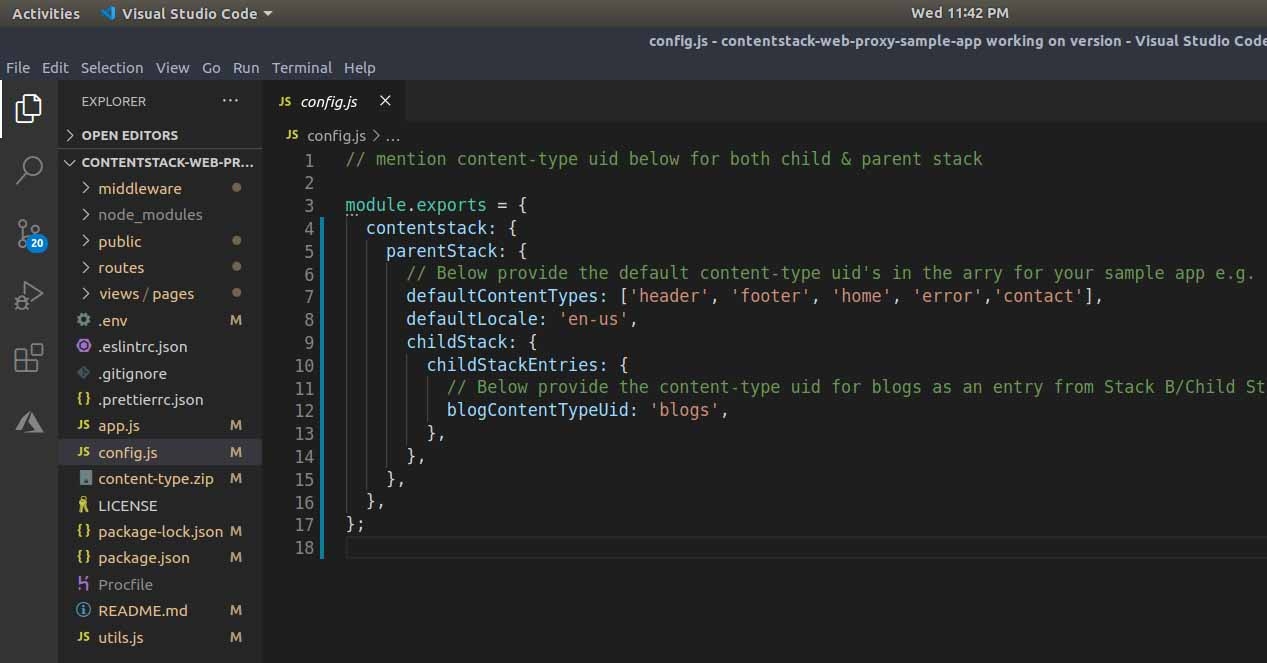
The defaultContentTypes array will contain the UIDs for the default entries from the parent Stack (Stack A) viz. “header,” “footer,” “home,” “error,” and “contact”. Whereas, blogContentTypeUid will hold the UID i.e “blog” for your blog entries from your child Stack (Stack B.) - Save the code.
Execute the Code
The final step of this experiment is to execute the code. In your root directory perform the following steps:
- In the command terminal, execute the command
npm start - In your web-browser enter the following address:
http://localhost:5000
You will see the following result:

This is how the two stacks communicate with each other. As you can see, the sample app enables the parent Stack - Stack A, to display the preview of the blogs from the child Stack - Stack B.
The JSON response that is generated is shown below:
{
  defaultEntries: {
    header: [ [Object] ],
    footer: [ [Object] ],
    home: [ [Object] ],
    error: [ [Object] ],
    contact: [ [Object] ]
  },
  entries: [
    {
      _version: 8,
      locale: 'en-us',
      uid: 'bltbd31fa200947d8ac',
      ACL: {},
      _in_progress: false,
      blog: [Object],
      created_at: '2020-09-30T16:48:45.943Z',
      created_by: 'blt828ab71437a69a50',
      tags: [],
      title: 'Blogs',
      updated_at: '2020-09-30T17:31:29.990Z',
      updated_by: 'blt828ab71437a69a50',
      url: '/blogs',
      publish_details: [Object]
    }
  ]
}
As you can observe from the above JSON response, there are no individual calls that are made to fetch entries for our sample app, therefore there is no need for individual APIs.
Notice the default entries object from our original response consists of default entries i.e header, footer, home, error, and contact from parent Stack (Stack A)
defaultEntries: {
    header: [ [Object] ],
    footer: [ [Object] ],
    home: [ [Object] ],
    error: [ [Object] ],
    contact: [ [Object] ]
 }
In the following response, you can see the previews of blogs added in the child Stack (Stack B)
 entries: [
    {
      _version: 8,
      locale: 'en-us',
      uid: 'bltbd31fa200947d8ac',
      ACL: {},
      _in_progress: false,
      blog: [Object],
      created_at: '2020-09-30T16:48:45.943Z',
      created_by: 'blt828ab71437a69a50',
      tags: [],
      title: 'Blogs',
      updated_at: '2020-09-30T17:31:29.990Z',
      updated_by: 'blt828ab71437a69a50',
      url: '/blogs',
      publish_details: [Object]
    }
  ]
This is how you get a common response for both of your entries (default and blogs) from two separate Stacks within a single JSON response using web proxy implementation.
- In the command terminal, execute the command
More articles
