

.svg?format=pjpg&auto=webp)
.svg?format=pjpg&auto=webp)
.png?format=pjpg&auto=webp)


.png?format=pjpg&auto=webp)
Creating an Automated Webhook Listener Using Contentstack Webhooks and Microsoft Azure
Microsoft Azure is a popular cloud computing platform used for analytics, networking, cloud storage, virtual computing, and much more.
The combination of Microsoft Azure and Contentstack Webhook can simplify the process of working with entries in Contentstack. We can use them to automatically update a particular field of an entry when any changes are made to it.
In this guide, we will discuss the steps for creating an automated system to do just that.
Process overview: We will create a content type and add an entry in it. When the entry is updated (Date and Priority fields), a webhook will trigger and invoke the Azure Function. The Azure Function will then auto-update a specific field (Sort order, in our example) in the entry.
We will learn how to create an Azure Function using two methods:
- Creating an Azure Function from Azure Portal
- Creating an Azure Function using the Visual Studio Code Editor
Prerequisites
- Microsoft Azure account
- Access to Azure functions
- Basic working knowledge of Microsoft Azure
- Contentstack Account
Creating an Azure Function from Azure Portal
In this method, we will look at the steps involved in creating an Azure Function from the Azure Portal. Follow the steps given below to set up your own Function App.
Steps for Execution
- Create a content type and add an entry
- Create a Microsoft Azure account
- Create a Function App in Azure Portal
- Add the environment variables
- Install npm dependencies
- Create a webhook in Contentstack
- Try it out
Let's get started!
-
Create a Content Type and Add an Entry
The first step is to create a content type and add an entry to it. For this exercise, we will create a content type with specific fields as listed below:
- Title
- URL
- Date (select Hide Time option)
- Select field with name Priority (display type as Radio)
- Single Line Textbox with name Sort order
Once you have created the content type with the above configuration, add an entry to it. This is what the entry will look like:
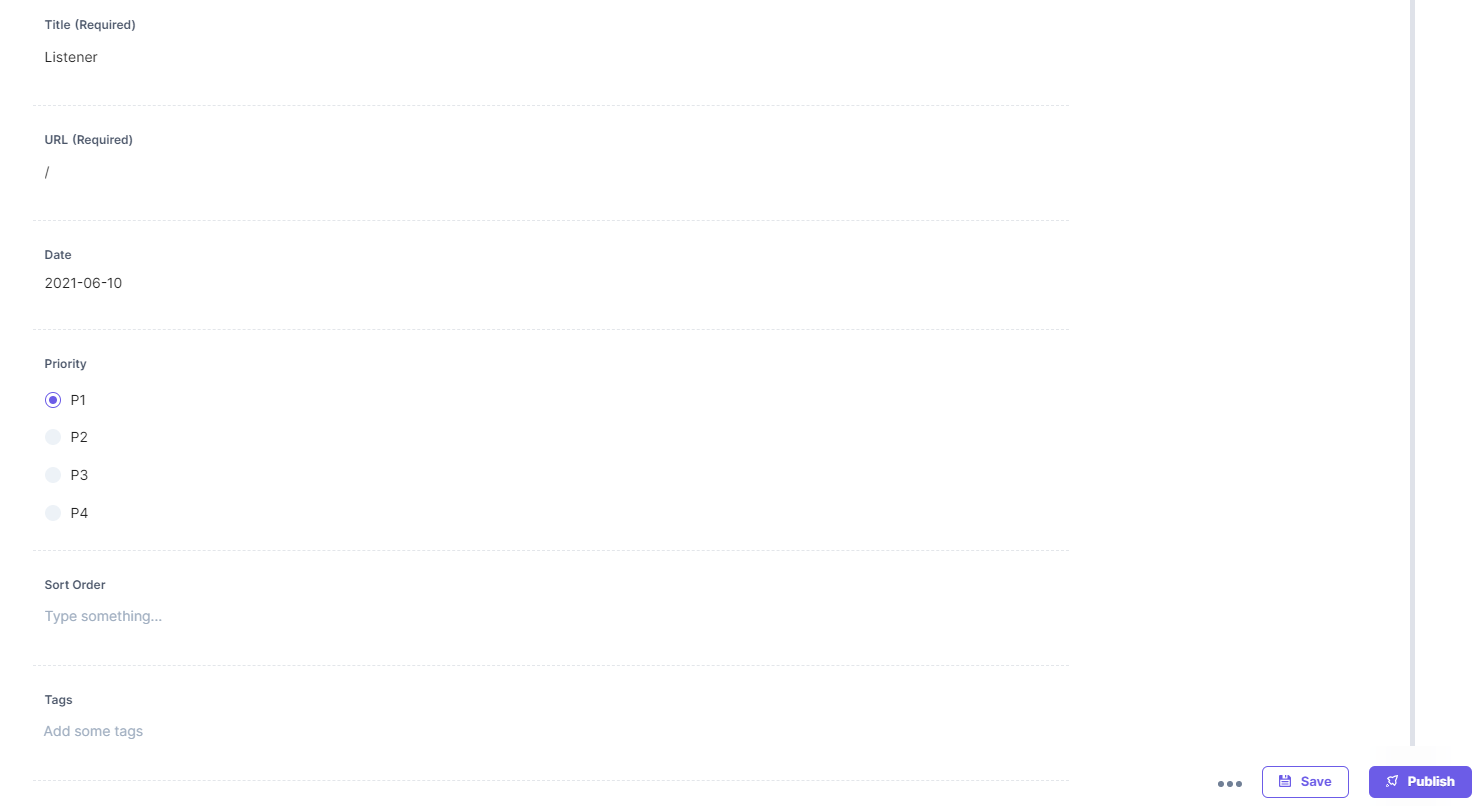
Note: Do not add anything in the Sort order field yet, keep it blank for now. It will auto-update when we make changes in the Date and Priority fields.
With this, we have the essentials ready, let's move on to creating our function in Azure.
-
Create a Microsoft Azure Account
In this method, we will go to the Azure portal and create an in-app function. Let's follow the steps given below:
- Go to the Microsoft Azure page and click on Start free. For this exercise, we are using the free version. You can opt to purchase their plan by clicking on Or buy now.
- On the next screen, you will be asked to log in. If you already have an account, just log in with your credentials. Else, click on Create one.
-
On the next screen, it will ask you to create a username. You can also create your account by providing your phone number or by creating a new Microsoft email address.
Note: It will not accept a work-related email address. Only your personal email address such as Gmail, Outlook, or Hotmail will be accepted.
- You will then receive an email with a verification code. Once your account is created, it will ask you to provide further information to safeguard the account. Follow the onscreen instruction and complete the account setup.
-
Create a Function App in Azure Portal
Once your account is ready, create a function app using the Azure Portal. This function will be invoked by our webhook when the entry is updated. So proceed with the following steps:
- After you set up your account successfully, you will be taken to the Azure Portal as shown below:
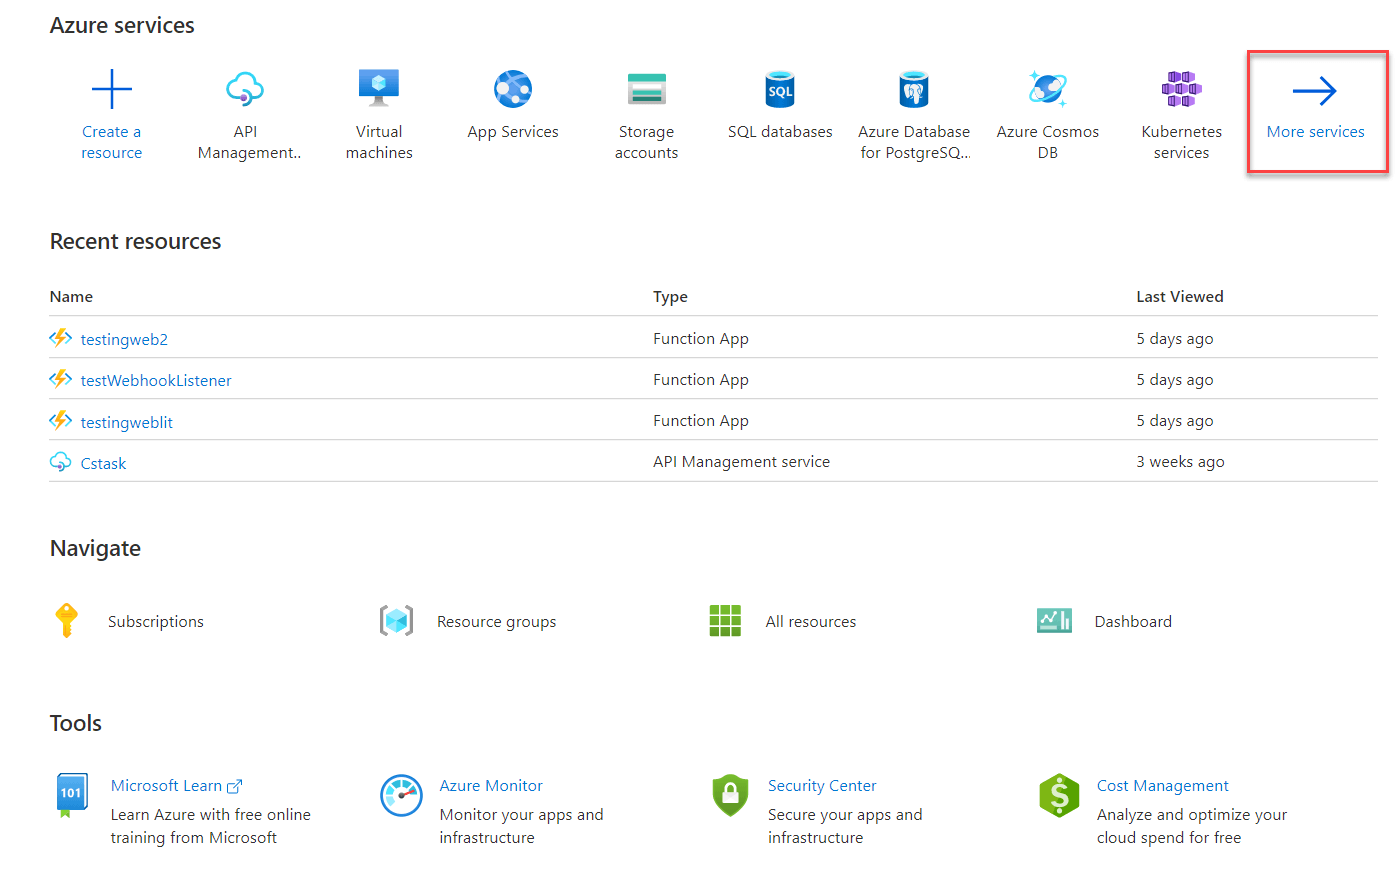
- Click on More services, as shown in the above screenshot, to view more services offered by Microsoft Azure.
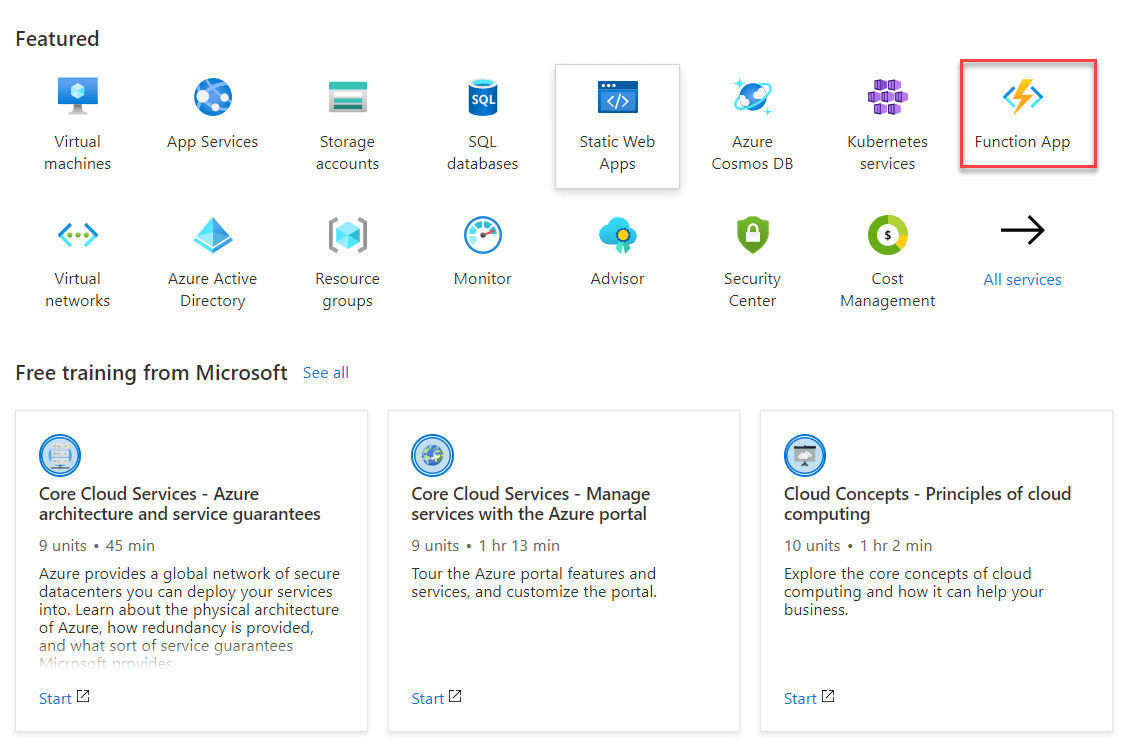
- Click on the Function App option and you will be directed to a console to create your Function App. Here, you can create your function app and within that function app, you can create your function which will interact with Contentstack to perform the webhook listener operation.
- Click on + Add to create a new function app and configure your function app with the following details:
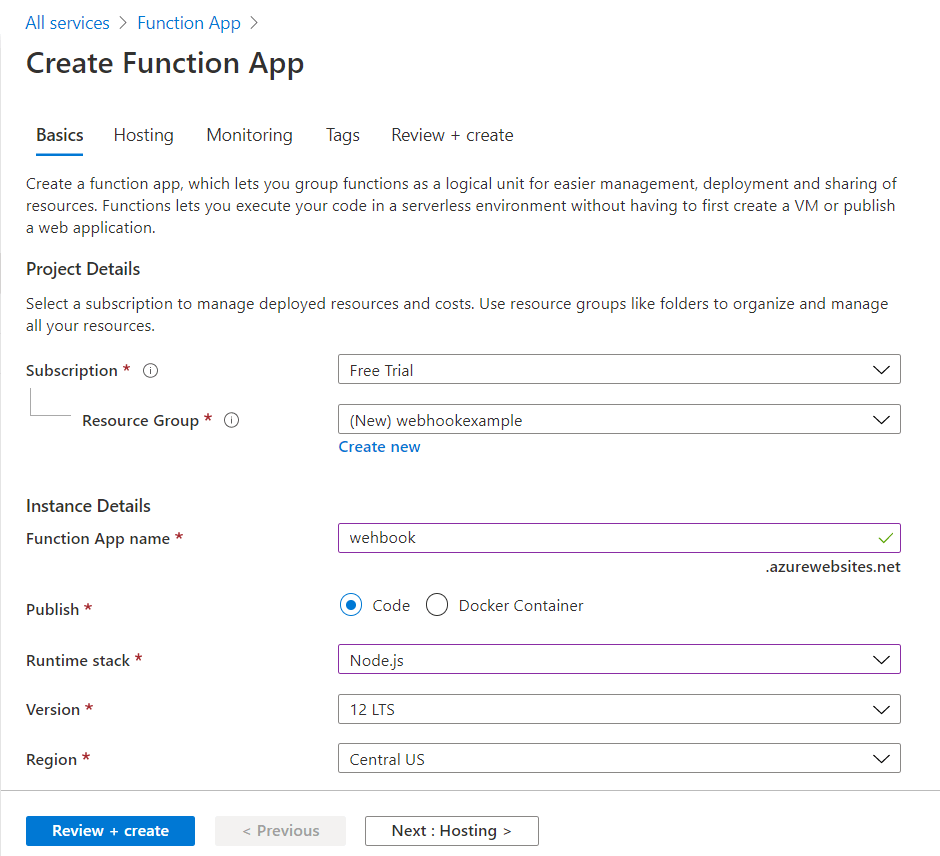 Make sure to select Javascript/Node.js version 12 as your Runtime language stack while creating your function app.
In the above configuration, Resource Group is a collection of operations. You can either create one by clicking on Create new or select from the list if you have already created a resource group previously. - Then, click on Review + create. Verify the settings once and click on Create. It will start the deployment process and you will get a deployment complete message as shown below:
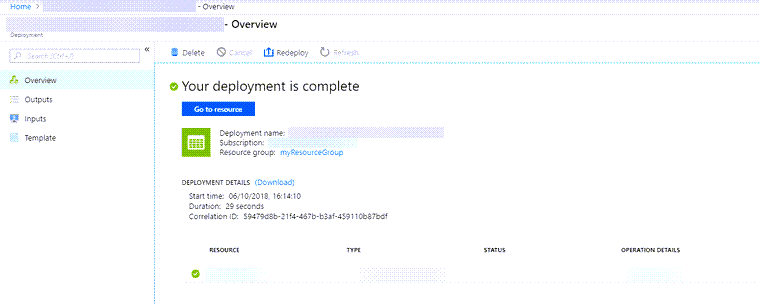
- Click on Go to resource. It will take you to your created function screen with several options on the left navigation panel as shown below:

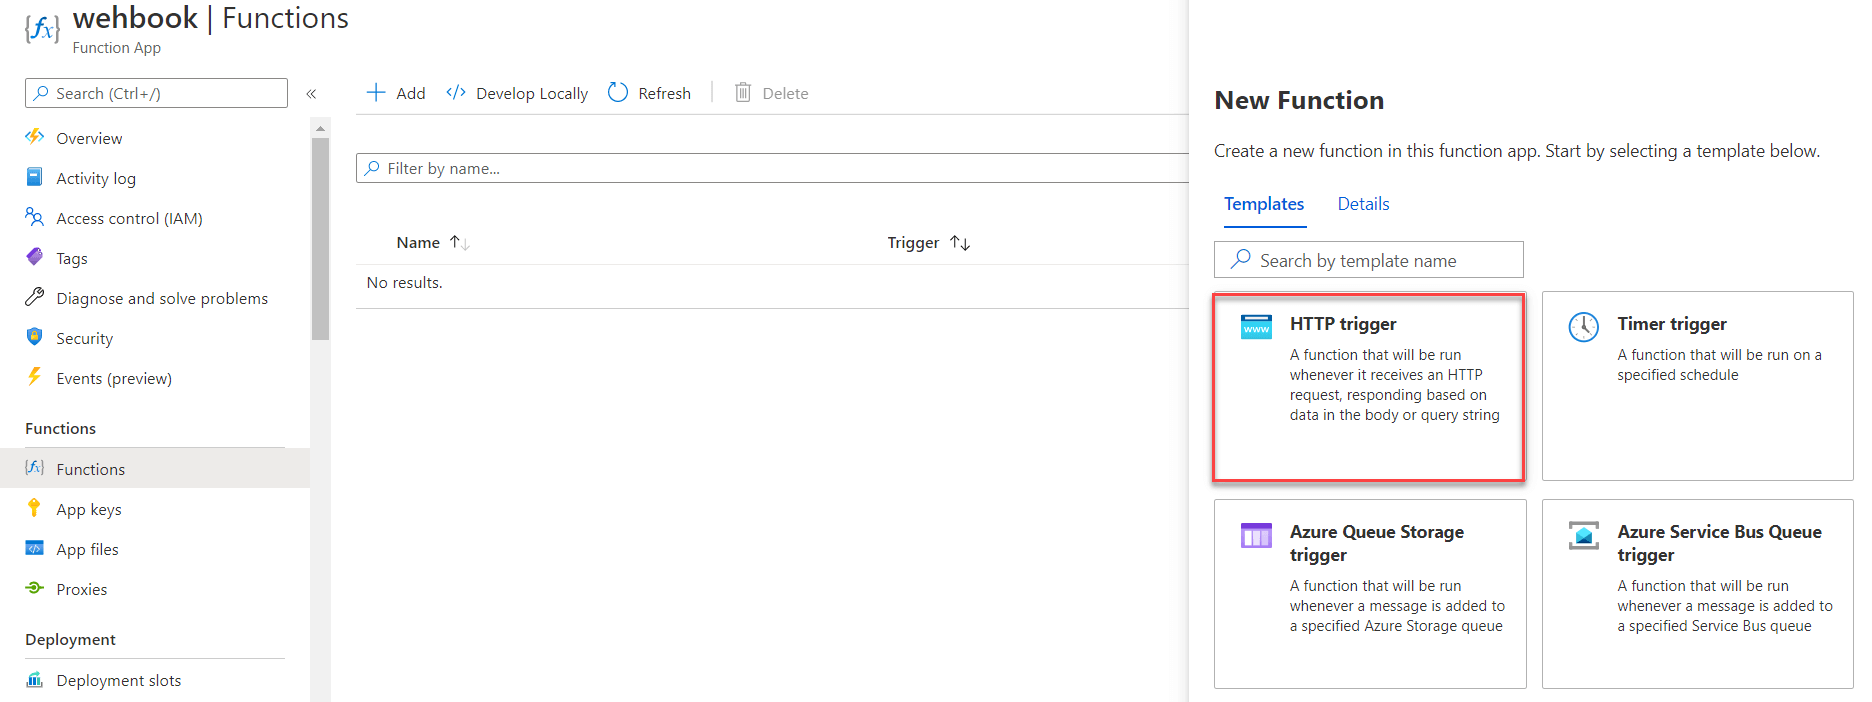
- Select the Functions option as shown in the above screenshot. Next, we need to create a function for our function app. So click on + Add to create a new function.
- Next, select HTTP trigger as the template for your function as shown below. This trigger will enable our function to trigger on an HTTP request such as “get,” “post,” and so on.
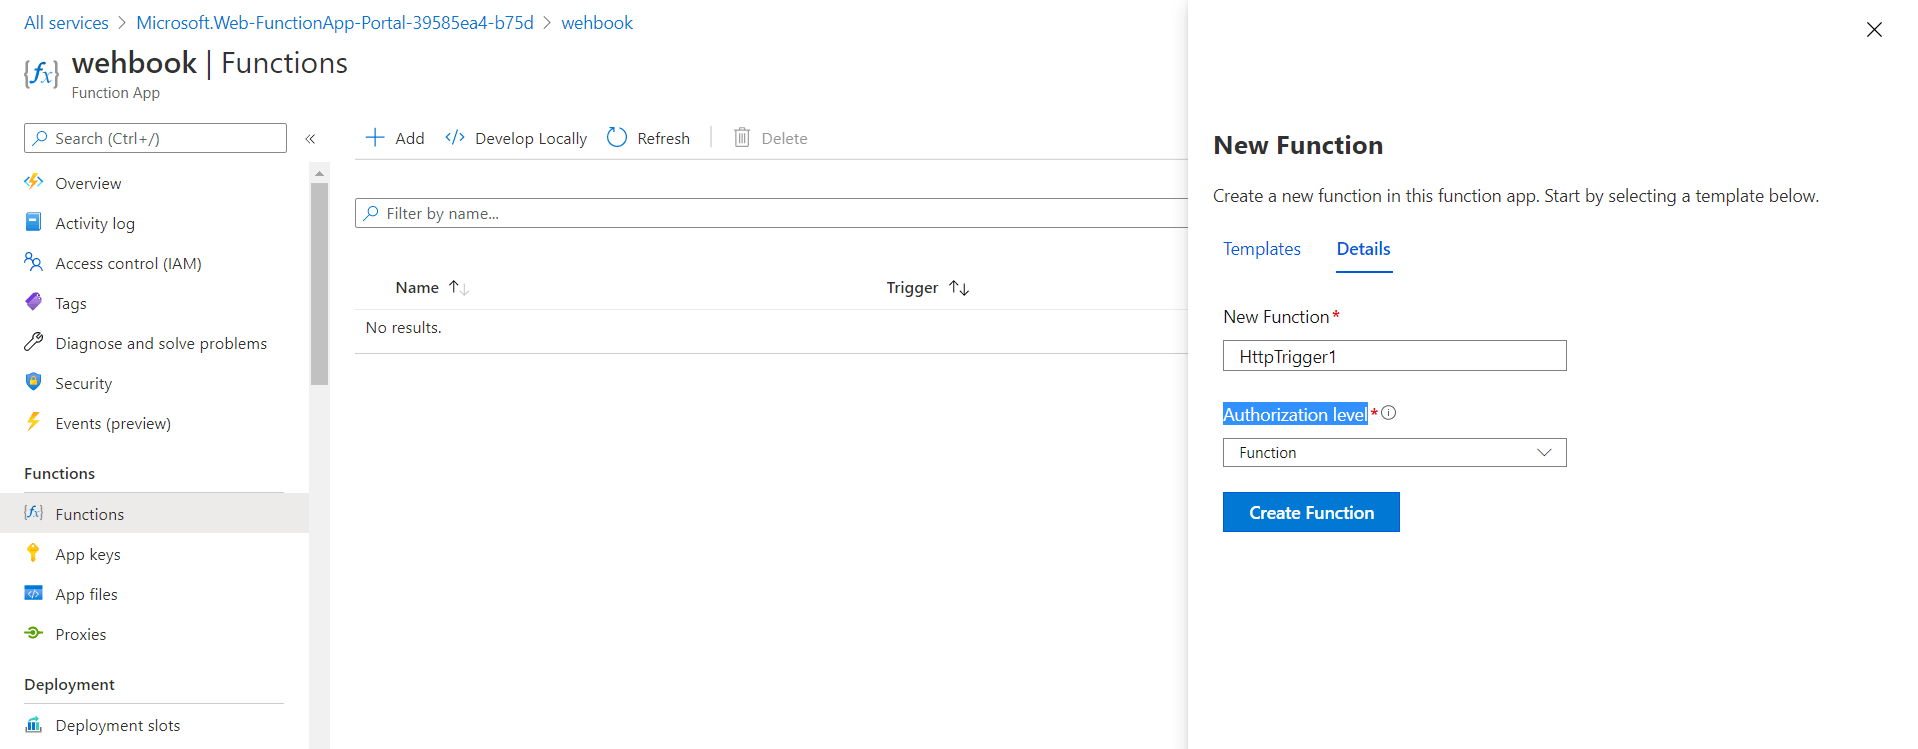
- It will ask you to provide a name for your function and the authorization level. So give a suitable name to your function, select Function from the Authorization level drop-down, and click on the Create Function button.
- Your function is now ready. Next, we need to insert the code for our function so that it performs the required action when it receives a notification from the webhook.
For this exercise, we have created a sample code which you can download from our GitHub repository. -
Click on the Code + Test option. You will see some default code already added there. Delete that and paste the code that you just downloaded (use the code from the index.js file) in the above step.
Once you add the code, it will look like this: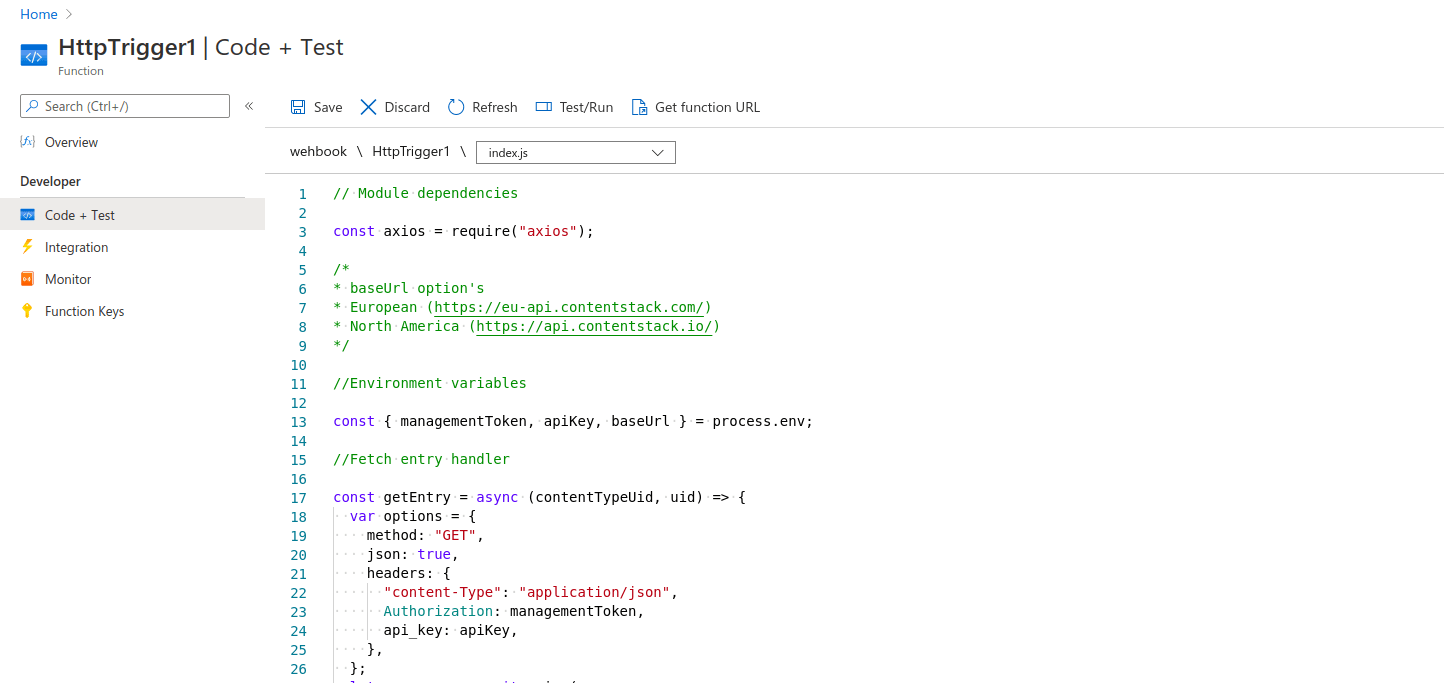
Note: Keep the handler as index.js as shown in the above image.
- Click on Save to save your code in the function.
With these steps, we have set up our code and it is now ready to execute after it receives a notification from Contentstack webhook when the entry is updated.
After setting up the code, we need to add environment variables for our function that will interact with Contentstack. Let's add them.
- After you set up your account successfully, you will be taken to the Azure Portal as shown below:
-
Add the Environment Variables
We can add the environment variables by following the steps as follows:
- Navigate to your Function App by clicking on the function name at the top as shown below:
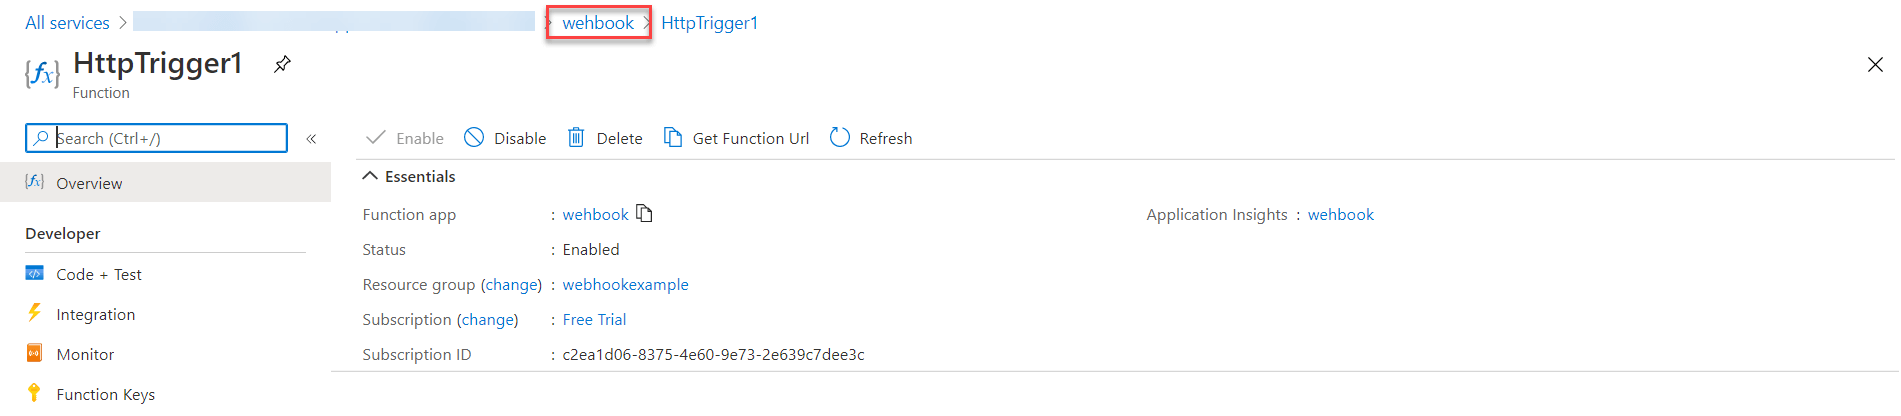
- Then, go to the Settings section on the left navigation panel and select Configuration as shown below:
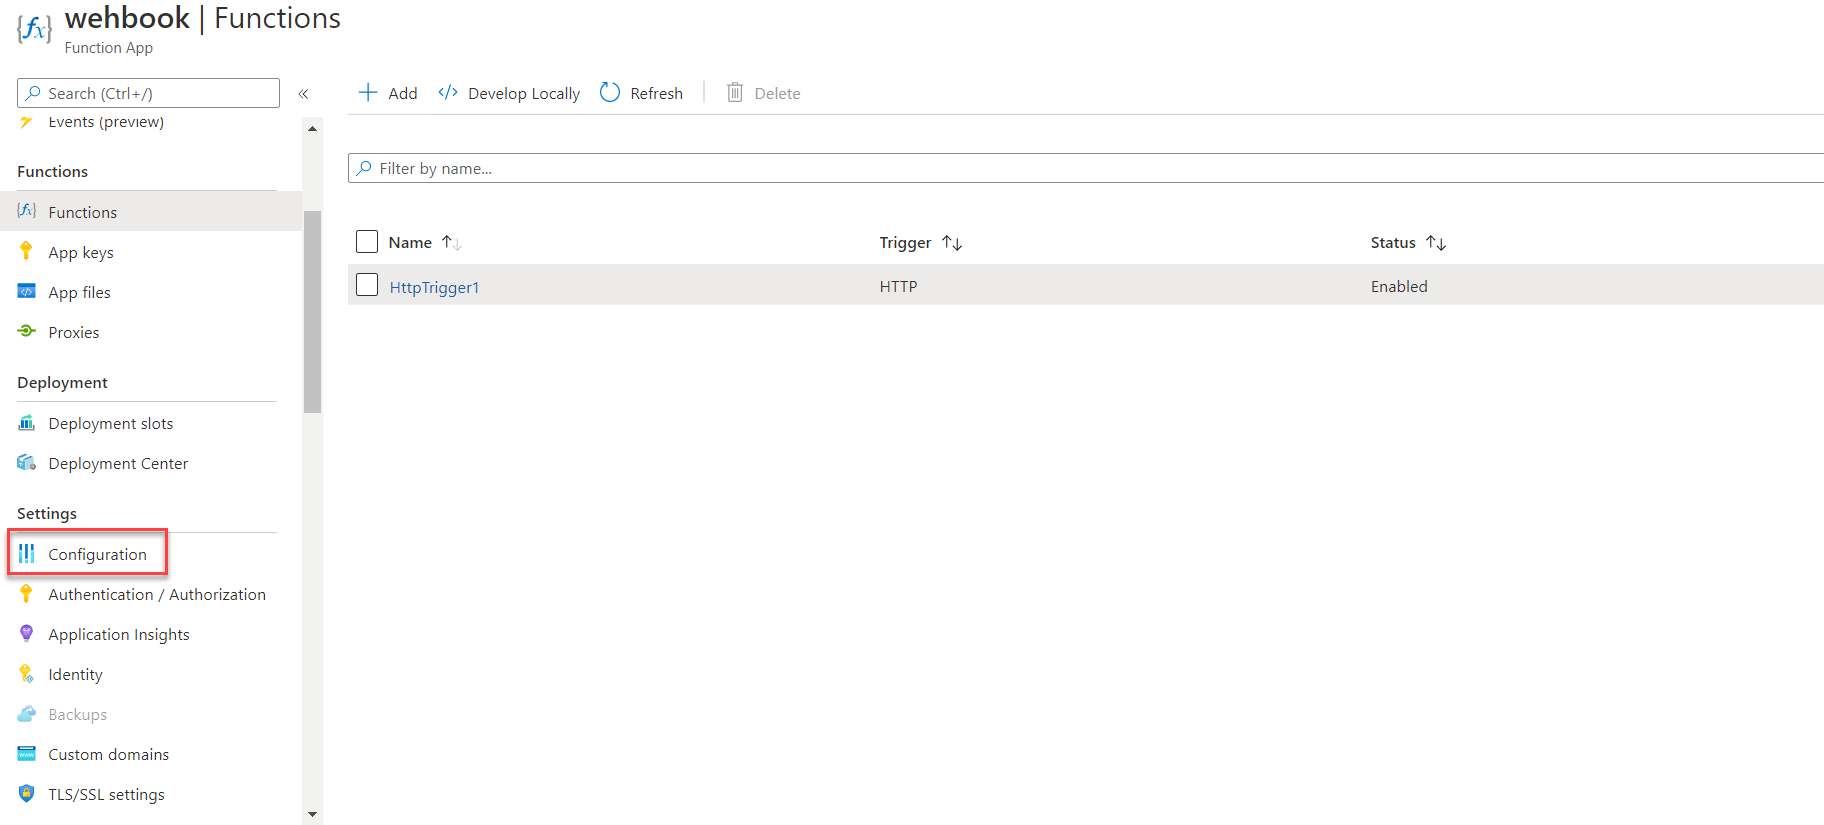
- Then, click on + New application setting, as shown below, to add a new environment:

-
We will add three environment variables with the following names and values:
- managementToken: Add your stack's management token ID as the value of managementToken variable.
- apiKey: Enter your Stack API key as the value for this variable.
- baseUrl: Add the region name where your Contentstack app is hosted, that is, for the Europe region (https://eu-api.contentstack.com/), North America (https://api.contentstack.io/), Azure North America (https://azure-na-api.contentstack.com/), and Azure Europe (https://azure-eu-api.contentstack.com/).
- After adding the environment variables, click on Save to save your function settings.
With these steps, we have added the environment variables for our function. Let's move ahead and add the required dependencies for our function.
- Navigate to your Function App by clicking on the function name at the top as shown below:
-
Install npm Dependencies
After setting up the environment variables in our configuration, we need to install the npm dependencies via the Kudu option. This is required by our function, in our case it is “axios”. Follow the steps given below to add the dependencies:
- Navigate to the Development Tools section on the left navigation menu and select Advanced Tools as shown below:
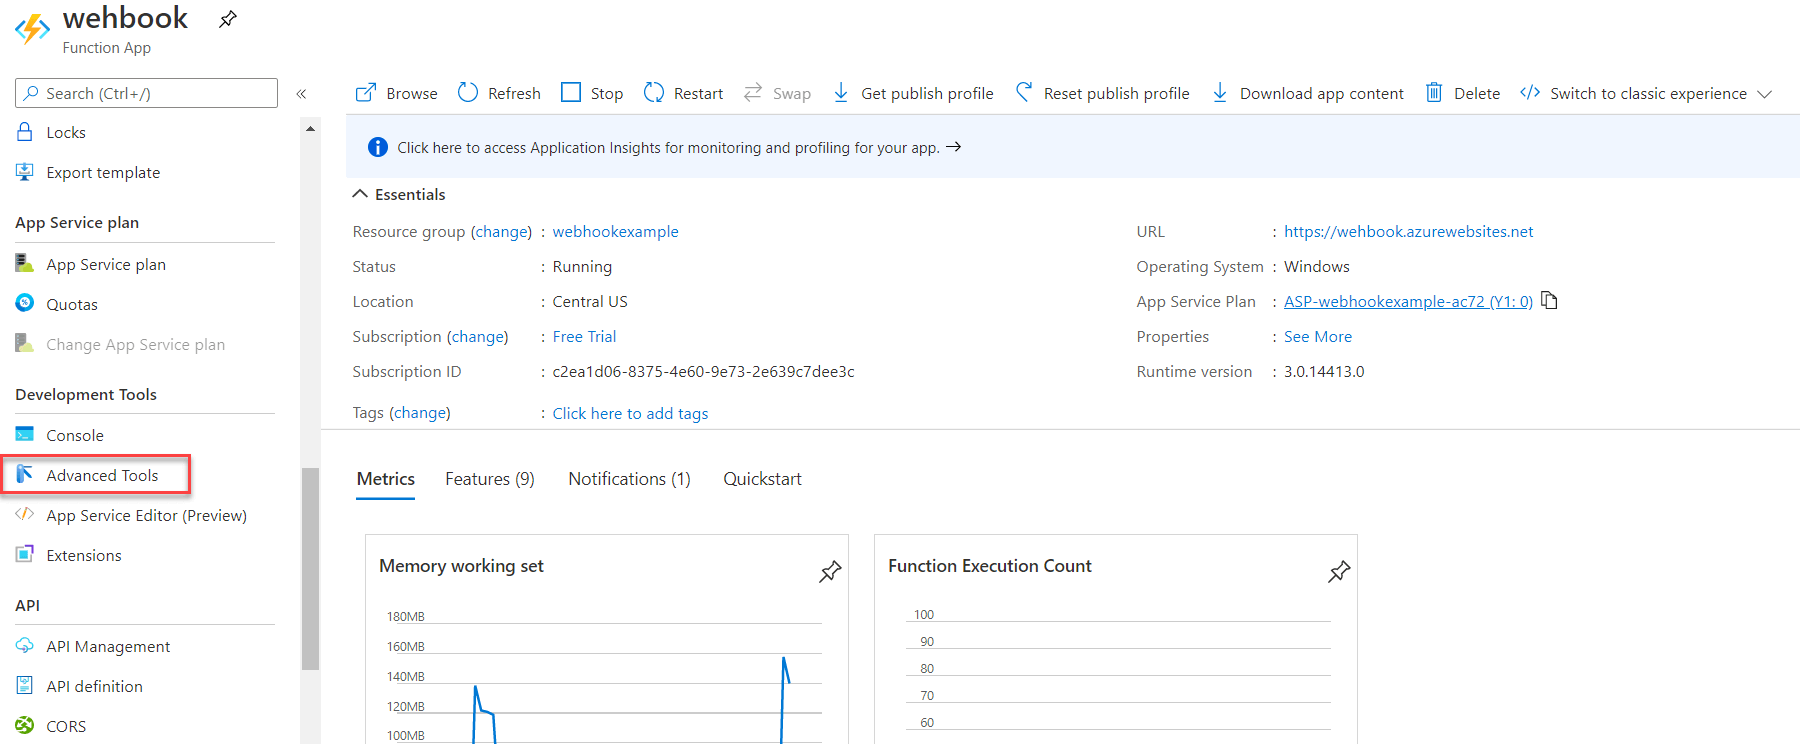
- The Kudu advanced tools section opens up. Click on Go and you will be directed to the Kudu services page or the Kudu web interface as shown below:
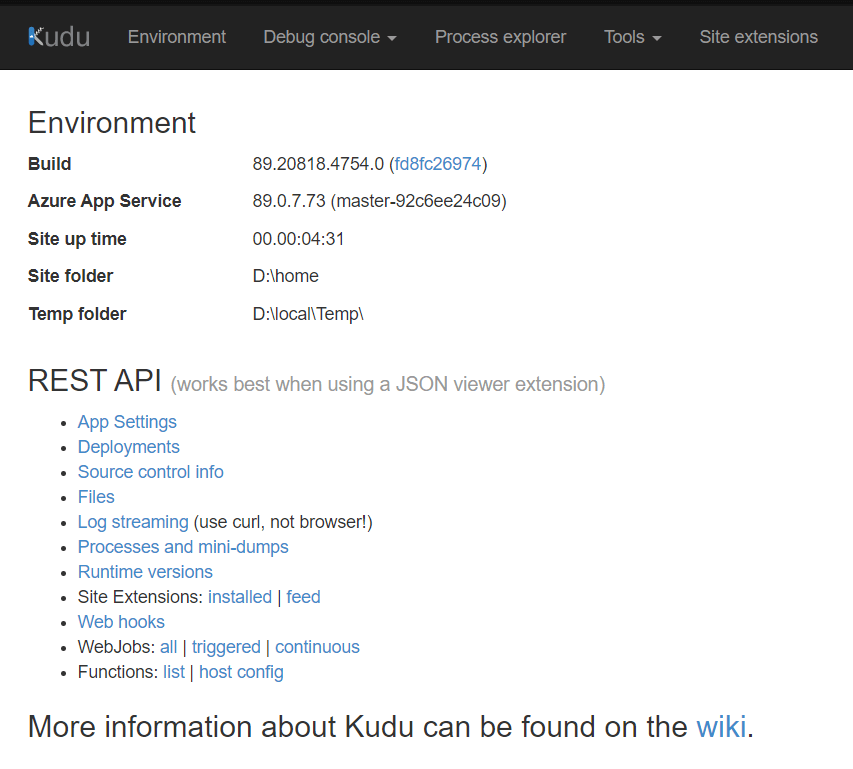
- Click on the Debug console option, at the top header, and select CMD. With the help of the Kudu web interface, you can download external npm dependencies based on your requirement.
- In the console that opens, navigate to site then to wwwroot and type npm init to create package.json. It asks you to provide project details, version number, and so on. Accept the default values by hitting the Enter key. This step will create the package.json file.
- Next, to install axios, type npm install axios in the same console and hit enter. This command will install the required dependencies and create the package-lock.json file as shown in the following screenshot:

- After setting up the external dependencies, navigate to your function, click on Get Function URL, and copy the function URL as shown below:
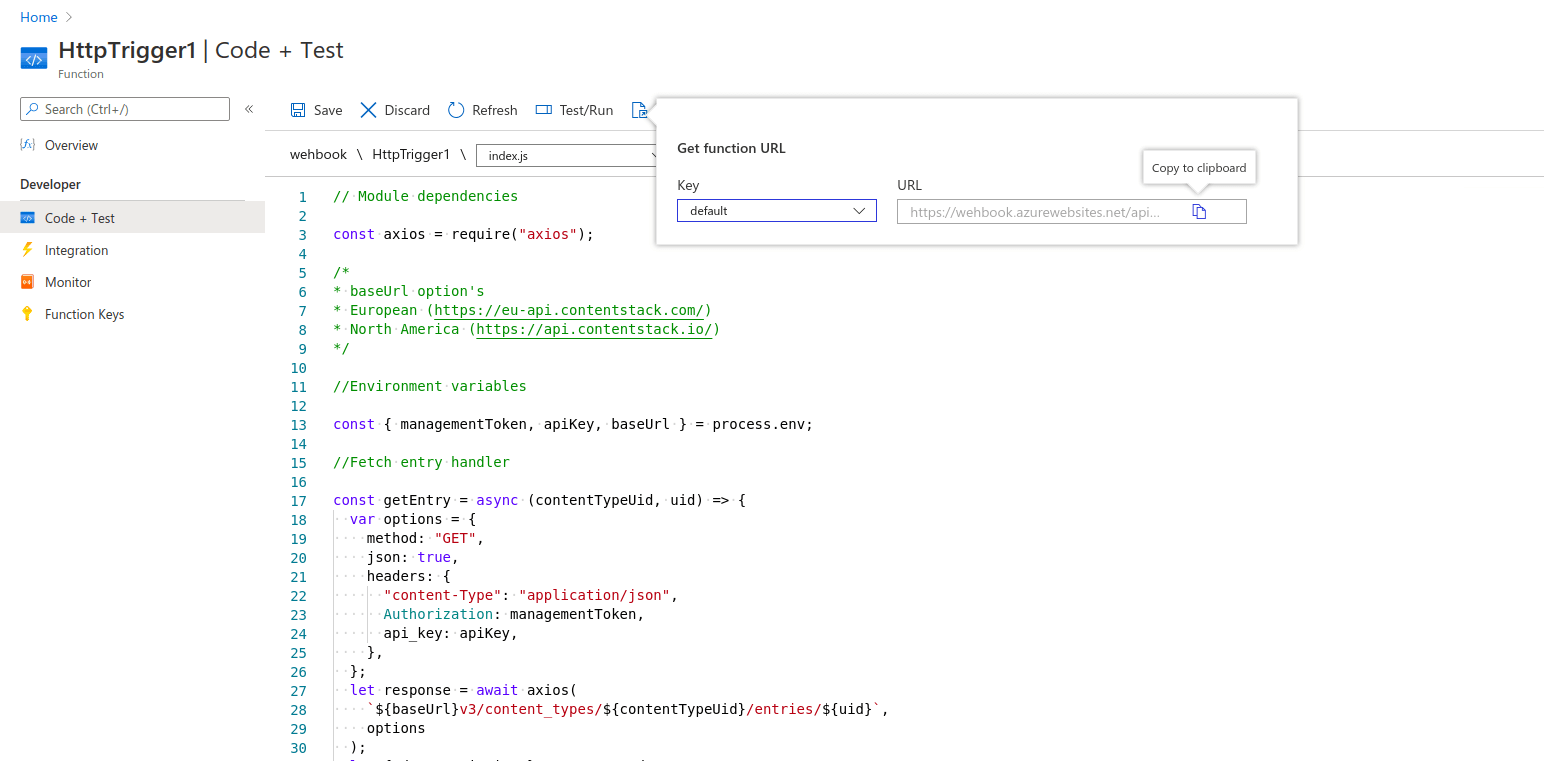
We will need this URL while setting up our webhook in Contentstack, so make note of it. With these steps, we have set up our function and now ready to create a webhook. Let's do that!
- Navigate to the Development Tools section on the left navigation menu and select Advanced Tools as shown below:
-
Create a Webhook in Contentstack
Let's now create a webhook in Contentstack to invoke our function through the URL that we just created. To do this, log in to your Contentstack account follow the steps given below:
- Navigate to your stack and click on the “Settings” icon (press “S”) on the left navigation panel.
- Click on Webhooks (press “alt + W” for Windows OS, and “option + W” for Mac OS). On the Webhook page, click on + New Webhook.
- On the Create Webhook page, fill up the Name field (for example, WebhookListener).
- In the URL to notify field, enter the URL (the Azure Function URL) that you generated in the above step.
- Scroll down to the Conditional View section for creating a trigger for the webhook as shown below:
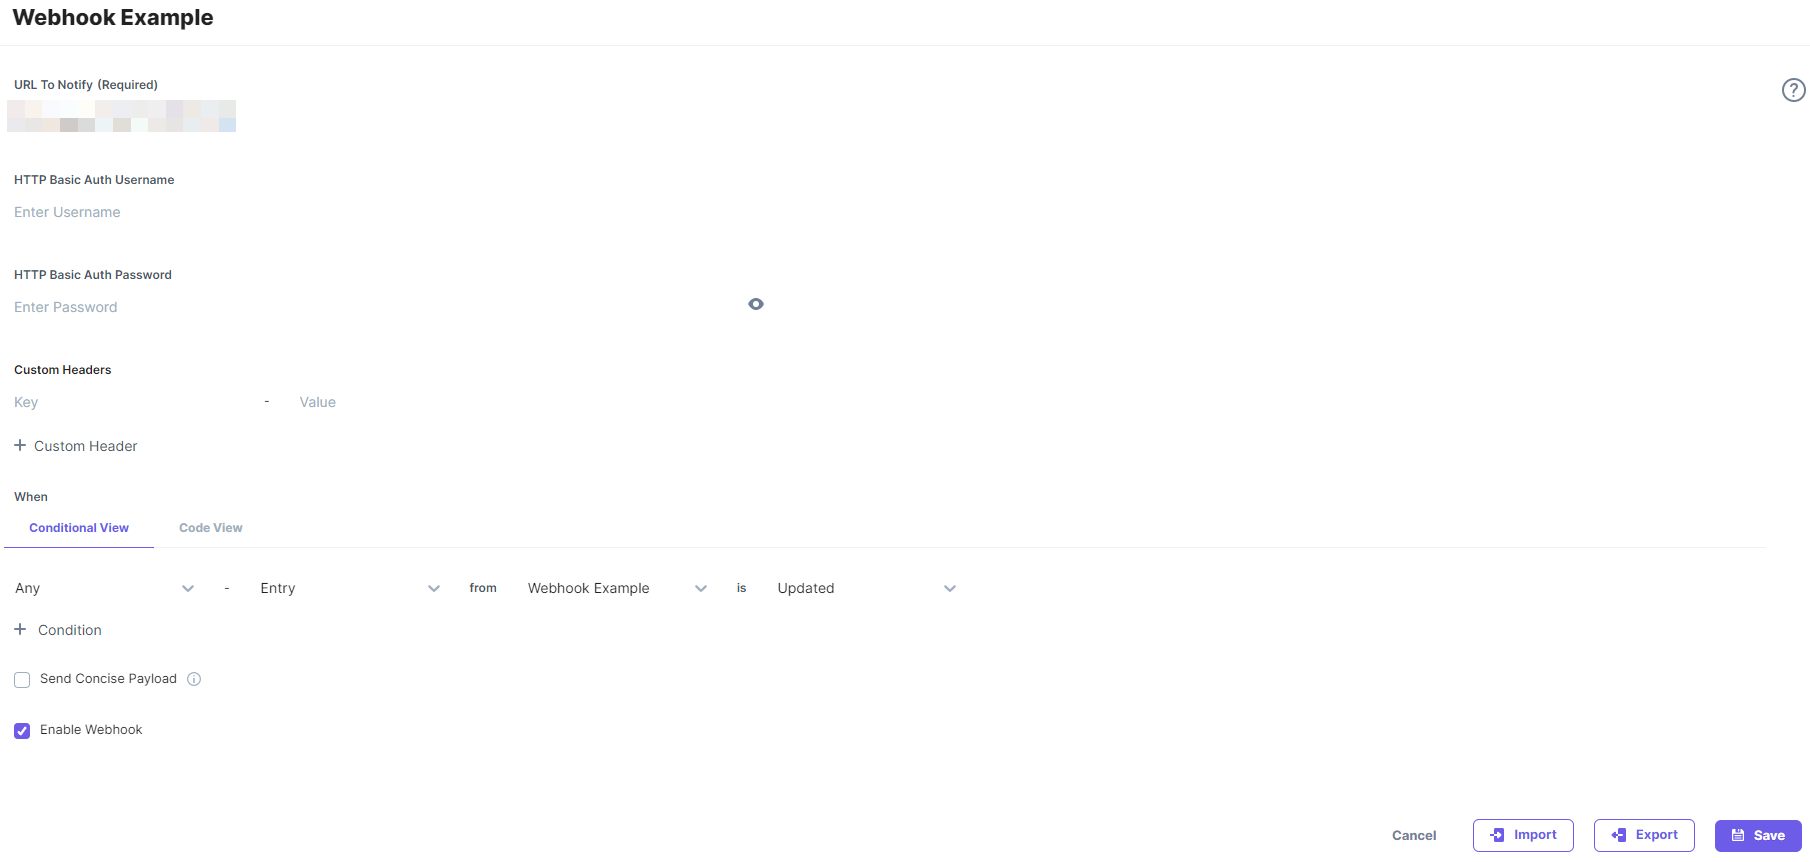
- Ensure the Enable Webhook checkbox is selected and click on Save to save your Webhook settings.
Your webhook is now ready to invoke the Azure function when an entry in the Webhook listener content type is updated.
-
Try it Out
The entire set up is done and you are ready to try this out.
- Navigate to your entry and try changing the Date and Priority fields.
- Save your entry. Upon saving, the webhook triggers. This trigger will invoke the Azure Function and update the Sort order field.
- Hard refresh (Ctrl + Shift + R) the entry page and you should see the changes.
Alternate Way to Creating an Azure Function Using the VS Code Editor
We will now see how we can create an Azure Function using the Visual Studio Code Editor. To do this, the above steps remain the same (content type creation, account creation in Microsoft Azure, and webhook creation).
The only difference here is that for creating the function app and installing the dependencies, we will use the VS Code Editor.
Prerequisites
- Microsoft Azure account
- VS Code Editor installed on your machine
Execution Steps
- Create a content type and add an entry
- Create a Microsoft Azure account
- Install Azure Function extension in VS Code Editor
- Create a function in VS Code Editor
- Create a webhook in Contentstack
- Try it out
Let's get started!
-
Create a content type and add an entry
Follow the steps mentioned in the create a content type section above.
-
Create a Microsoft Azure Account
Follow the steps mentioned in the create an account in Azure section above.
-
Install Azure Function Extension in VS Code Editor
Let's follow the steps given below to install the Azure Function extension:
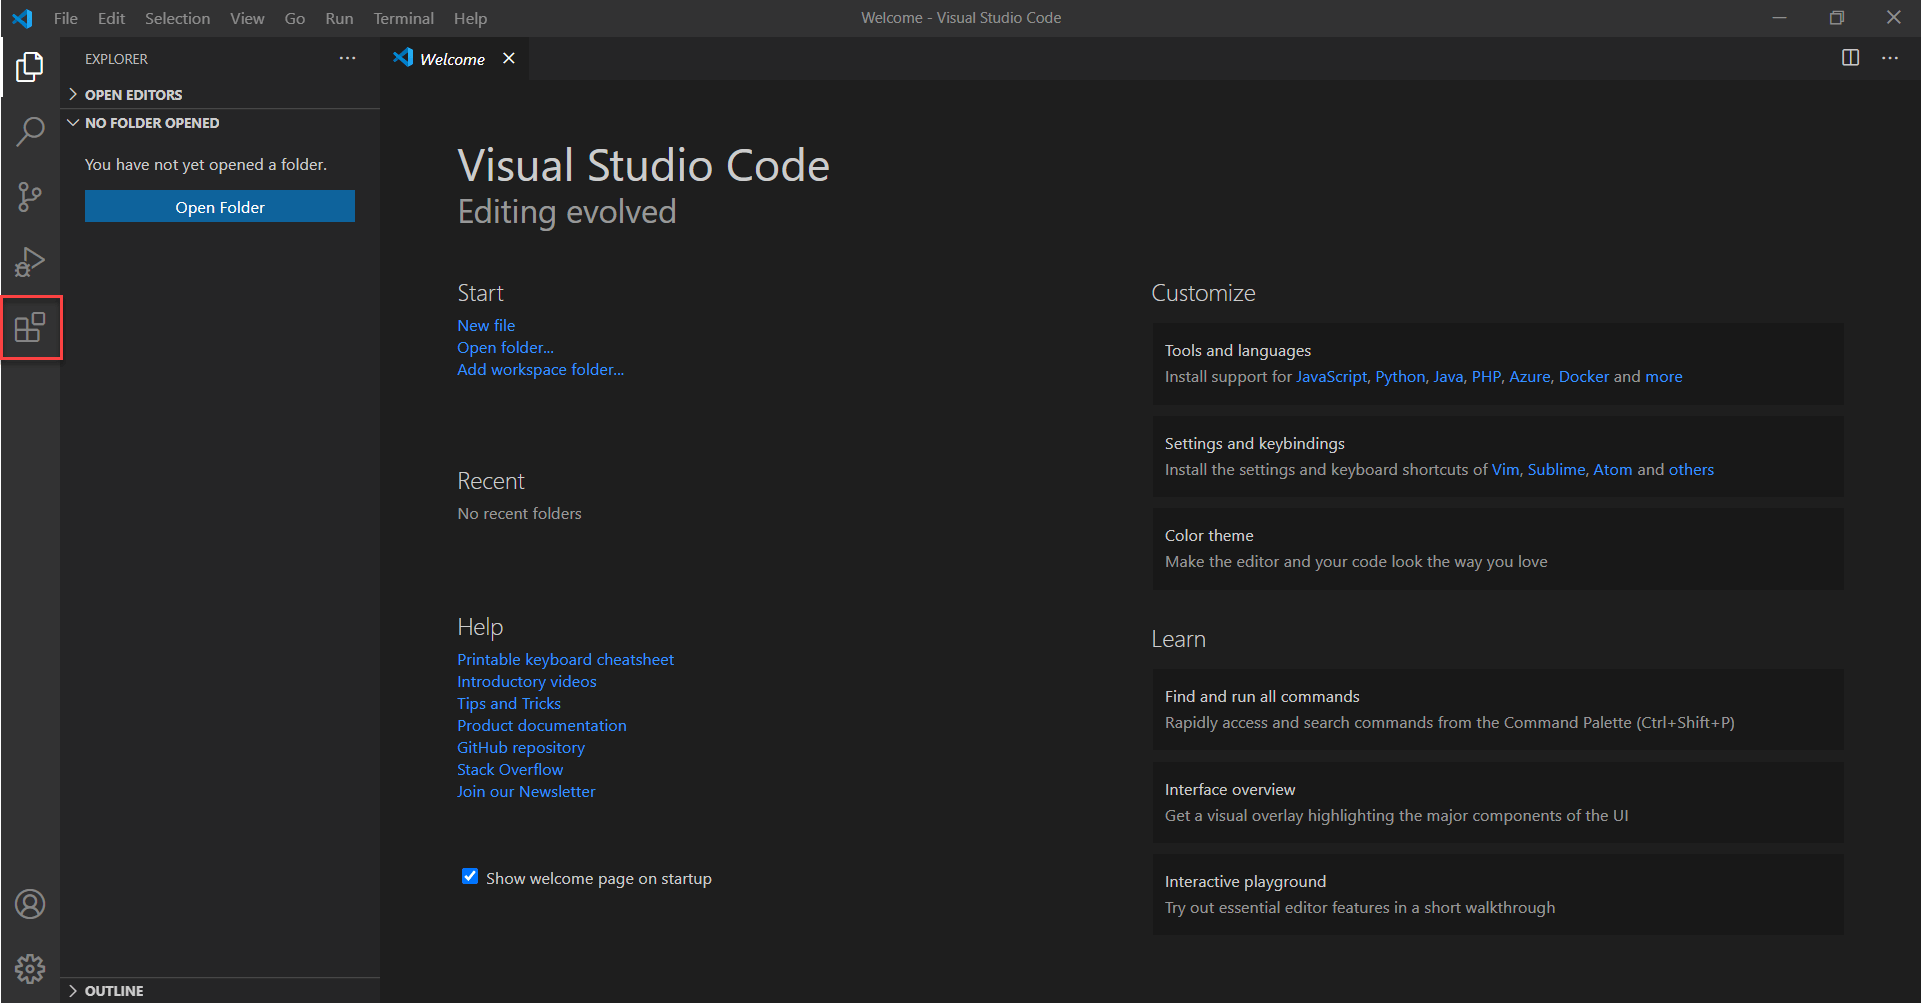
- Create an empty folder, which will be your project folder, and open it in your VS Code Editor.
- Navigate to the Extension icon (or press Ctrl + Shift + X) to open the VS Code Extension marketplace.
- In the Search Extensions in Marketplace text box, type Azure Function, and click on Install.
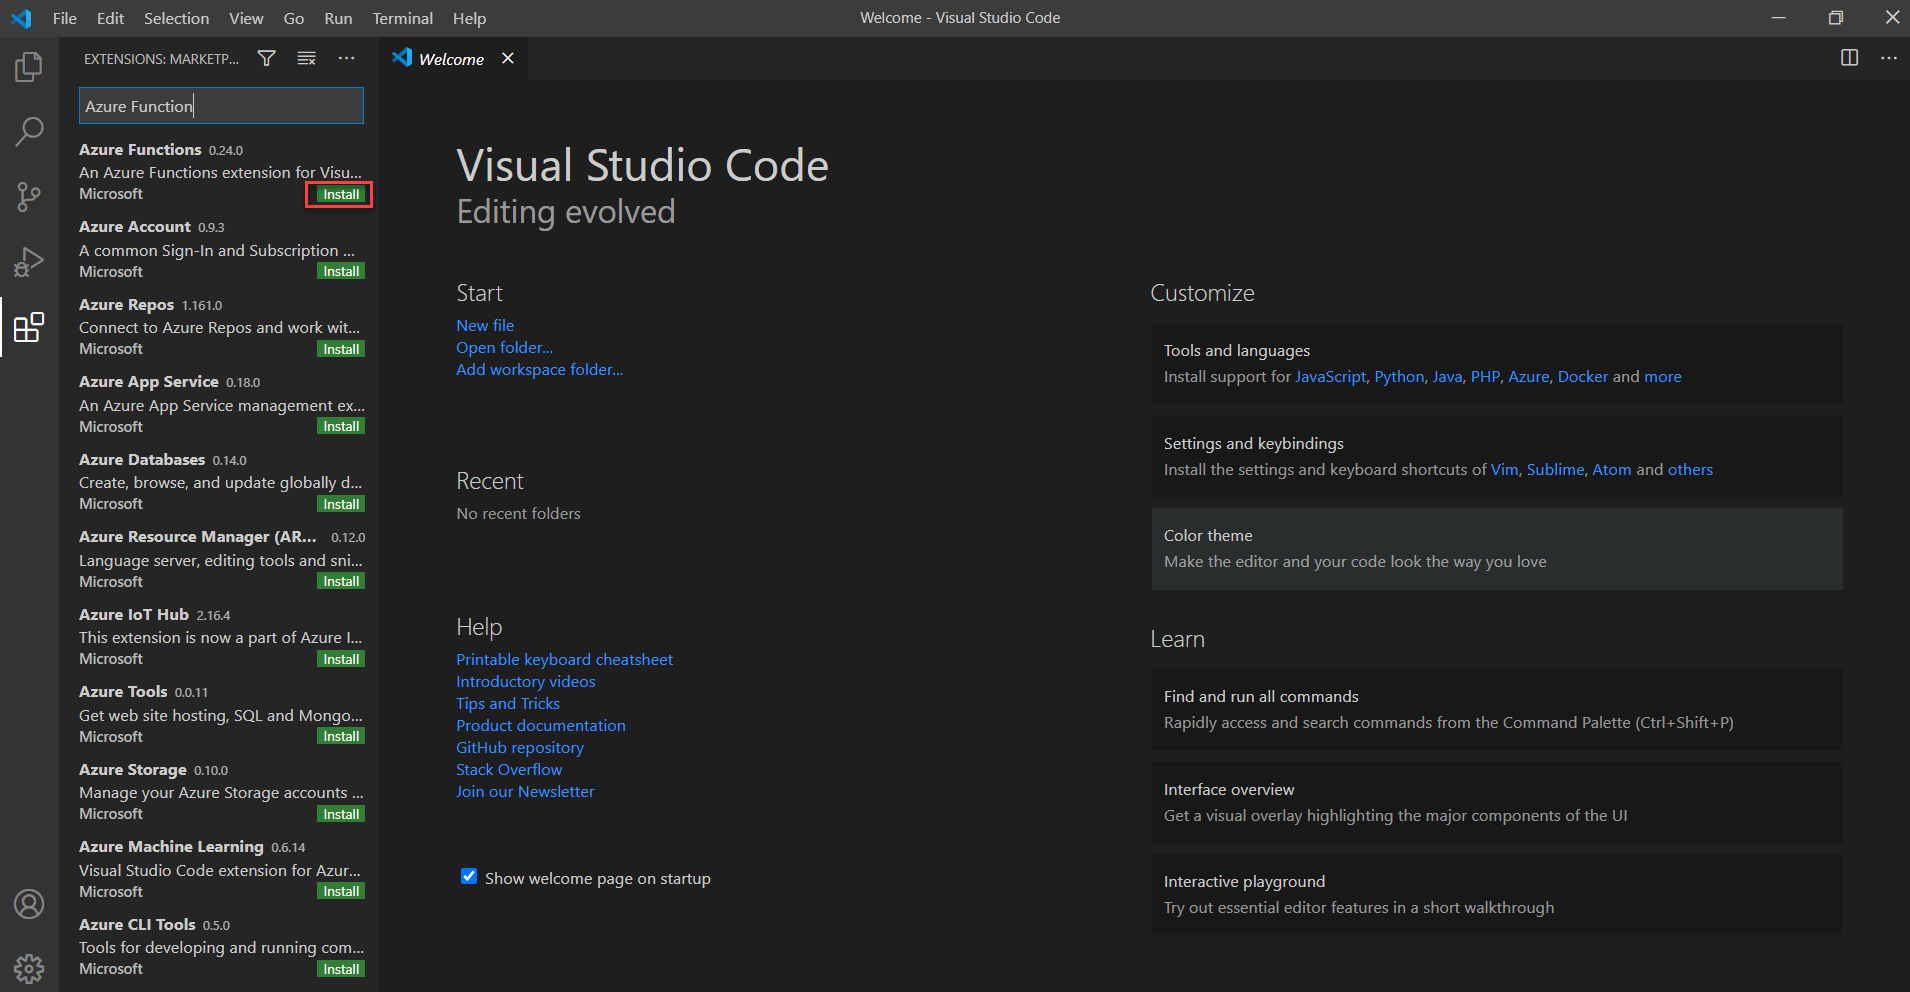
- After installing the extension, you will see the Azure icon, just below the Extensions option, as shown below:
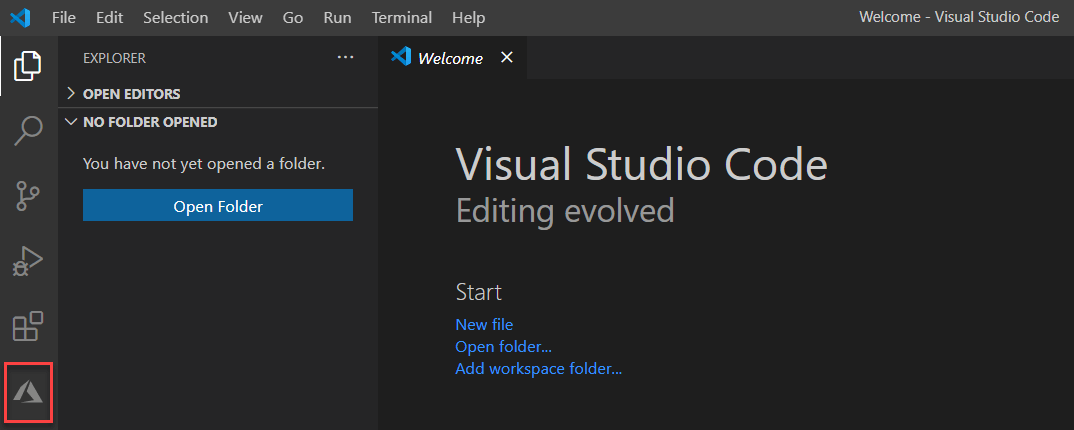
- Click on the Azure icon and it will ask you to log in or sign in to your Azure account.
- Once you log in, you will see a list of Azure Functions, if you have previously created any function, as shown below:
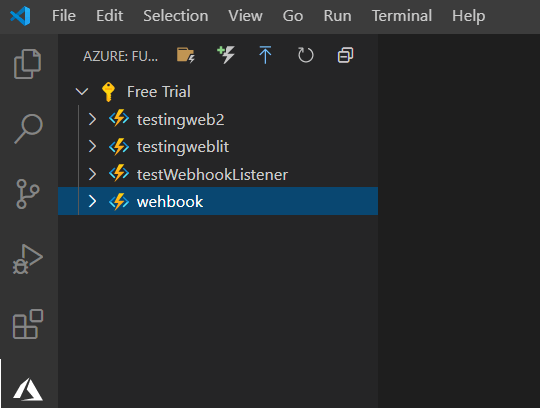
We have now installed the Azure Function extension and logged in to our Azure account through VS Code Editor.Let's now move ahead and create a function.
-
Create a Function in VS Code Editor
Follow the steps mentioned below to create your own Azure Function:
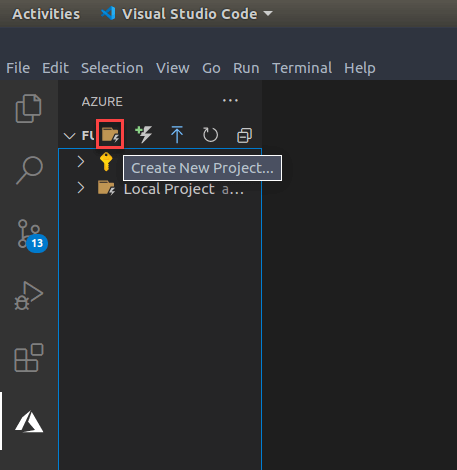
- Click on the Azure icon in VS Code Editor and then create a new project by clicking on New Project as shown below:
-
Select the following options to create a project:
- Project language - JavaScript
- Template - HTTP trigger
- Authorization level - Function
- After creating the project, you will get a local boilerplate code for local development of your Azure Function as shown below:
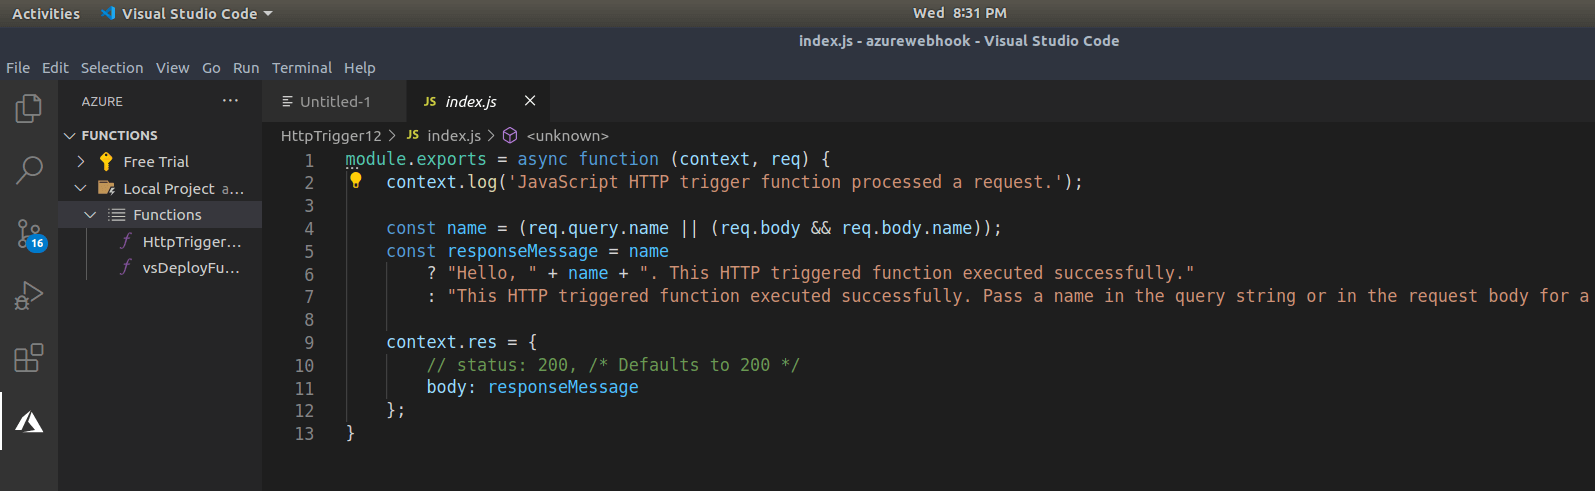
- Now if you navigate to the local root directory, you will see a folder structure with your function name as shown below:
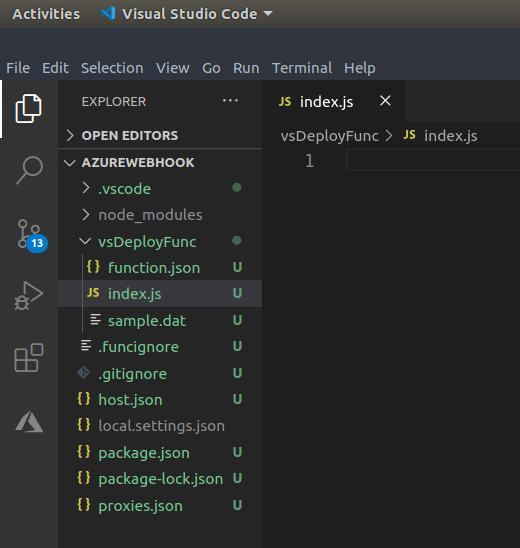
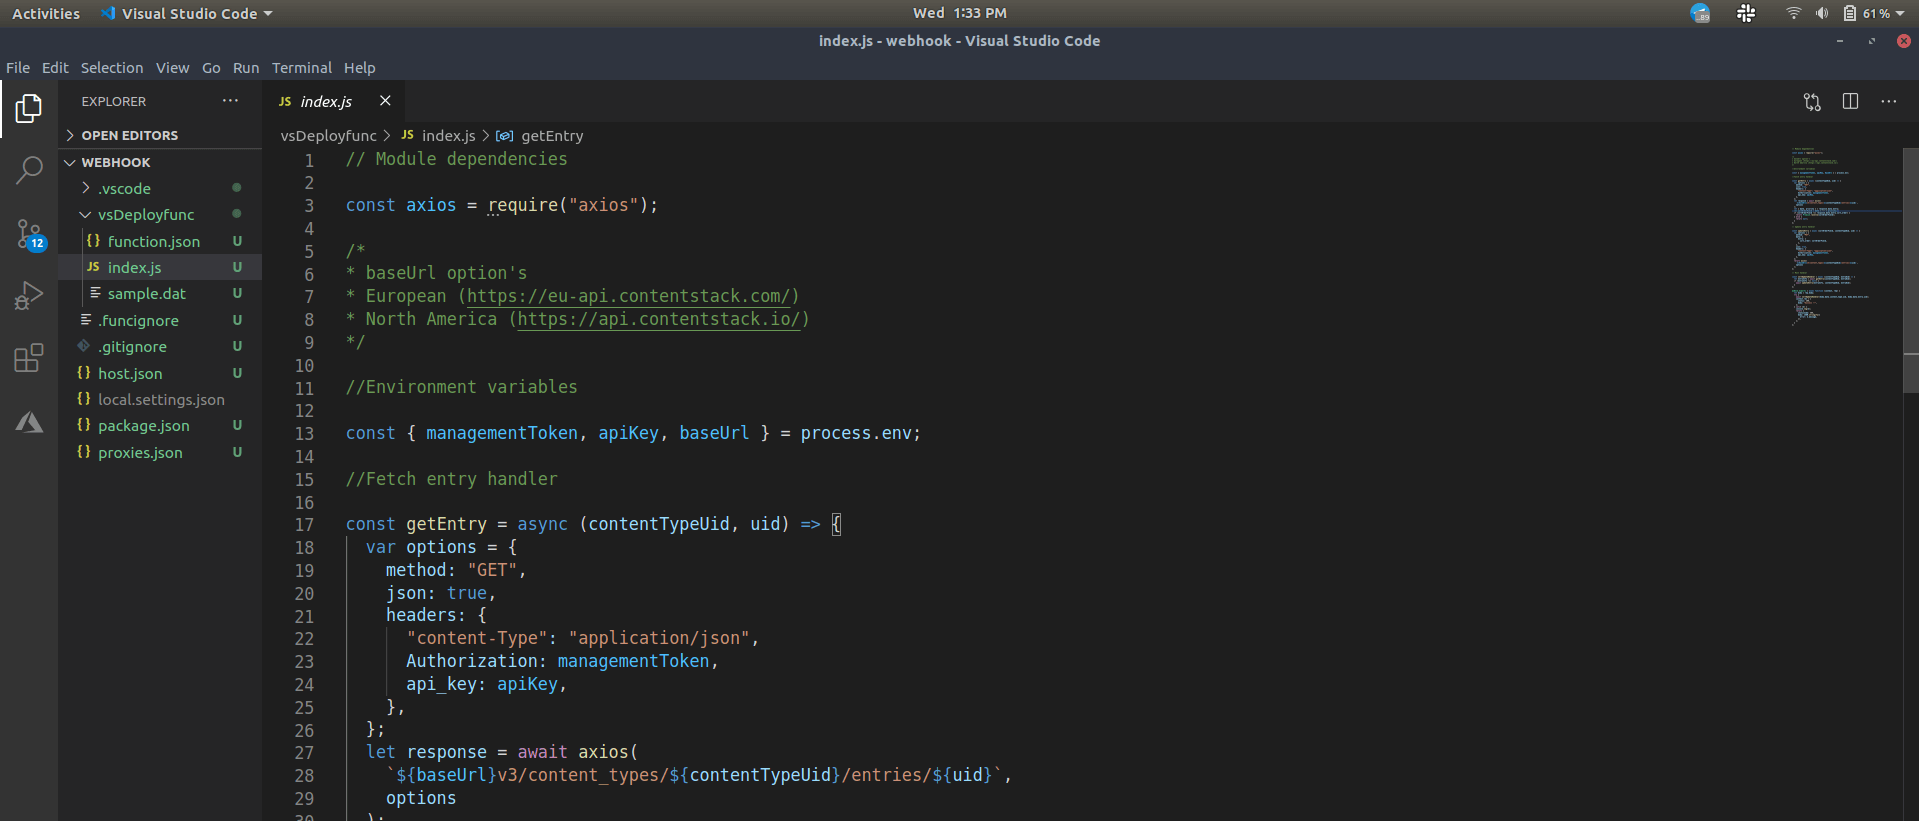
- This is your Azure Function which is created locally. Now open the index.js file and replace the boiler plate code with the webhook listener code as shown below:
-
After providing your code, let's install the npm dependencies. To do this, navigate to your Azure Function's root directory within your VS code integrated terminal, where your package.json resides, and hit the following command:
npm install axios
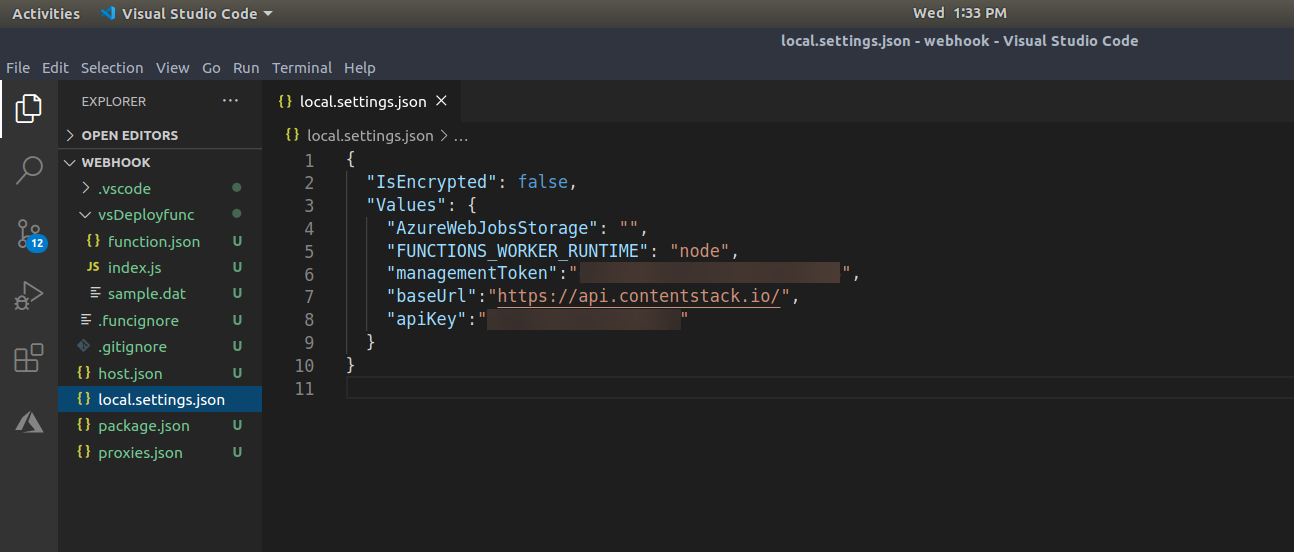
- Once that is installed, you can verify it in your package.json file. After the npm installation, let’s navigate to the local.settings.json file and add environment variables (similar to what we did in the first method when we added management token, API key and the base URL) as shown below:
- Save your file and now we are ready to deploy our function. But before that, remember to delete the local.settings.json line from the .funcignore file. As this is present by default, local.settings.json will not get uploaded as it consists of your environment variables.

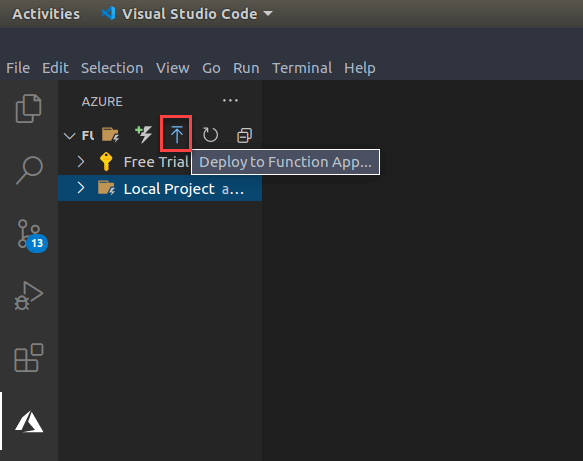
- After installing npm modules and setting your environment variables, save everything and navigate to the Azure icon.
- Then, deploy your local Azure Function to Azure Portal by selecting the Deploy to function App (up arrow) icon as shown below:
- You will be prompted, within the VS Code Editor, with certain options such as create a new function, stack framework (Node.js 12), and so on. Provide the required details and your function will get deployed to Azure Portal.
- It will take about a minute to get deployed and then you will get a prompt to upload your settings file, that is your local.settings.json.
- Click on Upload Settings to upload your environment variables (local.settings.json file) to the Azure Portal or else it won't get uploaded.
- Once it is deployed, navigate to Azure Portal, and copy the function URL (as we did in the previous method).
- Click on the Azure icon in VS Code Editor and then create a new project by clicking on New Project as shown below:
-
Create a Webhook in Contentstack
Follow the steps mentioned in the create a webhook section above and paste the URL you generated above in the URL to notify field.
-
Try it Out
To thy this out, follow the steps mentioned in the Try it out section above.
That's it!
If there are any changes to the code or config, you can change the appropriate file and re-deploy the function.
Additional Resources: Learn how to create an AWS Lambda Webhook Listener by using our Webhook Listener with Webhooks and AWS Lambda guide. You can also refer to our guides on how you can use Contentstack Webhooks with AWS Lambda to automate several content management tasks.
More articles
