
.svg?format=pjpg&auto=webp)
.svg?format=pjpg&auto=webp)
.png?format=pjpg&auto=webp)


.png?format=pjpg&auto=webp)
Cloudinary App Installation Guide
Cloudinary is a comprehensive media management platform that helps streamline the process of uploading, storing, managing, and delivering digital media content. With its robust capabilities for optimizing and transforming images and videos on-the-fly, it ensures they are delivered efficiently across various devices and platforms.
Cloudinary's powerful APIs and user-friendly interface enable developers and content creators to seamlessly integrate media management into their workflows, enhancing performance and user experience.
The Contentstack Marketplace lets you install the Cloudinary app and use it within your stack to refer media files from your Cloudinary account.
Prerequisites
- Cloudinary account
- Contentstack account
- Access to the Contentstack Organization/Stack as the Owner/Admin
This step-by-step guide explains how to install and configure Cloudinary within your stack.
Steps for Execution
- Get your credentials from Cloudinary
- Install and Configure the Cloudinary app in Marketplace
- Use the Cloudinary app within your Stack
-
Get your Credentials from Cloudinary
To get your Cloud Name and API Key from Cloudinary, follow the steps given below:
- Log in to your Cloudinary account.
- On the left-hand side primary navigation, click the Settings gear icon. Then, go to Account under Account settings to view your cloud name.
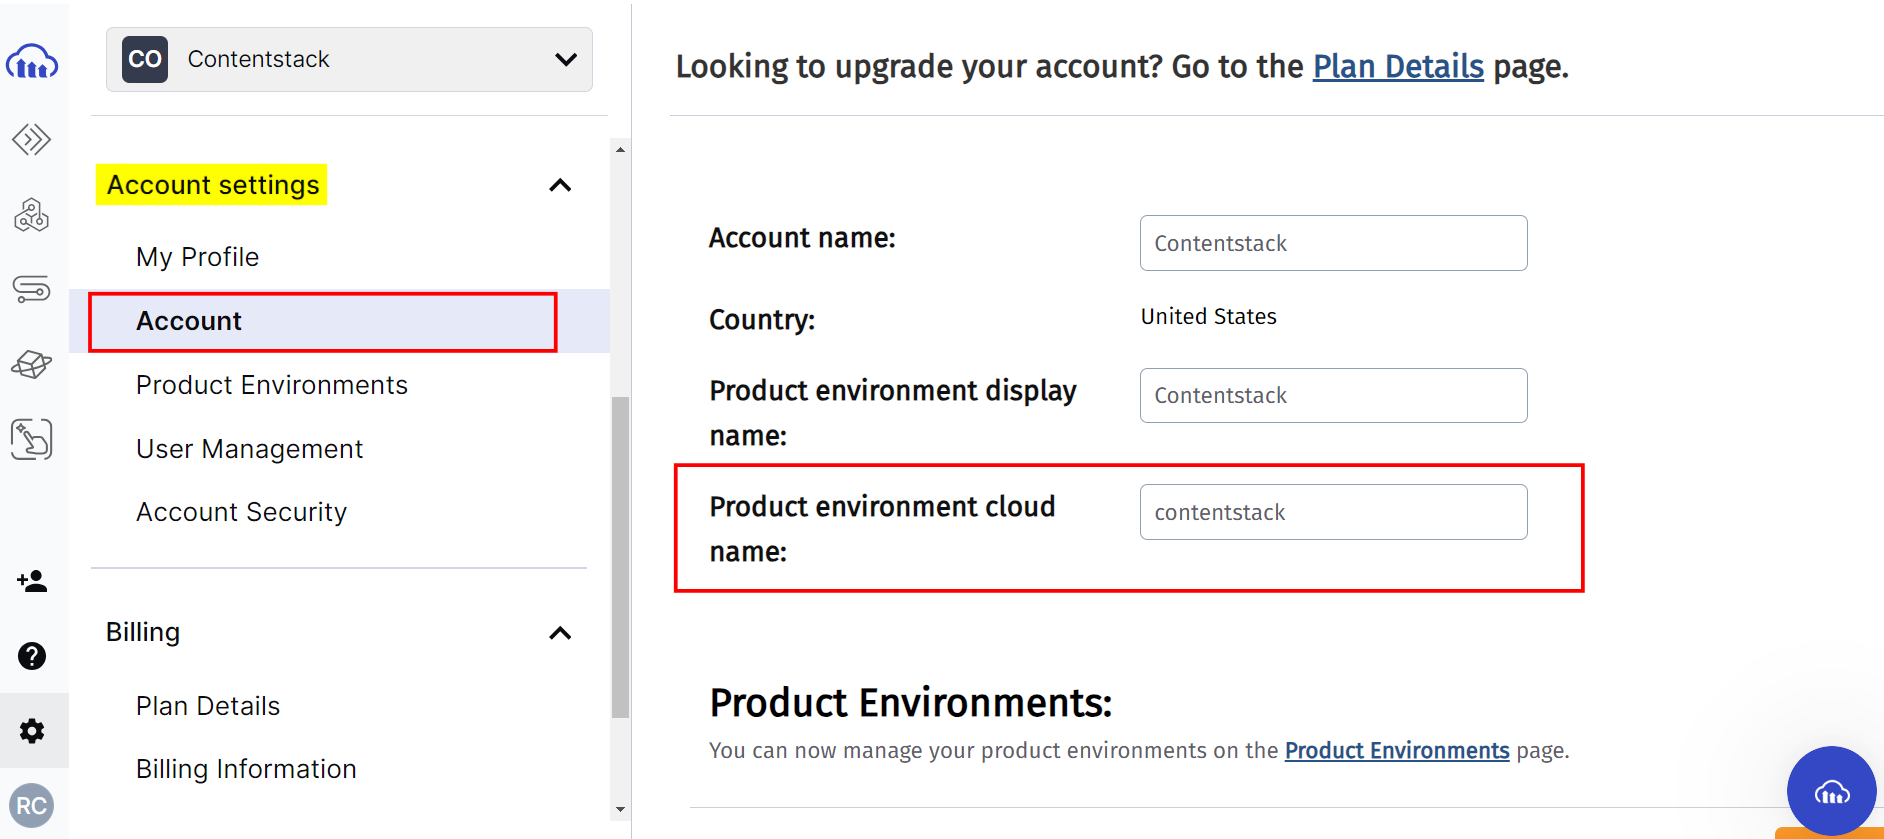
- Click API Keys under Product environment settings to view your API Key.
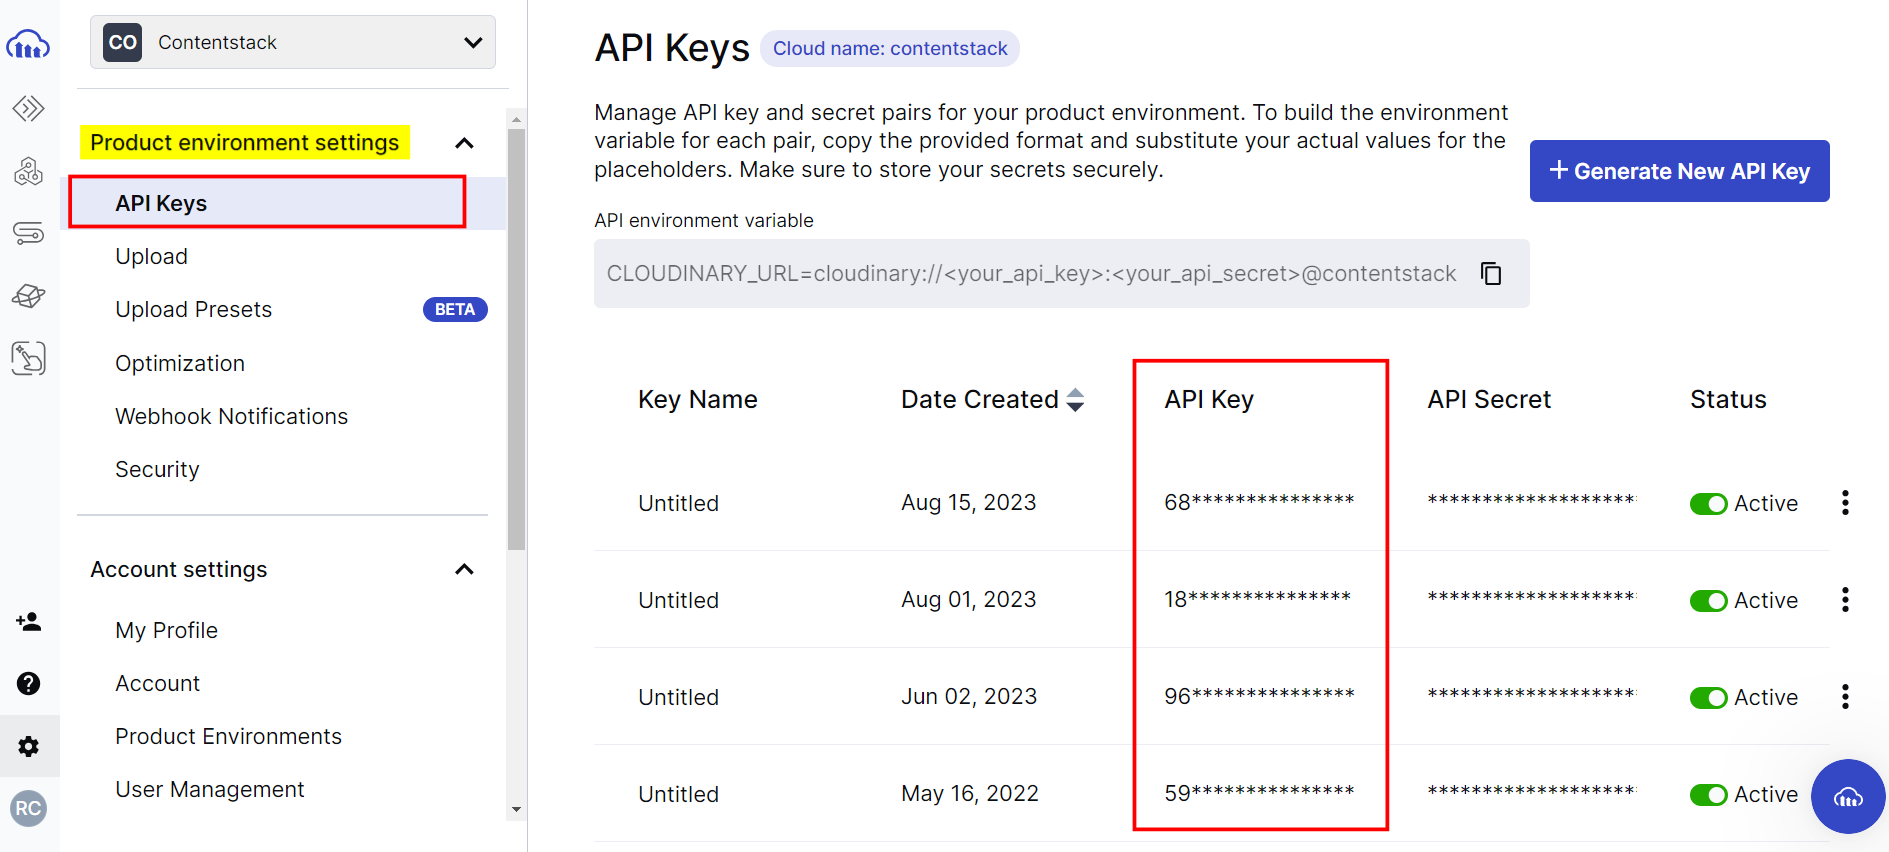
- Save the Cloud Name and API Key; you will need it while configuring your Cloudinary app in Contentstack in step 2.
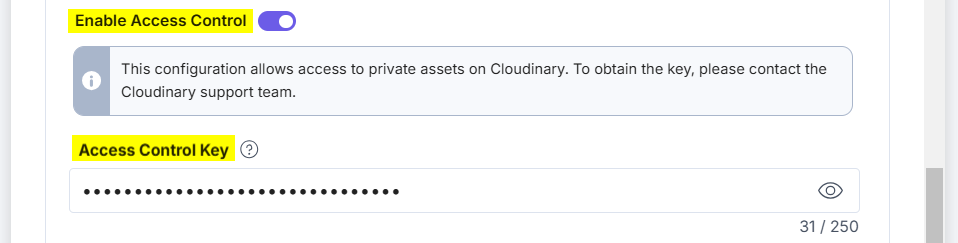
Note: To view the restricted assets, you need to configure the Access Control Key in step 2. Please contact the Cloudinary Support team to get this credential.
-
Install and Configure the Cloudinary App in Marketplace
To install the app, log in to your Contentstack account and follow the steps:
- From the left-hand side primary navigation, click the Marketplace icon.
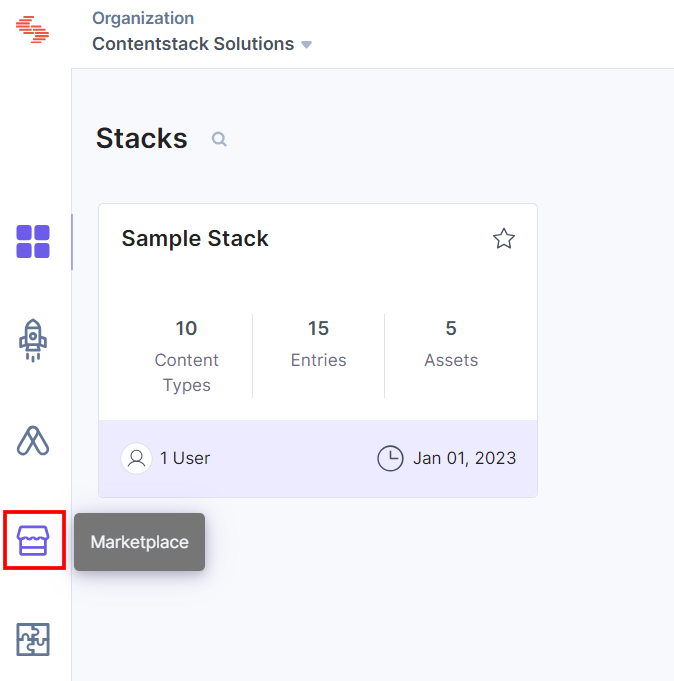
- Click Apps from the left panel.
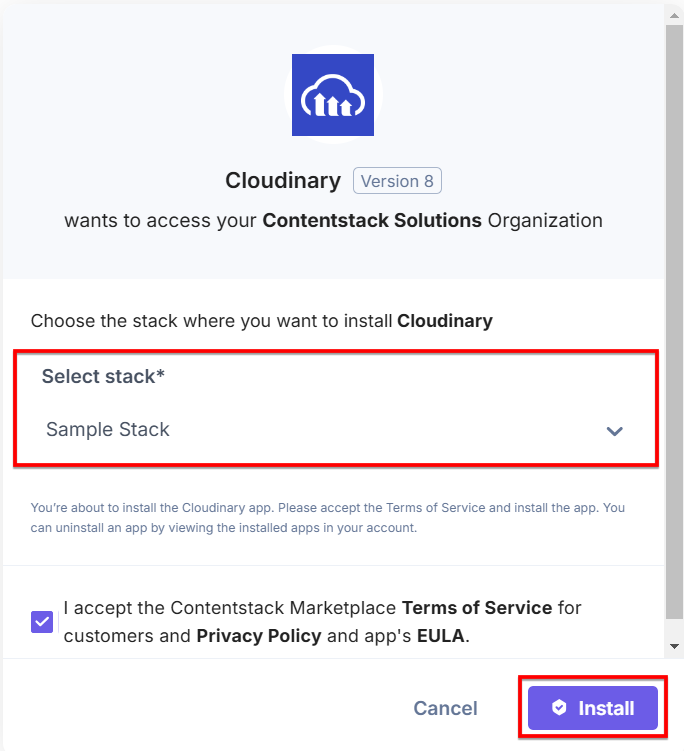
- Within the Marketplace, you can see all available apps. Hover over the Cloudinary app and click Install.
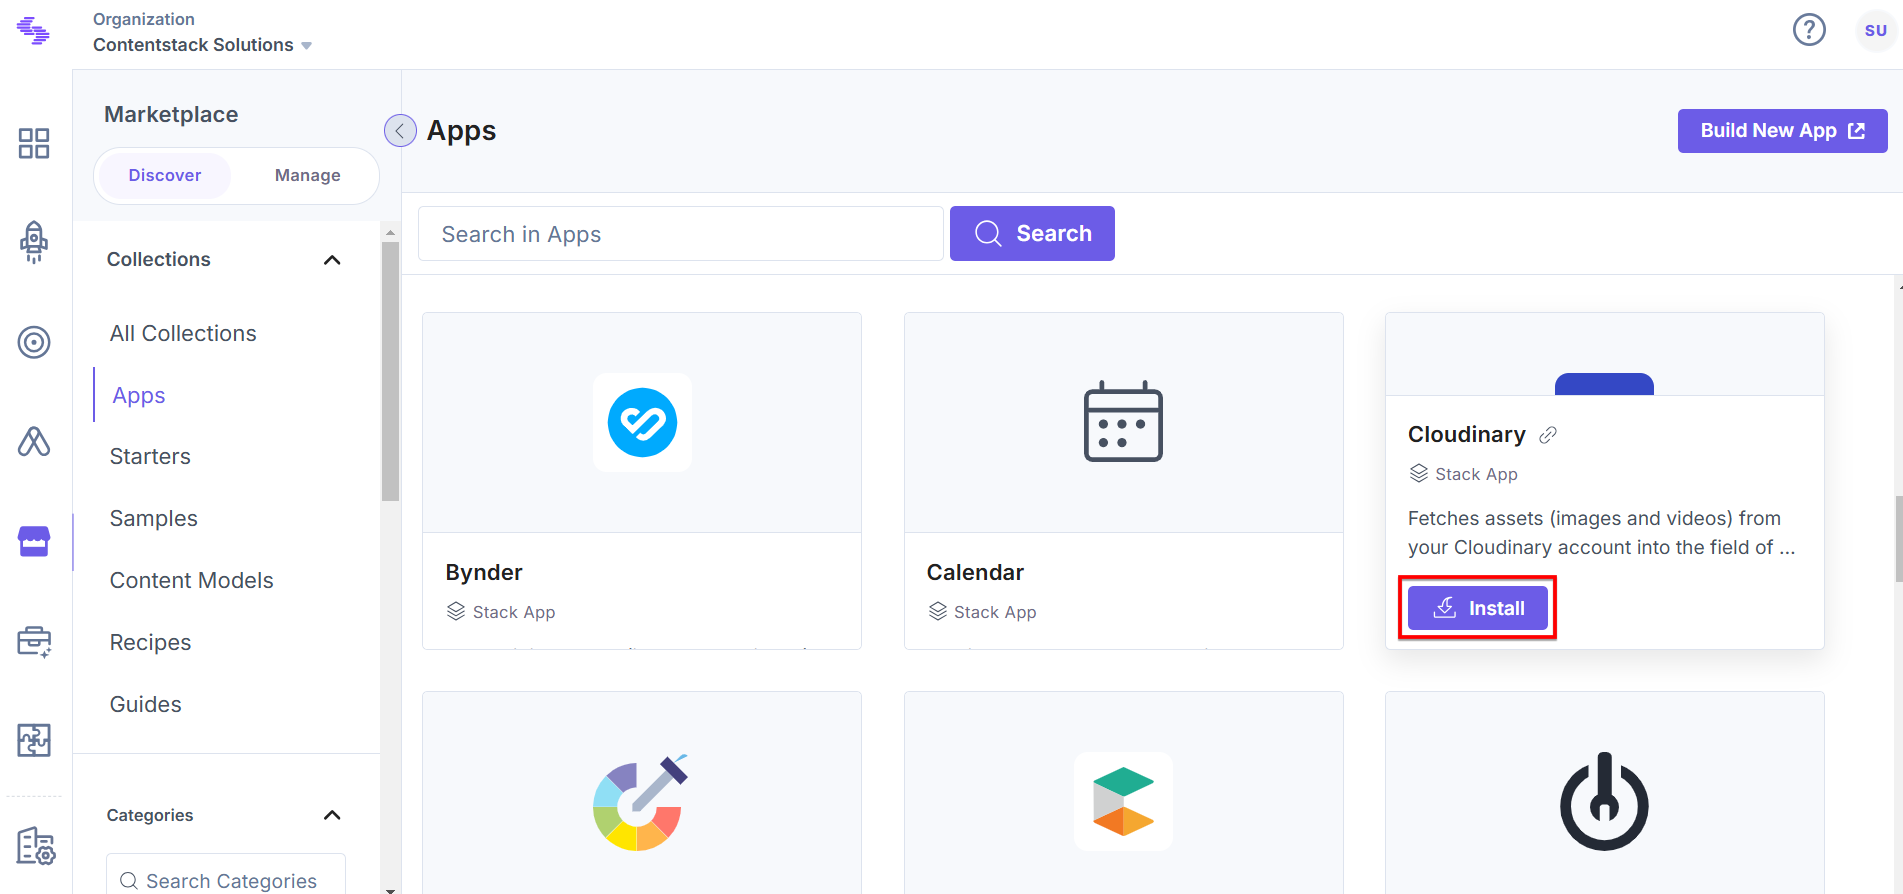
- In the pop-up window, select the stack where you want to install the Cloudinary app, accept the Terms of Service, and click the Install button.
- On the Configuration screen, you can add multiple configurations for Cloudinary. To do this, follow the steps given below:
- Click the + New Configuration button to add new configuration details.
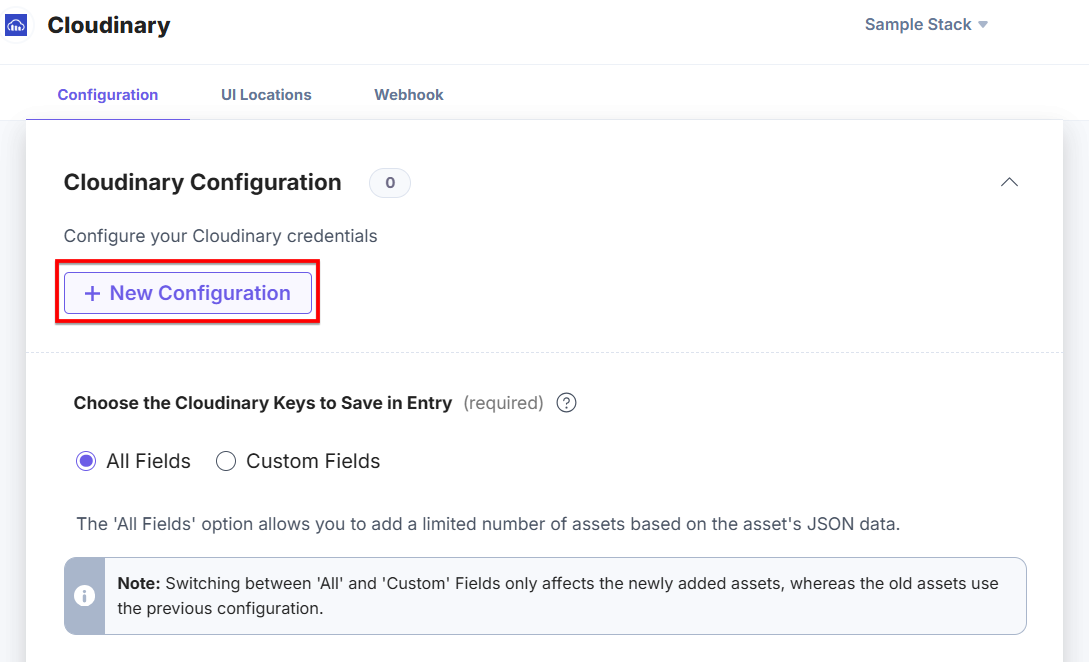
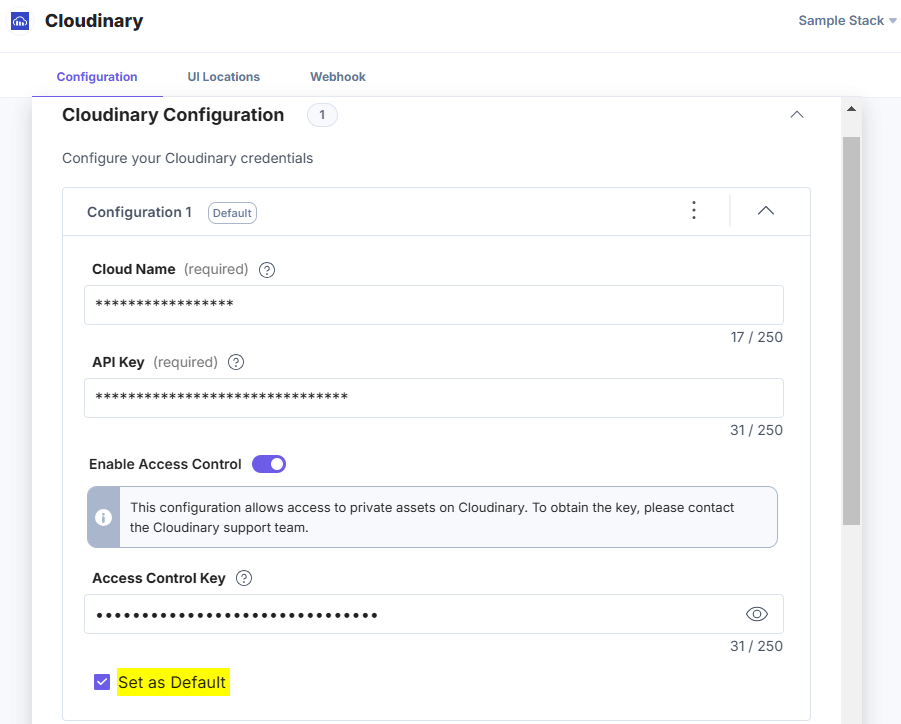
- After adding the configuration, enter the following details:
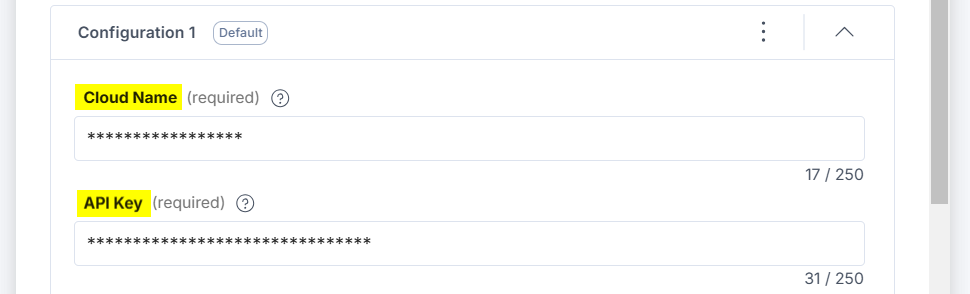
- Cloud Name and API Key: Enter the Cloudinary Cloud Name and API Key retrieved from your Cloudinary Account in step 1.
- Access Control: Click the Enable Access Control toggle button to view the restricted assets. Enable this option and add the Access Control Key which you have received from the Cloudinary Support team in step 1.
- Set As Default: To set this configuration as the default, click this checkbox.
Alternatively, you can set a configuration as the default by clicking three dots on the top-right side of the configuration section and then selecting Set As Default.
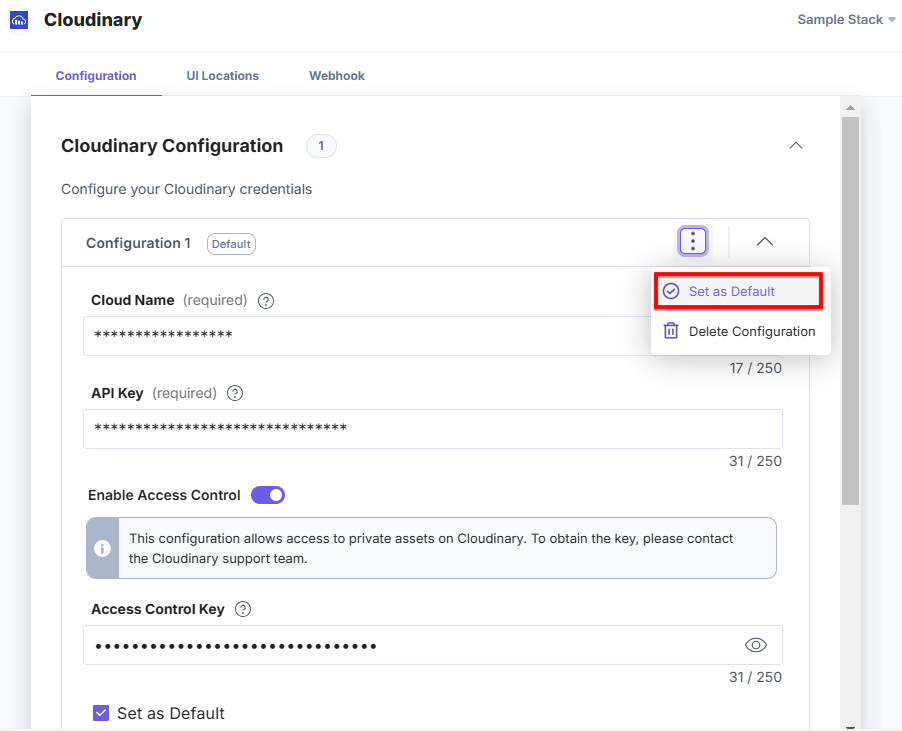
Note: At least one store configuration should be selected as the default.
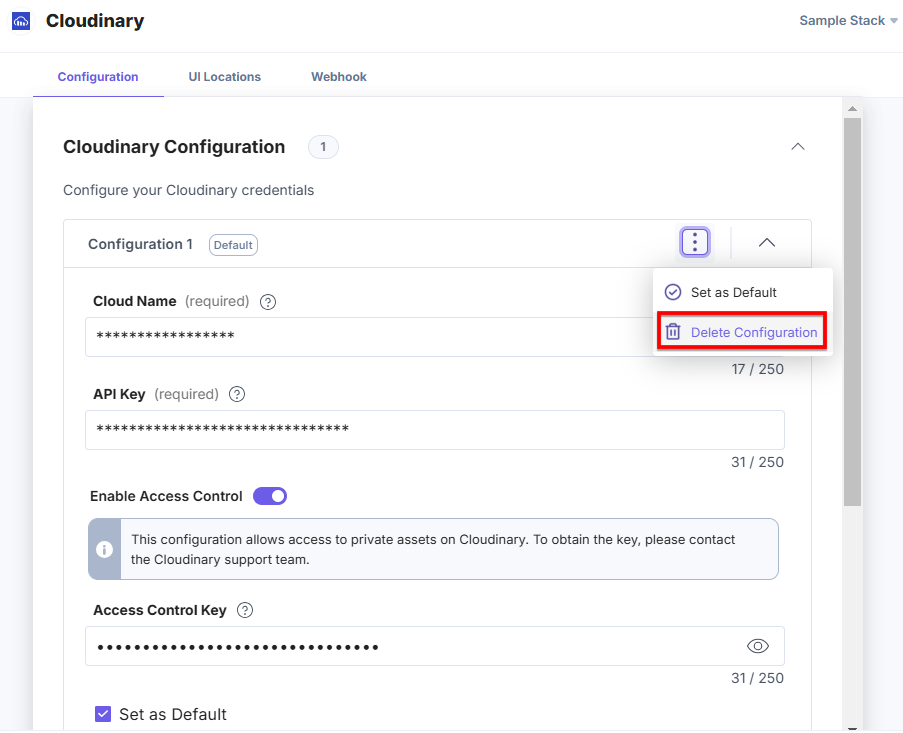
- To delete the configuration, click the three dots and select Delete Configuration.
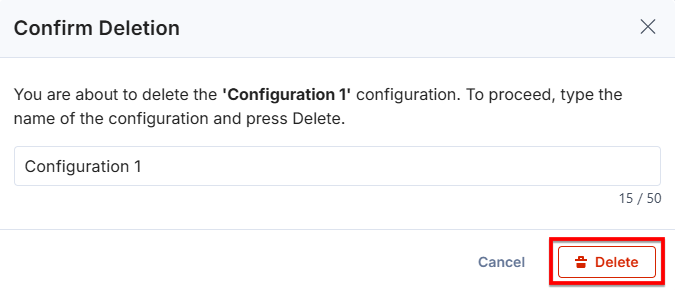
In the Confirm Deletion modal, add the configuration name and click Delete.
Similarly, you can add multiple configurations by following the steps discussed above.
- For an existing user, the credentials will be added as the default configuration, and named as legacy_config.
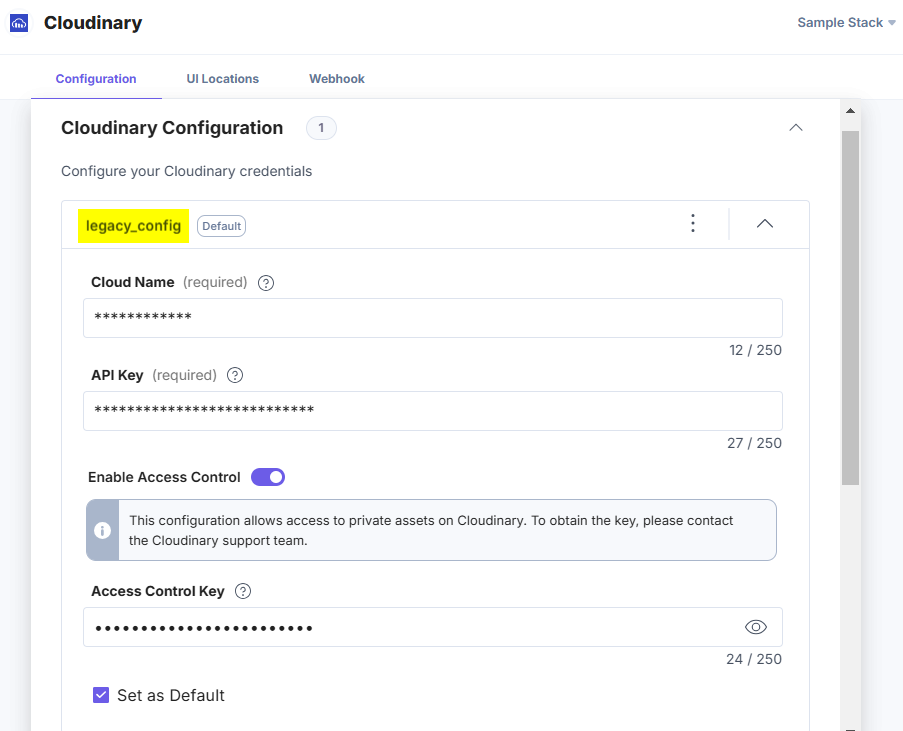 Warning:
- legacy_config is a reserved keyword and you cannot use it in adding new configurations.
- If you delete the legacy_config configuration, data loss may occur and you will not be able to access the assets from the related accounts.
- Cloud Name and API Key: Enter the Cloudinary Cloud Name and API Key retrieved from your Cloudinary Account in step 1.
- Choose the Cloudinary Keys to Save in Entry: Choose how to save the data fetched from the Cloudinary account in Contentstack entries. If you select the All Fields option, you can select only a limited number of assets in the entry. With Custom Fields, you can search and add specific Cloudinary fields you want to save in entries.
Warning: When you change the settings from All Fields to Custom Fields, and vice versa, any existing assets will follow the old configuration settings, whereas newly added assets in the entry will store the data according to the updated configuration settings.
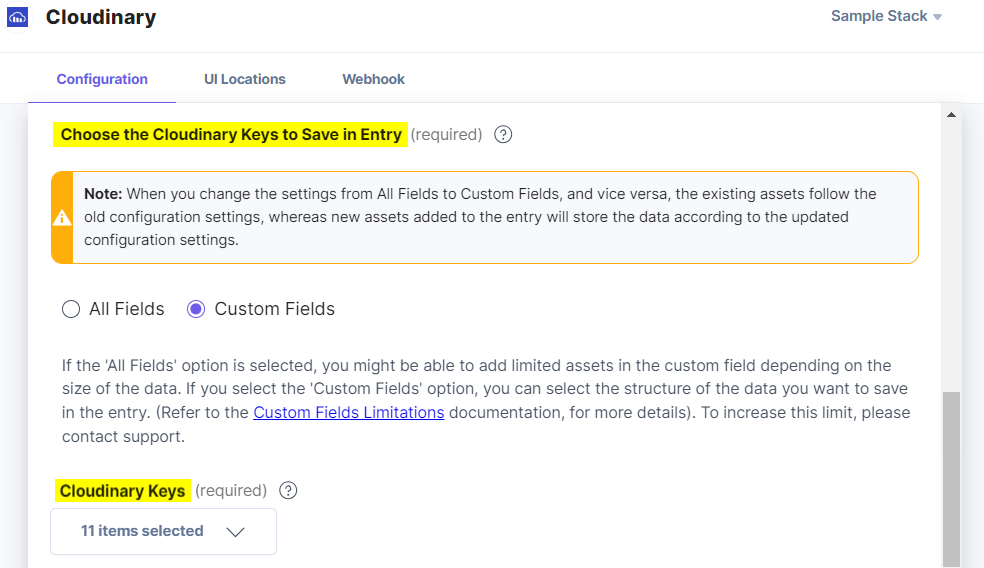
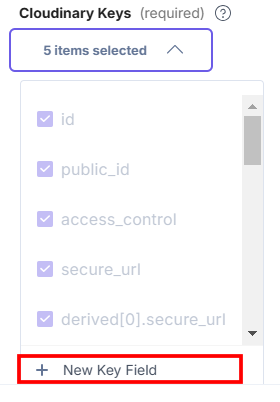
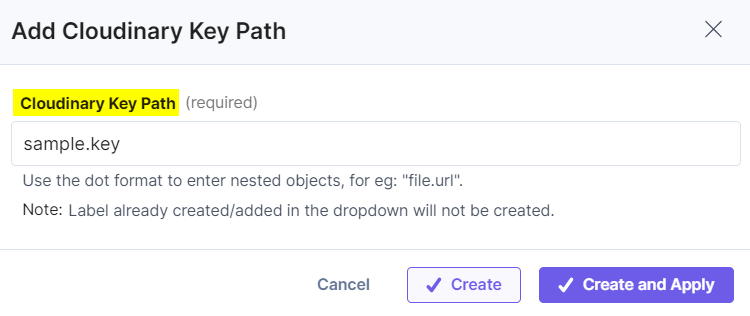
If you select Custom Fields then the Cloudinary Keys drop-down appears in which id, public_id, access_control, secure_url, and derived[0].secure_url Cloudinary Keys options are selected by default. If you want to create a new key, click the + New Key Field option.
In the Add Cloudinary Key Path modal, enter the Cloudinary Key Path and click the Create or Create and Apply button to create a new key.
You can map nested or complex structures in the following manner:
- While mapping nested fields, you must specify the object and its field using the dot(.) notation.
For example, Object.age for accessing the age field within the object.
- While mapping arrays, use indexing.
For example, Array[1] for accessing the second value of an array.
You can use the above rules to create mapping rules for complex structures that include objects and arrays. All Cloudinary fields are supported through this feature.
Example: Cloudinary Object
{ "public_id": "mens_nyfw_banner_efpxor", "resource_type": "image", "tags": ["mensignal", "womenwear"], "metadata": { "product_id": "0" }, } eg: tags[1] and metadata.product_id - While mapping nested fields, you must specify the object and its field using the dot(.) notation.
Note: The Choose the Cloudinary keys to Save in Entry feature is applicable to Cloudinary Custom Fields only.
- Click the + New Configuration button to add new configuration details.
- Click the Save button.
- On the UI Locations tab, you can see the predefined app locations. You can use the toggle button corresponding to each UI location to enable or disable it based on your requirements.
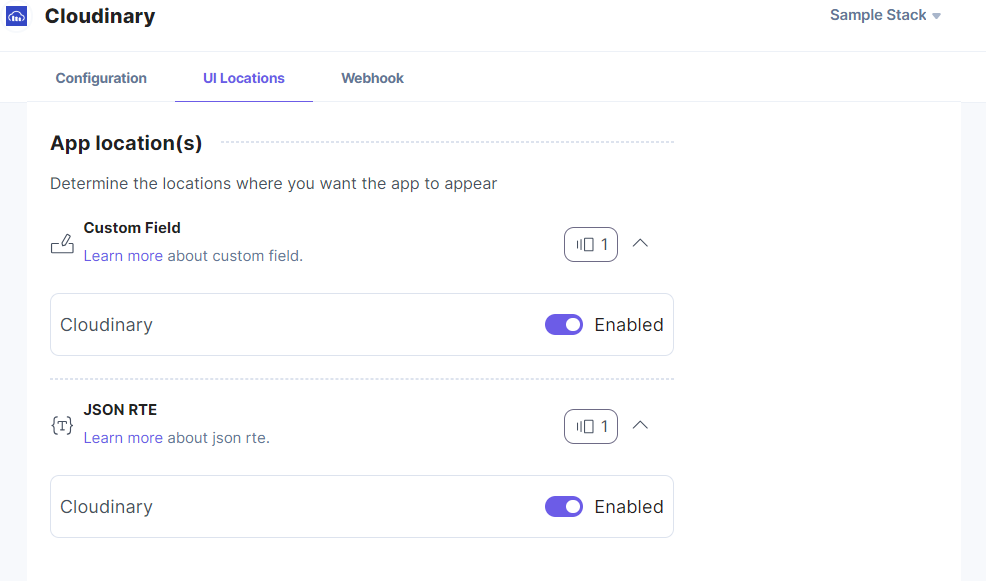
Note: The app requires at least one UI location to be enabled, otherwise you will not be able to save your app configuration settings.
- If the webhook is enabled for your app, you can view the webhook logs under the Webhook tab.
Additional Resource: For more information on UI locations and webhooks, please refer to the Installed Apps guide.
- Click Open Stack to start using the Cloudinary app.
- From the left-hand side primary navigation, click the Marketplace icon.
-
Use the Cloudinary App within your Stack
To use the Cloudinary app within an entry of your stack, follow the steps given below:
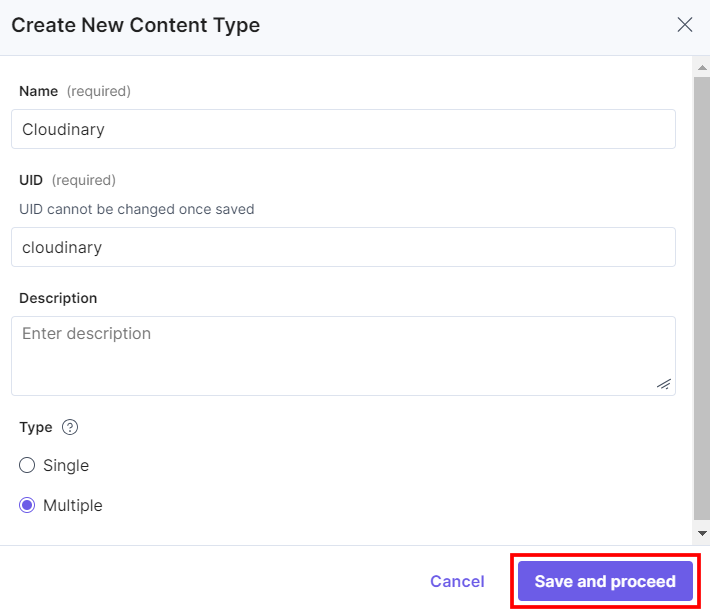
- Go to your stack and click the Content Models icon in the left navigation panel, and click the + New Content Type button.
- Create a content type by adding relevant details as displayed below:
There are two ways to use the Cloudinary app in your entry.
Steps to use the Cloudinary App as a Custom Field
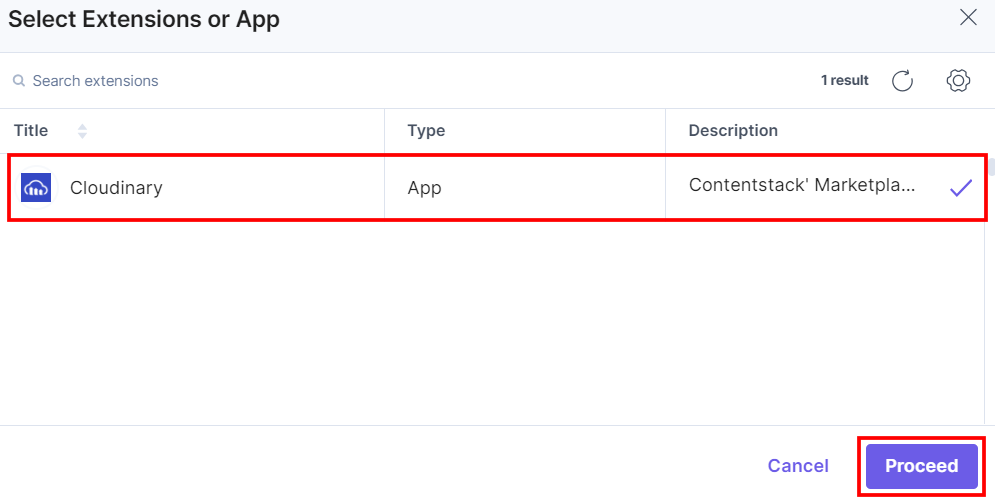
- In the Content Type Builder page, add a Custom field in your content type by clicking the Insert a field link represented by a + sign.
- Under Select Extension or App, select Cloudinary and click the Proceed button.
Change the Display Name of the custom field to your choice, for example, Cloudinary Custom Field. Optionally, you can add Help Text and Instruction Value for your custom field. This adds the Cloudinary app in the custom field.
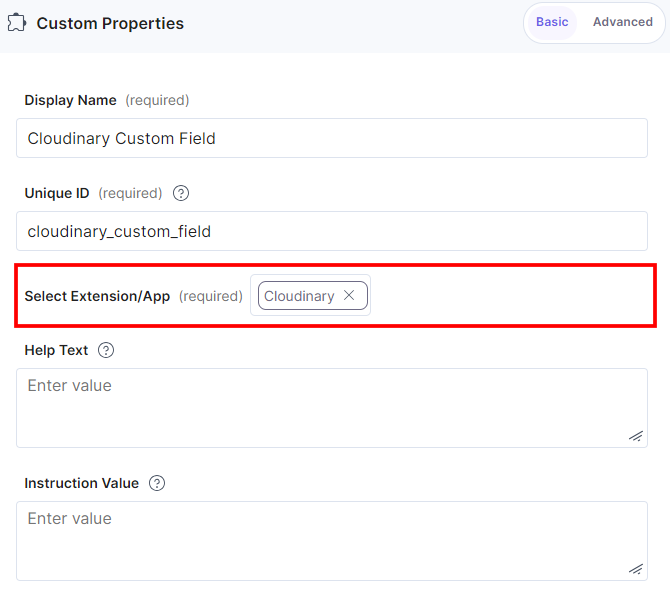
- Under Advanced properties, you have the option to set the Config Parameter for all entries of a particular content type. If you do so, it overrides the default app configuration you set at the time of app installation on the Configuration screen.
The key:value passed in the configuration object overrides the default app configuration settings.
-
In case you want to use a different Cloudinary configuration for any Custom field within the same stack, you need to specify the configuration name in the Config Parameter.
Configuration Object:
{ "config_label": [ "config2" ] } -
Locale Based Configuration Object: To add a locale-based configuration, add a locale parameter to the additional configuration object which specifies the locale value (for example: en-us) as the object key and the configuration object as the value to the locale.
{ "config_label": [ "config2" ], "locale": { "en-us": { "config_label": [ "config3" ] }, "fr-fr": { "config_label": [ "config1" ] } } } -
Asset Validations: Only those asset will be added in the Custom field that satisfy the advance config constraints for size, height, and width.
{ "advanced": { "size": { "max": 10, "min": 5 }, "height": { "max": 10, "min": 5, "exact": 25 }, "width": { "max": 10, "min": 5, "exact": 25 } } } -
Max Limit: You can set the maximum number of assets that can be added in the Custom field. In our example, it is 5.
{ "advanced": { "max_limit":5 } } -
Custom Settings: We have added an object, named custom_settings, which includes the following keys in the given format:
- path: Holds the path of the folder which is, by default, selected to choose products.
- resource_type: Holds the type of assets you want to add. In our example, we want to add images only.
{
        "custom_settings": {
           "compact_view_options": {
               "folder": {
                  "path":"demo_assets/sample",
                  "resource_type":"image"
                }
            }
        }
    }
Additional Resource: You can add more optional parameters within the compact_view_options object. For detailed description of these optional parameters, refer to the Cloudinary Media Library Widget documentation.
-
- After adding the app, click Save or Save and Close to save your changes.
- To use the Cloudinary app, create an entry for this newly created content type. To do this, in the left navigation panel, navigate to the Entries page, click + New Entry to create a new entry for the above content type, and then click Proceed.
You will see the Cloudinary app added as a custom field in your entry page as shown below:
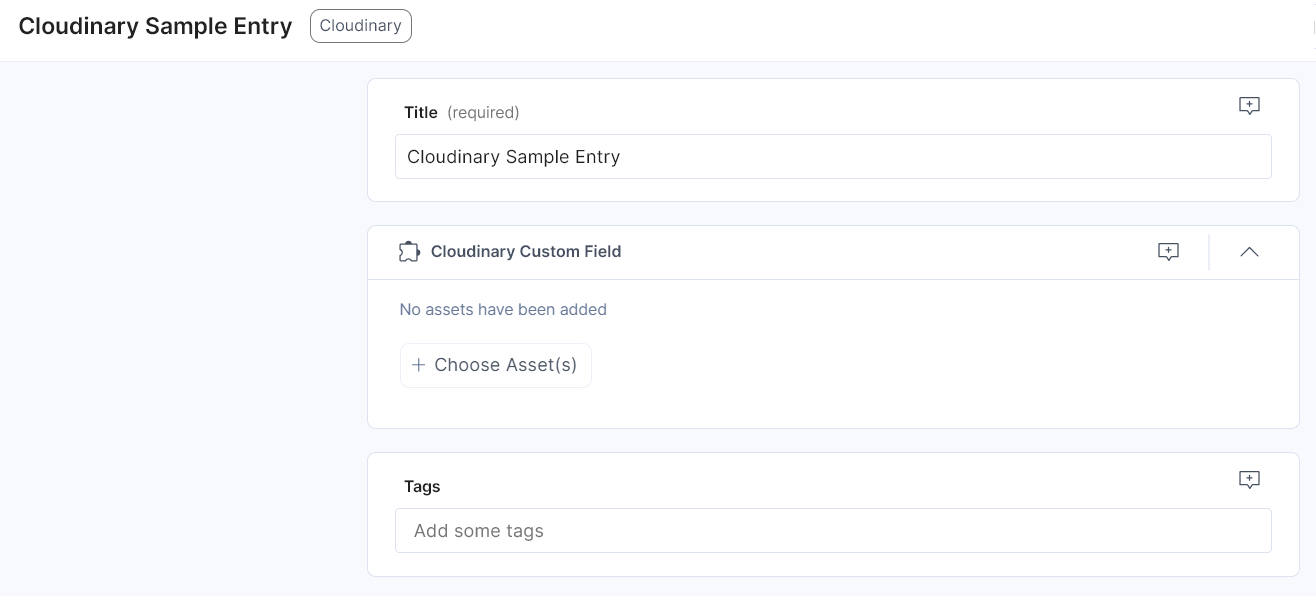
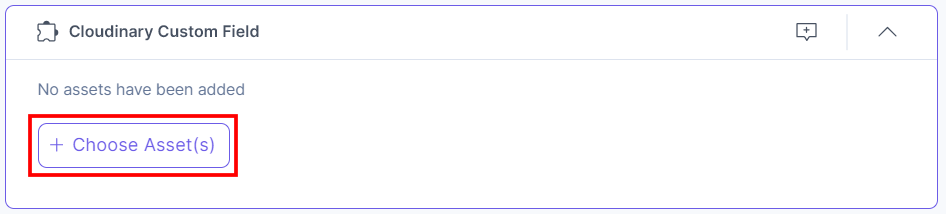
- Click the + Choose Asset(s) button to select assets from your Cloudinary account.
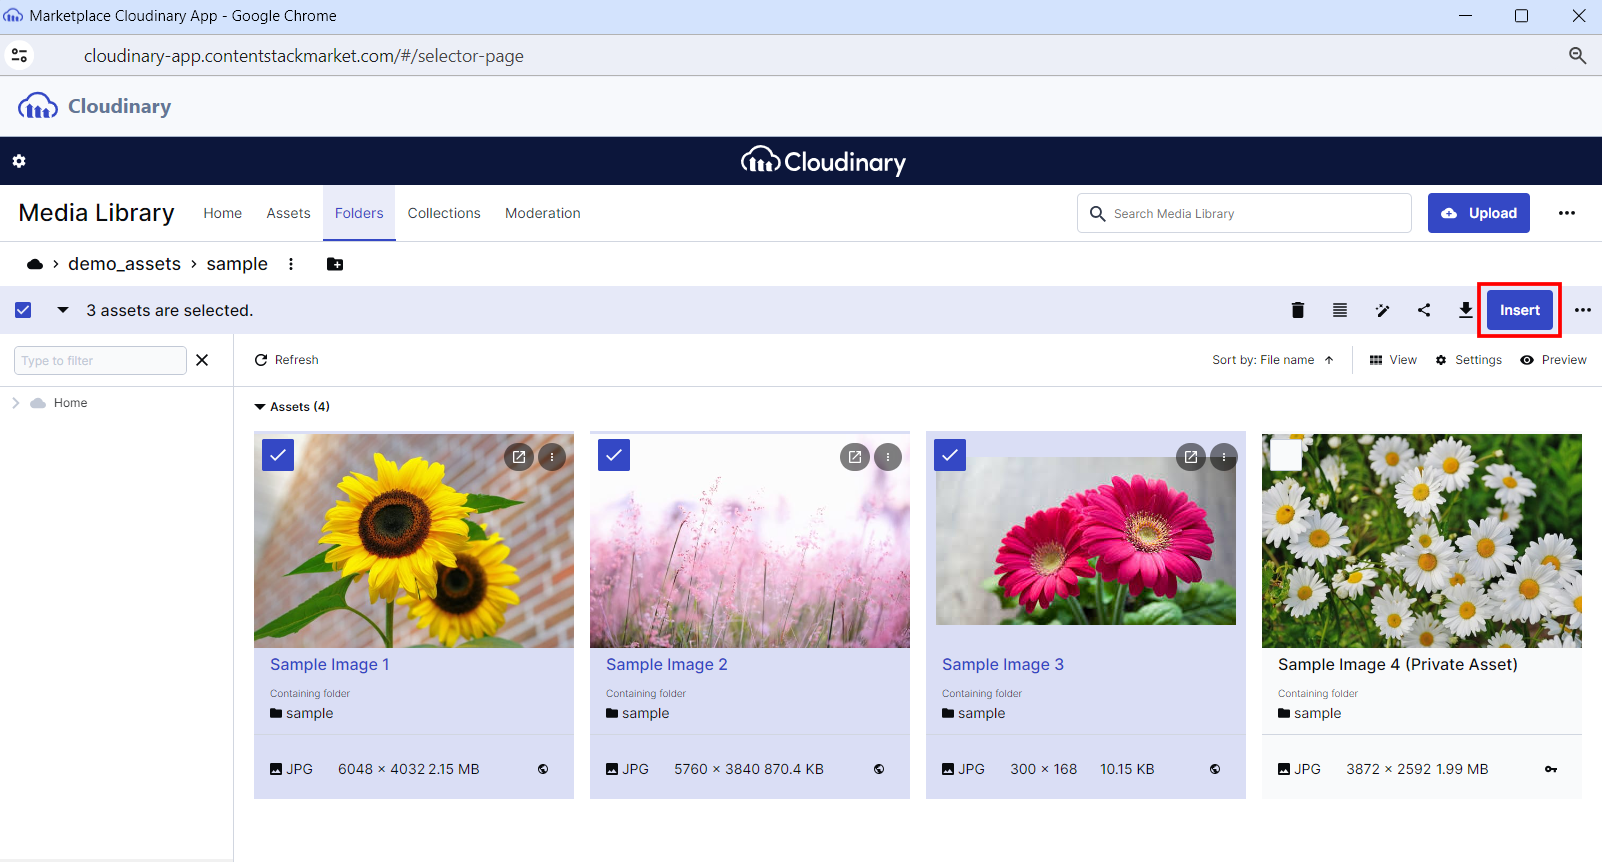
- If you are not logged into your Cloudinary account, it will ask you to enter your credentials. Once you do that, you are directed to your assets section. Then, select the image file(s) that you want to add and click the Insert button.
Note: If you have set the Config Parameter in the Custom Field Advanced Properties, you will directly land to the selected folder.
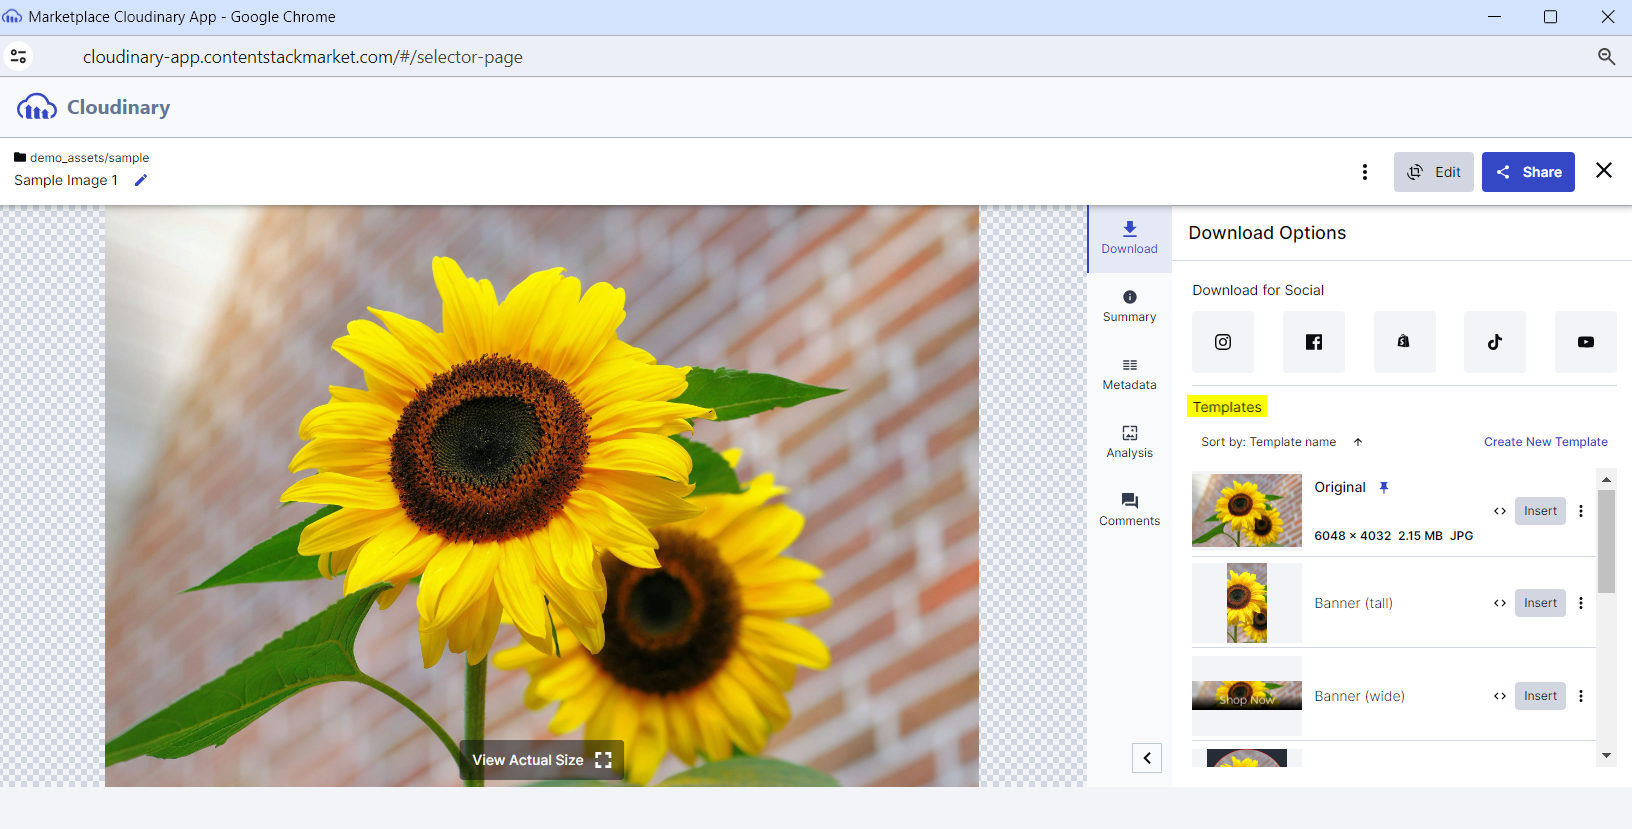
You can also add transformed assets. Transformed Assets are the files (such as images, videos, etc.) that have been modified or processed using Cloudinary's extensive transformation capabilities. These transformations can include resizing, cropping, format conversion, applying effects, watermarking, and more.
Select the image, click the three ellipses, then click Open from the list, you can see several transformed options under the Templates heading. You can create a new template or select the transformed asset and click the corresponding Insert button to add it to the Custom field.
You can also add restricted assets in the Custom field.
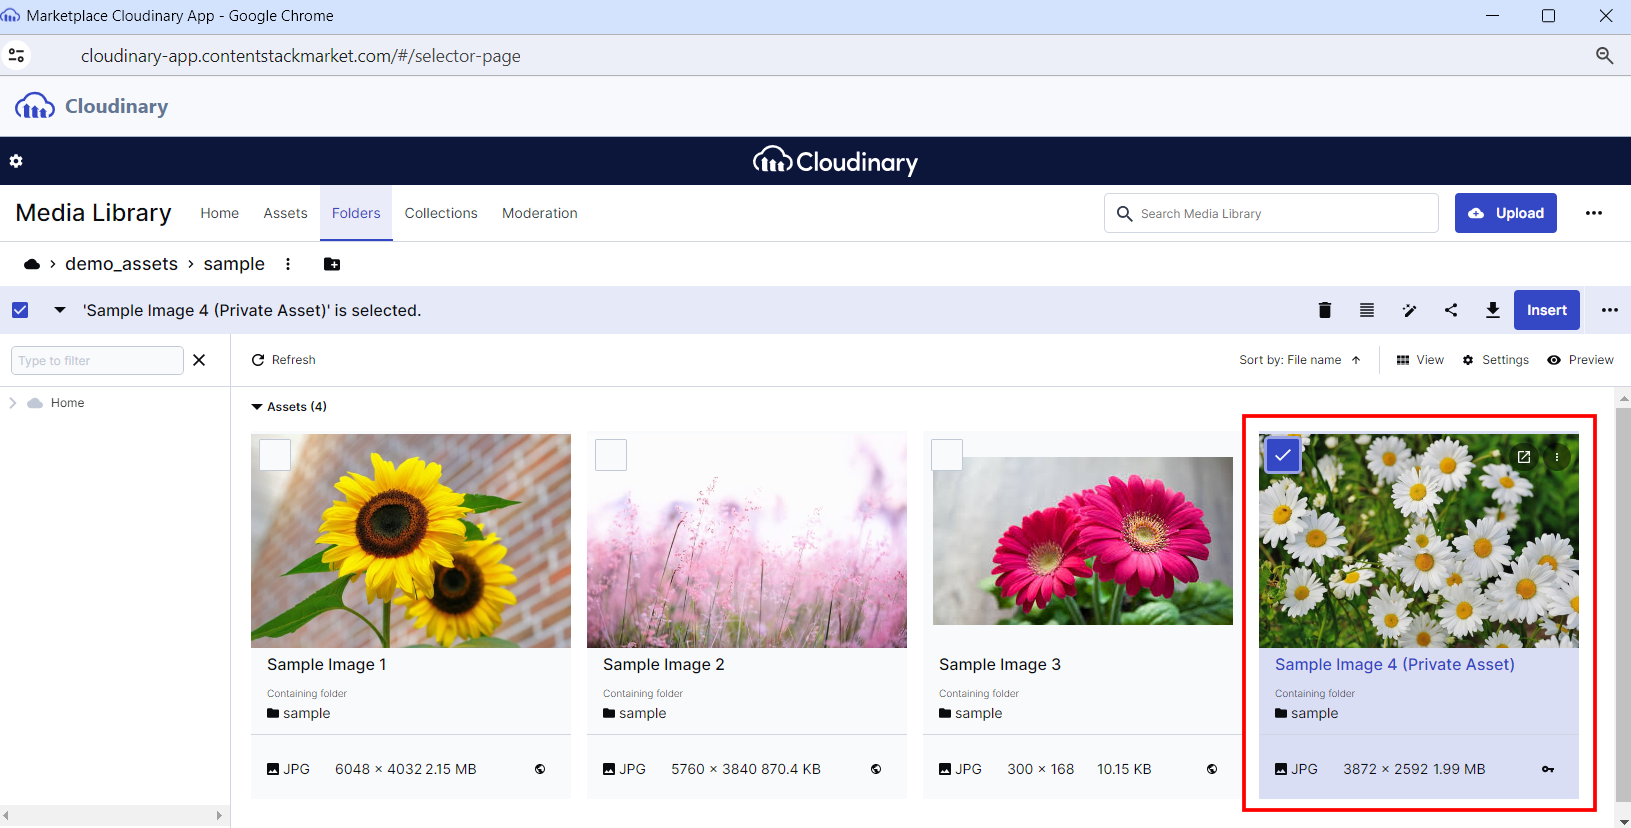
Note: To successfully add and view private images to the Custom field, make sure to configure the Access Control Key in step 2.
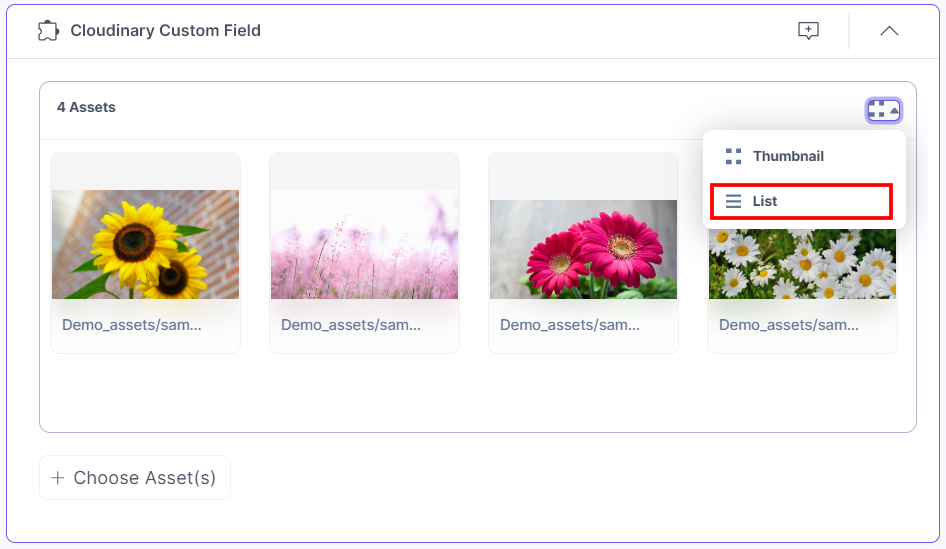
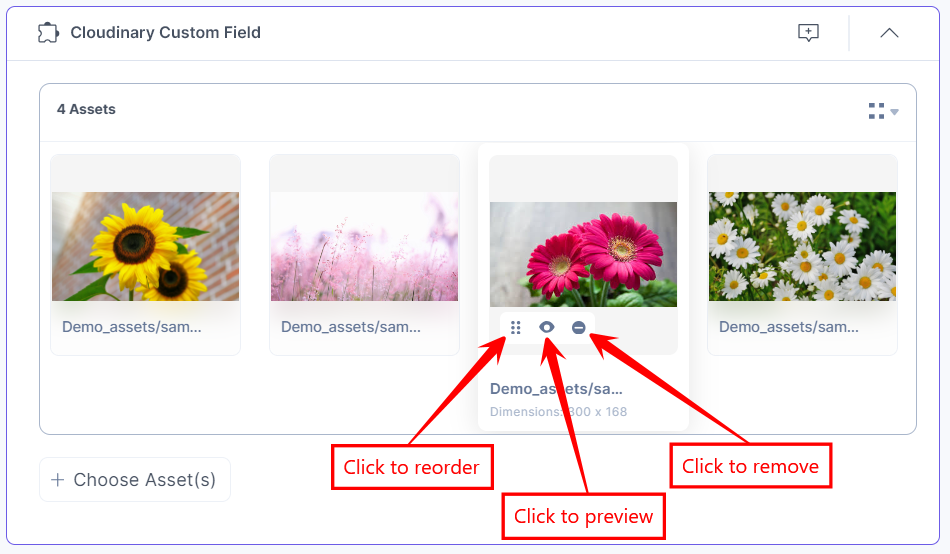
The assets you insert are referenced within your entry in the thumbnail view, by default.

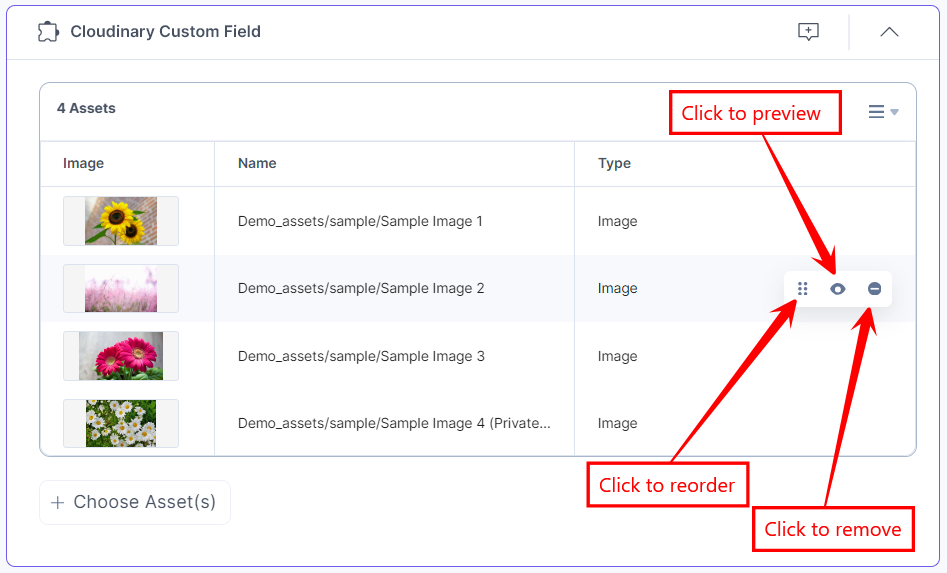
To change the assets view, select List from the drop-down menu as shown in the following screenshot:
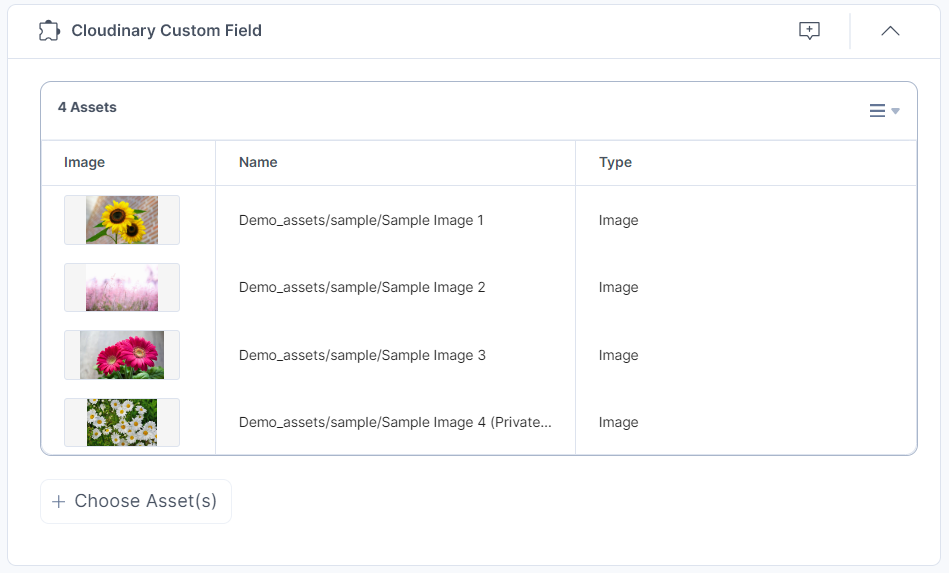
The assets you insert get referenced within your entry in the list view.
Note: Once you add the maximum number of assets, as defined in config parameter, the Choose Assets button becomes disabled. You cannot add more assets than the preconfigured limit in the Custom field.
When the Access Control Key is no longer served, the private assets become restricted to the user.
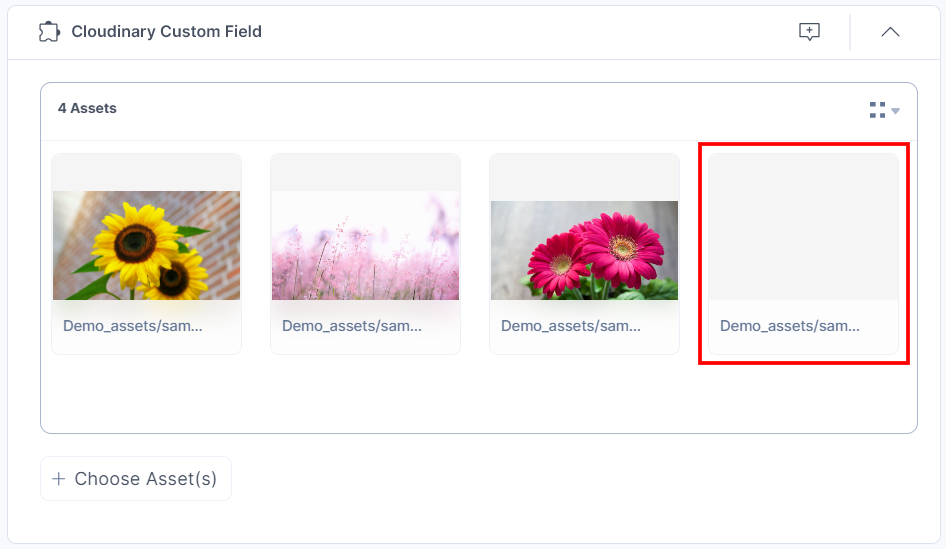
- Hovering over the image will allow you to reorder, preview, or remove it.
- To reorder the image, hover over it and select the Reorder icon. This will allow you to drag and reorder the image to your desired position.
- To preview the image, hover over it and select the Preview icon. You will be able to view the image in a new tab.
- To delete the image, hover over it and select the Remove icon.
Thumbnail View
List View
- Once you have added the assets, Save and Publish your entry.
Steps to use the Cloudinary App as a JSON RTE Plugin
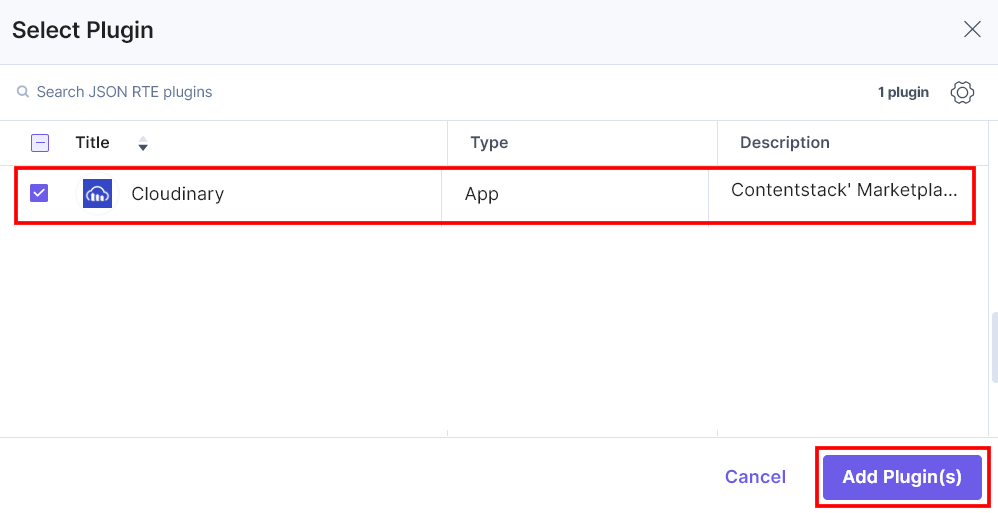
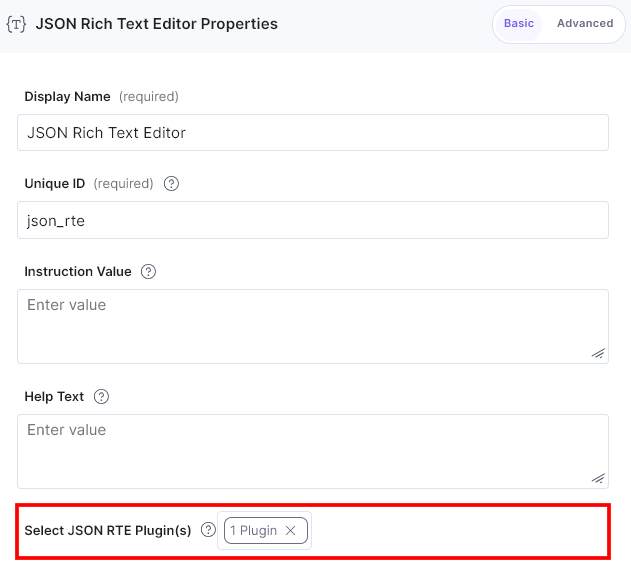
- In the Content Type Builder page (while creating the content type), add JSON Rich Text Editor in your content type by clicking the Insert a field link represented by a + sign.
- Under Select Plugin, select Cloudinary, and then click Add Plugin(s).
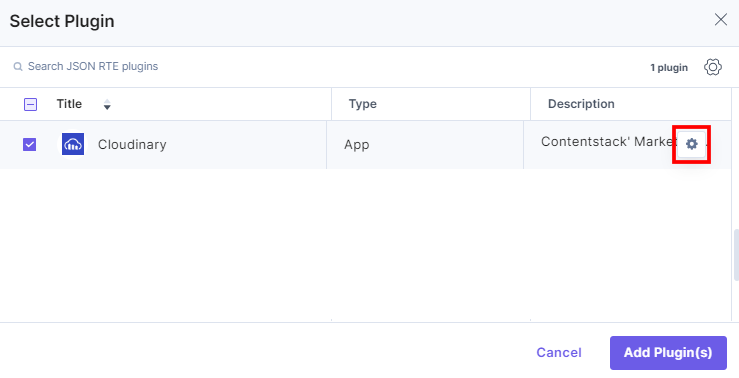
To add the Config Parameter in the JSON RTE field, click the gear icon on the app plugin selector page.
You can set the following validations for the JSON RTE field:
-
In case you want to use a different Cloudinary configuration for any JSON RTE field within the same stack, you need to specify the configuration name in the Config Parameter.
{ "config_label": [ "config 2" ] } -
Asset Validations: Only those assets will be added in the JSON RTE field that satisfy the advance config constraints for size, height, and width.
{ "advanced": { "size": { "max": 10, "min": 5 }, "height": { "max": 10, "min": 5, "exact": 25 }, "width": { "max": 10, "min": 5, "exact": 25 } } } -
Custom Settings: We have added an object, named custom_settings, which includes the following keys in the given format:
- path: Holds the path of the folder which is, by default, selected to choose products.
- resource_type: Holds the type of assets you want to add. In our example, we want to add images only.
{
        "custom_settings": {
           "compact_view_options": {
               "folder": {
                  "path":"demo_assets/sample",
                  "resource_type":"image"
                }
            }
        }
    }
Additional Resource: You can add more optional parameters within the compact_view_options object. For detailed description of these optional parameters, refer to the Cloudinary Media Library Widget documentation.
This adds Cloudinary in the JSON Rich Text Editor.
-
- After adding the app in a JSON Rich Text Editor field, click Save or Save and Close to save your changes.
- To use the Cloudinary app as a JSON RTE plugin, create an entry for this content type. To do this, in the left navigation panel, navigate to the Entries page, click + New Entry to create a new entry for the above content type, and then click Proceed.
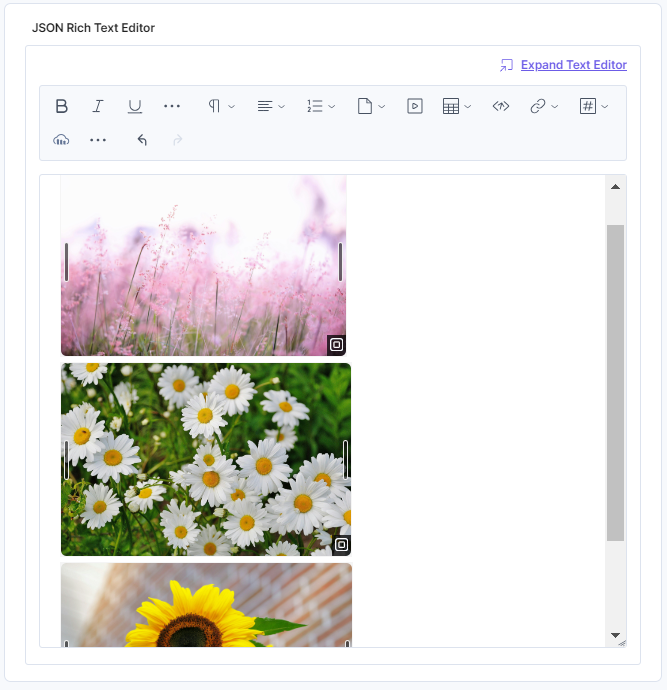
You will see the Cloudinary app icon inside the JSON RTE field in your entry page as shown below:

- Click the Cloudinary app icon to open the selector page or Media Library.
- If you are not logged into your Cloudinary account, it will ask you to enter your credentials. Once you do that, you are directed to your assets section. Choose one or more media files from the Media Library folder and then click the Insert button.
Note: If you have set the Config Parameter in the JSON RTE field, you will directly land to the selected folder.
You can also add transformed assets. Transformed Assets are files (such as images, videos, etc.) that have been modified or processed using Cloudinary's extensive transformation capabilities. These transformations can include resizing, cropping, format conversion, applying effects, watermarking, and more.
Select the image, click the three ellipses, and then click Open from the list. You can see several transformed options under the Templates heading. You can create a new template or select the transformed asset and click the corresponding Insert button to add it to the JSON Rich Text Editor field.
You can also add restricted assets in the JSON Rich Text Editor field.
Note: To successfully add and view private images to the JSON Rich Text Editor field, make sure to configure the Access Control Key in step 2.
The selected asset(s) gets displayed in the JSON Rich Text Editor:
When the Access Control Key is no longer served, the private assets become restricted to the user.
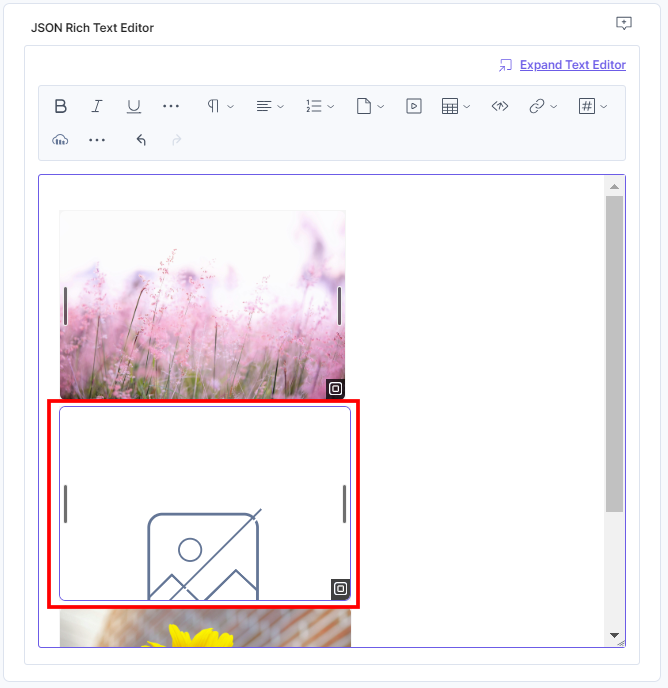
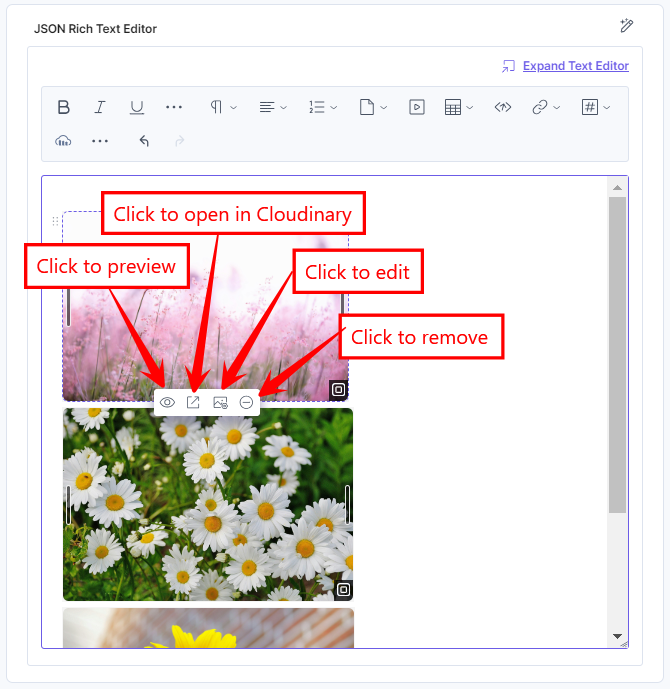
- To resize the image, drag the corner of the image and adjust the size as required. Hover over the image to view the following options:
- Click the Preview icon to view the image.
- Click the Open in Cloudinary icon to open the image in Cloudinary.
- Click the Edit icon to edit the image. Make the necessary changes and click the Save button.
- Click the Remove icon to remove the selected image.
Additional Resource: You can use alignment and inline asset features to edit the asset placement within the JSON Rich Text Editor field.
- After adding the asset(s), Save and Publish your entry.
Note:
- If you delete a configuration with private assets and create a new one with the same label but different credentials, the original private assets may not work correctly.
- For a deleted configuration, the associated assets are not removed from the entry, instead a warning icon is displayed on the assets.
More articles in "Digital Asset Management"
