

.svg?format=pjpg&auto=webp)
.svg?format=pjpg&auto=webp)
.png?format=pjpg&auto=webp)


.png?format=pjpg&auto=webp)
XTM App Installation Guide
XTM is a cloud-based translation management application that offers language localization to simplify the process of content distribution across systems. It is a simple, robust, and cost-effective solution that helps to broaden your reach to multiple customers with multiple languages and colossal content.
Contentstack Marketplace allows you to easily integrate the XTM application and use it within your stack to create localized versions of your entries.
Prerequisites
- XTM account
- Contentstack account
- Access to the Contentstack Organization/Stack as the Owner/Admin.
Let's go through the steps required to install and configure the XTM app within Contentstack Marketplace.
Steps for Execution
- Fetch the credentials from your XTM account
- Define workflow in Contentstack
Note: Skip this step if you want to create a project only using the Sidebar Widget.
- Install the XTM application
- Translate your Content
-
Fetch the credentials from your XTM account
To configure the application, you need to create an account in XTM. To do so, follow the below steps:
- Go to https://xtm.cloud and create a new account based on your requirement.
- Fetch the XTM details such as baseURL, user identifier, customer ID, UserCompany, and password required to set up the app configuration page.
-
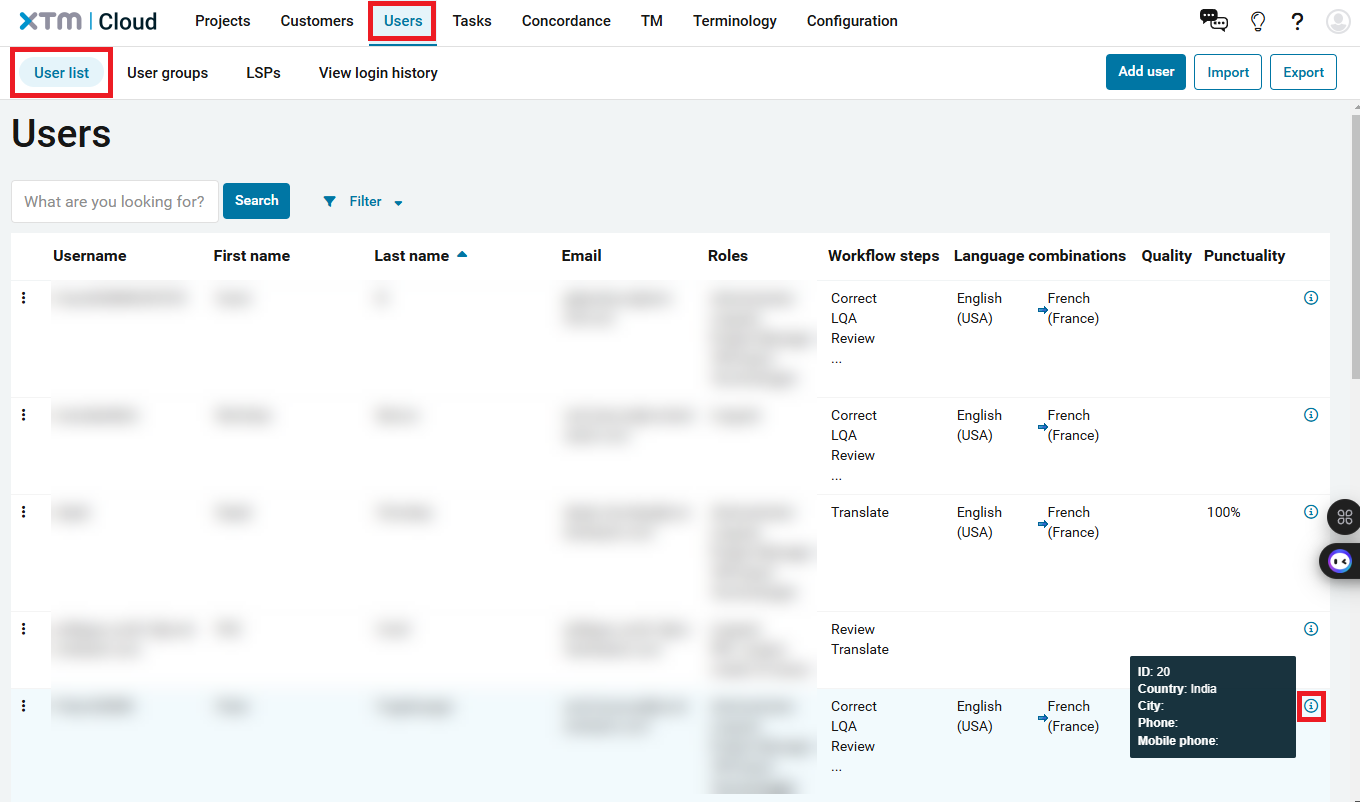
You can fetch the user ID from the User list section under Users in the XTM dashboard as given below:
-
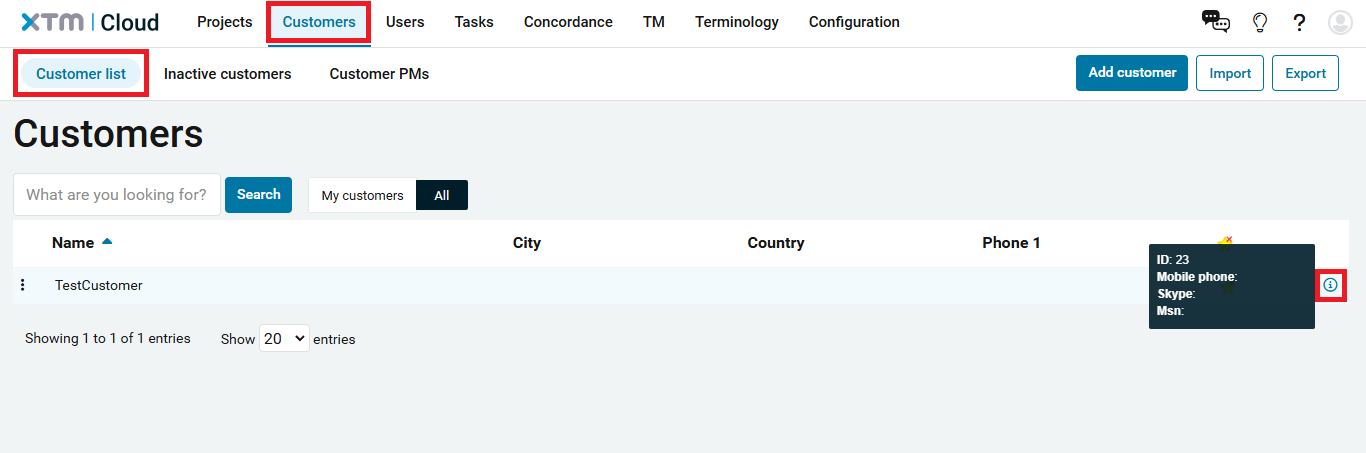
You can fetch the customer ID from the Customer list section under Customers in the XTM dashboard as given below:
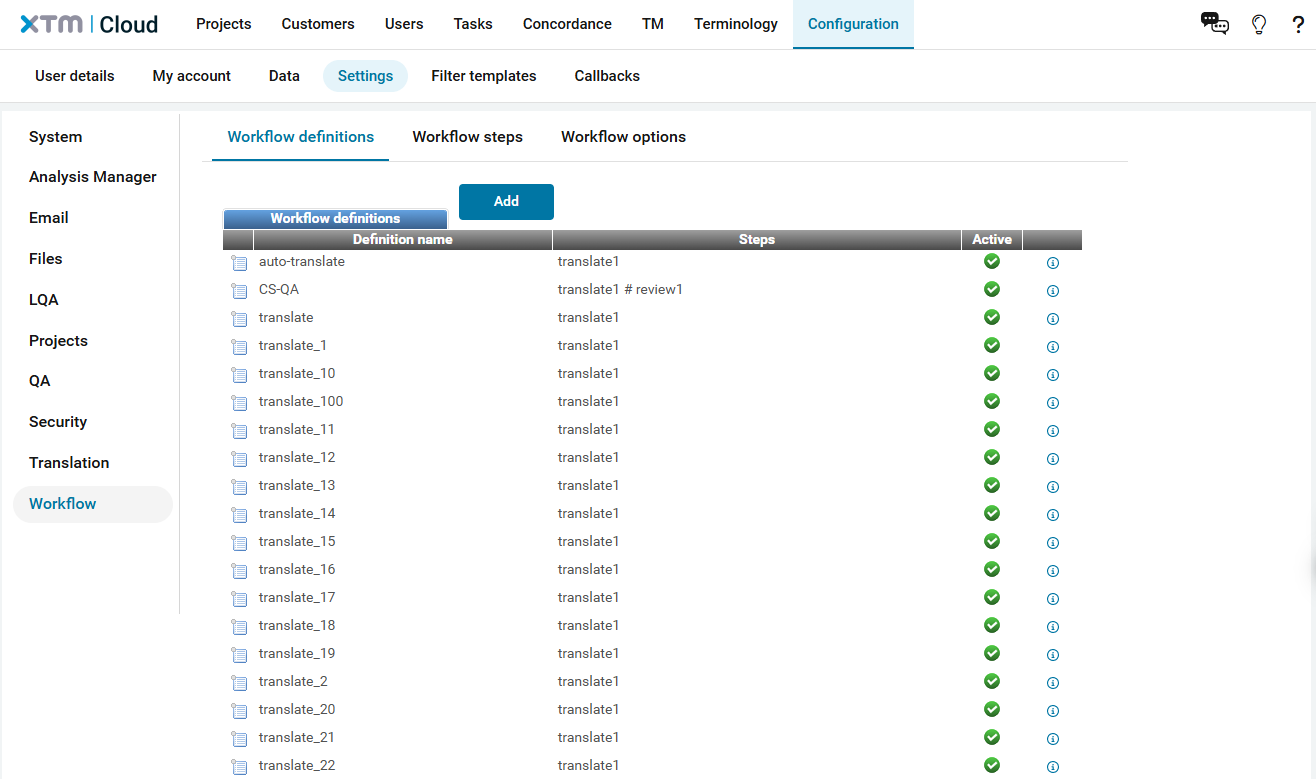
- If you want to create a project using the Sidebar Widget, create or fetch a workflow in the XTM dashboard under the Configuration section. You can use this workflow name in the XTM Workflow field on the app configuration page.
Note: In the XTM dashboard, you must define the languages and create a template for the translation process. Make sure these languages are present in Contentstack as well.
Add Custom Fields in XTM (Optional)
Follow the steps below to add custom fields in XTM:
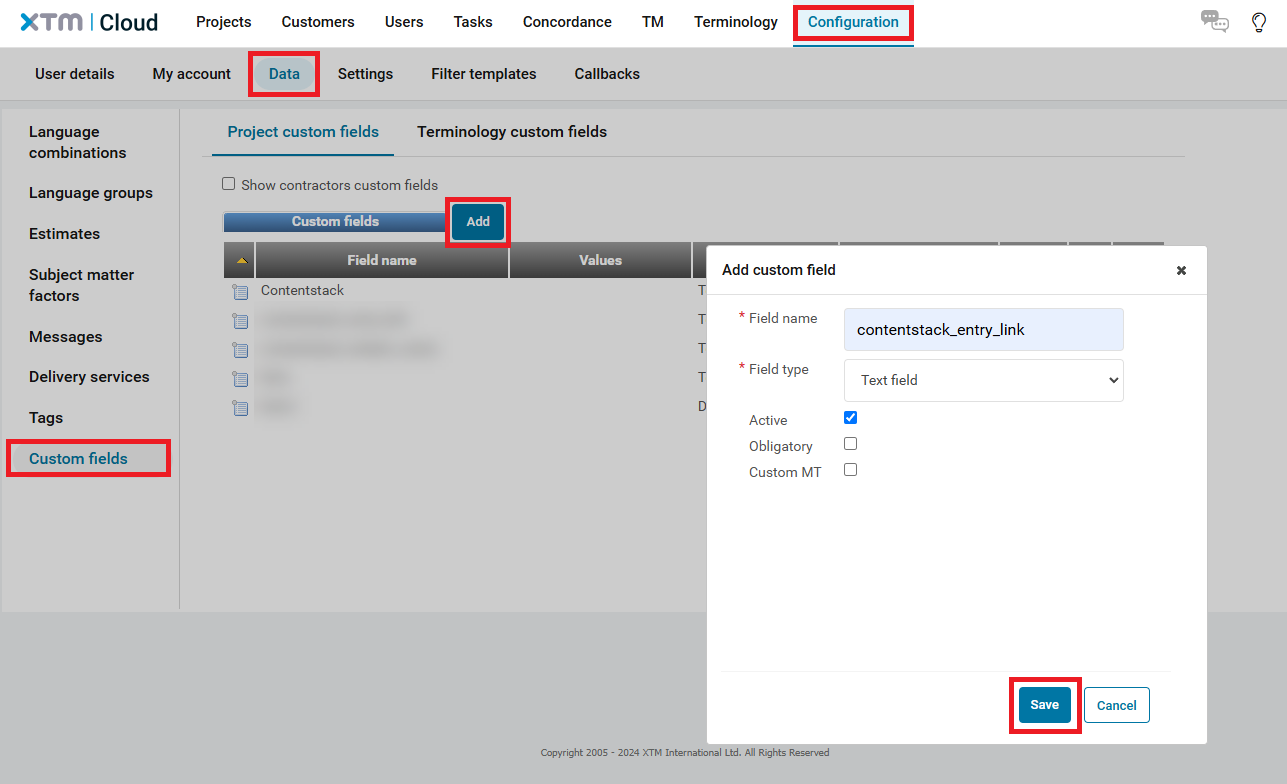
- Navigate to Configuration > Data > Custom fields.
- Under Project custom fields, click Add.
- In the Add custom field modal, enter the field name and select Text field in the Field type drop-down.
Note: Ensure that the checkbox for the Active field is selected.
- Click Save.
-
Define Workflow in Contentstack
To use the XTM application, you must define the Workflow to initiate the translation process.
Firstly, you need to create a content type and an entry. To do so, follow the below steps:
- Log in to your Contentstack account.
- Click the + New Stack button and then click the Create New button.
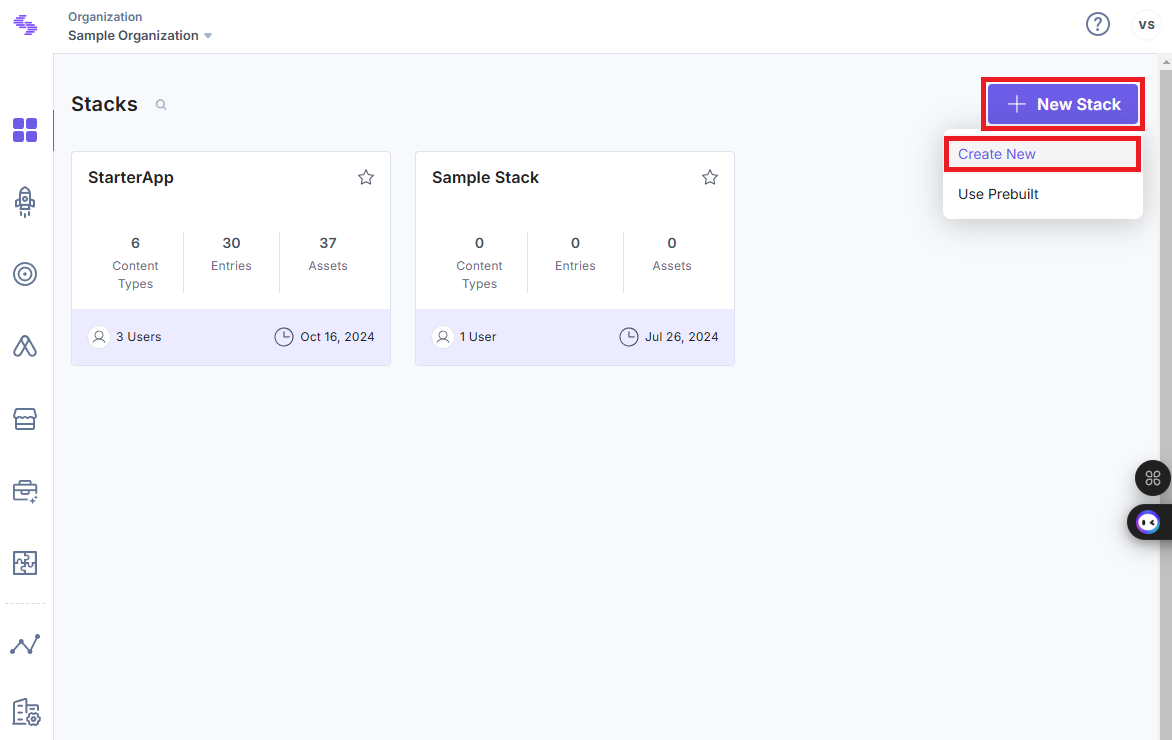
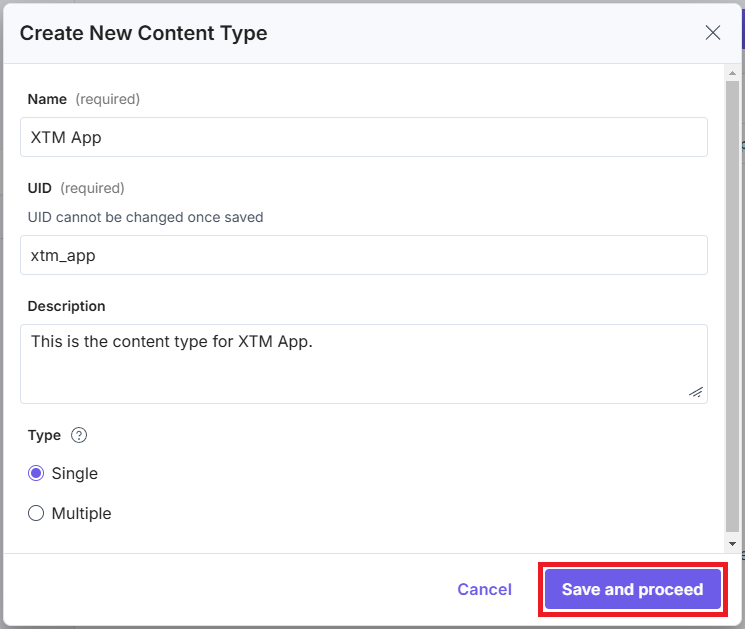
- Go to your stack, click the Content Models icon on the left navigation panel, and click the + New Content Type button.
- Create a content type by entering relevant details as given below:
- On the left navigation panel, select Entries. On the Entries list page, click the + New Entry button, select the content type and click the Proceed button.
- Add content in your entry that you want to translate and save the entry.
Note: If you already have a stack, skip the above steps.
Follow the steps below to define the Workflow for your stack:
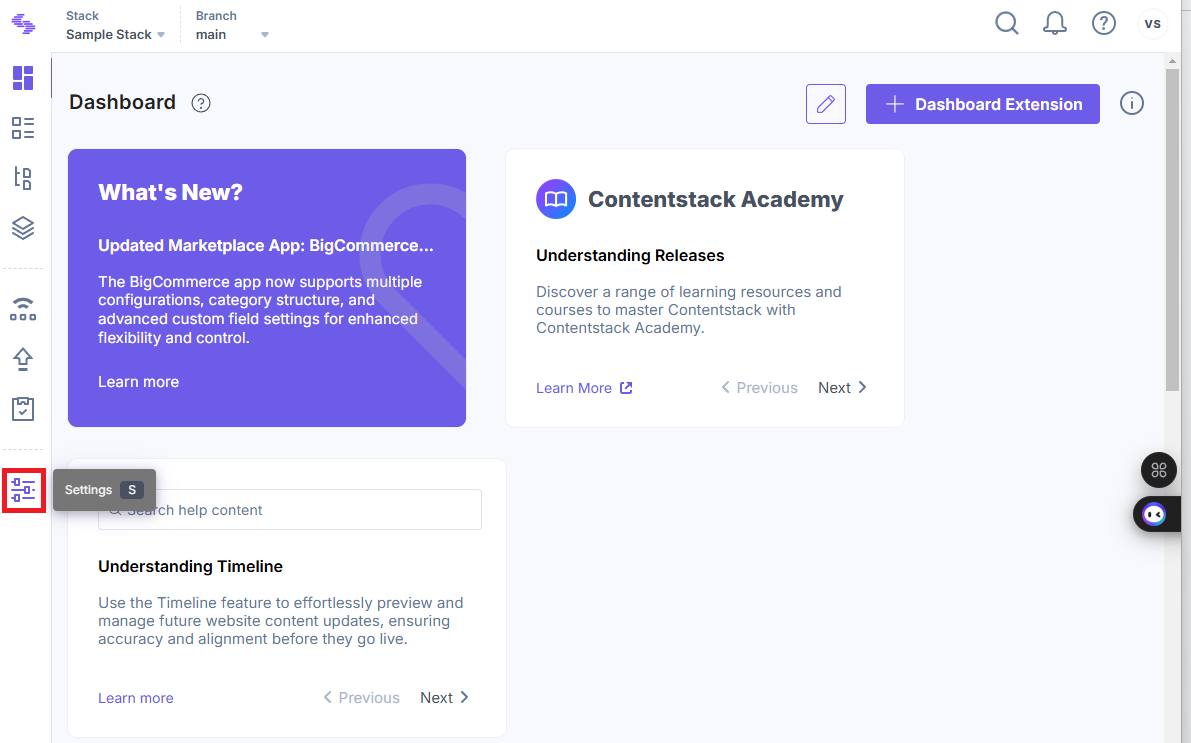
- Navigate to your stack and click the Settings icon on the left navigation panel.
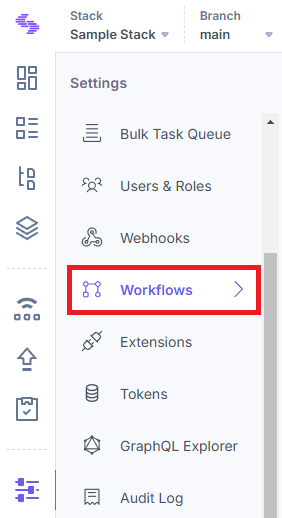
- Under Settings, click Workflows.
- Define the workflow stages.
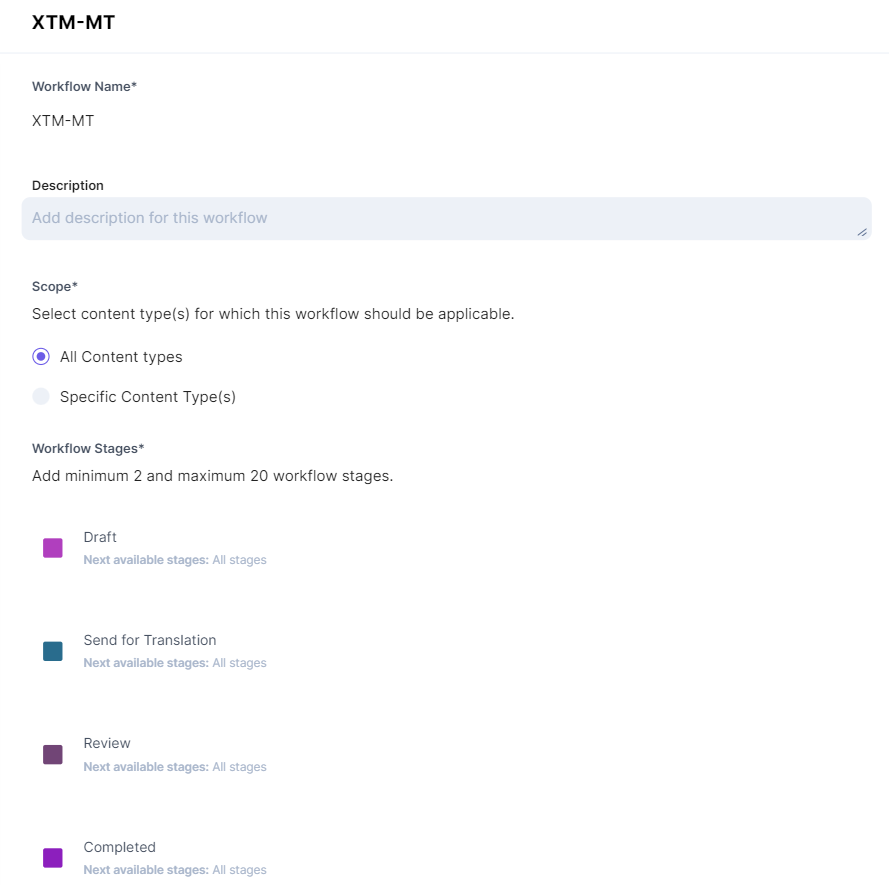
- Once done, click Enable Workflow and click the Save button.
Additional Resource: Learn more about Workflows.
-
Install the XTM application
Follow the steps to install the application in Contentstack.
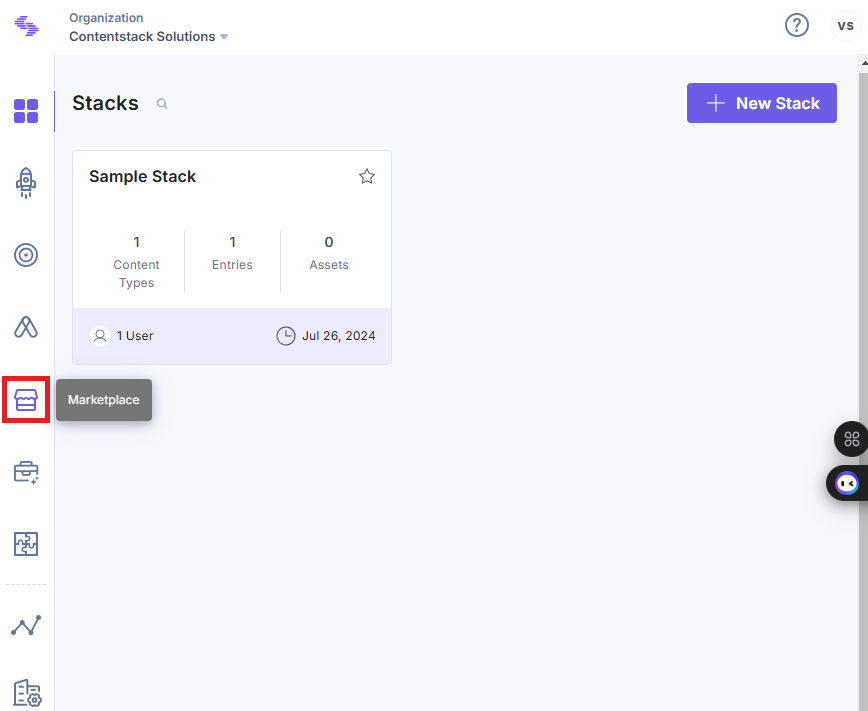
- Log in to your Contentstack account.
- In the left navigation panel, click the Marketplace icon.
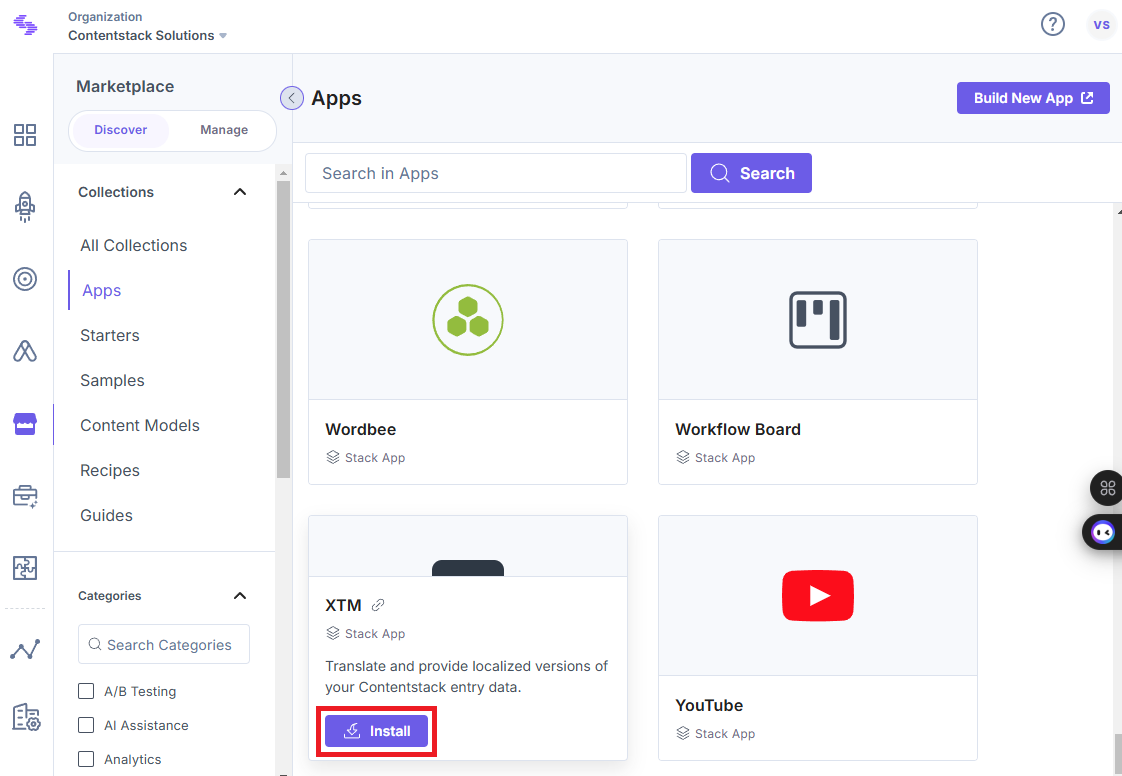
- Locate the XTM app from the list of apps and click the Install button.
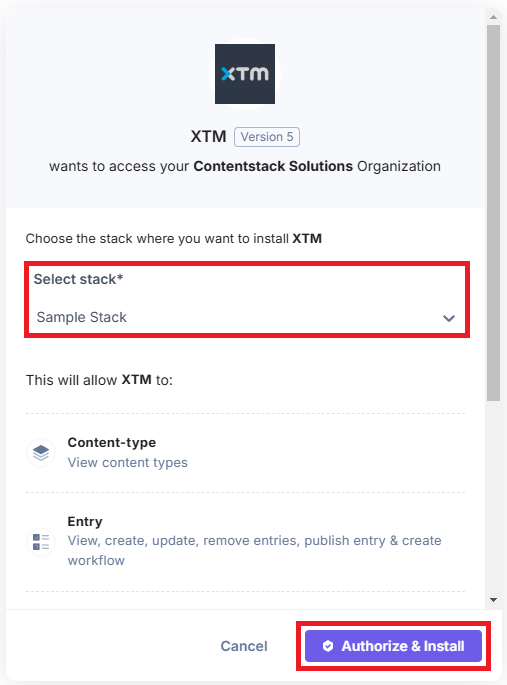
- In the Authorization window, select the stack where you want to install the app, accept the Terms of Service and Privacy Policy, and then click the Authorize & Install button.
You have successfully installed the XTM app to your stack in Contentstack.
- For configuring the app, refer to the Machine Translate section.
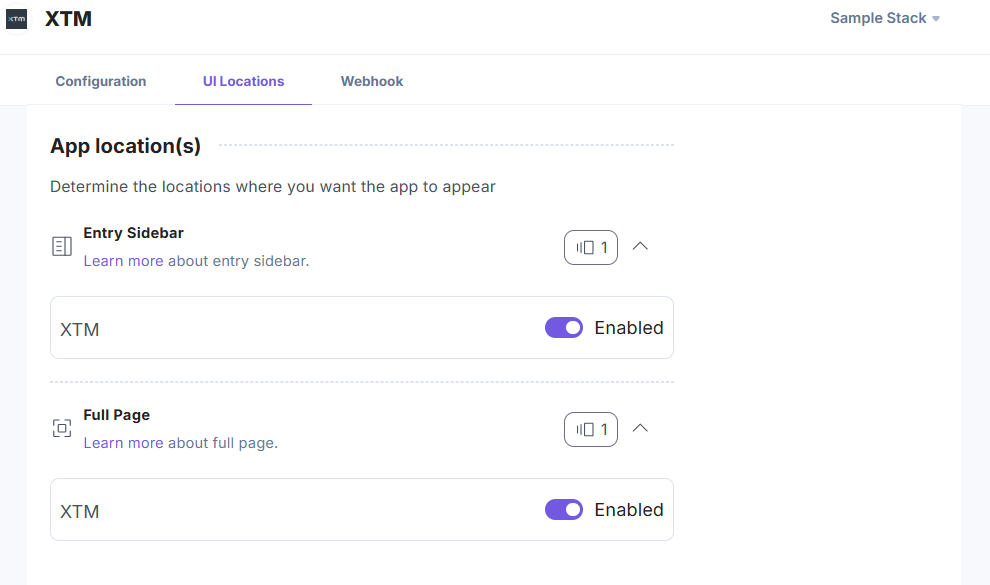
- On the UI Locations tab, you can see the predefined app locations. You can use the toggle button corresponding to each UI location to enable or disable it based on your requirements.
- If the webhook is enabled for your app, you can view the webhook logs under the Webhook tab.
Additional Resource: For more information on UI location and webhooks, please refer to the Installed Apps guide.
- On the UI Locations tab, you can see the predefined app locations. You can use the toggle button corresponding to each UI location to enable or disable it based on your requirements.
-
Translate your Content
XTM lets you translate your content in two different ways:
Machine Translate
The machine translation process can translate multiple languages in just one go. To do this, on the XTM Configuration screen, enter the following details:
- XTM Fields
You can fetch the below details from your XTM account.
- XTM Base URL: The URL of the application.
- XTM User Identifier: Unique identification given to a user.
- User Company Name: The company name of the user.
- XTM Customer ID: Unique customer ID given to users.
- XTM Password: Company credentials for integration.
- XTM Workflow: Enter the XTM Workflow name if you want to create a project from the Sidebar Widget by selecting the Language option.
- Select Translation Type: XTM provides two translation types.
- Machine Translate: Machine Translate helps to translate your entry data automatically once you update the workflow. It helps to process and translate data quickly.
- Human Translate: Human Translate lets the user on the XTM side manually translate the content (details covered in the next section). This process is slower than machine translation.
Note: The default translation type is Machine Translate.
- XTM Templates: This field can help to define the languages in which you want to translate your content. Click Get XTM Template, and a dropdown menu with a list of templates will appear.
- XTM Custom Fields (Optional):
Select one or both of the following fields to send to the custom fields in XTM when creating the project:
- Submitter’s Name
- Contentstack Entry Link
Note:- The field(s) (contentstack_entry_link, contentstack_initiator_name) must exist in the Custom fields section of the XTM app.
- When you select Submitter's Name in the XTM Custom Fields, the submitter's name will appear in the Status section of the Sidebar.

- Click the Next button.
- Configure the Contentstack Fields settings:
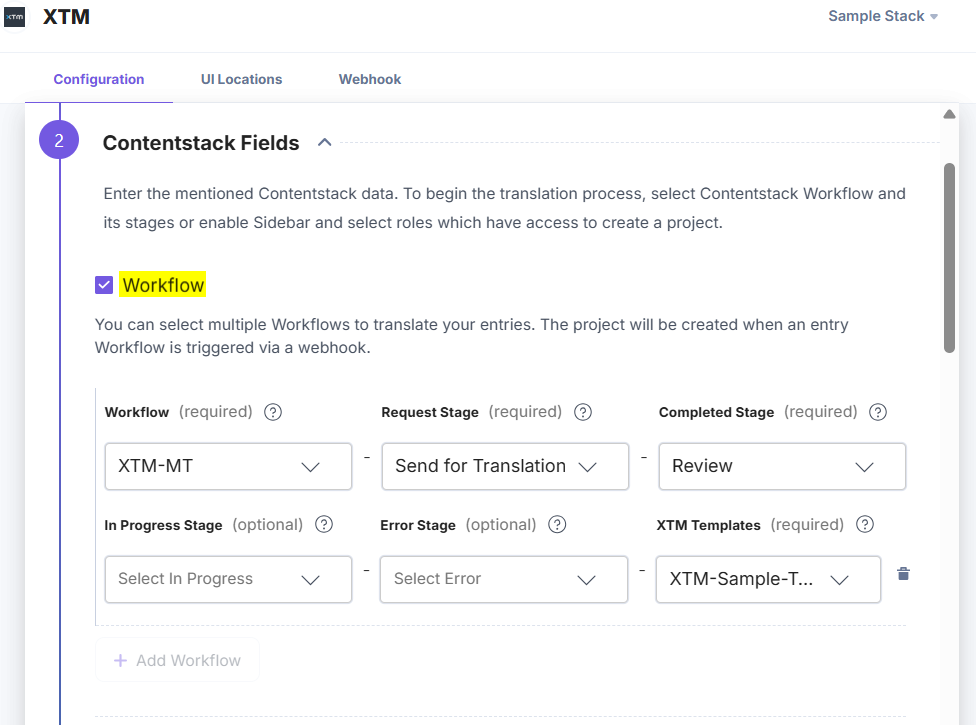
- You can create a project using multiple Workflows. Mark the Workflow checkbox and then click the Add Workflow button to fill in the following fields:
- Workflow: Set of instructions used to define the flow for a process.
- Workflow Stage: There are four workflow stages: Request Stage, Completed Stage, In Progress Stage (optional), and Error Stage (optional).
- XTM Templates: Creates projects using the selected XTM Template for the particular workflow.
- To create a project using the Sidebar Widget, check the From Sidebar or Full Page UI Location checkbox and select a role from the Select Roles drop-down.
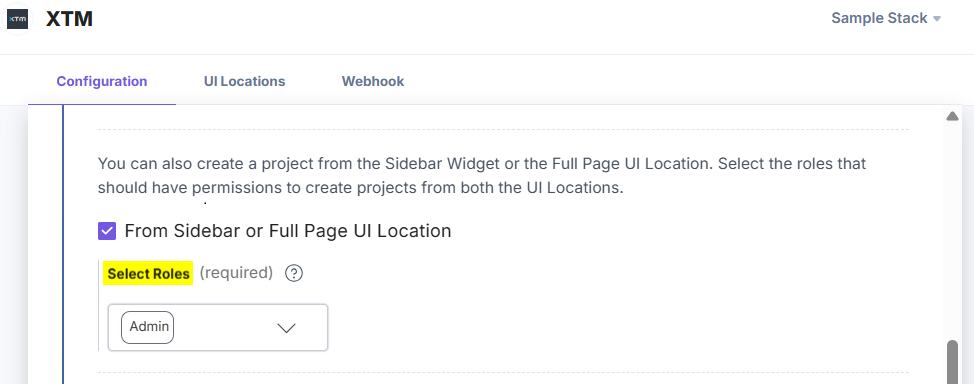
Note: The selected roles have access to 'Create Project' from the Full Page Location and Sidebar Widget. By default, only the stack owner and admin have access to create project(s).
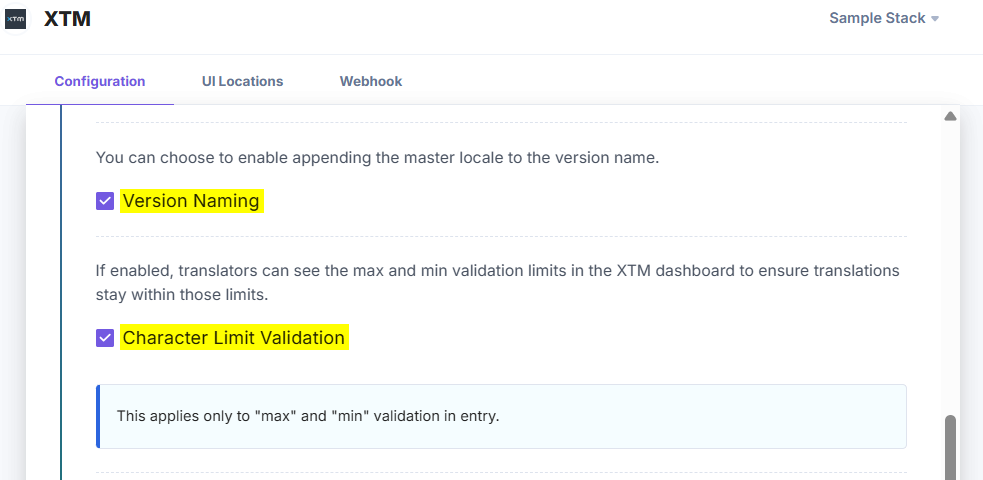
- Version Naming: You can now append the master locale to the version name, making it easier to identify and track different versions across locales.
Syntax: sourceEntrylocale_sourceEntryversion_targetEntryVersion
For example: en-us_1_3
- Character Limit Validation: Translators can now view both maximum and minimum character limits directly within the XTM dashboard.
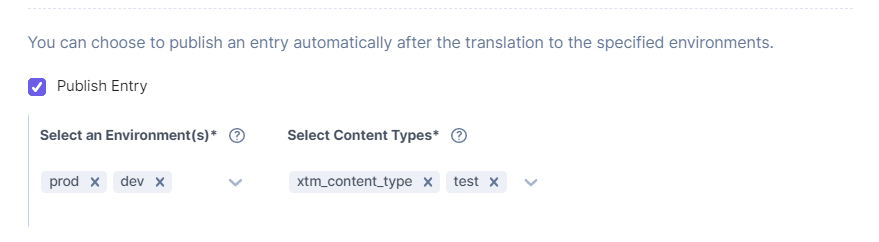
- To publish an entry automatically to the specified environments after the translation, mark the Publish Entry checkbox and select the required environment(s) and the content type(s) to which you want to publish.
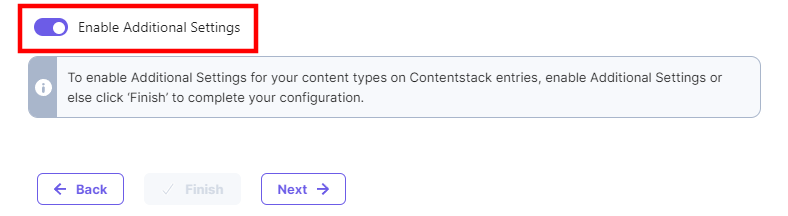
- Enable Additional Settings: If you select the Enable Additional Settings option, you can define the scope of your fields for translation.
- You can create a project using multiple Workflows. Mark the Workflow checkbox and then click the Add Workflow button to fill in the following fields:
- Click the Next button.
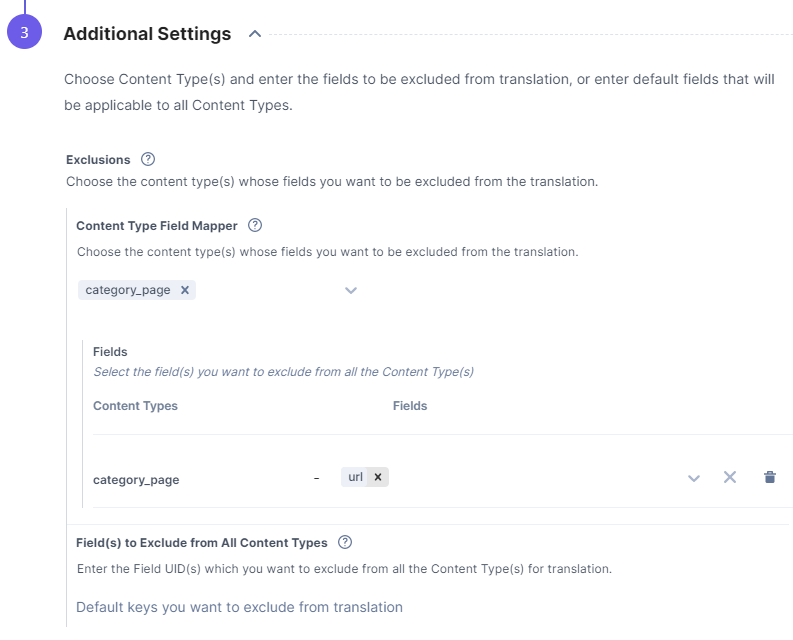
- Configure the Additional Settings:
- Exclusions:
- Content Type Field Mapper: Define the fields of a particular content type you want to exclude from the translation.
- Field(s) to Exclude from All Content Types: Define specific fields of all the content types you want to exclude from the translation.
Note: When the target language is not localized, the XTM app uses the source language code for exclusions. When the target language is localized, it will consider the target language code for exclusions.
- Inclusions:
- Content Type Field Mapper: Define the fields of a particular content type you want to include in the translation.
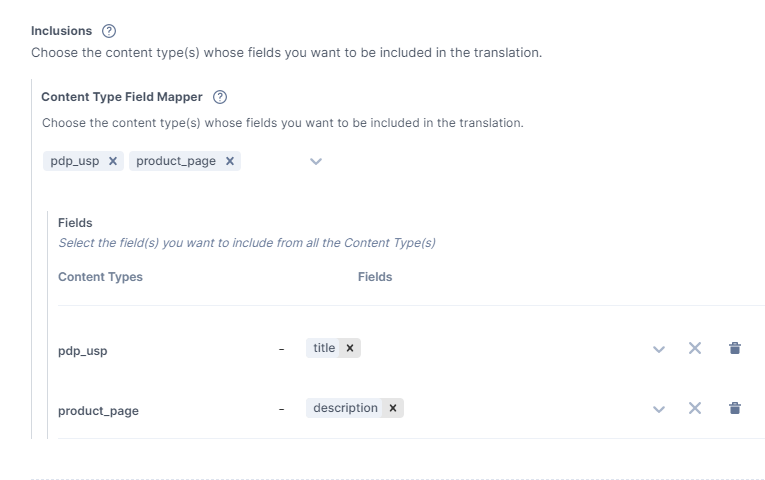
Note: While mapping Modular Blocks, you provide modular_blocks[].block_a.heading, and this sends all instances of block_a.heading inside modular_blocks from the entry to XTM. To target only the first instance, use indexing like modular_blocks[0].block_a.heading. However, do not use an index and an empty [] at the same time.
For example, modular_blocks[0].block_a.group[].title is invalid.
- Content Type Field Mapper: Define the fields of a particular content type you want to include in the translation.
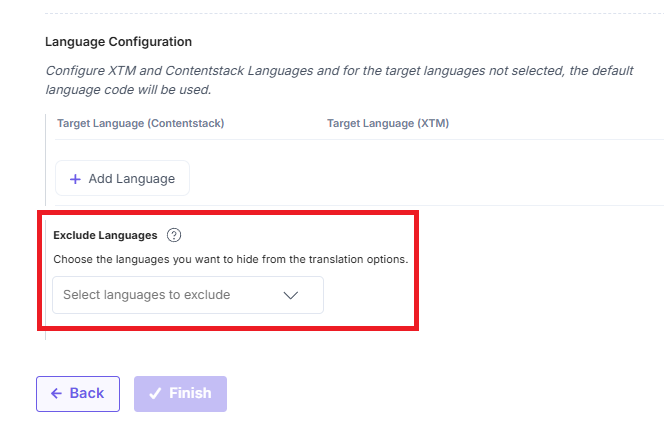
- Language Configuration: Define the content translation languages for XTM and Contentstack to avoid any mismatch between the language codes. All the entries from XTM languages will be localized into Contentstack languages. For any target languages not selected, the app uses the default language code of the stack. Click the Add Language button to add a language.
- Exclude Languages: Select the language(s) from the dropdown that you want to remove from the Language drop-down in the sidebar.
- Exclusions:
- Once done, click Finish and then the Save button.
- Reset the configuration:
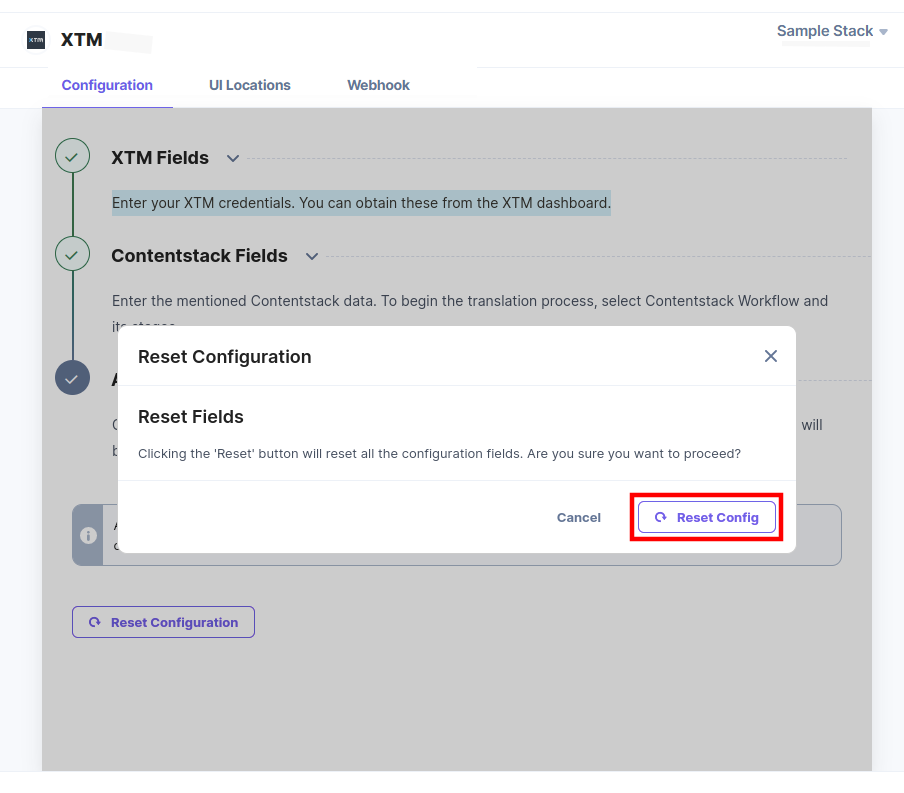
- If you want to reset the configuration with other values, click the Reset Configuration button.
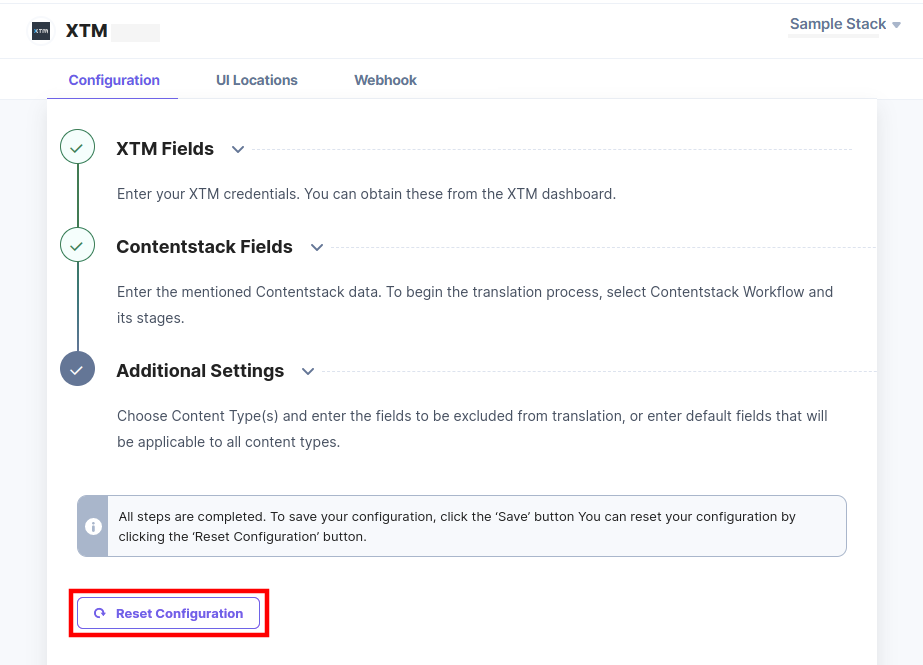
- A popup will appear. Click the Reset Config button to reset the entire configuration.
- If you want to reset the configuration with other values, click the Reset Configuration button.
Initiate the Translation Process
Once you define the configuration for your XTM application, initiate the translation process by following the below steps:
- Navigate to the Entry page that you created in Step 2.
- Enter the content in the entry field.
- Click the Save button.
Note: If you want to use the JSON Rich Text Editor field, you can select the XTM pre-configured JSON RTE template option from the Filter Template drop-down. To configure the Filter Templates in your XTM account, please contact XTM support.
- If you set the configuration to create a project using Workflows, follow the steps given below:
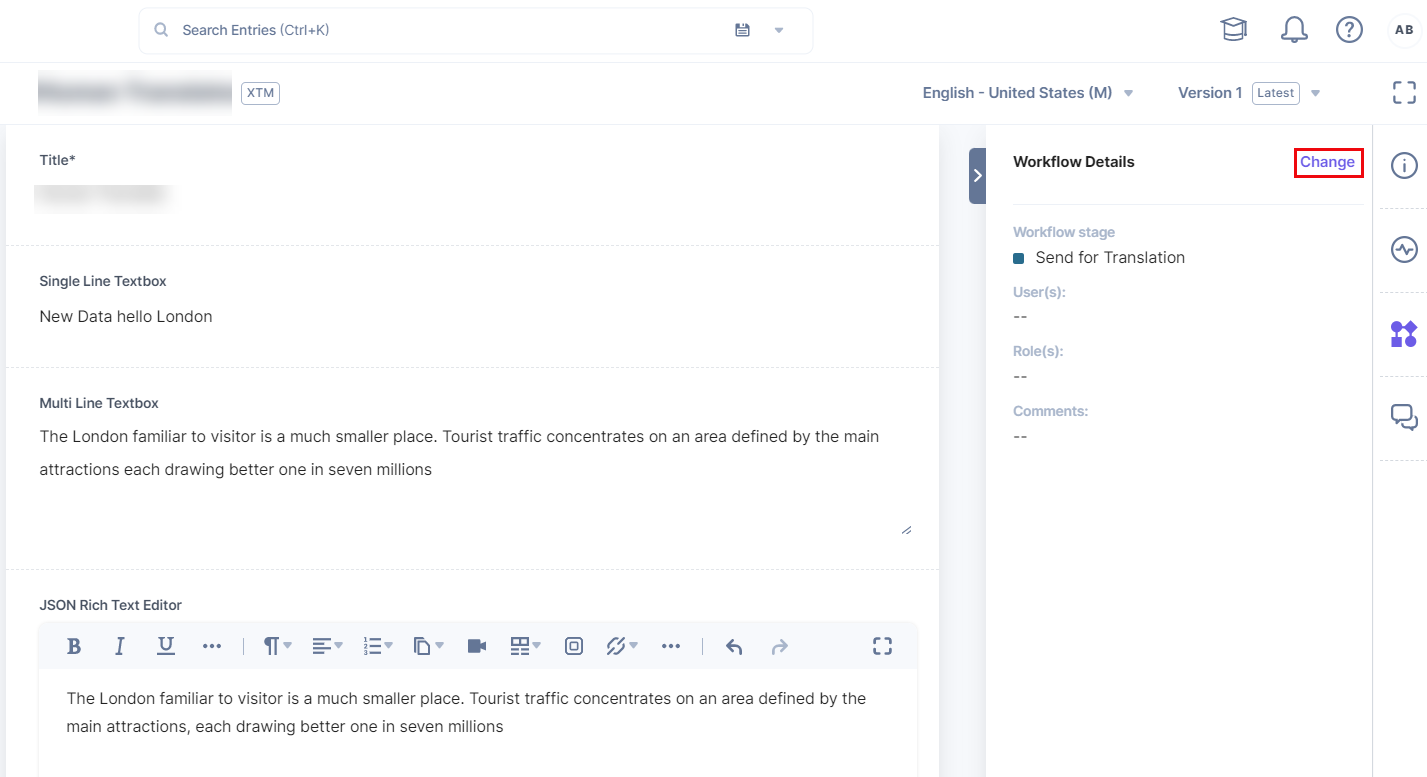
- In the right navigation panel, click Workflow Details.
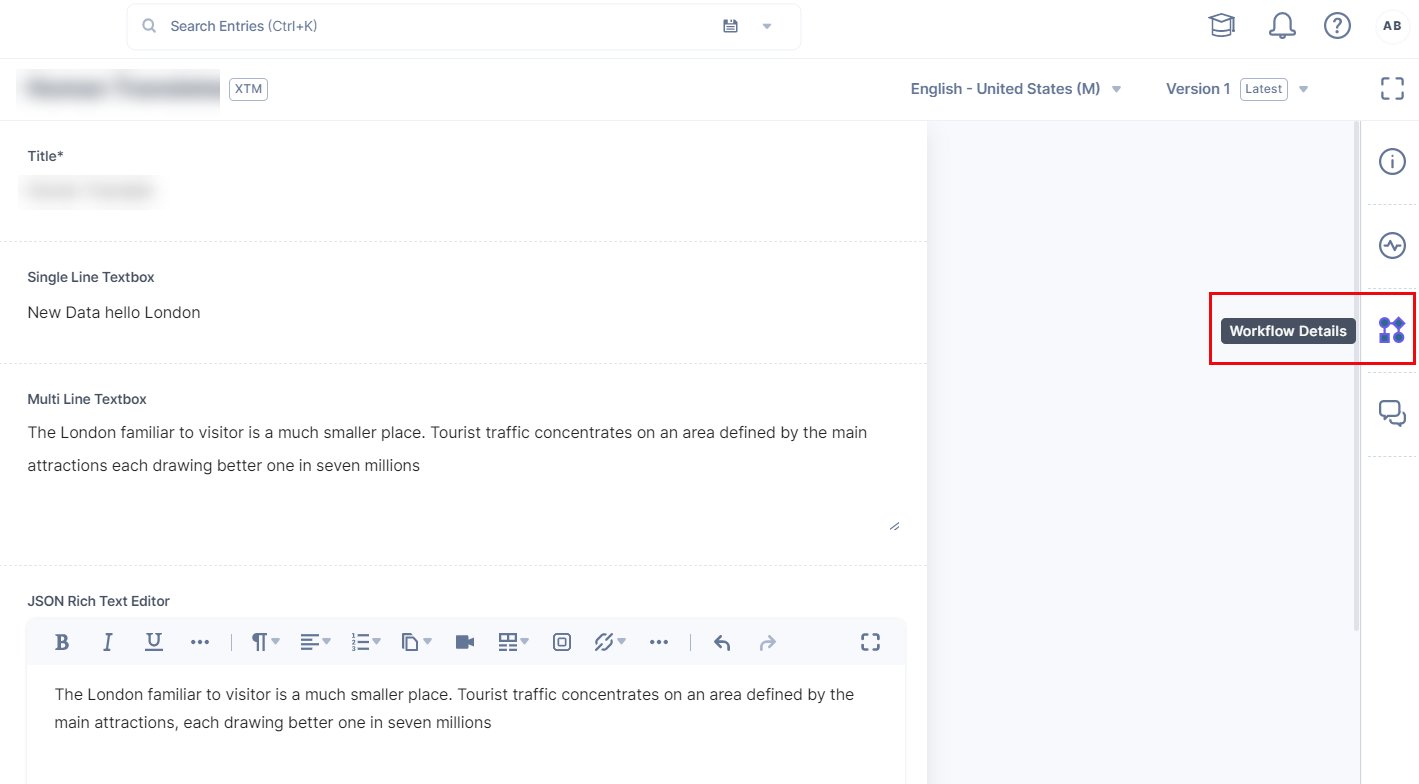
Note: Set Stage in the Workflow Details when you set Workflow for the first time.
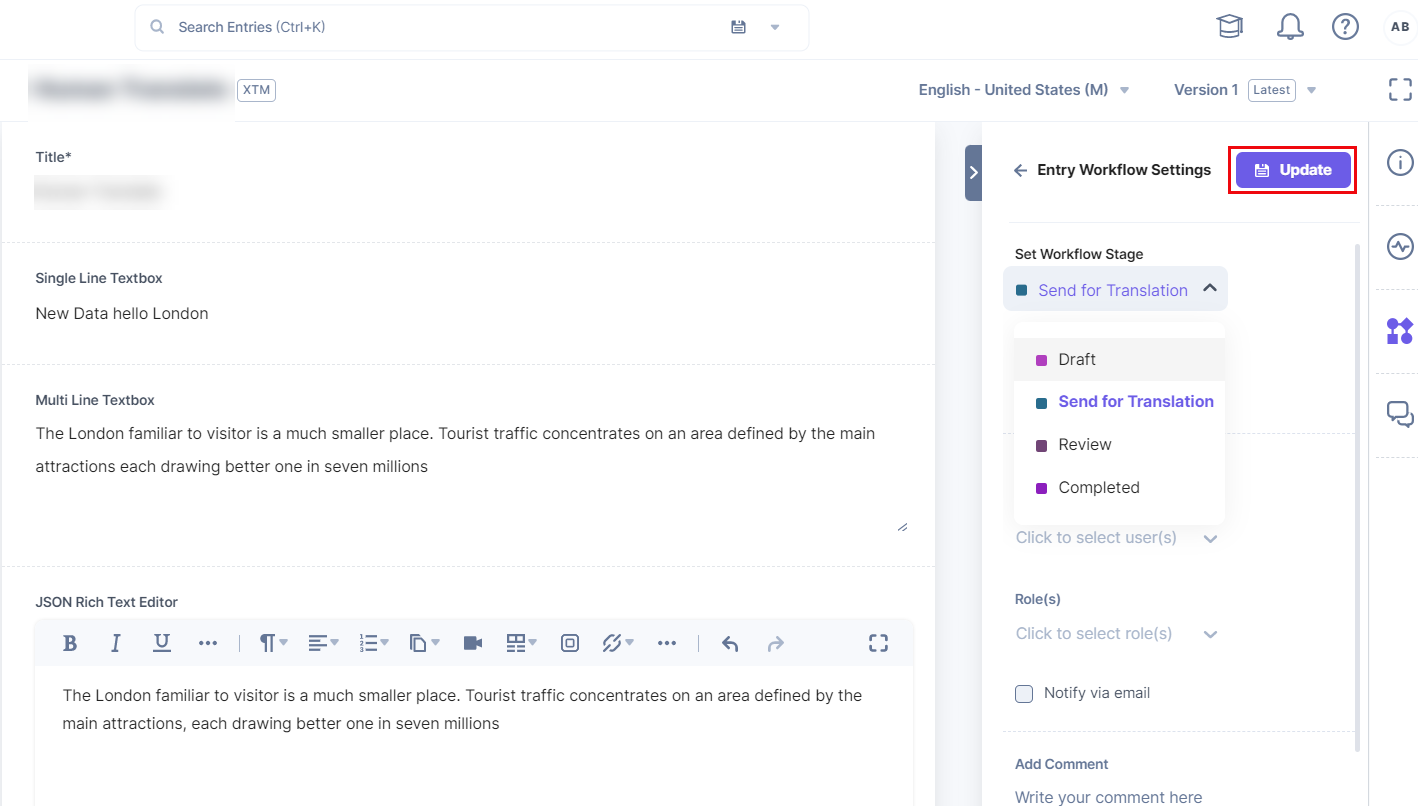
- Click Change. To start the translation process, you need to change the Workflow stage, as defined in the XTM configuration page.
- Select the Workflow stage from the dropdown and click the Update button.
- In the right navigation panel, click Workflow Details.
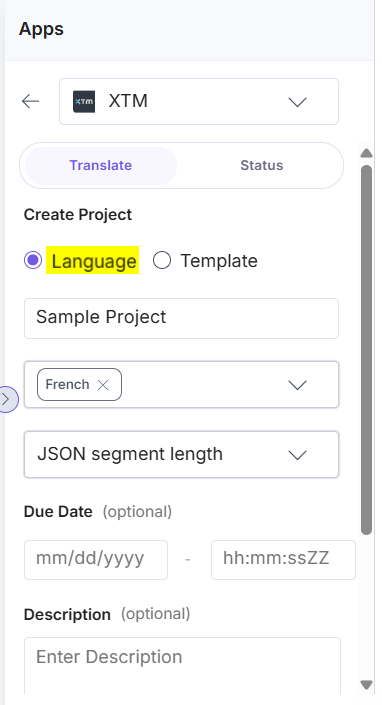
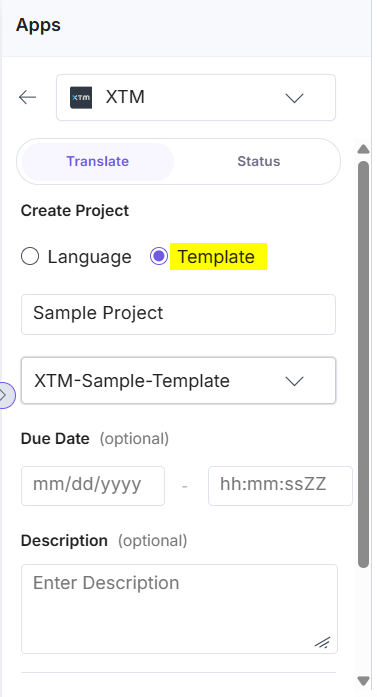
- Select XTM from the dropdown and fill in all the fields under the Translate tab.
- Project Name: Enter the project name to create a project for translation.
- Language: Click the Language option, select a language and a filter template from the respective dropdowns.
Note: If you are using the JSON Rich Text Editor field:
- Select the JSON RTE Filter template option in your XTM account.
- You must select a filter template using the Filter Template drop down.
- Template: Click the Template option and select a template from the dropdown.
- Due Date (optional): The due date selected in the Sidebar app will be displayed in the Delivery due date field of the General info section for the specified project in XTM.
- Description (optional): The description provided for the project in the Sidebar app will be displayed in the Description field of the General info section for the specified project in XTM.
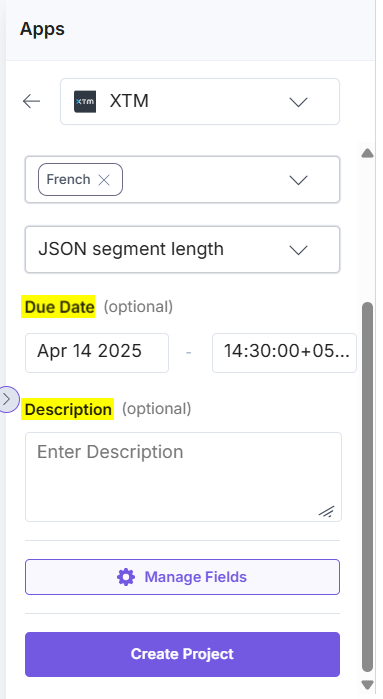
- Manage Fields: Click the Manage Fields button. In the Manage Fields modal, all fields are selected by default. If fields are specified in the Exclusion or Inclusion settings in the configuration, the fields displayed in the Manage Fields modal will reflect those settings.
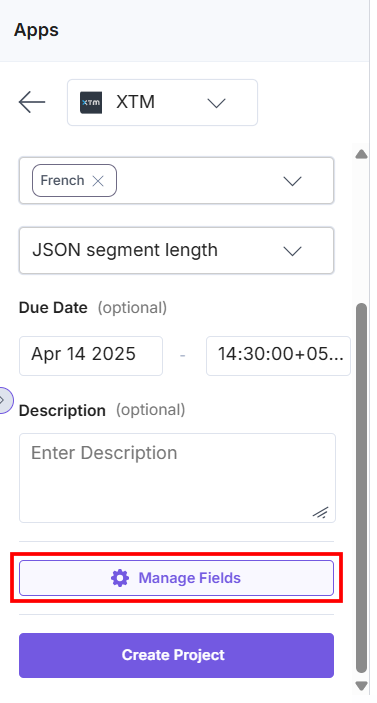
Deselect the fields you want to exclude from the translation and then click Save.
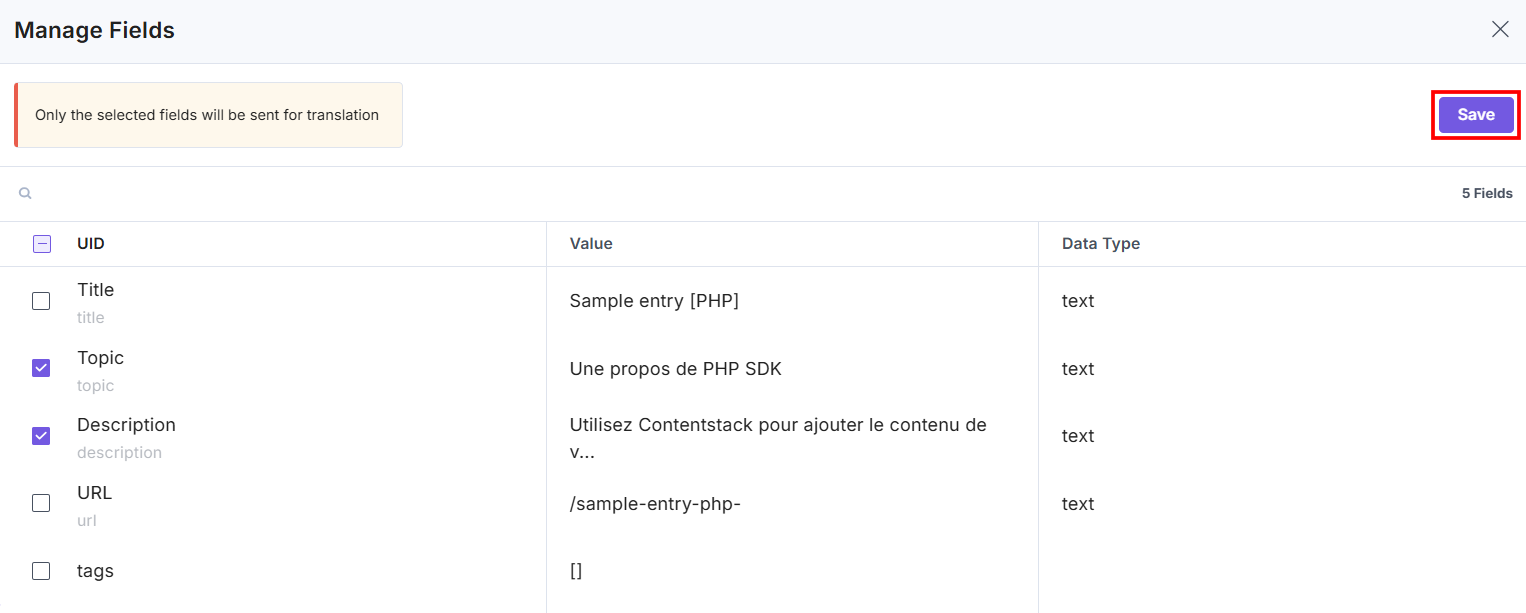
Note: Manage Fields settings will be saved for only one instance.
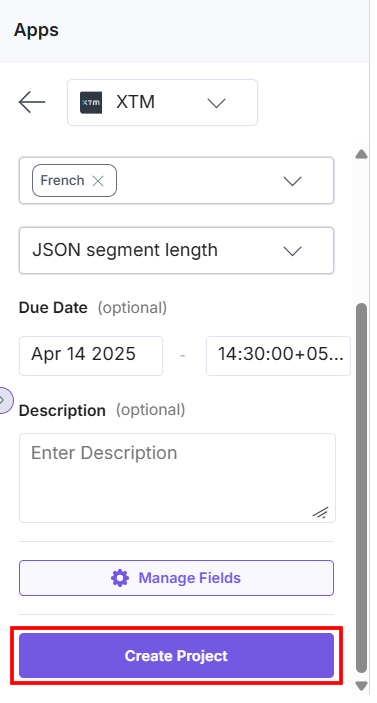
- Create Project: Click the Create Project button to complete project creation and start the translation process.
- You can view the translation status under the Status tab by selecting a project using the Select Project drop down. This dropdown holds the Project ID of the translation projects.
You can view the status of your project, and the date and time of update under the Project Status section. Click the vertical ellipses and click Cancel Project to cancel your project from the XTM dashboard.
Note: When you click Cancel Project, the project deactivates only in the XTM portal. The localized language remains as it is.
In the Language Status section, you can view the status of the individual language you selected. Click the Cancel icon to stop the translation process.
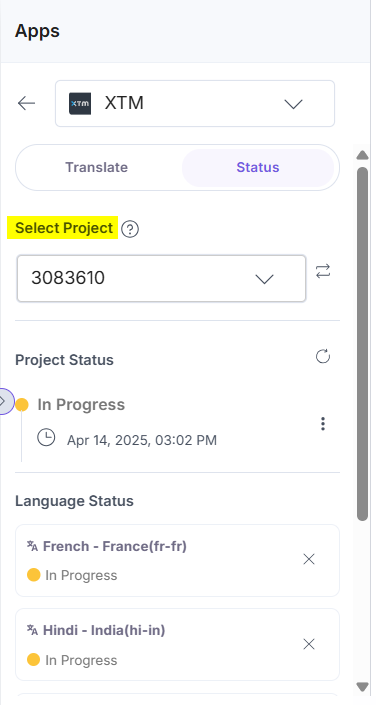
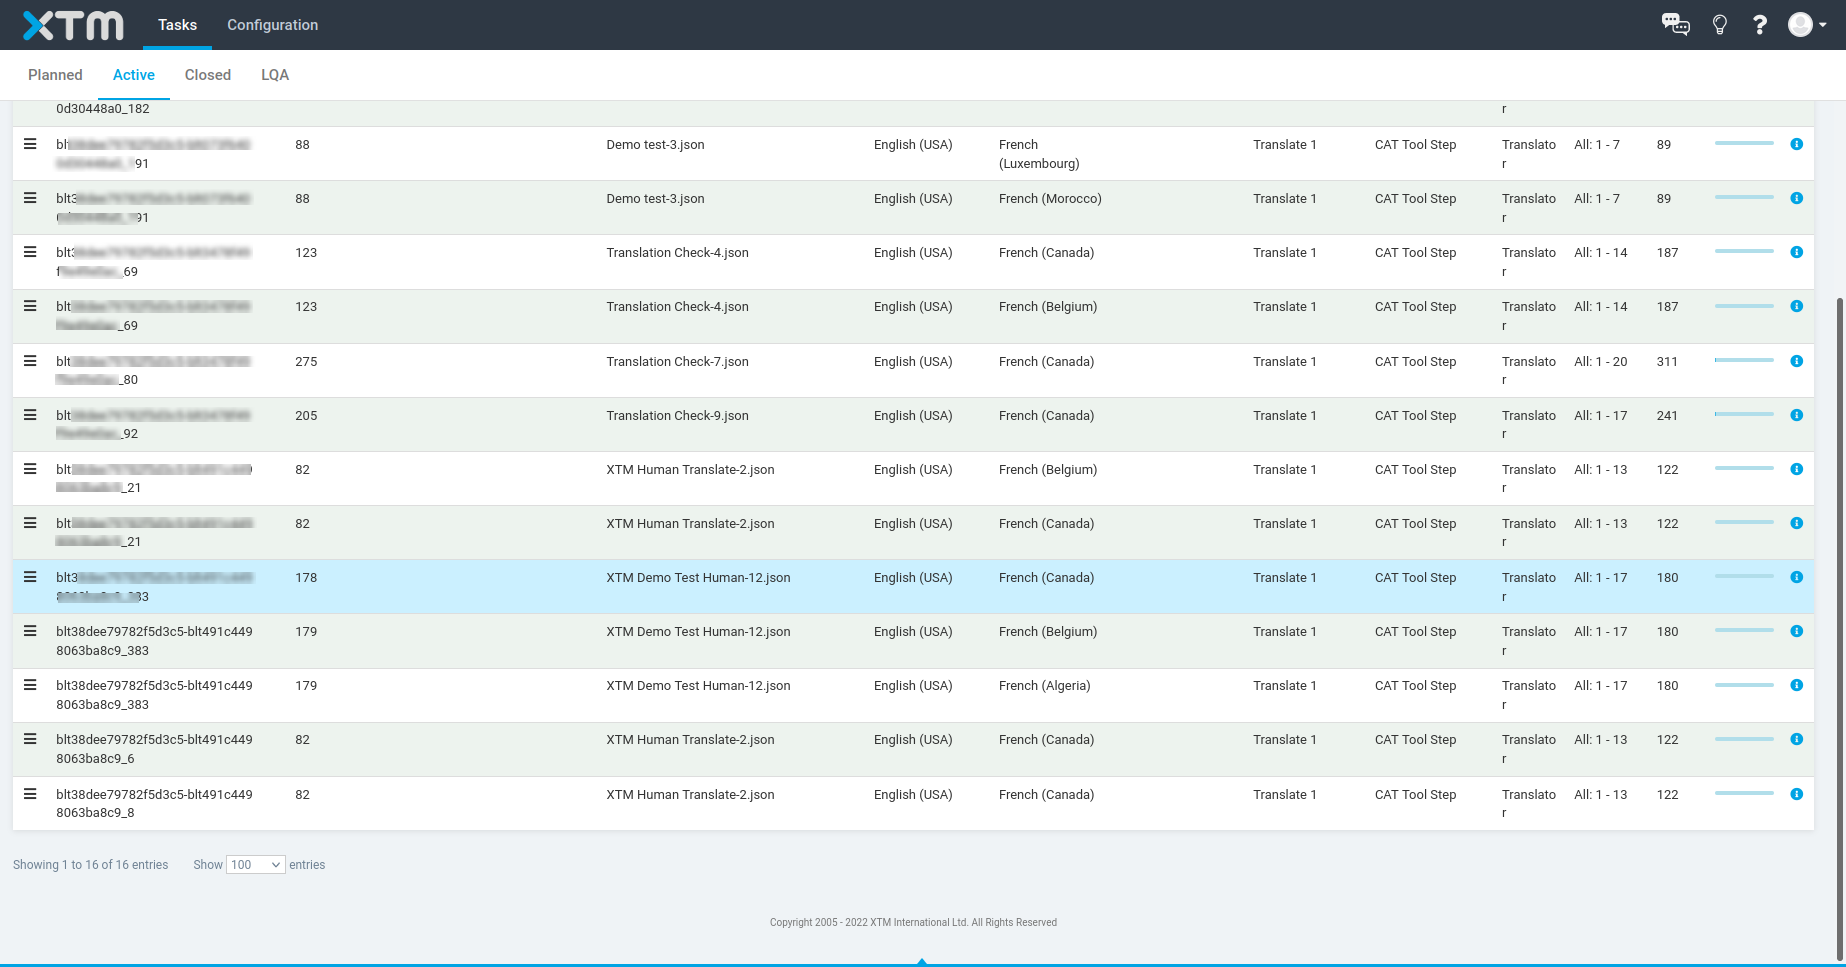
Note: You can view the translation status of up to 10 recent projects in the XTM dashboard.
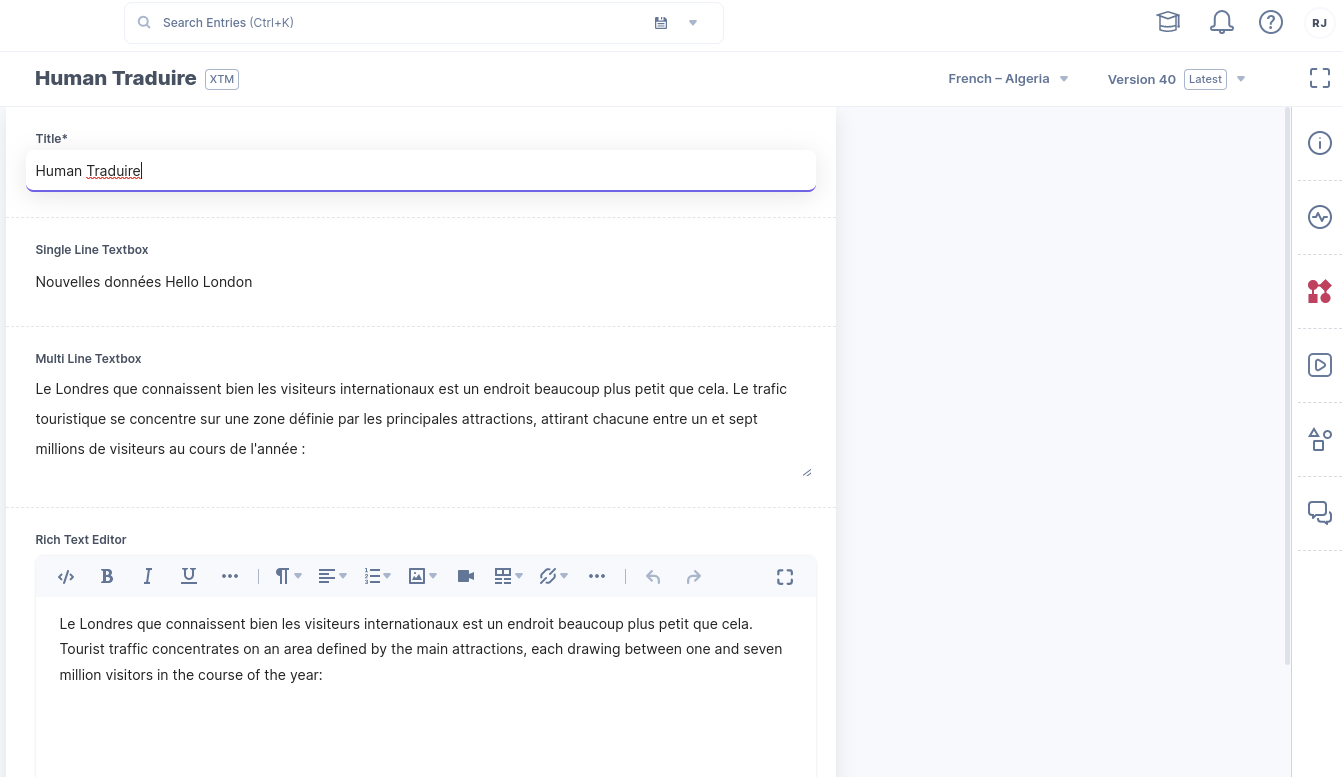
- After successful translation, you can view the translated content in the entries.
Human Translate
In the Human translation process, an individual user manually translates the content. This process is slower than machine translation.
On the XTM Configuration screen, enter the following details for human translation:
- XTM Fields
- Select Translation Type
- Human Translate
- Select Translation Type
Note: The rest of the configuration will be similar to the machine translation process.
The process for human translation will be as follows:
- Navigate to the entry page. Click on the Widget icon in the right navigation panel.
- Within Widgets, click the Entry Widgets dropdown, and under Apps, select XTM App.
- Select the project ID from the dropdown. You need to select the ProjectID from the Status section of the Sidebar Widget.
Note: Project ID is a unique identifier given to the entry which needs to be translated. With the help of project ID, users can easily search for the entry in the XTM dashboard and translate the content manually.
- Navigate to the XTM dashboard to view the list of all the projects.
- Select the project based on your project ID.
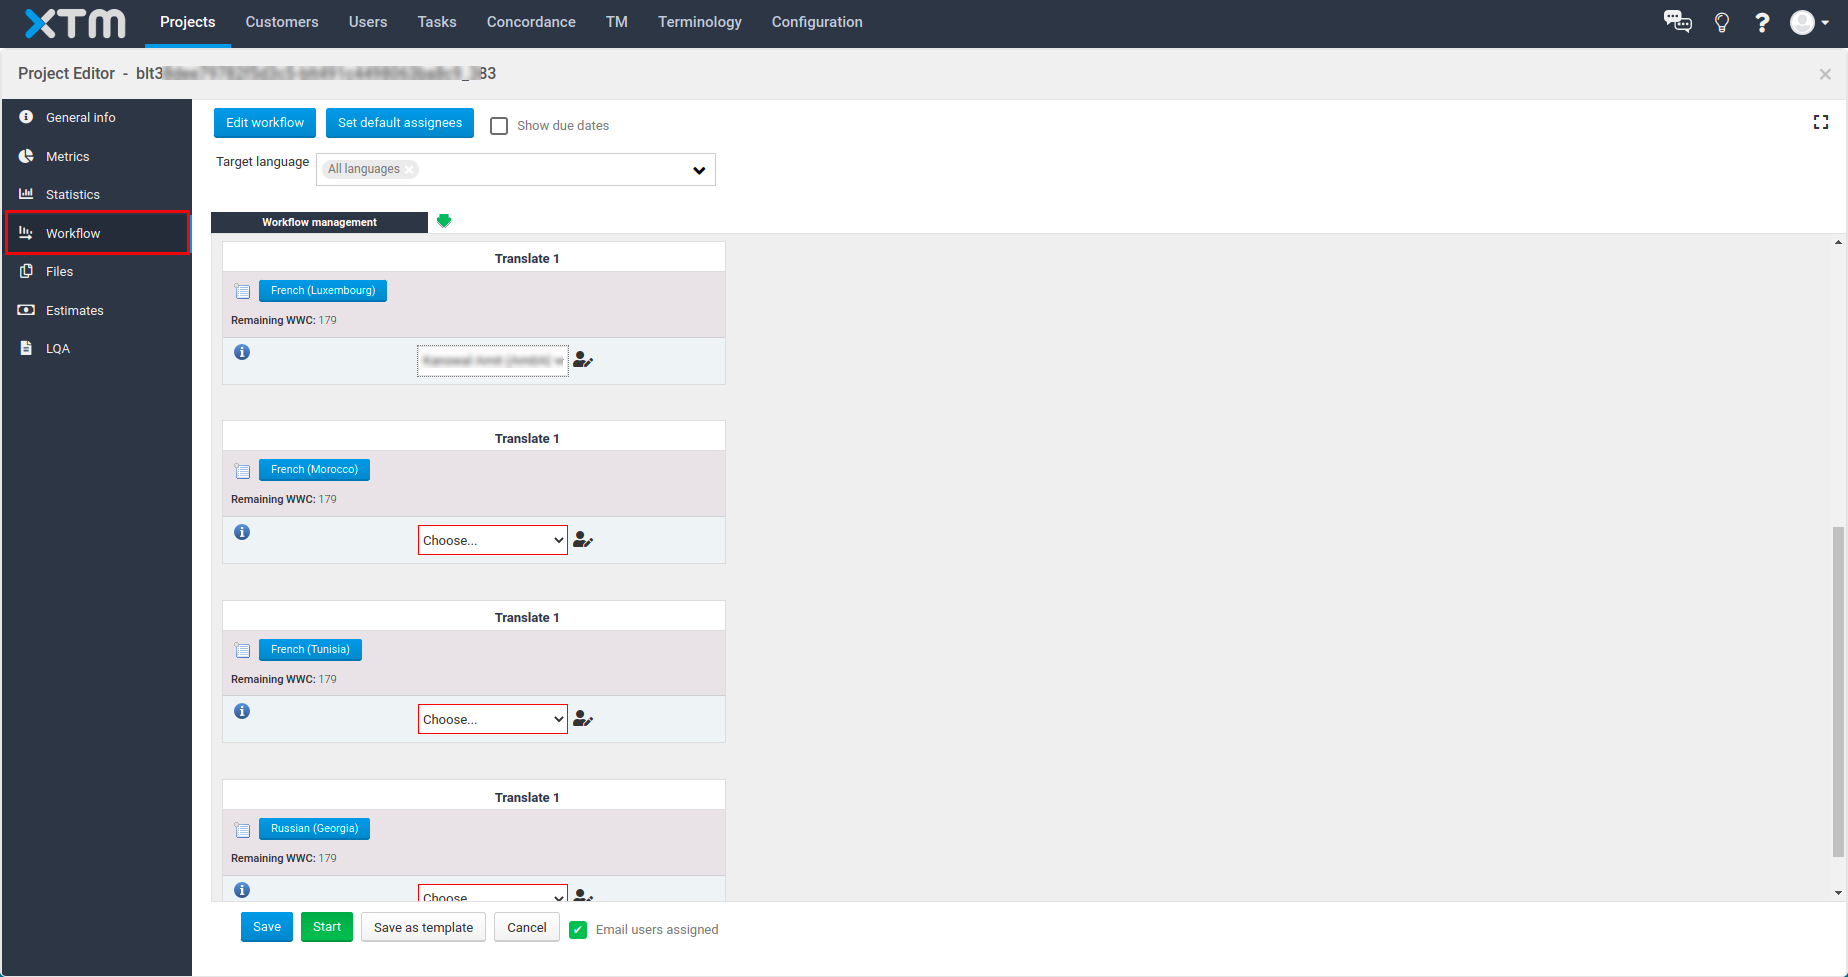
- In the left navigation panel, click Workflow. Assign different languages to different users so they can manually translate the content.
- Click the Start button.
Note: Users need to log in via individual credentials in the XTM dashboard. Credentials are different for human and machine translation in XTM.
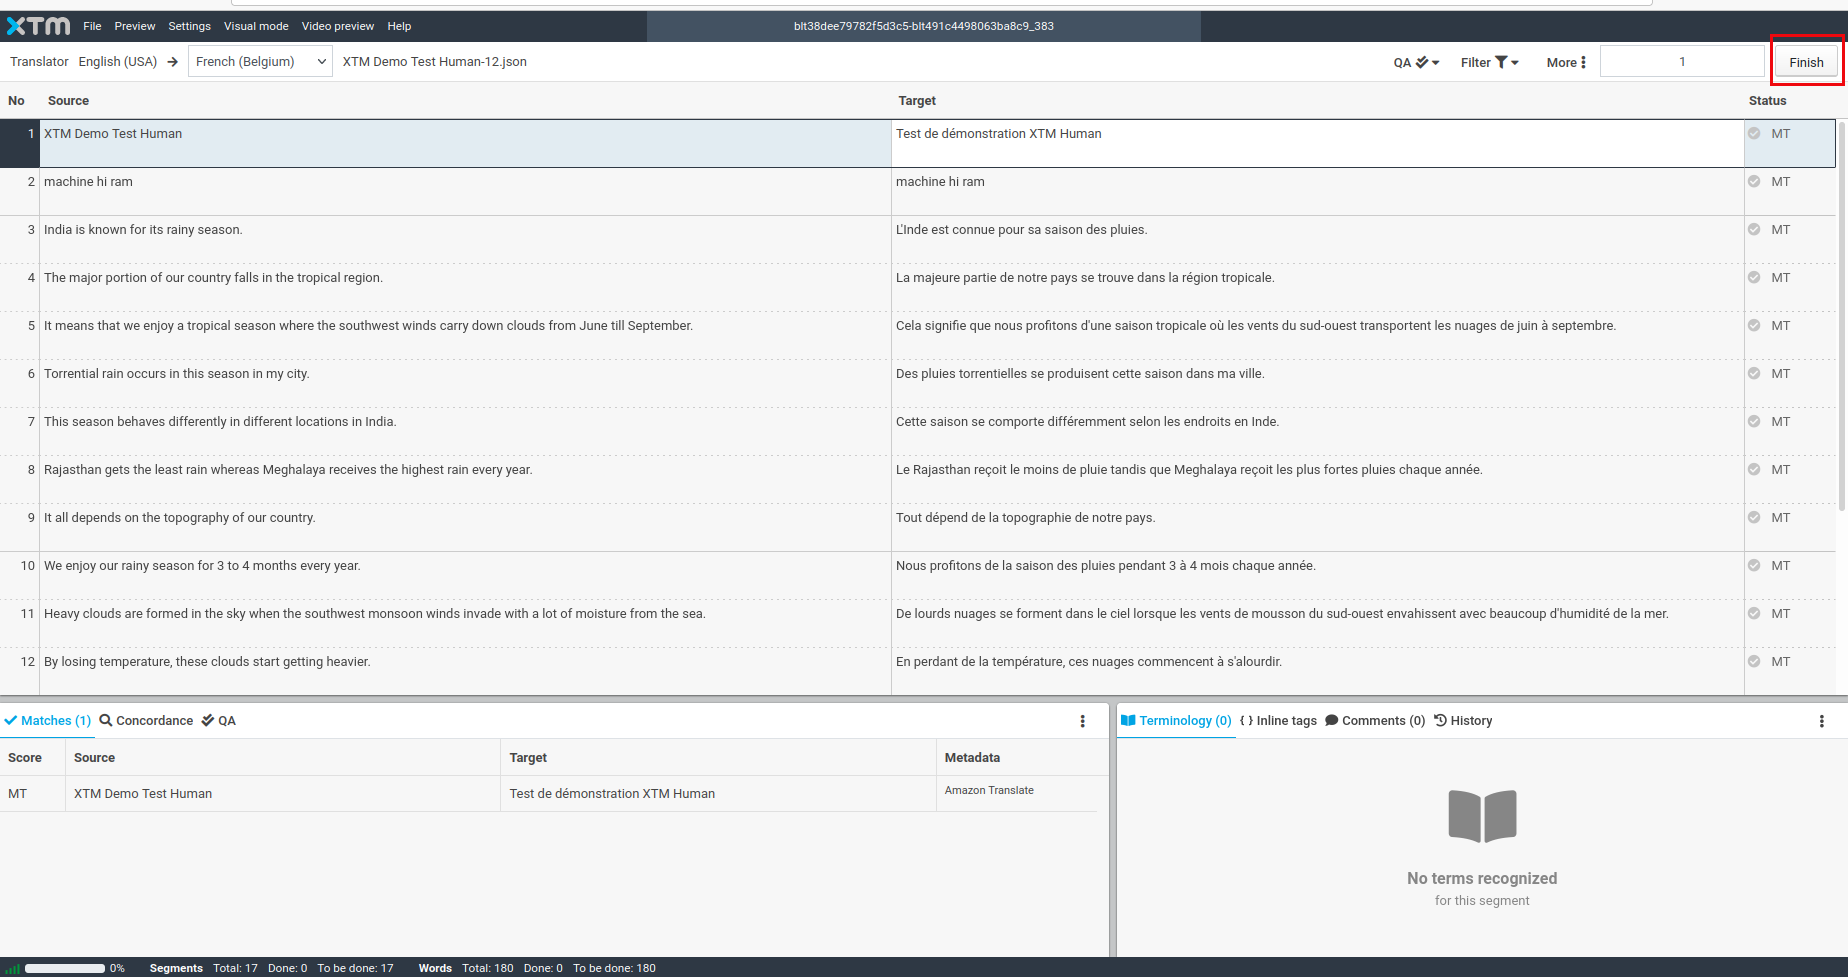
- Select the project based on project ID. Translate the content manually.
- Click the Finish button.
You will be able to see the translated content in Contentstack.
- XTM Fields
Using XTM as a Full Page Location App
To use the XTM app in Contentstack, log in to your Contentstack account and follow the steps below:
- Go to the stack dashboard. On the left-hand side primary navigation, you will find the XTM app icon (as shown below).
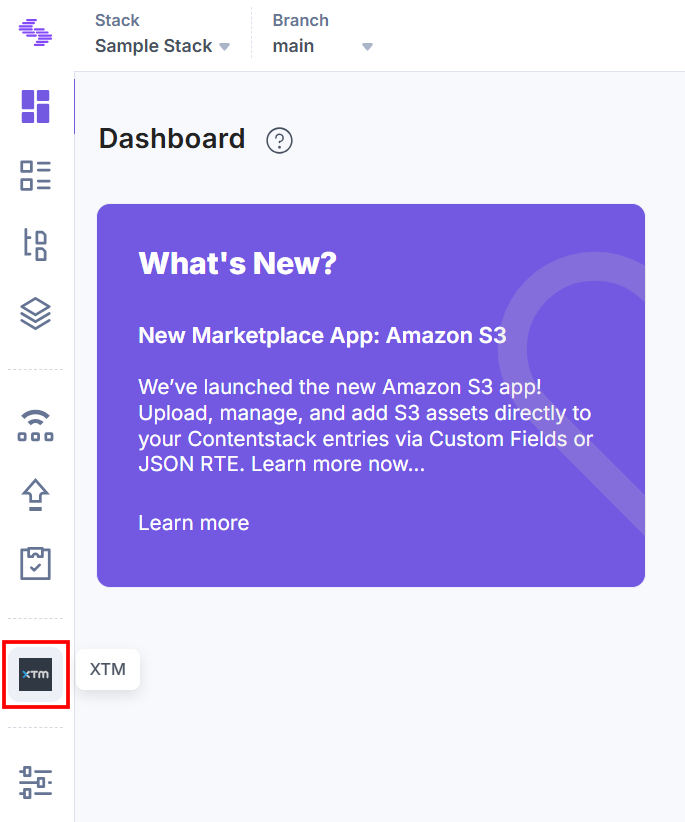
- Click the app icon to view the XTM app within your CMS.
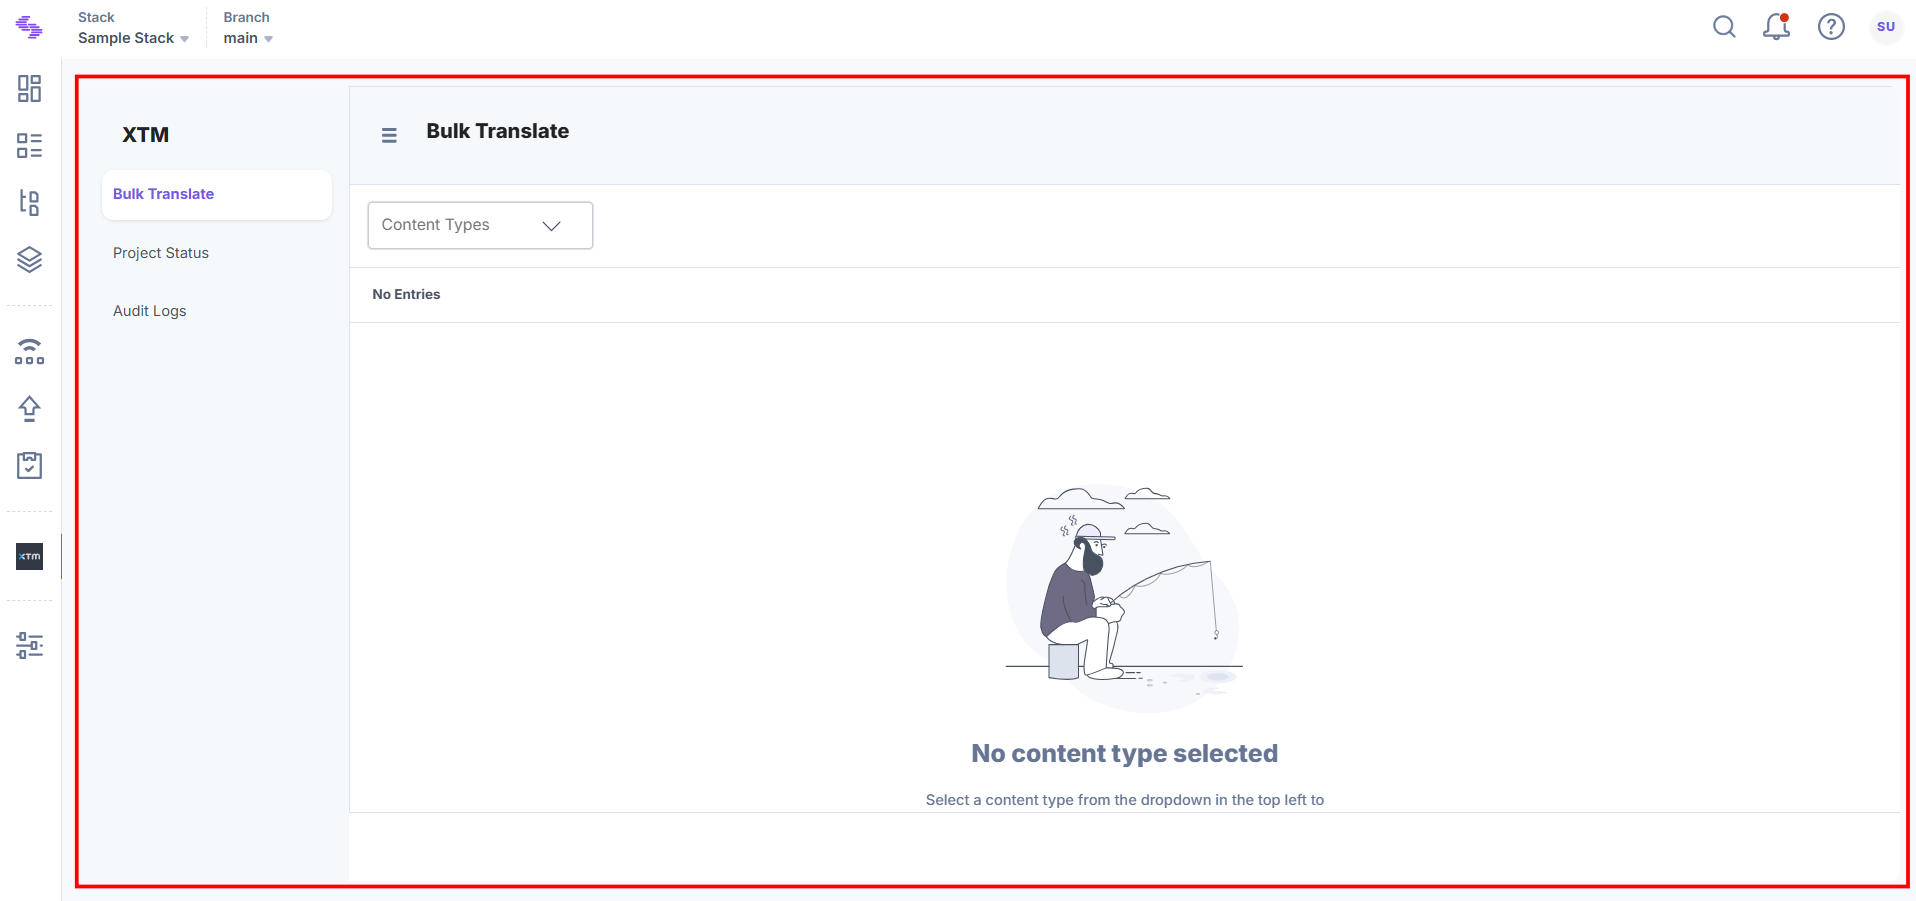
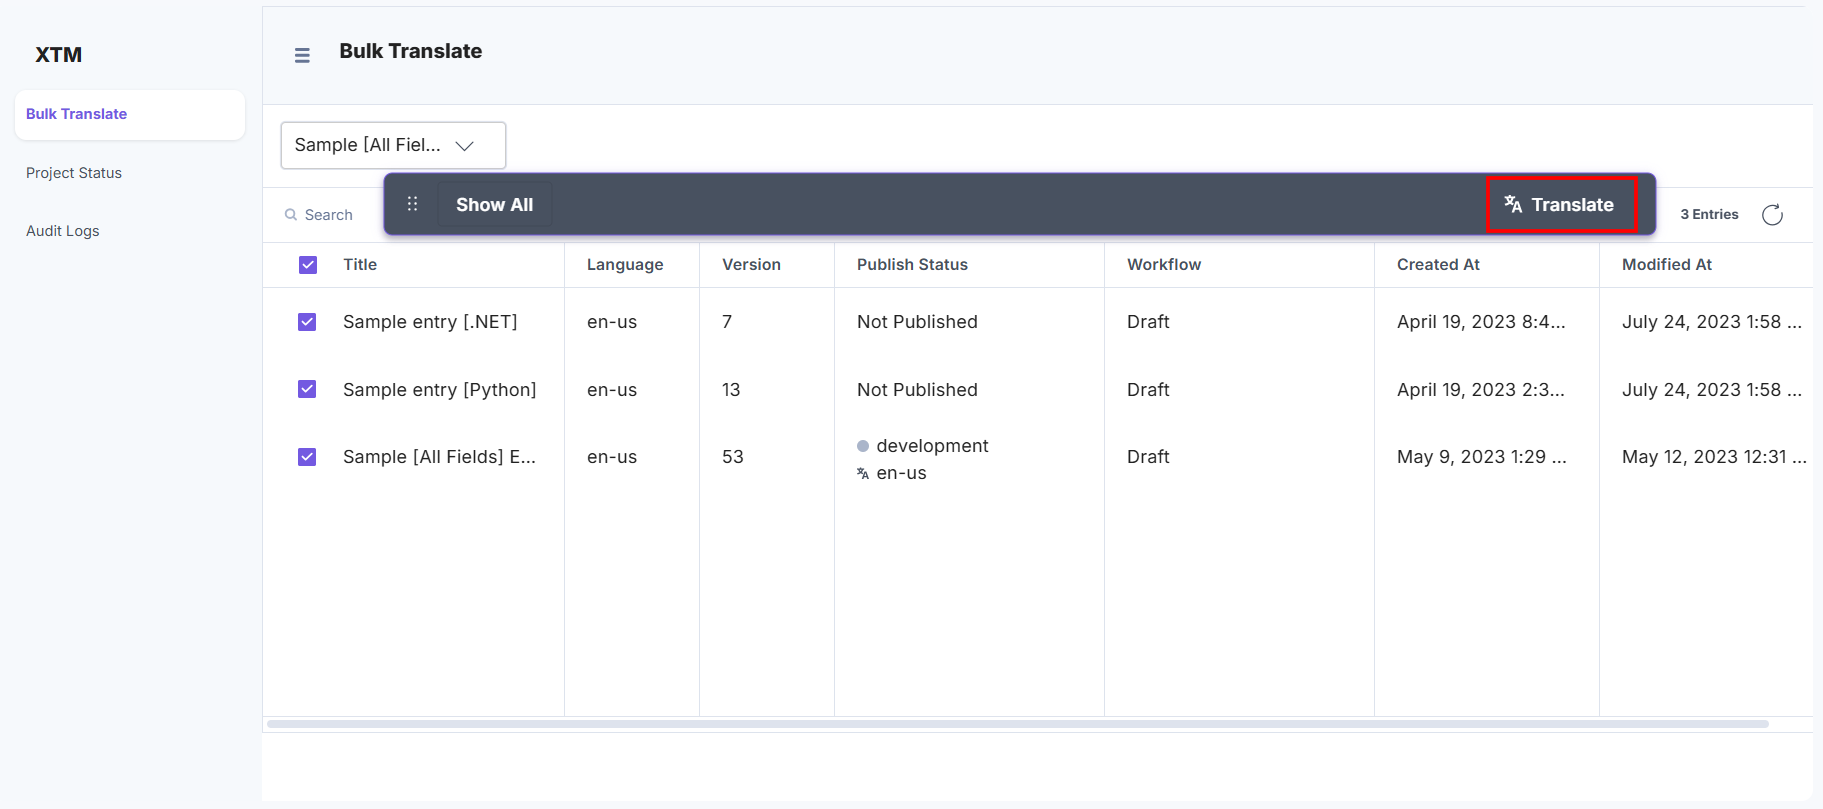
- In the Bulk Translate page, select the Content Type for translation.
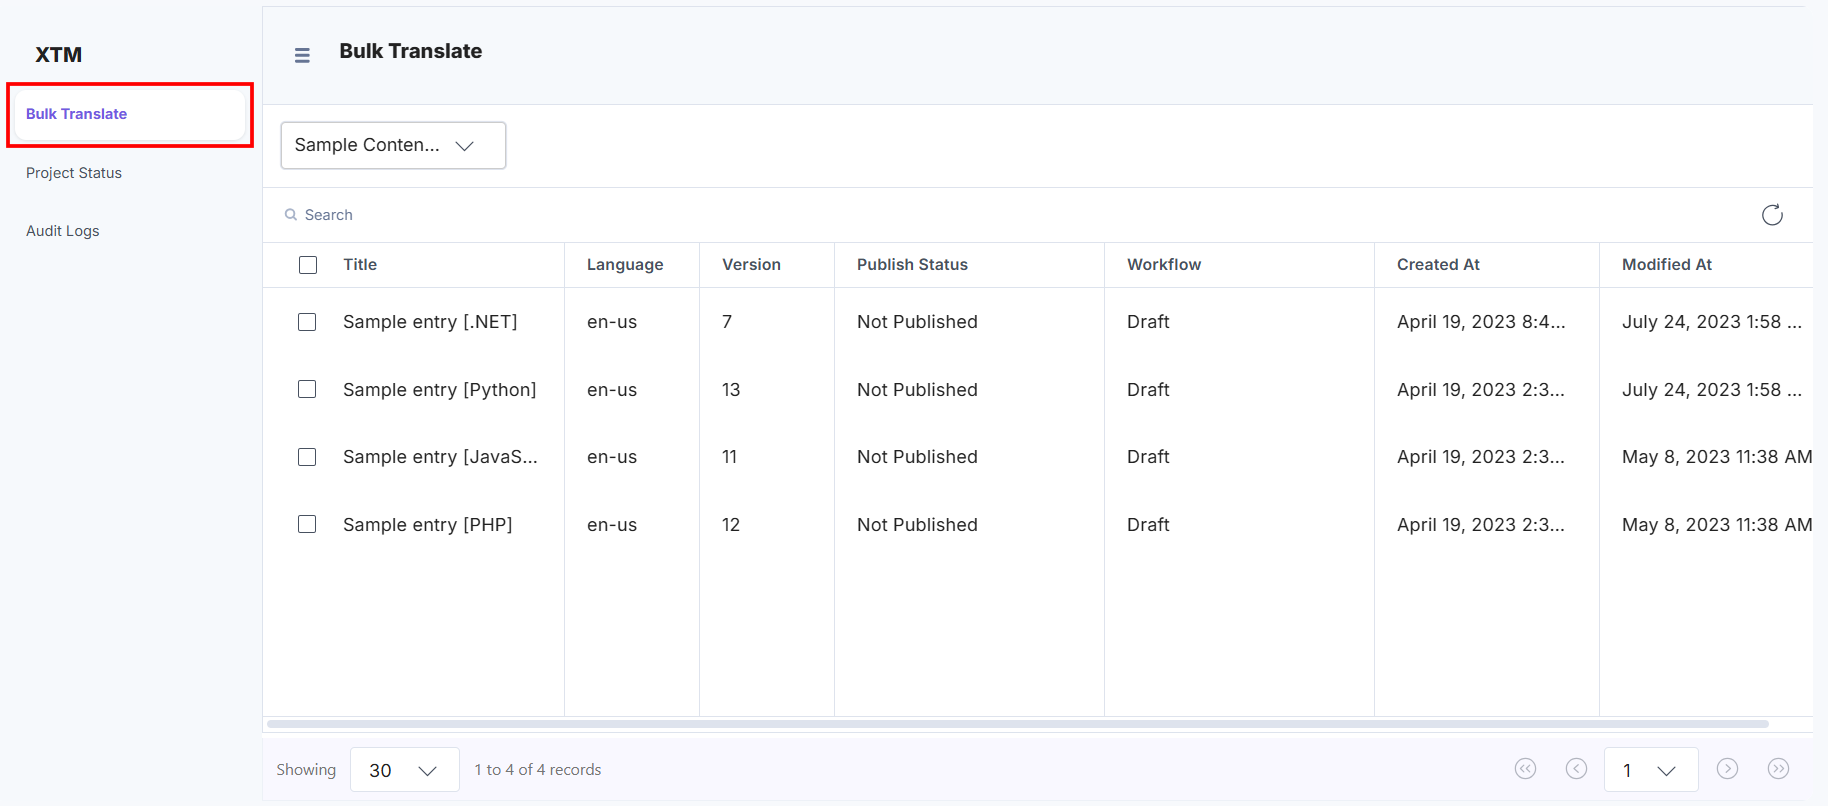
- Now select entries for translation.
Note: You can translate up to 500 entries (including the locale versions) at once.
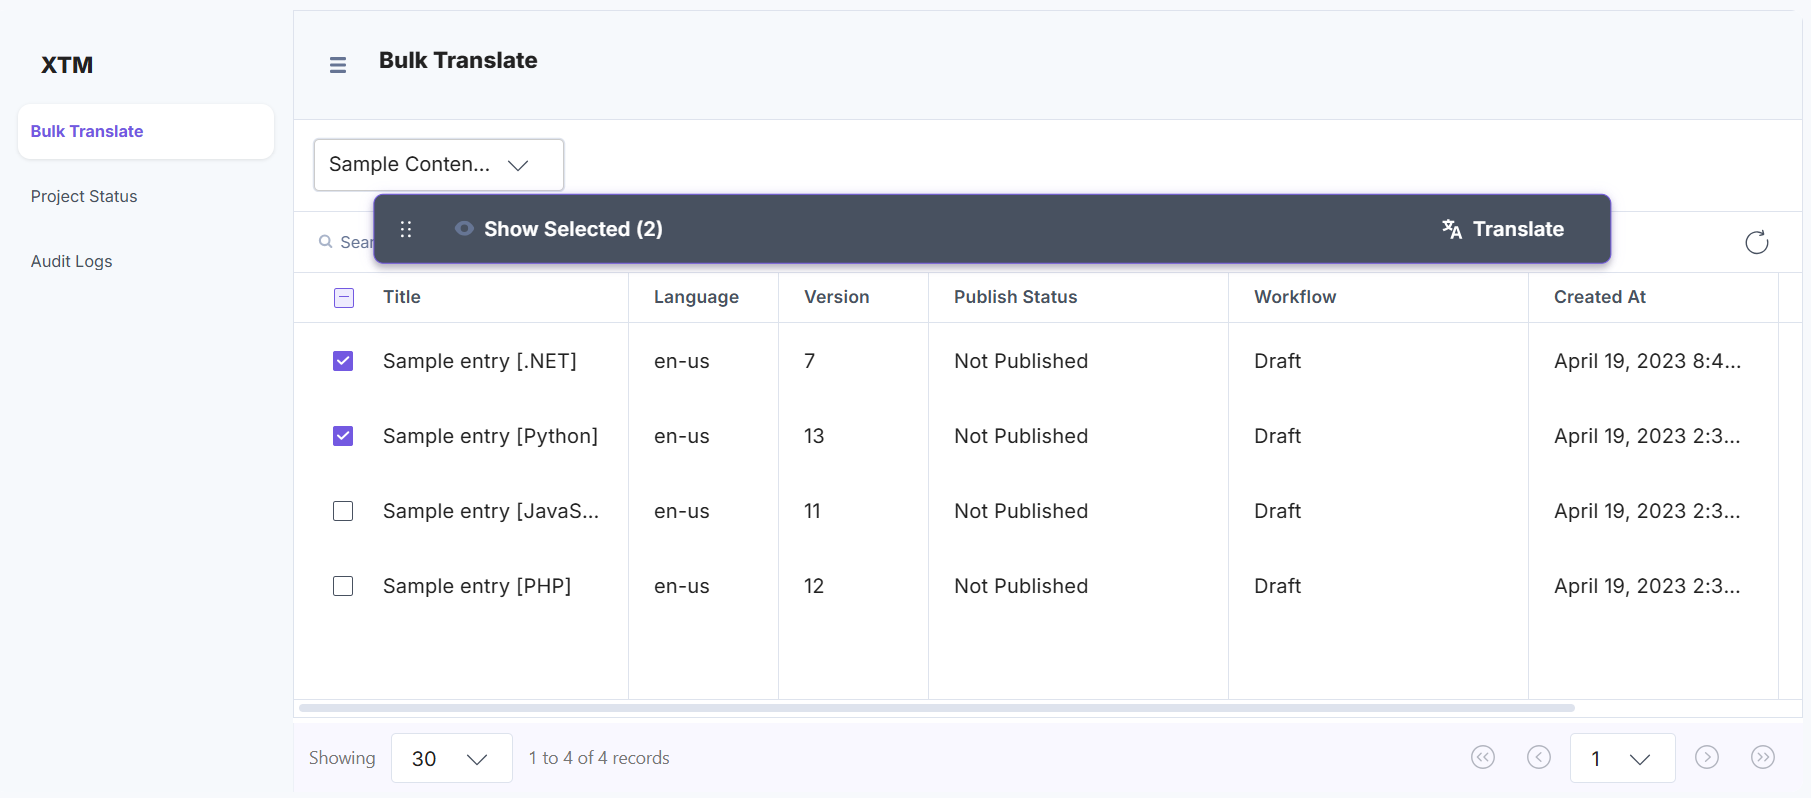
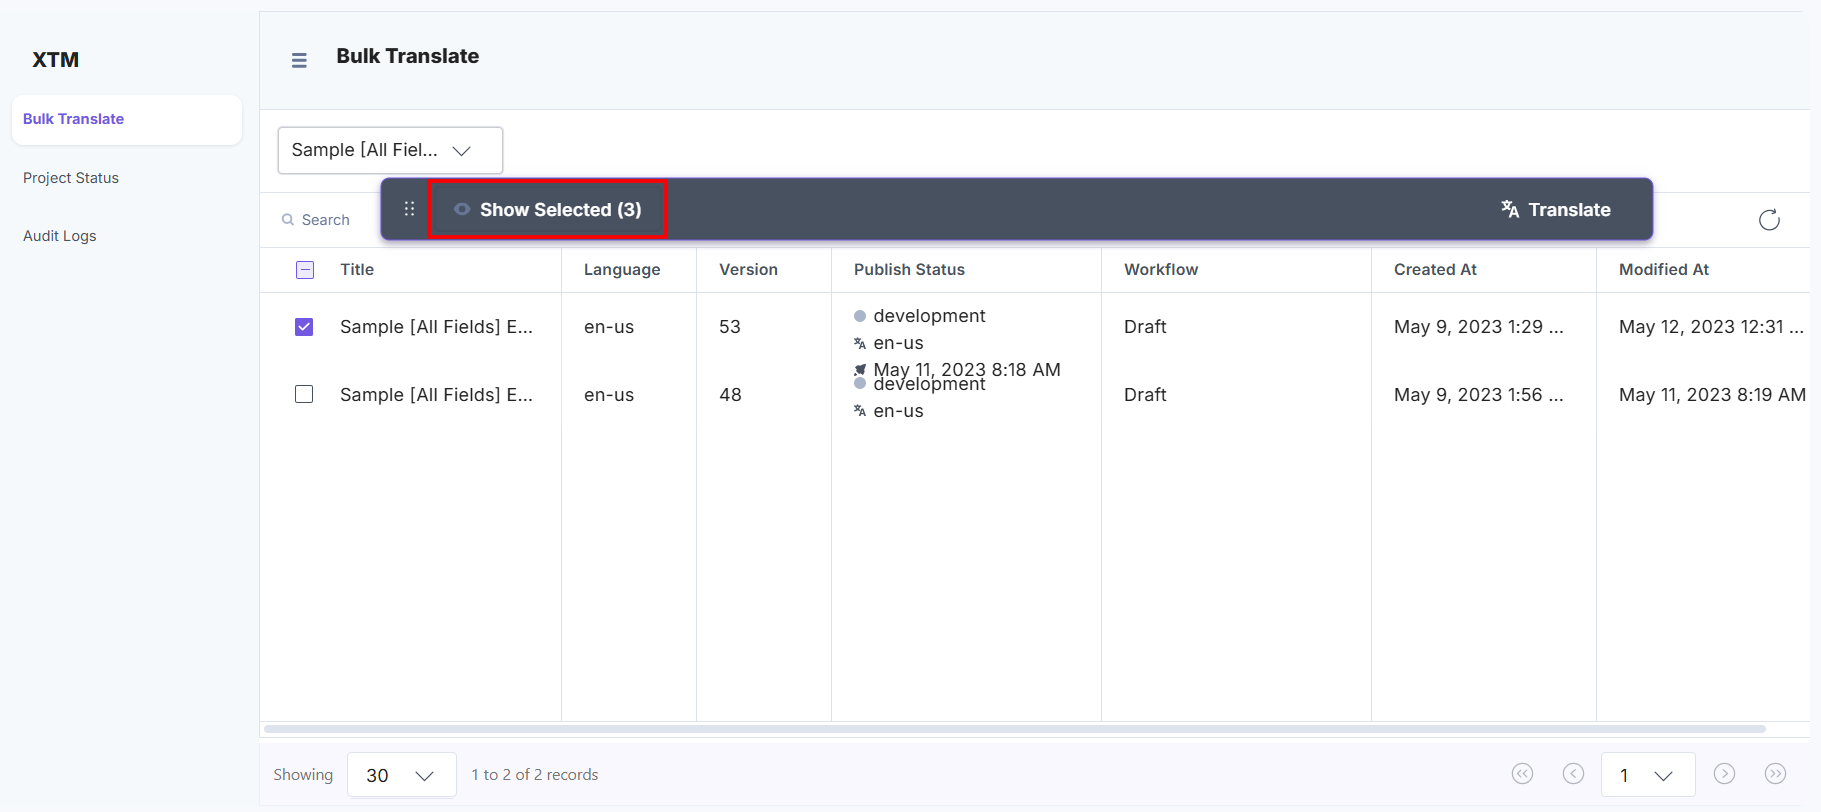
- After adding the entries, you can click Show Selected to view all the entries added for translation.
- To initiate the translation process, click Translate.
- In the Confirm Translation modal, fill in the details as follows:
- Provide the Project Name for the translation.
- Select the Language or Template option:
- Click the Language option, select a language and a filter template from the respective dropdowns.
Note: If you are using the JSON Rich Text Editor field, select the JSON RTE Filter template option in your XTM account.
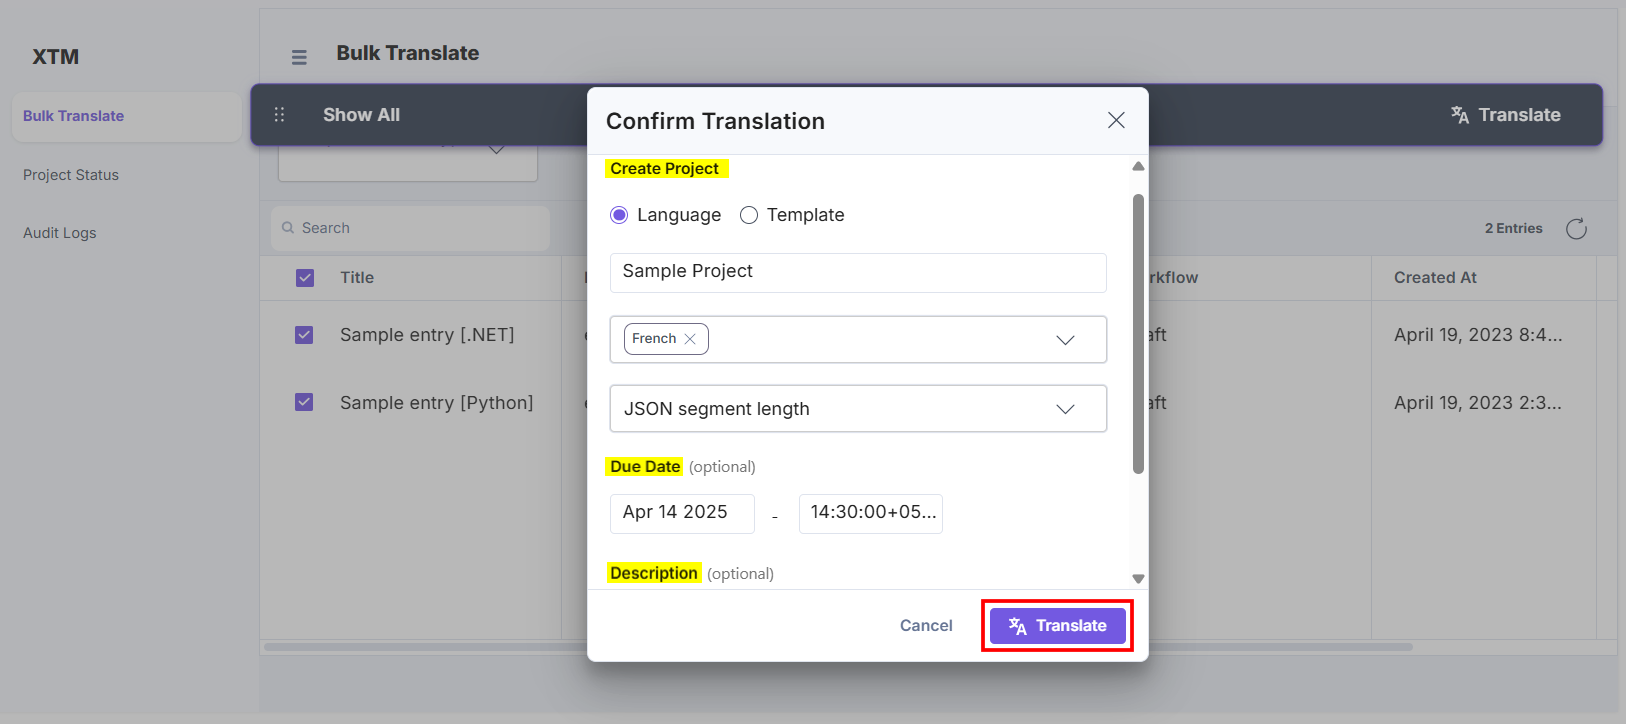
- Template: Click the Template option and select a template from the dropdown.
- Set the date and time in the Due Date (optional) field for the translation process.
Note: The Deadline Date format is mm:dd:yyyy, and the time format is hh:mm:ssZZ, where ZZ refers to the time zone.
- Click the Language option, select a language and a filter template from the respective dropdowns.
- Enter the Description (optional) for the XTM translation project.
- Once these details are added, click the Translate button.
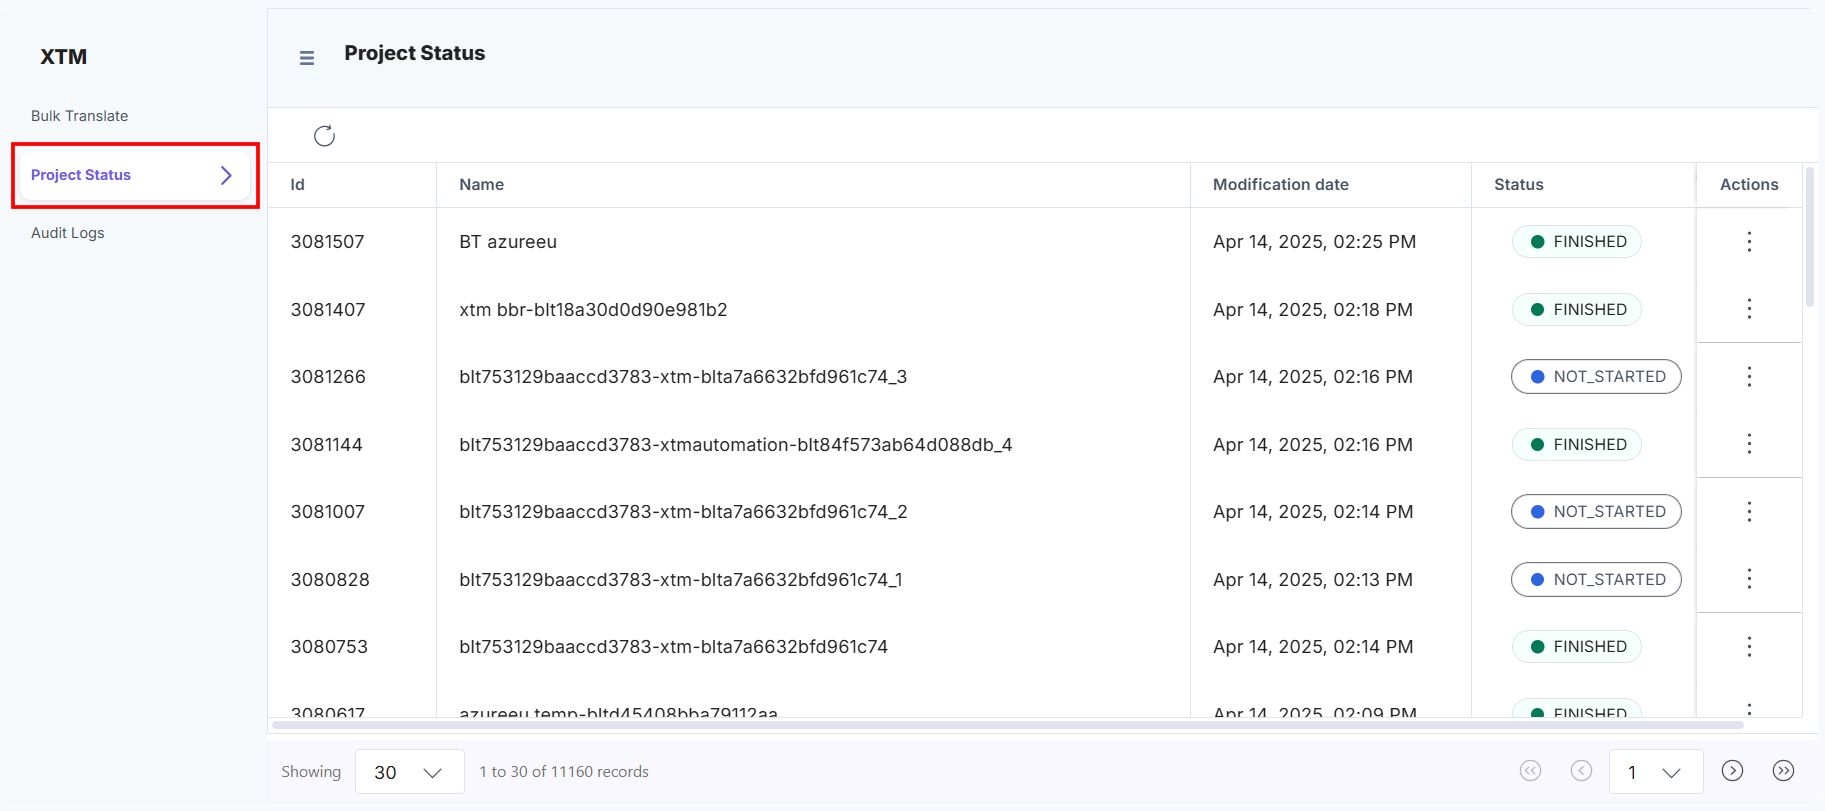
- To view the translation status of the entries, click Project Status from the left panel.
Note: You can also view the translation status in the XTM project dashboard.
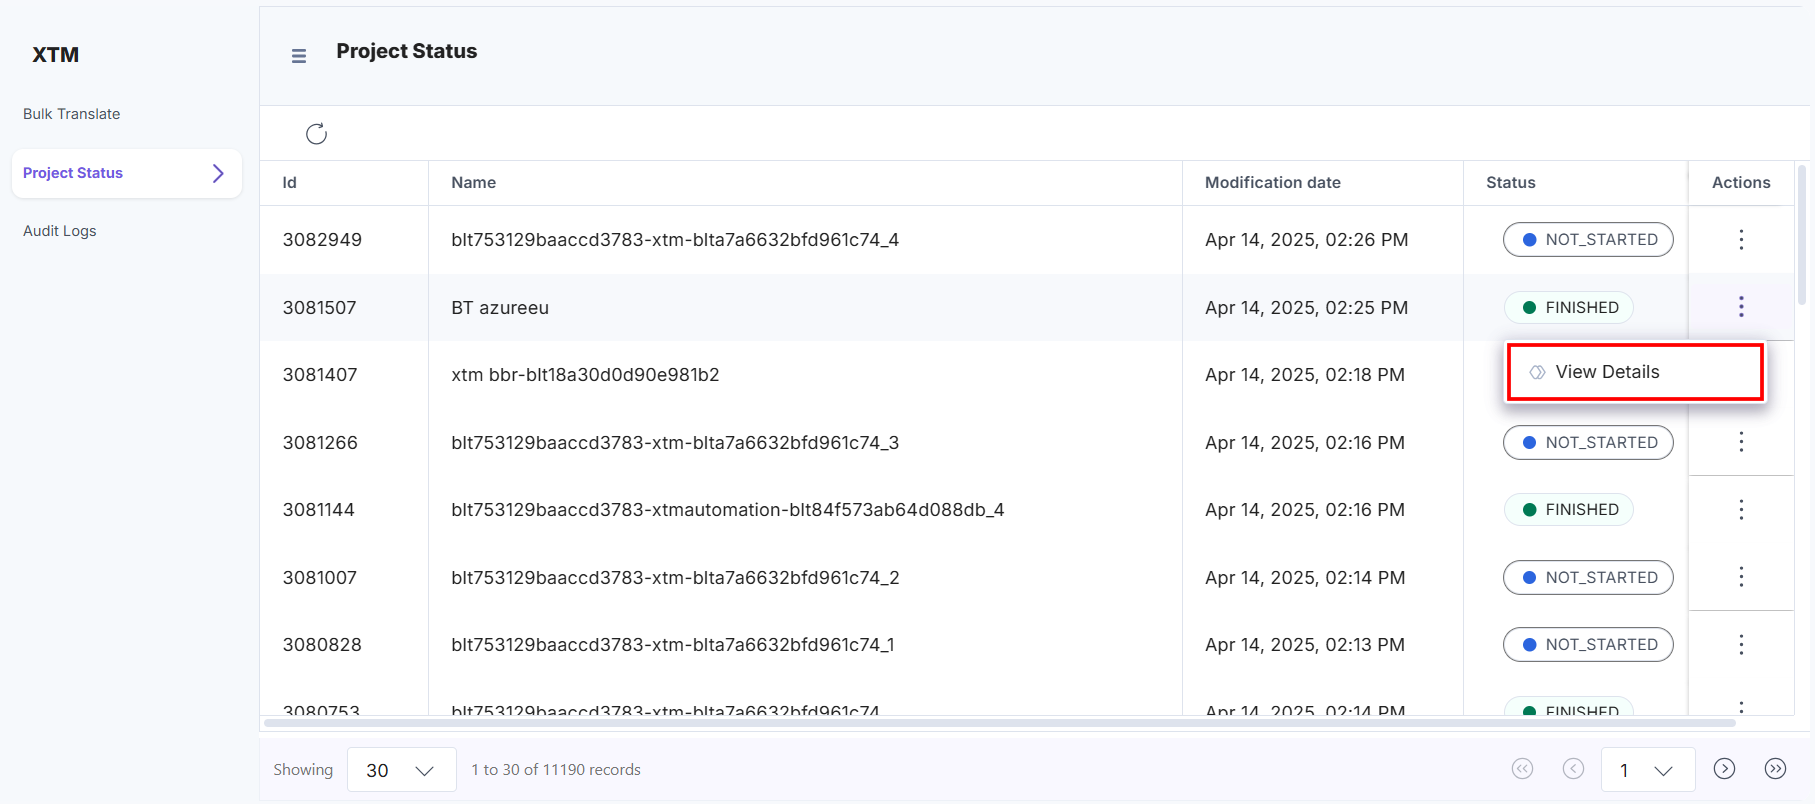
- To view the detailed status, click the vertical ellipses under the corresponding Actions section and click View Details.
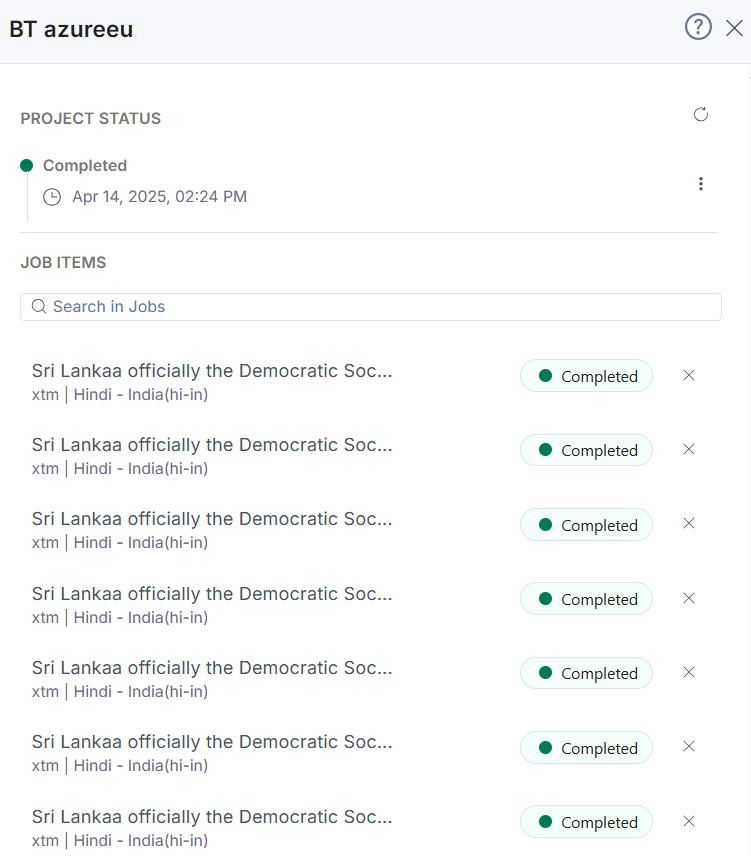
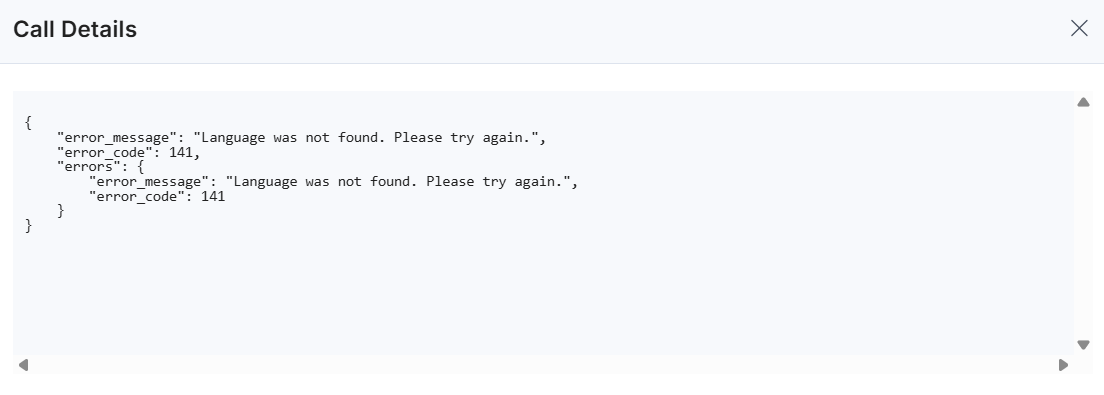
- You can check the elaborated translation status of the entry.
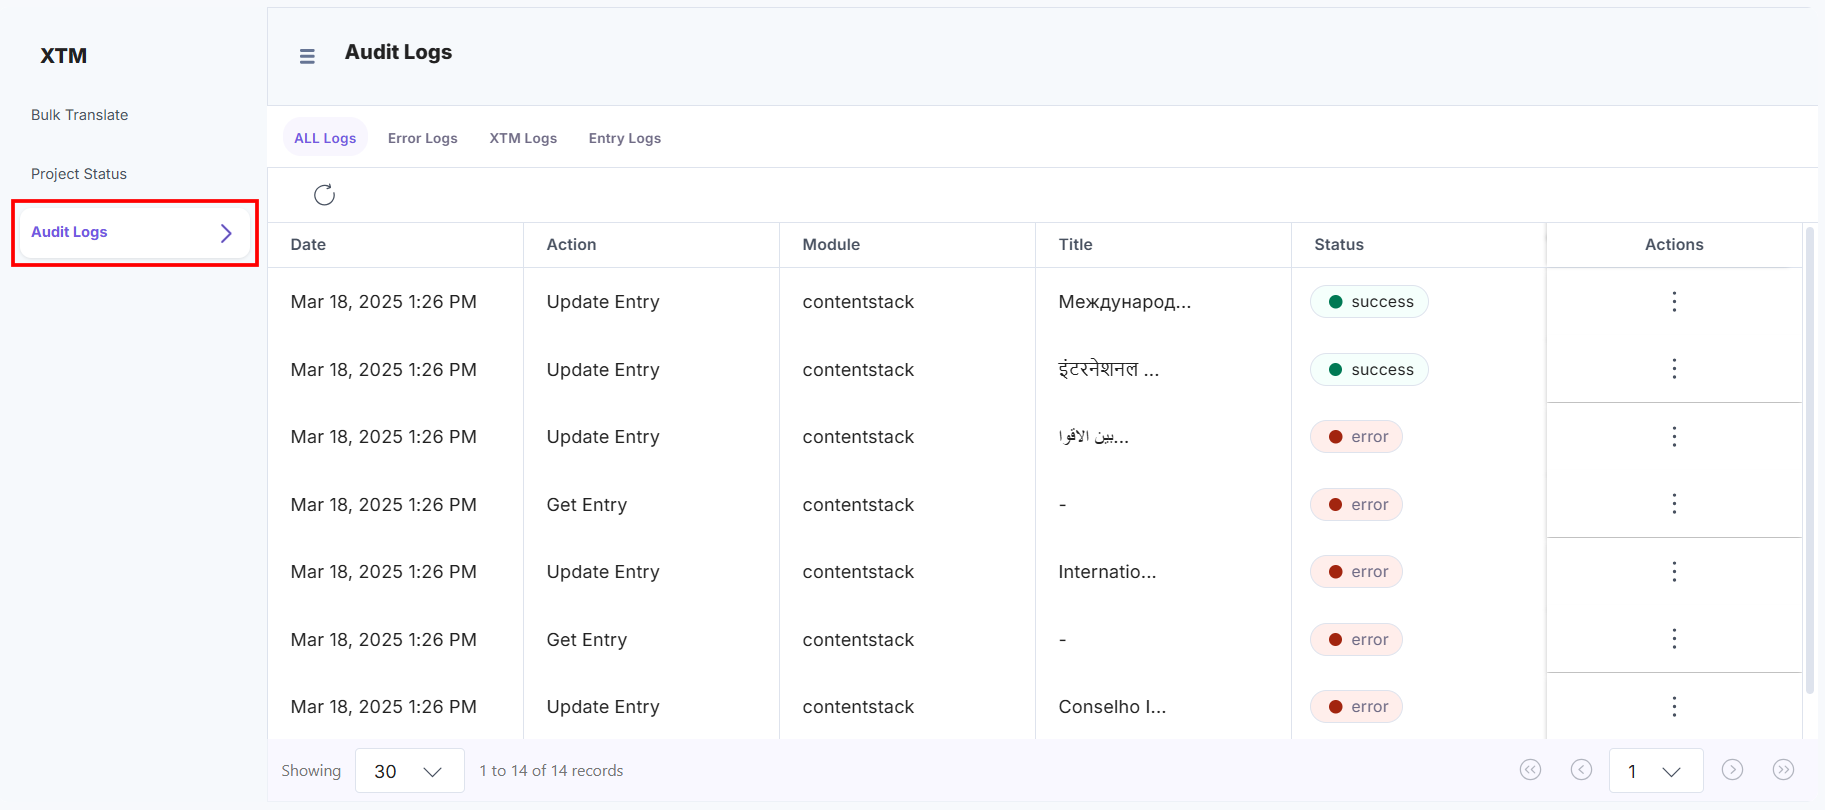
- Click Audit Logs to view all types of logs: Error Logs, XTM Logs, and Contentstack Entry Logs.
- To edit, click the vertical ellipses under the corresponding Actions section to edit the entry or view details.
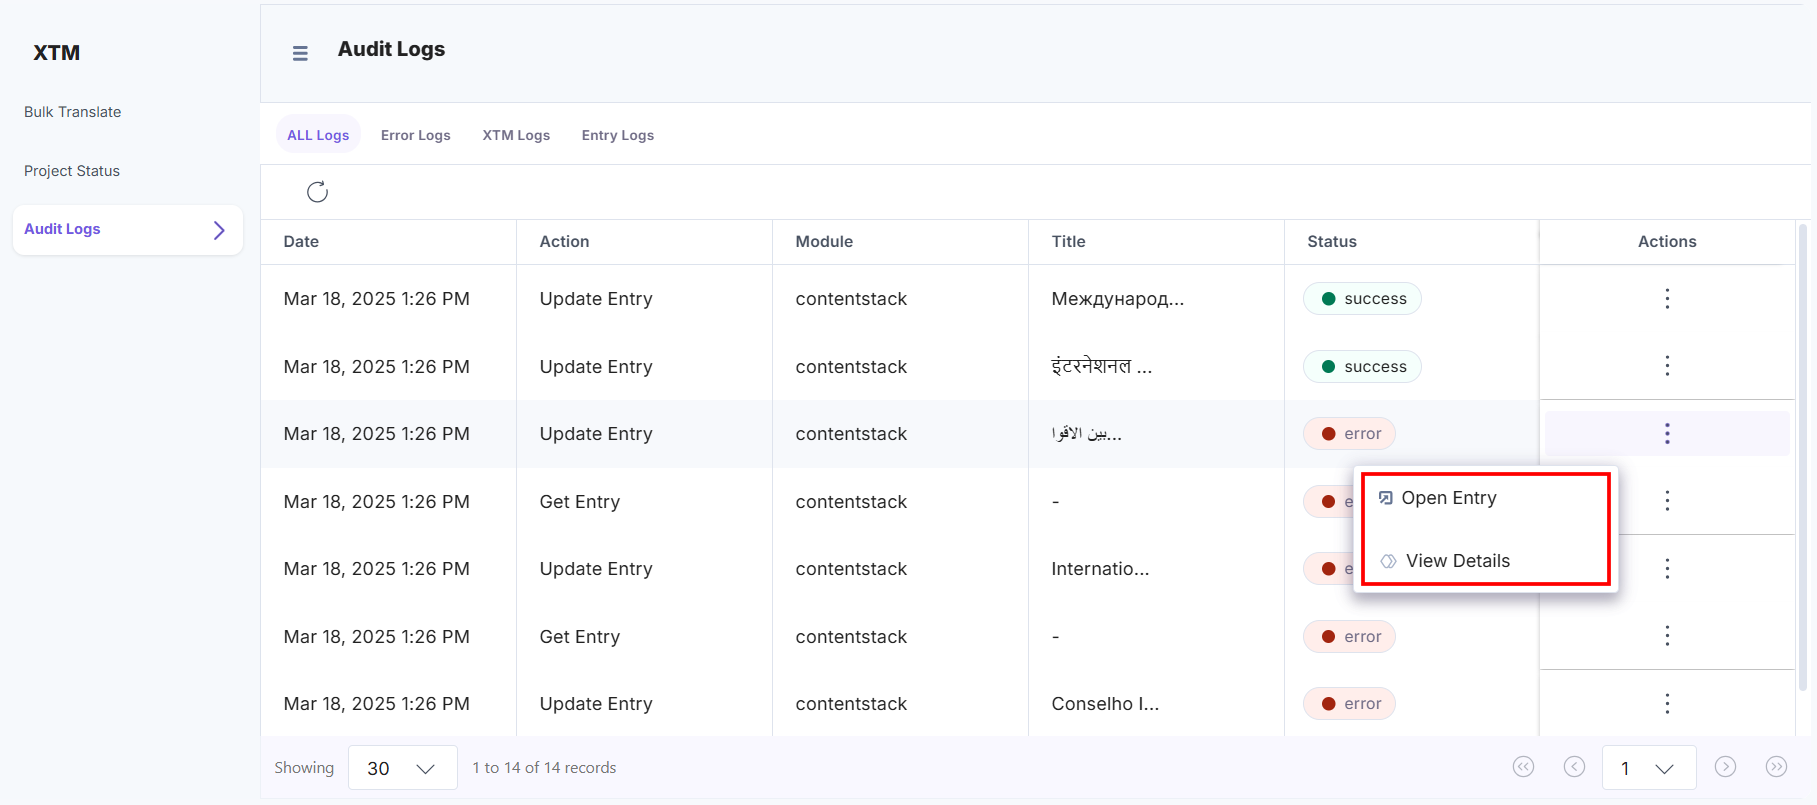
- Select Open Entry to go to the entry page.
- Select View Details to get the detailed error.
After successful translation, you can view the translated content in the entries.
More articles in "Translation"
