

.svg?format=pjpg&auto=webp)
.svg?format=pjpg&auto=webp)
.png?format=pjpg&auto=webp)


.png?format=pjpg&auto=webp)
Scheduler by Automate
Setting up timed automations is essential for streamlining repetitive tasks. This guide walks you through using the Scheduler by Automate to configure automation triggers, define time intervals, and customize execution parameters.
Whether you are scheduling actions to run every minute, hour, or day, this guide provides clear instructions to ensure your automations are set up effectively.
Set up the Scheduler by Automate Trigger
Perform the following steps to configure the Scheduler by Automate trigger:
- Click Configure Trigger from the left navigation panel.
- Within the Configure Trigger step, click the Scheduler by Automate connector.
- Under the Choose Trigger tab, select the Scheduler by Automate trigger. This allows you to schedule the activation time for your trigger event.
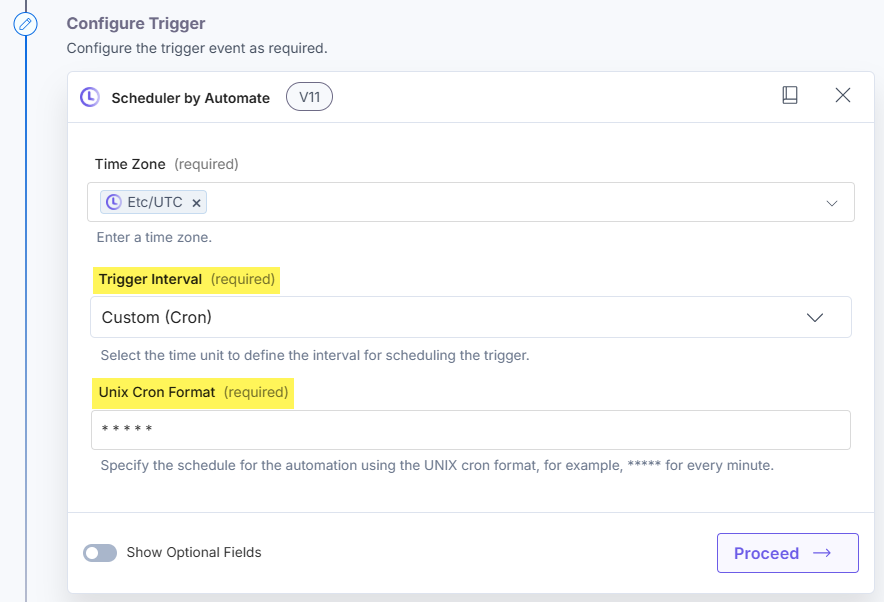
- On the Scheduler by Automate Configure Trigger page, enter the details given below:
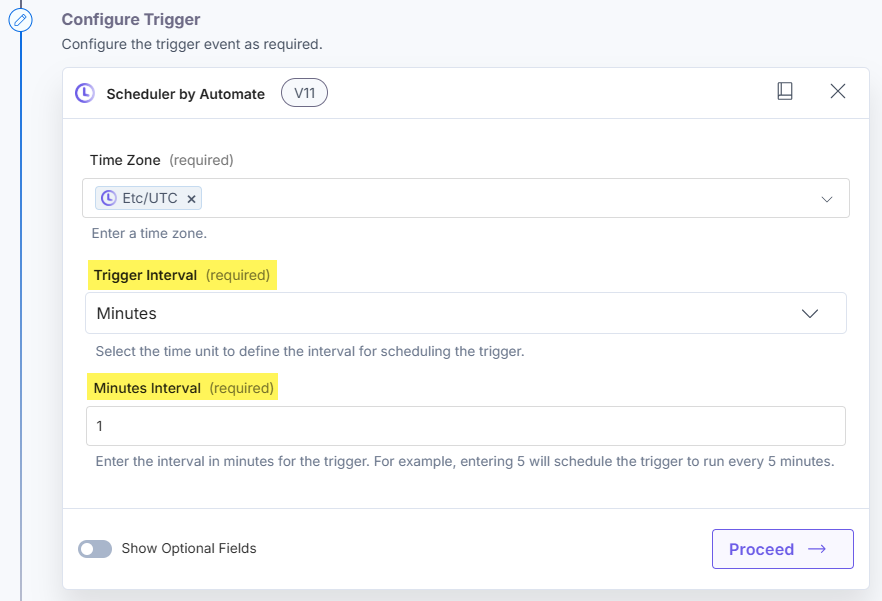
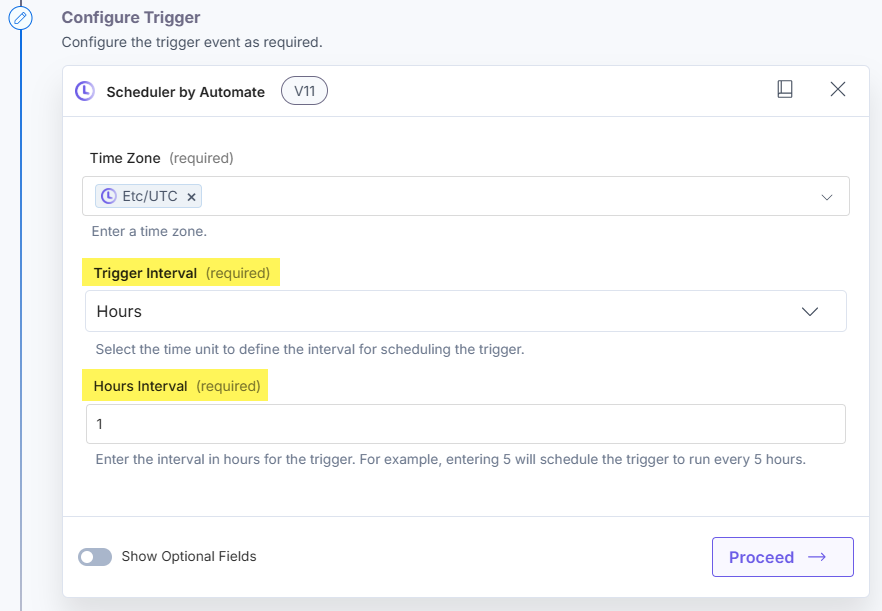
- Time Zone: Enter a time zone. By default, Etc/UTC is selected.
- Trigger Interval: Select the time interval unit to define the interval for scheduling the trigger. Options include Minutes, Hours, Days, Weeks, Months, and Custom (Cron).
Note: By default, the interval is set to Minutes.
When the user selects Minutes Trigger Interval
- Select Minutes from the Trigger Interval drop-down.
- In the Minutes Interval field, enter the interval in minutes between each trigger.
For example, entering 1 will schedule the trigger to run every 1 minute.
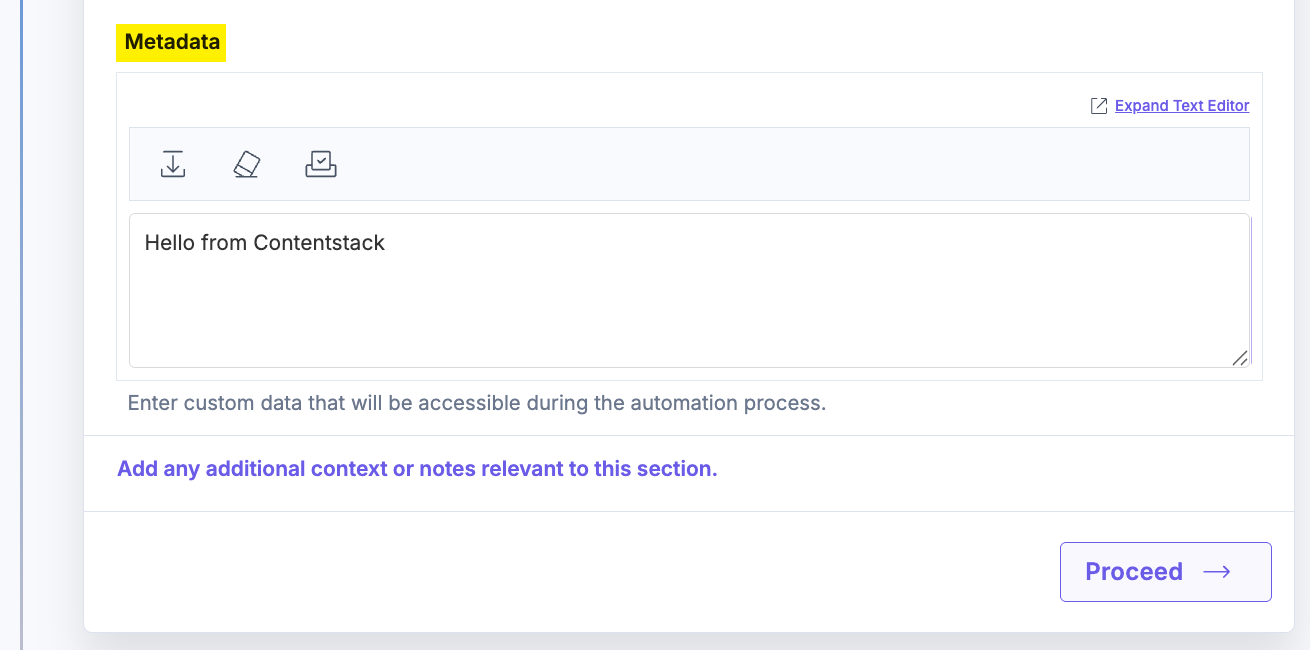
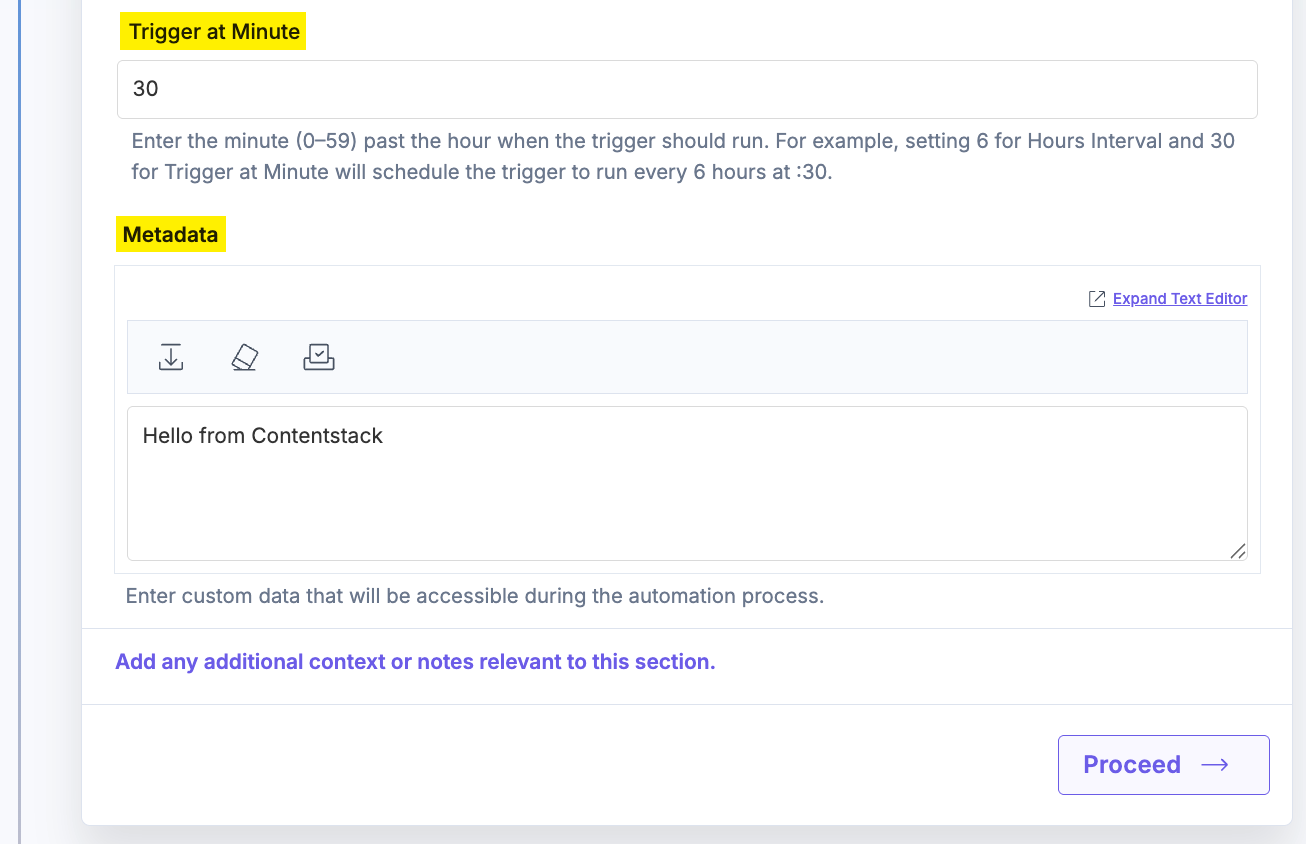
- Optionally, enable the Show Optional Fields toggle button to view the Metadata field. Enter custom data that will be accessible during the automation process.
When the user selects Hours Trigger Interval
- Select Hours from the Trigger Interval drop-down.
- In the Hours Interval field, enter the interval in hours between each trigger.
For example, entering 1 will schedule the trigger to run every 1 hour.
- Optionally, enable the Show Optional Fields toggle button to view the Trigger at Minute and Metadata fields.
In the Trigger at Minute field, enter the minute (0–59) past the hour when the trigger should run.
In the Metadata field, provide the data to be accessed while the automation runs.
For example, setting 6 for Hours Interval and 30 for Trigger at Minute schedules the trigger to execute every 6 hours at 30 minutes past the hour.
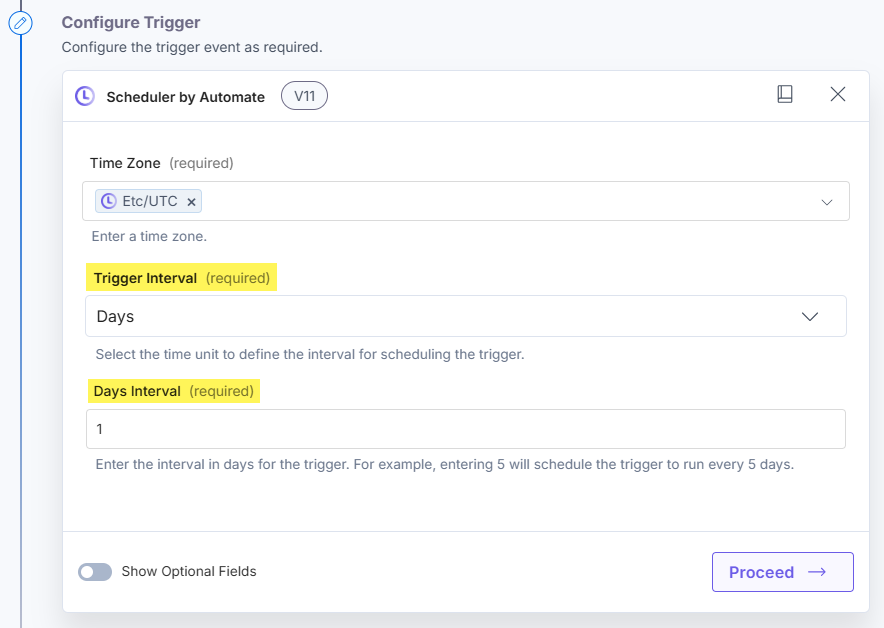
When the user selects Days Trigger Interval
- Select Days from the Trigger Interval drop-down.
- In the Days Interval field, enter the interval in days between each trigger.
For example, entering 1 will schedule the trigger to run every 1 day.
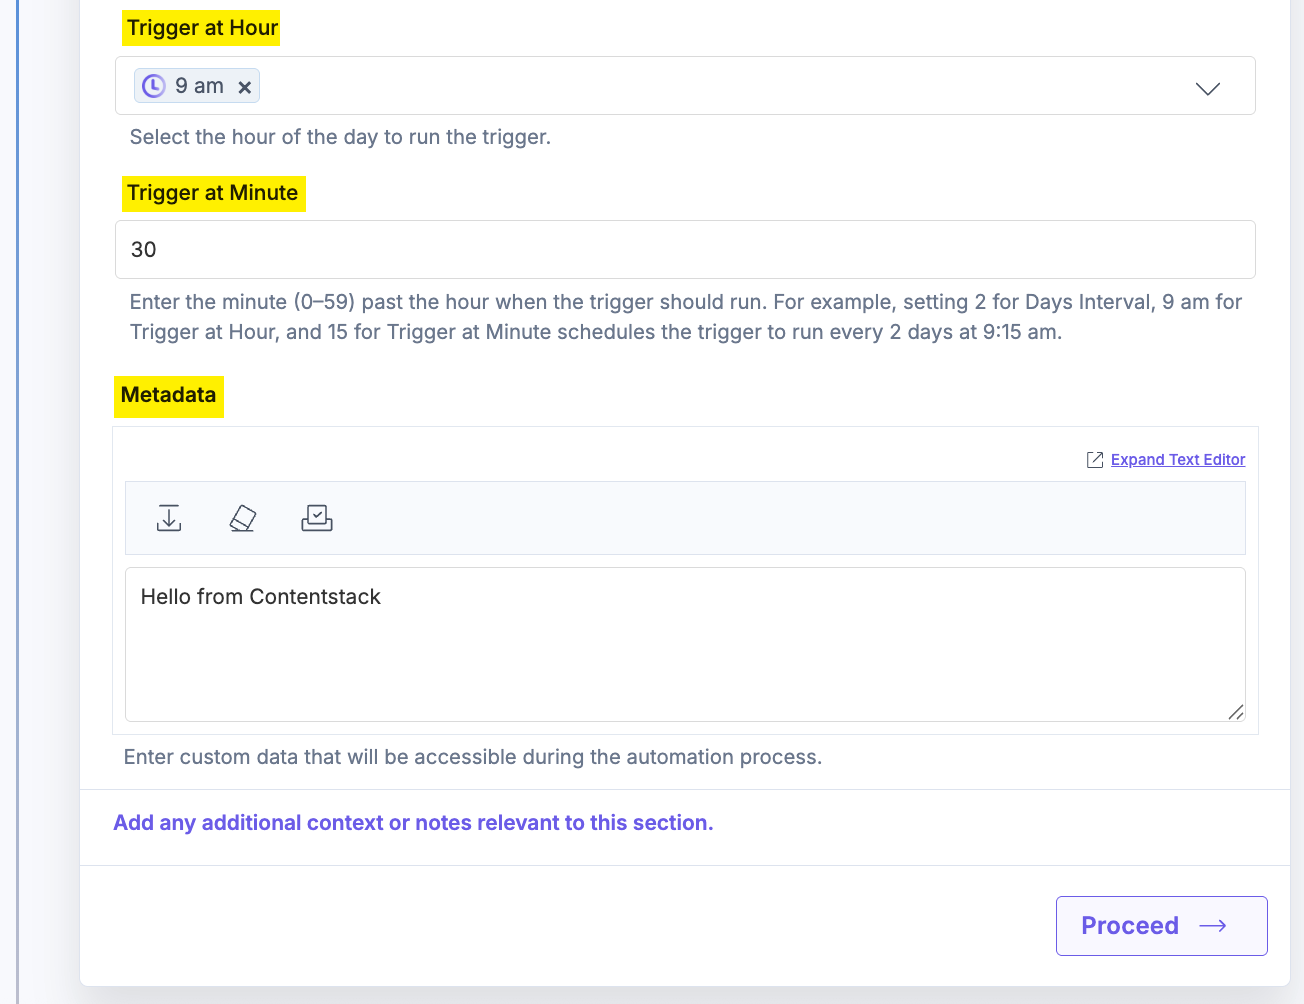
- Optionally, enable the Show Optional Fields toggle button to view the Trigger at Hour, Trigger at Minute, and Metadata fields.
In the Trigger at Hour field, select the hour of the day to run the trigger, i.e., 1 am, 2 am, etc. Enter the minute (0–59) past the hour when the trigger should run in the Trigger at Minute field. In the Metadata field, provide the data to be accessed while the automation runs.
For example, setting 2 for Days Interval, 9 am for Trigger at Hour, and 15 for Trigger at Minute schedules the trigger to run every 2 days at 9:15 am.
When the user selects Weeks Trigger Interval
- Select Weeks from the Trigger Interval drop-down.
- In the Trigger on Day of the Week field, select the days of the week to run the trigger. You can add multiple days by clicking the + Add Trigger on Day of the Week button.
For example, selecting Sunday will schedule the trigger to run every Sunday.
- Optionally, enable the Show Optional Fields toggle button to view the Trigger at Hour, Trigger at Minute, and Metadata fields.
In the Trigger at Hour field, select the hour of the day to run the trigger, i.e., 1 am, 2 am, etc. Enter the minute (0–59) past the hour when the trigger should run in the Trigger at Minute field. In the Metadata field, provide the data to be accessed while the automation runs.
For example, selecting Monday for Trigger on Day of Week, 3 pm for Trigger at Hour, and 30 for Trigger at Minute schedules the trigger to run weekly on Mondays at 3:30 pm.

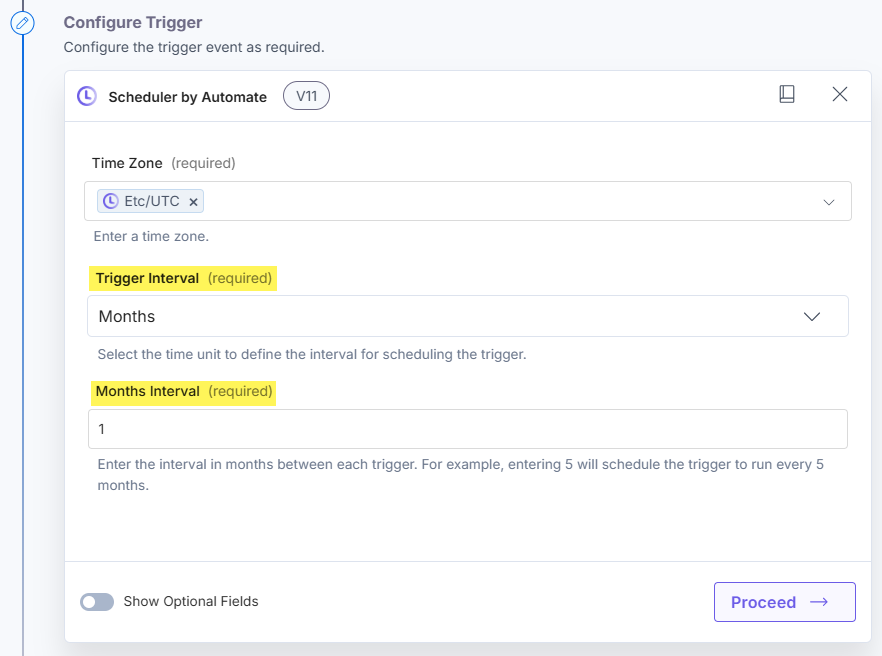
When the user selects Months Trigger Interval
- Select Months from the Trigger Interval drop-down.
- In the Months Interval field, enter the interval in months for the trigger.
For example, entering 1 will schedule the trigger to run every 1 month.
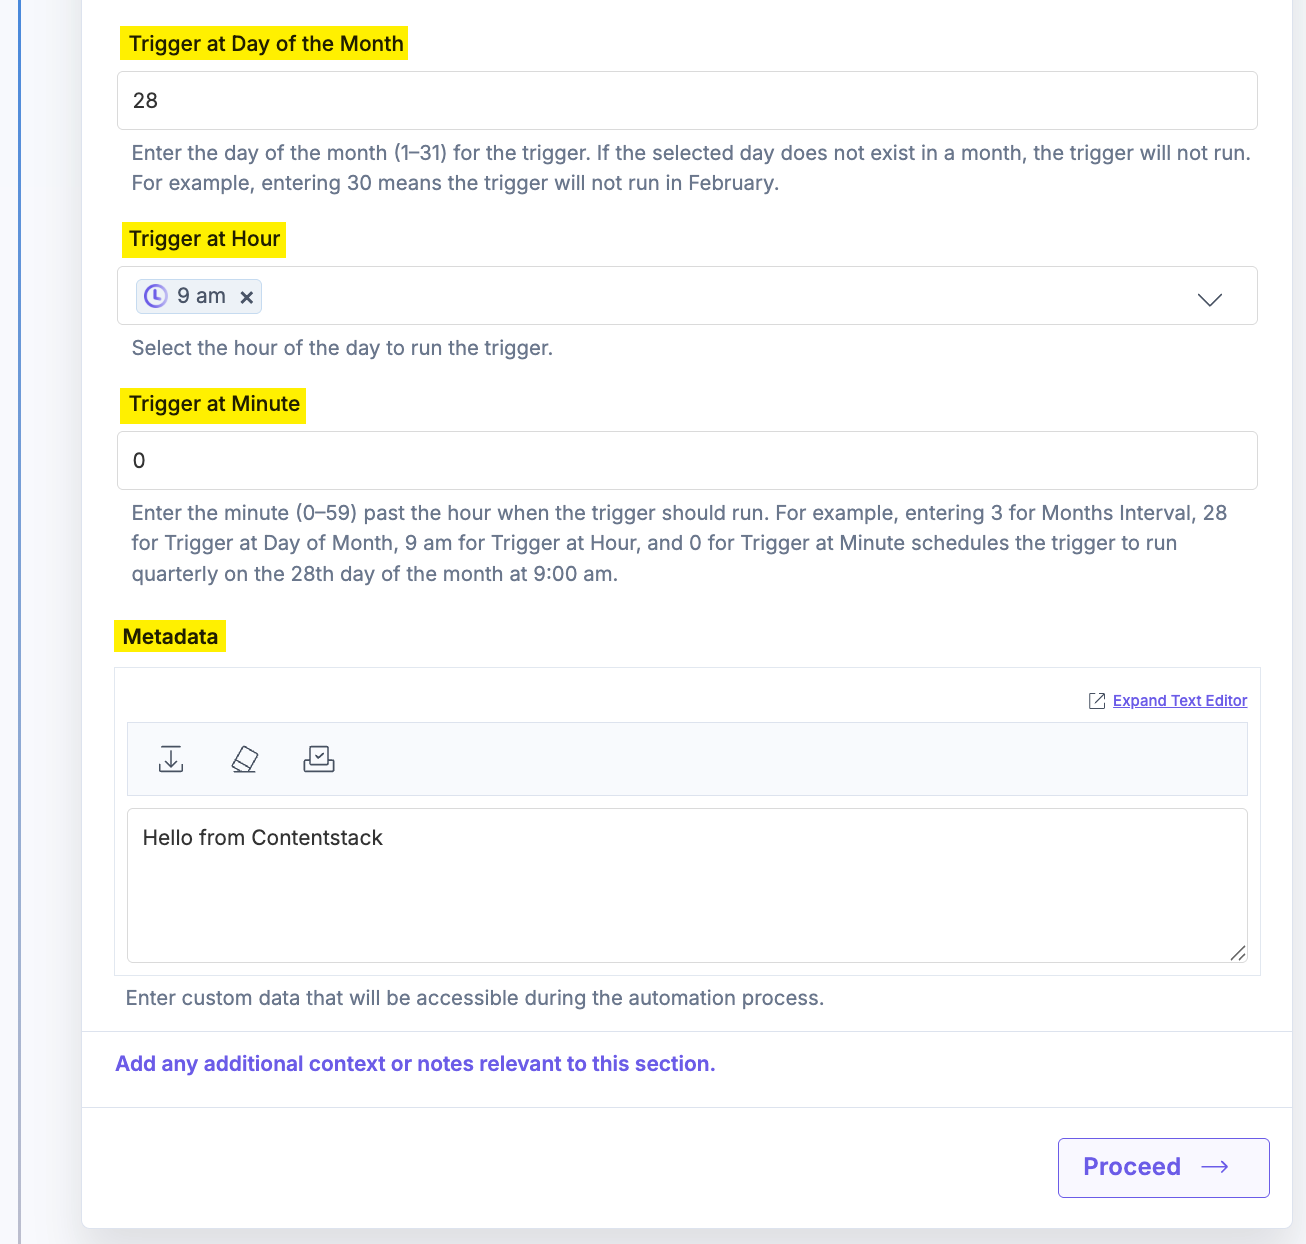
- Optionally, enable the Show Optional Fields toggle button to view the Trigger at Day of Month, Trigger at Hour, Trigger at Minute, and Metadata fields.
In the Trigger at Day of Month field, enter the day of the month (1–31) for the trigger. If the day does not exist in a month, the trigger will not run (for example, 30 will not run in February).
In the Trigger at Hour field, select the hour of the day to run the trigger, i.e., 1 am, 2 am, etc. Enter the minute (0–59) past the hour when the trigger should run in the Trigger at Minute field. In the Metadata field, provide the data to be accessed while the automation runs.
For example, setting 3 for Months Interval, 28 for Trigger at Day of Month, 9 am for Trigger at Hour, and 0 for Trigger at Minute schedules the trigger to run every 3 months on the 28th day at 9:00 am.
When the user selects Custom (Cron) Trigger Interval
- Unix Cron Format: 0 */6 * * * (this means the trigger event is to be activated every 6 hours). For examples on Unix Cron format values, check the Crontab guru | Cron Examples page.
Refer the below table for more details on the Unix Cron format:
Cron Format
Field Name
Allowed Names
*****
minute
0-59
*****
hour
0-23
*****
day of month
1-31
*****
month
The months of the year can be represented numerically from 1 to 12, where 1 is January, 2 is February, and so on. They can also be represented as three-character strings in uppercase, lowercase, or mixed-case formats based on their English names: JAN, jan, Jan; FEB, feb, Feb, etc.
*****
day of week
The days of the week can be represented numerically from 0 to 7, where 0 or 7 is Sunday, 1 is Monday, and so on. They can also be represented as three-character strings in uppercase, lowercase, or mixed-case formats based on their English names: MON, mon, Mon; TUE, tue, Tue, etc.
Additional Resource: For more information, refer to the Cron job format and time zone document.
- Optionally, enable the Show Optional Fields toggle button, to display the Metadata field. Metadata can be utilized during the execution of automation.
- Click the Proceed button.
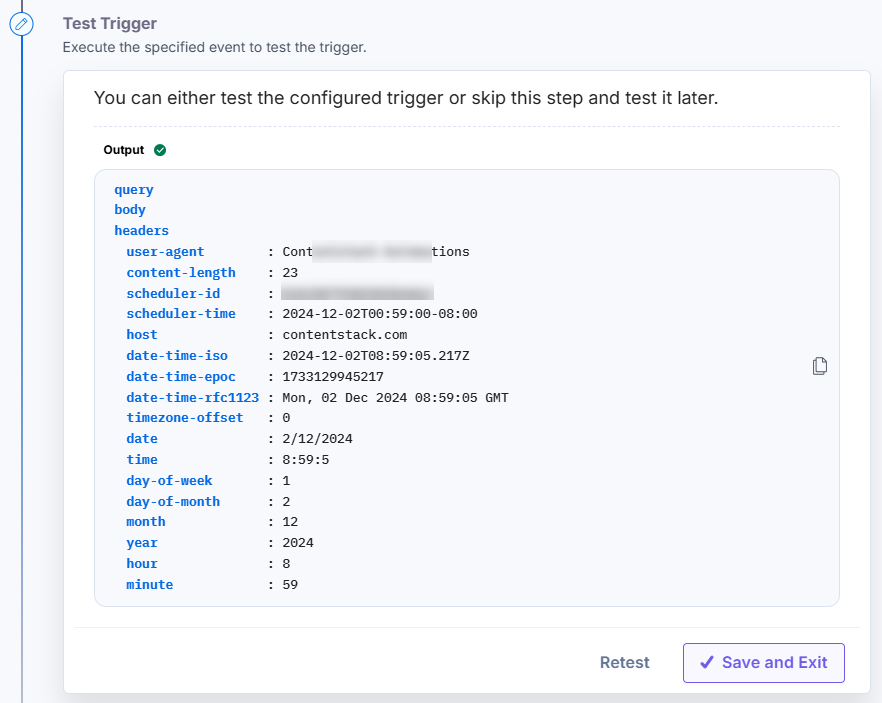
- Click the Test Trigger button to test the configured trigger.
- Click the Save and Exit button.
Note: After configuring the trigger, reconfiguring another trigger will prompt you to revert to the previous trigger configuration. You can restore the last configuration by clicking the Revert Changes button.
This sets up your Scheduler by Automate trigger.
More articles in "Triggers"
