

Image Delivery API
Introduction
Base URL
- AWS North America (AWS NA): https://images.contentstack.io/
- AWS Europe (AWS EU): https://eu-images.contentstack.com/
- AWS Australia (AWS AU): https://au-images.contentstack.com/
- Azure North America (Azure EU): https://azure-na-images.contentstack.com/
- Azure Europe (Azure EU): https://azure-eu-images.contentstack.com/
- GCP North America (GCP NA): https://gcp-na-images.contentstack.com/
- GCP Europe (GCP EU): https://gcp-eu-images.contentstack.com/
Overview
Contentstack’s Image Delivery API allows you to manipulate images stored in your content types. This API lets you perform various transformations on your images, such as resizing, cropping, changing the format etc.
Supported input formats
- JPEG
- PNG
- WEBP
- GIF
- AVIF
Supported output formats
- JPEG (baseline & progressive)
- PNG
- WEBP (lossy & lossless)
- GIF
- AVIF
If you are looking for APIs to deliver content to your web or mobile properties, use our Content Delivery API, and to manage content, you should use the Content Management API.
How Image Delivery APIs Work
Image Delivery APIs retrieve, manipulate and/or convert the retrieved image file, and deliver it to your web or mobile properties.
Note: The APIs do not modify the actual source image file in Contentstack.
Making a Request
You can use Image Delivery APIs by just appending queries to the image URL: {image_url}?environment={environment_name}&query_parameter
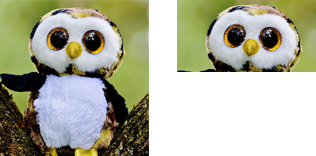
For example, to resize the width of an image to 100px, you need to append {&width={100} to the image URL. So, the API request would be:
https://images.contentstack.io/v3/assets/blteae40eb499811073/bltc5064f36b5855343/59e0c41ac0eddd140d5a8e3e/owl.jpg?environment=production&width=100You can also use multiple queries in a single API request.
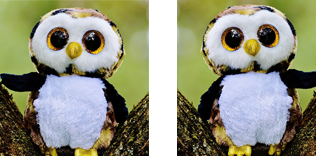
{image_url}?environment={environment_name}&width={width_value}&height={height_value}&resize-filter={resize-filter_value}In this case, the API request would form like this:
https://images.contentstack.io/v3/assets/blteae40eb499811073/bltc5064f36b5855343/59e0c41ac0eddd140d5a8e3e/owl.jpg?environment=production&width=500&height=550&resize-filter=nearestInclude Environment Parameter
When making Image Delivery API requests, you must include the environment query parameter:
{image_url}?environment={environment_name}&query_parameterUsing the environment parameter ensures that requests are routed through Contentstack’s Content Delivery Network (CDN). This approach provides the following benefits:
- Avoids routing requests through the Content Management API (CMA), which can cause rate limit errors and timeouts.
- Ensures higher rate limits and lower costs by serving images directly from the CDN.
Note: The image must be published in the environment which is being passed as a query parameter.
Understanding Different Strings in the Asset URL
Here’s an example of an asset URL:
https://images.contentstack.io/v3/assets/blteae40eb499811073/bltc5064f36b5855343/59e0c41ac0eddd140d5a8e3e/owl.jpgIf you notice the URL, you will see that it is made up of several strings. Here's the breakdown of these strings to understand what they are:
{base_url}/v3/assets/{stack_api_key}/{asset_uid}/{file_uid}/filenameAdditional Resource: Refer to Understanding Asset URL document to know more about asset URL structure.
Please note that the above breakdown of strings of the asset URL is just for your understanding. This is the default pattern of all the asset URLs.
If the "Branches" feature is part of your plan, you will see an updated download URL format for all assets part of any branch, except the default main branch. The branch={branch_UID} query parameter is attached to the download URL.
For instance, if you upload an asset to the development branch, Contentstack generates the following asset download URL:
https://assets.contentstack.com/v3/assets/blt252b550c5ccdae26/bltc56f275260214c0b/61280d9625aca65092ce7f15/Sample_Image.jpg?branch=developmentFor any asset that you upload to the main branch, Contentstack will continue to generate asset download URLs in the earlier format:
https://assets.contentstack.com/v3/assets/blt252b550c5ccdae26/bltc56f275260214c0b/61280d9625aca65092ce7f15/Sample_Image.jpgWhen working with this API documentation, you do not have to enter any of the above values. To make Image Delivery API requests, you simply need to append queries to the asset URL.
Limitations with Optimizing Image
- The maximum input image file size is 50 MB
- The maximum input image dimension is 12,000x12,000 pixels
- The maximum output image dimension is 8,192x8,192 pixels (8K Ultra HD)
- The maximum number of frames an animated GIF can contain is 1,000
- The maximum output image area for AVIF images is 4,096 x 4,096 pixels
API Reference
Automate Optimization
Auto
The auto parameter lets you enable the functionality that automates certain image optimization features. As of now, there are two possible values for this field, i.e., webp and avif. When the auto parameter is set to webp, it enables WebP image support. When set to avif, it enables AVIF image support. Both formats produce images at a higher compression ratio with a lower loss of quality compared to JPEG.
Additional Resources: The AVIF and WebP formats are not supported in all browsers. For more information on browsers and operating systems that support WebP images, refer the official WebP doc by Google. You will find additional information on their WebP FAQs page. For more information on WebP and AVIF support, refer to Fastly's auto documentation.
Note: Currently, the auto parameter doesn't work for GIF files.
Let's try enabling the auto parameter.
WebP and AVIF images are not supported by all browsers. If the auto parameter is used along with the format parameter, the former overrides the latter in browsers that support WebP and AVIF formats. In browsers that do not support WebP or AVIF format, the format parameter will be applied.
Let's try enabling the auto parameter along with the format parameter, for browsers that do not support WebP or AVIF formats, and encode them to progressive JPEG.
Additional Notes
- WEBP and AVIF formats are not supported by all browsers.
- If the format parameter is used with this parameter, the format parameter will be ignored in browsers that support WEBP and AVIF formats.
Note: Check out the limitations that are applicable here.
Control Quality
Quality
The quality parameter lets you control the compression level of images that have Lossy file format. The value for this parameters can be entered in any whole number (taken as a percentage) between 1 and 100. The lower the number, the smaller will be file size and lower quality, and vice versa. If the source image file is not of Lossy file format, this parameter will be ignored.
Additional Notes
- Lower the value, lower will be the quality of the output image, and vice versa.
- The quality parameter is not applicable for the image types (GIF and PNG) that are not lossy.
- When only the quality parameter is specified, and if the output image is larger than the actual image, the original image will be returned.
Note: Check out the limitations that are applicable here.
Convert Formats
Format
The format parameter lets you convert a given image from one format to another. The formats that the source image can be converted to are auto, gif, png, jpg (for JPEG), pjpg (for Progressive JPEG), webp, webpll (Lossless), webply (Lossy), and avif.
Of the formats mentioned above, JPEG, Progressive JPEG, AVIF, and WEBP (Lossy) support the quality parameter.
- If your source image is in HEIC format, you must specify an output format due to limited browser support.
- Check the applicable limitations here.
The format=auto parameter will serve the WebP or AVIF format to browsers that support it. If this option is not specified, a standard format like JPEG or PNG will be used.
Let’s try converting an image to GIF format.
Images can also be easily converted to PNG format.
JPEG is one of most common image formats.
A Progressive JPEG is an image file created using a compression method that displays higher detail in progression. When a Progressive JPEG image is loaded, it first loads a lower-quality pixelated version, and then gradually increases in quality and detail. Due to this, Progressive JPEG files (or its lower-quality version) loads faster than the baseline JPEG files.
AVIF images provide better compression and quality.
WEBP images are of two types: Lossy and Lossless. In the former, the data lost while compression cannot be reversed, hence the quality can be lower. While with the later format, no data is lost while compression and quality remains the same even after compression.
Let’s try converting to WEBP Lossy first.
Now let’s convert an image to WEBP Lossless format.
- The quality parameter can used only with JPEG, Progressive JPEG, AVIF, or WEBP (Lossy) image types.
- The WEBP and AVIF image type is supported only by Google Chrome, Opera, and Android browsers.
- GIF transcoding is not supported as of now.
- If 'auto=webp' or 'auto=avif' is used with the format parameter, the browsers that support the WEBP format will ignore the format parameter.
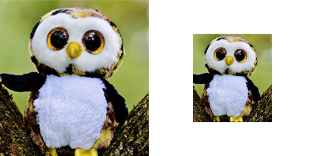
Resize Images
Width
The width parameter lets you dynamically resize the width of the output image by specifying pixels or percentage values. To specify pixel width, use any positive integer between 1 and 8192. For percentage width, use any value between 0.0 and 0.99. To get image width of more than 99 percent, use a value above 99 and append a p parameter to the value. For example, for image width of 300 percent, use width=300p.
The width parameter will automatically adjust the height of the image using the aspect ratio of the image. If the height parameter is specified, the given value will be used. And if both the height and the width parameters are not specified, the dimensions of the input image will be used.
In case the dimensions specified for the output image is greater than the dimensions of the input image, the image will be upscaled. You can disable upscaling of the image by using the disable=upscale parameter.
Note: Currently, the width parameter doesn't work for GIF files as it affects their quality.
Additional Notes
- In case the dimensions specified for the output image is greater than the dimensions of the input image, the image will be upscaled.
- To disable upscaling, use the disable=upscale parameter.
- To specify a width more than 100% of the original image, use the p parameter. For example, to get a width of 250%, use width=250p.
Note: Check out the limitations that are applicable here.
Height
The height parameter lets you dynamically resize the height of the output image by specifying pixels or percentage values. To specify pixel height, use any positive integer between 1 and 8192. For percentage height, use any value between 0.0 and 0.99. To get image height of more than 99 percent, use a value above 99 and append a p parameter to the value. For example, for image height of 300 percent, use height=300p.
The height parameter will automatically adjust the width of the image using the aspect ratio of the image. If the width parameter is specified, the given value will be used. And if both the height and the width parameters are not specified, the dimensions of the input image will be used.
In case the dimensions specified for the output image is greater than the dimensions of the input image, the image will be upscaled. You can disable upscaling of the image by using the disable=upscale parameter.
Note: Currently, the height parameter doesn't work for GIF files as it affects their quality.
Additional Notes
- In case the dimensions specified for the output image is greater than the dimensions of the input image, the image will be upscaled.
- To disable upscaling, use the disable=upscale parameter.
- To specify a height of more than 100% of the original image, use the p parameter. For example, to get a height of 250%, use height=250p.
Note: Check out the limitations that are applicable here.
Disable
The disable parameter disables the functionality that is enabled by default. For instance, upscale is always enabled, in which the image is upscaled if the output image (by specifying the width or height) is bigger than the source image. To disable this feature, you can use the query ?disable=upscale. This ensures that even if the specified height or width is much bigger than the actual image, it will not be rendered disproportionately.
As of now, there is only one value, i.e., upscale, that you can use with the disable parameter.
To see this parameter in action, the height or width (or both) parameter should be used with it.
Note: Check out the limitations that are applicable here.
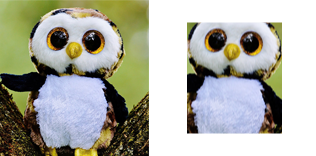
Crop Images
Crop
The crop parameter allows you to remove pixels from an image. You can crop an image by specifying the height and width in pixels or percentage value, or defining height and width in aspect ratio. You can also define a sub region (i.e., define the starting point for crop) before cropping the image, or you can offset the image on its X and Y axis (i.e., define the centre point of the crop) before cropping the image.
When simply cropping an image, use the query ?crop={width_value},{height_value} to crop the image from the center. The value can be in pixels (for example, ?crop=300,400) or in percentage (for example, ?crop=0.50,0.60) or a combination of both (for example, ?crop=300,0.60). Note that for the percentage value, you can also use the p parameter. For example, 100p for 100%.
Note: Check out the limitations that are applicable here.
You can define the crop region by means of passing the aspect ratio for the image, for example, ?crop={width}:{height}. So, if you have set an aspect ratio of 1:3 for an image, it means that the image height will be three times the width of the image.
Along with the crop parameter, you also need to specify either the width or height parameter or both in the API request to return an output image with the correct dimensions. If neither width nor height is defined for the given image, the API request will consider the dimensions of the source image and crop the image from the center on the basis of the requested aspect ratio. In this case, the image appears stretched out of proportion.
Note: Check out the limitations that are applicable here.
You can set the X-axis and Y-axis position of the top left corner of the crop by using the query ?crop={width_value},{height_value},x{value},y{value}. This lets you define the starting point of the crop region. The x-axis value and y-axis value can be defined in pixels or percentage. An example of this would be ?crop=300,400,x150,y75 or ?crop=300,400,x0.50,y0.60.
Note: Check out the limitations that are applicable here.
You can also set the horizontal and vertical offset of the crop region by using the query ?crop={width_value},{height_value},offset-x{value},offset-y{value}. This lets you define the center point of the crop area. The x-axis offset value and y-axis offset value can be defined only in percentage. An example of this would be ?crop=300,400,offset-x10.5,offset-y10.5.
Offset positioning distributes the remaining space according to the specified offset values or proportions.
For instance, if you crop an image with 2000 pixels width to 1000 pixels wide, an offset value of offset-x10.5 would crop 10% (100 pixels) from the left of the image and 90% (900 pixels) from the right. If you set the offset to 50, the API centers the crop area in the middle of the image.
Note: Check out the limitations that are applicable here.
You can append the safe parameter when cropping an image. This ensures that the output image never returns an error due to the specified crop area being out of bounds. The output image is returned as an intersection of the source image and the defined crop area.
Note: When you use the safe parameter, the API request entirely avoids returning an incorrect output image, however the image returned may not match the defined dimensions. Check out the limitations that are applicable here.
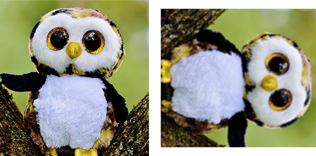
You can also specify the smart parameter to crop a given image using content-aware algorithms. Normal image cropping usually preserves the center of an image while cropping. However, content-aware image cropping returns a cropped image that automatically fits the defined dimensions while intelligently including the most important components of the image. For example, the smart parameter helps focus on a human being’s face while cropping a given image.
Let us try to crop an image using aspect ratio and smart cropping algorithms.
Note: Check out the limitations that are applicable here.
Additional Notes
- The x and y, or offset-x and offset-y parameters are not mandatory.
- The x and y, or offset-x and offset-y parameters can be used in any order. The only rule is that these parameters should come after the width parameter in the API request.
- If the x and y, or offset-x and offset-y parameters are not specified, the image will be cropped from the center.
- The x parameter can be used without y (and vice versa), and the offset-x parameter can be used without offset-y (and vice versa).
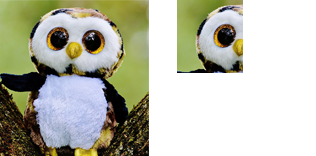
Fit Mode
This parameter enables you to fit the given image properly within the specified height and width. You need to provide values for the height, width and fit parameters. The available values for the fit parameter are bounds, cover and crop.
Fit to bounds
If fit is set to bounds, it will constrain the given image into the specified height and width.
Note: Check out the limitations that are applicable here.
Fit to cover
If fit is set to cover, it resizes the image (shrinks or enlarges) to fill the entire area defined by the width and height parameters. If the image's aspect ratio differs from the specified dimensions, it will be cropped centrally to fit.
Note: The fit parameter requires both the height and the width parameters.
Fit by cropping
If fit is set to crop, it will crop the given image to the defined height and width.
Additional Notes
- The fit parameter requires both the height and the width parameters.
Note: Check out the limitations that are applicable here.
Trim Images
Trim
The trim parameter lets you trim an image from the edges. This is especially useful for removing border or white spaces that the downloaded images usually come with. The value for this parameter can be given in pixels or percentage.
You can specify values for top, right, bottom, and left edges of an image. For example, to trim the top edge by 25px, right edge by 50px, bottom edge by 75px and left edge by 100, using the query ?trim=25,50,75,100.
You can also combine two or more values. For example, to trim the top edge by 25px, right edge by 50px, bottom edge by 75px and left edge by 50px, use the query ?trim=25,50,75. Similarly, to trim the top and bottom edge by 50px, and right and left by 100, use ?trim=50,100. To trim all edges by 50px, use ?trim=50.
- CSS style shorthand values are also acceptable.
- Check out the limitations that are applicable here.
Reorient Images
Orientation
The orient parameter lets you control the cardinal orientation of the given image. Using this parameter, you can orient the image right or left, flip horizontally or vertically or both, and do a lot more. It can automatically correct the orientation of the image if the source image contains orientation details within its EXIF data (Exchangeable Image File Format).
You can use any of the following values for the orient parameter:
- 1 - Set image to default
- 2 - Flip image horizontally
- 3 - Flip image horizontally and vertically
- 4 - Flip image vertically
- 5 - Flip image horizontally and then rotate 90 degrees towards left
- 6 - Rotate image 90 degrees towards right
- 7 - Flip image horizontally and then rotate 90 degrees towards right
- 8 - Rotate image 90 degrees towards left
Let’s try to change the orientation of the image. Use the request given below to orient the image right.
Note: Check out the limitations that are applicable here.
You can also use a combination of the two example given above. So, in the following API request, the image will be flipped horizontally, and then orient it right.
Note: Check out the limitations that are applicable here.
Additional Notes
- This parameter can automatically correct the orientation of the image if the source image contains orientation details within its EXIF data (Exchangeable Image File Format).
Overlay Settings
Overlay
The overlay parameter allows you to put one image on top of another. You need to specify the relative URL of the image as value for this parameter.
Additional Notes
- By default, the cropping alignment will be middle, center. See overlay-align for more details.
Note: Check out the limitations that are applicable here.
Overlay Align
The overlay-align parameter lets you define the position of the overlay image. The acceptable values for this parameter are given below:
- top: Align the overlay image to the top of the actual image
- bottom: Align the overlay image to the bottom of the actual image
- left: Align the overlay image to the left of the actual image
- right: Align the overlay image to the right of the actual image
- middle: Align the overlay image to the middle (vertically) of the actual image
- center: Align the overlay image to the center (horizontally) of the actual image
You can also specify two values for this parameter, for example ?overlay-align=left,bottom. By default, the overlay alignment is set to middle,center.

Note: Check out the limitations that are applicable here.
Overlay Repeat
The overlay-repeat parameter lets you define how the overlay image will be repeated on the given image. The three acceptable values for this parameter are given below:
- x: Horizontal repetition
- y: Vertical repetition
- both: Horizontal and vertical repetition
Let’s use these different parameters to understand how they work. First, try the horizontal repetition of overlay image.
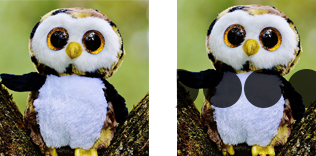
Note: Check out the limitations that are applicable here.
Let us now try how the vertical repetition of overlay image works.
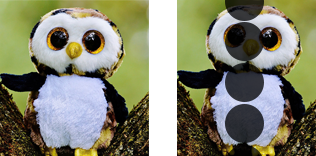
Note: Check out the limitations that are applicable here.
Now, let’s see what happens to an image when the vertical as well as horizontal repetition is enabled for the overlay image.
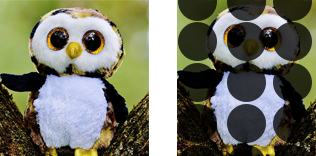
Note: Check out the limitations that are applicable here.
Overlay Width
The overlay-width parameter lets you define the width of the overlay image. The value for this parameter can be set in pixels or percentage. For pixel value, use any whole number between 1 and 8192. For percentage value, use any decimal number between 0.0 and 0.99. When height is defined in percentage, it relative to the output image.
In order to set the overlay image width to more than 99%, use the p parameter along with the value, for example, ?overlay-width=300p. If the overlay image width exceeds the width of the image, the overlay image will be cropped.
Additional Notes
- When width is specified in percentage, the width is relative to the output image.
- To specify a width more than 100% of the original image, use the p parameter. For example, to get a width of 250%, use overlay-width=250p.
- If the overlay image used is larger than the actual image, the overlay image will be cropped to fit the actual image.
Note: Check out the limitations that are applicable here.
Overlay Height
The overlay-height parameter lets you define the height of the overlay image. The value for this parameter can be set in pixels or percentage. For pixel value, use any whole number between 1 and 8192. For percentage value, use any decimal number between 0.0 and 0.99. When height is defined in percentage, it relative to the output image.
In order to set the overlay image height to more than 99%, use the p parameter along with the value, for example, ?overlay-height=300p. If the overlay image height exceeds the height of the image, the overlay image will be cropped.
Additional Notes
- When height is specified in percentage, the height is relative to the output image.
- To specify a height more than 100% of the original image, use the p parameter. For example, to get a height of 250%, use overlay-height=250p.
- If the overlay image used is larger than the actual image, the overlay image will be cropped to fit the actual image.
Note: Check out the limitations that are applicable here.
Pad
This parameter lets you add extra pixels to the edges of an image. This is useful if you want to add whitespace or border to an image. The value for this parameter can be given in pixels or percentage.
You can specify values for top, right, bottom, and left padding for an image. For example, to add padding to the top edge by 25px, right edge by 50px, bottom edge by 75px and left edge by 100, use the query ?pad=25,50,75,100.
You can also combine two or more values. For example, to add padding to the top edge by 25px, right edge by 50px, bottom edge by 75px and left edge by 50px, use the query ?pad=25,50,75. Similarly, to give padding to the top and bottom edge by 50px, and right and left by 100, use ?pad=50,100. To provide padding on all edges, use ?pad=50.
It is important to note that by default the pad parameter applies white background. If the given image contains transparent background, and the output image also has transparency, then transparent padding will be applied.
Note: Check out the limitations that are applicable here.
To add a colored border, you need to use the bg-color parameter along with pad. For example, to add a red border, use the query ?pad=10&bg-color=FF0000. Also, note that if the canvas and pad parameters are used together, the pad parameter will be ignored.
Note: Check out the limitations that are applicable here.
Additional Notes
- By default, this parameter applies padding in white color.
- If the given image contains transparent background and the output image also has transparency, then transparent padding will be applied.
- CSS style shorthand values are also acceptable.
- If the pad and the canvas parameters are used together in the same request, the pad parameter will be ignored.
Overlay Pad
The overlay-pad parameter allows you to add padding pixels to the edges of an overlay image. This parameter helps add border or whitespace to an overlay image.
With respect to the location of the padding that you need to add to the overlay image, you need to specify the padding values in this order along with the overlay-pad parameter: overlay-pad={top},{right},{bottom},{left}
Note: You can provide the padding values for an overlay image in either pixels or percentage.
You can either specify all the four padding values (top, right, bottom, and left) or combine two or more values. For example, to add padding to the top edge by 30px, right edge by 25px, and bottom edge by 50px, use the query ?overlay-pad=30,25,50. Similarly, to give padding to the top and bottom edge by 40px, and right and left by 75, use ?overlay-pad=40,75. To provide the same padding for all edges, use ?overlay-pad=25.
Additional Notes
- By default, the overlay-pad parameter applies padding to the overlay image in white.
- If the overlay image format supports a transparent background, the padding for the overlay image will be made up of transparent pixels.
- Values specified using CSS style shorthand are also acceptable.
- CSS shorthand allows you to specify values for all the edges in one property.
Note: Check out the limitations that are applicable here.
Background Color
The bg-color parameter lets you set a backgroud color for the given image. This is useful when applying padding or for replacing the transparent pixels of an image. There are three possible types of values for this parameter.
The first type is the 3- or 6-digit hexadecimal value, for example ?bg-color=cccccc.

Note: Check out the limitations that are applicable here.
The second type is the Red, Blue, Green value which defines the intensity of the corresponding color, with the value ranging anywhere between 0 and 255 for each. An example of this is ?bg-color=140,220,123.
Note: Check out the limitations that are applicable here.
And the last type is the Red, Blue, Green, Alpha value, which is an extension of the second type with an addition of the alpha element. The alpha value defines the transparency, with 0.0 being fully transparent and 1.0 being completely opaque. An example of this is ?bg-color=140,220,123,0.5.
Note: Check out the limitations that are applicable here.
Device Pixel Ratio
To implement the device pixel ratio functionality of the Image Delivery API, you require two parameters "dpr" and "height or width".
The dpr parameter lets you deliver images with appropriate size to devices that come with a defined device pixel ratio. The device pixel ratio of any device determines the screen resolution that its CSS would interpret. This ratio is the ratio between the physical pixels of the image and its logical pixels.
For example, if the iPhone 6s has a device pixel ratio of 2, it means that the actual resolution is double the logical resolution. Different devices have different pixel ratios. This parameter, therefore, lets you render appropriately sized images to different devices.
The value for this parameter could be a whole number (between 1 and 10000) or any decimal number (between 0.0 and 9999.9999...).
Along with the dpr parameter, you need to specify either the height or width parameter to dynamically resize the output image. If you only specify the height parameter, then the height parameter will automatically adjust the width of the image using the aspect ratio of the image. And if both the width and height parameters are specified, the given values will be used. Read more about resizing images using the width and height parameters.
The width or height of the output image changes depending on the values that you provide for dpr and height or width. For example, for a device pixel ratio of 2 and height 50, the height of the output image changes to 100.
![]()
Note: Check out the limitations that are applicable here.
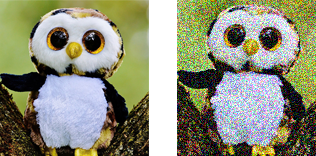
Blur
Blur
The blur parameter allows you to decrease the focus and clarity of a given image. To specify the extent to which you need to increase the blurriness of an image, use any decimal number (float) between 1 and 1000.
To increase the blurriness of an image by 40, use the following query:
Note: Check out the limitations that are applicable here.
Frame
Frame
The frame parameter fetche the first frame from an animated GIF (Graphics Interchange Format) file that comprises a sequence of moving images.
To extract the first frame from the following animated GIF: {GIF_name}, try the following query:
Additional Notes
- The frame parameter only supports animated GIF file format.
- Currently, the frame parameter can only fetch the first frame from an animated GIF.
Note: Check out the limitations that are applicable here.
Sharpen
Sharpen
The sharpen parameter allows you to increase the definition of the edges of objects in an image. This helps render a clear image with high detail and sharpness. You need to specify the following values for this parameter:
- a{value}: Amount (a) specifies the amount of contrast to be set for the image edges that you need to sharpen. This amount value is defined as the difference between the darkest and lightest tones in a given image.
- r{value}: Radius (r) specifies the radius of the image edges that you need to sharpen. A lower radius value sharpens only the pixels around the edges, while a higher radius value helps the sharpening effect spread over a broader band of pixels.
Tip: The radius value is directly proportional to the size of an image. For example, to get a balanced sharpening effect for two images with 3000x3000 pixels and 1000x1000 pixels, you need to set a radius value of 3 pixels for the larger image and 1 pixel for the smaller image.
- t{value}: Threshold (t) specifies the range of image edges that need to be ignored while sharpening an image. The threshold value sharpens the more noticeable edges of an image and leaves the edges with minor details untouched. For example, to sharpen an image of a human face, you would want to sharpen only the facial characteristics such as eyes, nose, or lips, and not concentrate on minor details such as pimples and birthmarks.
Let us try to increase the sharpness of a given image by amount:2, radius:1000, and threshold:2.
Things to Keep in Mind
- To specify the amount of increase in sharpness, you can use any decimal number (float) between 0 and 10.
- To specify the radius (size) of the sharpening area, you can use any decimal number (float) between 1 and 1000. You can also use percent style values to define the radius of the sharpening area, for example, 50p.
- To specify the threshold of the sharpening area, you can use any whole number (integer) between 0 and 255.
Note: Check out the limitations that are applicable here.
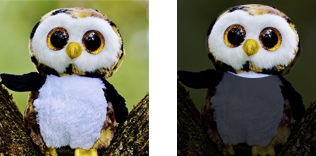
Saturation
Saturation
The saturation parameter allows you to increase or decrease the intensity of the colors in a given image. To specify the saturation for an image, use a whole number (integer) between -100 and 100. You can also define saturation using any decimal number between -100.00 and 100.00.
To increase the value of the saturation parameter of an image, pass a positive value:
Note: Check out the limitations that are applicable here.
To decrease the value of the saturation parameter of an image, pass a negative value:
Note: Check out the limitations that are applicable here.
Additional Notes
- The default value for the saturation parameter is 0. This renders an unchanged image.
- A value of -100 will render a grayscale image.
Contrast
Contrast
The contrast parameter allows you to increase or decrease the difference between the darkest and lightest tones in a given image. To specify contrast for an image, use a whole number (integer) between -100 and 100. You can also define contrast using any decimal number between -100.00 and 100.00.
To increase the value of the contrast parameter of an image, pass a positive value:
Note: Check out the limitations that are applicable here.
To decrease the value of the contrast parameter of an image, pass a negative value:
Note: Check out the limitations that are applicable here.
Additional Notes
- The default value for the contrast parameter is 0. This renders an unchanged image.
- A value of -100 will render a neutral gray image.
Brightness
Brightness
The brightness parameter allows you to increase or decrease the intensity with which an image reflects or radiates perceived light. To specify brightness for an image, use a whole number (integer) between -100 and 100. You can also define brightness using any decimal number between -100.00 and 100.00.
To increase the value of the brightness parameter of an image, pass a positive value:
Note: Check out the limitations that are applicable here.
To decrease the value of the brightness parameter of an image, pass a negative value:
Note: Check out the limitations that are applicable here.
Additional Notes
- The default value for the brightness parameter is 0. This renders the image unchanged.
- A value of 100 will render an entirely white image.
- A value of -100 will render an entirely black image.
Resize-filter
Resize-filter
The resize-filter parameter allows you to use the resizing filter to increase or decrease the number of pixels in a given image. This parameter resizes the given image without adding or removing any data from it.
The following values are acceptable for the resize-filter parameter:
- nearest: Utilizes the values of the neighboring translated pixels to provide smoother and quick resizing of a given image.
- bilinear: Utilizes a 2x2 environment of pixels on an average. This filter blends new interpolated pixels with the original image pixels to generate a larger image with more detail.
- bicubic: Utilizes a 4x4 environment of pixels on average. This filter maintains the innermost pixels and discards all the extra details from a given image.
- lanczos2: Enhances the ability to identify linear features and object edges of a given image. This filter uses the sinc resampling function to reconstruct the pixelation of an image and improve its quality.
- lanczos3: Utilizes a better approximation of the sinc resampling function to generate an image with better reconstruction.
You can use the ?resize-filter={resize_filter_value} query to resize an image through the resizing filter. Let us look at some examples to understand how we can use the resize-filter parameter.
Warning: If you only specify the resize-filter parameter, the API request will simply return the original image. You need to also specify either the width or height parameter in the API request to ensure that the resize-filter parameter is not ignored.
Use the ?resize-filter=nearest query to generate an image using the nearest resizing filter.
Note: Check out the limitations that are applicable here.
Try the following query to see how the bilinear resizing filter works.
Note: Check out the limitations that are applicable here.
Try the following query to see what happens to the given image when we use the bicubic resizing filter.
Note: Check out the limitations that are applicable here.
Let us also try out the lanczos resizing filter to check how it upscales a given image.
Note: Check out the limitations that are applicable here.
Additional Notes
- You can use the bicubic filter when you need to generate a smaller image with a natural sharpening effect.
- You can use the bilinear filter when you need to generate a larger image with a natural smoothing effect.
- You can use the nearest filter to provide a natural pixelation effect while resizing the number of pixels in the given image.
- You can use the lanczos filter when you need to generate a new image with the best quality. The default value for this filter is lanczos3.
Canvas
Canvas
The canvas parameter allows you to increase the size of the canvas that surrounds an image. You can specify the height and width of the canvas area in pixels or percentage or define the height and width of the aspect ratio of the canvas. You can also define the starting point for the canvas area or offset the canvas on its X and Y axis.
You can use the query ?canvas={width_value},{height_value} to set the height and width of the canvas area of the image from the center. The values can be in pixels (for example, ?canvas=700,800) or in percentage (for example, ?canvas=0.70,0.80) or a combination of both (for example, ?canvas=700,0.80).
Tip: You can also define the width and height of the canvas area in aspect ratio (for example, ?canvas=2:3).
Note: Check out the limitations that are applicable here.
To define the X-axis and Y-axis position of the top left corner of the canvas area, use the query ?canvas={width_value},{height_value},x{value},y{value}. This allows you to define the starting point of the canvas region. The x-axis value and y-axis value can be specified in pixels or percentage. An example of this would be ?canvas=700,800,x150,y75 or ?canvas=700,800,x0.60,y0.50.
Note: Check out the limitations that are applicable here.
You can set the horizontal and vertical offset of the canvas area by using the query ?canvas={width_value},{height_value},offset-x{value},offset-y{value}. This allows you to define the center point of the canvas area. The x-axis offset value and y-axis offset value can be defined only in percentage. An example of this would be ?canvas=700,800,offset-x0.65,offset-y0.80.
Note: Check out the limitations that are applicable here.
Additional Notes
- By default, the canvas parameter creates a canvas with white background for the output image. For image formats that support transparency, the canvas will display a transparent background.
- The values defined for the canvas parameter should always be greater than or equal to the image dimensions of the specified image.
- If the width and height parameters are not provided while specifying an aspect ratio for the canvas, the API request will return the largest area of the the requested aspect ratio as per the dimensions specified for the source image.
- The x and y, or offset-x and offset-y parameters are optional.
- The x and y, or offset-x and offset-y parameters can be specified in any order. However, these parameters should follow the width and height parameters in the API request.
- If the x and y or offset-x and offset-y parameters are not specified, the image will be positioned in the center of the canvas.
- The x parameter can be used without y (and vice versa), and the offset-x parameter can be used without offset-y (and vice versa).
- The canvas parameter takes precedence over the pad parameter if both are used in the same request.

