

.svg?format=pjpg&auto=webp)
.svg?format=pjpg&auto=webp)
.png?format=pjpg&auto=webp)


.png?format=pjpg&auto=webp)
Kickstart Next.js
This guide walks you through setting up and running a Next.js project integrated with Contentstack, ideal for developers new to either technology.
Prerequisites
- Node.js version > 22 installed on your machine
- Basic understanding of JavaScript and/or TypeScript
- Contentstack account
Project Setup
1. Clone the Repository
Clone the project repository from GitHub:
git clone https://github.com/contentstack/kickstart-next.git
cd kickstart-next
Github for Frontend Next App: Kickstart Next.js
2. Install Dependencies
Install the required dependencies and packages:
npm install
Project Structure
After you clone the repo and install dependencies, your Next project should resemble the following structure:
#kickstart-next

├── 📂 app
│   ├── 📄 favicon.ico
│   ├── 📄 globals.css
│   ├── 📄 layout.tsx
│   └── 📄 page.tsx
├── 📂 lib
│   ├── 📄 contentstack.ts
│   ├── 📄 types.ts
│   └── 📄 utils.ts
├── 📄 .env.example
├── 📄 next-env.d.ts
├── 📄 next.config.mjs
├── 📂 node_modules
├── 📄 package-lock.json
├── 📄 package.json
├── 📄 README.md
├── 📄 postcss.config.mjs
└── 📄 tsconfig.json
3. Create a Stack
Log in to your Contentstack account and create a new Stack. Follow these steps to seed your Stack with the necessary data:
- Download the Stack seed data from GitHub.
- Install the Contentstack CLI:
npm install -g @contentstack/cli
- If you are running the CLI for the first time, set your region:
csdx config:set:region EUNote:- North America: Set the region as NA.
- Europe: Set the region as EU.
- Azure North America: Set the region as AZURE-NA.
- Azure Europe: Set the region as AZURE-EU.
- Google Cloud Platform North America: Set the region as GCP-NA.
- Google Cloud Platform Europe: Set the region as GCP-EU.
- Log in via the CLI:
csdx auth:loginThis command will ask you to provide your Contentstack’s account credentials (email and password).
- Get your Organization ID from the Contentstack dashboard: Go to Org Admin > Info and copy the Org ID:
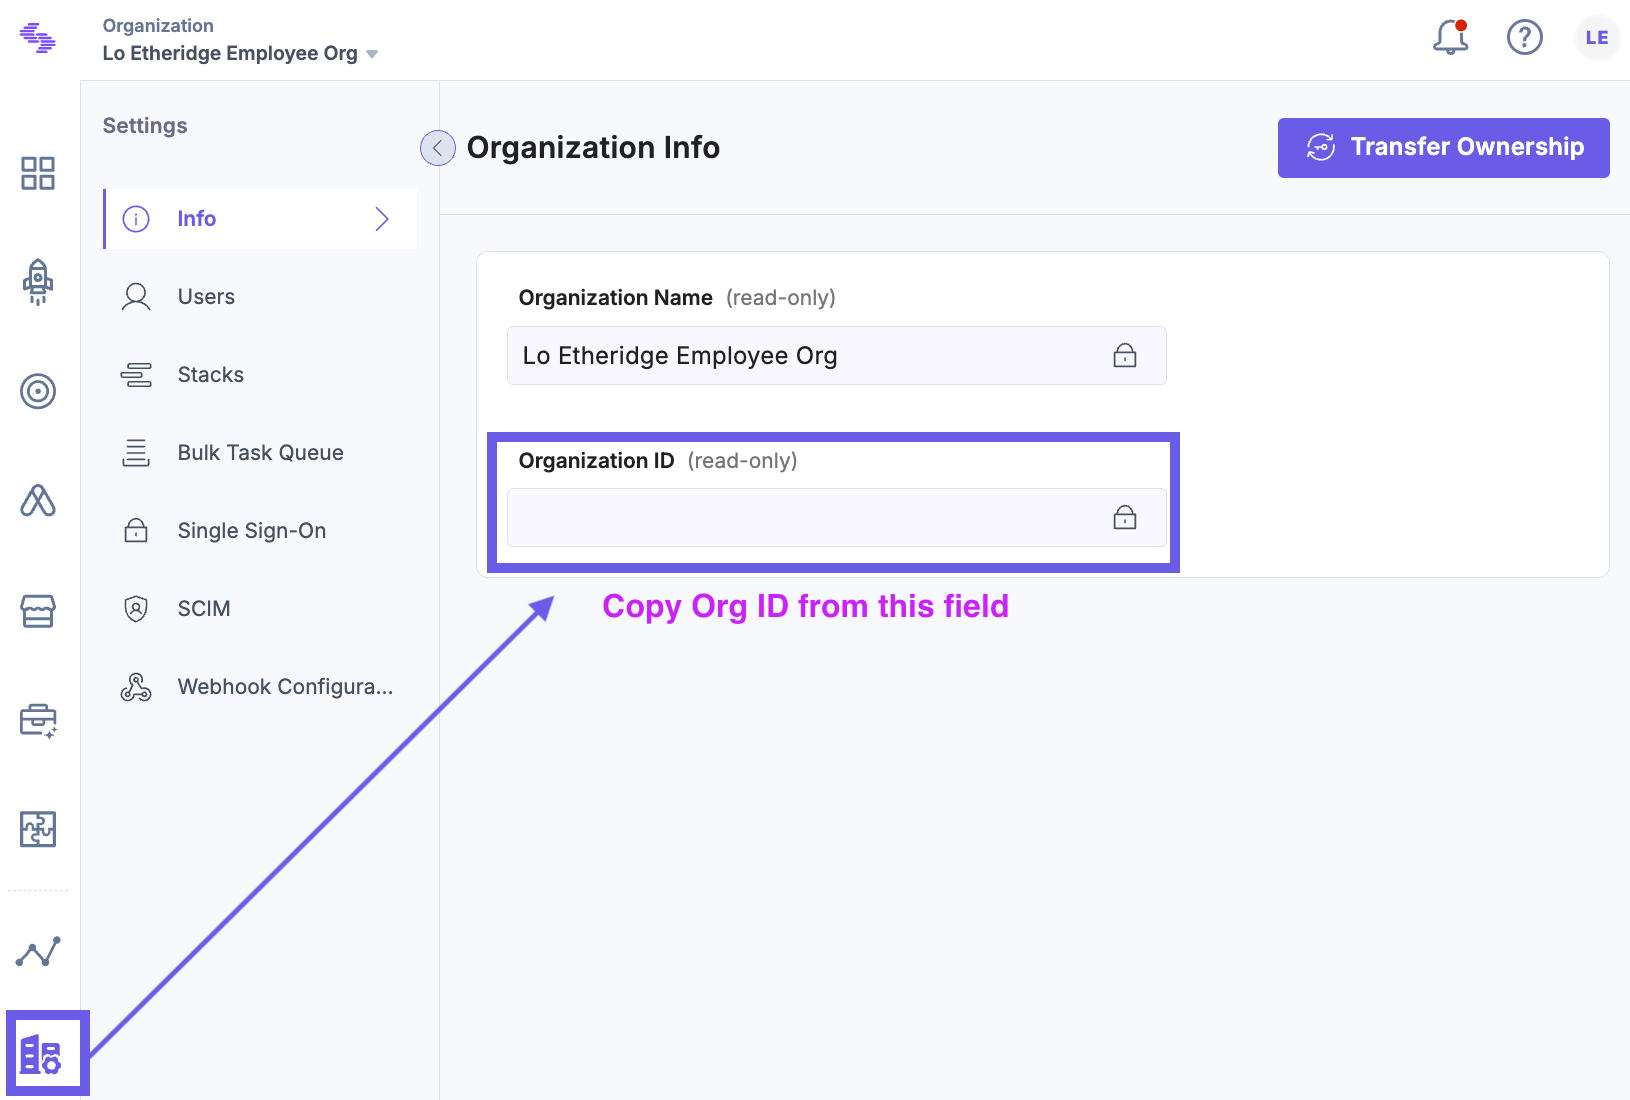
- Seed your Stack:
csdx cm:stacks:seed --repo "contentstack/kickstart-stack-seed" --org "<YOUR_ORG_ID>" -n "CS Kickstart Next"
Need more information, watch a quick video on how to seed a stack in the CLI.
4. Create a Delivery Token
In you stack, go to Settings > Tokens in your Contentstack dashboard and create a delivery token with the preview setting toggled to On.
Alternatively, watch a quick step-by-step tutorial on How to create delivery tokens.
For more information on environments and setting up delivery tokens, watch the Understanding Environments Contentstack Academy video.
5. Setup environment variables
Create a .env file in the root of your project and add your Contentstack credentials:
NEXT_PUBLIC_CONTENTSTACK_API_KEY=<YOUR_API_KEY>
NEXT_PUBLIC_CONTENTSTACK_DELIVERY_TOKEN=<YOUR_DELIVERY_TOKEN>
NEXT_PUBLIC_CONTENTSTACK_PREVIEW_TOKEN=<YOUR_PREVIEW_TOKEN>
NEXT_PUBLIC_CONTENTSTACK_REGION=<YOUR_REGION_NAME>
NEXT_PUBLIC_CONTENTSTACK_ENVIRONMENT=<ENVIRONMENT_NAME>
NEXT_PUBLIC_CONTENTSTACK_PREVIEW=true
#By default the live preview feature is enabled for this project.
Beware, free Contentstack developer accounts are bound to the EU region. We still use the CDN so the API is lightning fast.
6. Turn on Live Preview
Go to Settings > Live Preview in your Contentstack dashboard. Enable it and select the Preview environment.
7. Run Your Next App
Start the development server:
npm run dev
Open http://localhost:3000 in your browser to see your app in action.
Tip: You can Command + Click or Enter to open up the Localhost URL in the browser.
Kickstart guide video
Want to see this Next.js guide in action? Check out this kickstart video!
Key Files and Code
Contentstack SDK
File name: contentstack.ts
This file initializes the Contentstack SDK and provides helper functions to fetch data:
// Importing Contentstack SDK and specific types for region and query operations
import contentstack, { QueryOperation } from "@contentstack/delivery-sdk";

// Importing Contentstack Live Preview utilities and stack SDK
import ContentstackLivePreview, { IStackSdk } from "@contentstack/live-preview-utils";

// Importing the Page type definition
import { Page } from "./types";

// helper functions from private package to retrieve Contentstack endpoints in a convienient way
import { getContentstackEndpoints, getRegionForString } from "@timbenniks/contentstack-endpoints";

// Set the region by string value from environment variables
const region = getRegionForString(process.env.NEXT_PUBLIC_CONTENTSTACK_REGION || "EU");

// object with all endpoints for region.
const endpoints = getContentstackEndpoints(region, true)

export const stack = contentstack.stack({
  // Setting the API key from environment variables
  apiKey: process.env.NEXT_PUBLIC_CONTENTSTACK_API_KEY as string,

  // Setting the delivery token from environment variables
  deliveryToken: process.env.NEXT_PUBLIC_CONTENTSTACK_DELIVERY_TOKEN as string,

  // Setting the environment based on environment variables
  environment: process.env.NEXT_PUBLIC_CONTENTSTACK_ENVIRONMENT as string,

  // Setting the region based on environment variables
  region: region,
  live_preview: {
    // Enabling live preview if specified in environment variables
    enable: process.env.NEXT_PUBLIC_CONTENTSTACK_PREVIEW === 'true',

    // Setting the preview token from environment variables
    preview_token: process.env.NEXT_PUBLIC_CONTENTSTACK_PREVIEW_TOKEN,

    // Setting the host for live preview based on the region
    host: endpoints.preview,
  }
});

// Initialize live preview functionality
export function initLivePreview() {
  ContentstackLivePreview.init({
    ssr: false, // Disabling server-side rendering for live preview
    enable: process.env.NEXT_PUBLIC_CONTENTSTACK_PREVIEW === 'true', // Enabling live preview if specified in environment variables
    mode: "builder", // Setting the mode to "builder" for visual builder
    stackSdk: stack.config as IStackSdk, // Passing the stack configuration
    stackDetails: {
      apiKey: process.env.NEXT_PUBLIC_CONTENTSTACK_API_KEY as string, // Setting the API key from environment variables
      environment: process.env.NEXT_PUBLIC_CONTENTSTACK_ENVIRONMENT as string, // Setting the environment from environment variables
    },
    clientUrlParams: {
      host: endpoints.application
    },
    editButton: {
      enable: true, // Enabling the edit button for live preview
      exclude: ["outsideLivePreviewPortal"] // Excluding the edit button from the live preview portal
    },
  });
}
// Function to fetch page data based on the URL
export async function getPage(url: string) {
  const result = await stack
    .contentType("page") // Specifying the content type as "page"
    .entry() // Accessing the entry
    .query() // Creating a query
    .where("url", QueryOperation.EQUALS, url) // Filtering entries by URL
    .find(); // Executing the query and expecting a result of type Page

  if (result.entries) {
    const entry = result.entries[0]; // Getting the first entry from the result

    if (process.env.NEXT_PUBLIC_CONTENTSTACK_PREVIEW === 'true') {
      contentstack.Utils.addEditableTags(entry, 'page', true); // Adding editable tags for live preview if enabled
    }

    return entry; // Returning the fetched entry
  }
}
Quick breakdown of the code
The Contentstack Delivery SDK and Live Preview utilities are used to connect your Next project to Contentstack and use Live Preview. The Delivery SDK allows you to query, initialize live preview functionality, and fetch content from Contentstack
First, the necessary imports are made from the Contentstack SDK and Live Preview utilities, as well as a custom Page type from. The stack constant is then defined, which configures the Contentstack stack using environment variables for the API key, delivery token, and environment.
Tim Benniks' contentstack-endpoints package is used for a convenient way to get all needed endpoint URLs based on a given region as a string.
// Importing Contentstack SDK and specific types for region and query operations
import contentstack, { QueryOperation } from "@contentstack/delivery-sdk";

// Importing Contentstack Live Preview utilities and stack SDK
import ContentstackLivePreview, { IStackSdk } from "@contentstack/live-preview-utils";

// Importing the Page type definition
import { Page } from "./types";

// helper functions from @timbenniks private package to retrieve Contentstack endpoints in a convenient way
import { getContentstackEndpoints, getRegionForString } from "@timbenniks/contentstack-endpoints";

// Set the region by string value from environment variables
const region = getRegionForString(process.env.NEXT_PUBLIC_CONTENTSTACK_REGION || "EU");

// object with all endpoints for region.
const endpoints = getContentstackEndpoints(region, true)
The initLivePreview function initializes the Contentstack Live Preview functionality. It sets up the live preview with various options, including whether server-side rendering (SSR) is enabled, the preview mode, stack SDK configuration, stack details, client URL parameters, and an edit button. This function ensures that the live preview is properly configured and ready to use.
export const stack = contentstack.stack({
  // Setting the API key from environment variables
  apiKey: process.env.NEXT_PUBLIC_CONTENTSTACK_API_KEY as string,

  // Setting the delivery token from environment variables
  deliveryToken: process.env.NEXT_PUBLIC_CONTENTSTACK_DELIVERY_TOKEN as string,

  // Setting the environment based on environment variables
  environment: process.env.NEXT_PUBLIC_CONTENTSTACK_ENVIRONMENT as string,

  // Setting the region based on environment variables
  region: region,
  live_preview: {
    // Enabling live preview if specified in environment variables
    enable: process.env.NEXT_PUBLIC_CONTENTSTACK_PREVIEW === 'true',

    // Setting the preview token from environment variables
    preview_token: process.env.NEXT_PUBLIC_CONTENTSTACK_PREVIEW_TOKEN,

    // Setting the host for live preview based on the region
    host: endpoints.preview,
  }
});

// Initialize live preview functionality
export function initLivePreview() {
  ContentstackLivePreview.init({
    ssr: false, // Disabling server-side rendering for live preview
    enable: process.env.NEXT_PUBLIC_CONTENTSTACK_PREVIEW === 'true', // Enabling live preview if specified in environment variables
    mode: "builder", // Setting the mode to "builder" for visual builder
    stackSdk: stack.config as IStackSdk, // Passing the stack configuration
    stackDetails: {
      apiKey: process.env.NEXT_PUBLIC_CONTENTSTACK_API_KEY as string, // Setting the API key from environment variables
      environment: process.env.NEXT_PUBLIC_CONTENTSTACK_ENVIRONMENT as string, // Setting the environment from environment variables
    },
    clientUrlParams: {
      host: endpoints.application
    },
    editButton: {
      enable: true, // Enabling the edit button for live preview
      exclude: ["outsideLivePreviewPortal"] // Excluding the edit button from the live preview portal
    },
  });
}
The getPage function is an asynchronous function that fetches your content from Contentstack based on a given URL. It queries the specified content type for an entry with a matching URL. If a matching entry is found, and live preview is enabled, editable tags are added to the entry using Contentstack utilities. The function then returns the fetched entry.
export async function getPage(url: string) {
  const result = await stack
    .contentType("page") // Specifying the content type as "page"
    .entry() // Accessing the entry
    .query() // Creating a query
    .where("url", QueryOperation.EQUALS, url) // Filtering entries by URL
    .find(); // Executing the query and expecting a result of type Page

  if (result.entries) {
    const entry = result.entries[0]; // Getting the first entry from the result

    if (process.env.NEXT_PUBLIC_CONTENTSTACK_PREVIEW === 'true') {
      contentstack.Utils.addEditableTags(entry, 'page', true); // Adding editable tags for live preview if enabled
    }

    return entry; // Returning the fetched entry
  }
}
Quick Tip: API Endpoint helper package
You can use the Contentstack Endpoints NPM package to gather all the API endpoints you need to deliver content. For more details on how the package works, check out this explainer video!
Now, Lets jump into how the Next Home component works.
Home page component
File name: page.tsx
This file contains the Home page component that fetches and displays data from Contentstack:
"use client";

import Image from "next/image";
import ContentstackLivePreview from "@contentstack/live-preview-utils";
import { getPage, initLivePreview } from "@/lib/contentstack";
import { useEffect, useState } from "react";
import { Page } from "@/lib/types";

export default function Home() {
  const [page, setPage] = useState<Page>();

  const getContent = async () => {
    const page = await getPage("/");
    setPage(page);
  };

  useEffect(() => {
    initLivePreview();
    ContentstackLivePreview.onEntryChange(getContent);
  }, []);

  return (
    <main className="max-w-screen-2xl mx-auto">
      <section className="p-4">
        {page?.title ? (
          <h1
            className="text-4xl font-bold mb-4"
            {...(page?.$ && page?.$.title)}
          >
            {page?.title}
          </h1>
        ) : null}
        {page?.description ? (
          <p className="mb-4" {...(page?.$ && page?.$.description)}>
            {page?.description}
          </p>
        ) : null}
        {page?.image ? (
          <Image
            className="mb-4"
            width={640}
            height={360}
            src={page?.image.url}
            alt={page?.image.title}
            {...(page?.image?.$ && page?.image?.$.url)}
          />
        ) : null}
        {page?.rich_text ? (
          <div
            {...(page?.$ && page?.$.rich_text)}
            dangerouslySetInnerHTML={{ __html: page?.rich_text }}
          />
        ) : null}
        <div
          className="space-y-8 max-w-screen-sm mt-4"
          {...(page?.$ && page?.$.blocks)}
        >
          {page?.blocks?.map((item, index) => {
            const { block } = item;
            const isImageLeft = block.layout === "image_left";
            return (
              <div
                key={block._metadata.uid}
                {...(page?.$ && page?.$[`blocks__${index}`])}
                className={`flex flex-col md:flex-row items-center space-y-4 md:space-y-0 md:space-x-4 ${
                  isImageLeft ? "md:flex-row" : "md:flex-row-reverse"
                }`}
              >
                <div className="w-full md:w-1/2">
                  {block.image ? (
                    <Image
                      src={block.image.url}
                      alt={block.image.title}
                      width={200}
                      height={112}
                      className="w-full"
                      {...(block?.$ && block?.$.image)}
                    />
                  ) : null}
                </div>
                <div className="w-full md:w-1/2">
                  {block.title ? (
                    <h2
                      className="text-2xl font-bold"
                      {...(block?.$ && block?.$.title)}
                    >
                      {block.title}
                    </h2>
                  ) : null}
                  {block.copy ? (
                    <div
                      {...(block?.$ && block?.$.copy)}
                      dangerouslySetInnerHTML={{ __html: block.copy }}
                      className="prose"
                    />
                  ) : null}
                </div>
              </div>
            );
          })}
        </div>
      </section>
    </main>
  );
}
Quick breakdown of the Home page Next component
At the top of the file, several imports are made. These include Image from next/image for optimized image rendering, ContentstackLivePreview for live preview functionality, and custom functions getPage and initLivePreview from a local library. Additionally, the useEffect and useState hooks from React are imported to manage side effects and state within the component. The Page type is also imported to ensure type safety.
The Home component initializes a state variable page using the useState hook to store the page data.
export default function Home() {
  const [page, setPage] = useState<Page>();
 }; // code continues...
The getContent function is defined as an asynchronous function that fetches the page data by calling getPage with the root URL ("/") and updates the page state with the fetched data.
const getContent = async () => {
  const page = await getPage("/");
  setPage(page);
};
// code continues...
The useEffect hook is used to initialize the live preview functionality by calling initLivePreview and setting up an event listener for content changes using ContentstackLivePreview.onEntryChange, which triggers the getContent function to refresh the page data whenever there are changes.
useEffect(() => {
  initLivePreview();
  ContentstackLivePreview.onEntryChange(getContent);
}, []);
// code continues...
The return statement of the component renders the main content of the page. It uses conditional rendering to display various elements based on the presence of corresponding data in the page state. These elements include the page title, description, image, and rich text content. Additionally, it renders a list of blocks, each of which can contain an image, title, and copy. The layout of these blocks is dynamically adjusted based on the layout property of each block.
return (
  <main className="max-w-screen-2xl mx-auto">
    <section className="p-4">// Markup continues...</section>
  </main>
);
The Home component displays fetched data and integrates Contentstack's live preview and visual builder capabilities with your Next.js application, ensuring that content updates are reflected in real-time on the homepage.
You now have a basic understanding of how to set up and run a Next project integrated with Contentstack. If you have any questions or run into an error, join the Contentstack Community in Discord for further support.
More articles in "Set up Guides"
