

.svg?format=pjpg&auto=webp)
.svg?format=pjpg&auto=webp)
.png?format=pjpg&auto=webp)


.png?format=pjpg&auto=webp)
Google Analytics
Note: This documentation uses the legacy approach with extensions. We have launched Google Analytics as a Marketplace App. For more information on Google Analytics, please refer to the Google Analytics App Installation Guide.
The Google Analytics widget retrieves the Google Analytics data of your entry (if it is published) using the Reporting API and displays the common metrics data (such as Pageviews, New Users) and user behaviors (such as Avg. Time on Page) on the sidebar of your entry page. The URL of your entry is set as the pagePath filter in Google Analytics.
This step-by-step guide explains how to create the Google Analytics widget extension in Contentstack.
The steps to be performed are as follows:
- Create Google Service account key
- Enable Google Analytics Reporting API
- Add User and get View ID from Google Analytics
- Set up a Lambda Function and an API Gateway Trigger
- Add "Google Analytics" Widget Extension to your Stack
- Use the Extension
-
Create Google Service Account Key
In order to use this extension, you will need your Google Service account key. Google Service accounts let you fetch (or automate fetching of) your site’s Google Analytics data.
Follow the steps below to create google service account key.
- In case you don’t have a Service Account, you can create a Google service account. Make sure you create a Service account that is not assigned any role.
- Now that you have a Service Account, create a new Service account key. You need to select JSON when setting the key type.
- Open the JSON file in a JSON editor, and note down the client_email value.
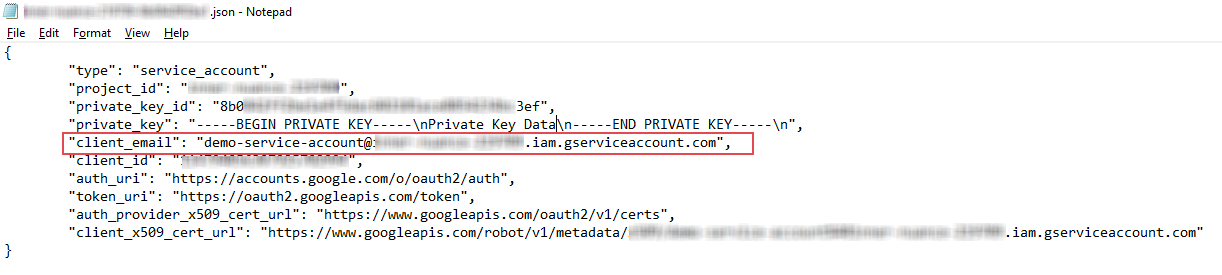
- You will need this email address in Step 3 while configuring your Google Analytics account. You will also need the complete JSON code in Step 4 while configuring the Lambda function of your extension in Contentstack.
-
Enable Google Analytics Reporting API
To enable the Google Analytics API, perform the steps given below:
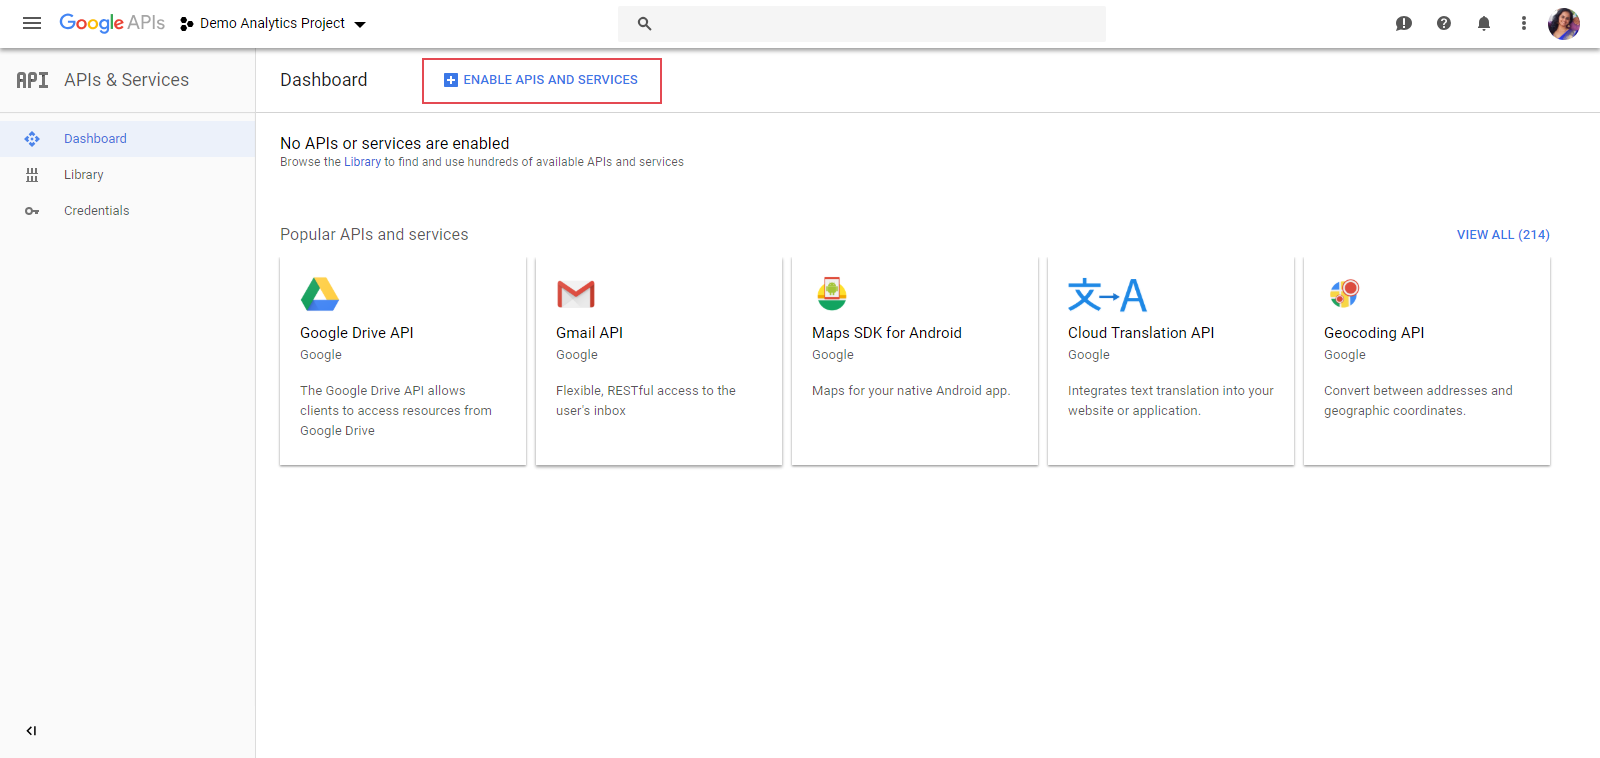
- Go to your project’s API Dashboard page in Google Cloud Platform.
-
Click on the ENABLE APIS AND SERVICES button on the top.
- In the search bar of the API Library page, type and select Google Analytics Reporting API
-
Click on the ENABLE button.

Next, we need to add a user and get the View ID.
-
Add user and get View ID from Google Analytics
A - Add new user and assign permission
After logging in to your Google Analytics account, perform the steps given below:
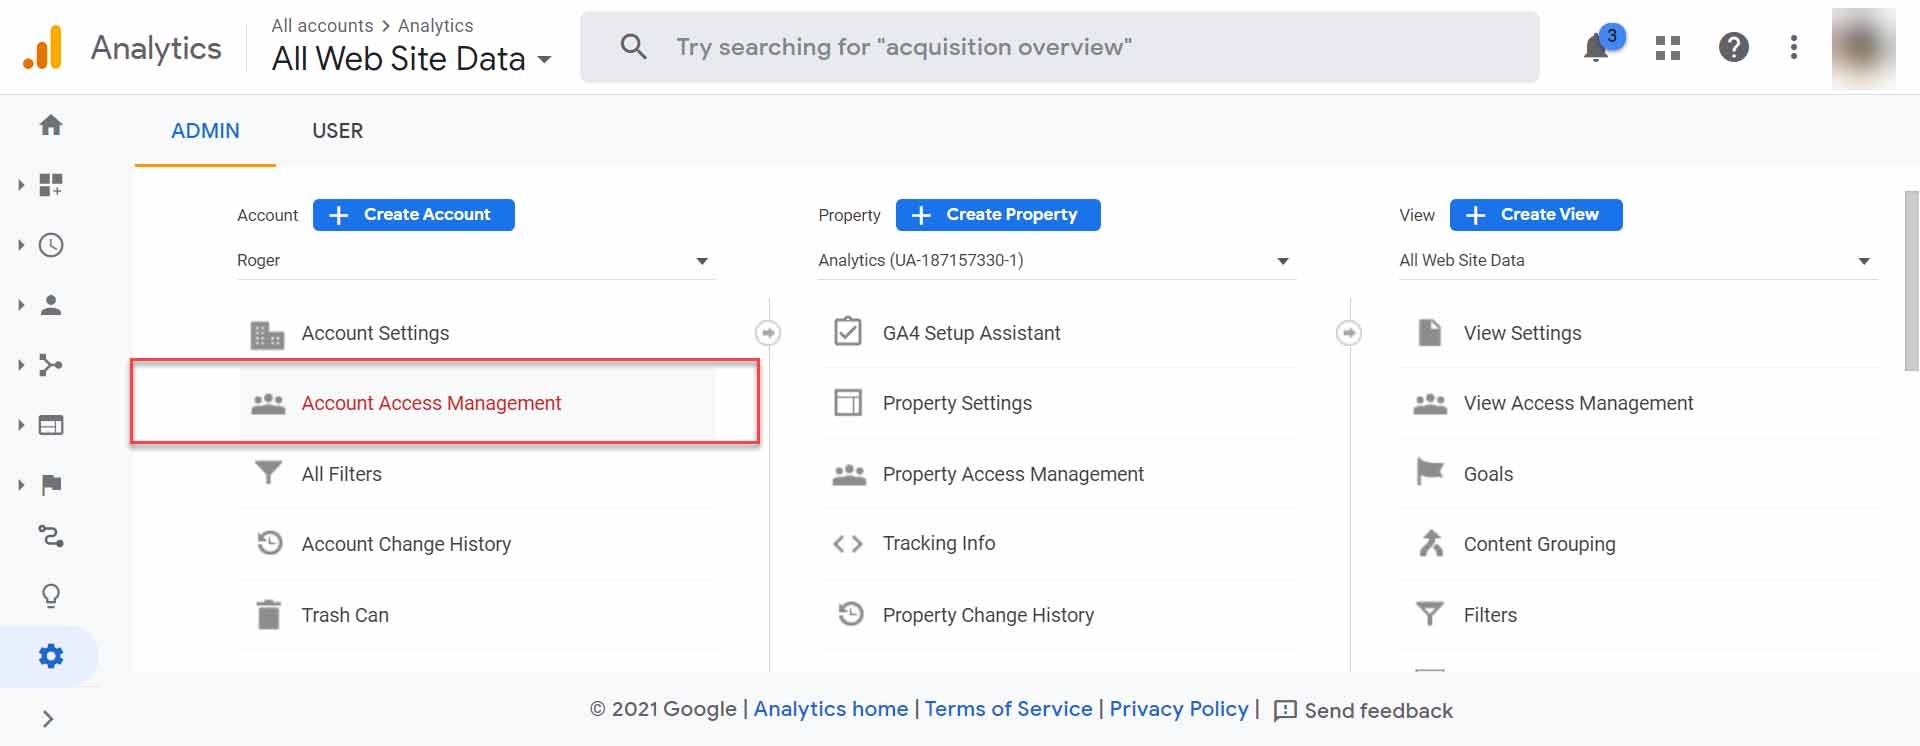
- Click on Admin at the bottom on the left navigation panel
-
Click on Account Access Management
- In the Account access management page that opens, click on + (Plus icon) at top-right corner and select Add users.
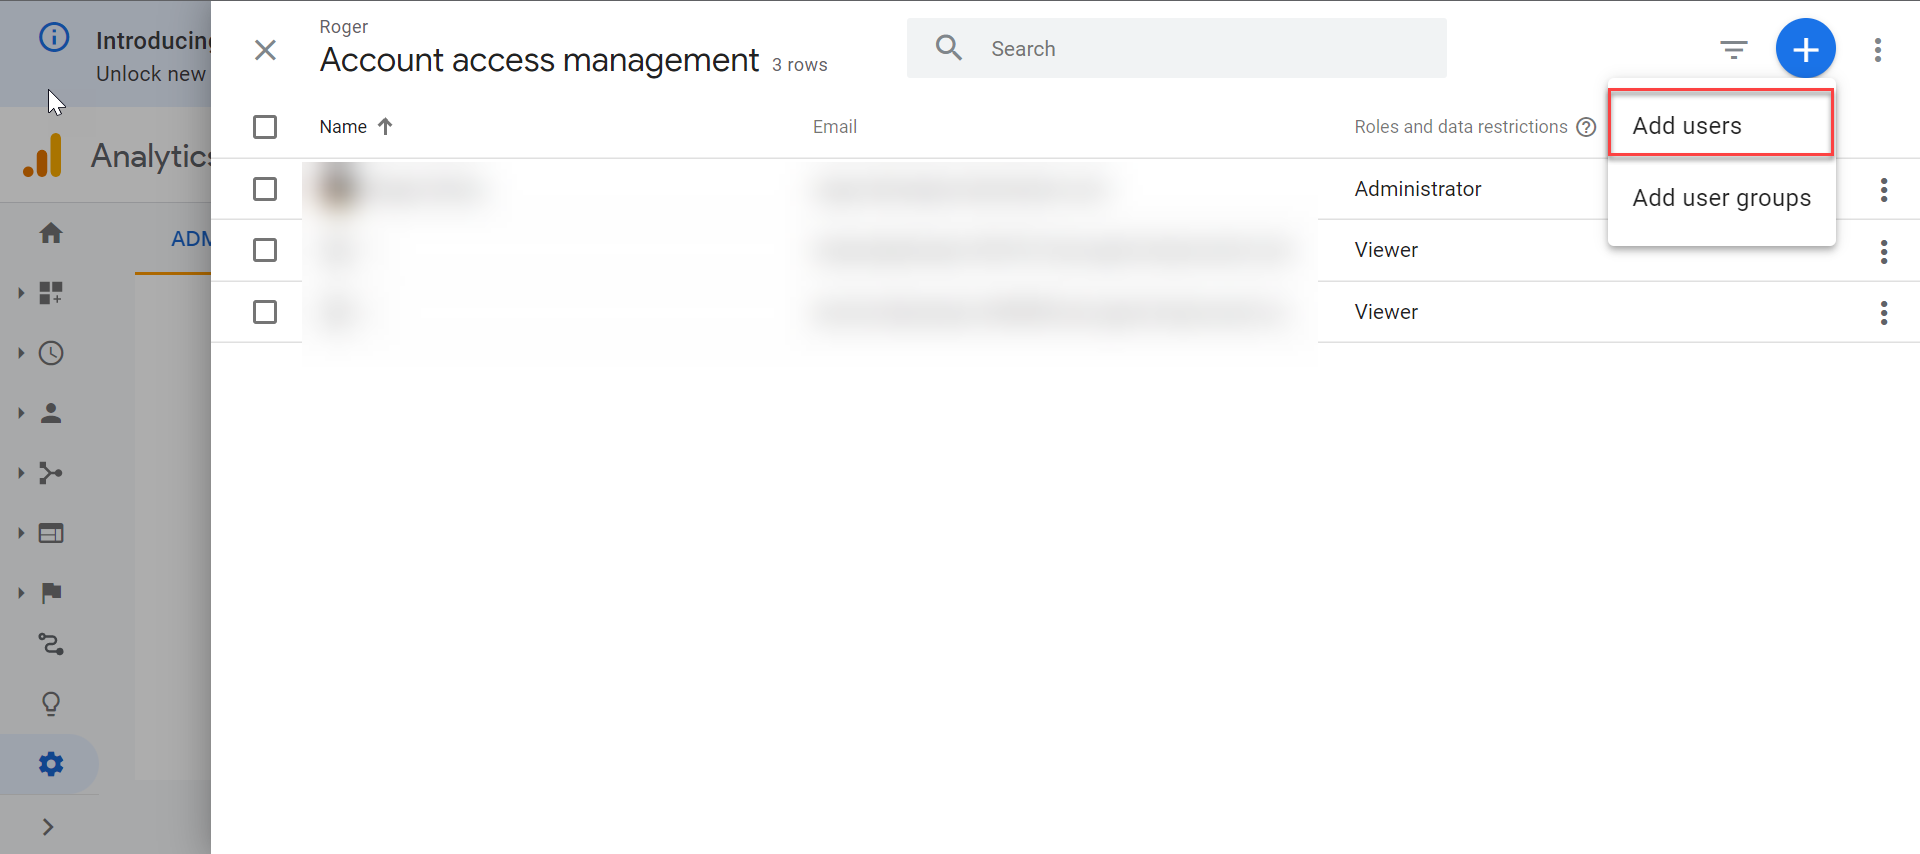
- In the Add roles and data restrictions page, enter the client email address that you retrieved in Step 1 within the JSON file and set the Standard roles and Data restrictions.
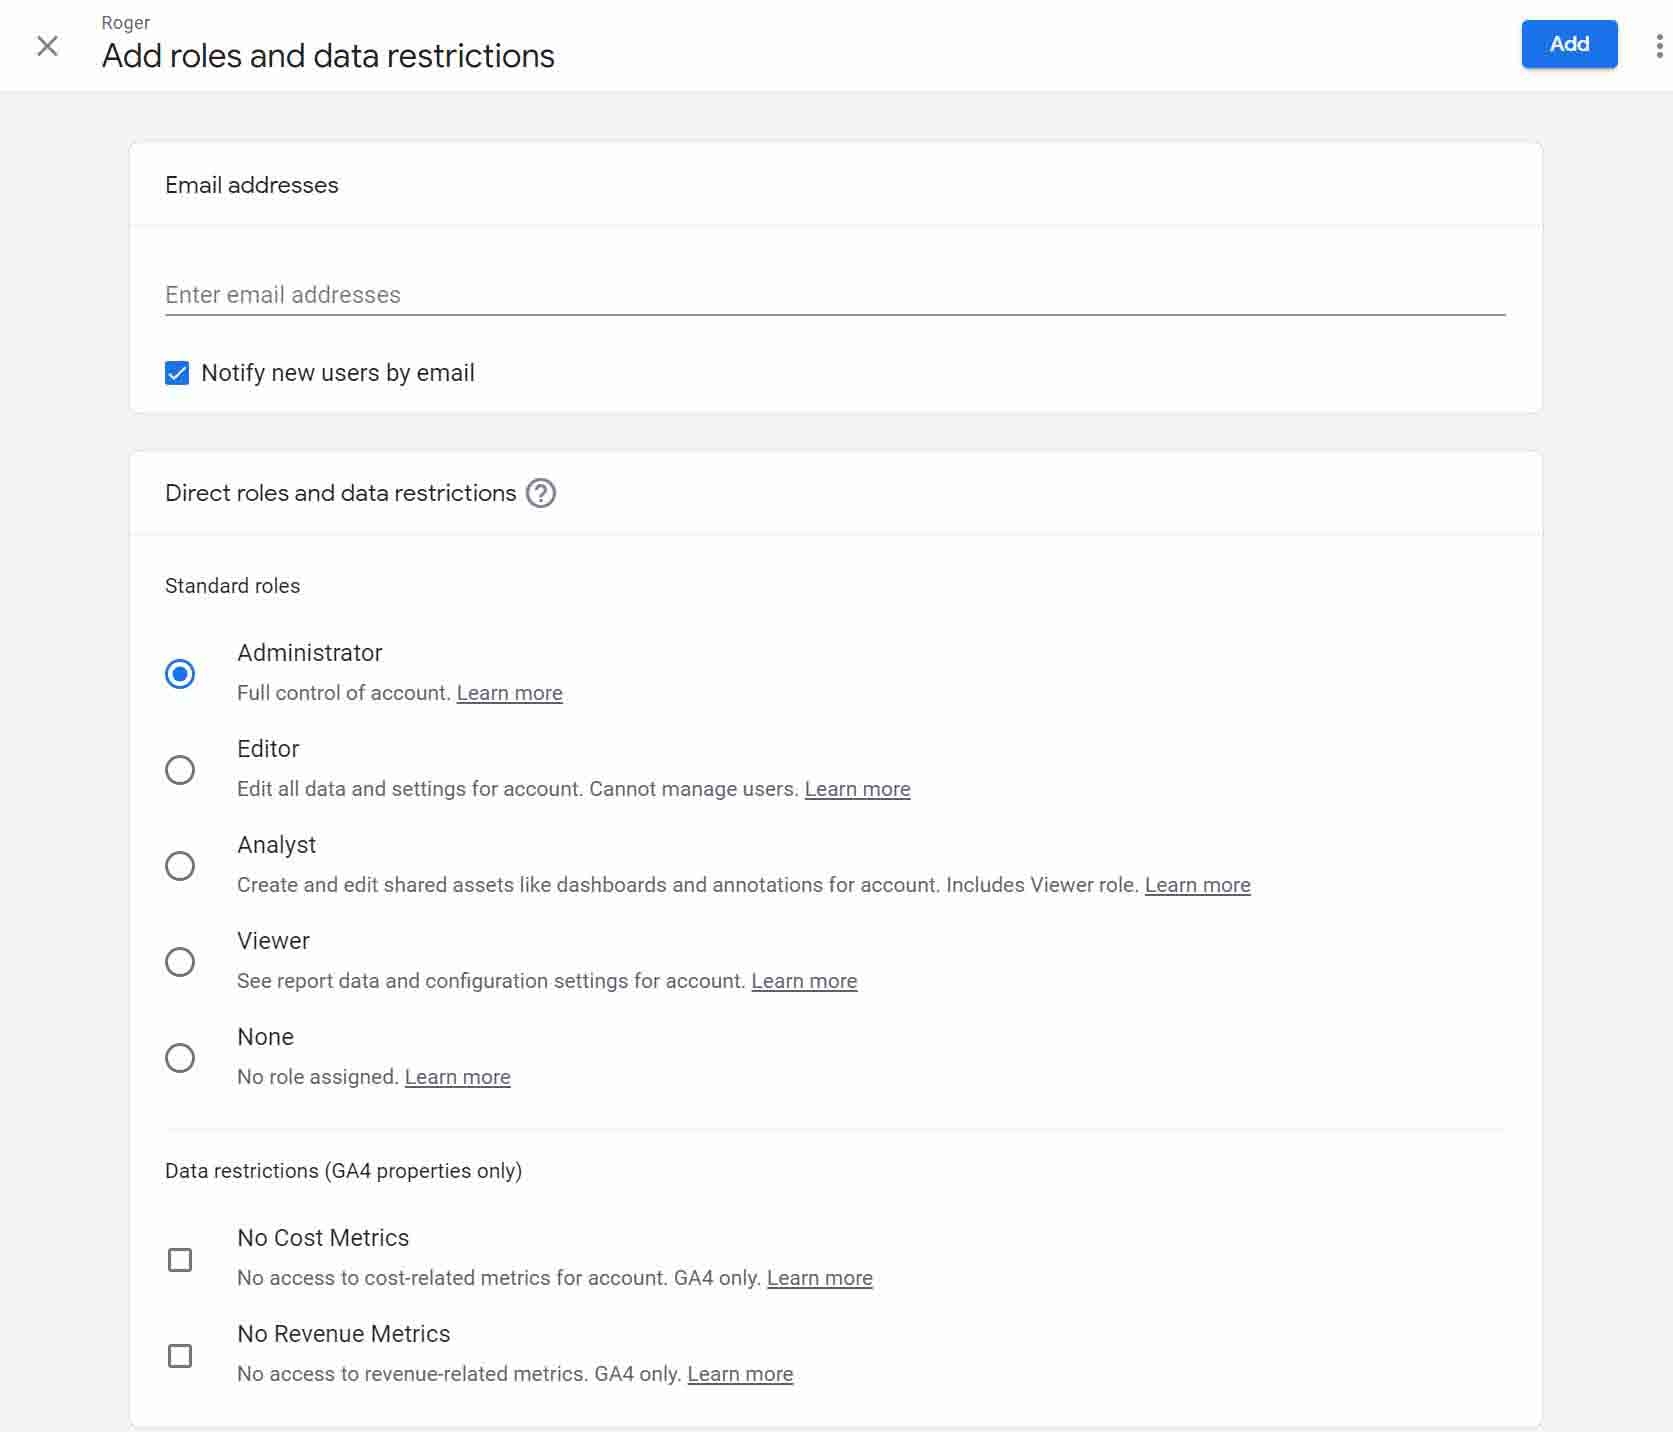
- Finally, click on the Add button.
B - Retrieve the View ID
Navigate to the Admin page. Under the View section, click View Settings.
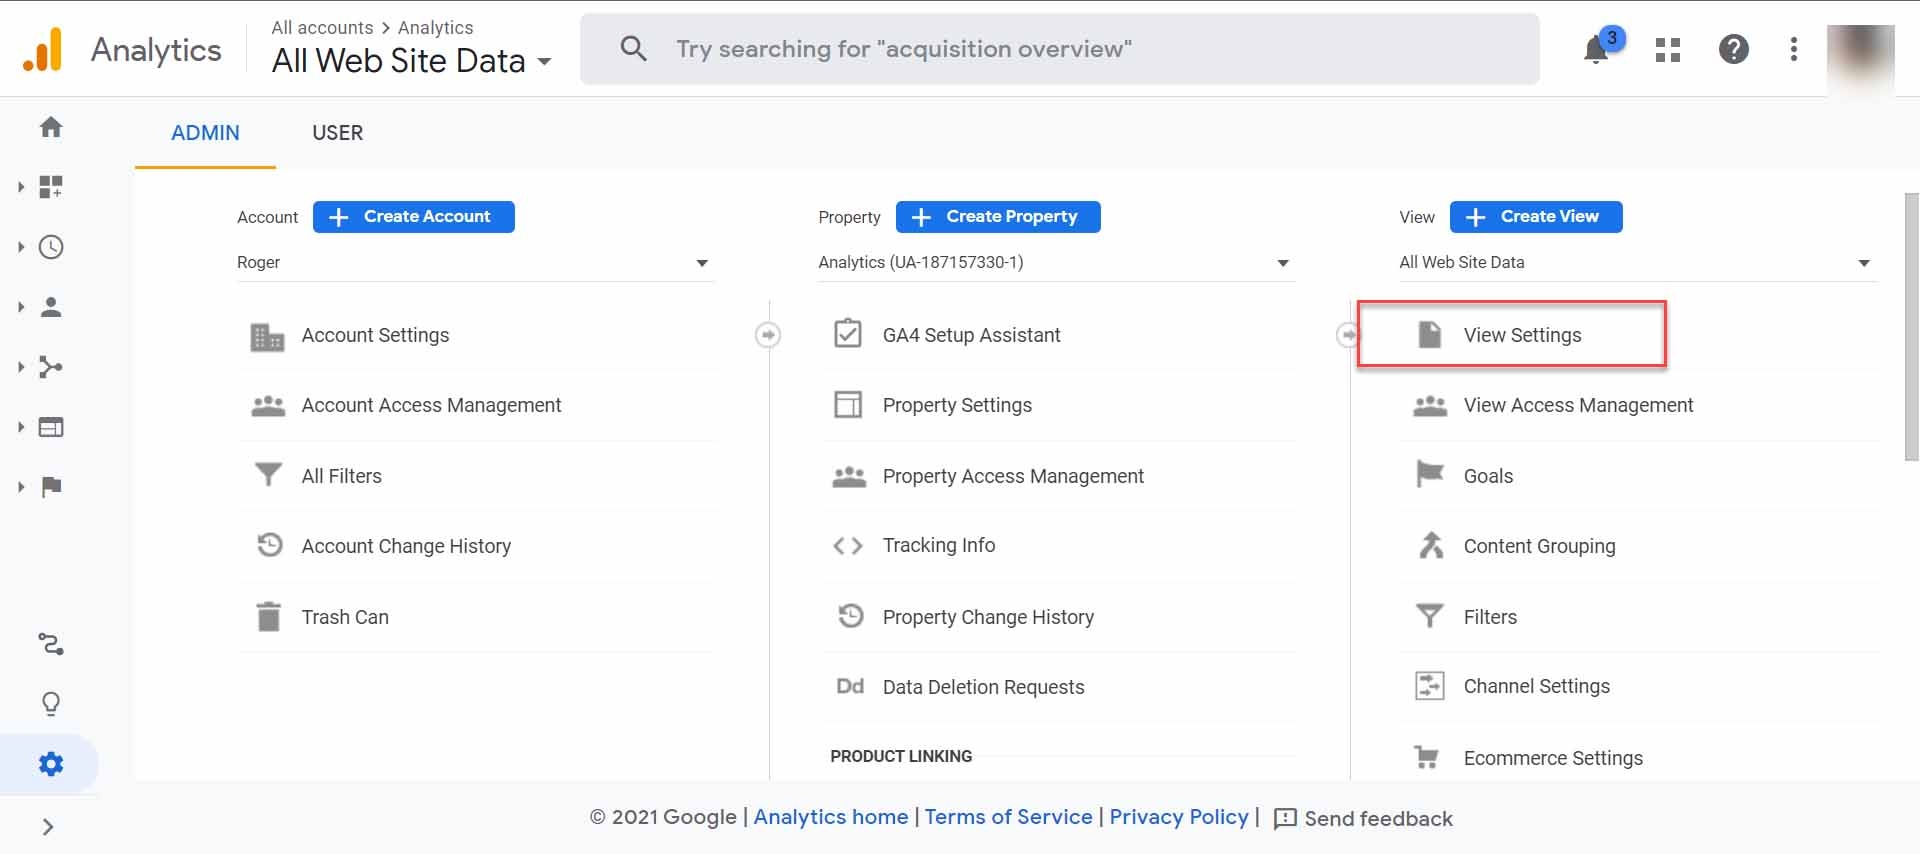
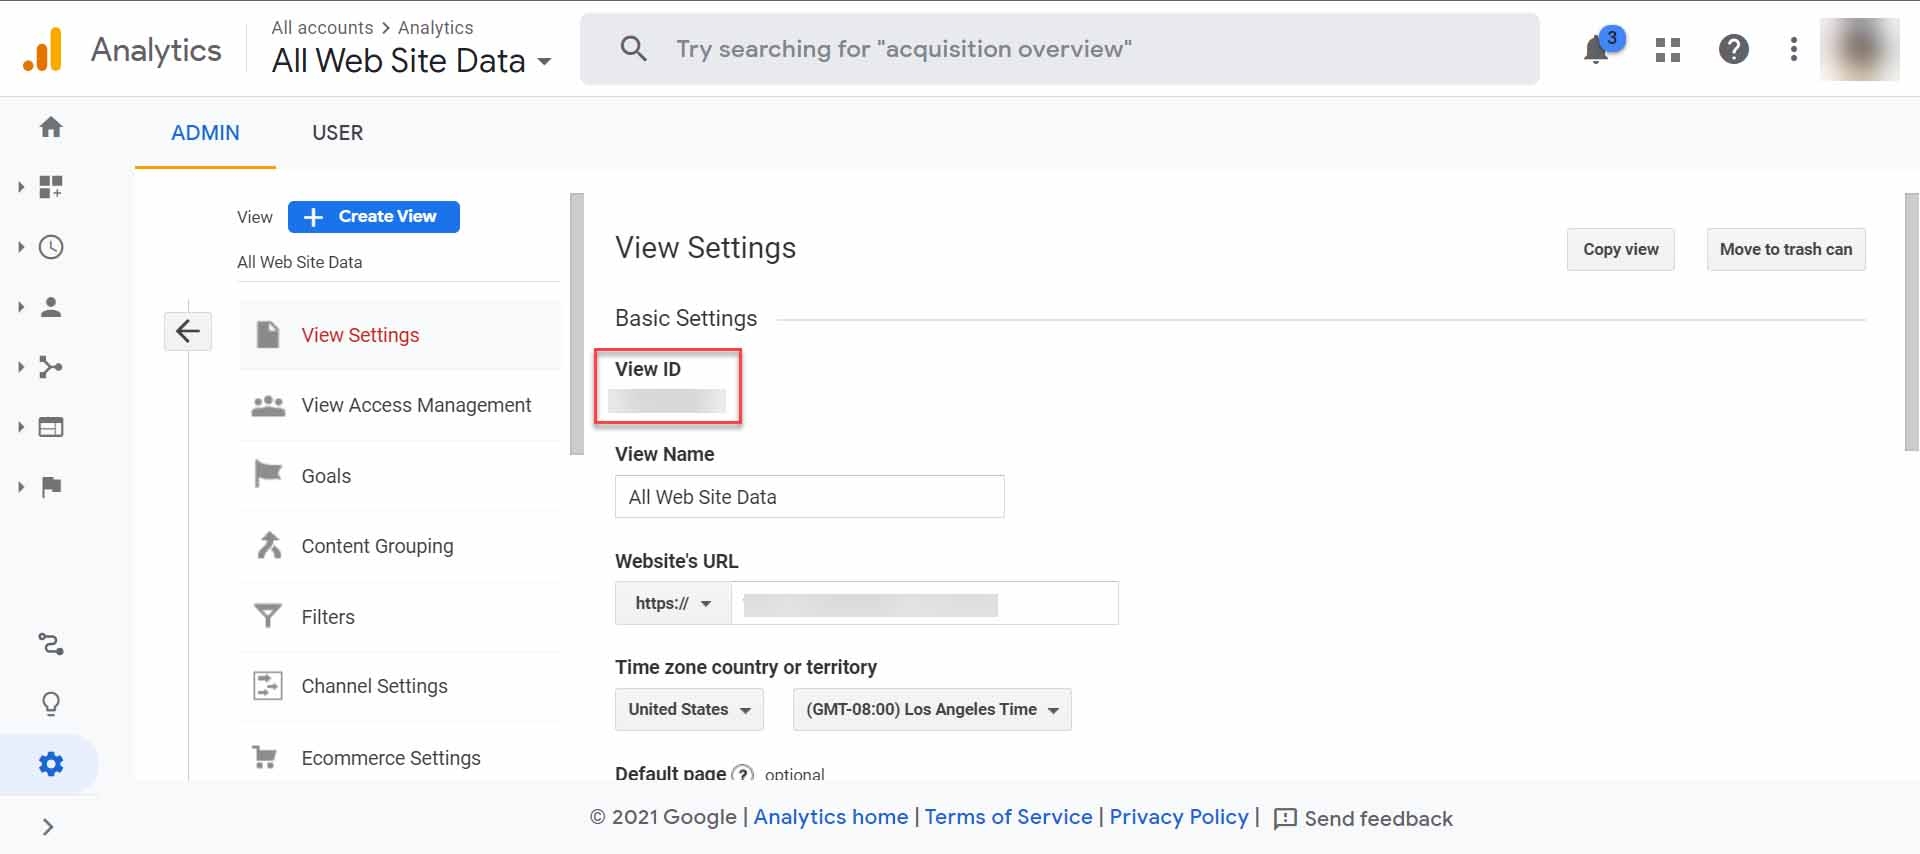
On the View Settings page, copy the value given under View ID. We will use the View ID while setting up the extension in Contentstack.
-
Set up a Lambda Function and an API Gateway Trigger
Download the Lambda function from GitHub. It contains all the required files. Then, navigate to your lambda function folder through a Terminal and install npm:
npm install
This downloads the required node modules within your lambda function. Now, open the service_account.json file within your lambda function folder and replace the existing content with the JSON content of the Service Key file that you extracted in Step 1. After that, zip your project file.
Note: If you are using Linux, use the zip -r index.zip * command in your root folder to zip the file.
Now, follow the steps below to set up the lambda function and an API gateway trigger.
- Login to your AWS Management Console, select Lambda from the Service list.
- Click on the Create function button, and then the Author from Scratch option.
- Provide a name to your lambda function inside the Function name field, select Node.js 14.x or any other version of Node as your Runtime language, and click on the Create function button.
- Upload the lambda file (as a zip file) by scrolling down to the Actions dropdown (in the Function code section) and selecting Upload a .zip file
- Keep Handler as index.handler and click on Save.
- Save your settings. Your lambda function is now ready.
- Scroll up to the Designer section and click on + Add trigger.
- On the Add trigger screen, from the Select a trigger dropdown, select API Gateway.
- Select Create an API, from the API dropdown. Then, select REST API inside the API type block, select Open from the Security dropdown, and click on Add.
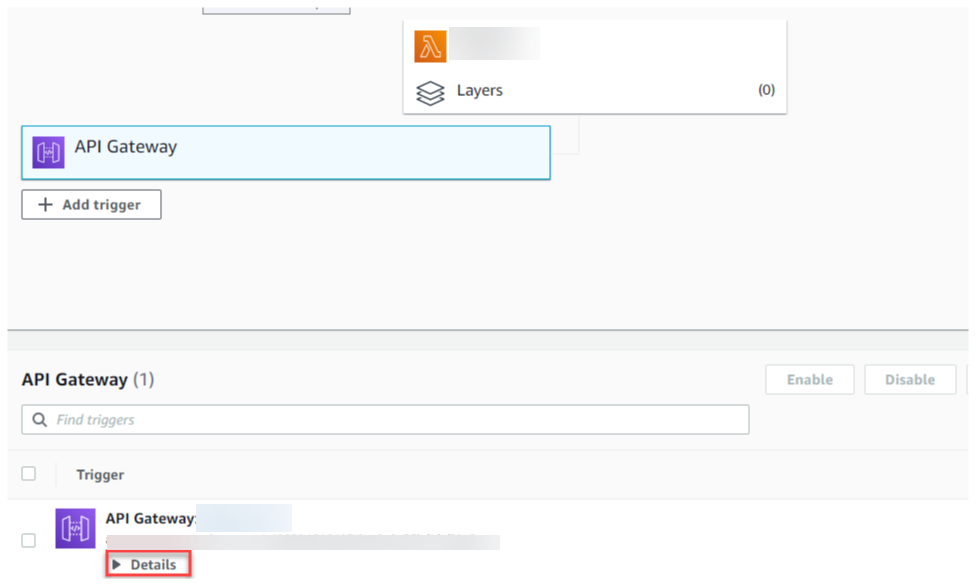
- An API is created for your lambda function. Under the Designer block, click on API Gateway. Click on Details and you will find your API endpoint. Make a note of it as we will need it while setting up the Google Analytics extension in Contentstack.
- For additional security, you can configure an API Key for the API Gateway trigger and use this API Key when configuring your lambda function.
- Lastly, Enable CORS in Amazon API Gateway console. It is mandatory for successful implementation of this extension.
-
Add "Google Analytics" Widget Extension to your Stack
To add Google Analytics widget to your stack, log in to your Contentstack account and perform the following steps:
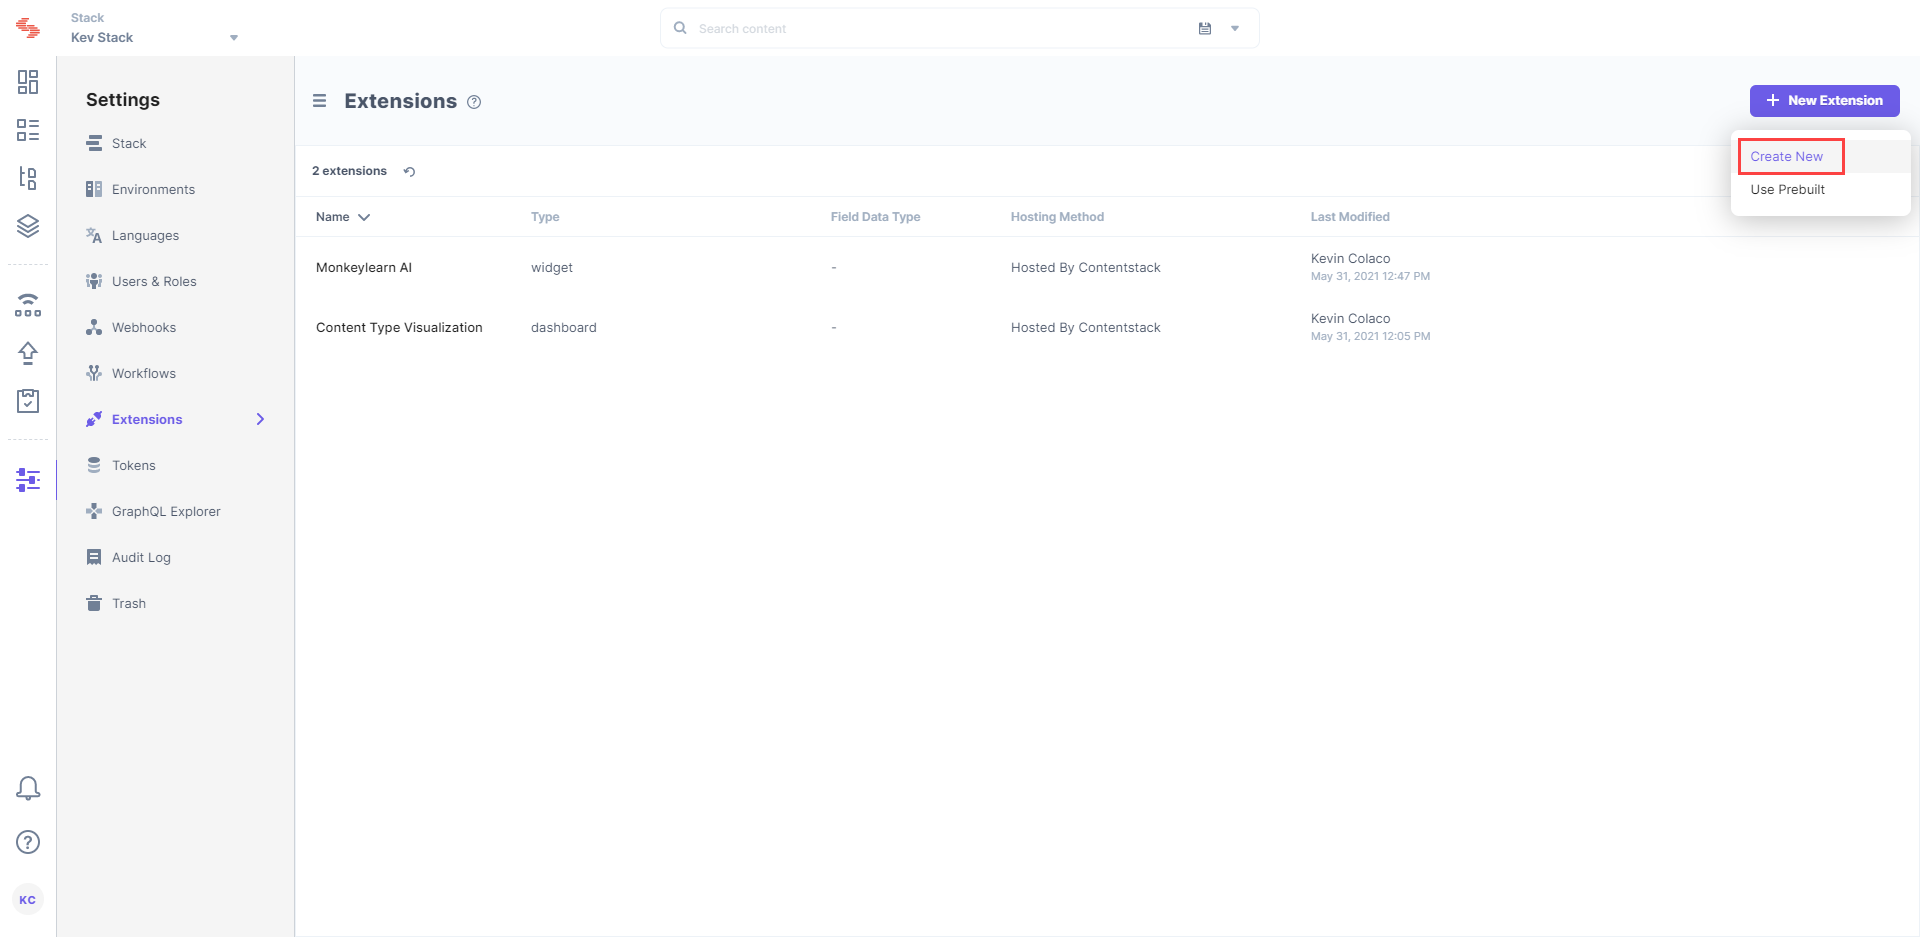
- Go to your stack and click on CONTENT at the header
- Hover over the “Settings” gear icon and click on Extensions. You can also use the shortcut keys “alt + X” for Windows OS users, and “option + X” for Mac OS users to access the extensions menu.
- Click on the + Add Extension button on the top-right corner and select Create new
- On the Create New Extension details page enter the following details in the:
- Title: Provide a suitable title. For example, Google Analytics.
- Hosting method: Select Hosted on Contentstack. As soon as you do this, you will see the "Extension Source Code" field below.
- Extension Source Code: In this field, you need to enter the extension code. Download the source code for the extension from its Github page.
- Config Parameters: Enter the configuration details for the extension.
{ "url": "https://abcde1234.execute-api. us-east-1.amazonaws.com/default/ contentstack-google-analytics-widget", "view_id": "111111111", "x-api-key": "SSS111Sss1ssSSsssS11s11SS11SS" }- "url": Add the AWS API gateway URL for the lambda function that you noted in the last step.
- “view_id”: Mention the view ID that you retrieved from Google Analytics in step 2.
- “x-api-key”: Add the API key for secured access if you have enabled it in step 3.
- Scope: You can choose to incorporate this widget in either All Content Types or Specific Content Types. Selecting the latter option displays a list of content types from which you can select the required ones.
- Click Save. This will create your Sidebar Extension.
-
Use the extension
Once you have added your Sidebar Extension, you can use it in your entries of the selected content type(s). To use the Sidebar Extension log in to your Contentstack account and perform the following steps:
- Click on the content type for which you have enabled the Sidebar Extension.
- Click on an entry. You will see the Widgets dropdown at the top. Click on it and select Google Analytics.
- The selected widget expands on the sidebar. Based on the URL of the entry, the analytics for the page is displayed.
Note: Make sure that the URL that you provide is a live published page.
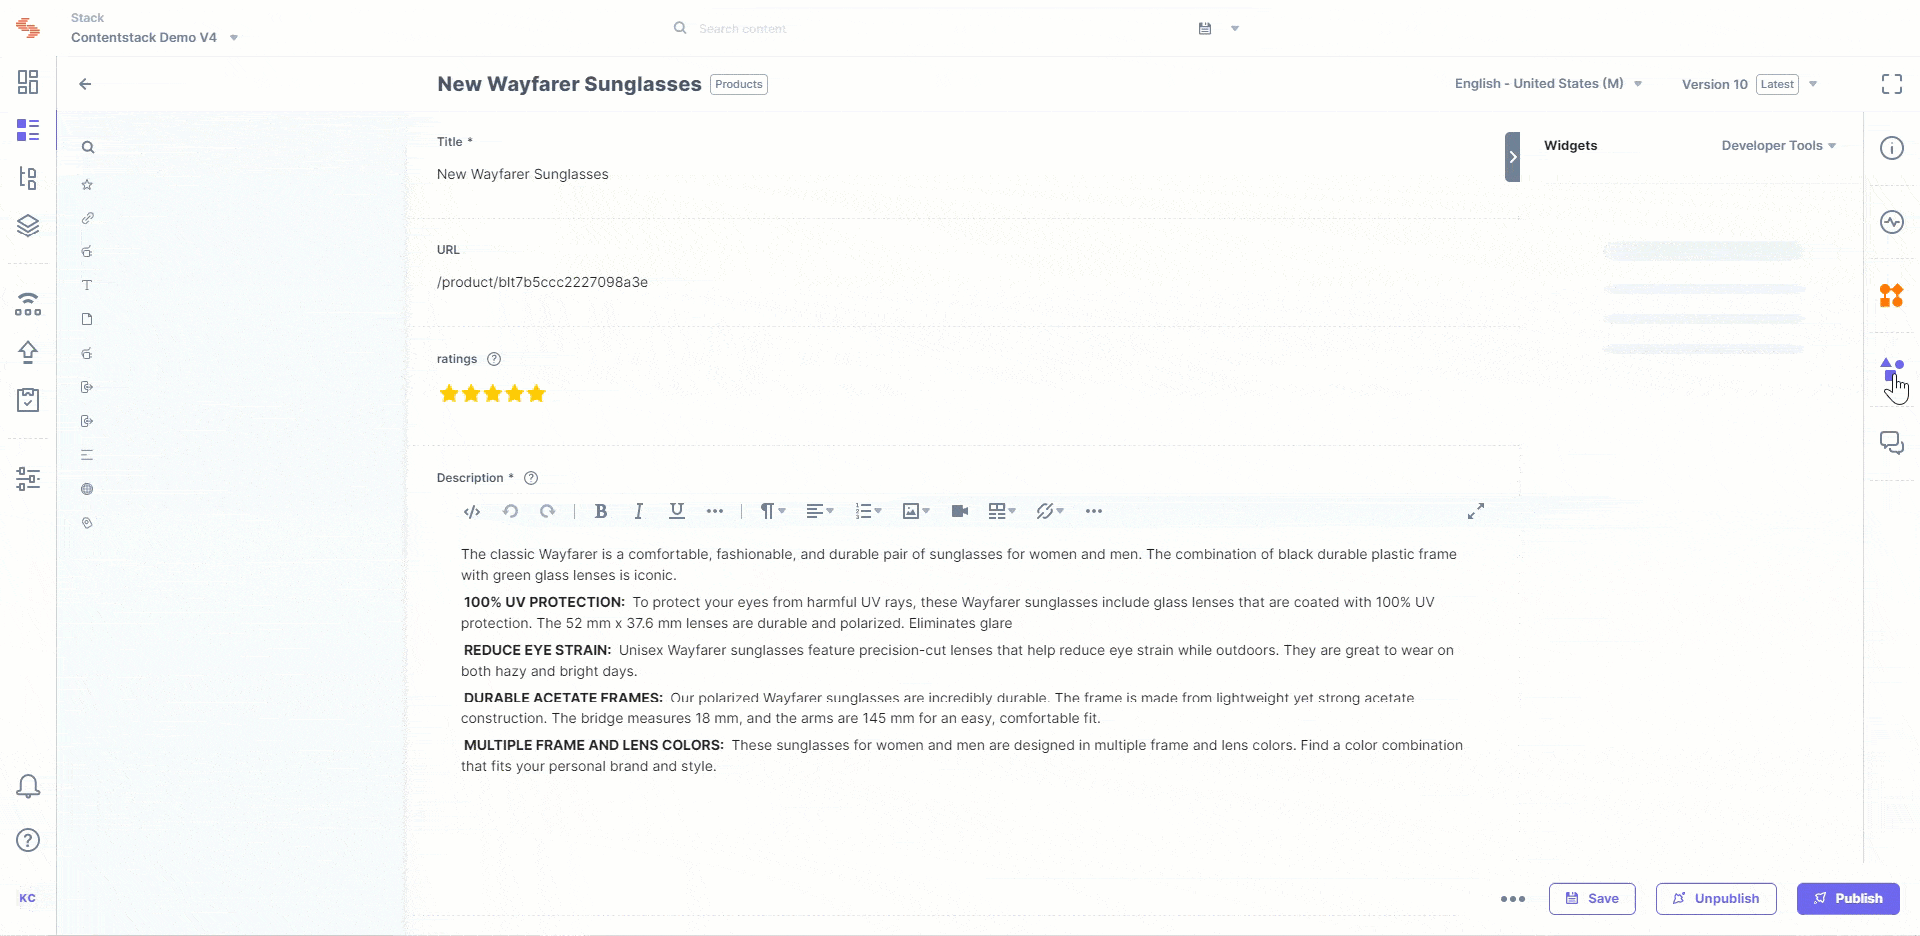
You can view the analytics data of the last 1, 7, 15, 30, 180, or 365 day(s). Default value is 30 days.

Additional Resource: If you want to view and analyze Google Analytics metrics right on your dashboard, check out our Google Analytics Dashboard Widget guide.
You can also integrate Google Analytics, via GTM (Google Tag Manager), into Contentstack. To do so, check out Google Analytics via GTM guide.
