

.svg?format=pjpg&auto=webp)
.svg?format=pjpg&auto=webp)
.png?format=pjpg&auto=webp)


.png?format=pjpg&auto=webp)
BigCommerce
Note: This documentation uses the legacy approach with extensions. We have launched BigCommerce as a Marketplace App and Automate Connector. For more information on BigCommerce, please refer to the BigCommerce App Installation Guide for Marketplace and BigCommerce Connector documentation for Automate.
The BigCommerce extension lets you search and fetch the products of your BigCommerce store and display them in your entry page via a custom field. Thus, while creating entries for this content type, you can select a single/ multiple products or categories of your store as the input value for that field.
Prerequisites
- BigCommerce account
- Contentstack account
- Access to AWS environment
- Working knowledge of AWS lambda and AWS API Gateways
This step-by-step guide explains how to create a BigCommerce custom field extension for your content types in Contentstack.
Steps for Execution
- Retrieve your API client credentials from BigCommerce
- Set up a lambda function and an API Gateway trigger
- Add the “BigCommerce” custom field extension to your stack
- Use the custom field
Retrieve your API client credentials
In order to use this extension, firstly login to your BigCommerce account. Now, you need to retrieve the API client credentials of your BigCommerce store. The credentials include the API Path URL and access token of your BigCommerce store API client.
Note: Make note of the API URL and access token as these will be required while configuring the parameters and setting up the lambda function.
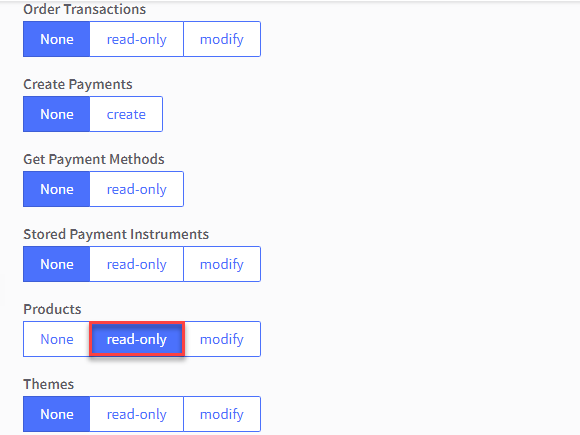
While making an API account to be used with the extension, make sure to select Product read-only as the permission as shown below.
Additional Resource: Refer to the Authenticating BigCommerce’s REST APIs page to get the required API credentials.
Set up a Lambda Function and an API Gateway Trigger
In this guide, we use an AWS Lambda Function and API Gateway that triggers the BigCommerce extension we create in our content type. To do this, perform the following steps:
- Log in to your AWS Management Console, select Lambda from the Service list.
- Click on the Create function button, and then the Author from Scratch option.
- Provide a name to your lambda function inside the Function name field, select Node.js 14.x or any other version of Node as your Runtime language, and click on the Create function button.
- For this exercise, we have created a sample code that will help you set up the system. If Extensions are part of your plan, contact our Support team to get the code for the extension.
Note: The support team will provide you a file that contains the BigCommerce lambda function code, the extension source code and a redirect.html file.
- Once you download the code, upload the BigCommerce lambda file (as a zip file) by scrolling down to the Actions dropdown (in the Function code section) and selecting Upload a .zip file.
- Keep Handler as index.handler and click on Save.
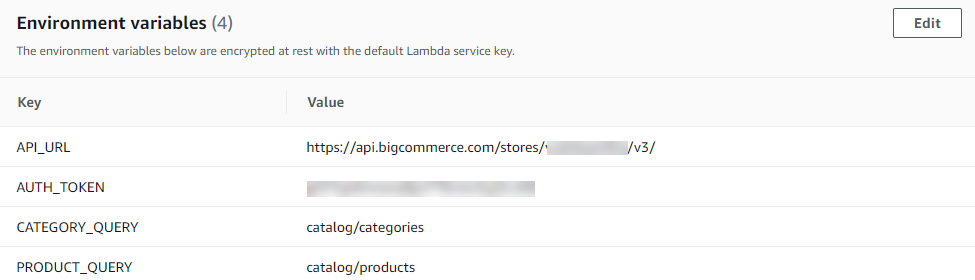
- Now scroll up and click on Configurations, go to the Environment variables section and add the following variables to it by clicking on Edit and then Add environment variable.
- Next, set Environment variables for your lambda function as follows:
- Save your settings.
- Your lambda function is now ready. Scroll up to the Designer section and click on + Add trigger.
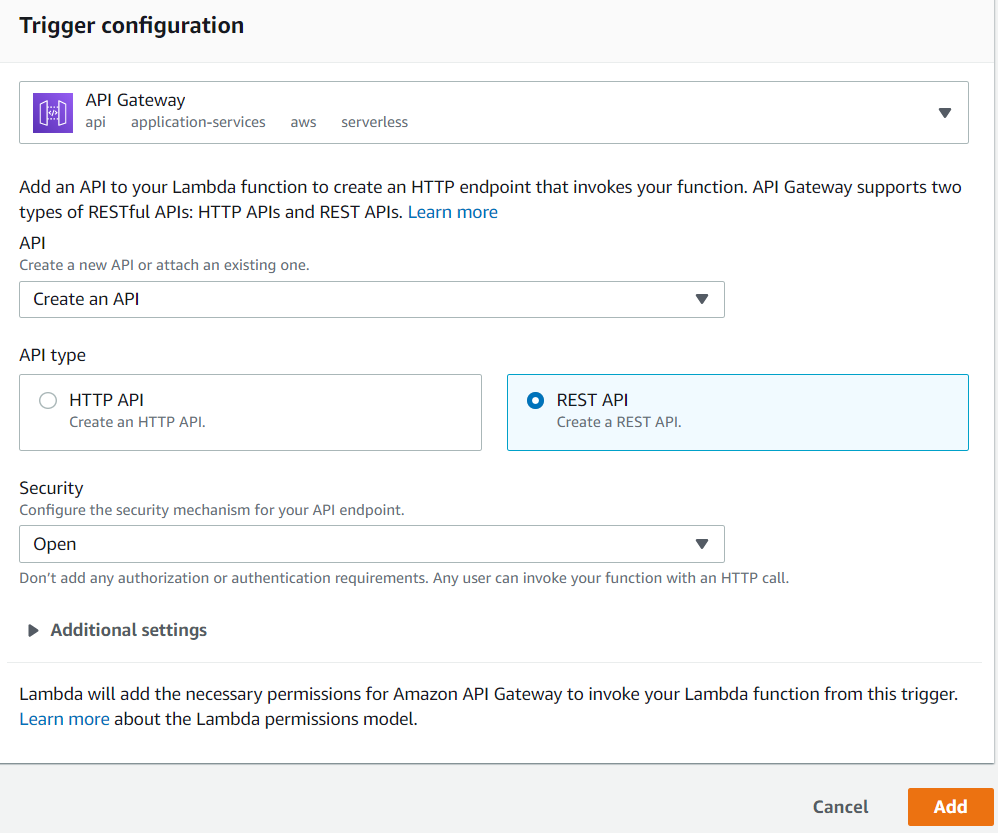
- On the Add trigger screen, from the Select a trigger dropdown, select API Gateway.
- Select Create an API, from the API dropdown. Then, select REST API inside the API type block, select Open from the Security dropdown, and click on Add.
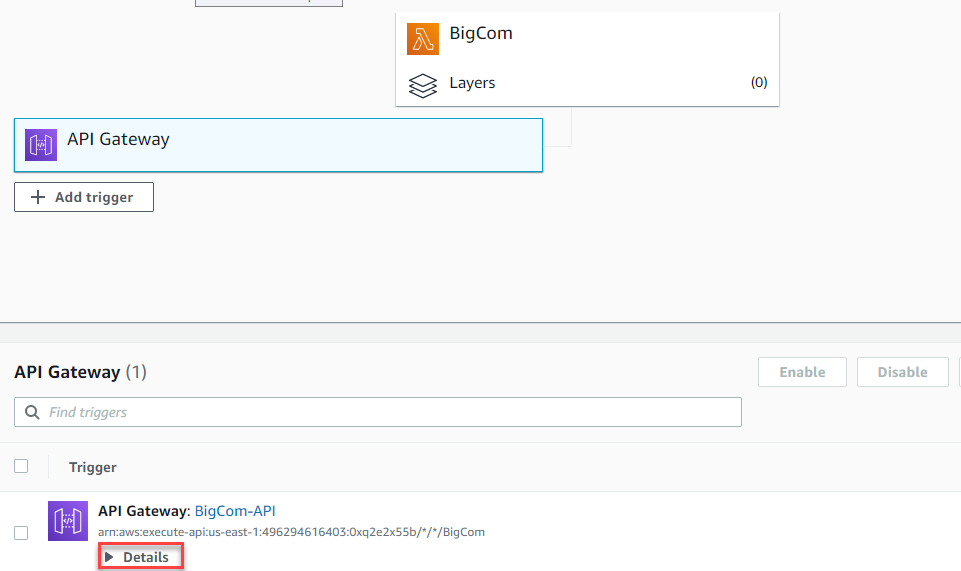
- An API is created for your lambda function. Under the Designer block, click on API Gateway. Click on Details and you will find your API endpoint. Make a note of it as we will need it while setting up the BigCommerce extension in Contentstack.
- Lastly, Enable CORS in Amazon API Gateway console. It is mandatory for successful implementation of this extension.
- Log in to your AWS Management Console, select Lambda from the Service list.
Add the “BigCommerce” Custom Field Extension to your Stack
To add this extension to your stack, log in to your Contentstack account, go to your stack, and perform the following steps:
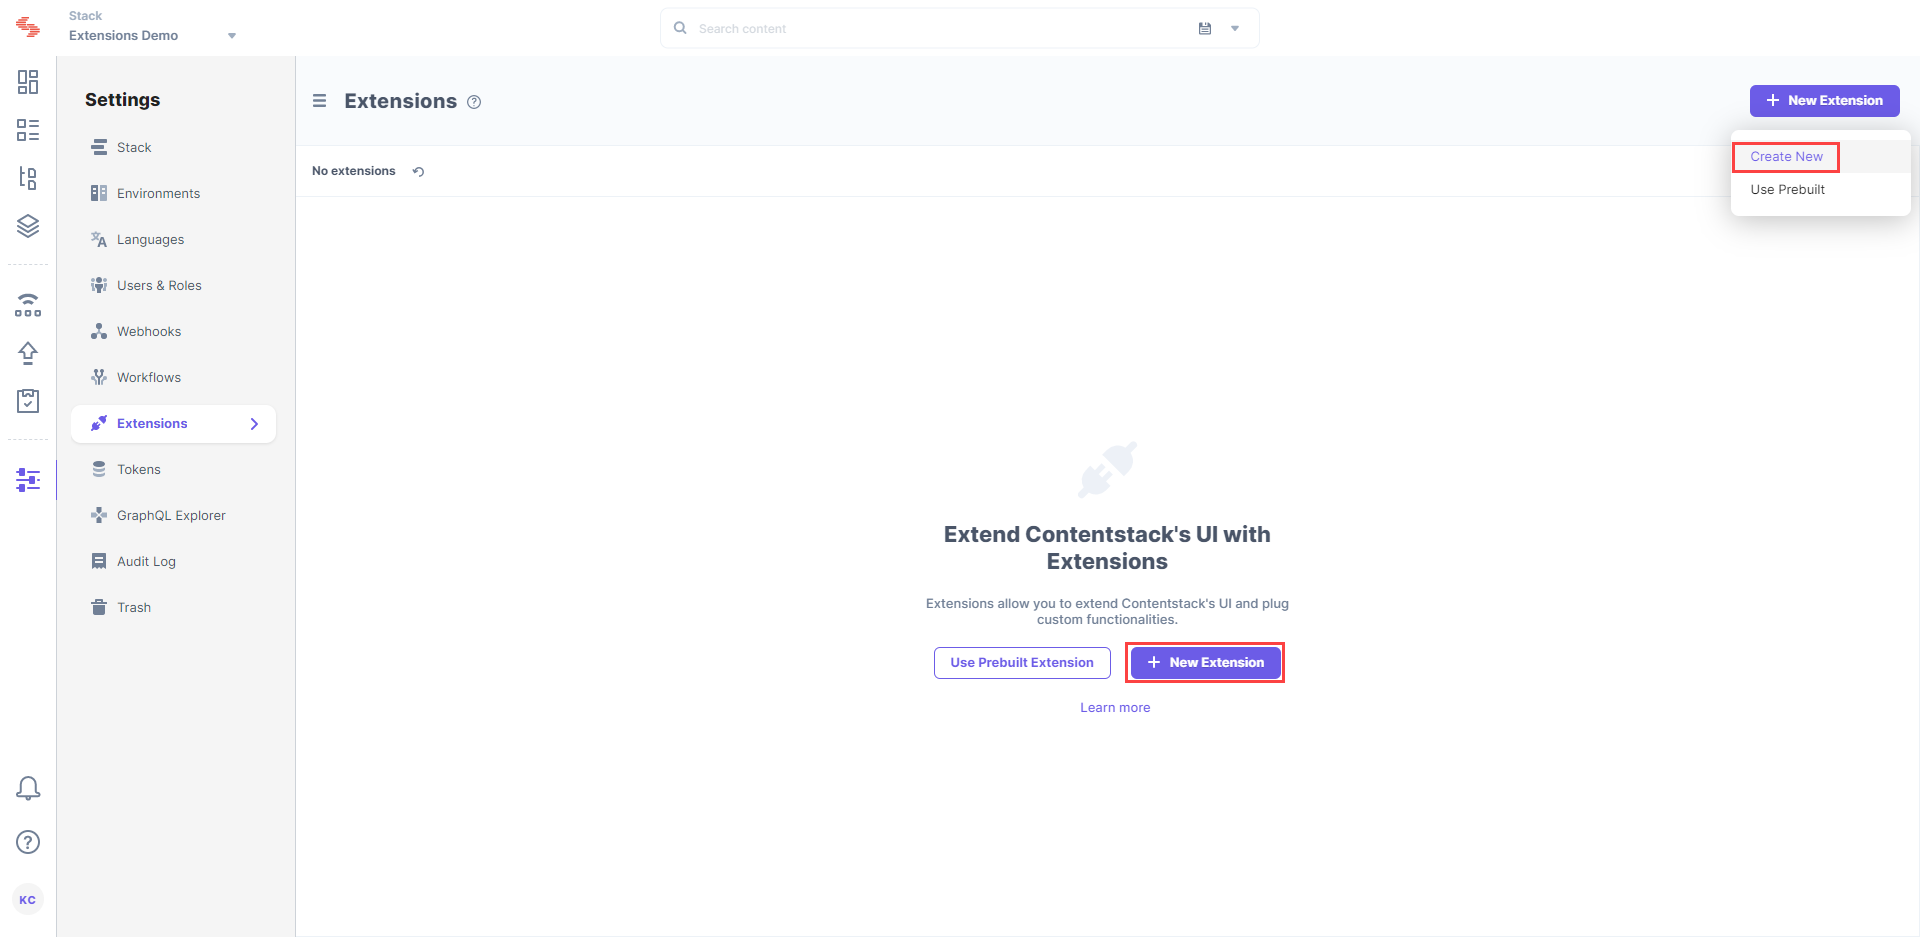
- Click the “Settings” icon on the left navigation panel.
- Select Extensions. You can also use the shortcut keys “alt + X” for Windows OS users, and “option + X” for Mac OS users to access the extensions menu.
- Now, click on the + New Extension button, and select Create new.
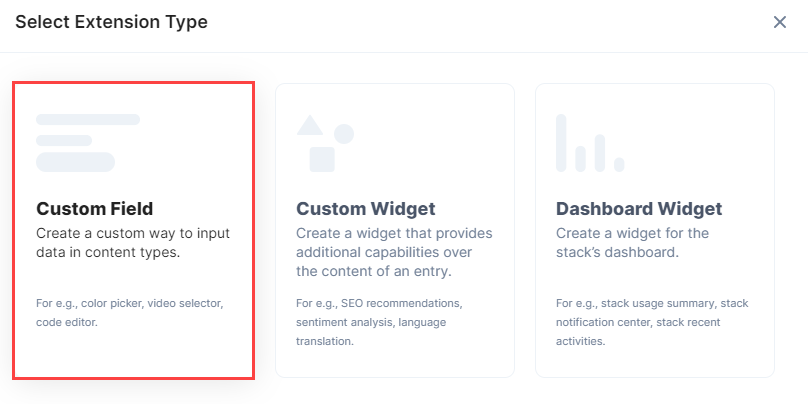
- In the Select Extension Type window, select Custom Field.
- On the Create New Extension page, enter values in the fields as given below:
- Title (required): Provide a suitable title, for example, “BigCommerce,” for your custom field. This title will be visible when you select the extension in the Custom field in your content type.
- Field Data Type (required): Select the data type in which the input data of the field should be saved in Contentstack. In this case, select JSON.
- Multiple (optional): Leave this field unchecked.
- Hosting Method (required): Select Hosted by Contentstack as the hosting method for this content type.
- Extension Source Code: Specify the extension code here. Copy the source code from the index.html file located in the root folder that you get from our Support team, and paste it into the Extension source code field.
Note: The root folder contains a redirect HTML file. Upload this file as an asset in Contentstack by following the steps mentioned in the Create/Upload asset article. After uploading the file, you'll get a URL in the asset details section, make note of this URL.
- Config Parameter: Provide values for the config parameters.Enter the configuration details in your extension settings as follows:
{ "url": " ", "type": " ", "page_count": " ", "store_id": " ", "redirect_url": " " }- "url": Enter the lambda API endpoint URL that we got in Step 2.
- "type": This key can have different values such as "category"( to select item category), "product_single" (to select a single product from the available list of products using a radio button) or "product_multiple" (to select more than one item from the available list).
- "page_count": This key allows you to control the number of items listed.
- "store_id": Enter the Store Hash value that we generated in Step 1. The API PATH URL consists of the store hash value: https://api.bigcommerce.com/stores/<<STOREHASH>>/v3
- "redirect_url": The value for redirect_url is the URL of the redirect HTML file which you uploaded as an asset.
- Save the custom field.
Use the Custom Field
Once you have added a custom field, you can use it in your content type. To add a custom field in your content type, follow the steps below:
- Click on the “Content Models” icon on the left navigation panel.
- Click on the + New Content Type button, enter the required details, and click Proceed.
- Click on the “Insert a field” link (+ sign), and add the Custom field to it.
- Under Select Extension drop-down menu in Basic properties, select the “BigCommerce” extension field that you created.
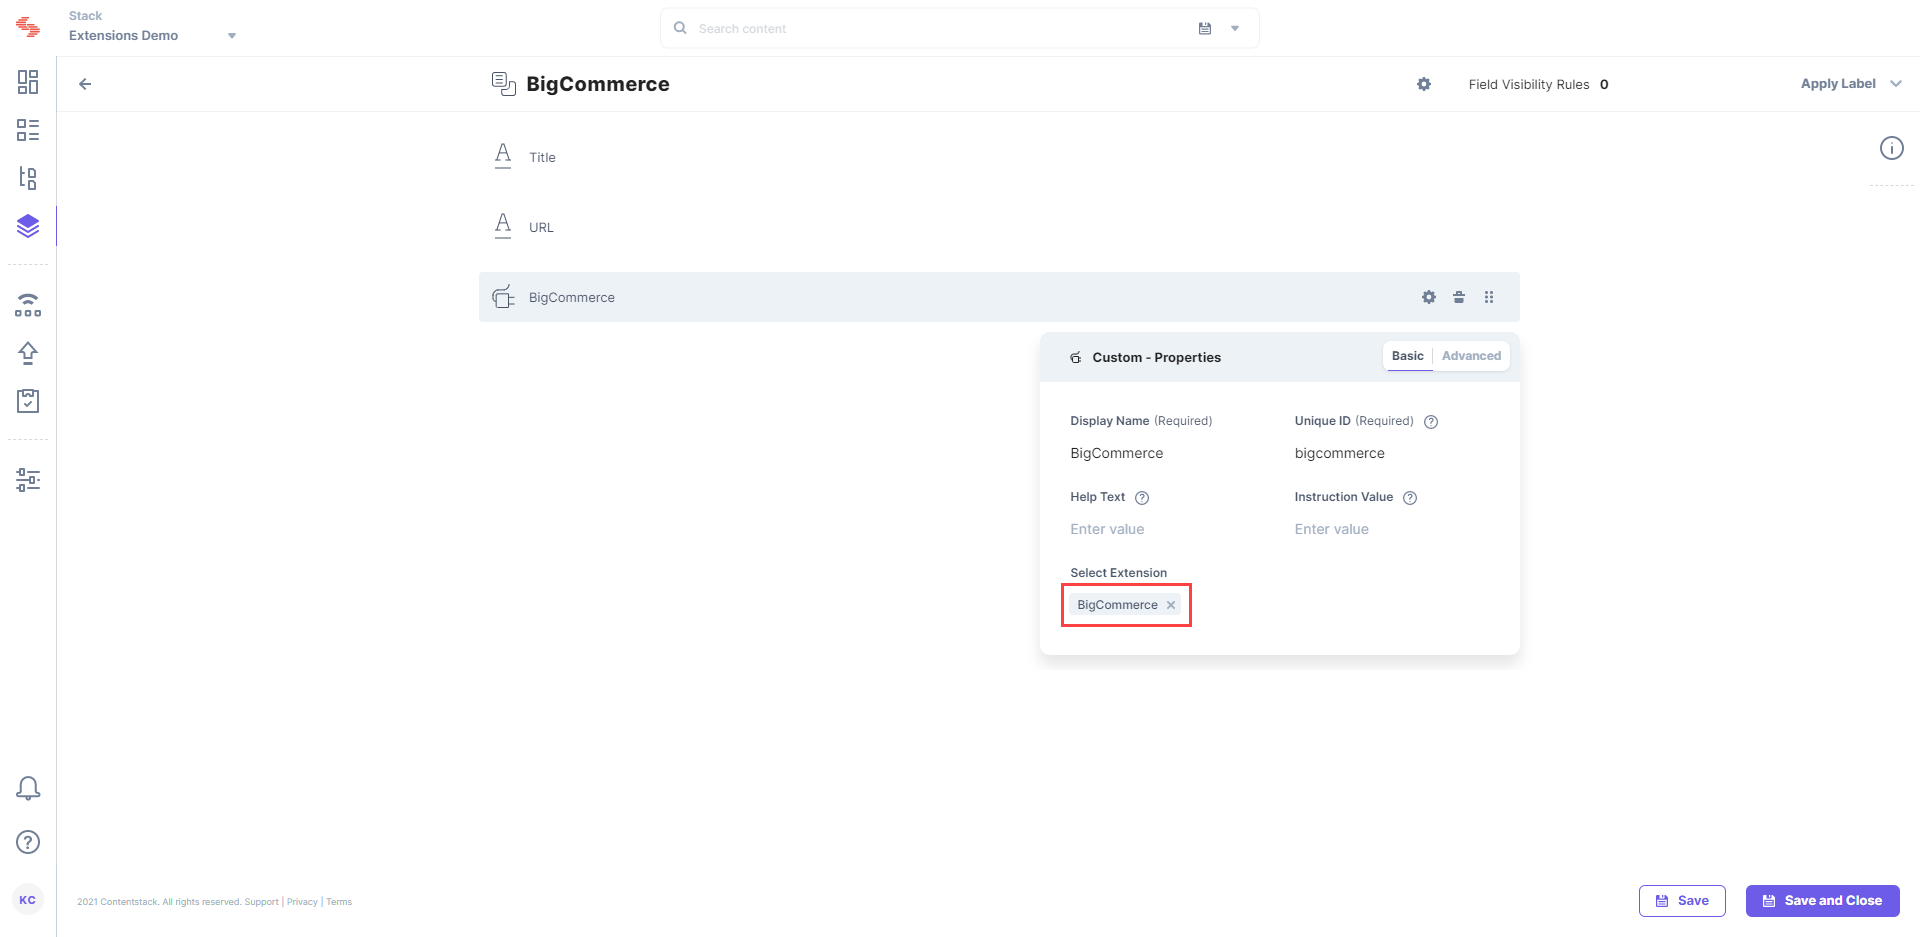
- Finally, click on Save and Close.
- Now create an entry for this content type, and you will see the BigCommerce custom field in action.
- Click on the Add Products button to add products of your choice to the custom field.
- Select the products of your choice and click on the Add Product(s) button.
- Finally, click on the Save button to save your entry.

Note: The number of items that can be selected depends on the size of the JSON that is to be stored, and currently, only 10 KB of data can be stored. This is due to limitation of the JSON data stored via Custom Field. Refer to our Custom Field Limitation doc for more details.
