

.svg?format=pjpg&auto=webp)
.svg?format=pjpg&auto=webp)
.png?format=pjpg&auto=webp)


.png?format=pjpg&auto=webp)
Azure Blob Storage
Azure Blob Storage custom field extension allows you to fetch your data (documents, images, videos, etc) from your Azure Blob Storage account and display them into a field of a content type in your stack.
Thus, while creating entries, you can select any data (as mentioned above) as the input value for the field in the content type of your stack.
This step-by-step guide explains how to create Azure Blob Storage custom field extension for your content types in Contentstack.
Prerequisites
Steps for Execution
- Create an Azure Blob Storage Service Account
- Retrieve SAS Token from Azure Storage Account
- Add the Azure Custom Field Extension to your Stack
- Use your Custom Field
Create an Azure Blob Storage Service Account
In order to use this extension, you need to create an account with Amazon Web Service. To do that, follow the steps given below:
- Goto https://azure.microsoft.com/en-us/free/ and click on Start free option.
- On the next screen, you'll be asked to log in. If you already have an account, just log in with your credentials. Else, you can Create one!
- Follow the on-screen instructions and create your Azure account.
Additional Resource: For more information about the features of Azure Blob Storage, its pricing, and FAQs, visit the Azure Storage page.
- Log into your newly created account and proceed to create your Azure storage account. Select Storage accounts from the left menu of your Azure portal.
- Navigate to the Storage accounts page and click on Create. Select your account type (you need a Basic storage account for this guide) and proceed to create your Azure storage account.
- To start using your Storage, you need to create Containers for your account that will hold your data. To do that, select Containers from your left menu portal within the Storage accounts page.
- Now, click on + Container button and follow the onscreen instructions to create your container.
- Once that is done, click on the container you created and add content to the container by clicking on the Upload button. You can add more than one container in your account.
- To access the data of a container, you need to make the containers public. Select the container(s) you created and click on the Change access level button. Click on the Public access level dropdown and select the Blob(anonymous read access for blobs only) option.
- Finally, enable Cross-origin resource sharing (CORS) in your Storage account.
Note: It is mandatory to enable CORS for your extension to work smoothly. Refer this detailed guide on how to enable CORS in Azure.
- Goto https://azure.microsoft.com/en-us/free/ and click on Start free option.
Retrieve SAS Token from Azure Storage Account
Now lets create and retrieve SAS token from your Azure Storage account. This token will help you set up your extension.
To get the SAS token, follow the steps given below:
- Navigate to the Storage accounts page and expand your Blob Container.
- Click on your Blob Container, in the left navigation, scroll down and under the Security + networking section select the Shared access signature option.
- Now specify your access policies, token lifespan, time zone and define your container’s permission as shown below:
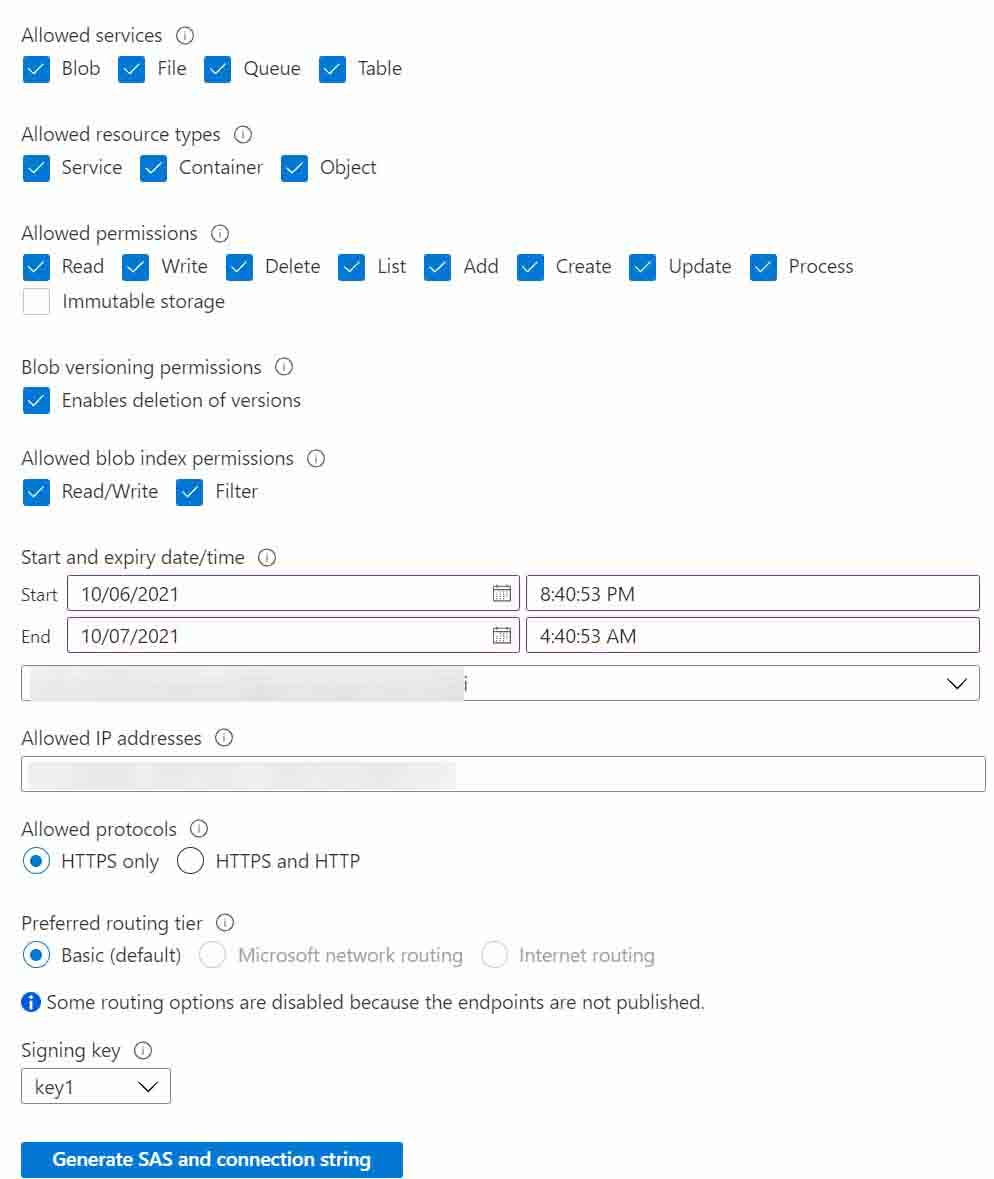
- Once done, click on the Generate SAS and connection string button.
- You will find the SAS token of your container. Note down the token, we will use it to set up our extension.
Note: The SAS token (URL) should be in the following format starting with a “?” sign. If it isn't, then generate a new token.
Additional Resource: Learn in detail how to create SAS token in Azure Storage Explorer.
- Navigate to the Storage accounts page and expand your Blob Container.
Add the Azure Blob Storage Custom Field Extension to your Stack
To set up an extension in Contentstack, log in to your Contentstack account and follow the steps given:
- If Extensions are part of your plan, contact our Support team to get the code for the extension. The support team will provide you with the source code that contains the following files:
- azure: Navigate to azure/build/index.html file. We will upload the code in this file in the extension source code field of our extension in the next step.
- azure-popup: Navigate to azure-popup/build/index.html, upload this file as an asset in your stack by referring to the Create/Upload Assets guide. After uploading this file, make a note of the asset URL. To view the asset URL, open the asset and copy the File URL.
- Goto your stack and click on the “Settings” icon on the left navigation panel.
- Click on Extensions. You can also use the shortcut keys “alt + X” for Windows OS users, and “option + X” for Mac OS users to access the extensions menu.
- On the Extensions page, click on the + New Extension button, and select Create new.
- In the Select Extension Type window, select Custom Field.
- On the Create New Extension page, enter details in the fields as given below:
- Title: Provide a suitable title. For example, “Azure Blob Storage”. This title will be visible when you select the extension in the Custom field in your content type.
- Field data type: Select the data type in which the input data of the field should be saved in Contentstack. Select JSON in this case.
- Multiple: Keep this option unchecked.
- Hosting method: Set the hosting method to Hosted By Contentstack.
- Extension Source Code: Enter the downloaded extension source code here. Navigate to azure/build path from the downloaded folder, copy and add the code of the index.html file here.
- Config Parameter: Enter the following configuration details as the extension's config parameter:
{
sasToken: “ ”,
accountName: “ ”,
redirectUrl: “ ”
}
- Title: Provide a suitable title. For example, “Azure Blob Storage”. This title will be visible when you select the extension in the Custom field in your content type.
- Click on Save. This creates your custom field.
Now, let’s understand how you can start using this custom field in your content type.
- If Extensions are part of your plan, contact our Support team to get the code for the extension. The support team will provide you with the source code that contains the following files:
Use your Custom Field
After adding the custom field to your content type, you can use it like any other field.
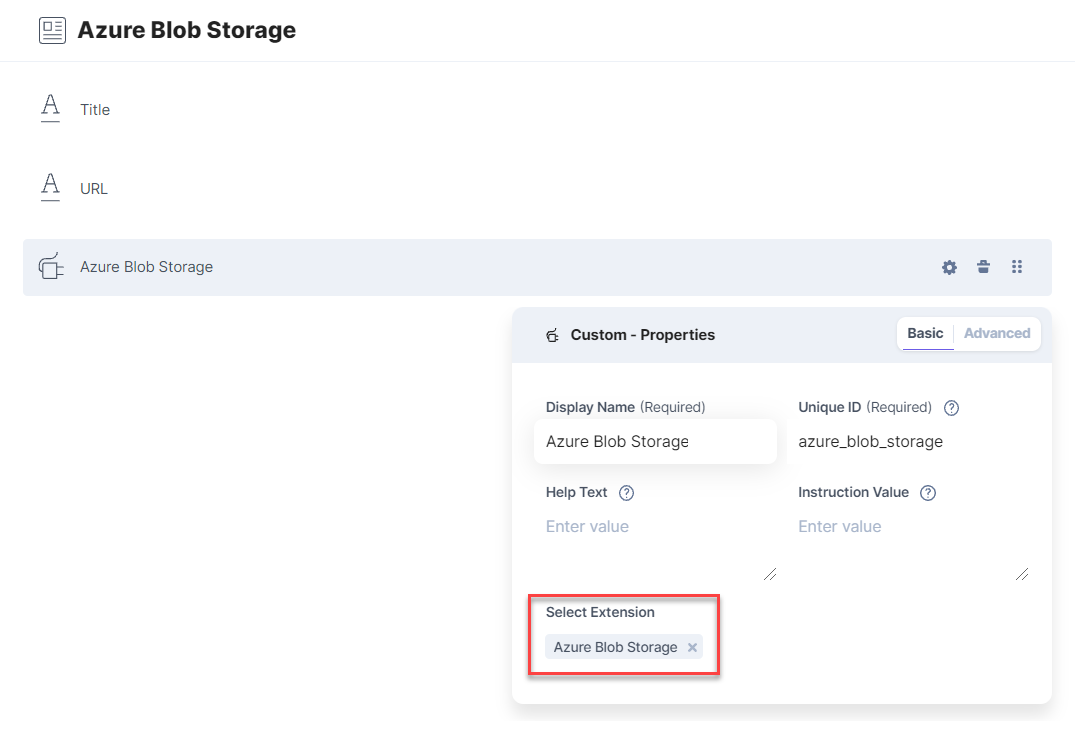
To add a custom field in your content type, perform the following steps:- Create a content type then add the custom field to it.
- Under Select Extension, select the “Azure Blob Storage” field that you created and set other properties. You can add other fields as per requirements.
- Click on Save or Save and Close to save your changes.
- Next, create an entry for this content type, and you will see the Azure Blob Storage field in your entry page.
- Click on Choose from Azure Container.
It will redirect you to a new page, where you can select documents, images, videos, etc, and insert them in your field by clicking on Add Selected Object.
Note: The number of items that can be selected depends on the size of the JSON that is to be stored, and currently, only 10 KB of data can be stored. This is due to limitation of the JSON data stored via Custom Field. Refer to our Custom Field Limitation doc for more detail.
- Create a content type then add the custom field to it.


