


.jpg?format=pjpg&auto=webp)


WordPress to Contentstack
In this section, we'll learn how to migrate content from WordPress to Contentstack.
To migrate content from WordPress to Contentstack, you will first need to export content from WordPress and then import the exported content to Contentstack.
-
Export Content from WordPress
There are two methods to export content from WordPress:
- Export content using MySQL queries
- Export content using exported XML file
In this guide, we will go through each of these methods in detail.
Method 1 - Export Content Using MySQL Queries
Contentstack provides a tool that allows you to export content from WordPress using MySQL queries and makes it possible to import it into Contentstack. Using this project, you can easily export WordPress Users (authors), Categories, Media (assets), and Blog posts from WordPress and import them into Contentstack.
To do so, you need to perform the steps given below:
- Download the exporter utility tool: To export your content from WordPress, you need to first download the export utility tool from GitHub. This utility tool consists of modules that will help you to download your content from WordPress and save it in JSON format in your file system. JSON format makes it easier to import data into Contentstack.
- Install Node modules: Node.js modules play an essential part in the effective working of the utility tool. Using Node.js package manager (npm), the essential modules of the utility tool will export content into your file system.
To install the node modules that are necessary for exporting the content into your file system, open a terminal, navigate to the root folder of the utility tool, and run the command given below:
bash
npm install
- Add configuration details: Before exporting the content, certain changes need to be made in the configuration file of the utility tool. So, open the index.json file within the config folder of the utility tool and add the following configuration details:
"host":"<<mysql host>>",
"user":"<<mysql username>>",
"password":"<<mysql password>>",
"database":"<<mysql database of wordpress>>"
In the above configuration details, you need to provide the MySQL host, username, and password, and also provide the name of the WordPress database content.
Note: When exporting content via MySQL, you can specify a user-defined prefix under the table_prefix parameter. By default, the value is set to wp_.
- Export modules: After entering the configuration details, you are now ready to export content from WordPress. On the basis of your requirement, you can either perform a complete export of the content or you can export specific modules via their name or ID.
- To export the entire content, run the command given below:
npm run exportThis command will fetch data of authors, assets, categories, and posts from the downloaded XML file and convert them in JSON files that is supported in Contentstack. These files are stored in the path mentioned in the data key in the config/index.js file.
- To export specific modules of your content, run the command given below:
npm run export {module-name}When exporting modules individually, make sure you follow the module sequence as given below:
- assets
- authors
- categories
- posts
This mans that, before exporting posts, you must have had exported assets, authors, and categories:
- Modules that you wish to export separately or those that have failed to export (the details of these modules are recorded in the error log or in the failed.json file) can be installed with the help of their IDs. These IDs will be stored as comma-separated values in the failed.json file.
Now, to export the modules, you need to provide the absolute path of the file that stores the IDs, when running the following command in a terminal:
npm run export <<module name>> <<absolute_path_of_the_file>> - Copy schema: Copy the contentTypes folder from the utility folder, place it within the exported data folder, and rename it to content_types. The structure of the exported data folder should look like below:
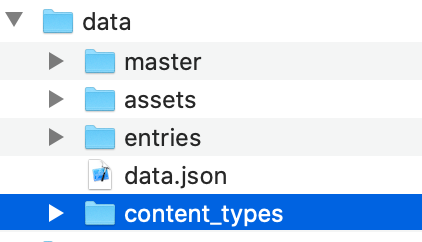
The content_types folder consists of the basic schema of content types which will help you to migrate your data.
You can find the success and error logs of the export process under libs/utils/logs. The successfully run processes are recorded under success and the processes that have errors will be recorded under errors.
The logs for failed assets are recorded in failed.json and is stored under the master folder located where your exported data resides.
Note: This utility tool can be used to extract only the latest published version of an entry.
The latest published content will be exported in JSON format and stored at the location provided in the index.json configuration file from where you can later import the data into Contentstack.
Limitations of this utility
There are certain limitations when exporting the content from WordPress. They are listed as follows:
- Only the latest published posts will be exported from WordPress.
- The internal links provided within the content will not be exported.
- There is no provision to migrate the authors' profile pictures or their social profile details, comments on posts, and pages.
- In XML-based export process, if the version of WordPress is lower than 4, the category description and parent details will be absent.
The exported content is now ready to be imported into Contentstack. This content will be in JSON format and stored at the location provided in the index.json configuration file from where you can later import the data into Contentstack.
To import the content, check the Import Content into Contentstack section.
Method 2 - Export Content Using Exported XML File
Contentstack tool allows you to export content from WordPress into an XML file and prepare it to be imported into Contentstack. Using this project, you can easily export WordPress Users (authors), Categories, Media (assets), and Blog posts from WordPress and convert them into a format suitable to be imported into Contentstack.
To do so, you need to perform the steps given below:
- Download the exporter utility tool: To export your content from WordPress, you need to first download the export utility tool from GitHub. This utility tool consists of modules that will help you to download your content from WordPress and save it in JSON format in your file system. JSON format makes it easier to import data into Contentstack.
- Install Node modules: Node.js modules play an essential part in the effective working of the utility tool. Using Node.js package manager (npm), the essential modules of the utility tool will extract content into your file system.
To install the node modules that are necessary for exporting the content into your file system, open a terminal, navigate to the root folder of the utility tool, and run the command given below:
bash
npm install
- Export content from WordPress: Use the Export tool provided by WordPress which will allow you to download your WordPress content into an XML file from the WordPress admin panel.
Now, pass the absolute path of the exported file to the xml_filename key in the index.json file under the config folder of the exporter utility. This will enable the exporter utility to understand the location from where it has to pick up the XML file of the content.
Note: When exporting content via MySQL, you can specify a user-defined prefix under the table_prefix parameter. By default, the value is set to wp_.
- Export modules: After the configuration, you are now ready to export content from WordPress. On the basis of your requirement, you can either perform a complete export of the content or you can export specific modules via their name or their ID.
- To export the entire content, run the command given below:
npm run exportThis command will extract data of authors, assets, categories, and posts from the downloaded XML file and convert them in JSON files that is supported in Contentstack. These files are stored in the path mentioned in the data key in the config/index.js file.
- To export specific modules of your content, run the command given below:
npm run export {module-name}When exporting modules individually, make sure you follow the module sequence as given below, for example, before exporting entries, you must have had exported assets, environments, locales, and content types:
- assets
- authors
- categories
- posts
- Modules that you wish to export separately or those that have failed to export (the details of these modules are recorded in the error log or in the failed.json file) can be installed with the help of their IDs. These IDs will be stored as comma-separated values in the failed.json file.
Now, to export the modules, you need to provide the absolute path of the file that stores the IDs, when running the following command in a terminal:
npm run export <<module name>> <<absolute_path_of_the_file>>If you wish to export the categories module, you need to provide the absolute path of the file that stores the slugs of all the categories (the slugs are stored as comma-separated values in the file), when running the following command in a terminal:
npm run export <<module name>> <<absolute_path_of_the_file (slug for category)>> - Copy schema: Copy the contentTypes folder from the utility folder, place it within the exported data folder, and rename it to content_types. The structure of the exported data folder should look like below:
The content_types folder consists of the basic schema of content types which will help you to migrate your data.
You can find the success and error logs of the export process under libs/utils/logs. The successfully run processes are recorded under success and the processes that have errors will be recorded under errors.
The logs for failed assets are recorded in failed.json and is stored under the master folder located where your exported data resides.
Note: This utility tool can be used to extract only the latest published version of an entry.
The latest published content will be exported in JSON format and stored at the location provided in the index.json configuration file from where you can later import the data into Contentstack.
Limitations of this utility
There are certain limitations when exporting the content from WordPress. They are listed as follows:
- Only the latest published posts will be migrated from WordPress.
- In XML export file, the author count will not be accurate as the details of only those authors who have published posts are exported.
- The internal links provided within the content will not be updated.
- There is no provision to migrate the authors' profile pictures or their social profile details, comments on posts, and pages.
- In XML-based export process, if the version of WordPress is lower than 4, the category description and parent details will be absent.
Now, refer the next section to learn how to import the exported content into Contentstack.
Import Content into Contentstack
The exported content is now ready to be imported into Contentstack. This content will be in JSON format and stored at the location provided in the index.json configuration file from where you can later import the data into Contentstack.
To import the content, follow the steps mentioned in the Import Content into Contentstack document.
More articles
