

.svg?format=pjpg&auto=webp)
.svg?format=pjpg&auto=webp)
.png?format=pjpg&auto=webp)


.png?format=pjpg&auto=webp)
Deploying AWS Lambda code in different environments

This comprehensive guide provides clear instructions on creating, deploying and securing a Lambda function in AWS. It offers practical insights into setting up environments, crafting aliases, and integrating them with the API Gateway. To witness the real-world application of these steps, we encourage you to schedule a demo today.
The beauty of AWS Lambda is that it allows you to deploy and execute code without needing any physical server. In other words, you can set up “serverless” architecture using AWS Lambda.
When deploying your code, you may want to deploy it in various environments (such as testing, development, and production), so that you can test your code before going live.
This article takes you through the steps of setting up Lambda functions in different environments by using the AWS Lambda function alias and versioning. By the end of this blog, we will have learned how to do the following:
- Create an alias for AWS Lambda function
- Associate the AWS Lambda function alias with the AWS API Gateway stage
- Secure the AWS API Gateway stage with API Key and Rate Limiting
- Reassociate versions with the alias
These are the essentials for managing different environments within the serverless system and for the smooth rolling out of releases.
Create an Alias for AWS Lambda Function
The following section shows you how to create environment aliases for a Lambda function and associate them with function versions. We will create two aliases for the development and production environments as an example.
Modernize your digital presence with Contentstack. Learn from the success stories of Icelandair and Pella. Improve your site performance, publishing efficiency, and speed, just as they did. Start your journey towards a modern digital experience. Start your free trial with Contentstack today and witness an ROI of up to 295%.
Create a Lambda function
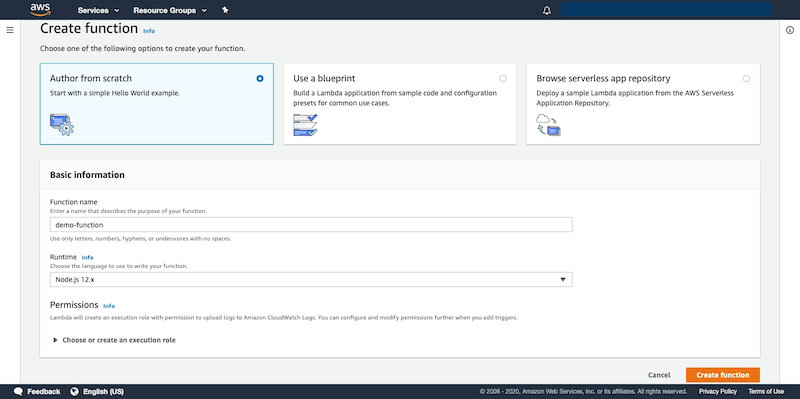
To create a Lambda function, follow the steps below:
- Login to your AWS Management Console, select AWS Lambda service from the Service list.
- Click on the Create function button, and then the Author from scratch option.
- Configure the lambda based on your requirements. Choose Node.js 12.x as your run-time language and click on the Create function button.
Publish Version
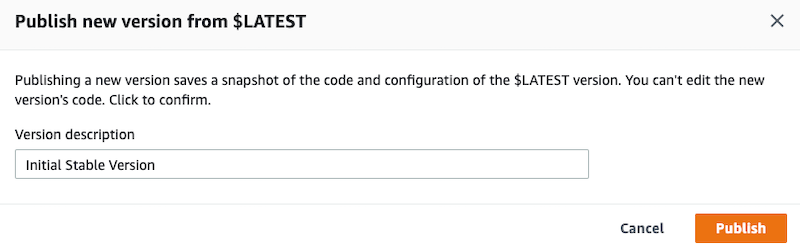
After creating a Lambda function, you can publish the version as follows:
- Go to the newly created version.
- Select Publish new version from the “Actions” drop-down menu:

- Publish the new version with an appropriate version description, for example, “Initial Stable Version.”
Create an Alias for Each Environment
The next step is to create an alias for each environment, as shown below:
- From the Actions drop-down menu, select Create a new alias.
- Add the alias Name, Description, and Version, as shown in the following example:
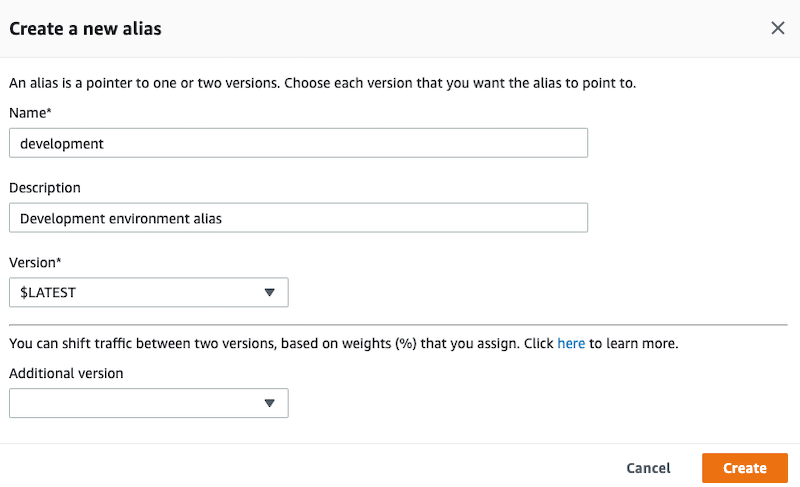
Note: You have to perform this step twice, first for the development environment and second for the production environment.
- The version for the development environment should be $LATEST and for the production environment, it should be 1 which we created in the Publish Version section above.
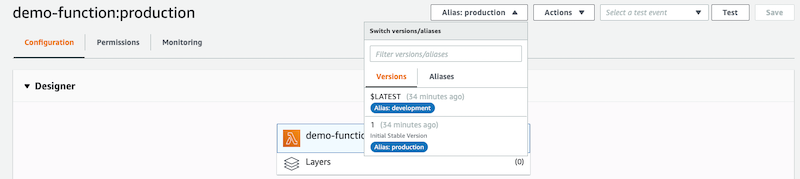
These steps ensure that a specific version of the Lambda function is assigned to the production environment, and the latest version is assigned to the development environment.
Associate the AWS Lambda Function Alias With the AWS API Gateway Stage
This section shows how to create a new AWS Lambda API Gateway and associate the production and environment stages with the respective Lambda function aliases.
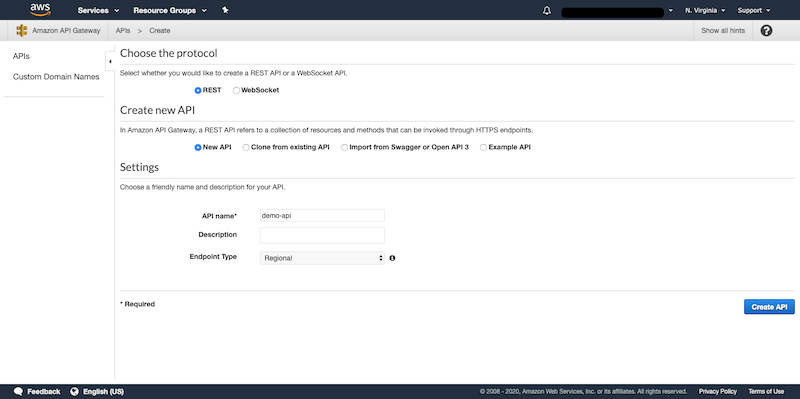
Create a New REST API
REST APIs help the Lambda function to fetch and send data. So, the next step is to create a REST API using the steps given below:
- Log in to AWS Management Console and select API Gateways from the services list.
- Click on the Create API button.
- On the Choose an API type page, go to the REST API option (the public one) and click on Build.
- On the next page, ensure that the Choose the protocol section has REST checked, and the Create new API section has New API checked. Enter the API name in the Settings section and click on Create API.
- Now add a new resource to the API gateway as shown in the following screenshot:
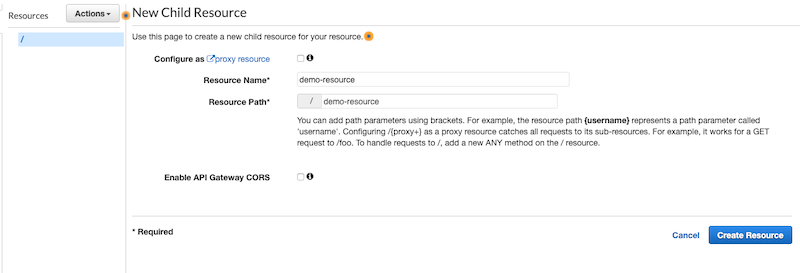
- Add a simple method of the required type. In this example, we have created a GET method for "/demo-resource".
Deploy and Add Stage Variable
Now that the API is created, let’s deploy it.
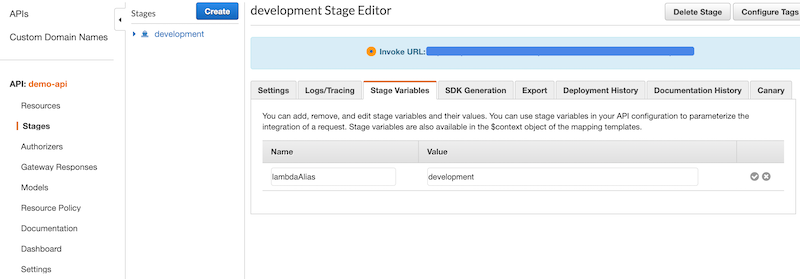
- Deploy the API in two new stages and name them development and production.
- In the Stages tab of API Gateway, navigate to each deployed stage and add the stage variable with key as lambdaAlias and the name of the stage as value.
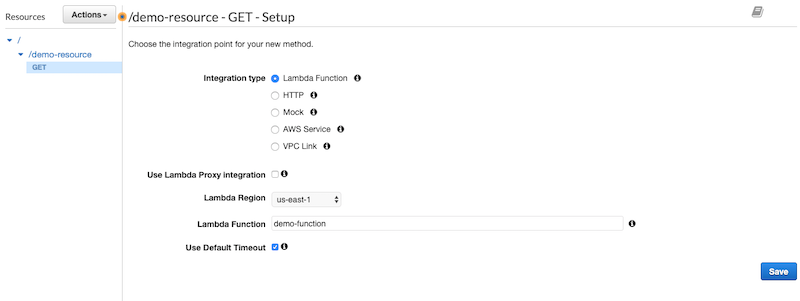
Associate Stage With Lambda Alias
- In the Resources tab of API Gateway, select the REST API method that we created in the above.
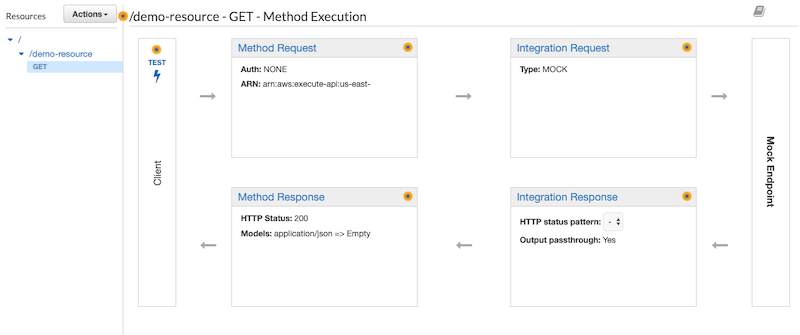
- Click on Integration Request, which is associated with Mock by default.
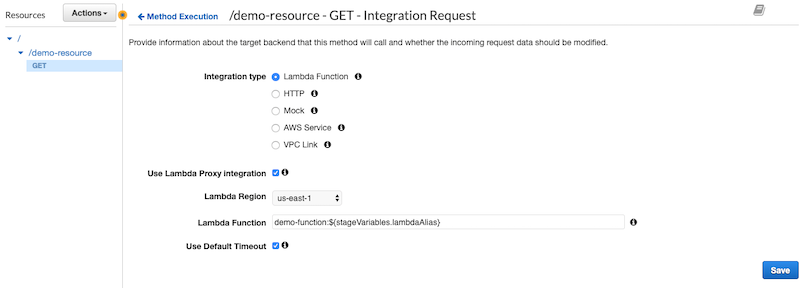
- Select the Lambda region in the Integration Request section and set name to the name of the Lambda function followed by :${stageVariables.lambdaAlias}. In our example, we have named it demo-function:${stageVariables.lambdaAlias} as shown below:
- After clicking Save, a prompt appears with a CLI command and instructions to add permission for each stage. Execute the command from AWS CLI by replacing :${stageVariables.lambdaAlias} with each stage name.
- After you execute the command, your Lambda stages successfully attach to the respective Lambda function aliases.
Securing AWS API Gateway Stage With API Key and Rate Limiting
The following section shows how to add the API key security to the API gateway and apply appropriate rate-limiting to safeguard our respective environments.
Contentstack: Your partner in scaling digital experiences. Twice named a Leader in Forrester's composable DXP award, Contentstack offers an innovative approach to DXP. Experience our 100% microservices architecture and API coverage that allows instant scalability. Start your free trial today.
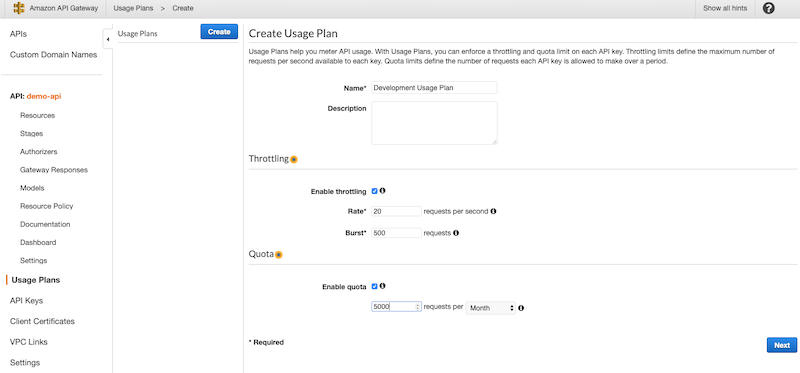
Create Usage Plan
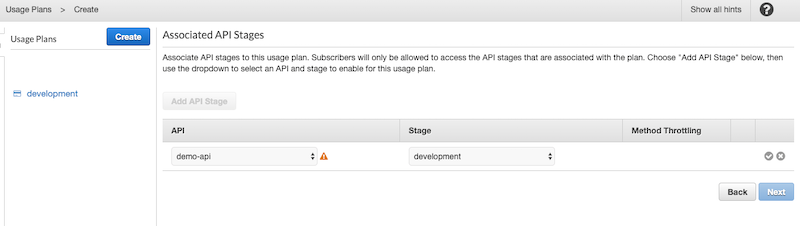
- Create an API usage plan for development and production environments with appropriate throttling and quota for the respective stage.
- Note: For more information on the rate-limiting algorithm, read the following guide: https://docs.aws.amazon.com/apigateway/latest/developerguide/api-gateway-request-throttling.html.
- Now associate the API gateway stage with the respective usage plan while creating. In our use case, we associate the development usage plan with the development stage of the API gateway.
Create and Add Api Key to Usage Plan
- Select each usage plan and go to the API Keys tab.
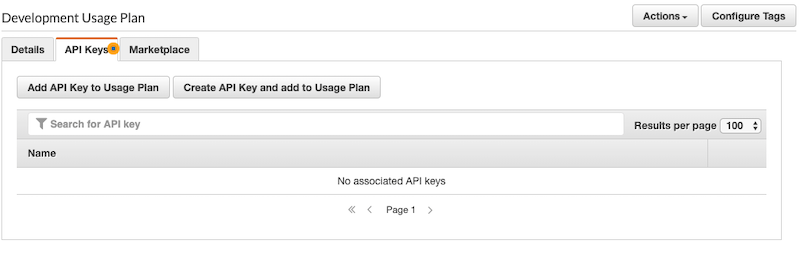
- Click on Create an API Key and add it to the Usage Plan and add the API key.
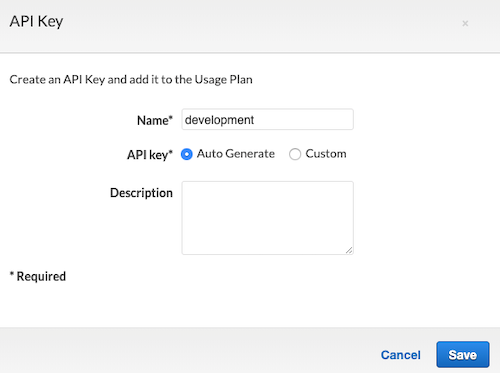
- After creating the API key, click on the newly created API key from respective usage plans.
Make API Key Mandatory For Resource
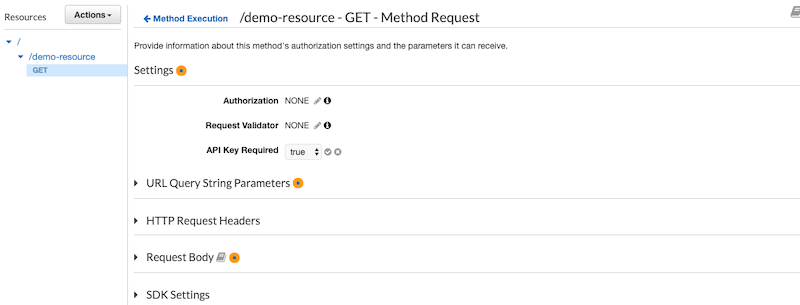
- Go to the Resource Method created for the API.
- Within the Method Execution section, click on Method Request.
- From the Settings section, set API Key Required drop-down to true.
- Deploy the API gateway to both the created stages for respective environments.
After completing the above steps, you will require the respective API keys to access the stages of the API gateway associated with different aliases.
Reassociating Version With Alias
This section demonstrates how you can update the alias version for a Lambda function, which you can use to either associate a new version to a production alias or revert code to an earlier version.
Publish New Version
- Publish a new version of the latest Lambda function when development is completed.
- This step is optional if you are trying to revert the code to an earlier version.
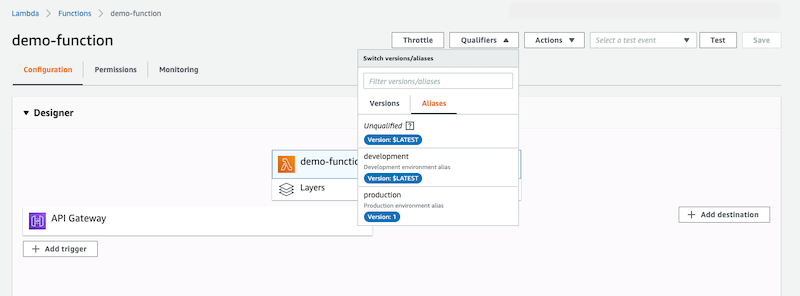
Switch Alias
Select production alias from the Qualifiers drop-down of the AWS Lambda function.
Update Alias Version
- After switching alias from the drop-down, scroll down to the Aliases section of the Lambda function and select a new version for the alias.
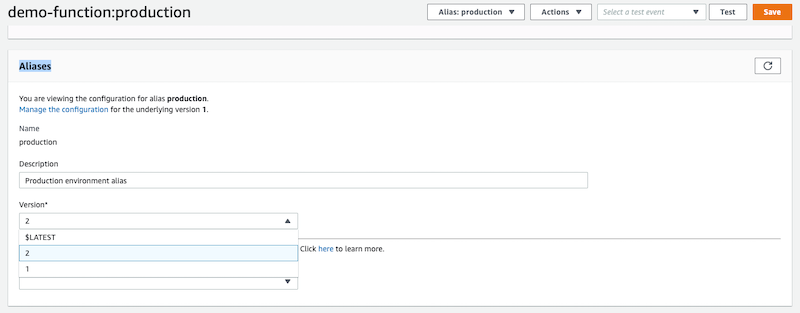
- Click on Save to complete the reassociation of the version with the alias.
The above steps should help you set up multiple environments in AWS Lambda. We can ensure that the development URL always gets the result from the latest Lambda function and the production environment is bound to one fixed version of the Lambda function.
About Contentstack
The Contentstack team comprises highly skilled professionals specializing in product marketing, customer acquisition and retention, and digital marketing strategy. With extensive experience holding senior positions at renowned technology companies across Fortune 500, mid-size, and start-up sectors, our team offers impactful solutions based on diverse backgrounds and extensive industry knowledge.
Contentstack is on a mission to deliver the world’s best digital experiences through a fusion of cutting-edge content management, customer data, personalization, and AI technology. Iconic brands, such as AirFrance KLM, ASICS, Burberry, Mattel, Mitsubishi, and Walmart, depend on the platform to rise above the noise in today's crowded digital markets and gain their competitive edge.
In January 2025, Contentstack proudly secured its first-ever position as a Visionary in the 2025 Gartner® Magic Quadrant™ for Digital Experience Platforms (DXP). Further solidifying its prominent standing, Contentstack was recognized as a Leader in the Forrester Research, Inc. March 2025 report, “The Forrester Wave™: Content Management Systems (CMS), Q1 2025.” Contentstack was the only pure headless provider named as a Leader in the report, which evaluated 13 top CMS providers on 19 criteria for current offering and strategy.
Follow Contentstack on LinkedIn.

Recommended posts


