


.jpg?format=pjpg&auto=webp)


Contentstack Management - Taxonomy Actions
Taxonomy assists in organizing the content within stack into categories, making it easier to navigate, search, and retrieve information. You can perform taxonomy based operations using the following Contentstack Management Taxonomy actions.
- Create a Taxonomy
- Create a Term
- Delete a Taxonomy
- Delete a Term
- Export a Taxonomy
- Get All Ancestors of a Term
- Get All Descendants of a Term
- Get All Taxonomies
- Get All Terms
- Get All Terms across All Taxonomies
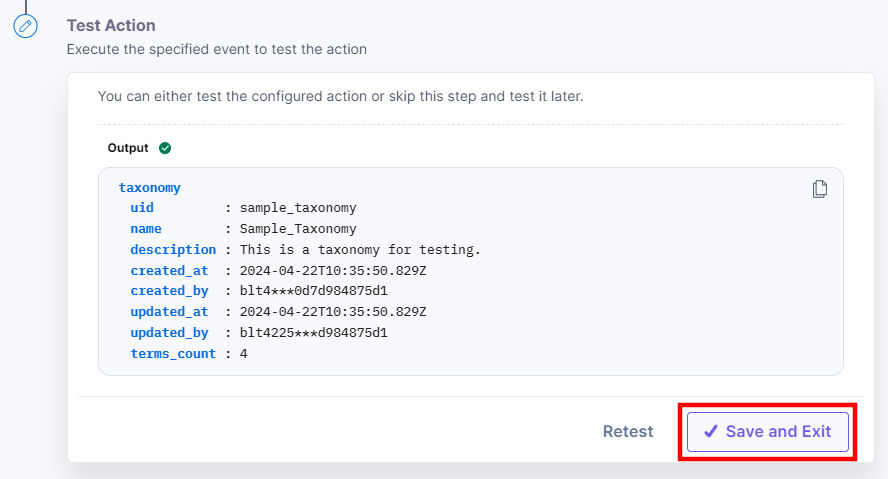
- Get a Single Taxonomy
- Get a Single Term
- Import a Taxonomy
- Update a Taxonomy
- Update a Term
Let’s look at each of these in detail.
Create a Taxonomy
This action lets you create a new taxonomy in a stack.
- Under Choose an Action tab, select the Create a Taxonomy action.
- On the Create a Taxonomy Configure Action page, enter the details given below:
- Click + Add New Account button to connect your Contentstack account as shown in the Connect your Contentstack Account to Automate step.
- Select a Stack from the Lookup list.
- Enter a suitable Taxonomy UID and Taxonomy Title. For example, enter sample_taxonomy in Taxonomy UID and Sample_Taxonomy in Taxonomy Title.
Note: The Taxonomy UID must contain only alphanumeric values and underscores.
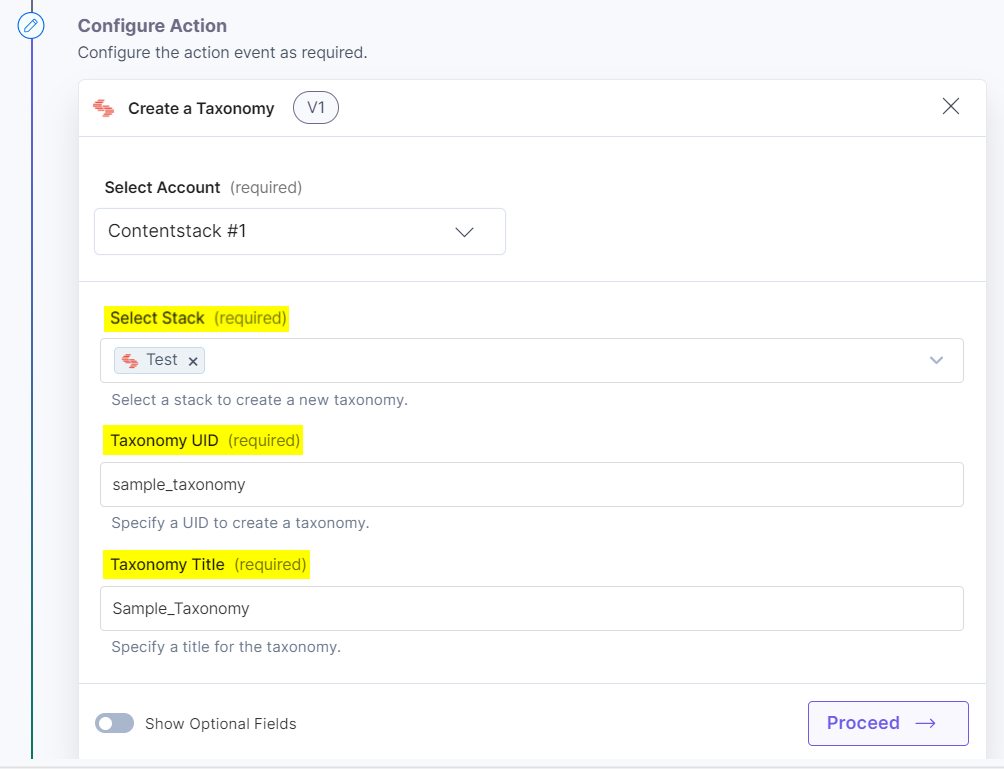
- [Optional] Enable the Show Optional Fields toggle button to display the Taxonomy Description field.
- In the Taxonomy Description field, specify a suitable description for your taxonomy.

- Once done, click Proceed.
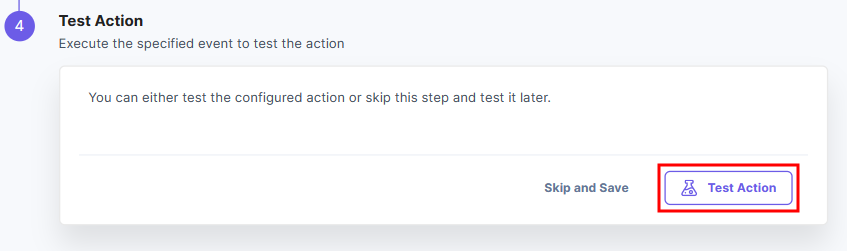
- Click Test Action to test the configured action.
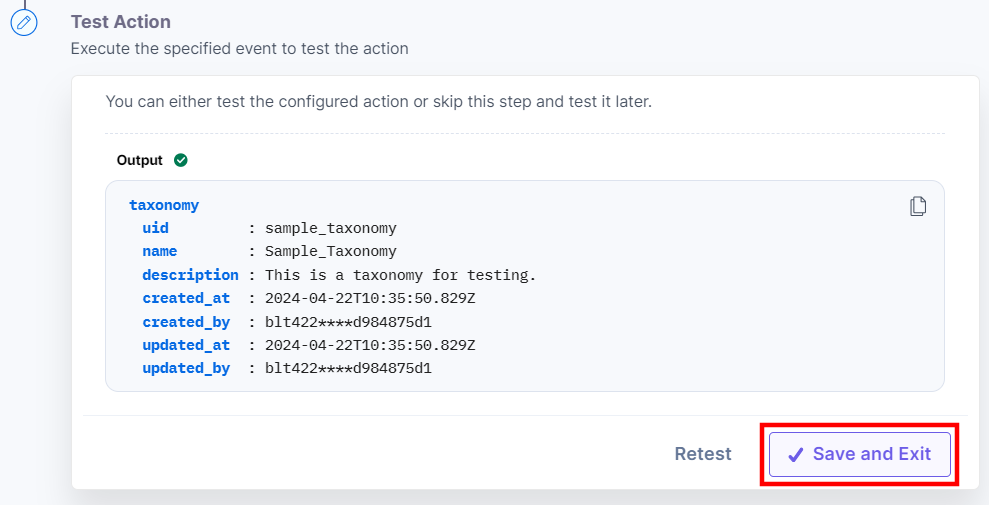
- The output will be shown as below. Click the Save and Exit button.
Create a Term
This action lets you create a new term within a taxonomy.
- Under Choose an Action tab, select the Create a Term action.
- On the Create a Term Configure Action page, enter the details given below:
- Click + Add New Account button to connect your Contentstack account as shown in the Connect your Contentstack Account to Automate step.
- Select a Stack and Taxonomy from the Lookup list. In this example, we are creating a term for the Sample_Taxonomy we created in the previous action.
- Enter a suitable Term UID, Term Title, and Term Order to create a new term. For example, enter child_term_test in Term UID and Child_Term_Test in Term Title, and 1 in the Term Order.
Note: The Term UID must contain only alphanumeric values and underscores.
- In the Select Parent Term field, select the parent to create a term. For example, select Parent_Test term created within Sample_Taxonomy. The new term will become a child element of the Parent_Test term.

- Once done, click Proceed.
- Click Test Action to test the configured action.
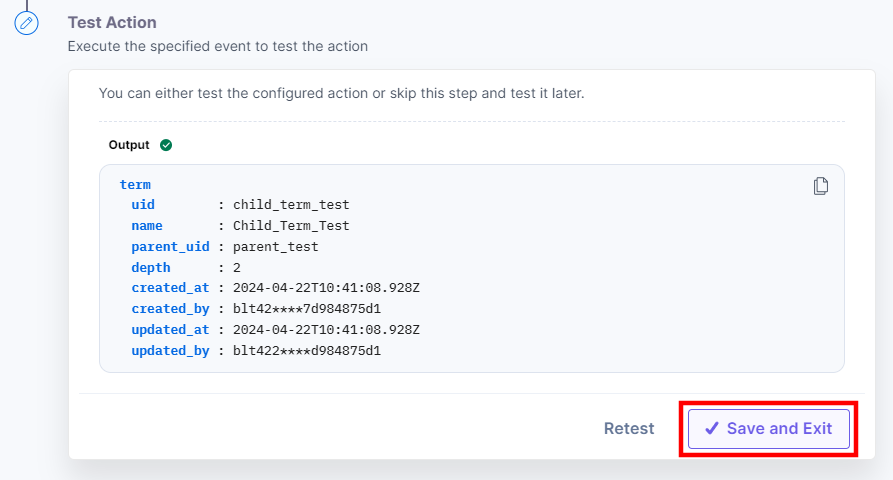
- The output will be shown as below. Click the Save and Exit button.
Delete a Taxonomy
This action deletes a taxonomy and all its associated terms from a stack.
- Under Choose an Action tab, select the Delete a Taxonomy action.
- On the Delete a Taxonomy Configure Action page, enter the details given below:
- Click + Add New Account button to connect your Contentstack account as shown in the Connect your Contentstack Account to Automate step.
- Select a Stack and Taxonomy from the Lookup list. For example, select Test stack and Sample 2 taxonomy.
- Click the Force Delete checkbox to delete the taxonomy. This will delete the taxonomy even if it is referenced in the entries.
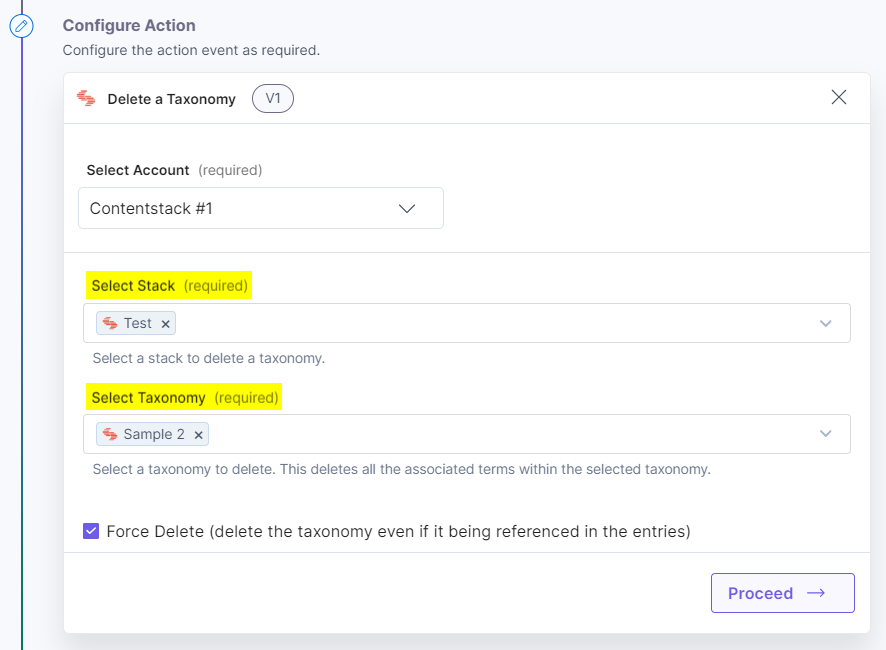
- Once done, click Proceed.
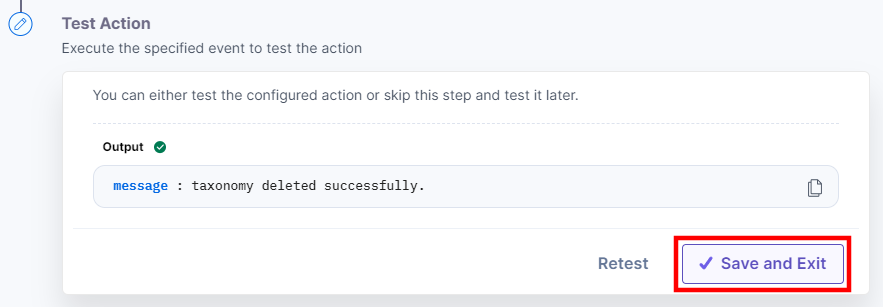
- Click Test Action to test the configured action.
- The output will be shown as below. Click the Save and Exit button.
Delete a Term
This action deletes a term within a taxonomy.
- Under Choose an Action tab, select the Delete a Term action.
- On the Delete a Term Configure Action page, enter the details given below:
- Click + Add New Account button to connect your Contentstack account as shown in the Connect your Contentstack Account to Automate step.
- Select a Stack, Taxonomy, and Term from the Lookup list.
For example, select Test stack, Sample_Taxonomy taxonomy, and Child_Term_Test term.
- Click the Force Delete checkbox to delete the term. This will force the term to be deleted even if it is referenced in the entries.
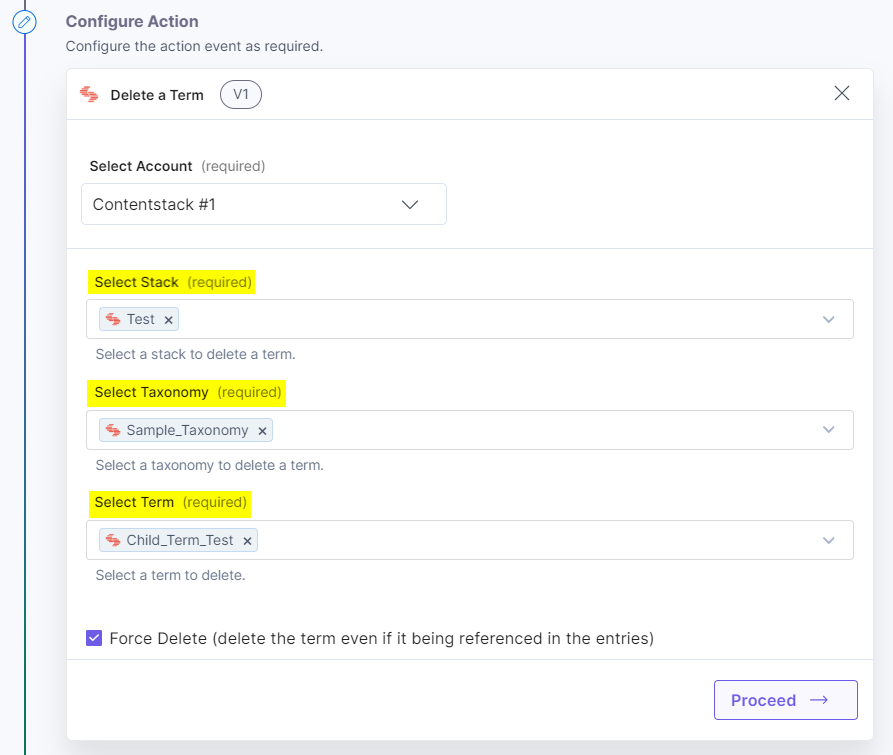
- Once done, click Proceed.
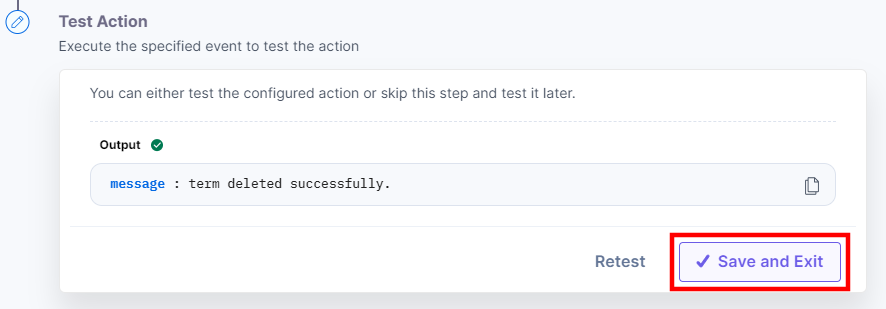
- Click Test Action to test the configured action.
- The output will be shown as below. Click the Save and Exit button.
Export a Taxonomy
This action exports a taxonomy and all its associated terms in a stack.
- Under Choose an Action tab, select the Export a Taxonomy action.
- On the Export a Taxonomy Configure Action page, enter the details given below:
- Click + Add New Account button to connect your Contentstack account as shown in the Connect your Contentstack Account to Automate step.
- Select a Stack and Taxonomy from the Lookup list. For example, select Test stack and Sample_Taxonomy taxonomy.
- Select a Format in which you want to export the taxonomy. You can choose to export the taxonomy in JSON or CSV format. For example, select JSON.
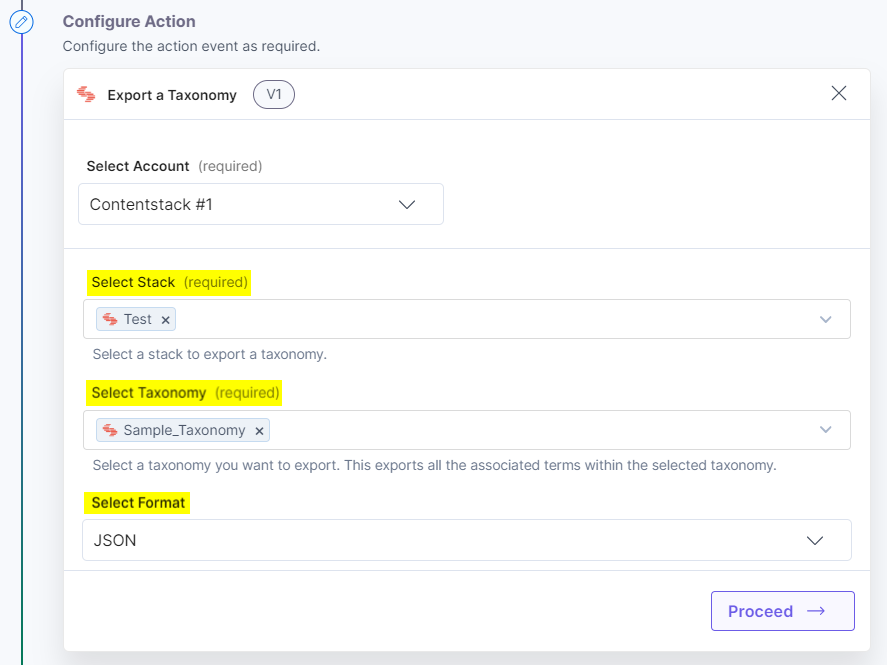
- Once done, click Proceed.
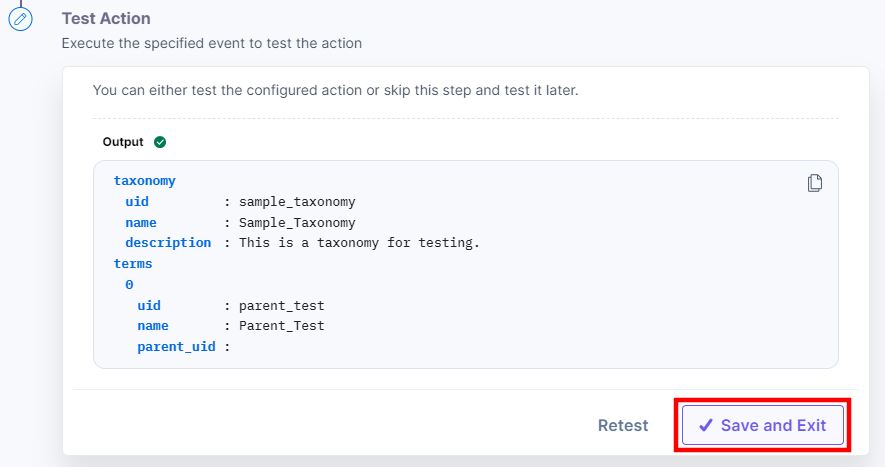
- Click Test Action to test the configured action.
- The output will be shown as below. Click the Save and Exit button.
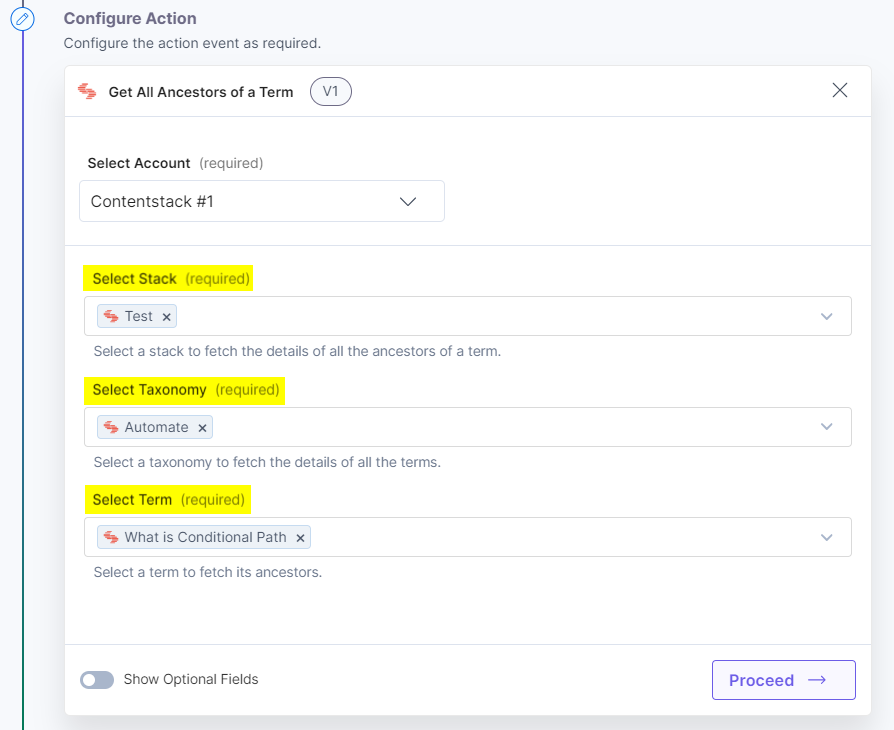
Get All Ancestors of a Term
This action fetches the details of all the ancestors of a term.
- Under Choose an Action tab, select the Get All Ancestors of a Term action.
- On the Get All Ancestors of a Term Configure Action page, enter the details given below:
- Click + Add New Account button to connect your Contentstack account as shown in the Connect your Contentstack Account to Automate step.
- Select a Stack, Taxonomy, and Term from the Lookup list. For example, select Test stack, Automate taxonomy, and What is Conditional Path term.
- [Optional] Enable the Show Optional Fields toggle button to display the Term Limit and Skip Term (Pagination) fields. For example, enter 5 in Term Limit and 1 in Skip Term. This will skip the first term and fetch the next 5 terms.
- Click the checkboxes to include the count of terms, number of child terms, and referenced entries count.
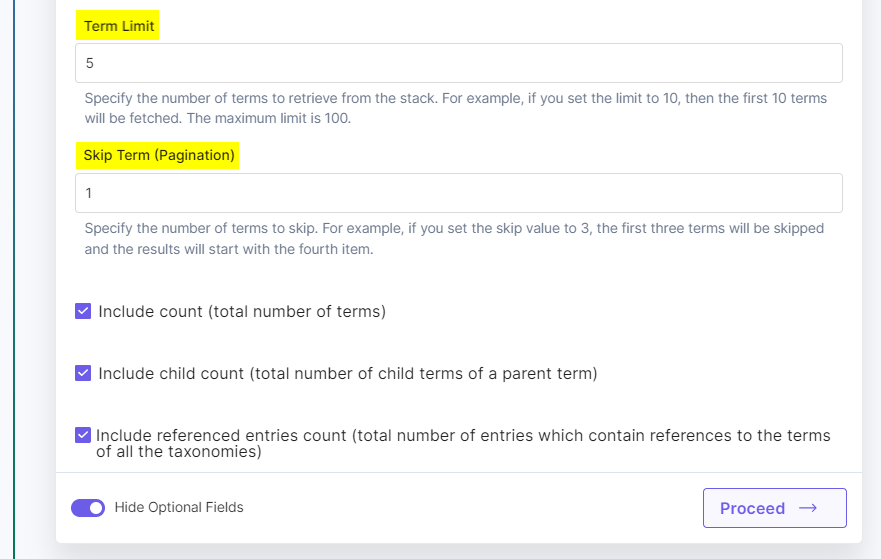
- Once done, click Proceed.
- Click Test Action to test the configured action.
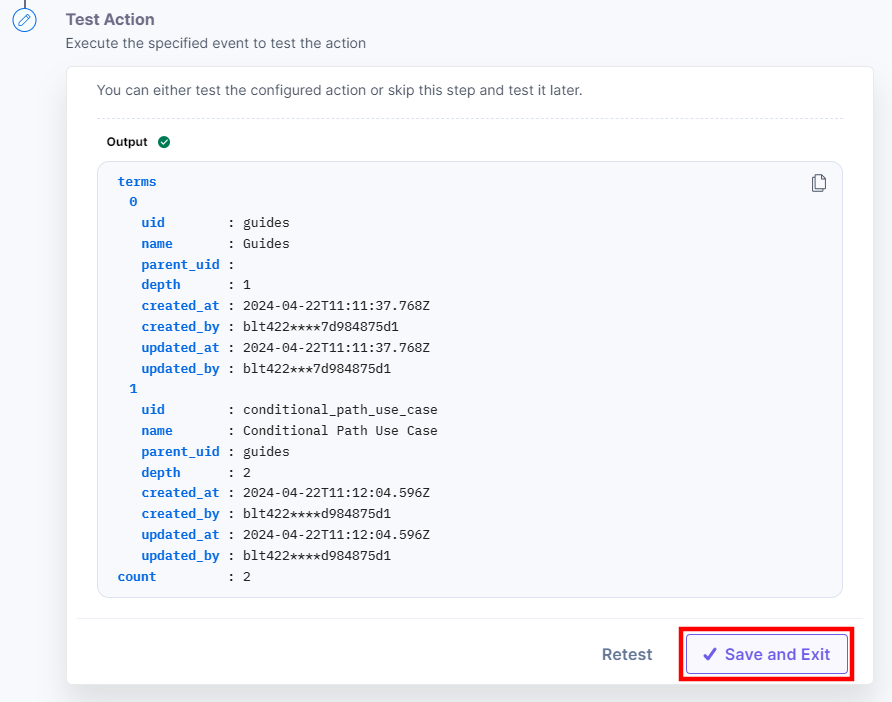
- The output will be shown as below. Click the Save and Exit button.
Get All Descendants of a Term
This action fetches the details of all the descendants of a term.
- Under Choose an Action tab, select the Get All Descendants of a Term action.
- On the Get All Descendants of a Term Configure Action page, enter the details given below:
- Click + Add New Account button to connect your Contentstack account as shown in the Connect your Contentstack Account to Automate step.
- Select a Stack, Taxonomy, and Term from the Lookup list. For example, select Test stack, Automate taxonomy, and Guides term.
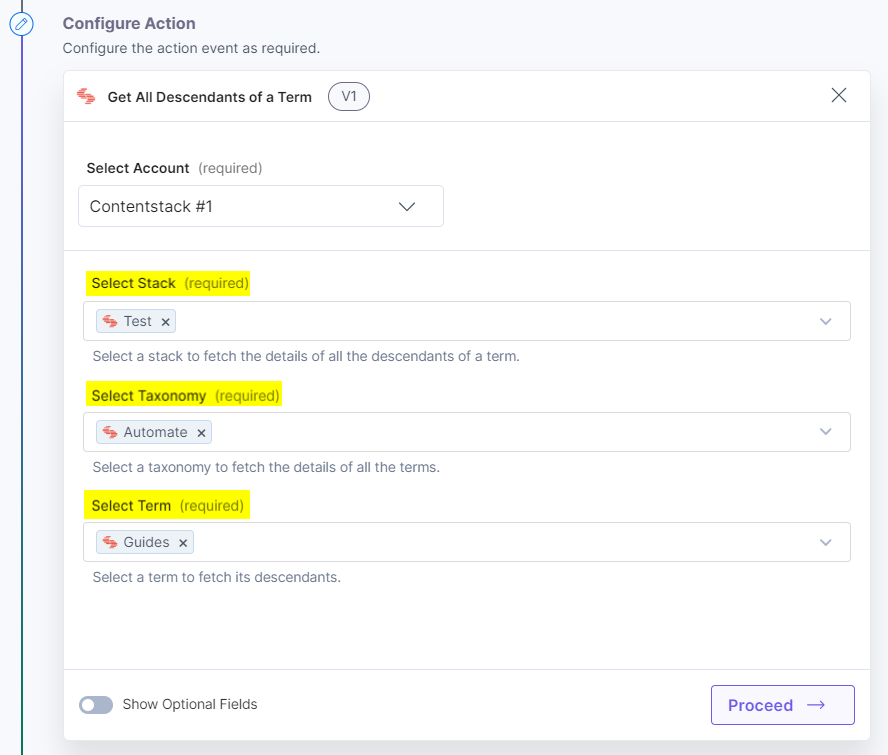
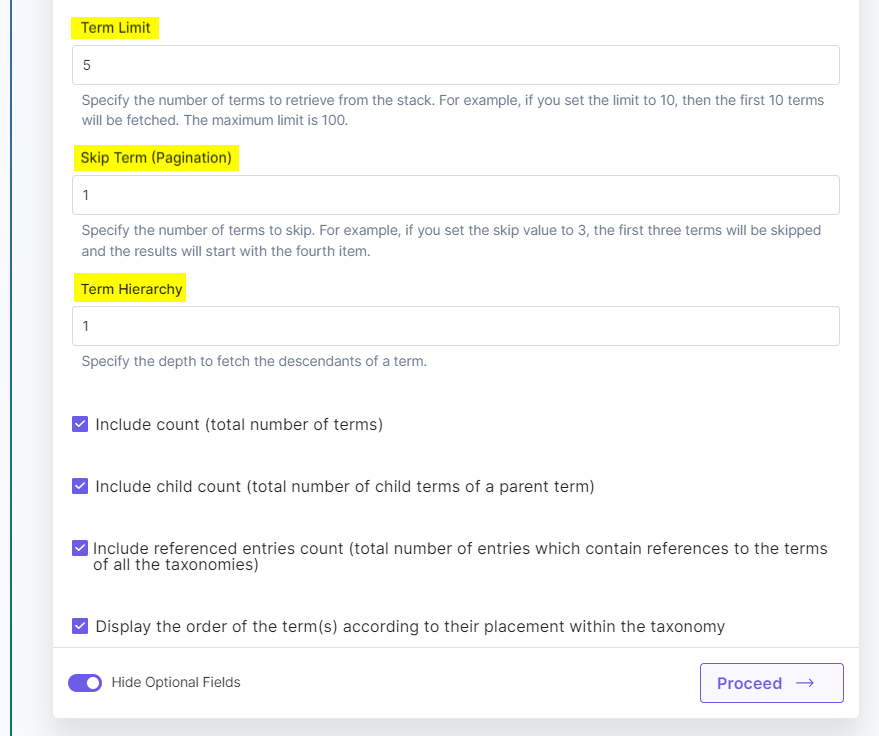
- [Optional] Enable the Show Optional Fields toggle button to display the Term Limit, Skip Term (Pagination), and Term Hierarchy fields.
For example, enter 5 in Term Limit, 1 in Skip Term, and 1 in Term Hierarchy. This will skip the first term and fetch the next 5 terms.
With Term Hierarchy, the first descendant of Guides will be fetched. If you enter Term Hierarchy as 2, then 2 descendants of Guides will be fetched.
- Click the checkboxes to include the count of terms, number of child terms, referenced entries count, and the order of the term(s) according to their placement in the taxonomy.
- Once done, click Proceed.
- Click Test Action to test the configured action.
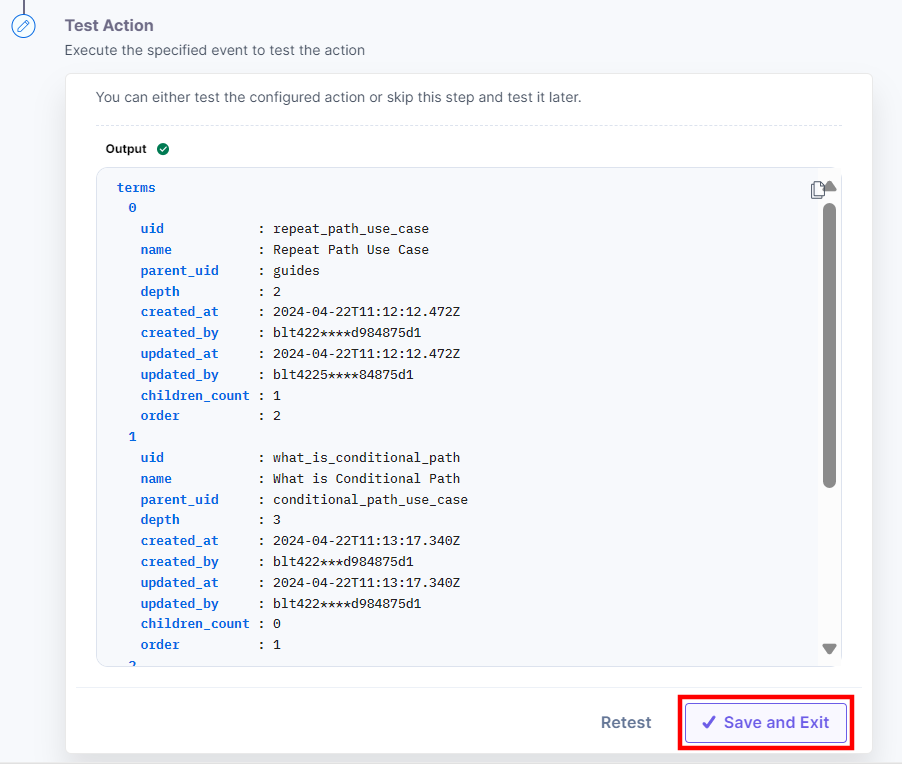
- The output will be shown as below. Click the Save and Exit button.
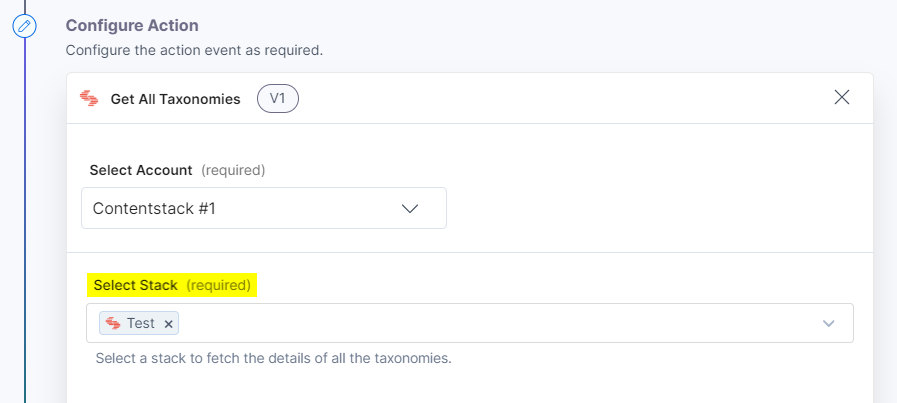
Get All Taxonomies
This action fetches the details of all the taxonomies in a stack.
- Under Choose an Action tab, select the Get All Taxonomies action.
- On the Get All Taxonomies Configure Action page, enter the details given below:
- Click + Add New Account button to connect your Contentstack account as shown in the Connect your Contentstack Account to Automate step.
- Select a Stack from the Lookup list. For example, select Test stack.
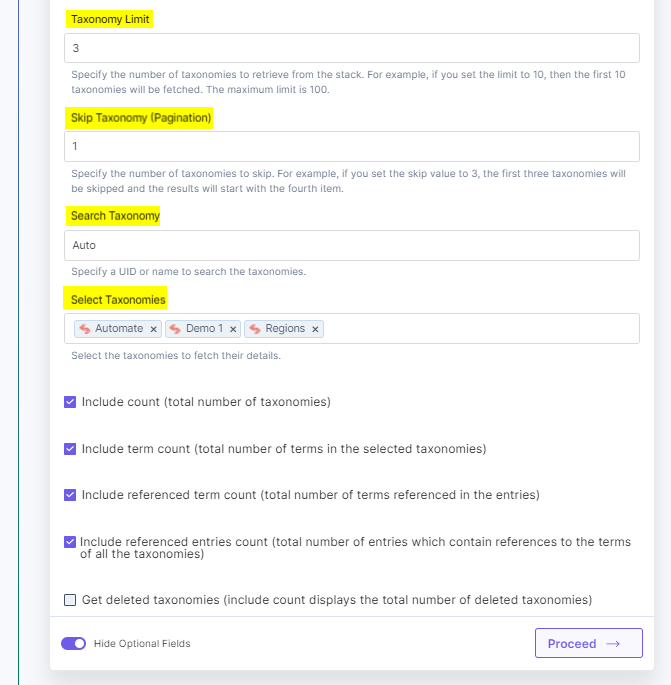
- [Optional] Enable the Show Optional Fields toggle button to display the Taxonomy Limit, Skip Taxonomy (Pagination), Search Taxonomy, and Select Taxonomies fields.
For example, select Automate, Demo 1, and Regions in Select Taxonomies. Enter 3 in Taxonomy Limit and 1 in Skip Taxonomy.
In the Search Taxonomy field, enter a UID or name of the taxonomy to search all the taxonomies containing the specified value. For example, enter Auto in Search Taxonomy.
Note: You can select multiple Taxonomies to fetch the details.
- Click the checkboxes to include the count of taxonomies, count of terms, referenced term count, referenced entries count, and get the deleted taxonomies.
Note: If you mark the checkbox for Get deleted taxonomies, the output will only display all the deleted taxonomies in the selected stack.
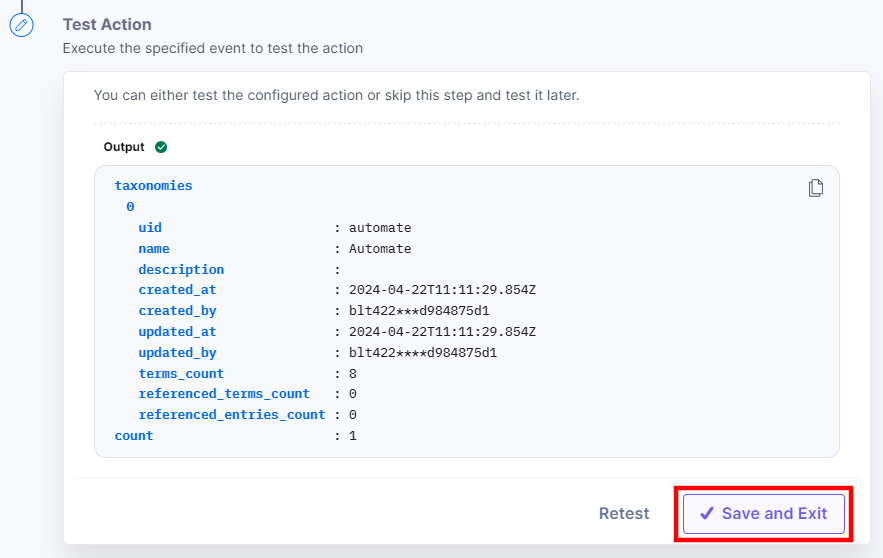
- Once done, click Proceed.
- Click Test Action to test the configured action.
- The output will be shown as below. Click the Save and Exit button.
Get All Terms
This action fetches the details of all the terms in a stack.
- Under Choose an Action tab, select the Get All Terms action.
- On the Get All Terms Configure Action page, enter the details given below:
- Click + Add New Account button to connect your Contentstack account as shown in the Connect your Contentstack Account to Automate step.
- Select a Stack and Taxonomy from the Lookup list. For example, select Test stack and Automate taxonomy.

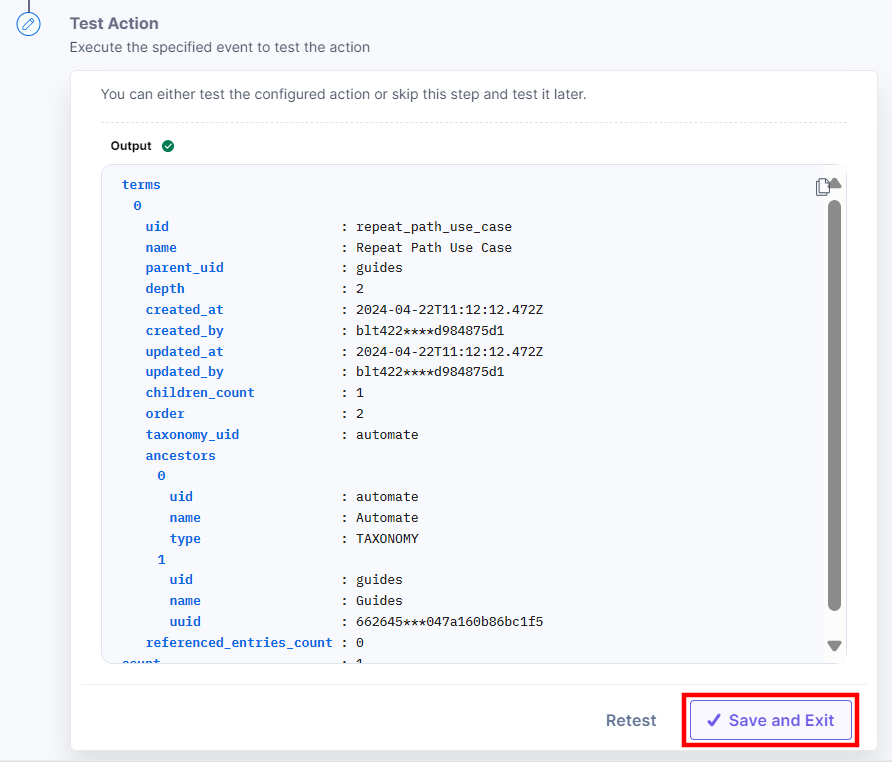
- [Optional] Enable the Show Optional Fields toggle button to display the Term Limit, Skip Term (Pagination), Search Term(s), Select Terms, and Term Hierarchy fields.
For example, enter 5 in Term Limit, 1 in Skip Term (Pagination). Enter Repeat Path in Search Term(s). Select What is Repeat Path, Repeat Path Use Case, and What is Conditional Path in the Search Terms field. Enter 2 in Term Hierarchy.
- Click the checkboxes to include the count of terms, number of child terms, referenced entries count, order of the term(s) according to their placement in the taxonomy, and get the deleted terms.
Note: If you mark the checkbox for Get deleted taxonomies, the output will only display all the deleted terms from the selected taxonomy in the selected stack based on the specified Term Hierarchy.

- Once done, click Proceed.
- Click Test Action to test the configured action.
- The output will be shown as below. Click the Save and Exit button.
Get All Terms across All Taxonomies
This action fetches the details of all the terms across all the taxonomies in a stack.
- Under Choose an Action tab, select the Get All Terms across All Taxonomies action.
- On the Get All Terms across All Taxonomies Configure Action page, enter the details given below:
- Click + Add New Account button to connect your Contentstack account as shown in the Connect your Contentstack Account to Automate step.
- Select a Stack from the Lookup list.
For example, select Test stack. - Enter the Search Term(s) to fetch all the term(s).
For example, enter repeat in Search Term.
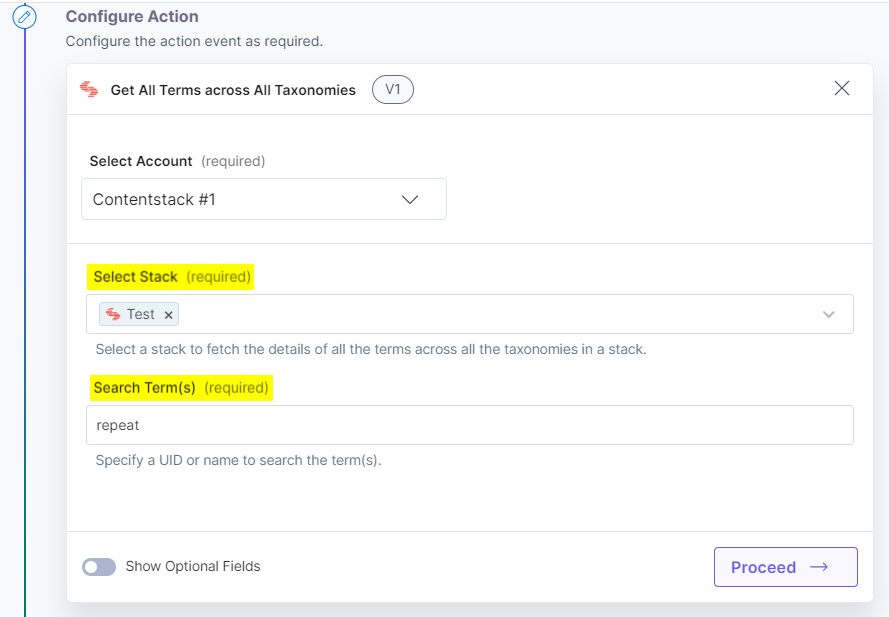
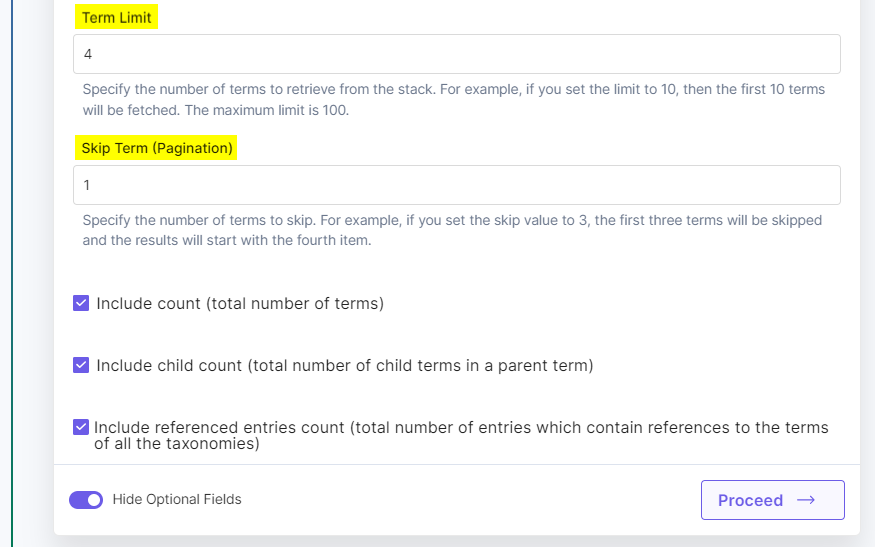
- [Optional] Enable the Show Optional Fields toggle button to display the Term Limit, Skip Term (Pagination) fields. For example, enter 4 in Term Limit and 1 in Skip Term (Pagination).
- Click the checkboxes to include the count of terms, number of child terms, and referenced entries count.
- Once done, click Proceed.
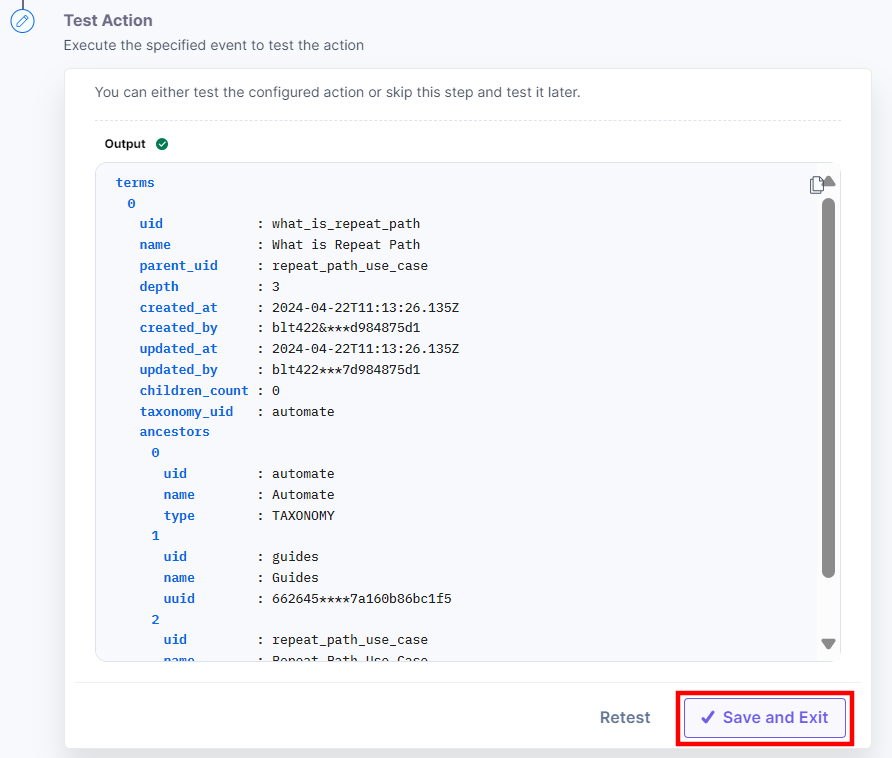
- Click Test Action to test the configured action.
- The output will be shown as below. Click the Save and Exit button.
Get a Single Taxonomy
This action fetches the details of a single taxonomy in a stack.
- Under Choose an Action tab, select the Get a Single Taxonomy action.
- On the Get a Single Taxonomy Configure Action page, enter the details given below:
- Click + Add New Account button to connect your Contentstack account as shown in the Connect your Contentstack Account to Automate step.
- Select a Stack and Taxonomy from the Lookup list. For example, select Test stack and Sample_Taxonomy taxonomy.
- [Optional] Enable the Show Optional Fields toggle button to display the checkboxes for the count of terms, referenced term count, and referenced entries count.
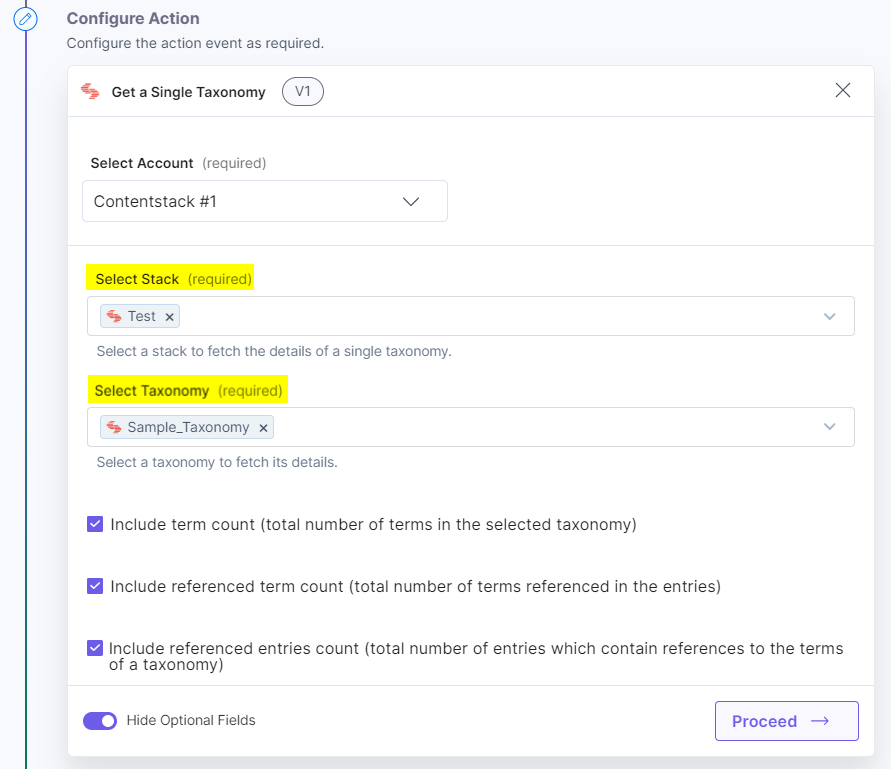
- Once done, click Proceed.
- Click Test Action to test the configured action.
- The output will be shown as below. Click the Save and Exit button.
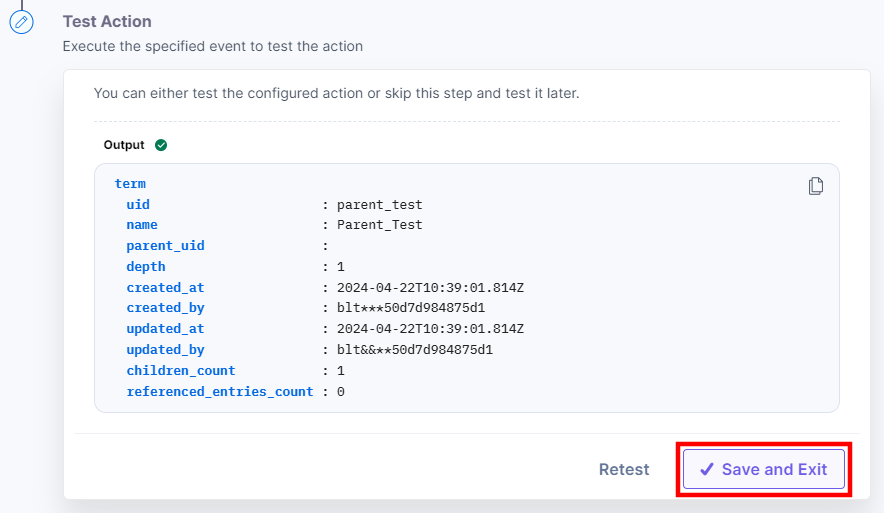
Get a Single Term
This action fetches the details of a single term in a stack.
- Under Choose an Action tab, select the Get a Single Term action.
- On the Get a Single Term Configure Action page, enter the details given below:
- Click + Add New Account button to connect your Contentstack account as shown in the Connect your Contentstack Account to Automate step.
- Select a Stack, Taxonomy, and Term from the Lookup list. For example, select Test stack, Sample_Taxonomy taxonomy, and Parent_Test term.
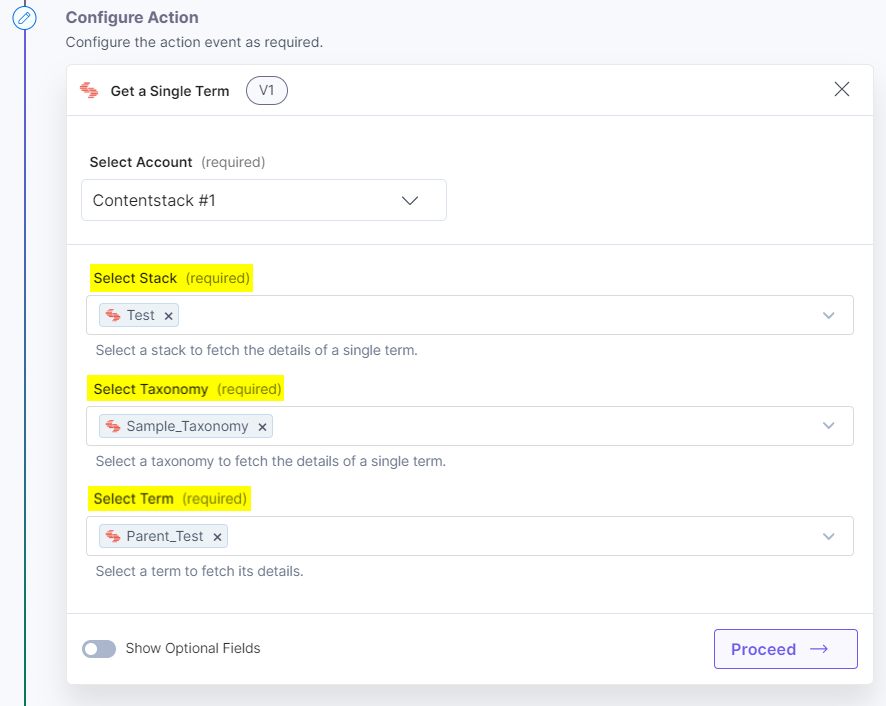
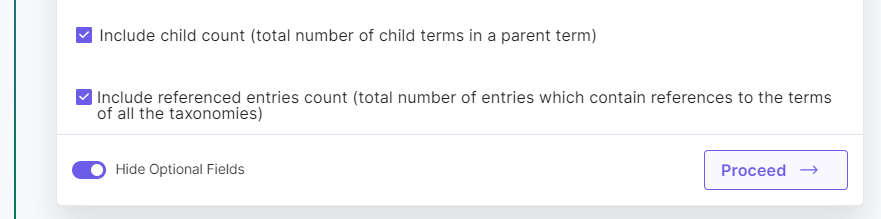
- [Optional] Enable the Show Optional Fields toggle button to display the checkboxes for the number of child terms and referenced entries count.
- Once done, click Proceed.
- Click Test Action to test the configured action.
- The output will be shown as below. Click the Save and Exit button.
Import a Taxonomy
This action imports a taxonomy, along with all its associated terms in a stack.
- Under Choose an Action tab, select the Import a Taxonomy action.
- On the Import a Taxonomy Configure Action page, enter the details given below:
- Click + Add New Account button to connect your Contentstack account as shown in the Connect your Contentstack Account to Automate step.
- Select a Stack from the Lookup list. For example, select Test stack.
- Select the Format, i.e., CSV or JSON to import the taxonomy.
- In the Taxonomy Data field, enter the data to import. Provide the data in JSON or CSV format.
Example:
CSV Format:Taxonomy Name,Taxonomy Uid,Taxonomy Description,Level 1 Term Name,Level 1 Term Uid,Level 2 Term Name,Level 2 Term Uid,Level 3 Term Name,Level 3 Term Uid Sample Parent Taxonomy,parent_taxonomy,,,,,,, ,,,Sample Child 1,sample_child_1,,,, ,,,,,Sample Grandchild Term 1,sample_grand_child_term_1,, ,,,,,Sample Grandchild Term 2,sample_grand_child_term_2,, ,,,Sample Child 2,sample_child_2,,,, ,,,,,Sample Grandchild Term 3,sample_grand_child_term_3,, ,,,,,,,Sample Great Grandchild Term 1,sample_great_grand_child_term_1JSON
{"taxonomy":{"uid":"parent_taxonomy","name":"Sample Parent Taxonomy","description":""},"terms":[{"uid":"sample_child_1","name":"Sample Child 1","parent_uid":null},{"uid":"sample_child_2","name":"Sample Child 2","parent_uid":null},{"uid":"sample_grand_child_term_1","name":"Sample Grandchild Term 1","parent_uid":"sample_child_1"},{"uid":"sample_grand_child_term_3","name":"Sample Grandchild Term 3","parent_uid":"sample_child_2"},{"uid":"sample_grand_child_term_2","name":"Sample Grandchild Term 2","parent_uid":"sample_child_1"},{"uid":"sample_great_grand_child_term_1","name":"Sample Great Grandchild Term 1","parent_uid":"sample_grand_child_term_3"}]}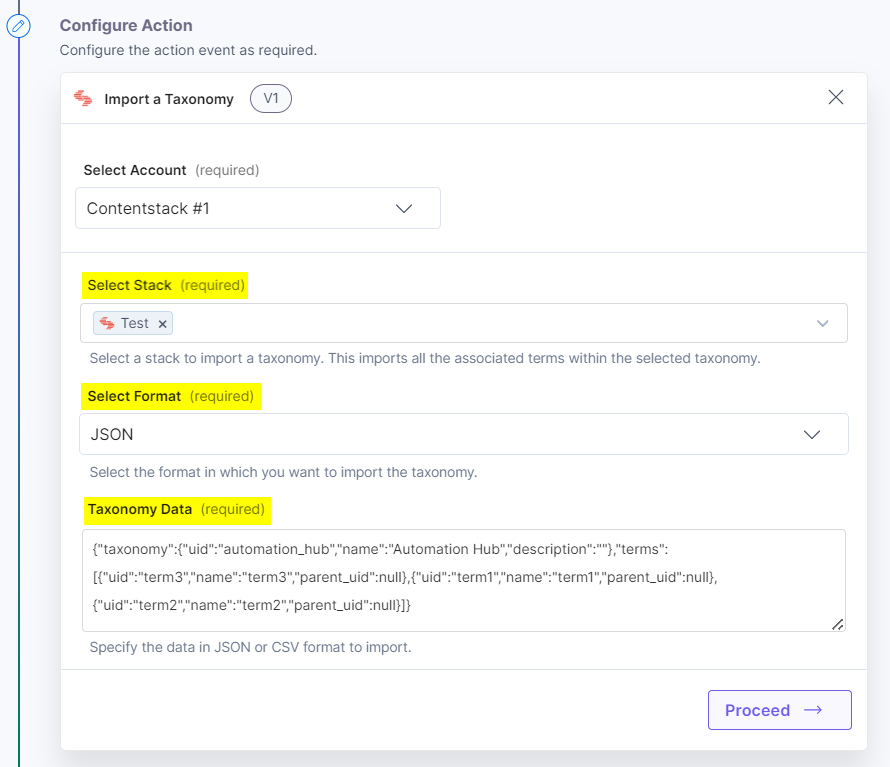
- Once done, click Proceed.
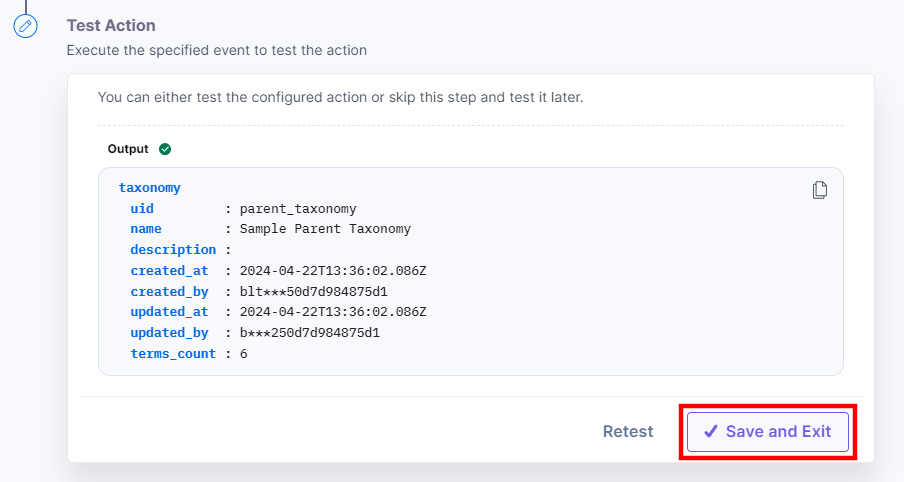
- Click Test Action to test the configured action.
- The output will be shown as below. Click the Save and Exit button.
Update a Taxonomy
This action lets you update the description and title of a taxonomy.
- Under Choose an Action tab, select the Update a Taxonomy action.
- On the Update a Taxonomy Configure Action page, enter the details given below:
- Click + Add New Account button to connect your Contentstack account as shown in the Connect your Contentstack Account to Automate step.
- Select a Stack and Taxonomy from the Lookup list. For example, select Test stack and Sample_Taxonomy taxonomy.
- Enter a suitable Taxonomy Title and Taxonomy Description. For example, enter Sample_Taxonomy_Updated in Taxonomy Title and The Sample_Taxonomy is updated in Taxonomy Description.
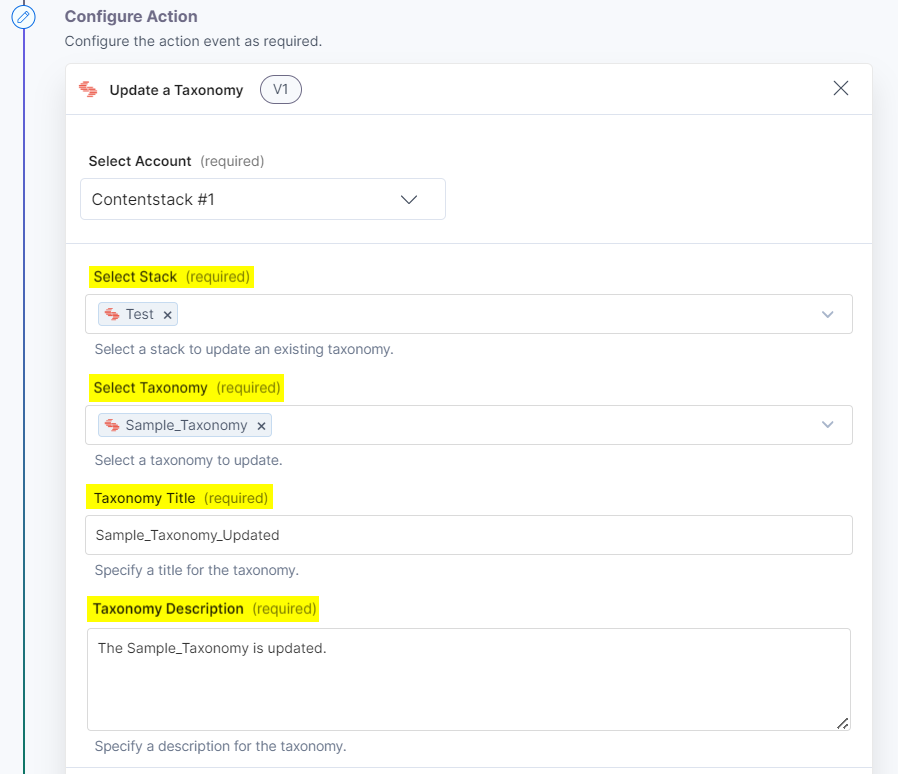
- Once done, click Proceed.
- Click Test Action to test the configured action.
- The output will be shown as below. Click the Save and Exit button.

Update a Term
This action lets you update the title of a term.
- Under Choose an Action tab, select the Update a Term action.
- On the Update a Term Configure Action page, enter the details given below:
- Click + Add New Account button to connect your Contentstack account as shown in the Connect your Contentstack Account to Automate step.
- Select a Stack, Taxonomy, and Term from the Lookup list. For example, select Test stack, Sample_Taxonomy taxonomy, and Parent_Test term.
- Enter a suitable Term Title to update. For example, enter Parent_Test _Updated in Term Title.
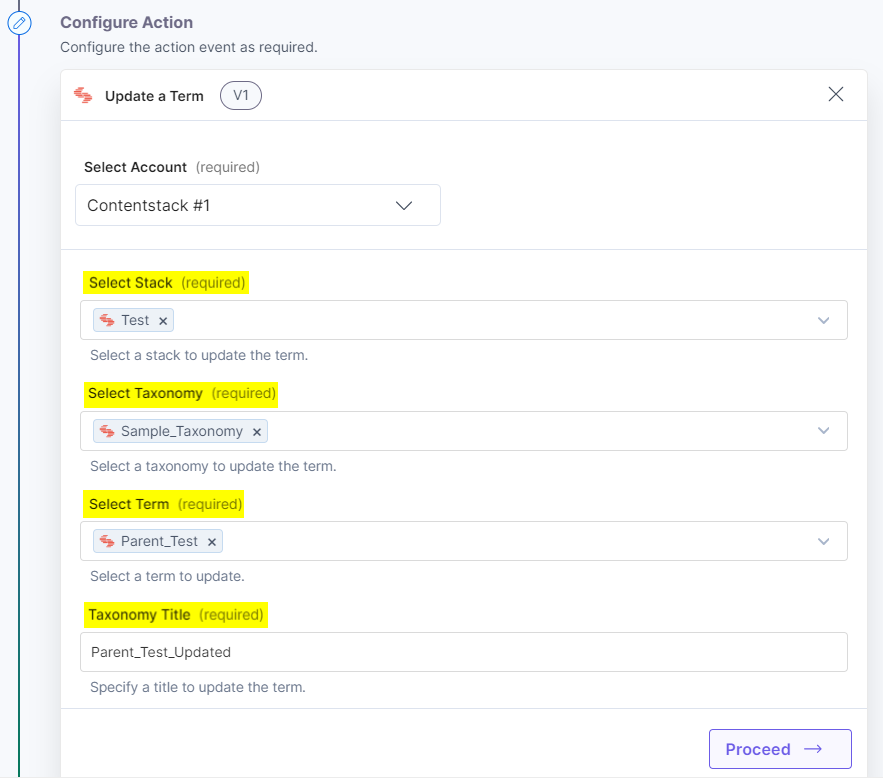
- Once done, click Proceed.
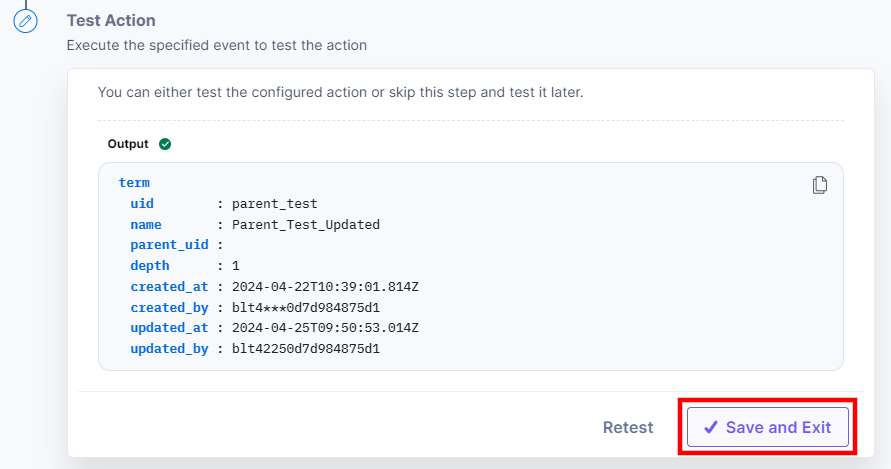
- Click Test Action to test the configured action.
- The output will be shown as below. Click the Save and Exit button.
More articles in "Contentstack Management"
