---
title: "Quickstart Guide to Creating Your First Page"
description: "Step-by-step guide to composing your first Studio page: create a template, bind components to entry data, and render a live page in minutes."
url: "https://www.contentstack.com/docs/studio/quickstart-guide-to-creating-your-first-page"
product: "Contentstack"
doc_type: "guide"
audience:
- developers
- admins
version: "current"
last_updated: "2026-07-17"
---
# Quickstart Guide to Creating Your First Page
A quickstart for evaluators. You'll go from "Studio installed but never opened" to "I composed a page and saw it render" in five minutes. Uses Studio's default components (no custom registration), assumes a stack with at least one content type and one entry.
If you're an enterprise team planning to ship with your own components, start with [Enterprise day one](/docs/studio/enterprise-setup-from-install-to-first-authored-page) instead. That recipe takes longer but lands you in a real working configuration.
## What You'll Have
* A Studio project linked to your stack
* A template against an existing content type
* A page rendered with real entry data
* A working understanding of the canvas, bind, render loop
## What You Need Before Starting
* Studio + Live Preview + Studio SDK installed in your app ([Setup](/docs/studio/setup-overview))
* An app running locally (npm run dev or equivalent)
* A canvas route mounting ([Section preview route](/docs/studio/section-preview-route))
* A catch-all template route mounting (ONE route handles every URL via Studio's CDA query) ([Template preview routes](/docs/studio/template-preview-routes))
* Project Settings → Configuration filled in: Environment, Language, Canvas URL ([Configure project](/docs/studio/configure-environment-language-and-canvas-url))
If any of the above isn't done, go through [Setup](/docs/studio/setup-overview) first.
## Step 1: Pick a Content Type to Template
You need a content type that has at least one entry. A blog\_post, product, or anything similar works. We'll call it below.
If your stack doesn't have a populated content type yet, that's prerequisite work: create one in Contentstack with a couple of entries before continuing.
## Step 2: Create the Template
In Studio:
1. **Compositions → Templates tab → + New Template**
2. In the create dialog, pick as the connected content type
3. Studio opens a blank canvas

The canvas chrome shows: - Your template name in the top bar - A **Content type chip** confirming the connection - A **PREVIEW ENTRY** chip with one of the entries auto-picked (the first one) - Components palette on the left, Settings panel on the right
## Step 3: Drop Two Components
From the **Components** palette, expand **Basic**:
1. Drag a **Heading** onto the canvas
2. Drag a **Text** below it
Both render with placeholder content: "Heading text" and "Body text".

## Step 4: Bind to Entry Data
1. Click the **Heading** on the canvas
2. Right panel → **Data** tab
3. Next to the text prop, click the binding chip (the link icon)
4. The Data Picker opens
5. Pick a text field from your content type: title, name, whatever fits

The Heading now shows the actual entry's title in the canvas.
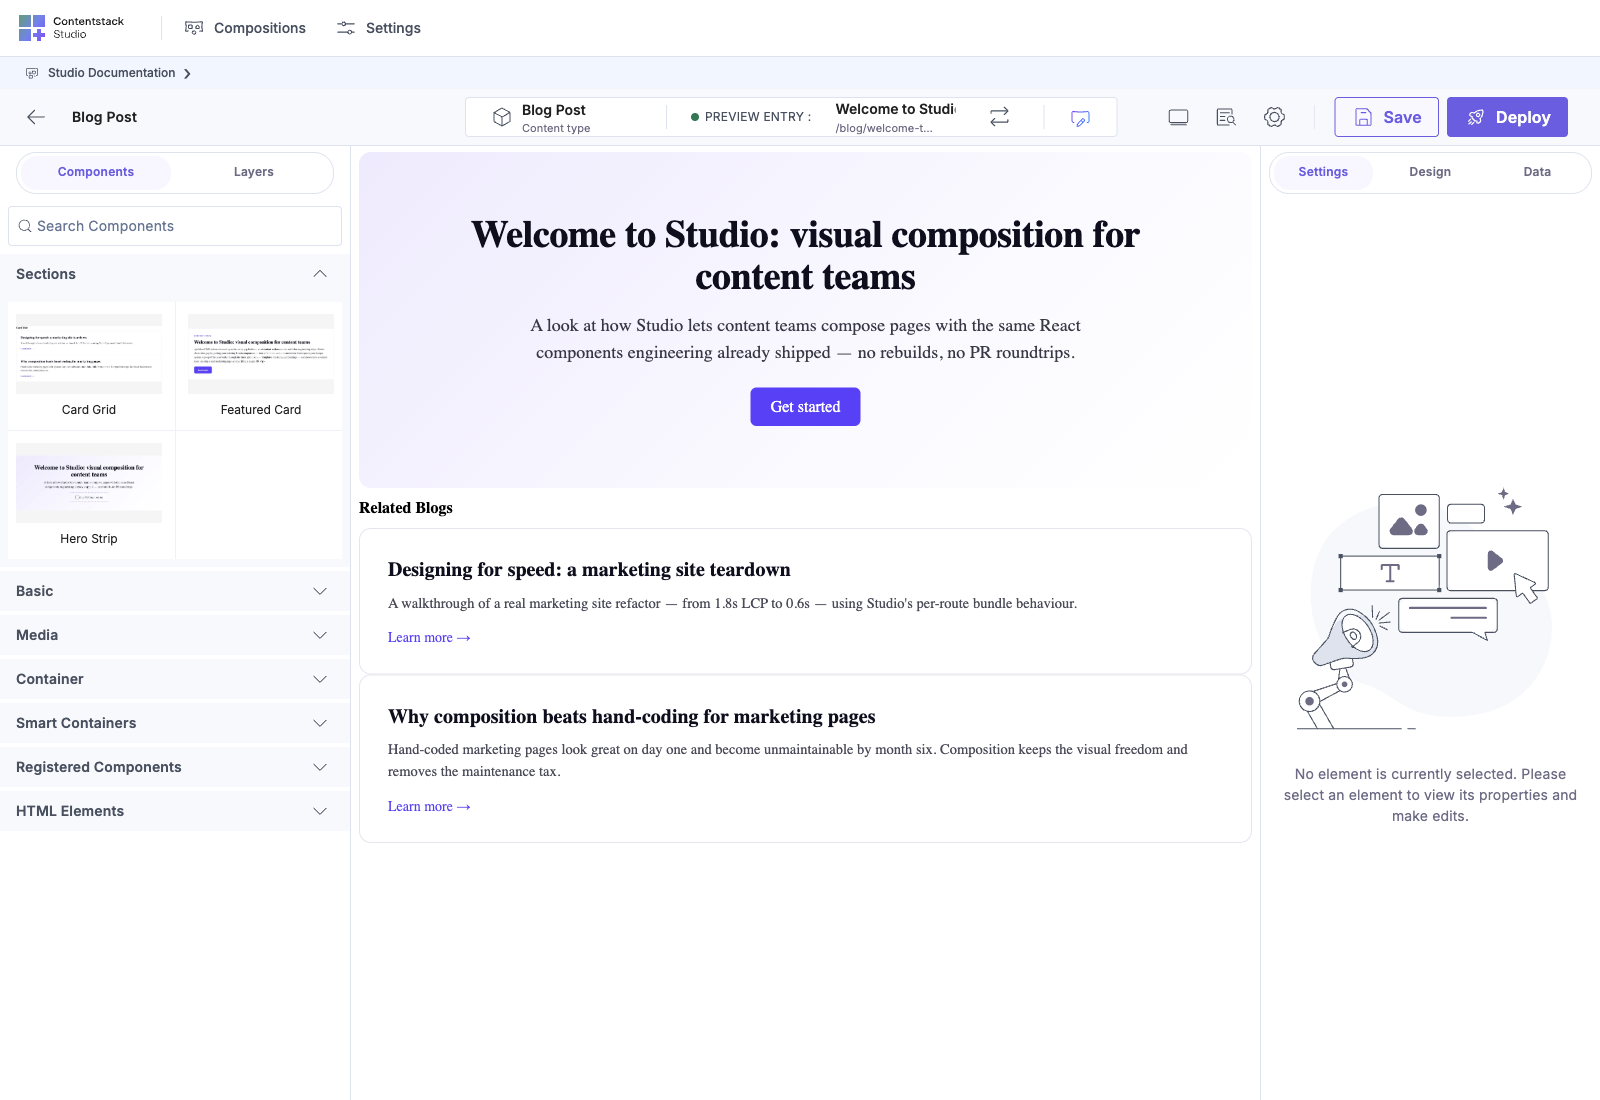
Repeat for the Text component, binding to a longer field: body, description, etc.
## Step 5: Save and View
1. Click **Save** in the top bar
2. Studio writes the composition record to your stack
The template now lives. Find the URL pattern Studio derived: click the **URL pencil icon** in the top bar to see it. It'll be something like //{{entry.title}} or //{{entry.uid}} depending on your content type's URL setup.

## Step 6: Open the Rendered Page
Open http://localhost:3000 in your browser, substituting your actual entry's data.
For example, if the URL pattern is /blogs/{{entry.title}} and your entry's title is "AI 101", open /blogs/AI%20101.
You should see: - The entry's title rendered as a heading - The entry's body rendered as text - Both via your app's route
That's a working Studio template. **A composition you built visually, bound to a real entry, rendering through your app's route.**
## What to Try Next
* **Swap the Preview Entry.** Click the ⇄ icon next to PREVIEW ENTRY in the canvas toolbar. Pick a different entry. The canvas re-renders with that entry's data. The same template, all entries.
* **Drop a section.** Build a small reusable block from the [Card grid with slots](/docs/studio/card-grid-with-slots) recipe. Drop it on this template.
* **Bring your own components.** The default Heading and Text are utility components. For real work, register your own: see [Bring your own components](/docs/studio/bring-your-own-components) or jump to [Enterprise day one](/docs/studio/enterprise-setup-from-install-to-first-authored-page) for the full flow.
## When This Recipe Doesn't Work
What you see
Likely cause
Fix
Canvas opens but iframe is blank
not mounted at the Canvas URL
[Section preview route](/docs/studio/section-preview-route)
"Template did not load" error
URL pattern doesn't resolve through Studio's CDA query (no template matches that URL)
Check the URL pattern in Studio, or wire the catch-all route via [setup-template-preview-routes](../prompts/setup-template-preview-routes.md). The catch-all matches every URL; you don't need per-template routes.
Binding shows no fields
Connected content type doesn't have the fields you expected
Verify the CT in Contentstack
Saved but page on your site shows nothing
not on the route, or useCompositionData is querying wrong URL
[Template preview routes](/docs/studio/template-preview-routes)
Other
Walk the layered diagnostic
[Verify end to end](/docs/studio/verify-your-studio-setup-end-to-end)
## Speed It Up with an LLM
```
curl -fsSL https://www.contentstack.com/docs/studio/install.sh | sh
```
Then ask: _"Verify my Studio setup."_ The LLM walks the layered diagnostic and tells you exactly what's missing.
## See Also
* [Enterprise day one](/docs/studio/enterprise-setup-from-install-to-first-authored-page): same flow but with your own component library
* [Templates](/docs/studio/choosing-between-templates-and-sections): the concept
* [Setup: Verify end to end](/docs/studio/verify-your-studio-setup-end-to-end): diagnostic