


.jpg?format=pjpg&auto=webp)


Auto Image Tagging with Contentstack Webhooks, AWS Lambda, and AWS Rekognition
Image auto-tagging is the process of assigning relevant tags and keywords to images automatically.
In Contentstack, you can achieve this with Contentstack webhooks, AWS Lambda, and AWS Rekognition.
Here's a quick overview of the process: When an image is created or updated in Contentstack, a webhook is triggered. This calls an AWS Lambda function via the AWS API Gateway. AWS Lambda will then use AWS Rekognition to get relevant tags for the image and update the image tags in Contentstack by making Content Management API requests.
Here are the steps to set up image auto-tagging:
- Create an AWS account and user
- Create a Contentstack role
- Set up Lambda function and API gateway
- Trigger a webhook to initiate auto-tagging
Prerequisites
- Working knowledge of AWS API Gateways
- Access to the AWS environments such as AWS Lambda, AWS API Gateway, and AWS Rekognition
- Contentstack account
Create an AWS Account and User
- Create an AWS user with programmatic access.
- Add the Amazon Rekognition Read-only Access (AWS managed policy) permission policy to the user.
- Create an access key and secret key for the user. These credentials will be used to access AWS Rekognition service from the Lambda function.
Create a Contentstack Role
- Create a role in Contentstack and give that user full access to assets, so that users can publish the assets.
- You can create a new role or assign an existing user with full access to assets. These credentials will be used in the Lambda function.
Set up Lambda Function and API Gateway
- Login to your AWS Management Console, select AWS Lambda Service from the service list.
- Click on the Create Function button, and then the Author from Scratch option.
- Configure the Lambda based on your requirements. Choose Node.js as your run-time language.
Note: You can use any language instead of Node.js. You can also add triggers to your lambda to push an event when the lambda is invoked.
- AWS Lambda offers an inline code editor. You can write your lambda code here or alternatively upload the code. We have created a sample code for this exercise. If Extensions are part of your plan, contact our Support team to get the code for the extension.
- After downloading the code, use the index.zip file present in the root folder of the current repo as AWS lambda code and add the environment variable as shown in the next step.
- In the Environment variables section, enter the credentials against the variables as follows:
REKOGNITION_AWS_ID = {access_id_of_aws_user} (required)
REKOGNITION_AWS_REGION = {aws_region} (required)
REKOGNITION_AWS_SECRET = {access_key_of_the_aws_user} (required)
MIN_CONFIDENCE = {minimum_confidence_of_tag} (default is 70)
MAX_TAGS = maximum tags per image (default is 10)
CONTENTSTACK_STACK_MANAGEMENT_TOKEN= {Your Stack's Management Token}
CONTENTSTACK_STACK_API_KEY= {Your stack API Key} - In the Lambda function handler and role, keep the index.handler as Handler and for the Role choose an existing role or create a new role from template(s).
- Review your setting and click on the Create Function option if everything you entered is correct.
Once you do this setup, AWS Lambda will run the code that we have uploaded. So every time a new asset is published in Contentstack, a webhook (we will set up next) will be triggered and the Lambda function will be executed.
Trigger a Webhook to Initiate Auto Tagging
Create a webhook in Contentstack that will initiate a Lambda function that we have set up in the above step. To do this, log in to your Contentstack account and perform the following steps:
- Click on the “Settings” icon (press “S”) on the left navigation panel and click on Webhooks (press “alt + W” for Windows OS, and “option + W” for Mac OS).
- Click on + New Webhook.
- Enter any valid name for your webhook, for example, Auto Image Tagging.
- In the URL to notify field, enter the AWS Lambda URL, where the webhook will notify about the change.
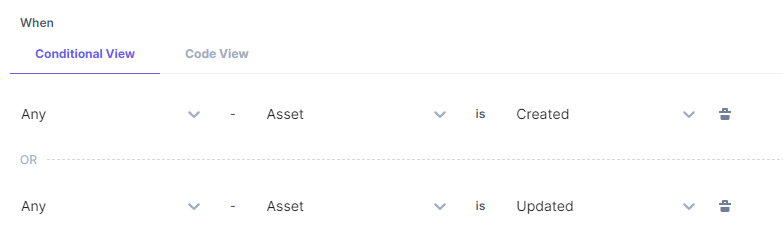
- Under the Conditional View section, select the options Any | Asset | Created.
- Click on "+" icon and add another condition. Select the options Any | Asset | Updated.
Additional Resource: You can refer to our guides on how you can use Contentstack Webhooks with AWS Lambda to automate several content management tasks.
More articles
