


.jpg?format=pjpg&auto=webp)


Modular Blocks
Modular Blocks is a field that allows content managers to dynamically create and modify components of a page or app on the go.
While creating a new entry, content managers now have the option to choose from multiple blocks, say "Banner" (Single Line Textbox and File fields), "Product Details" (Title, RTE, and File fields), or "Video" (File and Multi-line Textbox fields). Content managers can add the required block(s) from these options, move blocks up or down, remove them, as and when required.
Additional Resource: You can read more about Field Visibility Rules in our documentation where we have covered it extensively
This gives content managers the flexibility to create rich pages without the need to engage a developer for changes in the content type structure.
Let’s learn how developers and content managers can use this field.
Developer
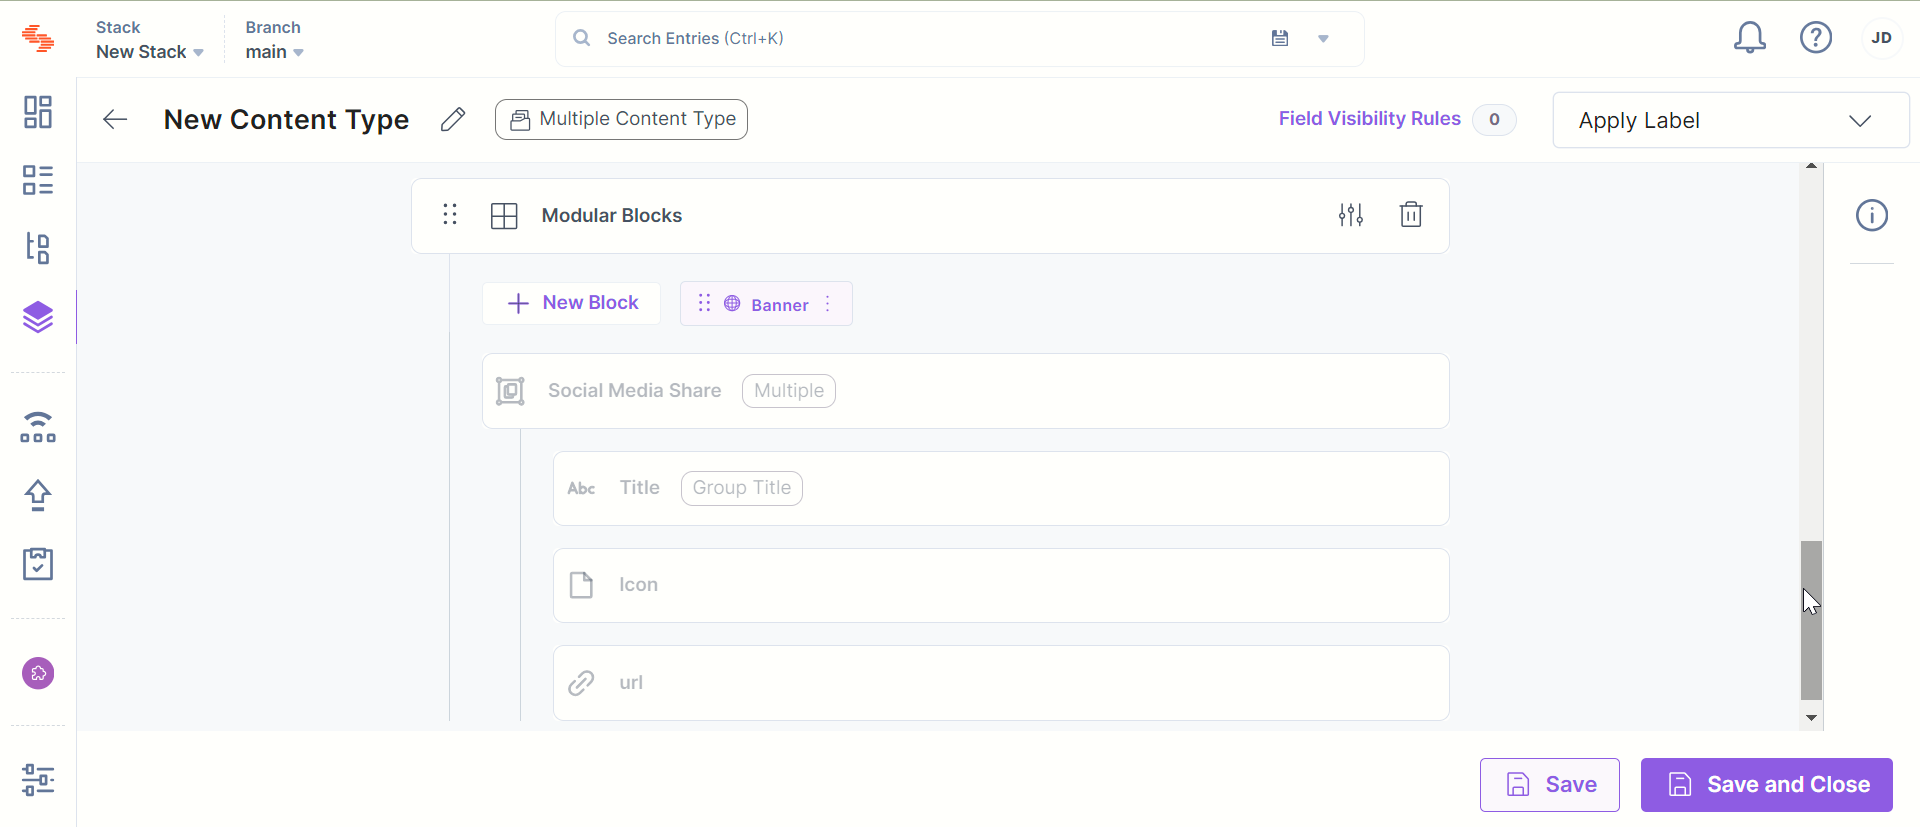
The developer must first add this field to the content type builder while creating a content type. Once added, click the + New Block button, provide a name of your choice for this block (e.g., banner), and click Create.
You will notice a new block within the field. Now, using the + New Block option under the Modular block you can add the fields of your choice into this block. Likewise, you can add multiple blocks (with several fields within each block) into the added Modular Blocks field. You can, at any time, rename or delete the added blocks.
The developer can add a maximum of five Modular Blocks fields within a content type, and a maximum of 20 blocks within each Modular Blocks field.
Warning: You cannot add a Modular Blocks field within a Group field.
Content Manager
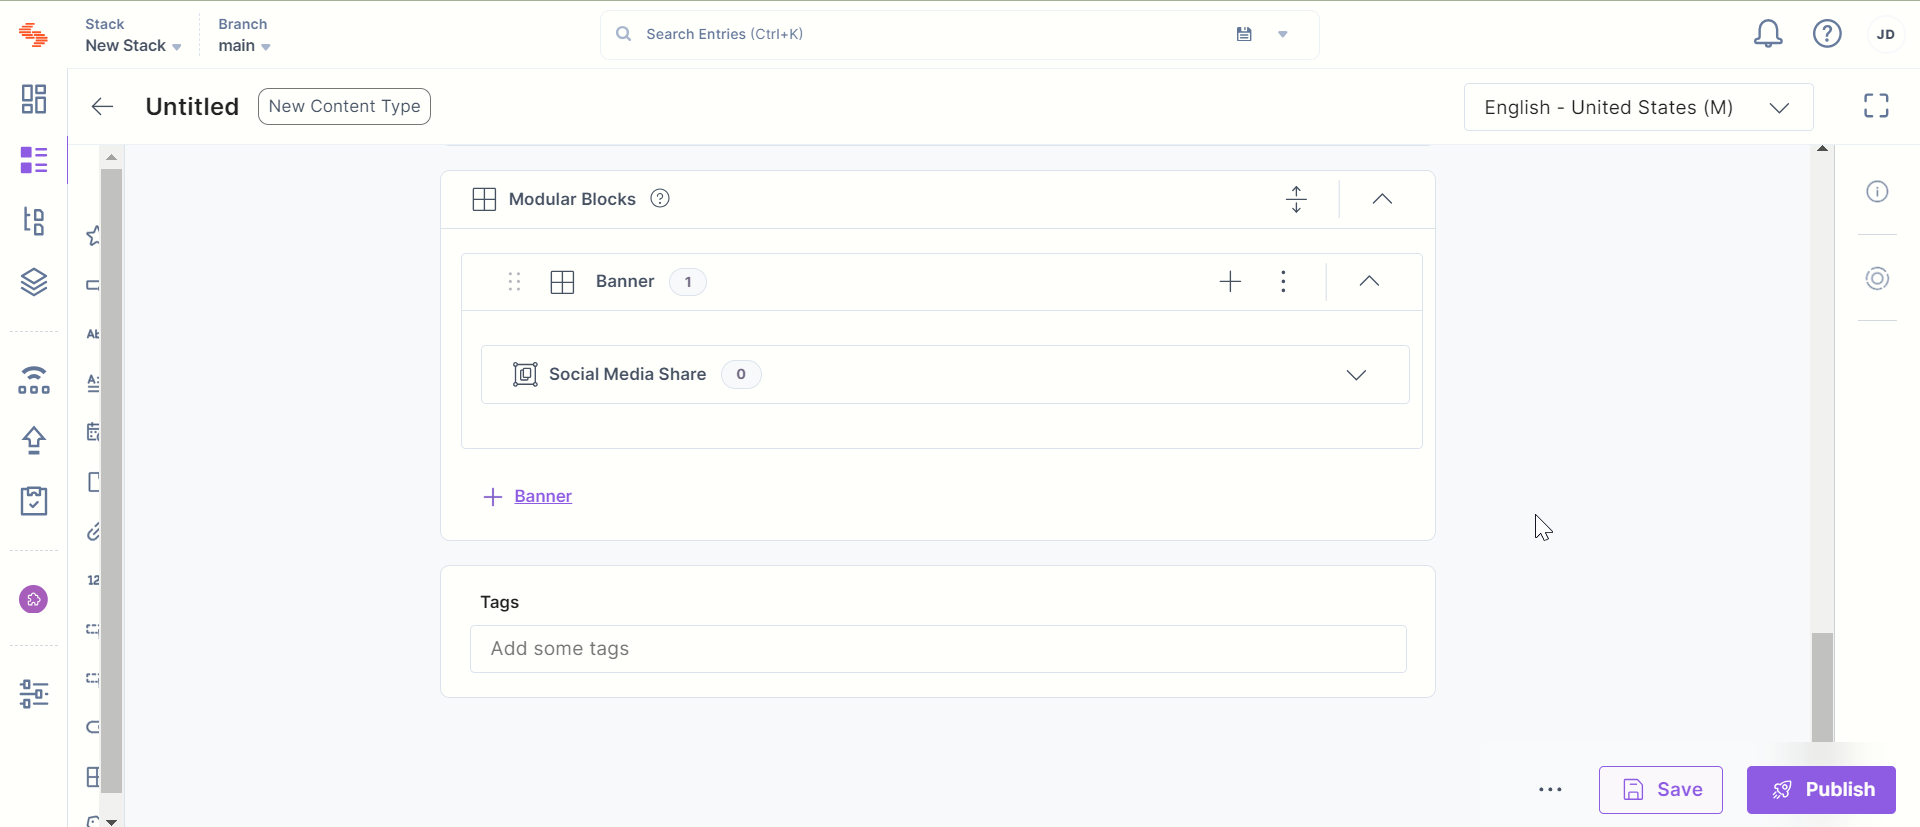
While creating an entry, the content manager sees the Modular Block field (or as renamed) and, within it, the links to add the defined blocks (e.g., a banner). By clicking on any of these block links, the relevant block (with all the corresponding fields) will be added in the entry form.
The content managers can add different multiple blocks and can also add the same blocks multiple times. They can also sort them, delete them, or add another block above a block using the icons given on the right-hand side top corner of a block.
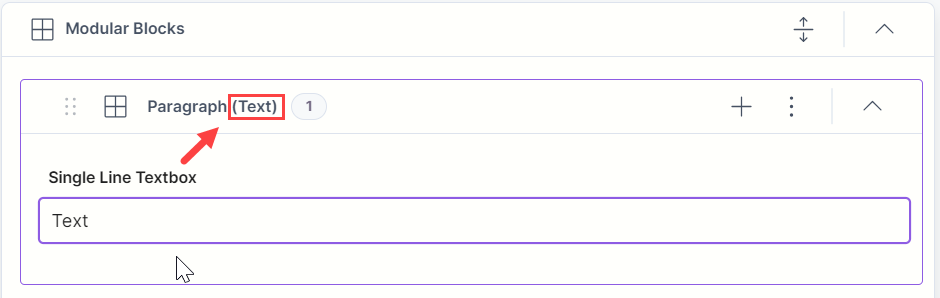
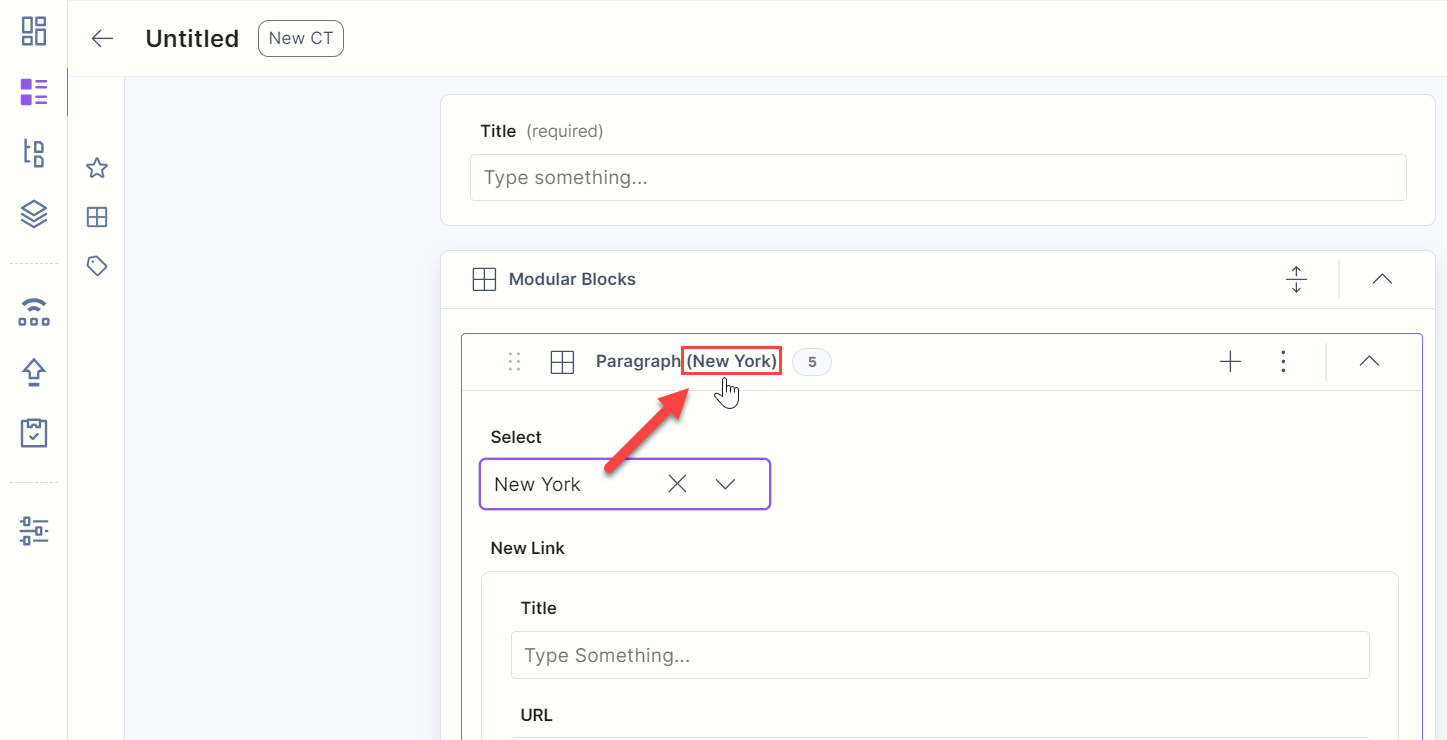
When creating entries, sometimes the title of certain blocks within a Modular Block automatically updates to reflect the values selected or provided in the first field within the block.
This happens in the following scenarios:
- When entering text into either a Single Line Textbox as follows:
Or, a Multi Line Textbox within the Modular Block.
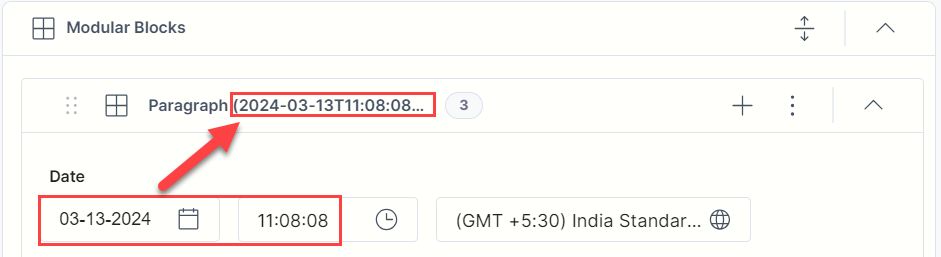
- When inputting data into a Date field (the block title reflects the date in ISO format)
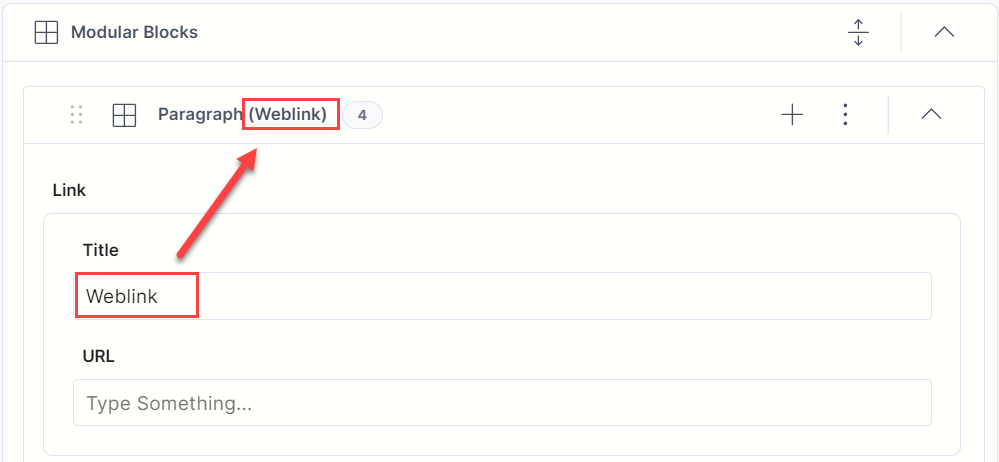
- When entering text in the "Title" field within a Link field.
- Selecting an option from a Single Type - Radio Button or Single Type - Dropdown Select Field inside the block.
Modular Blocks - Real World Scenarios
Let's learn how to work with Modular Blocks in Contentstack using a few use cases.
Example 1 - Fluid Page Components
Creating a single content type for many similar, but still different pages can be a complicated task. However, by using modular blocks, this can be simplified to a great extent. While giving the content editor the freedom to structure and order the page components as he/she wants, he/she can still only conform to the norms and standards the web page (or any other channel editing content for) offers.
Create the Page Content Type
To do this, log in to your Contentstack account and perform the following steps:
- Move into your stack you created earlier and from the Content Models icon (on the left navigation menu) go to the Content Types page and click on the +New Content Type button at the top right.
- By following the steps mentioned, create a content type and name it as Page.
Then, insert all fields that should always be defined for all pages, for example: Intro, Metadata, SEO and so on.
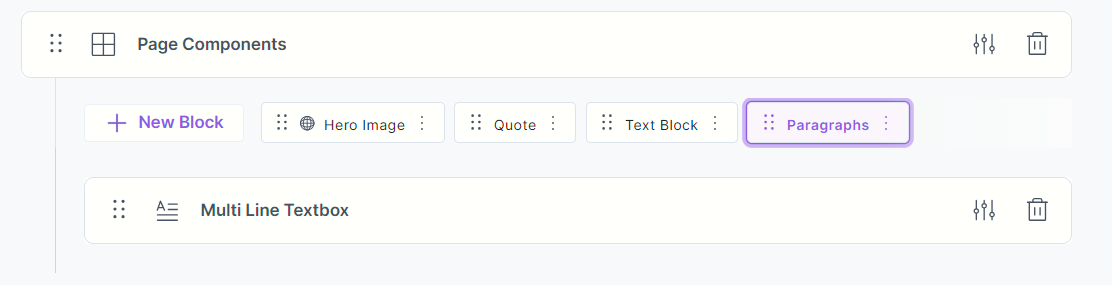
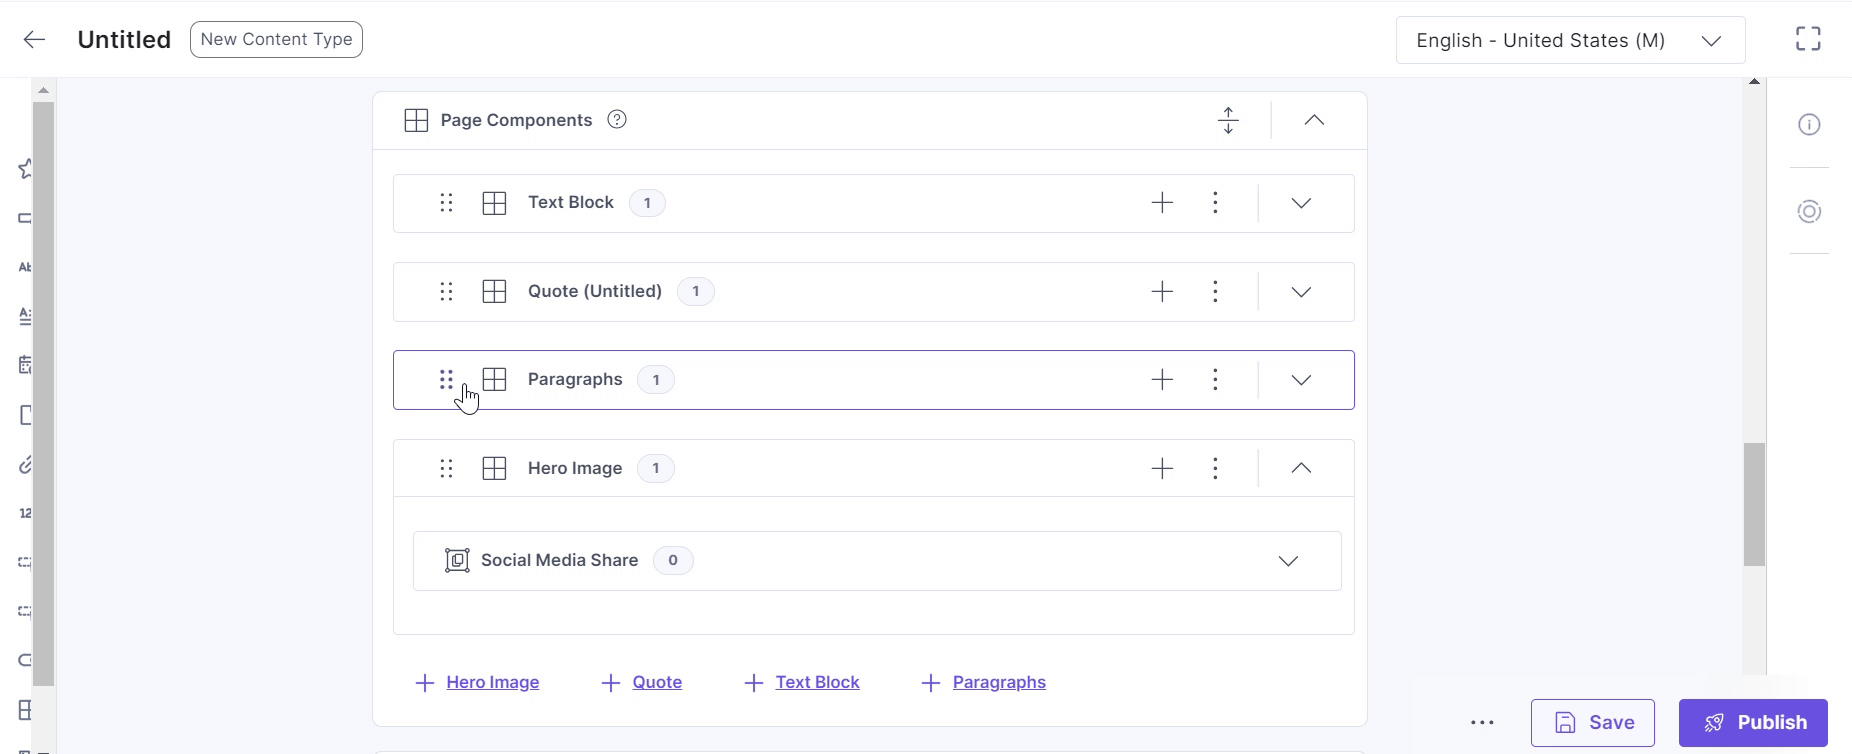
- Insert a Modular Blocks field and name it as Page Components.
- Inside the Page Components field, create items for any desired page component. E.g. “Hero Image”, “Quote”, “Text block/s”, “Paragraph/s”, and so on.
It will look something like this:
The editor is then free to structure and reorder available page components at will.
Example 2 - Creating a Menu
With Modular Blocks, you can create a navigation menu for your web page. In this example, we will create two content types: Landing Page and Menu.
The Landing Page content type will serve as the referenced content type whereas the Menu content type is where we will add the modular block field. The entries in this content type will refer to the entries of the Landing Page content type.
Create the Landing Page Content Type
To do this, log in to your Contentstack account and follow the steps given below:
- Create a new stack.
- On the left navigation menu, from the Content Models icon go to the Content Types page and click on the +New Content Type button at the top right.
- Then, click on the + New Content Type button.
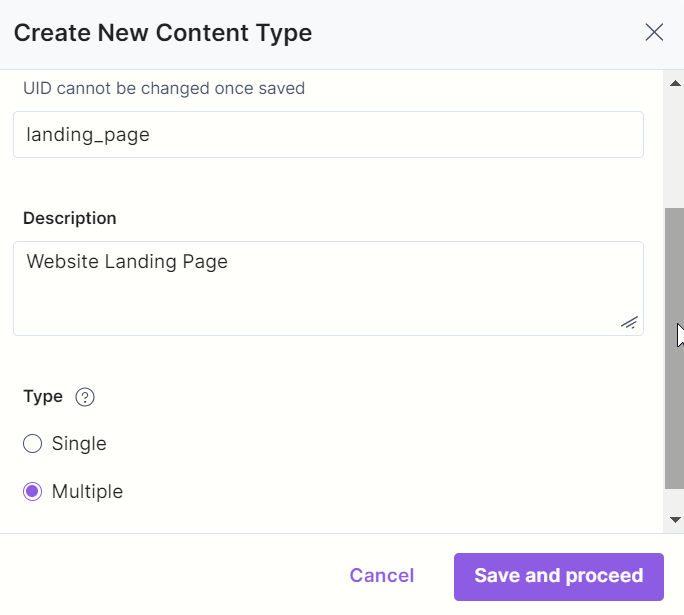
- On the Create New Content Type screen, provide a name to your content type, for example Landing Page and an optional description.
Select Multiple (to create multiple entries in this content type) option as shown below:
- Then click Save and proceed and you will be directed to the Content Type Builder page. Next, click on Insert a field (+) icon.
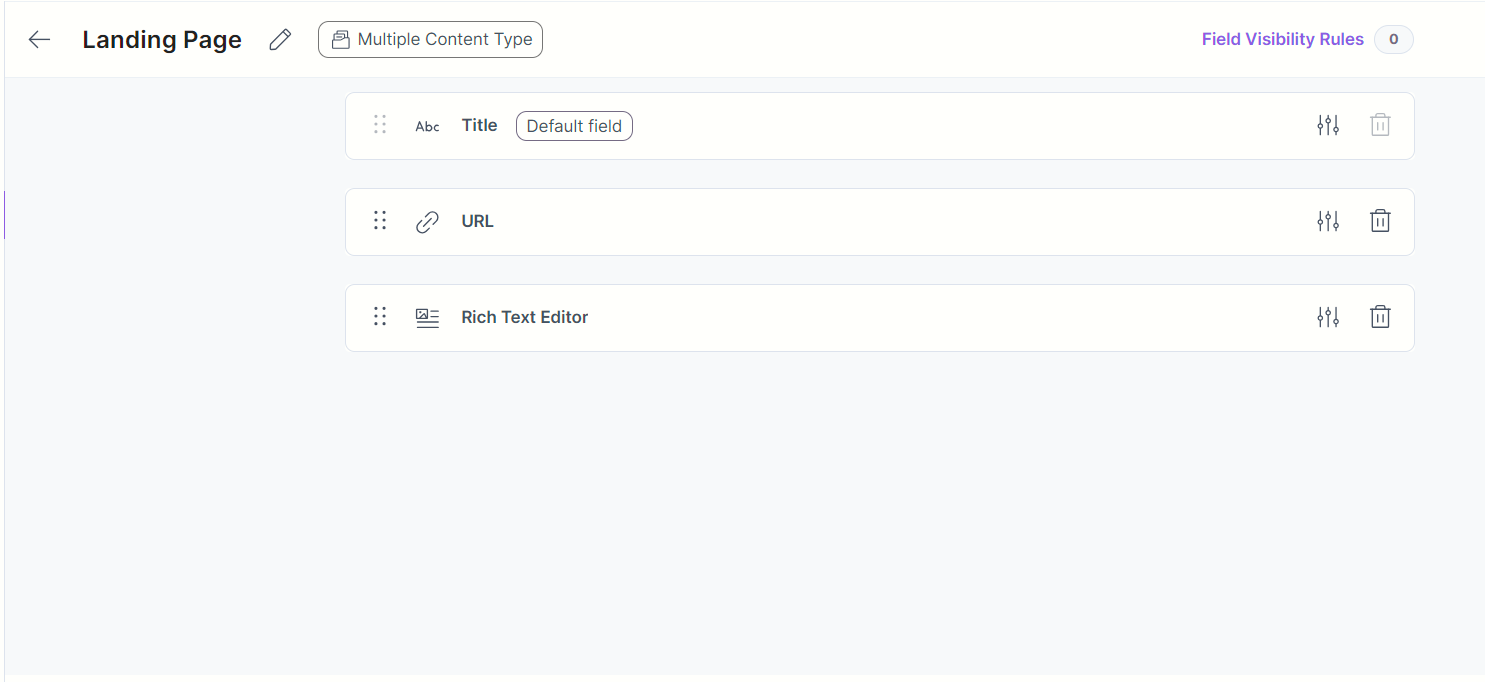
Add a Rich Text Editor field (Title added by default) to your content type as shown below and click on Save and Close.
Create the Menu Content Type
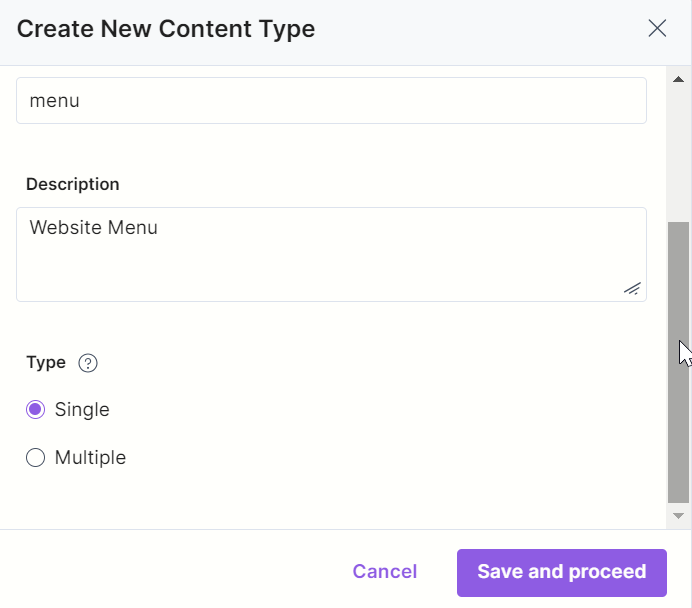
- Follow the same steps (1- 3) as discussed above and create a new content type named Menu.
- On the Create New Content Type screen, provide a name to your content type and an optional description.
Select Single option via radio button provided as shown below:
- Then click Save and proceed and you will be directed to the Content Type Builder page. Next, click on Insert a field (+) icon.
- Title field is added by default. Click the modular block field and name it as Menu Items.
- Click +New Block button and name it Landing Page Reference, and then click on Create.
Click the Single Line Textbox field (name it Label) along with a Reference field into the Landing Page Reference item.
For the reference field that you just added, define the reference to only Landing Page content type by selecting Landing Page. Also, ensure that the multiple option is unmarked.
- Click on the +New Block button again in the Menu Items field, name it External, and click on Create.
- Click on the +New Block button once again in the Menu Items field, name it Custom, and click on Create. Insert two Single Line Textbox items into the Custom item and name them Label and Path.
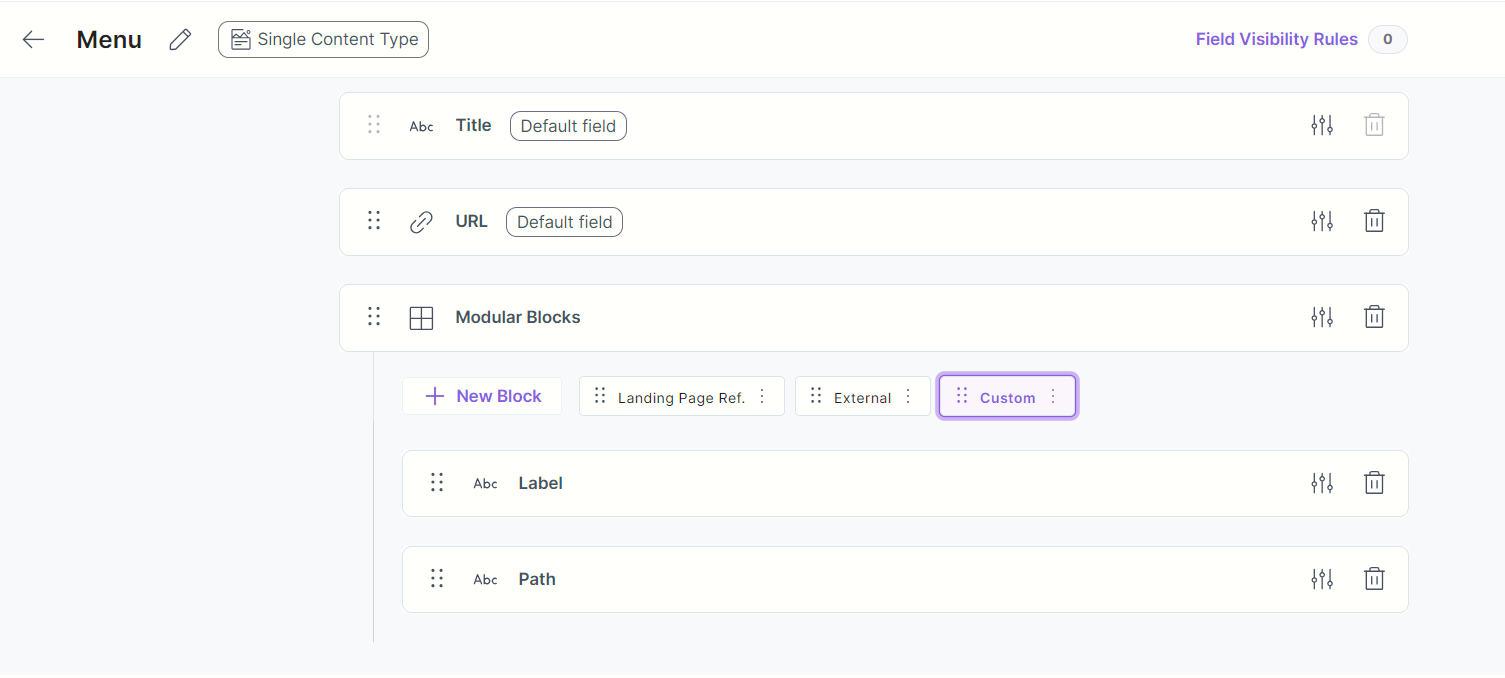
- Once you have added all these items, click on Save and Close.
Now that we are done creating our content types, let's create entries in them and see modular block in action.
Create Entries in the Landing Page Content Type
Start by navigating to your stack where you created these content types. Then, follow the instructions given below:
- Click on the Entries icon from the left navigation menu. Now in the entries page click on +New Entry button at the top right and then select the Landing Page Content Type. We will add two entries to this content type.
- First, create an entry and name it Frontpage. Make sure the value of the URL field starts with one slash (“/”).
- You may insert some text into the Main Text field.
- Once content has been added, click on Save to save your entry.
- Now create another entry named About. The URL field will automatically be “/about”. Add some text in the Main Text field and save your entry.
Create an Entry in the Menu Content Type
Let's now add an entry in the Menu Content Type. To do this, Start by navigating to your stack where you created the Menu Content Type. Then, follow the instructions given below:
- Click on the Entries icon from the left navigation menu. Now in the entries page click on +New Entry button at the top right and then select the Menu Content Type. Provide a name to your entry in the Title field.
- Click on Landing Page Reference and give the item the label Home. In the reference section, click on Choose existing entry. Select Frontpage from the available options and click on Add Selected Entries.
- Click on Landing Page Reference again and name it About in the Label field. In the reference section, click on Choose existing entry. Select About from the available options and click on Add Selected Entries.
Now click on the External block within the modular block (you created earlier). Name the title field as Contentstack and in the URL field insert the https://contentstack.com link.
Note: The custom field in a content type is just a way to link to another part of the website (or channel), like using "/some-other-link/on-my-webpage" for a "Path" field.
- By using the Content Delivery API provided by Contentstack, you can fetch the content of the Menu entry. It could look something like this.
Example 3 - Light Geo-Segmentation
To show the end user something different based on their physical location (IP address), you can do so by using Modular Blocks in Contentstack.
You can follow the same approach as detailed above and create a content type that has the following modular block structure:
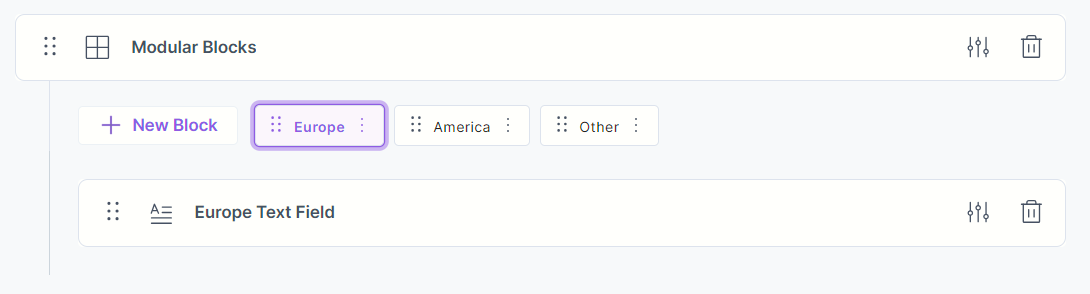
Note: This is only offering the editor to structure the content, not the functionality required to physically position the end user.
Nested Modular Blocks
You can add Modular Blocks within a Modular Block field while creating a content type. This provides content managers with the flexibility of creating complex data structures with different content schemas.
Tip: You can use Nested Modular Blocks to create nested or flexible content pieces that have different structures. However, for similar structures, you can use nested Group fields instead.
For instance, you want to offer flexibility to news authors by providing flexible page structures that allow them to create either standard new articles or submit a set of photos of the event. Further, when creating standard news articles, there should be flexibility in usage of images, image description and body content as required.
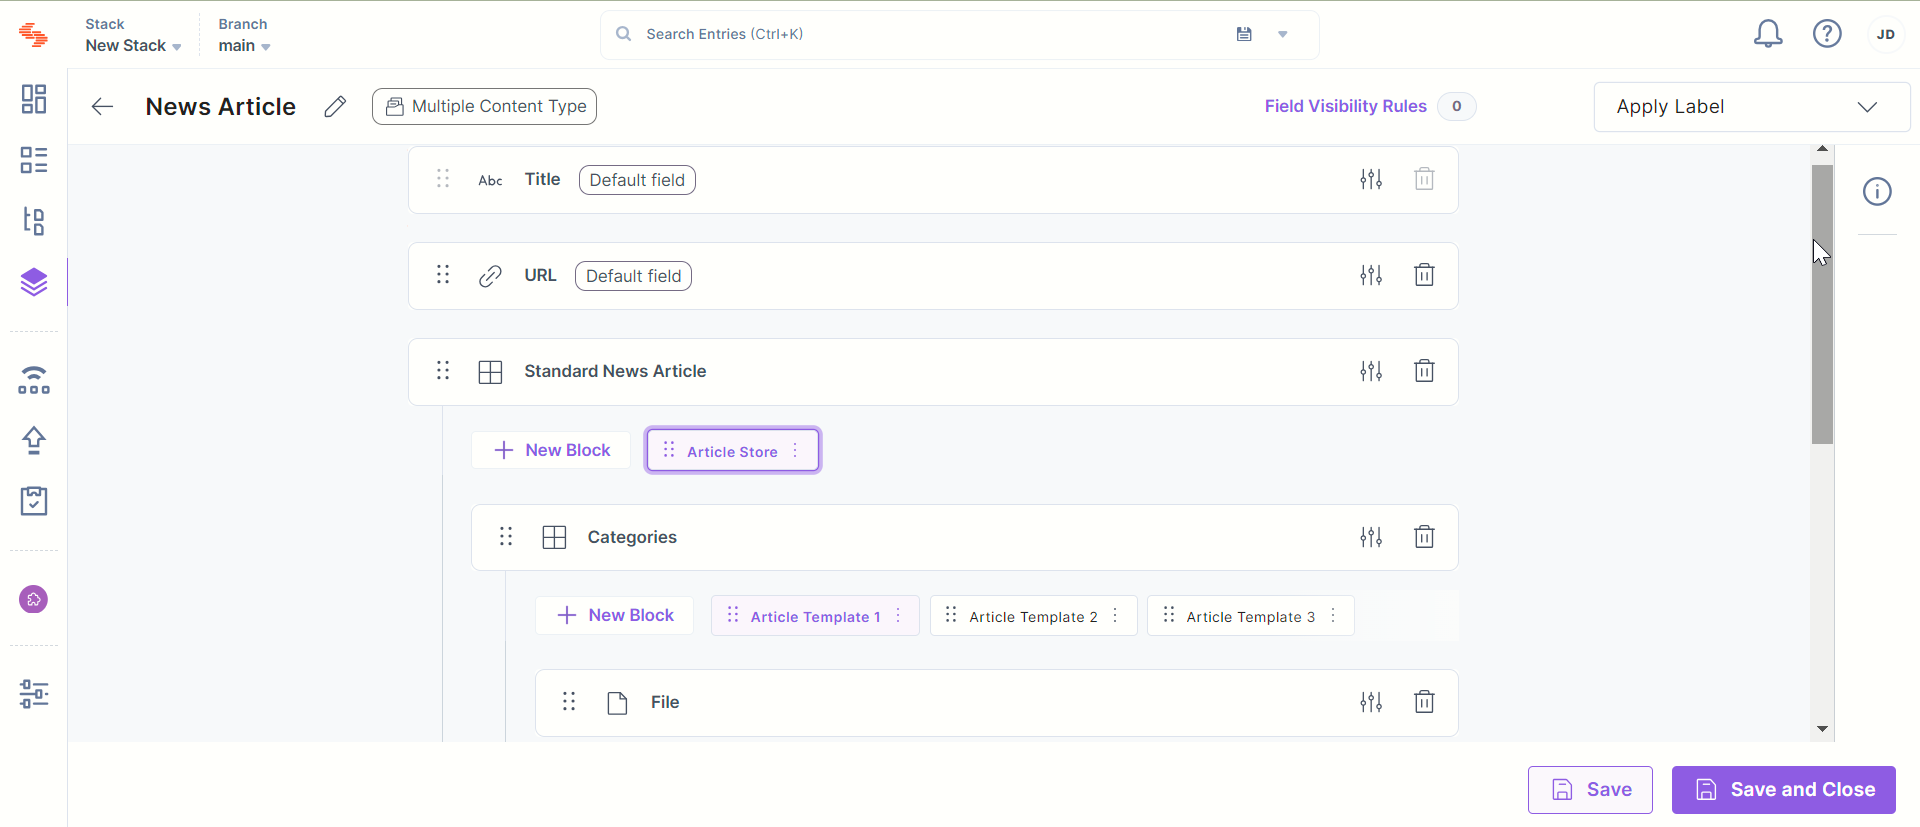
To achieve this, you can create a content type by adding a Modular Blocks field, and add two blocks within it: “Standard News Article” and “Image Gallery”.
Within the first block (i.e., Standard News Article), add another (nested) Modular Blocks field, and add a block each for the following fields: File, Single Line Textbox, and Rich Text Editor.
For the “Image Gallery” Modular Blocks field, add a File field and mark it as Multiple. Save this content type.
Now, while creating entries for this content type, news authors can choose between the “Standard News Article” format or the “Image Gallery” format. Further, they can create varieties of “Standard News Articles” by adding any of the three given fields anywhere in the page multiple times.
Let’s look at how content managers and developers can make use of Nested Modular Blocks while working with entries and content types.
Add the Nested Modular Blocks Field to Content Types
To add a Nested Modular Blocks field to the content type, log in to your Contentstack account, and perform the following steps:
- Edit your content type by clicking on the existing Modular Blocks field. Alternatively, you can add a Modular Blocks field by clicking on the Insert a field (+) icon and selecting the Modular Blocks from the Fields list displayed.
Note: Developers can add up to 5 Modular Blocks fields in a content type.
- Once added, click the + New Block link, provide a name of your choice for this block (e.g. News Articles), and click Create.
You can add multiple blocks (with several fields within each block) into the added Modular Blocks field.
Tip: You can, at any time, rename or delete the added blocks.
Now, within one of these blocks (for e.g. News Articles), select a Nested Modular Blocks field, and provide a name of your choice for this field (for e.g. Categories).
Note: Only two levels of nesting are allowed for the Modular Blocks field.
Now, you can add multiple blocks (with several fields within each block) into the Nested Modular Blocks field (for e.g. the three nested blocks here would contain different template structures for an article).
Note: The maximum number of blocks that can be added to a Modular Blocks field is 20.
Add Content to the Nested Modular Blocks Field
Let’s learn how the Nested Modular Blocks field allows content managers to flexibly add content to their entries. While creating an entry, the content manager can perform the following steps to add content to the entry:
- Open the entry.
- You will see the Modular Blocks field (or as renamed), the subsequent Nested Modular Blocks field within it, and links to the different blocks defined within the Nested Modular Blocks field.
Now, click on any of the links to add the defined blocks (e.g., a banner) to your entry. The relevant block (with all the corresponding fields) will be added in the entry form.
Note: The content manager cannot add more than 30 blocks within a Nested Modular Blocks field.

Tip: While creating content types, the blocks can be rearranged to the right or left as needed. Also, when creating entries, content managers can add different blocks or repeat them as needed.
Limitations of Modular Blocks
- The maximum number of Modular Blocks fields that can be added in a single content type is 5.
- The maximum number of blocks that the developer can add within the Modular Blocks field is 20.
- The maximum depth limit for nesting of Modular Blocks fields is 2.
- The maximum number of fields that can be added to a content type is 100. When you add a Modular Blocks field to a content type, each Modular Blocks field is counted as a field, each block within the Modular Blocks field is counted as a field, and each field within a block is counted too. Consider for example, a content type with one Modular Blocks field that contains two blocks, each block with two fields each, will be counted as a total of 7 fields.
- The content manager cannot add more than 30 blocks within a Modular Blocks field.
- The maximum number of blocks that the developer can add within the Nested Modular Blocks field is 20.
- While creating an entry, the content manager cannot add more than 30 blocks within a Nested Modular Blocks field.
Additional Resources: To know about the best practices to add Modular block, please read our documentation on it. Also, learn about Validating Modular Blocks in our in-depth guide.
More articles in "Fields"
