Product Changelog

Stay up-to-date with all the improvements, features, and changes introduced to the product, APIs, docs, and other resources.

rss_feedSubscribe to RSS Feed

Added

You can now download your schema from the app. Until now, the only way to get a copy of your fields and mappings was the schema API, followed by converting its JSON by hand.

What's new

  • A Download menu on Fields and Mappings. Under Schema Studio, the Download icon on the Fields and Mappings lists now offers CSV or JSON of the rows on screen, or the full schema as JSON.
  • Filter first, then download. The fields and mappings files hold only the rows your search and filters show, so you can download just the subset you need.
  • One row per field. The fields CSV lists every stream that maps to a field in one Streams column, so a field with several mappings is still one row.

See Downloading Fields and Mappings for the details.

Added

File exports have a new Hash PII Fields toggle. Turn it on and the fields marked private for your account leave Lytics as SHA-256 hashes instead of plain text.

How it works

  • Where: Amazon S3, Google Cloud Storage, Azure Blob Storage (JSON), and the Lytics File Service exports (CSV and JSON via SFTP, and Email CSV).
  • What's hashed: every field marked private for your account, as the SHA-256 of the trimmed, lowercased value. List fields are hashed value by value.
  • What isn't sent: a private field that isn't text, such as an address or a date, is left empty in a CSV and left out of JSON. It is never sent in plain text.
  • Phone numbers are hashed exactly as stored, so store them in the format your destination expects.
  • Off by default. Existing jobs keep sending the same data until you turn it on.

See Amazon S3, Google Cloud Storage, Microsoft Azure, and Lytics File Service for where the toggle sits in each job.

Improved

The Meta Conversions API export can now send order and product details with each event, and can flag events for Meta's Limited Data Use.

What's new

  • order_id is now in Custom Parameters Mapping. Map a single-valued field. Numbers are sent as strings.
  • contents sends a list of products. Map a field that holds a JSON array such as [{"id": "sku-1", "quantity": 2, "item_price": 19.99}]. Lytics keeps only id, quantity, item_price, and delivery_category, so no other data in the field reaches Meta.
  • delivery_category takes in_store, curbside, or home_delivery.
  • Limited Data Use (LDU) is a new toggle, off by default. Turn it on to flag every event for Meta's Limited Data Use, which Meta applies by the user's location for US state privacy laws such as the CCPA.

See Meta for the full setup.

Added

Custom Roles let you bundle granular permissions into a single named role that you create, edit, and delete yourself. No more hand-picking a long list of permissions for every user, and no more asking Lytics to provision a role for you. When none of the predefined roles fit a job function, define the access shape once and reuse it across your team.

What's new

  • Author roles in the app. A new Custom Roles section (under Users, next to Manage Users) lets account admins create a role from the granular permissions catalog, give it a name and description, and save it.
  • Start from a predefined role. Prefill the permission selection from a built-in role like Data Manager, then tune it to exactly the access you want.
  • Assign like any other role. Saved custom roles appear in the Predefined Roles tab and are assigned the same way as built-in roles. Permissions stay additive across everything a user holds.
  • Edit once, applies everywhere. Changing a custom role's permissions immediately updates the access of every user who holds it, with no re-assignment needed. Before deleting a role, you can see how many users and access tokens currently use it.

See Custom Roles for the full walkthrough.

Improved

BigQuery imports handle large tables more reliably. A large query result is now exported and imported a piece at a time, so a failure retries only the piece that failed, and an import's result is capped at 100 GB.

What's new

  • Large results import in windows. When a result is larger than about 10 GiB and the import has a Timestamp Field, it is split into time windows of about 10 GiB, and each run exports and imports one window. A failed export retries only its own window and reuses the query result instead of running your query again.
  • Imported files are cleaned up. Each window's export files are deleted as soon as they're imported, and a failed export deletes what it wrote.
  • A stop doesn't lose rows. If a deploy or rebalance interrupts a file mid-import, that file is imported again.

What you need to know

  • An import whose result is larger than 100 GB now stops without exporting anything, and doesn't retry. Its error says how large the result was.
  • To bring in a larger history, narrow what the import reads, for example with a view over a date range, and import older data with separate imports. Lytics Support can raise the limit for your account.

See Google BigQuery for setup.

Improved

Flow metrics for versions created on or after October 15, 2026 now count every move a user makes from one step to the next, and refresh hourly instead of once a day. Every step and every branch has its own number.

What's new

  • Entered counts every entry, including users who re-enter.
  • Completed counts every way out of the flow: the end of a path, a split that couldn't place the user, or a step that was removed.
  • Active is Entered minus Completed: the users still in the flow.
  • Wait steps show how many users are waiting at that step right now.
  • Split steps count each branch, including branches that lead straight out of the flow, which used to show "—".
  • A number that is still loading, or failed to load, shows "—" rather than 0.

Scope

  • Older flow versions, drafts, and templates keep their daily snapshot metrics, so their numbers don't change.
  • A new version can read differently from an older version of the same flow, because it counts every way out.

See Flow Metrics for how each number is defined.

Improved

The left navigation is reorganized so the pages you use to work with people sit together, and the pages that shape your data model sit together. Building Profiles is now Schema Studio, and a new Audiences & Profiles section sits between it and Using Profiles.

What moved

  • Schema Studio lists its Dashboard first, then Versions, Drafts, Fields, Mappings, and Ranks, each one click away instead of under a Schema group. Identity keeps its own group (Rules, Stats), and Exploration holds Schema Copilot, Schema Viz, Schema Audit, Field Audit, and Simulate.
  • Audiences & Profiles gathers Dashboard, Audiences, Behavioral Scores, Search Users, Lookalike Models, and Bulk GDPR. Search Users moved here from Schema Studio.
  • Using Profiles keeps Experiences, Personalize, Flows, Widgets, Goals, and Reports.
  • The Queries row is gone.

What stays the same

  • Every page keeps its URL, so bookmarks and shared links still work.
  • Permissions are unchanged. A section shows only the rows you can open.

See Audiences and Schema Drafts for walkthroughs that start from the new navigation.

Added

The audience builder has a new Flow rule, so you can build an audience from where users are in a flow and reach them with anything that takes an audience.

What you can do

  • Reach users who are currently at a stage, for example everyone waiting in a nurture step, with a matching message in another channel.
  • Find users who have reached a stage, to measure how far a flow is getting people or to hand them to a follow-up campaign.

How it works

  • Pick a flow, its version, a condition, and one or more stages by name.
  • A saved rule reads back as the flow and stage names, so anyone opening the audience can see what it targets.
  • The Flow tab appears on user audiences for people with access to Flows.

See Audiences for the steps.

Improved

Every client-side integration in the Lytics JavaScript tag now runs only when its box is checked in account settings. Eight of them used to run automatically whenever the partner's tag was on the page: Facebook Ads, Google Tag Manager, Google DFP, Google Analytics custom dimensions, AdRoll, Tealium, Qubit, and AddThis. They now work like the rest, so one list shows what the tag shares with which partner, and you can change it yourself.

What changes

  • Existing accounts: nothing stops working. Any of the eight that was running on your account was switched on for it.
  • New accounts: every client-side integration starts off. Check the ones you use, such as Facebook Ads to sync audiences through the Meta Pixel, or Google Tag Manager to collect the dataLayer.
  • The Integrations Blocklist is gone from account settings. On the version 2 and version 3 tags, the checkboxes are the only on/off control.

What you need to do

  • Setting up a new account? Check the integrations you need under Account → Settings → JavaScript Tag → Client Side Integrations.
  • Still on the legacy version 1 tag? It doesn't read the checkboxes and still uses the blocklist. Contact Lytics Support to change it.

See JavaScript Tag Config for the full list of integrations.

Added

The audience builder has a new recurring anniversary operator for date fields. It builds an audience of people whose date comes around today, such as a birthday, a signup anniversary, or a renewal date, and it updates every day without anyone editing the rule.

What's new

  • Reach people on the same month and day every year, the same day every month, the same weekday every week, or every N days, for birthday offers, membership anniversaries, or recurring check-ins.
  • Reach them a set number of days after the date instead of on it, such as a follow-up 10 days after a birthday, or a half-birthday at 182 days.
  • See the audience's size and sample profiles while you build the rule, as with any other rule.

How it works

  • Matching uses today's date in UTC.
  • A date that doesn't exist in a period doesn't match: a Feb 29 birthday matches only in leap years, and the 31st only in months that have one.
  • Available on date fields. Dates stored inside a map field aren't supported.
  • In SegmentQL and the Segment API, the same rule is the recurring() function.

See Audiences for the rule settings, and Advanced Mapping Functions for recurring().

Added

Bulk GDPR lets privacy and data teams queue deletions for a whole list of profiles from the Lytics UI, without writing code against the bulk deletion API.

How it works

  • Upload a one-column CSV of identifiers, such as email addresses, from Using Profiles > Bulk GDPR, then confirm the count before anything is queued.
  • See how many profiles were queued and how many failed, and download a results file with a request ID for each identifier, ready for your audit trail.
  • Resubmitting an identifier on the same day returns its original request ID instead of queuing a duplicate.

Good to know

  • The page is available to users whose role can delete profiles (Admin, Data Manager, or User Profile Manage).
  • Files are limited to 500 KB. Larger lists should use the bulk deletion API directly.
  • Deletions can't be undone.

See Bulk User Deletion for the full walkthrough.

Added

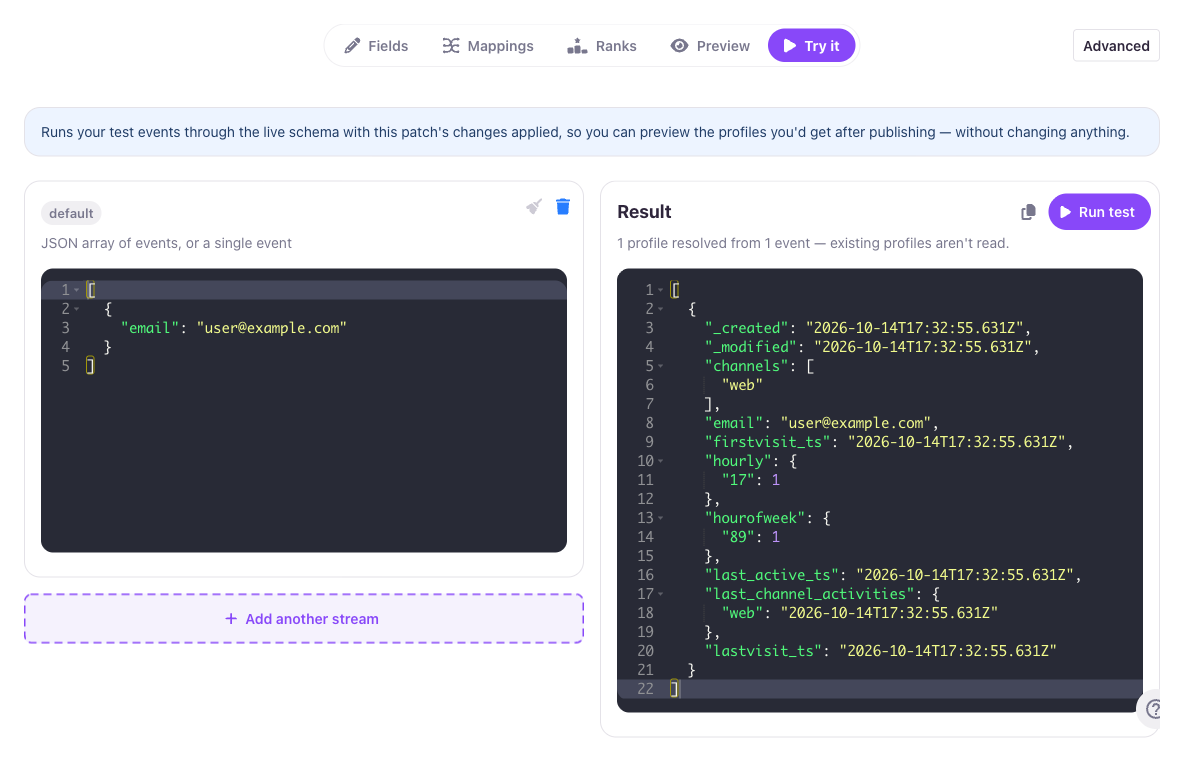
The Try it tab in the schema draft editor, showing sample events and the resolved profile

The schema Draft editor now has a Try it tab for running sample events through your staged changes and seeing the profile they resolve to before you publish.

How it works

  • No setup, no customer data. Each stream your draft maps gets its own events box, pre-filled with a synthetic sample built from the draft's own mappings. Try it never reads your real stream data.
  • See the result instantly. Choose Run test, and the resolved profile comes back as JSON, with a summary of the fields your draft adds or changes versus the live schema.
  • Catch problems early. Streams that map no identifier, or whose events wouldn't contribute to the result, are flagged up front, before you apply anything.

Nothing is published or written to any profile by running a test. See Schema Drafts for the full walkthrough.

Added

Job Blueprints let you save a configured job as a reusable starting point and spin up new jobs from it, pre-filled and ready to review, instead of rebuilding the same setup by hand each time.

How it works

  • Save any configured job as a blueprint from its actions menu; the blueprint captures the job's settings, authorization, quiet window, and monitoring.
  • Start a new job from a blueprint in one click. The create wizard opens with everything pre-filled, so you just review the values and adjust what you need before creating.
  • Manage an integration's blueprints (use, rename, or delete them) from its Manage Integration page.

Good to know

  • Blueprints are scoped to your account and tied to the integration they were saved from.
  • A blueprint's authorization is reapplied automatically when it's still valid, and left for you to pick when it isn't, so a new job never starts from a stale credential.
  • Editing a blueprint doesn't change jobs already created from it, and using one follows your existing job permissions.

See Job Blueprints for the full walkthrough.

Improved

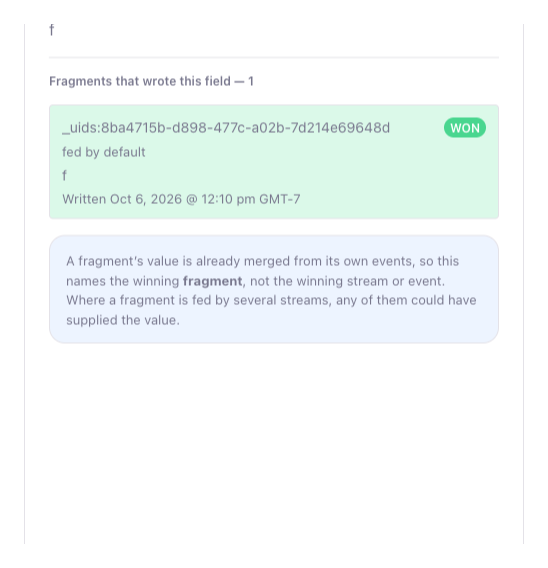
The Source column on a profile's Profile Fields tab now shows what actually set each value on that profile. Previously it listed every stream that could write the field, so a field like last_name named several streams that had supplied nothing next to the one that had.

What's new

  • Trace any value to its origin: a specific identity fragment, a Cloud Connect data model, Scoring, or "Merged from N fragments" when the field combines several.
  • Click a source to open Why this value?, which lists every fragment that wrote the field and marks the one that won. Use it to answer "why does this profile have that last name?" without reading raw data.
  • Switch to By identity fragment to see a profile from its pieces: each fragment's values, and which of them survived on the merged profile.
  • Profiles open faster. Fields show right away, and the Source column fills in a moment later.
  • Identifiers are listed first and internal fields last, so the fields you care about are at the top.

Why this value? drawer

How it works

Look up a profile under Building Profiles → Search and open the Profile Fields tab. The drawer names the winning fragment, not the individual stream or event within it, and which fragment wins is decided by the field's merge operator, not by identity-key rank.

See Identity Explorer for details.

Improved

Destination filters can now be set on a single authorization, not just on a whole integration. Until now, every job of an integration got the same suppression list, whichever downstream account it delivered to.

What's new

  • Keep an audience out of one downstream account without filtering the others — for example, a second email account for a region where open tracking is turned off, or an ad account managed by an agency.
  • New jobs created on a filtered authorization are protected from their first run, with no per-job setup.
  • Apply the filter to every integration using the authorization, so integrations added to it later are covered too, or to one integration only.
  • Filters set on the integration and on an authorization combine. Adding one never weakens another.
  • A job's filters show wherever you view the job, including ones it inherits from an authorization.

How it works

Open an integration's summary page with Manage Integration. Each authorization it delivers through now has its own filter below the integration-wide one. Changes take effect on each job's next run.

See Destination Filters for setup and permissions.

Improved

The redesigned Behavioral Scores page, under Using Profiles > Behavioral Scores, is now a workbench for building audiences. You can see how each of the nine scores is distributed across your users, combine the ones you want, and send the result straight to the audience builder. You no longer need to know score thresholds up front.

What's new

  • Start from a play. Named combinations such as Binge readers (high intensity, low frequency) or At-risk regulars (high frequency, falling momentum) give you a working behavioral audience in one click.
  • Set bands on any score. Pick Low, Medium, or High, or drag the range slider for an exact band. Bands on different scores are combined with AND.
  • See the size before you build. The page shows an estimated count of matching users and the rule that will be created.
  • Continue in audience builder. The score rules carry over into the Audience Builder, where you can name the audience, add more rules, and save it.
  • Explanations next to your data. Expand Why This Score Matters on any score row to see what the score measures and when to use it.

See Behavioral Scores for what each score means and the full set of out-of-the-box behavioral audiences.

Added

Supertopics group related topics into a single targetable interest — what Lytics previously called Affinities. They now have a page of their own at Content → Topics, open to every account with content access.

What's new

  • See your whole interest taxonomy in one place — every topic Lytics found in your content, and every supertopic built from them, scoped by context layer.
  • Build a supertopic in a couple of clicks — name it and pick its topics, or accept one of the groupings Lytics suggests from your own content.
  • Judge a supertopic before you act on it — how much of your content it covers, how many people carry a score for it, and how strongly the average scored user matches.
  • Turn interest into an audience in place — pick a band, or drag your own range, and create the audience without leaving the page.
  • Follow what your content connects — the content map shows which topics share URLs, and a supertopic can be built from any two of them.
  • Shape the taxonomy — allow a topic to keep it available, or block one that isn't useful.

About the rename

Your existing Affinities are your Supertopics, under the same names, with the same member topics and the same scores. Audiences you have already built keep working, and profile fields are untouched.

The word affinity still names the score, so a supertopic reports an avg affinity score and bands such as High Affinity.

See Topics & Supertopics for how the two relate, and Supertopics for creating, editing, and renaming them.

Added

Lytics now integrates with Quantcast, an advertising and audience-measurement platform that brands use to plan, activate, and measure campaigns across the open internet. The integration launches with a Conversion API Export job that turns Lytics audience membership into server-side Quantcast conversions — fire events like purchase or signup from an audience built on cross-channel behavior, data science scores, and content affinities, instead of depending on what a browser pixel happens to catch.

What you can do

  • Drive Quantcast conversions from any Lytics audience, so campaign optimization learns from the full profile rather than on-site activity alone.
  • Stream conversions in near real time as users enter or exit the audience — or trigger on changes to the user fields you care about.
  • Backfill the audience's current members on start, so Quantcast reporting reflects who already qualifies.
  • Attach commerce and page context — order ID, revenue, product category, labels, referrer — so conversions carry the value behind them, not just the fact that they happened.

How it works

Authorization needs only your Quantcast account ID (pCode). Lytics assembles one conversion per user from the identifiers you map, hashes email addresses to SHA-256 before sending, and batches conversions to Quantcast's Conversion API.

See Quantcast for identifier requirements and the full configuration walkthrough.

Added

OpenAI Ads is now a Lytics integration. Two new export jobs let you measure and target campaigns running in ChatGPT with the same Lytics audiences you already activate everywhere else.

What's new

  • Conversions API Export — send server-side conversion events from a Lytics audience to an OpenAI pixel, so conversions the browser pixel never sees (offline purchases, phone orders, back-office events) still count toward campaign measurement and optimization.
  • Custom Audience Export — keep an OpenAI custom audience in step with a Lytics audience, so behavioral data, data science scores, and content affinities drive who your OpenAI campaigns reach. Enters add members, exits remove them, continuously.

How it works

  • Conversion events are triggered by audience enters and exits, and optionally by changes to any of up to 75 user fields you choose. Map Event ID to the same ID your browser pixel sends and OpenAI deduplicates the two.
  • Because OpenAI rejects an entire batch of 1,000 conversions if a single event in it is invalid, Lytics drops any profile it cannot build a valid event from and reports it as omitted — one bad profile never costs you the rest of the batch.
  • Emails, phone numbers, names, and external IDs are hashed for you, with each API's normalization rules applied automatically. Google Advertising IDs are sent unhashed, as OpenAI requires.
  • Custom audience membership syncs both directions and reports what OpenAI accepted; OpenAI itself reports audience size only as a privacy-preserving range.

What you need to do

  • Create an OpenAI Ads API Key authorization for custom audience syncs, and an OpenAI Conversions API Key authorization for conversion events. These are separate credentials in OpenAI Ads Manager, and each Ads API key is scoped by OpenAI to a single ad account.
  • Have your Pixel ID ready from the conversions tab in OpenAI Ads Manager before configuring a Conversions API Export.

See OpenAI Ads for the full configuration walkthrough.

Deprecated

The Data Activation Layer (DAL) is deprecated. Setting up Lytics now starts with a Lytics project in Contentstack, and the setup guides have moved there with it.

What's changed

  • A project is the entry point. Creating one provisions the matching Lytics account, generates a JStag snippet, and opens a default data stream ready to receive events — there's no separate activation step to complete first.
  • Connections replace DAL configuration. Link a project to a CMS stack, a Launch project, or a Personalize project to move data between products. The Personalize connection is what makes Lytics audiences available for variant targeting and experiments — the old Sync Audience Definitions job is no longer needed.
  • Launch can handle the tag for you. If your site runs on Contentstack Launch, connect the Launch project and skip installing the JavaScript tag by hand.
  • Access is scoped per project. Collaborators and roles are assigned on each project — organization membership alone doesn't grant access, and a role on one project doesn't carry over to another.

What you need to do

  • Nothing changes in the Lytics app. A project in Contentstack and an account in Lytics are the same thing under two names, so your existing account, streams, and audiences are unaffected.
  • Set up new projects in Contentstack. The three DAL setup pages in these docs have been retired in favor of a single overview page that links into the project setup guides.

See Lytics Projects in Contentstack for the component summary and setup links, or the Contentstack integration for syncing stack entries into Lytics.

Improved

The Topic Summary page has been rebuilt in the new Lytics interface. Open any topic to see how much of your content covers it and how interested your audience is — then turn any slice of that interest into an audience without leaving the page.

What's new

  • Judge a topic at a glance — how much of your content carries the topic, how many people have a score for it, and the average level of interest, with the band that average falls into named beside it.
  • See who is interested — the whole distribution of scores from 0 to 1, instead of a single summary figure.
  • Select a band, and know what it costs you — one click for High, Some, Low, Uninterested or any affinity, or drag the handles for a custom range. Every choice reports how many users it selects before you commit to it.
  • Create the audience in place — Build audience opens a drawer with a prefilled name, a size queried from your live audience rather than estimated from the chart, and a plain statement of who is in, who is out, and who isn't counted either way. Refine in audience builder hands the same band off to the builder when you want to combine it with other rules.
  • Share what you're looking at — the active tab and context layer travel in the page's URL.

See Topics for the full walkthrough, including how the interest bands are defined.

Improved

The Google Ads Customer Match export can now send a user's IP address alongside the match keys you already configure. IP address isn't a list type of its own — it rides along with email, phone, mailing address, or user ID to give Google more to match on, which means better match rates on the same audience.

How it works

  • Map the Lytics field that holds the user's IP address when you configure the export. The field can hold a single address or an array — every valid address on the profile is sent.
  • Optionally map IP Observed From and IP Observed Until to tell Google when that address was in use. Lytics sends the window in UTC.
  • Both IPv4 and IPv6 are supported, and IPv4-mapped IPv6 addresses are normalized to their IPv4 form.
  • Unlike email and phone number, IP addresses are sent as plain text rather than SHA256-hashed.

What to know

  • Only public, routable addresses are sent. Private, carrier-grade NAT, loopback, link-local, multicast, and malformed values are skipped — the user is still exported on their other match keys.
  • The fields have no effect on a Google DV360 audience export, which rejects audience members carrying IP data.
  • Audience removals are matched on identifiers alone, so no IP data is attached when a user exits the audience.

See Google Ads for the full field list, the complete set of skipped address ranges, and configuration steps.

Added

Inline Job Monitoring lets you turn on notifications for a single job right where you manage it — no separate alert job to stand up. Choose which events matter and where the alerts should go, and the job carries that configuration itself.

What you can do

  • Get notified when a job starts, syncs, completes, is updated, goes to sleep, starts erroring, fails, or is deleted — pick only the events your team cares about.
  • Send those alerts to Email, Slack, or Microsoft Teams (or any combination).
  • Turn on monitoring from the Monitoring row on a job's summary page, or from the jobs list — including selecting several jobs and applying one configuration to all of them at once.
  • Spot monitored jobs at a glance: the jobs list shows a monitored indicator on jobs that have it enabled.

How it works

Monitoring lives on the job itself, so there's nothing extra to maintain and changes take effect without restarting the job. Alerts reuse the same Slack/Teams cards and email delivery as Lytics' existing Job Alerts, so account-wide and multi-workflow alerting keep working exactly as before. Configuring monitoring requires job-management access; everyone else sees the configuration read-only.

See Monitoring a Job for the full walkthrough.

Improved

Content Index is now the home for all of your classified content in Lytics, replacing the Classification page for every account. Your content is still classified and enriched exactly as before, and everything the Classification page offered now lives in Content Index, with better tools to explore it.

What's new

  • Overview gives you classification health at a glance: URL analysis trends over time (with optional alert thresholds for unusual spikes or drops), the share of recently analyzed URLs that generated topics, and your most recently analyzed URLs.
  • An improved Content flow diagram shows where URLs drop out of the pipeline, whether they are blocked by robots.txt, filtered by your domain and path settings, or failing to fetch. Click a stage to see recent example URLs so you can diagnose issues without guessing.
  • The URLs tab lets you browse and search every indexed URL, filter by enrichment status or content collection, and see the topics assigned to each.
  • Manually analyze a URL replaces the old manual classification tool: test any URL, preview its metadata and topics, adjust topic assignments, and add it to your index. When an analysis fails, you get a clearer diagnosis of what went wrong.
  • The Insights tab carries over the dashboard from the Classification page, unchanged.

What you need to do

  • Nothing. Old Content → Classification links redirect to Content Index automatically, and a dismissible in-app notice points the way during the transition.

See Content Index for the full tour.

Added

Max File Size lets you cap how large each file in a Lytics File Service SFTP export can get. Previously a large audience always exported as a single file; now, when that file would exceed the size you set, Lytics automatically splits the export across several smaller files — so a downstream system with an upload limit (such as a data warehouse or ingestion service) can accept your data.

What's new

  • Set a maximum file size on the Export CSV via SFTP and Export JSON via SFTP jobs; larger exports are delivered as numbered parts (…part-001, …part-002, and so on).
  • Every user is still exported — the data is split across files, never truncated.
  • The size limit applies to the data before compression, so gzip/zip or PGP-encrypted files arrive smaller than the limit you set.

How it works

Leave Max File Size blank (or 0) to keep exporting a single file — existing jobs are unchanged. Set a value (in bytes) to split, and it works with your current SFTP authorization, compression, and PGP settings.

See Lytics File Service (/docs/lytics-file-service) for setup details, including the minimum size.

Added

The Oracle Marketing Cloud: Eloqua integration can now export Lytics profile data and audience membership to an Eloqua Custom Data Object (CDO). Unlike the existing audience export, which writes to a contact list, this job populates a dedicated object — so Lytics-computed data like scores, attributes, and audience flags stays off the master contact record while still being usable in Eloqua's campaign canvas, dynamic content, and reporting.

What you can do

  • Land Lytics profile fields and audience membership in a dedicated Eloqua object, keeping computed data separate from your master contacts.
  • Target and personalize on Lytics data directly in Eloqua — campaign canvas, dynamic content, and reports can read the CDO.
  • Keep records current automatically: one upserted record per contact, with membership fields flipping true/false as contacts enter and exit each audience.

How it works

  • Runs server-side over the Eloqua REST API, batching every 5 minutes (or sooner when more than 1,000 records are pending).
  • Reuses your existing Eloqua authorization — no new credentials to set up.
  • Creates a lytics_{audience_slug} membership field on the object for each selected audience automatically. Create the Custom Data Object in Eloqua first; Lytics populates it and adds the membership fields, but doesn't create the object itself.

See Oracle Marketing Cloud: Eloqua for the full field mapping and configuration steps.

Improved

Cloud Connect can now import a warehouse JSON or OBJECT column into a map-typed Lytics field. Key-value data in your BigQuery, Snowflake, or other supported warehouse now lands on the profile as a proper map you can use in audiences and activation — instead of a flat string blob of JSON.

How it works

  • Create the destination field in your schema with the right map data type — map[string]string, map[string]int, map[string]number, map[string]bool, or map[string]time.
  • In your Data Model's Field Mappings, map the JSON/OBJECT source column to that map field. Lytics parses the object and coerces each value to the field's value type.

Scope

  • Available through Field Mappings only. Activated Fields auto-create their schema fields from the query columns and can't produce a map type, so the map field must already exist and be mapped explicitly.
  • map[string]value and map[string]intsum are not supported as import destinations.

See Data Models & Queries for the full Data Model setup.

Added

The Optimizely Data Platform (ODP) audience export writes your Lytics audience membership onto ODP customer profiles, so you can build Real-Time Segments and target users in Optimizely Feature Experimentation based on the cross-channel behavior, data science scores, and content affinities behind your Lytics audiences. This is the path Optimizely recommends for getting CDP audiences into Feature Experimentation.

What you can do

  • Sync a Lytics audience to ODP as users enter and exit, so experiments and feature flags stay matched to live audience membership without manual list pulls.
  • Build an ODP Real-Time Segment off a boolean attribute that Lytics maintains per audience — set to true while a user is a member and false once they exit — and let the Feature Experimentation SDK evaluate it at runtime.
  • Optionally backfill the current members of an audience the moment the export starts, so you don't have to wait for new activity to populate ODP.
  • Match users on any of ODP's canonical identifiers — email, customer ID, or visitor ID (VUID).

How it works

Lytics streams near-real-time enter/exit events to ODP's profiles API, batching profiles for efficient delivery. Each audience maps to its own boolean attribute, so you can export multiple audiences independently without one clobbering another. Authorization is a single ODP API key, with the region detected automatically from the key.

See Optimizely for authorization, identifier mappings, and the full setup walkthrough.

Improved

Account admins can now move a user from the broad predefined roles model to fine-grained granular permissions in one step. On the Predefined Roles tab, select one or more non-Admin roles and click Convert to granular permissions — Lytics fills in the equivalent granular permissions, clears the roles it converted, and drops you on the Granular Permissions tab to review before anything is saved. It's the fastest way to tighten an over-permissioned user down to only the access they actually need.

How it works

  • The conversion is conservative and never escalates access — a granular permission is selected only when every bit of access it grants was already granted by the roles you converted.
  • Anything that can't be expressed exactly as a granular permission is dropped and listed in a warning, so you can decide how to handle it (keep the predefined role, or ask about a custom role) rather than silently losing or over-granting access.
  • Nothing is saved until you submit. The button only stages the new selections for review.

Scope

  • Admin is excluded — it grants everything and has no granular equivalent, so it's left untouched.
  • The button is disabled when you're editing your own account, so users can't change their own access.

See Predefined Roles and Granular Permissions for the full granular catalog and conversion details.

Added

The new Infobip integration connects Lytics to Infobip's omnichannel communications platform, so the audiences you build in Lytics can drive cross-channel messaging — and the contacts and engagement living in Infobip can flow back into your profiles. Sync audience membership to Infobip People, send triggered SMS, and bring Infobip contacts into Lytics, all backed by the cross-channel behavior, data science scores, and content affinities that power your audiences.

What's new

  • Export audiences to Infobip People. Members of a Lytics audience are tagged in Infobip in real time, with any mapped profile fields synced to standard fields and custom attributes — so you can build Infobip segments and trigger messaging off Lytics audience membership.
  • Send triggered SMS. Fire a personalized SMS through Infobip the moment a user enters an audience — order confirmations, shipping updates, welcome texts — with per-recipient handlebars tokens drawn from profile fields.
  • Import Infobip contacts. Pull Infobip People into Lytics on the infobip_contacts stream, including their Infobip tags, so you can build audiences from Infobip contact data and audience membership. Runs incrementally on an hourly schedule with Keep Updated.
  • Trigger email and WhatsApp. Sync the audience to Infobip and let an Infobip Flow send your authored template, or POST directly to Infobip's send endpoints with an Audience Triggers Webhook — template starters included for both channels.

How it works

Connect with an Infobip API key and account Base URL. Exports and SMS sends are real-time with a one-time backfill on start; users are matched to Infobip People by email, falling back to phone. The contact import is idempotent — re-importing updates the existing Lytics user instead of creating a duplicate.

See Infobip for the full authorization and configuration walkthrough.

Added

The Snapchat integration now includes a Conversions API Export job that sends server-side conversion events from a Lytics audience to Snapchat's Conversions API (CAPI). Reporting conversions server-side complements the Snap Pixel, improves measurement when browser signals are limited, and can sharpen the performance of your ad campaigns.

How it works

  • Pick a Lytics Audience and a Snap Pixel ID (for web and offline events) or Snap App ID (for mobile-app events), then choose the Snapchat Event Name and where the conversion happened with Action Source (WEB, OFFLINE, or MOBILE_APP).
  • Map your Lytics fields to Snapchat identifiers with User Data Mapping — email, phone, name, and address fields are normalized and SHA-256 hashed automatically, while device and click identifiers (IP, user agent, mobile ad ID, Snap click ID) are sent as-is.
  • Enrich events with conversion value, currency, item count, and a conversion ID for deduplication.
  • Trigger conversions on audience enters, exits, or field changes, with an optional backfill of the current audience on start. Events stream to Snapchat in near real time.

What you need to do

  • Create a Snapchat authorization for this job. The recommended method is a long-lived Conversions API Token generated in Snapchat Ads Manager (it doesn't expire). Snapchat Sign In (OAuth) also works, but you'll need a new authorization — the one used for the audience export doesn't grant Conversions API access.
  • Have your Snap Pixel ID or Snap App ID ready from Snapchat Ads Manager.

See Snapchat for the full configuration walkthrough.

Improved

Wait & Personalize steps in Flows can now hold users until a specific clock time, not just a relative duration. Instead of "wait 24 hours," you can now say "wait until 9:00 AM" or "wait until Monday at 9:00 AM" — evaluated in the timezone you choose. This makes it easy to align flow actions to business hours or a recurring weekly cadence regardless of when each user enters the step.

What's new

  • Time of Day — hold each user until the next occurrence of a specific time (e.g., 09:00) in your chosen timezone. Great for landing sends inside business hours no matter when someone enters the flow.
  • Day of Week — hold each user until the next occurrence of a chosen weekday and time (e.g., Monday at 09:00). Ideal for weekly newsletters, digests, or any recurring weekly action.

How it works

  • Pick a time in 24-hour HH:MM format and an IANA timezone (e.g., America/New_York). The timezone defaults to your browser's.
  • Each user wakes at the next matching moment in that timezone. Entering exactly at the target moment waits until the following occurrence.
  • These modes are mutually exclusive with the existing relative duration and condition-based waits — pick one mode per step.

See Managing Flow Steps for the full Wait & Personalize walkthrough.

Improved

The V2 data model config form now brings back Activated Fields from V1, letting you declare them directly when you build a Cloud Connect audience, and it adapts the Field Mappings section to your permissions so the form is clearer about what you can edit.

What's new

  • Activated Fields — back from V1, this lets you pick the source columns you want Lytics to activate, and Lytics automatically creates the matching schema fields populated by this data model. Options are drawn straight from the columns your SQL query returns, so you only choose from fields that actually exist in your results.
  • Permission-aware Field Mappings — if your role doesn't include schema management, the Field Mappings section now stays visible but read-only, with a clear note that schema management permissions are required to edit it. Activated Fields and the rest of the configuration remain fully editable, so you can still build and save the model.

See Creating Cloud Connect Audiences for the full data model configuration walkthrough.

Added

The Attentive integration exports your Lytics audiences to Attentive in real time, so you can trigger personalized SMS and email journeys off of Lytics audience membership — and the cross-channel behavior, data science scores, and content affinities behind it.

What you can do

  • Sync Lytics audiences to Attentive as users enter and exit, so SMS and email campaigns stay matched to live audience membership without manual list pulls.
  • Build Attentive segments off a boolean attribute that Lytics maintains per audience — set to true while a user is a member and false once they exit.
  • Optionally backfill the current members of an audience the moment the export starts, so you don't have to wait for new activity to populate Attentive.
  • Match users on any combination of Attentive identifiers (phone, email, and more) and enrich their profiles with mapped well-known and custom attributes.

How it works

Lytics streams near-real-time enter/exit events to Attentive's Bulk User Attributes API, batching users for efficient delivery and backing off automatically if Attentive rate limits. Lytics only updates user attributes — it never touches subscriptions.

See Attentive for authorization, field mappings, and the full setup walkthrough.

Added

The new AppsFlyer integration lets you drive AppsFlyer in-app conversion events straight from a Lytics audience, without waiting for the event to fire on a user's device. Send events like af_purchase, af_complete_registration, or a custom name — backed by the cross-channel behavior, data science scores, and content affinities that power your Lytics audiences — and they land in AppsFlyer's reporting to feed attribution, retargeting, and analytics.

What's new

  • Activate audiences as server-to-server events. Any Lytics audience can drive AppsFlyer in-app events, so the segments you already build for email and display can also power mobile attribution and retargeting.
  • Match on the right mobile identifier. Map your Lytics fields to AppsFlyer identifiers (IDFA/IDFV for iOS, GAID/OAID/Android ID for Android, plus uid/cid) and the export picks the platform-appropriate one per user.
  • Enrich events with revenue and product context. Map fields to AppsFlyer event_value keys (af_revenue, af_currency, af_content_id, and more) to send purchase and conversion detail alongside each event.
  • Stay current automatically. Trigger on audience enters, exits, or both - and optionally on changes to up to 75 user fields — with a one-time backfill of existing members on start.

How it works

The integration uses AppsFlyer's S2S in-app events bulk endpoint with a per-app Dev Key authorization. The Dev Key signs each batch (HMAC-SHA256) and is never sent in plaintext or logged. Note that this export sends post-install events only. AppsFlyer reserves the install and launch counters for on-device SDK events, and it handles iOS ATT / limited-tracking users per AppsFlyer's zero-UUID spec.

See AppsFlyer for the full authorization and configuration walkthrough.


Added

Schema Patches are the new way to make schema changes in Lytics. Instead of editing fields and mappings directly into a shared draft, every change now goes through a patch — a named changeset where you can group related changes, review themas a complete diff, and publish them all at once. Once the Patches feature is activated for your account, all schema changes will go through this new publishing flow.

What's new

  • Group related changes to fields, mappings, and identity key ranks into a single changeset, then review and publish them together — ideal when onboarding a new data source or reorganizing identity resolution, where the changes only make sense as a unit.
  • See exactly what will change before anything goes live: every modified field and mapping comes with a property-level diff showing before/after values.
  • Nothing reaches your live schema without an explicit review-and-apply step, so changes can't slip in unreviewed.
  • Name and describe each changeset so it's clear who changed what and why — useful when multiple people are working on the schema.
  • Undo an individual change inside a patch without discarding the rest.

How it works

Applying a patch publishes a new schema version containing all of its changes. If something goes wrong, revert to a previous version from your schema version history. Most teams will work with patches through the Visual Schema Editor; the underlying concept and API are documented separately.

See Schema Patches for the full lifecycle, patch statuses, and API details.

Improved

Account admins can now tune profile culling directly, deciding which profiles the nightly cull job drops from the profile store without routing the change through an account manager. Author the cull rule with the same segment builder you use for audiences, see how many profiles currently match before you save, and adjust the anonymous-only retention window on your own schedule — handy for keeping the profile store focused on identifiable people and for trimming the long tail of stale anonymous traffic.

How it works

  • Compose the cull rule in a segment builder that uses the same FilterQL grammar as the audience builder, with a live audience-size preview so you can sanity-check scope before committing.
  • Set an independent days-old threshold for anonymous-only profiles — those with a single alias and only auto-generated _uids.
  • Both controls live under Account → Settings -> Profile in a new Cull Profiles section.

Scope

  • The filter takes precedence: when Cull User Filter is set, the nightly job ignores Cull Anonymous Users — the two don't stack.
  • Culling removes profiles from the profile store but not the underlying event data. If new events later arrive for a culled alias, the profile is rebuilt with its prior history.

See Profile Controls for the full setting reference.

Added

The new Spotify integration lets you activate Lytics audiences against Spotify's listener base, so the same first-party segments you already use for email and display can drive audio campaigns in Spotify Ad Studio.

What's new

  • Reach known customers with audio creative. Send any Lytics audience to Spotify as a customer-list audience and target it from Spotify Ads Manager — useful for re-engagement, suppression, lookalike seeds, and loyalty campaigns that already live in Lytics.
  • Match on email or mobile ad ID. Map an email field, a mobile advertising ID (IDFA/AAID), or both as the matching key. Lytics SHA-256–hashes identifiers before upload so raw PII never leaves the platform.
  • Stay in sync automatically. Schedule daily, weekly, or monthly refreshes and the Spotify audience is updated in place — no manual re-uploads, no managing CSV exports.

How it works

The integration uses Spotify's Ads API v3 with a standard Spotify Sign-In authorization. Each scheduled run does a full replacement of the Spotify audience with the current Lytics audience contents, so the segment in Spotify always reflects the latest membership.

A few Spotify-side constraints worth knowing up front:

  • Customer-list uploads require at least 1,000 hashed identifiers — smaller audiences won't push until they cross the threshold.
  • Uploads are capped at 1 GiB per run; very large audiences should map a single identifier type rather than both.

See Spotify for the full setup walkthrough.

Added

The Databricks integration now ships three new export workflows — Export Event Data, Export System Events, and Export Audience Changes — bringing it to parity with the Snowflake and BigQuery destinations. If Databricks is where your team already does analytics, modeling, or BI, you can now keep raw Lytics activity right alongside the rest of your lakehouse data.

What's new

  • Export Event Data — land raw events from your Lytics data streams in Databricks so analysts and data scientists can query behavioral data with the same SQL and notebooks they use for everything else. Use it to power custom dashboards, train models on first-party signals, or join event history with warehouse data Lytics doesn't see.
  • Export System Events — pipe Lytics audit-log activity (jobs run, authorizations changed, audiences edited, and more) into Databricks for governance, compliance reporting, and operational monitoring. Scope an export to a single work, segment, or account to feed a focused alerting or oversight workflow.
  • Export Audience Changes — stream near-real-time enter/exit events for up to ten audiences into Databricks as they happen, with an optional one-time backfill of existing members. Use it to drive downstream activation, attribution analysis, or lifecycle modeling without polling segment membership.

How it works

All three workflows reuse your existing Databricks Database Authorization and load data with COPY INTO against a Databricks Delta table — no new auth method, storage integration, or warehouse setup beyond what you already use for Databricks jobs. Loads are append-only and safe to retry.

See Databricks → Export Event Data, Export System Events, and Export Audience Changes for the full configuration walkthroughs.

Added

The Snowflake and Databricks integrations now include an Export Metrics workflow that lands raw time-series metric data — segment sizes, stream volumes, job activity, and the rest of the /v2/metric catalog — directly in your warehouse for analysis and reporting. Same controls as the existing BigQuery metric export, now available against two more destinations.

How it works

  • Pick a Metric Dimension (e.g. segment, stream, works), optionally narrow to a single Dimension ID, and choose a Metric Type scoped to that dimension. The full dimension/type matrix is shared across all three warehouse exports.
  • Choose a Lookback Range for the initial backfill — 0d, 7d, 14d, 30d (default), 60d, or 90d.
  • Toggle Keep Updated to run the export daily. Each run is append-only: only new rows since the last successful export are loaded, and existing rows are never modified or dropped.
  • Snowflake: reuses the Snowflake Direct Authorization for Bulk Export (with GCS storage integration). Stages gzipped NDJSON to GCS, then COPY INTO your table with VARCHAR(16777216) / TIMESTAMP_TZ(9) / FLOAT columns. Default table LYTICS_{AID}_METRICS.
  • Databricks: uses the standard Databricks Database Authorization. Stages gzipped CSV to a Lytics-managed S3 bucket, then COPY INTO a Delta table with STRING / TIMESTAMP / DOUBLE columns. Default table lytics_{AID}_metrics.

See Snowflake → Export Metrics and Databricks → Export Metrics for the full configuration walkthroughs.

Added

The new LINE Ads integration pushes Lytics audiences into LINE Ads as Custom Audiences for targeting in your LINE campaigns. Identifiers are normalized and SHA-256 hashed by Lytics before upload; values that are already hashed pass through unchanged.

How it works

  • Authorize with a LINE Ads API Access Key and Secret Key pair from the LINE Ads Manager. Lytics signs each request server-side with HMAC-SHA256 and never logs the secret.
  • Pick a Lytics Audience, enter your LINE Ads Account ID, then either select an existing LINE Custom Audience to upload into or supply an Audience Name to create a new one.
  • Choose one Identifier Type per job — Email, Phone Number, or IFA (Apple IDFA / Google GAID) — and map it to the Lytics user field that holds the value.
  • Each run streams identifiers in chunks of up to 1M records / 60 MB. The first chunk replaces prior audience membership; subsequent chunks append, so a full re-sync is atomic per run.
  • Schedule re-uploads with Keep Updated and pick Daily, Weekly, or Monthly cadence (with day-of-week and time-of-day controls).

What you need to do

  • Have your LINE Ads partner account provisioned with API access, and obtain the Access Key (kid) + Secret Key from your LINE Ads representative.
  • Confirm the Lytics user field you plan to export holds the identifier in a clean form — emails or phone numbers can be raw (Lytics will normalize and hash) or pre-hashed SHA-256.

See LINE Ads for the full authorization and configuration walkthrough.

Added

The The Trade Desk integration now includes a Conversions Export job that sends server-side conversion events from a Lytics audience to The Trade Desk's Real-Time Conversion Events API. Use it to track page views against a universal pixel or to send user-interaction events (purchase, add-to-cart, etc.) against an event tracking tag.

How it works

  • Pick a Lytics Audience and a Pixel / Event Tracking Tag ID, then choose the mode: leave Event Name empty to send page views (requires Advertiser ID and a Page URL Field), or set an event name to send user interactions (requires Merchant ID).
  • Map at least one Lytics user field to a Trade Desk identifier type via Identifier Mapping. One identifier is sent per event, picked in TTD's recommended priority order: UID2, EUID, TDID, then a single device ID, then RampID. UID2 and EUID values must already be tokens — Lytics does not mint them.
  • Optionally enrich events with Item Mapping (cart/product fields → items[]) and Custom Fields Mapping (td1–td10).
  • Trigger conversions on audience enters, exits, or both — and optionally on changes to up to 75 user fields.
  • Backfill the current audience on start with the Existing Users toggle.

What you need to do

  • Create or reuse a Username and Password authorization for The Trade Desk; the Conversions Export uses the existing TTD userpass flow.
  • Have your TTD universal pixel or event tracking tag ID, plus the Advertiser ID (page views) or Merchant ID (user interactions) provisioned in The Trade Desk.

See The Trade Desk for the full configuration walkthrough.

Added

The Google Cloud Storage integration now includes an Export Activity Data job that writes raw events from your Lytics streams to a GCS object as CSV. Use it to archive event history, hand data off to downstream tools that read from GCS, or run analysis outside of Lytics.

How it works

  • Pick a Project and Bucket the authorization has access to, and optionally a Directory inside the bucket.
  • Choose one or more Data Streams to Export — leave it empty to export all streams.
  • Optionally bound the export with Start Date and End Date (inclusive start, exclusive end, yyyy-mm-dd).
  • Customize the destination filename with a {TIMESTAMP} placeholder; pick a timestamp format and compression (none, gzip, or zip).
  • Toggle Keep Updated to run the export on a schedule — daily, weekly, or monthly — at a configured day, time of day, and time zone.

See Google Cloud Storage for the full configuration walkthrough.

Added

The Salesforce Data Cloud integration connects Lytics with Salesforce Data Cloud so you can import unified Individual profiles, segment membership, and calculated insights into Lytics, and send Lytics audiences and user fields back to Data Cloud either in real time via the Ingestion API or in bulk via Google Cloud Storage for zero-copy ingestion.

What's included

  • Imports

    • Import Data Cloud Segment Membership — pulls the unified Individual DMO plus UnifiedContactPointEmail, UnifiedContactPointPhone, UnifiedContactPointAddress, and segment membership into Lytics streams (sdc_individuals, sdc_contact_point_emails, sdc_contact_point_phones, sdc_contact_point_addresses, sdc_segments). Active segment names are accumulated into a Lytics user field for direct audience targeting.
    • Import Data Cloud Calculated Insights — pulls calculated insight results into a Lytics stream on a configurable schedule.
    • Import Data Cloud Change Events — polls Data Cloud for CREATE / UPDATE / DELETE events on selected Data Model Objects, with a configurable poll interval and lookback window.
  • Exports

    • Export Audience Membership to Data Cloud — keeps a Lytics audience in sync with a Data Cloud Ingestion API target object in real time, sending adds and removes keyed by a chosen match field.
    • Export Users to Data Cloud — streams Lytics user fields to a Data Cloud Ingestion API object using a custom field mapping, with a configurable batch size (max 200, the Data Cloud limit) and per-hour rate limit.
    • Bulk Export to Data Cloud via GCS — stages a CSV or newline-delimited JSON file in a Google Cloud Storage bucket for Data Cloud zero-copy ingestion — the high-volume path when per-record API calls aren't a fit.

What you need to do

  • Create a Salesforce Data Cloud authorization in Lytics using JWT Bearer Token (or JWT Bearer Token (Sandbox)). The integration requires a Salesforce External Client App configured with the Data Cloud OAuth scopes (cdp_query_api, cdp_ingest_api, cdp_profile_api, cdp_calculated_insight_api, cdp_segment_api) and digital-signature auth — there is no browser-based OAuth flow for Data Cloud.
  • For Ingestion API exports, your Salesforce admin needs to set up an Ingestion API source and target object in Data Cloud first.
  • For the GCS bulk export, you need a Google Cloud Storage bucket configured as a Data Cloud zero-copy data source.

See Salesforce Data Cloud for the full setup walkthrough, including the External Client App prerequisites, field mappings for each import stream, and per-job configuration steps.

Added

Metric Threshold Alerts let you set expected min and max bounds directly on Lytics activity charts. When a metric falls outside the configured bounds, Lytics sends a batched email to users opted in to alerts — no separate monitoring job to configure.

How it works

  • A bell icon now appears next to Audience Activity, Job Metrics, and Stream Event Activity charts. Click it to open the Alert Thresholds popover.
  • Set an Interval (per hour / per day / per week), Min, Max, and Allowable violations, then Save. Threshold lines render on the chart — red dashed for max, orange dashed for min.
  • Lytics evaluates rules hourly. Violations trigger a batched alert email to anyone in the account with the Metrics Rule Alerts role, with a link back to the affected chart. Duplicate emails are throttled within a 24-hour window.

Scope

  • Available on three chart types: audience size, job metrics (Added / Removed / Omitted), and stream events.
  • Rule management is gated by the new Metrics Rule View and Metrics Rule Manage roles. Email delivery is controlled separately by the Metrics Rule Alerts role.
  • The Job Metrics chart now defaults to a 10-day daily view so threshold lines render on first open. Existing rules are unaffected.
  • Rules are also accessible programmatically via the /v2/anomaly/rule API for accounts that manage them at scale.

See Metric Threshold Alerts for the full walkthrough, including screenshots of the popover and threshold-line rendering.

Deprecated

The redesigned audience builder is now the default experience for creating and editing audiences. The legacy builder will be sunset on May 4, 2026 — after that date, all audience creation and editing will happen in the new builder.

What's new

The new builder keeps all your favorite features from the legacy builder — live audience size preview, sample profiles, groups, Expires After — with a more modern feel, and consolidates rule creation into two tabs: Attribute and Audience. New in this builder:

  • Geolocation rules — country, region, city, and radius-from-point targeting, surfaced in the Attribute tab alongside other user fields.
  • Enable for Personalization toggle — replaces the legacy "API Accessible" checkbox and controls whether the audience is surfaced by the personalization API, Experiences, Pathfora, and tag-based personalization.

Content Affinity no longer has a dedicated tab. Affinities and Topics now appear in the Attribute tab alongside other user fields — search by name to find them.

What you need to do

  • Existing audiences keep working. No migration is required; existing definitions are automatically available in the new builder.
  • Start using the new builder today. Go to Using Profiles → Audiences and click + Create Audience. See Audiences for a full walkthrough.
  • After May 4, 2026, the legacy builder will be removed and the legacy Audiences doc will be retired; the new builder page becomes the canonical reference.

Questions or migration issues? Contact your Lytics support team.

Added

The Pushly integration connects Lytics with Pushly's web push notification platform, letting you target push campaigns by Lytics audience and tie known users back to their Pushly subscriptions.

What's included

  • Export Audiences — send Lytics audience members to Pushly in real time via REST API, matched on a configurable identity field (defaults to email).
  • Subscriber ID capture — the Lytics JavaScript tag reads the Pushly subscriber ID from PushlySDK on the page and stores it on the user profile as pushly_subscriber_id, with a pushly_sync_ts timestamp.
  • Audience membership sync to Pushly tags — when the tag plugin is active, the current user's Lytics audiences are pushed to Pushly via PushlySDK.push(['setTags', ...]), so you can segment Pushly campaigns by Lytics audiences directly.

What you need to do

  • Create a Pushly authorization in Lytics with your Pushly API Key and Domain ID.
  • To enable the JavaScript tag plugin (subscriber ID capture + audience tag sync), contact your Lytics account manager to turn on the Pushly Tag Integration account setting.

See Pushly for the full setup walkthrough and field reference.

Added

Audience Naming Conventions let admins define reusable name templates that keep audiences consistent across the account. Builders pick a convention when creating or editing an audience, fill in its variables from dropdowns and an optional free-text field, and the audience Name is generated for them — no more stray prefixes or ad-hoc rules.

How it works

  • Admins configure conventions under Account → Settings → Audiences → Audience Naming.
  • A template looks like {{Team}}_{{Channel}}_{{input}} — {{Variable}} tokens become dropdowns with admin-defined options, and {{input}} is an optional free-text field.
  • A separate Enforce Audience Naming Conventions setting controls whether picking a convention is required. With enforcement off, users can still type a free-form name; with it on, a convention must be selected.
  • When editing an existing audience, Lytics auto-detects the matching convention (if any) and pre-fills the variable values.

Scope

  • Applies to user-table audiences. Other segment types are unaffected.
  • Applies to both audience creation and editing.
  • Existing audiences are not retroactively renamed — names only change when a user saves an audience with a convention selected.

See Audience Naming Conventions for the full walkthrough, including admin setup and builder UX.

Improved

We've made significant improvements to how Cloud Connect Data Models are created and managed. These changes simplify the configuration process, give you more control over syncing, and provide stronger validation to catch issues before they impact your data.

What's New

Direct Field Mappings

Data Models now use explicit field mappings, giving you precise control over how your warehouse data flows into Lytics profiles. Instead of selecting bulk activated fields, you now map individual SQL columns to specific Lytics profile fields. This makes it clear exactly where each piece of data will land and reduces the chance of misconfiguration.

With this new improvements, you can now combine data from multiple data models and streams into a single Lytics field. Whether your data comes from warehouse tables (via cloudconnect), website activity, mobile events, or other connected sources, it all merges into one consolidated profile field — giving you a unified view of your customers without managing separate fields per source.

Flexible Sync Scheduling

You now have more granular control over when your Data Models sync:

  • Hourly — sync every hour
  • Daily — sync once per day at a time you choose
  • Weekly — sync on a specific day and time each week
  • Monthly — sync once per month at a specified time

You can also set the timezone for your sync schedule, so syncs run at the right time for your team.

What This Means for You

These improvements are now live for all accounts. Here's what you need to know:

  • Creating new Data Models? You'll see the updated configuration experience automatically — including field mappings and flexible scheduling options.
  • Have existing Data Models? They continue to work exactly as before. No changes or migration needed on your end.
  • Want to take advantage of the new features? You can create new Data Models alongside your existing ones at any time. Please reach out to Lytics support to enable new version for the existing accounts.

Added

You can now export Lytics platform metrics directly to Google BigQuery. This new integration gives you access to raw time-series data — including audience sizes, stream volumes, job
activity, and more — right in your BigQuery warehouse for custom analysis, reporting, and dashboarding.

Key highlights:

  • Flexible dimensions: Export metrics across audiences, streams, flows, works, content enrichment, and more.
  • Configurable lookback: Pull up to 90 days of historical data on the initial export.
  • Keep it fresh: Enable "Keep Updated" to automatically export new data on a daily basis.
  • Standard BigQuery workflow: Data lands as a structured table with dimension, type, timestamp, and value fields — ready for your existing BI tools.

To get started, navigate to Destinations, select Google Cloud, and choose the BigQuery: Export Metrics job type. For full setup instructions, see our Google BigQuery
documentation
.